Cisco Nexus 1000V Getting Started Guide, Release 4.0(4)SV1(2)
Bias-Free Language
The documentation set for this product strives to use bias-free language. For the purposes of this documentation set, bias-free is defined as language that does not imply discrimination based on age, disability, gender, racial identity, ethnic identity, sexual orientation, socioeconomic status, and intersectionality. Exceptions may be present in the documentation due to language that is hardcoded in the user interfaces of the product software, language used based on RFP documentation, or language that is used by a referenced third-party product. Learn more about how Cisco is using Inclusive Language.
- Updated:
- December 11, 2009
Chapter: Configuring the Software Using the GUI
Configuring the Software Using the GUI
This chapter describes how use the GUI application to configure your new Cisco Nexus 1000V software.
GUI Software Configuration Process
The following section will guide you through this process. After completing each procedure, return to this section to make sure you complete all required procedures in the correct sequence.
Step 1 ![]() Set up the VSM virtual machine using the "Setting Up the VSM Virtual Machine Using the GUI" procedure.
Set up the VSM virtual machine using the "Setting Up the VSM Virtual Machine Using the GUI" procedure.
Step 2 ![]() Add the Cisco Nexus 1000V licenses.
Add the Cisco Nexus 1000V licenses.

Note ![]() The software provides licenses for 16 CPU sockets for a period of 60 days. These licenses are used only if there are no permanent licenses installed on the VSM. The evaluation period of 60 days starts when you install the software.
The software provides licenses for 16 CPU sockets for a period of 60 days. These licenses are used only if there are no permanent licenses installed on the VSM. The evaluation period of 60 days starts when you install the software.
If you have purchased licenses, see the Cisco Nexus 1000V License Configuration Guide, Release 4.0(4)SV1(2).
Step 3 ![]() Do one of the following:
Do one of the following:
•![]() If you are adding dual VSMs, continue with the next step.
If you are adding dual VSMs, continue with the next step.
•![]() If this VSM is a standalone VSM, its HA role has been automatically configured. Go to Step 5.
If this VSM is a standalone VSM, its HA role has been automatically configured. Go to Step 5.
Step 4 ![]() Configure the HA role for this VSM using the "Configuring the VSM HA Role" procedure.
Configure the HA role for this VSM using the "Configuring the VSM HA Role" procedure.
Step 5 ![]() You have completed this process. Return to the "Software Configuration Process" section on page 2-5 to continue setting up your VSM software.
You have completed this process. Return to the "Software Configuration Process" section on page 2-5 to continue setting up your VSM software.
Setting Up the VSM Virtual Machine Using the GUI
You can use this procedure to configure the VSM as follows:
•![]() Create the following port profiles:
Create the following port profiles:
–![]() System port profile
System port profile
–![]() Data port profile
Data port profile
–![]() Uplink port profile
Uplink port profile
•![]() Create the following VLANs:
Create the following VLANs:
–![]() Control VLAN
Control VLAN
–![]() Packet VLAN
Packet VLAN
–![]() Management VLAN
Management VLAN
•![]() Enable SSH and configure an SSH connection.
Enable SSH and configure an SSH connection.
•![]() Create a Cisco Nexus 1000V plug-in and register it on the vCenter server.
Create a Cisco Nexus 1000V plug-in and register it on the vCenter server.
•![]() Power off and then restart the VSM.
Power off and then restart the VSM.
BEFORE YOU BEGIN
Before beginning this procedure, you must know or do the following:
•![]() You have the following Cisco Nexus 1000V domain information:
You have the following Cisco Nexus 1000V domain information:
–![]() Control VLAN ID
Control VLAN ID
–![]() Packet VLAN ID
Packet VLAN ID
–![]() Domain ID
Domain ID
•![]() The Cisco Nexus 1000V GUI supports the configuration of the control, management, and packet port groups for a single common vswitch—not for multiple vswitches.
The Cisco Nexus 1000V GUI supports the configuration of the control, management, and packet port groups for a single common vswitch—not for multiple vswitches.
DETAILED STEPS
Step 1 ![]() In your browser address field, enter the VSM IP address.
In your browser address field, enter the VSM IP address.
The Cisco Nexus 1000V home page opens.
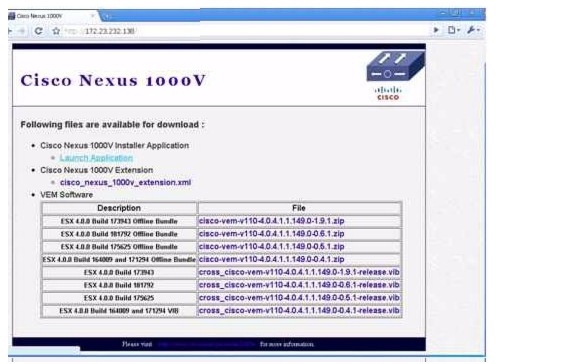
Step 2 ![]() Click Launch Application.
Click Launch Application.
A security screen opens asking if you want to run this application.
Step 3 ![]() Click Run.
Click Run.
The Enter VSM Credentials screen opens.
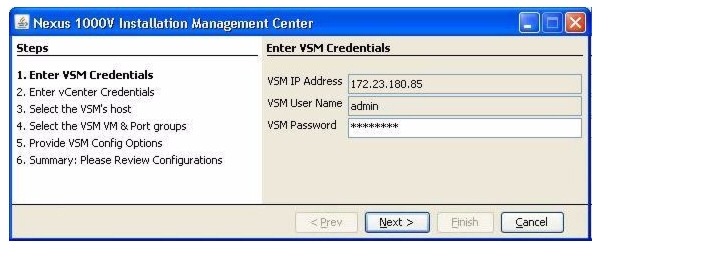
Step 4 ![]() Enter a password for the Adminisrator and then click Next.
Enter a password for the Adminisrator and then click Next.
The Enter vCenter Credentials screen opens.
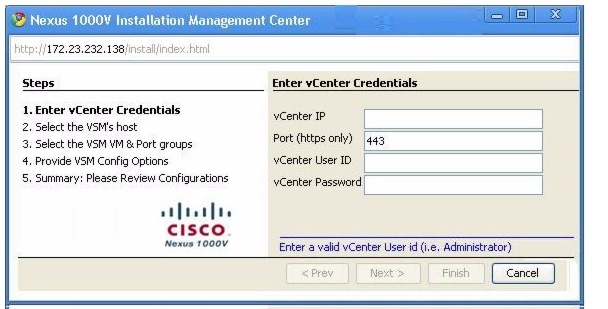
Step 5 ![]() Enter the following vCenter credentials.
Enter the following vCenter credentials.
•![]() vCenter IP address
vCenter IP address
•![]() Secure HTTP port
Secure HTTP port
Port 443 is configured by default, but you can change this if needed.
•![]() vCenter User ID (for a vCenter user with administrator-level privileges)
vCenter User ID (for a vCenter user with administrator-level privileges)
•![]() vCenter Password (for a vCenter user with administrator-level privileges)
vCenter Password (for a vCenter user with administrator-level privileges)
Step 6 ![]() Click Next.
Click Next.
The VSM Host screen opens.
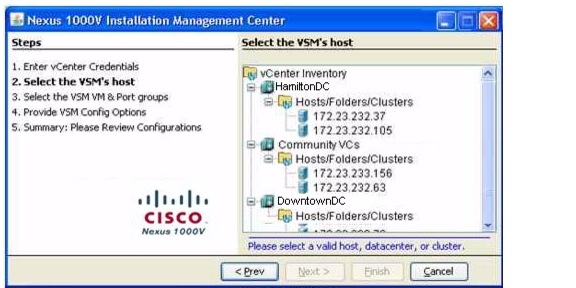
Step 7 ![]() Choose the host for the VSM and click Next.
Choose the host for the VSM and click Next.
The VSM VM and Port Groups screen opens.
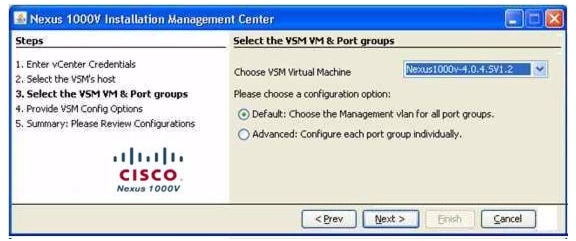
Step 8 ![]() Choose your VSM from the selection list.
Choose your VSM from the selection list.
Step 9 ![]() Do one of the following:
Do one of the following:
•![]() Click Default to use the default configuration and continue with the next step.
Click Default to use the default configuration and continue with the next step.
The default option configures the management VLAN for all port profiles (system, data, and uplink).
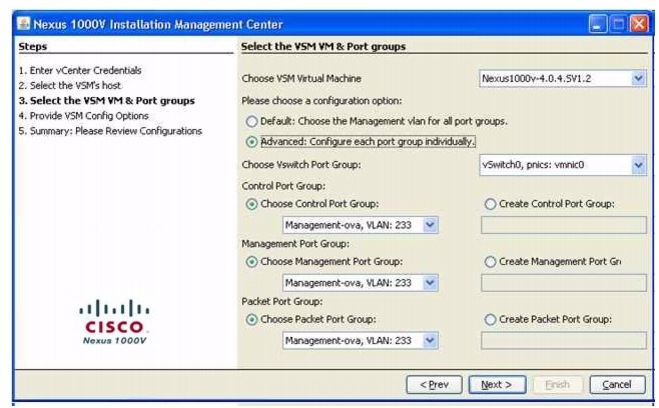
•![]() Click Advanced to configure each port profile and go to Step 11.
Click Advanced to configure each port profile and go to Step 11.
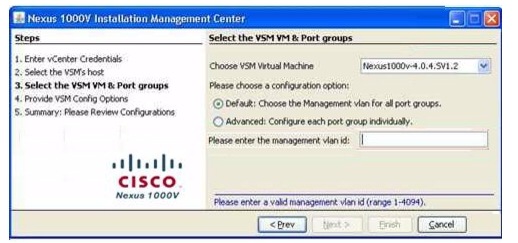
Step 10 ![]() Enter the management VLAN ID to be used for control and packet traffic, click Next, and then go to Step 12.
Enter the management VLAN ID to be used for control and packet traffic, click Next, and then go to Step 12.
Step 11 ![]() Choose your port groups from the selection lists, enter VLAN IDs when prompted, and then click Next.
Choose your port groups from the selection lists, enter VLAN IDs when prompted, and then click Next.
•![]() Control VLAN
Control VLAN
•![]() Management VLAN
Management VLAN
•![]() Packet VLAN
Packet VLAN
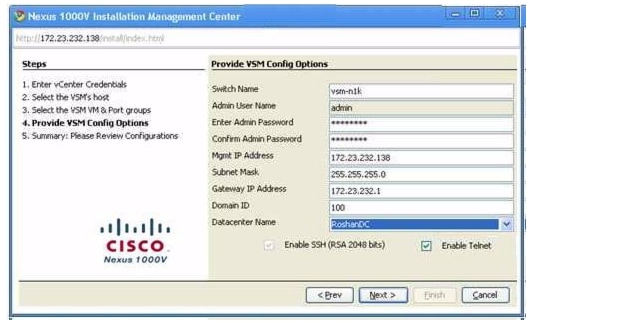
Step 12 ![]() In the VSM Config Options screen, configure the following for your VSM and click Next.
In the VSM Config Options screen, configure the following for your VSM and click Next.
•![]() Administrator user name and password
Administrator user name and password
•![]() Management IP address, subnet mask, and gateway IP address
Management IP address, subnet mask, and gateway IP address
The VSM VM must be run on the same IP subnet as the ESX 4.0 hosts that it manages.
•![]() Domain ID
Domain ID
•![]() Datacenter name
Datacenter name
•![]() Whether to enable telnet
Whether to enable telnet
Step 13 ![]() In the VSM Summary Screen, review the configuration for accuracy.
In the VSM Summary Screen, review the configuration for accuracy.
To make corrections, click Prev and go back to the previous screens.
When the configuration is accurate, click Finish.
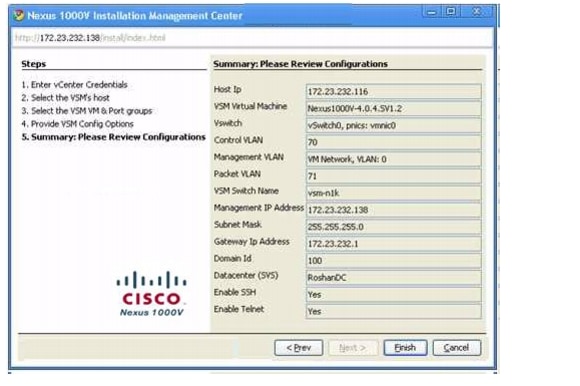
The configuration is applied to the VSM.
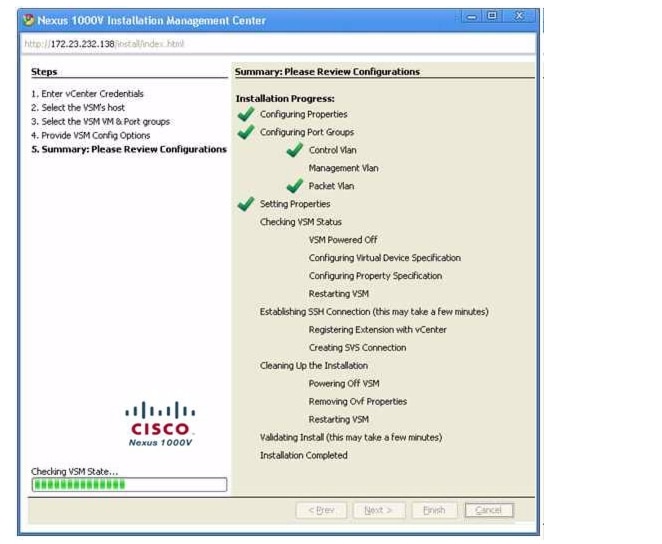
Step 14 ![]() A second summary screen opens displaying the progress as each configuration completes on the VSM.
A second summary screen opens displaying the progress as each configuration completes on the VSM.
A third summary screen opens displayingthe completed VSM configuration.
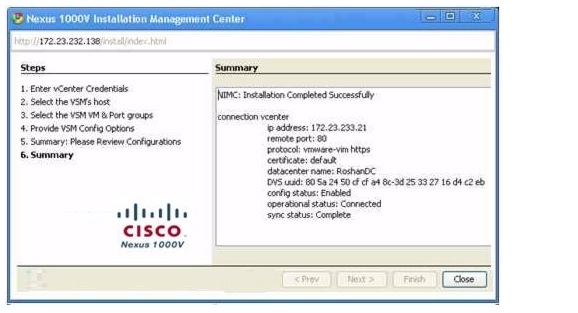
Step 15 ![]() Click Close.
Click Close.
Step 16 ![]() You have completed this procedure.
You have completed this procedure.
Return to the GUI Software Configuration Process.
Configuring the VSM HA Role
You can use this procedure to change the role of a VSM to one of the following after it is already in service:
•![]() standalone
standalone
•![]() primary
primary
•![]() secondary
secondary
BEFORE YOU BEGIN
Before beginning this procedure, you must know or do the following:
•![]() If you are changing a standalone VSM to a primary or secondary VSM, be sure to first isolate it from the other VSM in the pair as follows:
If you are changing a standalone VSM to a primary or secondary VSM, be sure to first isolate it from the other VSM in the pair as follows:
–![]() Disconnect the VSM VM management and control ports from the switch.
Disconnect the VSM VM management and control ports from the switch.
–![]() Stop the control and management VLAN in the upstream switch.
Stop the control and management VLAN in the upstream switch.
This prevents any interaction between the two VSMs during the change. Then power the VM off from the vSphere Client before reconnecting it as standby.
•![]() You are logged in to the CLI in EXEC mode.
You are logged in to the CLI in EXEC mode.
•![]() The HA redundancy states are active and standby.
The HA redundancy states are active and standby.
•![]() A change from a standalone to a primaryVSM takes effect immediately.
A change from a standalone to a primaryVSM takes effect immediately.
SUMMARY STEPS
1. ![]() show system redundancy status
show system redundancy status
2. ![]() system redundancy role {standalone | primary | secondary}
system redundancy role {standalone | primary | secondary}
3. ![]() show system redundancy status
show system redundancy status
4. ![]() copy running-config startup-config
copy running-config startup-config
 Feedback