- Overview
- Tools Used in Troubleshooting
- Installation
- Upgrade
- Licenses
- High Availability
- VSM and VEM Modules
- Ports
- Port Profiles
- Port Channels and Trunking
- Layer 2 Switching
- VLANs
- Private VLANs
- NetFlow
- Access Control Lists
- Quality of Service
- SPAN
- Multicast IGMP Snooping
- DHCP, DAI, and IPSG
- System
- Network Segmentation Manager
- Ethanalyzer
- Before Contacting Technical Support
Cisco Nexus 1000V for Microsoft Hyper-V Troubleshooting Guide, Release 5.2(1)SM3(2.1)
Bias-Free Language
The documentation set for this product strives to use bias-free language. For the purposes of this documentation set, bias-free is defined as language that does not imply discrimination based on age, disability, gender, racial identity, ethnic identity, sexual orientation, socioeconomic status, and intersectionality. Exceptions may be present in the documentation due to language that is hardcoded in the user interfaces of the product software, language used based on RFP documentation, or language that is used by a referenced third-party product. Learn more about how Cisco is using Inclusive Language.
- Updated:
- November 30, 2018
Chapter: Installation
- Host Is in the Not Responding State in the Microsoft SCVMM
- VMs populated on the Microsoft SCVMM are missing
- Adding Hosts to a Logical Switch in Microsoft SCVMM Fails
- Host Changes to a Non-Responding State in Microsoft SCVMM
- Installation Failure When the Microsoft SCVMM Fails to Resolve Hostnames
- Refreshing the Connection Between the Cisco Nexus 1000V and Microsoft SCVMM Server
- Updating the Cisco Nexus 1000V Configuration Data on Hyper-V Hosts
- Verifying That the Cisco Provider Installed Correctly
- Cleaning Up Switch Extention Fails
- Removing of vem.msi Throws an Error
- Installing the Install-Nexus1000V-VSMCertificate.ps1 Fails
- Refreshing Switch Extension Manager Fails
- Verifying Logical Switch Compliance
- Verifying the Logical Switch Extension
- Verifying the Logical Switch Uplink Mode
- Creating or Deleting a Switch on a Host Management Adapter
- Exporting VM Templates When a Hard Disk Fails
- Deleting Temporary Templates
- Verifying Host Compliance in the Microsoft SCVMM
- Creating a Switch on a Management NIC When a Static IP Address Fails on a Server Core
- Problems with Management NICs
Installation
This chapter describes how to identify and resolve installation problems.
Host Is in the Not Responding State in the Microsoft SCVMM
You can refresh the host that is in the Not Responding state.
Step 1![]() Launch the Microsoft SCVMM UI.
Launch the Microsoft SCVMM UI.
Step 2![]() Choose the server that is in the Not Responding state.
Choose the server that is in the Not Responding state.
VMs populated on the Microsoft SCVMM are missing
At times, the VMs that are populated in the Microsoft SCVMM are found to be missing, but are visible under the View Dependent Resources option that is displayed when you right-click the logical switch and are accessible from the Cisco Nexus 1000V HyperV manager in the host.
In this case, perform the steps in the following document to get the VMs back in Microsoft SCVMM and refresh both, the host and the SCVMM agent.
https://social.technet.microsoft.com/forums/en-us/f9ce9fa8-e509-40ed-b6ee-9c352f44c5c5/vdi-created-vms-vm-fails-to-show-up-in-the-system-center-2012-virtual-machine-manager
Adding Hosts to a Logical Switch in Microsoft SCVMM Fails
When you try to add hosts to a logical switch in Microsoft SCVMM, it fails with ERROR 2912.
To add hosts to a logical switch in the Microsoft SCVMM, perform the following steps:
Step 1![]() On the affected HyperV host, navigate to Control Panel > Hardware> Device Manager.
On the affected HyperV host, navigate to Control Panel > Hardware> Device Manager.
Step 2![]() Under Network Adapters, check for the following adapters:
Under Network Adapters, check for the following adapters:
Figure 3-1 Adapters Under Network Adapters
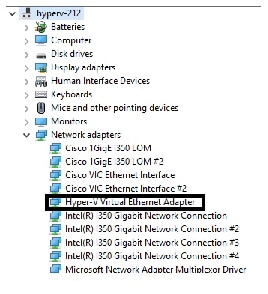
Step 3![]() Right-click and select uninstall to uninstall the above adapters if available.
Right-click and select uninstall to uninstall the above adapters if available.
Step 4![]() From the Hyper-V manager, navigate to Server Manager > Control Panel > Adapter Settings to verify if the adapters have been removed successfully.
From the Hyper-V manager, navigate to Server Manager > Control Panel > Adapter Settings to verify if the adapters have been removed successfully.
Step 5![]() From the Hyper-V manager, navigate to Server Manager > Control Panel > Adapter Settings to create a new virtual switch with a physical external adapter.
From the Hyper-V manager, navigate to Server Manager > Control Panel > Adapter Settings to create a new virtual switch with a physical external adapter.
Step 6![]() Right-click Adapter Settings to open the properties of the physical adapter over which the Virtual Switch needs to be created.
Right-click Adapter Settings to open the properties of the physical adapter over which the Virtual Switch needs to be created.
Figure 3-2 Properties Dialog Box
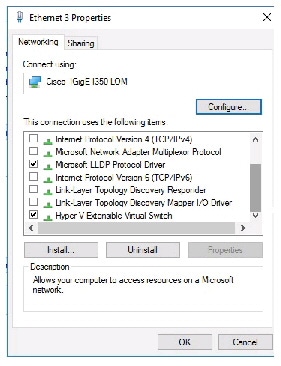
Step 7![]() Uncheck Hyper-V Extensible Switch and recreate the virtual switch.
Uncheck Hyper-V Extensible Switch and recreate the virtual switch.
Step 8![]() On the Hyper-V host, open PowerShell, and run the Get-NetSwitchTeam command.
On the Hyper-V host, open PowerShell, and run the Get-NetSwitchTeam command.
Step 9![]() Remove any NIC team if available by running the Remove-NetSwitchTeam -Name <name of the team present already> command.
Remove any NIC team if available by running the Remove-NetSwitchTeam -Name <name of the team present already> command.
Figure 3-3 PowerShell - Get and Remove NetSwitchTeam Commands
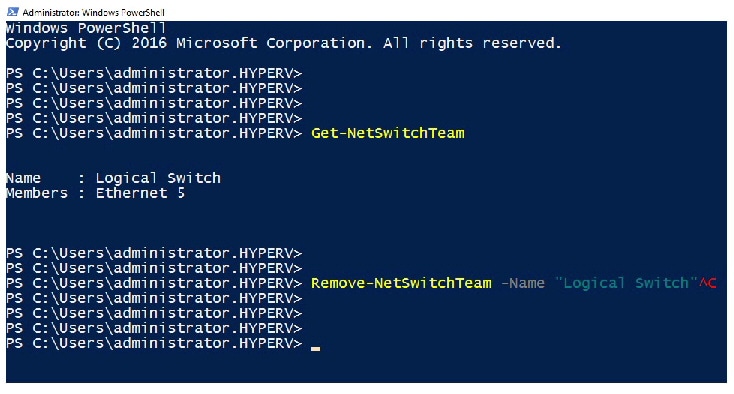
Step 10![]() Verify if the NIC team is removed successfully by running the Get-NetSwitchTeam command and then create the logical switch from the Microsoft SCVMM.
Verify if the NIC team is removed successfully by running the Get-NetSwitchTeam command and then create the logical switch from the Microsoft SCVMM.
Host Changes to a Non-Responding State in Microsoft SCVMM
This occurs when the update patches are installed on the SCVMM server. When there is a mismatch of these update patches on the SCVMM server and host, with reference to the patch dated May 8, 2018—KB4103723 (OS Build 14393.2248) which includes the CredSSP updates for CVE-2018-0886. Hence, if the SCVMM server is updated to patch, OS Build 14393.2248 or above when the host is below this patch, then the host changes to the non-responding state.
For the Microsoft SVCMM server and host communication to function properly, both the Microsoft SCVMM and the host should be either below or above patch OS Build 14393.2248.
To resolve this issue, update the host to patch OS Build 14393.2248 or above. If you cannot update the host, perform the following steps:
Step 1![]() Open Run and enter gpedit.msc.
Open Run and enter gpedit.msc.
Step 2![]() From the Local Group Policy window that appears, navigate to Computer Configuration > Administrative Templates > System > Credentials Delegation.
From the Local Group Policy window that appears, navigate to Computer Configuration > Administrative Templates > System > Credentials Delegation.
Step 3![]() Right-click Encryption Oracle Remediation, set it to Enable, set the value to Vulnerable, and click OK.
Right-click Encryption Oracle Remediation, set it to Enable, set the value to Vulnerable, and click OK.
Step 4![]() Open Run and enter regedit.
Open Run and enter regedit.
Step 5![]() Under the HKLM\Software\Microsoft\Windows\CurrentVersion\Policies\System\CredSSP\Parameters registry path, set the Allow Encryption Oracle value to 2.
Under the HKLM\Software\Microsoft\Windows\CurrentVersion\Policies\System\CredSSP\Parameters registry path, set the Allow Encryption Oracle value to 2.
The following error is displayed when the host is refreshed:
|
|
|
|---|---|
| An internal error has occurred trying to contact the 'hyperv-117.n1kqa.com' server: :. WinRM: URL: [http://hyperv-117.n1kqa.com:5985], Verb: [INVOKE], Method: [GetVersion], Resource: [http://schemas.microsoft.com/wbem/wsman/1/wmi/root/scvmm/AgentManagement] |
Verify if the WS-Management service is installed and is running on the hyperv-117.n1kqa.com server. For more information. run the winrm helpmsg hresult command. If hyperv-117.n1kqa.com' is a host/library/update server or a PXE server role then ensure that the VMM agent is installed and running. For more information, see http://support.microsoft.com/kb/2742275 |
Installation Failure When the Microsoft SCVMM Fails to Resolve Hostnames
The Microsoft SCVMM might fail to resolve the hostnames of the managed Cisco Nexus 1000V for Microsft Hyper-V servers. Which might result in the failure of pushing Cisco Nexus 1000V for Microsoft Hyper-V VEM MSI to the Microsoft SCVMM server hosts from the Microsoft SCVMM server.
Any host side operation might fail when DNS is not resolved and could resolve in the following:
- Refresh failure of the host from the Microsoft SCVMM
- Failure to create a Cisco Nexus 1000V logical switch on the host
Step 1![]() Launch the Microsoft SCVMM UI.
Launch the Microsoft SCVMM UI.
Step 2![]() At the command prompt, enter the ping hostname, where the hostname is the name of the DNS host.
At the command prompt, enter the ping hostname, where the hostname is the name of the DNS host.
Step 3![]() Enter the winrm id - r < hostname > command.
Enter the winrm id - r < hostname > command.
Step 4![]() Repeat Step 2 and Step 3 from the host and replace the hostname with the name of the Microsoft SCVMM DNS server.
Repeat Step 2 and Step 3 from the host and replace the hostname with the name of the Microsoft SCVMM DNS server.
Step 5![]() If there is more than one DNS server associated with the host, make sure that the management NIC contains only the DNS server that points to the Active Directory (AD).
If there is more than one DNS server associated with the host, make sure that the management NIC contains only the DNS server that points to the Active Directory (AD).
Step 6![]() Using your browser, navigate to Tools > Internet Options > Connections to relocate your alternate DNS server (if any).
Using your browser, navigate to Tools > Internet Options > Connections to relocate your alternate DNS server (if any).
Refreshing the Connection Between the Cisco Nexus 1000V and Microsoft SCVMM Server
You can refresh the connection between the Cisco Nexus 1000V and Microsoft SCVMM server.
Step 1![]() Launch the Microsoft SCVMM UI.
Launch the Microsoft SCVMM UI.
Step 2![]() For the SCVMM 2016 SP1 server, choose Fabric Management > Networking > Switch Extension Manager.
For the SCVMM 2016 SP1 server, choose Fabric Management > Networking > Switch Extension Manager.
Step 3![]() For the SCVMM 2016 R2 server, choose Fabric Management > Networking > Network Service.
For the SCVMM 2016 R2 server, choose Fabric Management > Networking > Network Service.
Step 4![]() Choose Cisco Nexus 1000V and right click to refresh. See Figure 3-4.
Choose Cisco Nexus 1000V and right click to refresh. See Figure 3-4.
Figure 3-4 Refresh Cisco Nexus 1000V Connection with the Microsoft SCVMM Server

Step 5![]() Verify that the job is complete by checking the Jobs section.
Verify that the job is complete by checking the Jobs section.
Updating the Cisco Nexus 1000V Configuration Data on Hyper-V Hosts
You can update the Cisco Nexus 1000V configuration data on the Hyper-V hosts.
Step 1![]() Launch the Microsoft SCVMM UI.
Launch the Microsoft SCVMM UI.
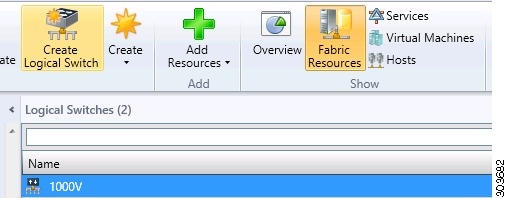
Step 2![]() Choose Fabric > Logical Switches to display the screen. See Figure 3-5.
Choose Fabric > Logical Switches to display the screen. See Figure 3-5.
Figure 3-5 Displaying Logical Switches
Step 3![]() From the toolbar, choose Hosts.
From the toolbar, choose Hosts.
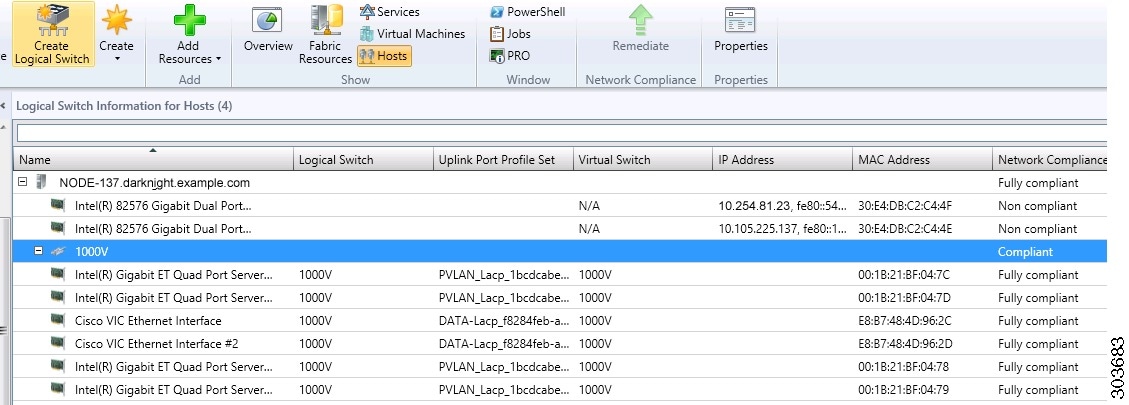
Step 4![]() Choose the host and choose 1000V. See Figure 3-6.
Choose the host and choose 1000V. See Figure 3-6.
Figure 3-6 Choosing the Cisco Nexus 1000V Switch
Step 5![]() From the toolbar, choose Remediate.
From the toolbar, choose Remediate.
Step 6![]() Verify that the job was completed by checking the Jobs section.
Verify that the job was completed by checking the Jobs section.
Verifying That the Cisco Provider Installed Correctly
You can verify that the Cisco pCleaning up the switch extension might fail when you are deploying a VM that uses a static IP address from the static IP address pools that are published by the Cisco Nexus 1000V VSM.rovider has been installed correctly.
Step 1![]() Launch the Microsoft SCVMM UI.
Launch the Microsoft SCVMM UI.
Step 3![]() Choose Configuration Providers.
Choose Configuration Providers.
Cleaning Up Switch Extention Fails
Cleaning up the switch extension might fail when you are deploying a VM that uses a static IP address from the static IP address pools that are published by the Cisco Nexus 1000V VSM.

Note![]() This problem is a known Microsoft issue.
This problem is a known Microsoft issue.
Because the error is due to unrevoked IP addresses, the error shown by the Microsoft SCVMM is not specific.
Step 1![]() Launch the Microsoft SCVMM UI.
Launch the Microsoft SCVMM UI.
Step 2![]() Using a PowerShell window, enter the following commands, in sequence, to revoke the static IP adresses:
Using a PowerShell window, enter the following commands, in sequence, to revoke the static IP adresses:
Step 3![]() The configuration provider details appear on the Microsoft SCVMM.
The configuration provider details appear on the Microsoft SCVMM.
Removing of vem.msi Throws an Error
Removing of vem.msi in WSUS throws an error if the WSUS is a part of SCVMM.
To resolve this issue, perform the following steps:
Step 1![]() Remove the WSUS server from SCVMM.
Remove the WSUS server from SCVMM.
Step 2![]() Remove vem.msi from the WSUS using the powershell script.
Remove vem.msi from the WSUS using the powershell script.
Step 3![]() Readd the WSUS server to SCVMM.
Readd the WSUS server to SCVMM.
Step 4![]() In the WSUS server, provide the cisco-get update command to successfully remove the image.
In the WSUS server, provide the cisco-get update command to successfully remove the image.
Installing the Install-Nexus1000V-VSMCertificate.ps1 Fails
If the proxy settings are enabled on the SCVMM virtual machine, you must disable these proxy settings from the virtual machine.
To disable the proxy settings, do the following:
Step 2![]() Navigate to Network and Internet > Internet Options.
Navigate to Network and Internet > Internet Options.
Step 3![]() In the Internet Properties dialog box, navigate to Connections > LAN Settings.
In the Internet Properties dialog box, navigate to Connections > LAN Settings.
Step 4![]() In Local Area Network(LAN) Settings, Uncheck the Proxy Server check box.
In Local Area Network(LAN) Settings, Uncheck the Proxy Server check box.
Now try to run the Install-Nexus1000V-VSMCertificate.ps1. It will work.
Refreshing Switch Extension Manager Fails
The following are symptoms, possible causes, and solutions for problems when refreshing the Switch Extension Manager or the Network Service.
Verifying Logical Switch Compliance
The Microsoft SCVMM might report a non compliant warning when you are deploying or changing port profiles on the Cisco Nexus 1000V logical switch. This problem is a result of a mismatch of the opaque data stored on Microsoft SCVMM and that of the individual hosts.

Note![]() This issue is only a warning; it is not an error.
This issue is only a warning; it is not an error.
Step 1![]() Launch the Microsoft SCVMM UI.
Launch the Microsoft SCVMM UI.
Step 2![]() Navigate to Fabric > Logical Switches > Hosts.
Navigate to Fabric > Logical Switches > Hosts.
Step 3![]() Using a Microsoft SCVMM PowerShell window, enter the following:
Using a Microsoft SCVMM PowerShell window, enter the following:
Get-SCVirtualNetwork | where-object {$_.LogicalSwitch -like “1000V”} | select VMHost, HighlyAvailable, LogicalNetworks, VMHostNetworkAdaters | LogicalSwitchComplianceStatus
To remove the Logical Switch Compliance Warning, perform the following steps:
Step 1![]() Refresh the Virtual Switch Extension Manager
Refresh the Virtual Switch Extension Manager
Step 2![]() Choose Fabric > Logical Switches > Hosts.
Choose Fabric > Logical Switches > Hosts.
Step 3![]() Select the appropriate logical switch and choose Remediate the Host.
Select the appropriate logical switch and choose Remediate the Host.
Verifying the Logical Switch Extension
The Cisco Nexus 1000V logical switch extension is always a forwarding extension. You can verify the logical switch extension.
Step 1![]() Launch the Microsoft SCVMM UI.
Launch the Microsoft SCVMM UI.
Step 2![]() Choose Fabric > Logical Switches > switch_name > Properties > Extensions.
Choose Fabric > Logical Switches > switch_name > Properties > Extensions.
Step 3![]() Verify that the extension type is Forwarding.
Verify that the extension type is Forwarding.
Verifying the Logical Switch Uplink Mode
The Cisco Nexus 1000V logical switch uplink mode should be team. You can verify the logical switch uplink mode.
Step 1![]() Launch the Microsoft SCVMM UI.
Launch the Microsoft SCVMM UI.
Step 2![]() Choose Fabric > Logical Switches > switch_name > Properties > Uplink.
Choose Fabric > Logical Switches > switch_name > Properties > Uplink.
Step 3![]() Verify that the Uplink mode is Team.
Verify that the Uplink mode is Team.
Creating or Deleting a Switch on a Host Management Adapter
While you are deploying a Cisco Nexus 1000V switch or cleaning up a Cisco Nexus 1000V on a host management adapter, the operation might fail if there are network flaps or a DNS resolution. This problem might cause host connectivity loss because the failure occurs on the host management adapter.
Step 1![]() Log in to the host using the remote console.
Log in to the host using the remote console.
Step 2![]() Open an elevated PowerShell window and enter the Remove-VMSwitch - name switchname command.
Open an elevated PowerShell window and enter the Remove-VMSwitch - name switchname command.
Step 3![]() Remove the NetSwitch Team from the host and restore connectivity by entering the Get-NetswitchTeam | Remove-NetSwitchTeam command.
Remove the NetSwitch Team from the host and restore connectivity by entering the Get-NetswitchTeam | Remove-NetSwitchTeam command.
Step 4![]() Refresh the host from the Microsoft SCVMM.
Refresh the host from the Microsoft SCVMM.

Note![]() If Step 2 fails when the WMI on the host is stuck in an inconsistent state, manually delete the switch from the registry, and perform a system reboot and proceed to Step 3.
If Step 2 fails when the WMI on the host is stuck in an inconsistent state, manually delete the switch from the registry, and perform a system reboot and proceed to Step 3.
Exporting VM Templates When a Hard Disk Fails
When you are exporting a VM template and the hard disk selected fails, the problem is probably caused by the internet proxy settings.
Step 1![]() Launch the Microsoft SCVMM UI.
Launch the Microsoft SCVMM UI.
Step 2![]() Verify that the internet Connection Settings field is blank.
Verify that the internet Connection Settings field is blank.
Deleting Temporary Templates
You can delete temporary templates that are created by the Microsoft SCVMM.
Verifying Host Compliance in the Microsoft SCVMM
You can verify host compliance in the Microsoft SCVMM; all hosts should show as fully compliant.
Step 1![]() Choose Fabric > Logical Switches > Hosts.
Choose Fabric > Logical Switches > Hosts.
Step 2![]() Choose the host from list.
Choose the host from list.
Step 3![]() From the toolbar, choose Remediate.
From the toolbar, choose Remediate.
Step 4![]() Verify that the job was completed by checking the Jobs section
Verify that the job was completed by checking the Jobs section
Creating a Switch on a Management NIC When a Static IP Address Fails on a Server Core
Creating a switch fails when using a Cisco Nexus 1000V on a management NIC with a static IP address on a server core.

Note![]() This problem is a Microsoft issue with Server Core versions of Windows Server 2016.
This problem is a Microsoft issue with Server Core versions of Windows Server 2016.
Step 1![]() Launch the Microsoft SCVMM UI.
Launch the Microsoft SCVMM UI.
Step 2![]() Log in to the host using the remote console.
Log in to the host using the remote console.
Step 3![]() Using a Microsoft SCVMM PowerShell window, delete the switch from the host by entering the Remove-VMSwitch – name switchname command.
Using a Microsoft SCVMM PowerShell window, delete the switch from the host by entering the Remove-VMSwitch – name switchname command.
Step 4![]() Remove the NetSwitch Team from the host and restore connectivity by entering the Get-NetswitchTeam | Remove-NetSwitchTeam command.
Remove the NetSwitch Team from the host and restore connectivity by entering the Get-NetswitchTeam | Remove-NetSwitchTeam command.
Step 5![]() Refresh the host from the Microsoft SCVMM.
Refresh the host from the Microsoft SCVMM.
Problems with Management NICs
The following are symptoms, possible causes, and solutions for problems with management NICs.
 Feedback