Cisco Cloud Network Automation Provisioner for the Microsoft Cloud Platform-Administrator Portal Guide, Release 2.1
Bias-Free Language
The documentation set for this product strives to use bias-free language. For the purposes of this documentation set, bias-free is defined as language that does not imply discrimination based on age, disability, gender, racial identity, ethnic identity, sexual orientation, socioeconomic status, and intersectionality. Exceptions may be present in the documentation due to language that is hardcoded in the user interfaces of the product software, language used based on RFP documentation, or language that is used by a referenced third-party product. Learn more about how Cisco is using Inclusive Language.
- Updated:
- August 10, 2016
Chapter: Appendix B-Sample Data Base as a Service Deployment
Sample Database as a Service Deployment
This appendix provides an overview of how you can deploy Database as a Service (DBaaS) over the CCA MCP solution. The deployment procedures guide you through the required steps.
For detailed information on deploying DBaaS, see Cisco Cloud Architecture for the Microsoft Cloud Platform: DBaaS Configuration Guide, Release 1.0 and the Microsoft Azure Pack documentation.
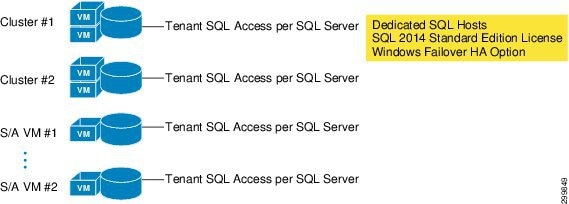
Dedicated Service Deployment Mode—Failover Cluster Redundancy Option and SQL DBaaS Instance in Dedicated per-Tenant Virtual Machines
Figure B-1 Failover Cluster Redundancy Option
Use the Administrator SQL Resource Provider User Interface to Create the DBaaS Plan and Resource Allocation
Step 1![]() On the WAP Admin Portal, log in with your Active Directory user ID and password.
On the WAP Admin Portal, log in with your Active Directory user ID and password.
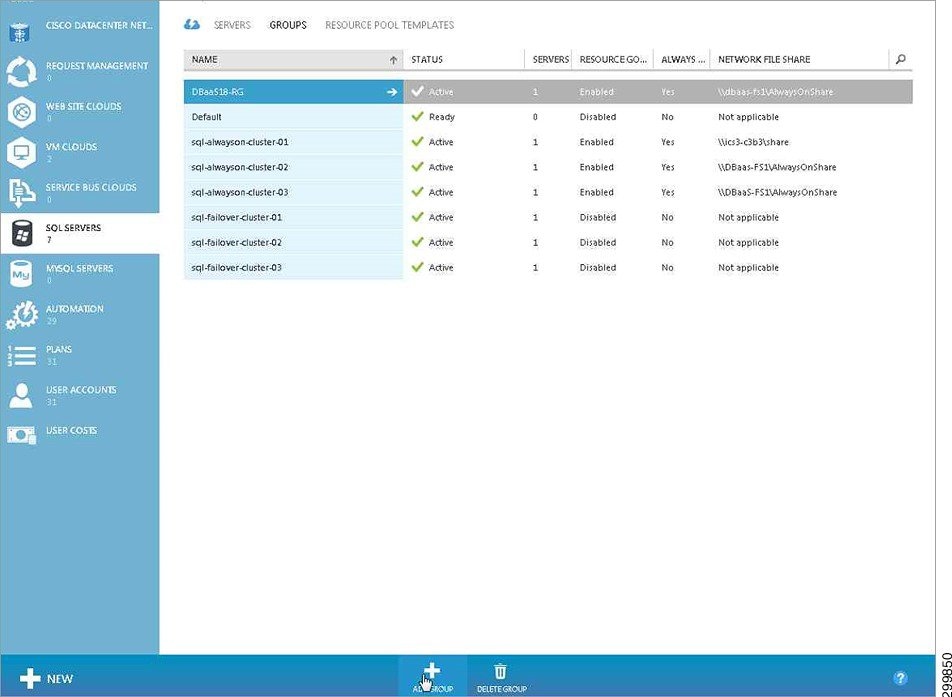
Step 2![]() Open the SQL Server RP tab. At the bottom of screen, click + New to add a group.
Open the SQL Server RP tab. At the bottom of screen, click + New to add a group.
Step 3![]() Enter the Group Name and specify whether it is standalone or HA.
Enter the Group Name and specify whether it is standalone or HA.
Step 4![]() Check the SQL Server Group View to verify that the Group is created when you are done.
Check the SQL Server Group View to verify that the Group is created when you are done.

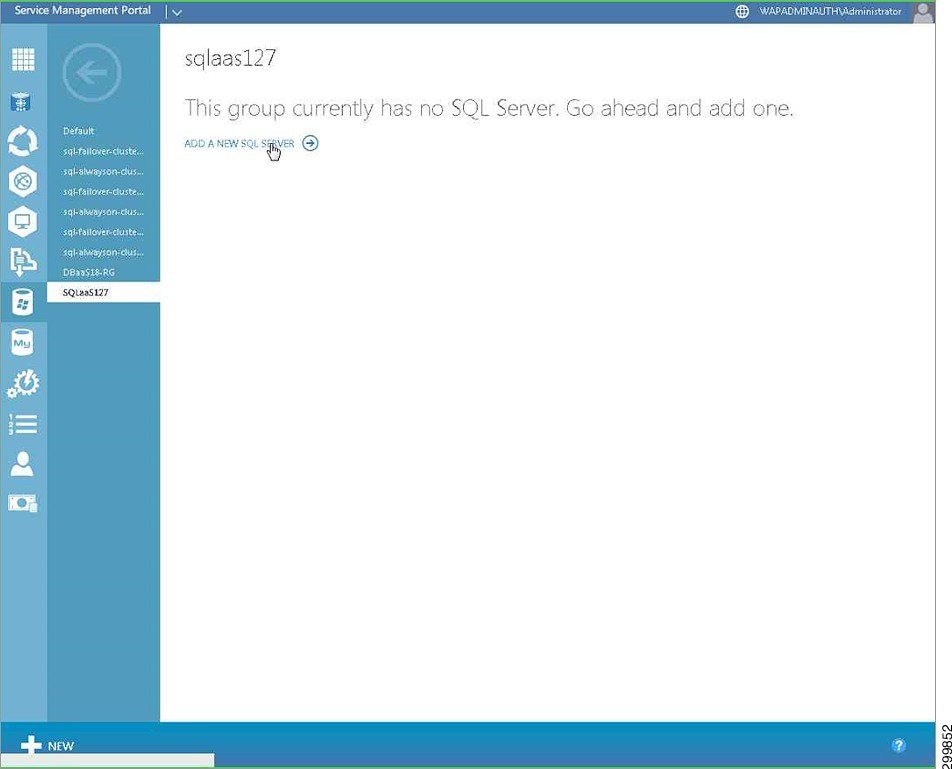
Step 5![]() Add a server to the new group.
Add a server to the new group.
Step 6![]() Specify the Server Name, User Name/Password, and Instance Disk Size Allocation.
Specify the Server Name, User Name/Password, and Instance Disk Size Allocation.

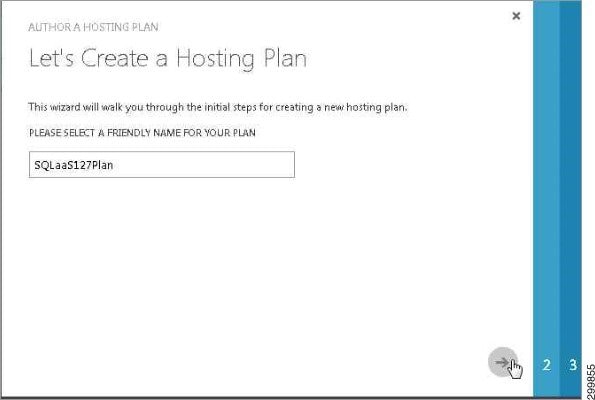
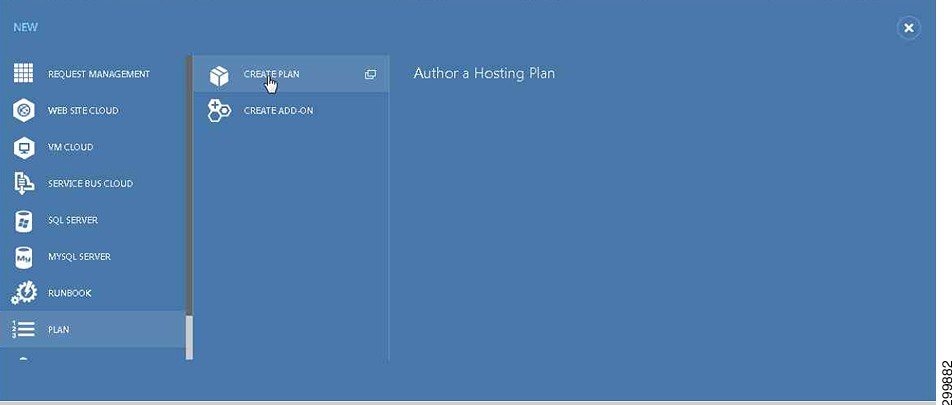
Step 8![]() Specify the plan name and services (SQL Server Name Selection)
Specify the plan name and services (SQL Server Name Selection)
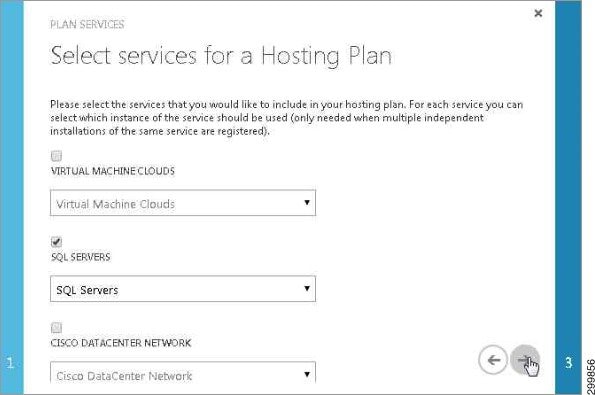
Step 9![]() Select services for the plan (SQL Servers)
Select services for the plan (SQL Servers)
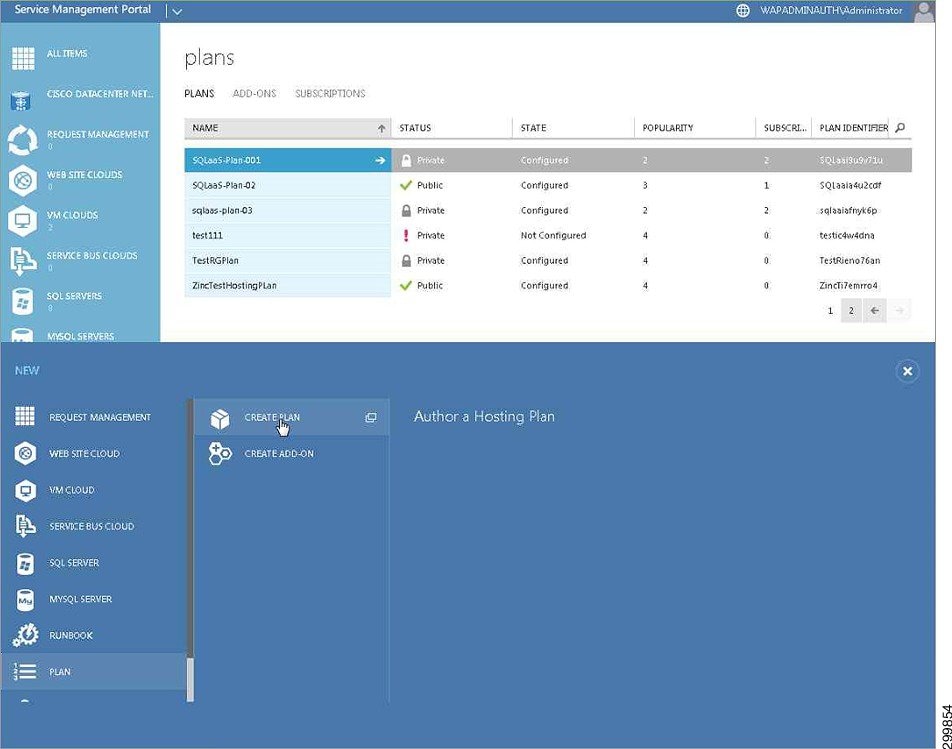
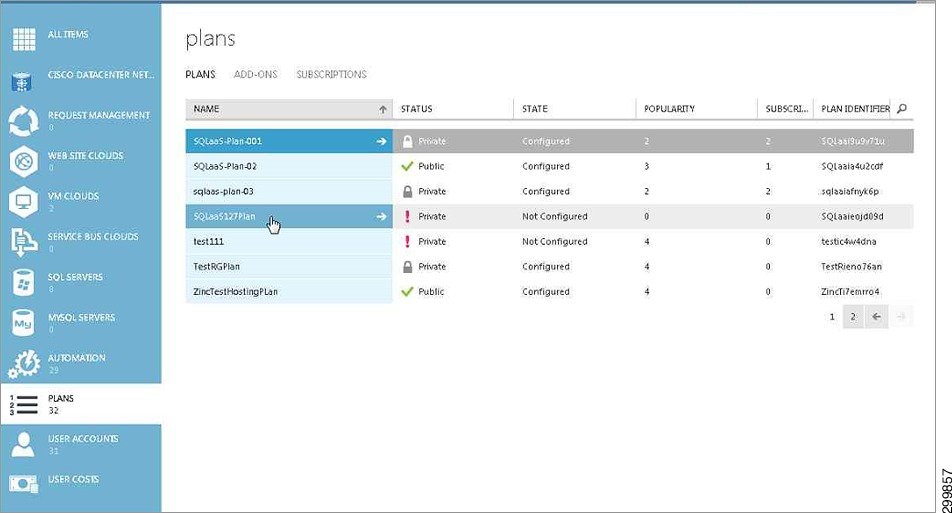
Step 10![]() Verify plan creation from the Plan Windows SQL.
Verify plan creation from the Plan Windows SQL.
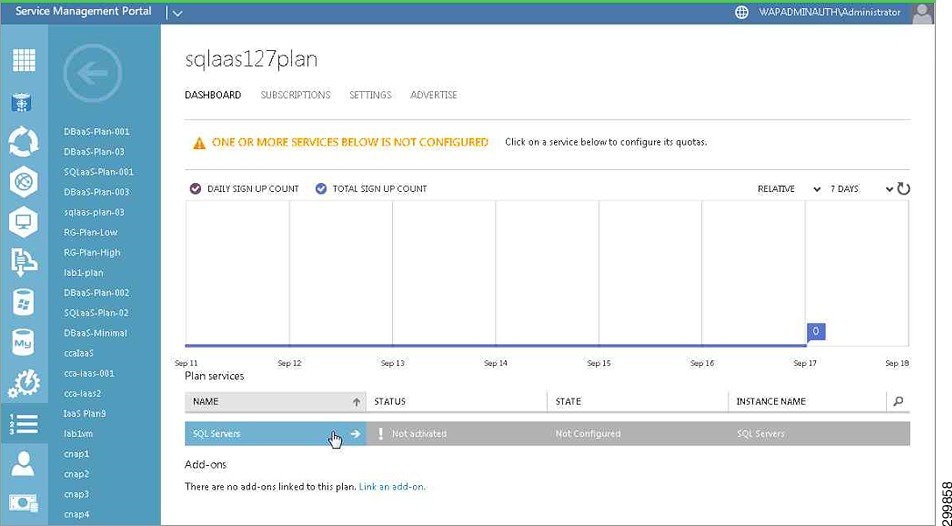
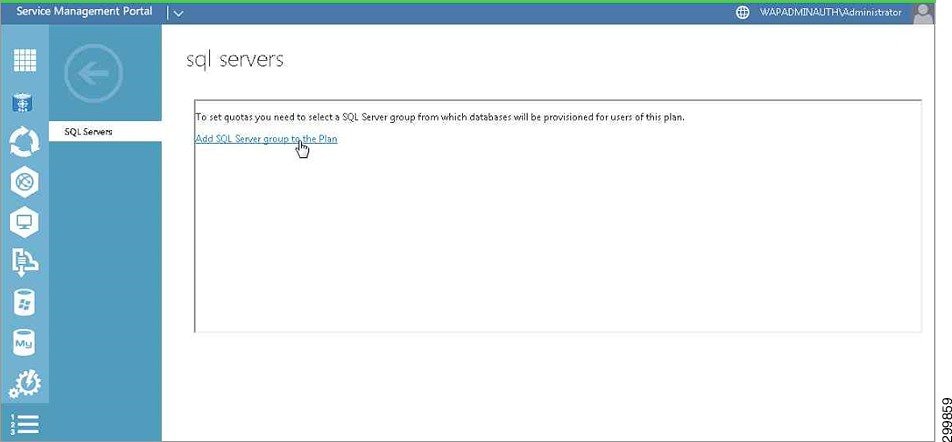
Step 11![]() Open the created plan and select SQL server group to add to the plan.
Open the created plan and select SQL server group to add to the plan.
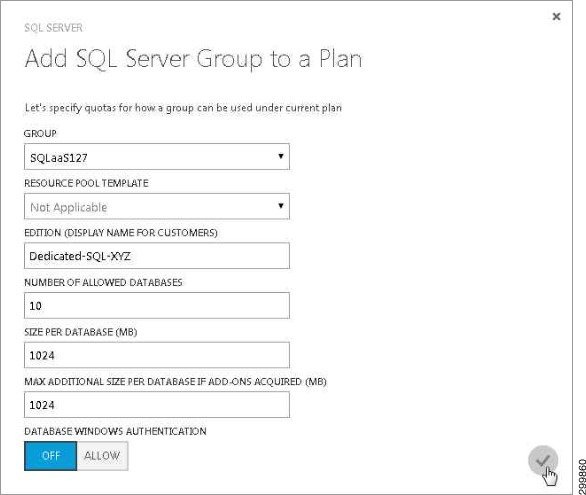
Step 12![]() Add SQL Server Group to the Plan. Specify resource allocation per instance; i.e., allowed databases and size of database per subscription.
Add SQL Server Group to the Plan. Specify resource allocation per instance; i.e., allowed databases and size of database per subscription.
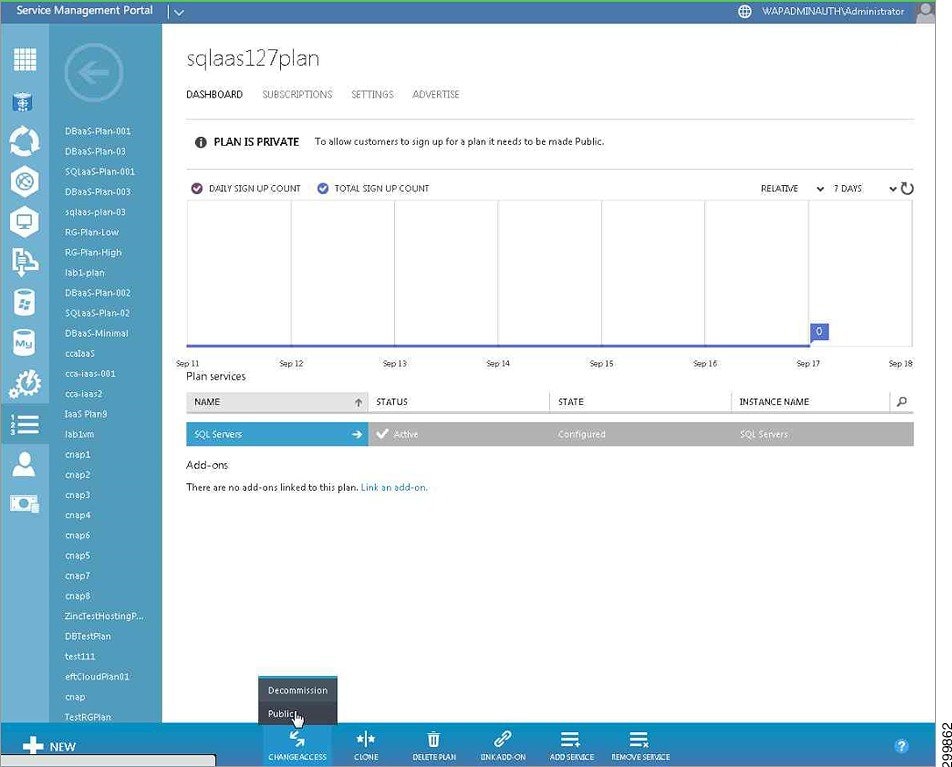
Step 13![]() Save and verify the addition. By default, plans are created as Private.
Save and verify the addition. By default, plans are created as Private.


Note![]() The plan can be updated to public status from the screen below. For purposes of this appendix, change it to a public plan so it can be viewed and selected from the Tenant Portal.
The plan can be updated to public status from the screen below. For purposes of this appendix, change it to a public plan so it can be viewed and selected from the Tenant Portal.
Use the Tenant SQL Resource Provider User Interface to View Published Plan Options and Subscribe
Step 1![]() Login to the WAP Tenant Administrator portal. Enter your username and password.
Login to the WAP Tenant Administrator portal. Enter your username and password.
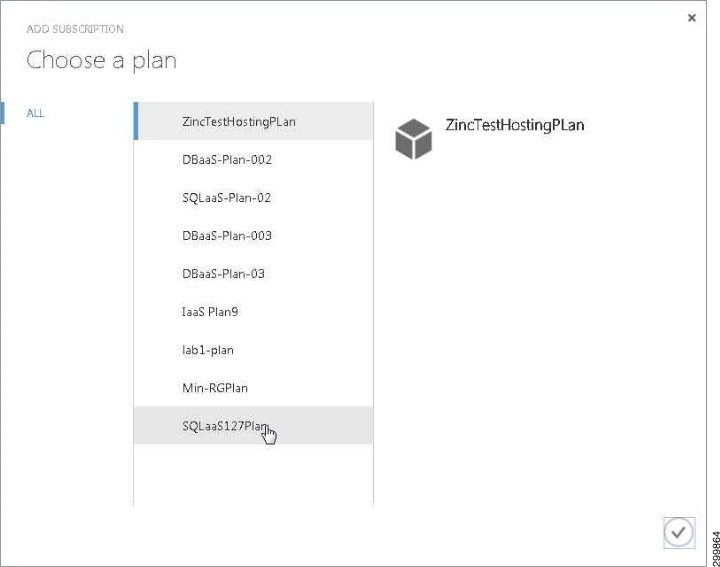
Step 2![]() Go to My Account and select Add Subscription. From the available plan(s) previously created and published through the SP Admin UI, select a plan.
Go to My Account and select Add Subscription. From the available plan(s) previously created and published through the SP Admin UI, select a plan.

Step 3![]() Create databases under the subscribed plan. At the bottom of screen, click + New to add a database and enter the database name. If there is more than one service subscription, select from the drop-down menu to associate the new database with the proper service option.
Create databases under the subscribed plan. At the bottom of screen, click + New to add a database and enter the database name. If there is more than one service subscription, select from the drop-down menu to associate the new database with the proper service option.

Step 4![]() Specify the username/password credentials for database user access.
Specify the username/password credentials for database user access.
Step 5![]() Once created, the tenant is able to view their existing databases, including the one just created in the step above.
Once created, the tenant is able to view their existing databases, including the one just created in the step above.
Step 6![]() By selecting View Info (bottom of screen above), the tenant is able to view the defined SQL Server database credentials. These credentials may be required as part of front-end operations for database connections.
By selecting View Info (bottom of screen above), the tenant is able to view the defined SQL Server database credentials. These credentials may be required as part of front-end operations for database connections.
Shared Service Deployment Mode—Always-on Cluster Redundancy Option and DBaaS Instance per-Tenant on Multi-tenant SQL Server(s)
Figure B-2 Always-on Cluster Redundancy Option

Use the Administrator SQL Resource Provider User Interface to Create DBaaS Plan and Resource Allocation
Step 1![]() On the WAP Admin Portal, log in with your Active Directory user ID and password.
On the WAP Admin Portal, log in with your Active Directory user ID and password.
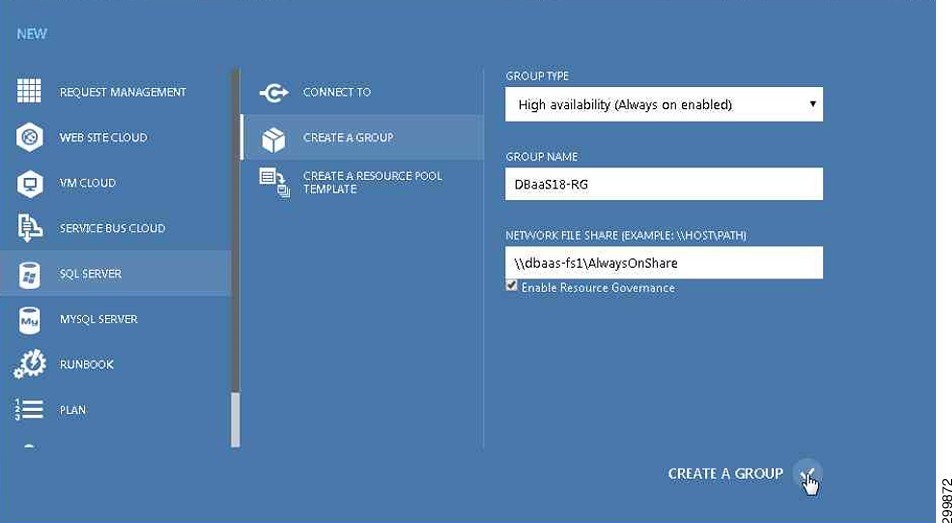
Step 2![]() Open the SQL Server RP tab. At the bottom of screen, click + New to add a group.
Open the SQL Server RP tab. At the bottom of screen, click + New to add a group.

Step 3![]() Enter the Group Name and specify whether it is standalone or HA. In this example, HA selection is Always on (enabled).
Enter the Group Name and specify whether it is standalone or HA. In this example, HA selection is Always on (enabled).

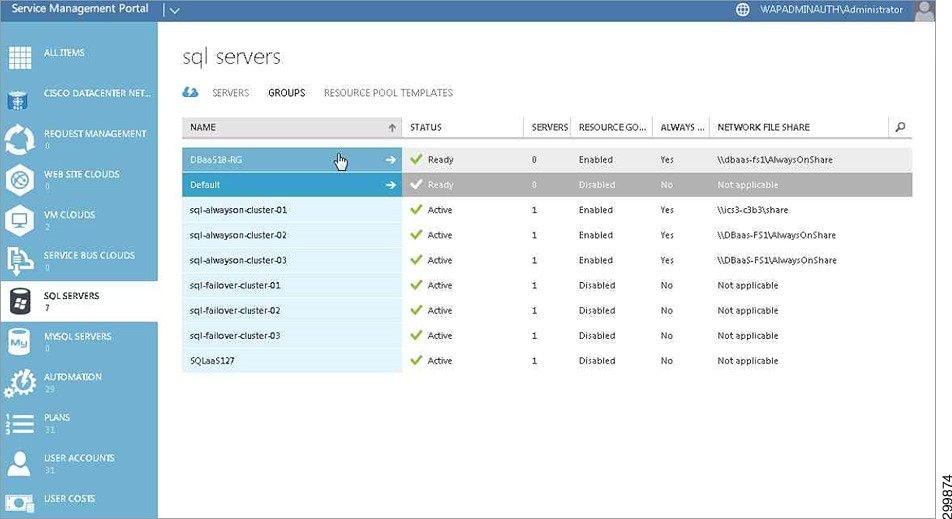
Step 4![]() Check the SQL Server Group View to verify that the Group is created when done.
Check the SQL Server Group View to verify that the Group is created when done.
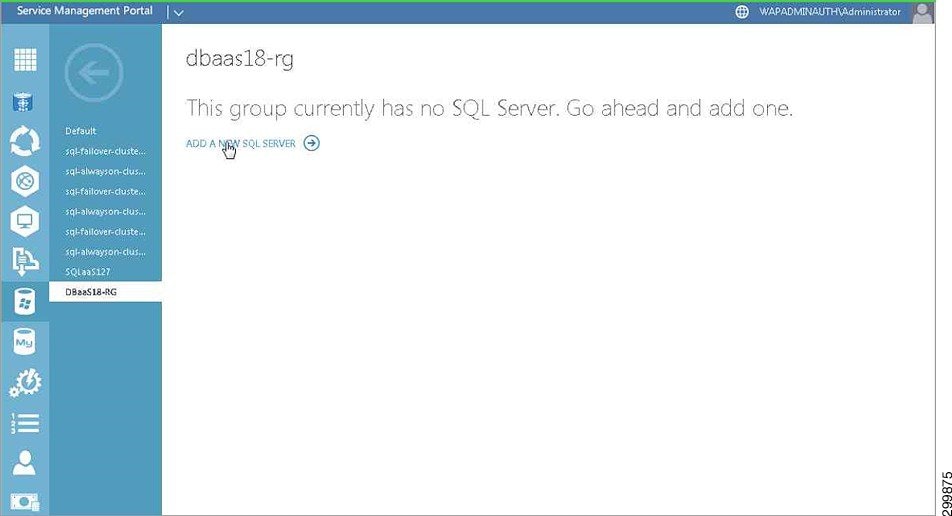
Step 5![]() Add an SQL Server to the new group.
Add an SQL Server to the new group.
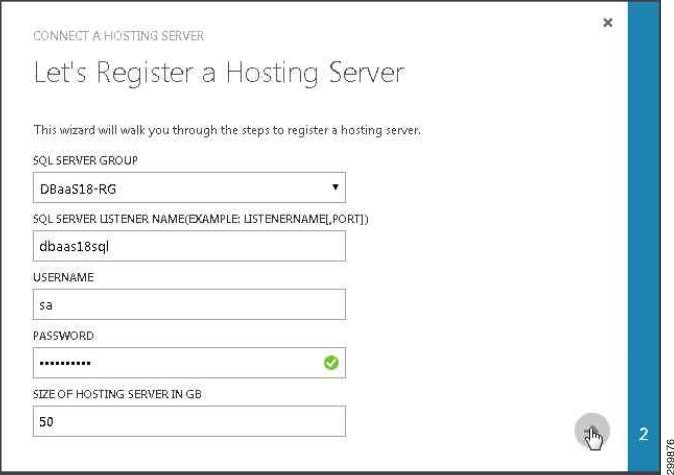
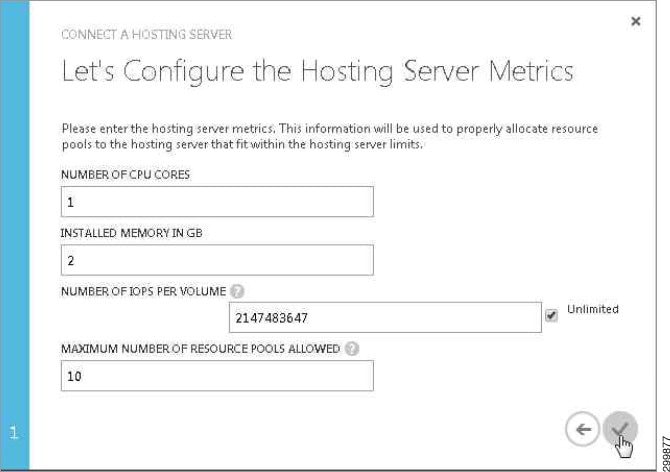
Step 6![]() Specify the Server Name, User Name/Password, and Instance Disk Size Allocation.
Specify the Server Name, User Name/Password, and Instance Disk Size Allocation.

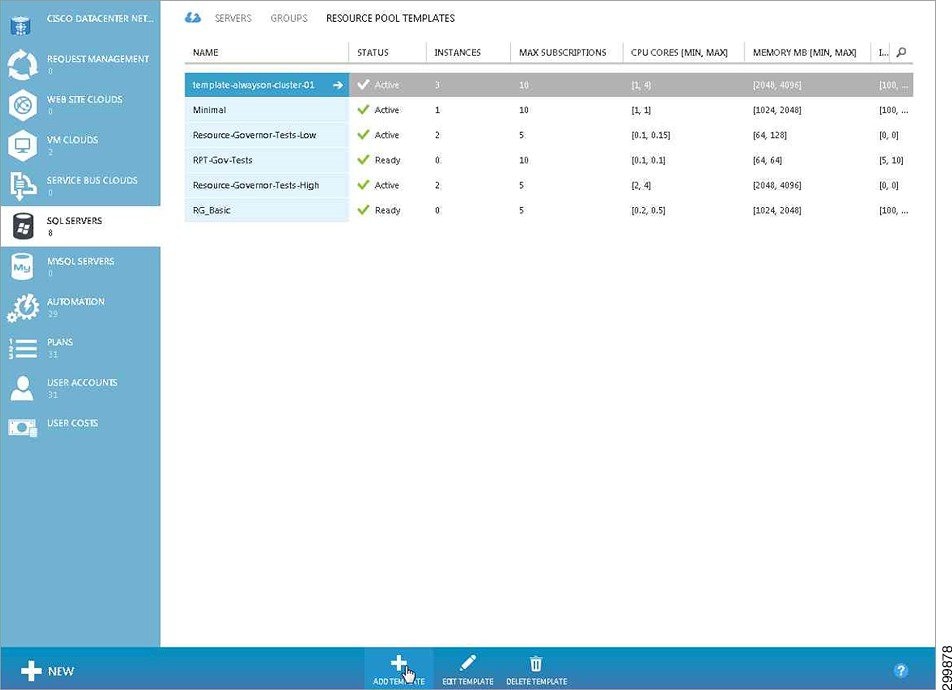
Step 7![]() Create a New Resource Pool Template by clicking + New (Add Template).
Create a New Resource Pool Template by clicking + New (Add Template).
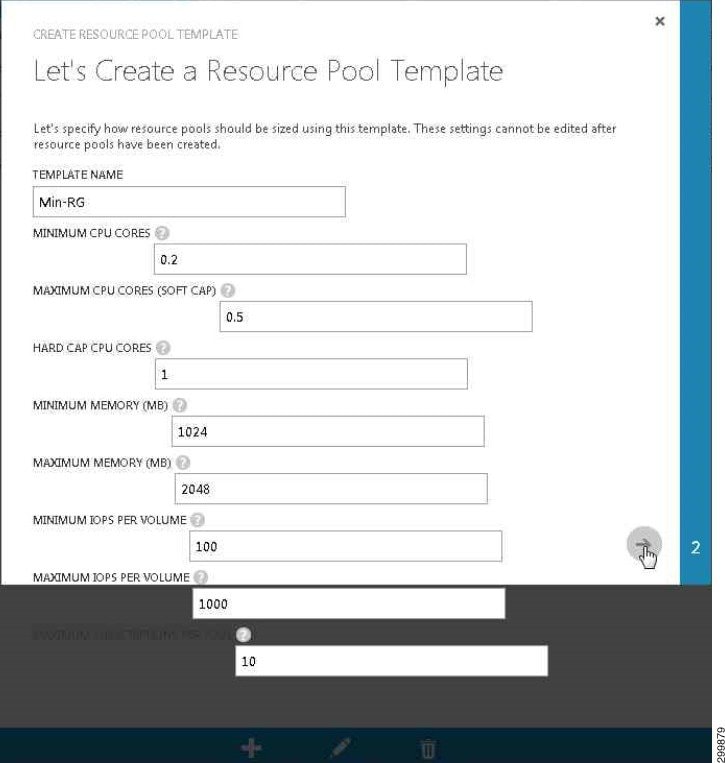
Step 8![]() In the resulting form, specify the template name and define the resource allocation.
In the resulting form, specify the template name and define the resource allocation.
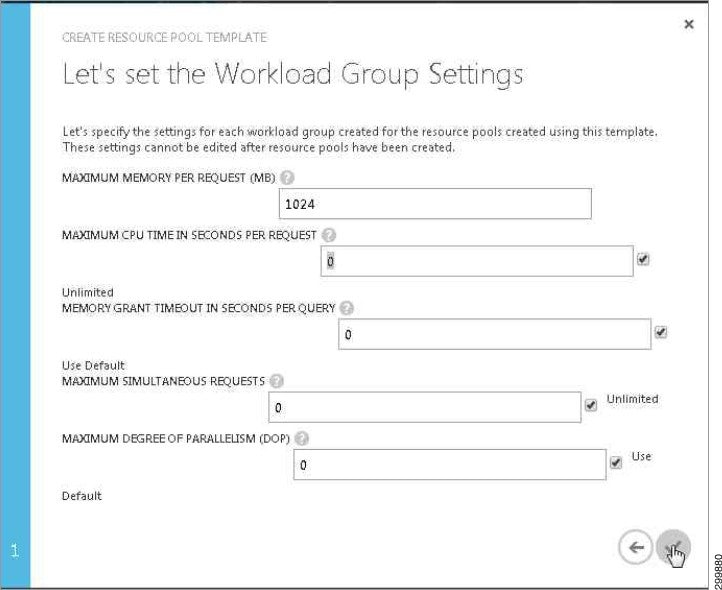
Step 9![]() Set the Workload Group settings for the new template
Set the Workload Group settings for the new template
Note![]() The maximum memory must be the same as the minimum assigned memory previously defined in the resource allocation parameters.
The maximum memory must be the same as the minimum assigned memory previously defined in the resource allocation parameters.

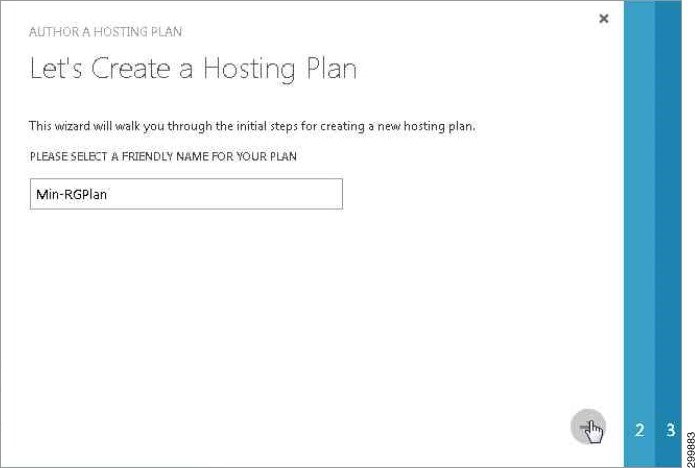
Step 11![]() In the plan creation view, specify the plan name.
In the plan creation view, specify the plan name.
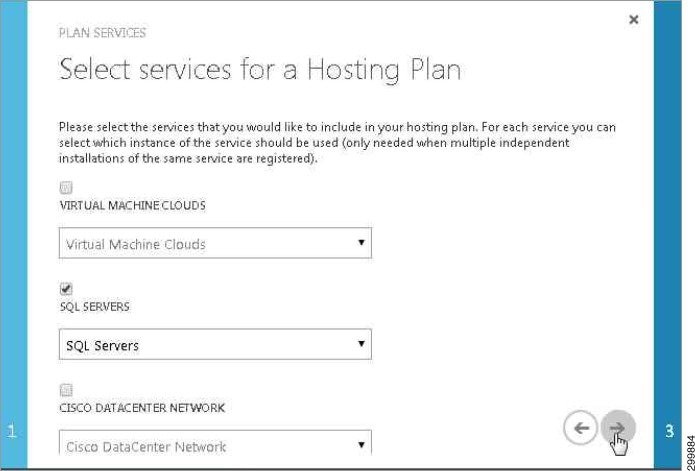
Step 12![]() Select the applicable services (a function of the resource providers previously registered to WAP for the cloud).
Select the applicable services (a function of the resource providers previously registered to WAP for the cloud).
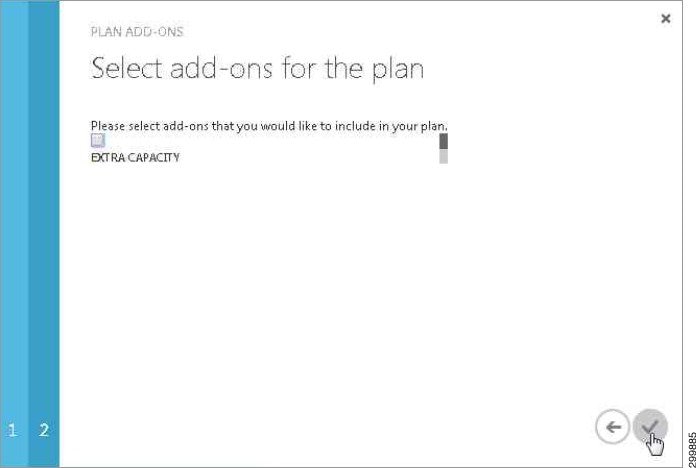
If add-on service options are defined (extra capacity in this example), they may be offered for inclusion in this new plan.

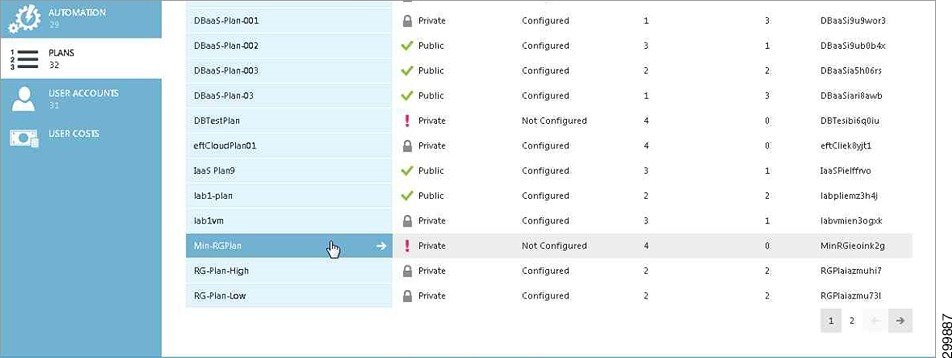
Step 13![]() View the list of defined plans to verify that the new plan is included.
View the list of defined plans to verify that the new plan is included.
Step 14![]() Configure service quotas. Click the new plan (Min-RGPlan) from the list in the view above to view its dashboard listing the available services.
Configure service quotas. Click the new plan (Min-RGPlan) from the list in the view above to view its dashboard listing the available services.
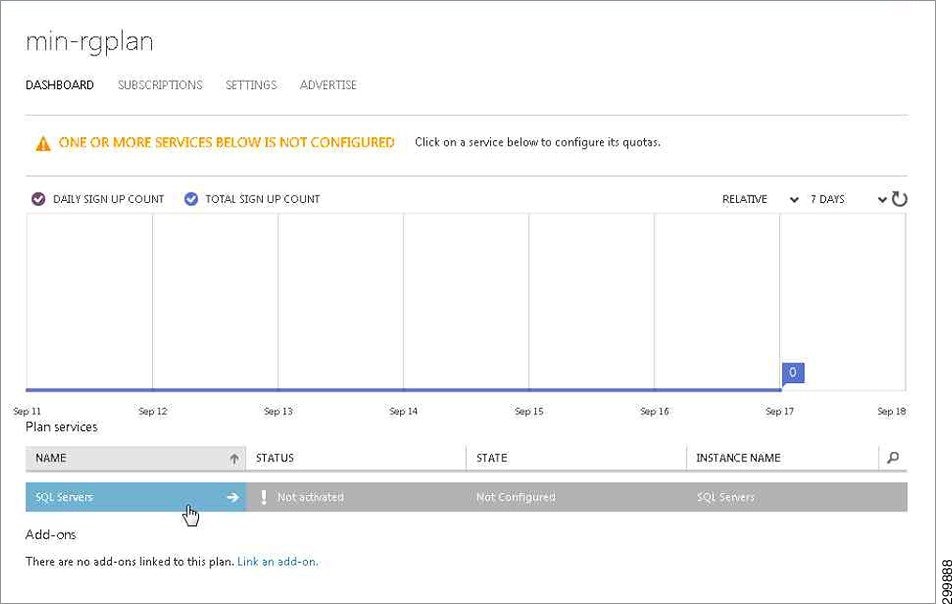
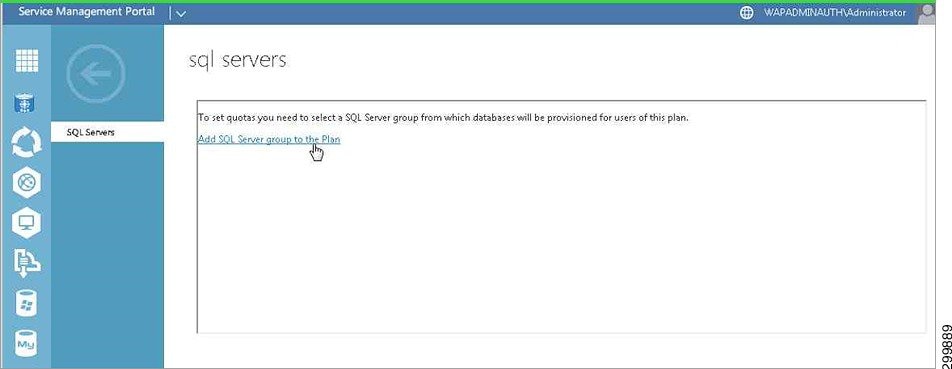
Step 15![]() Click the SQL Servers service to begin configuring quotas for the servers associated with this DBaaS plan on which the databases will be created per tenant request.
Click the SQL Servers service to begin configuring quotas for the servers associated with this DBaaS plan on which the databases will be created per tenant request.
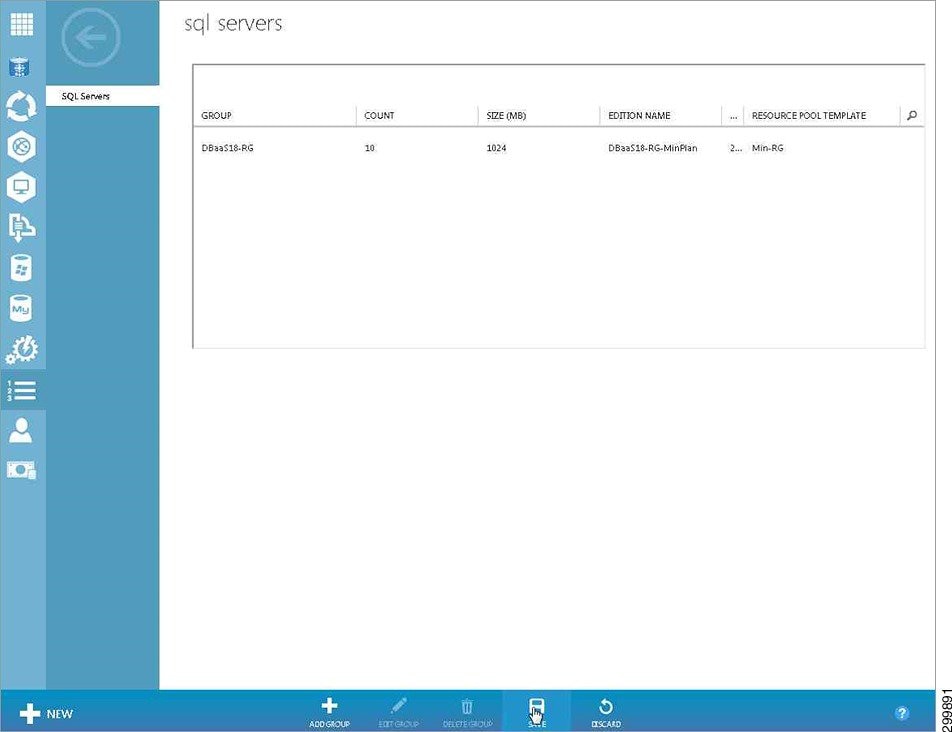
Step 16![]() Add the SQL Server Group to the plan with the desired quotas. These include the number of allowed databases and size per database, per tenant subscription.
Add the SQL Server Group to the plan with the desired quotas. These include the number of allowed databases and size per database, per tenant subscription.

Step 17![]() From the SQL Server view within the plan, see the list of defined groups to verify that the newly defined group is listed.
From the SQL Server view within the plan, see the list of defined groups to verify that the newly defined group is listed.

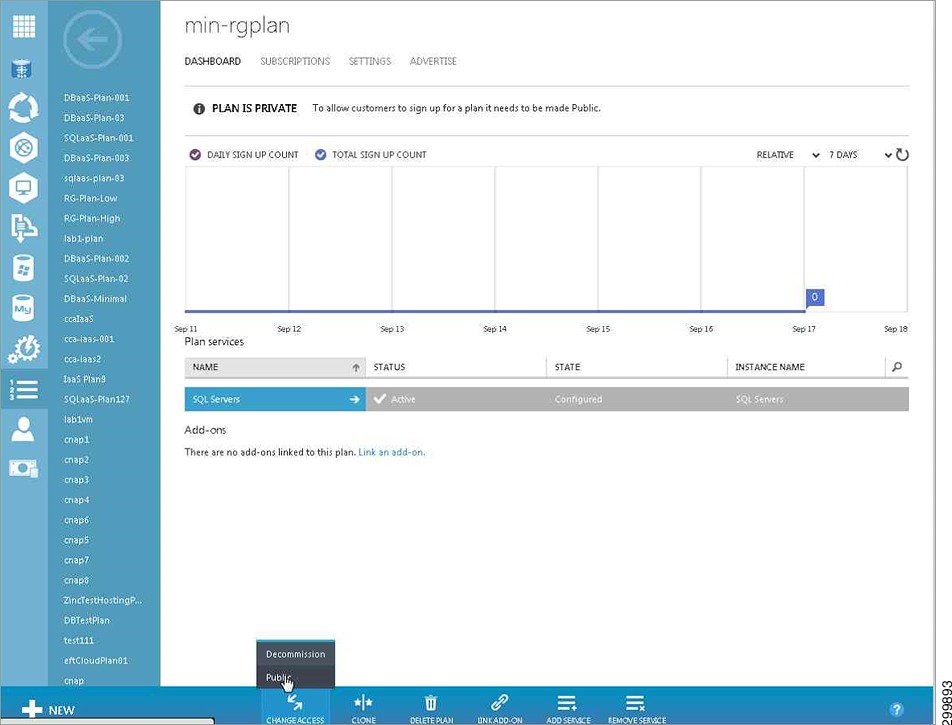
Step 18![]() Select the newly created plan from the plan list to change the plan from the default “private” to “public” so that it is selectable from the tenant service management portal.
Select the newly created plan from the plan list to change the plan from the default “private” to “public” so that it is selectable from the tenant service management portal.


Use the Tenant SQL Resource Provider User Interface to Create DBaaS Plan and Resource Allocation
Step 1![]() Login to the WAP Tenant Administrator portal. Enter your username/password.
Login to the WAP Tenant Administrator portal. Enter your username/password.
Step 2![]() Subscribe to a plan. Go to My Account and select Add Plan.
Subscribe to a plan. Go to My Account and select Add Plan.
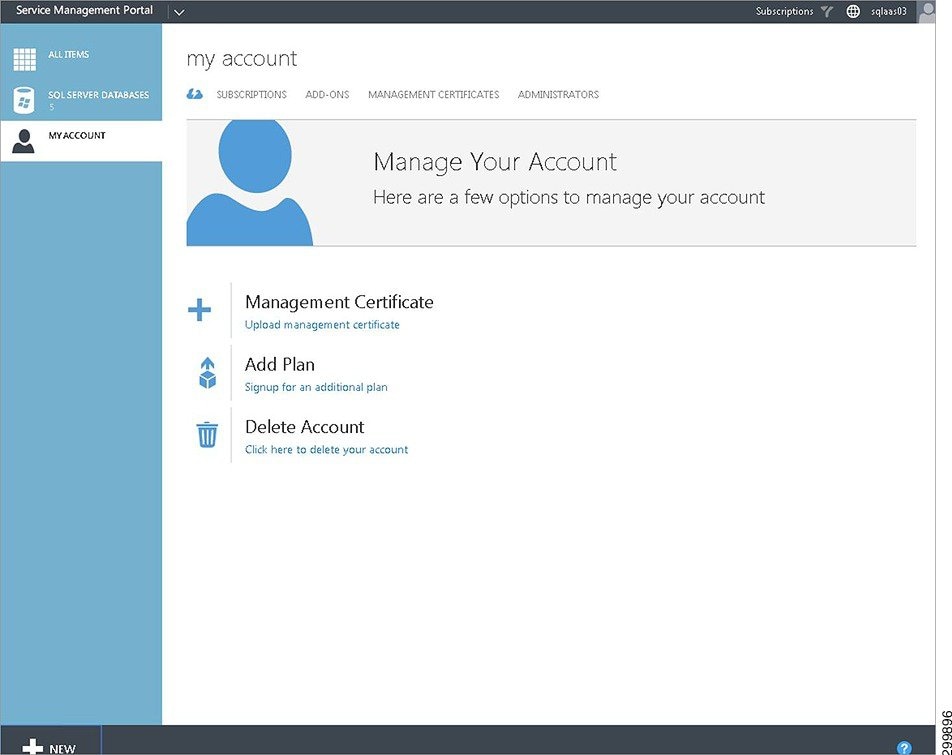
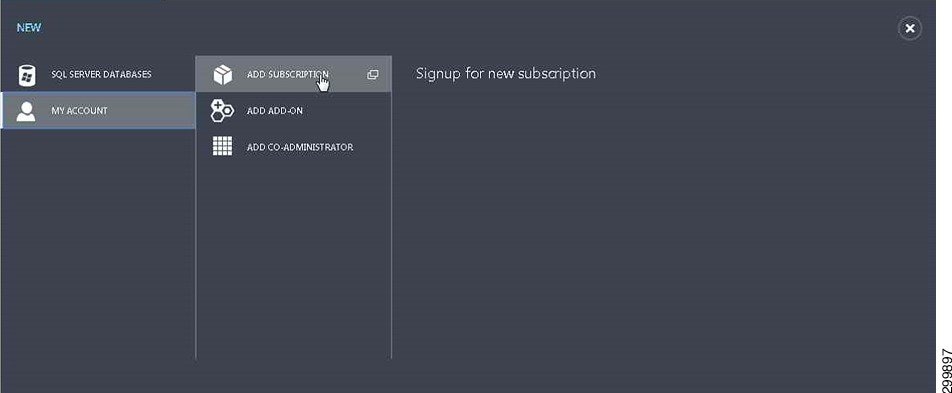
Alternatively, +New may be used to add a subscription.
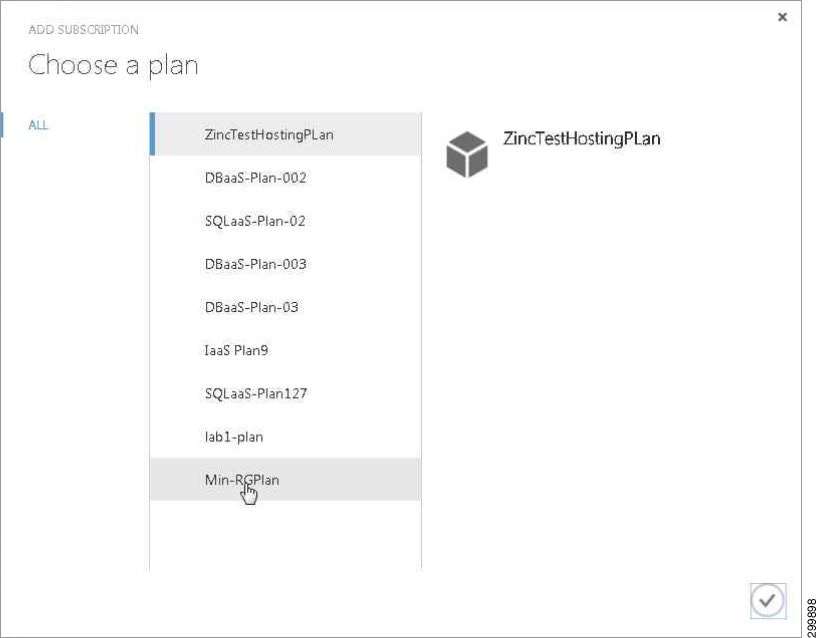
Step 3![]() From the resulting list of available plan(s) previously created and published through the SP Admin UI, select a shared DBaaS plan.
From the resulting list of available plan(s) previously created and published through the SP Admin UI, select a shared DBaaS plan.
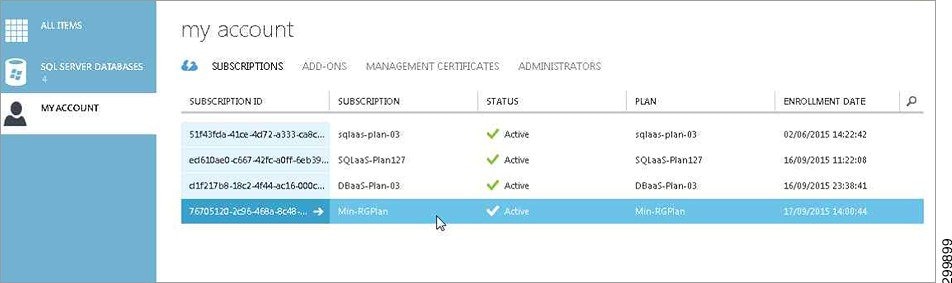
Step 4![]() Check My Account subscriptions to verify that the new service subscription is listed.
Check My Account subscriptions to verify that the new service subscription is listed.
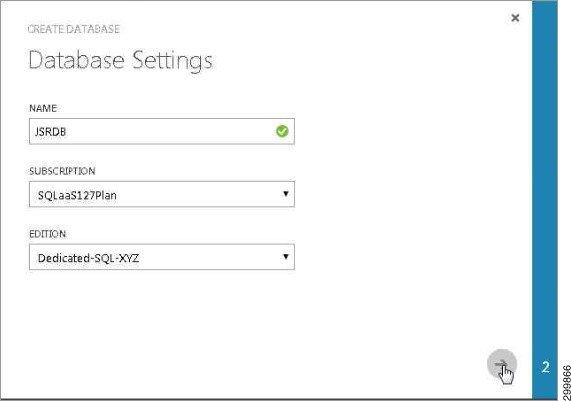
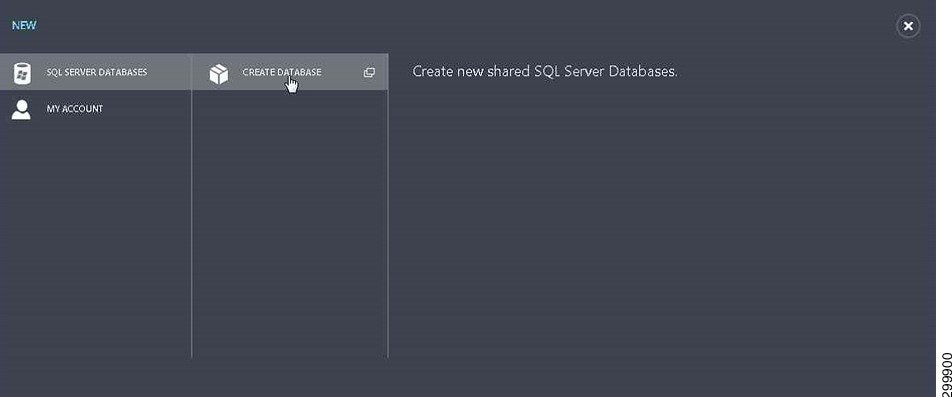
Step 5![]() Create new database. Click + New to bring up the SQL Server Database/Create Database option.
Create new database. Click + New to bring up the SQL Server Database/Create Database option.
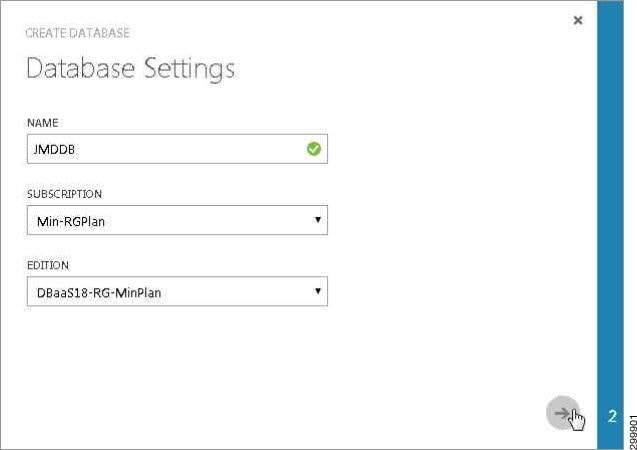
Step 6![]() In resulting view, select the database name and associated plan from the pull-down list of plans to which the tenant has subscribed.
In resulting view, select the database name and associated plan from the pull-down list of plans to which the tenant has subscribed.
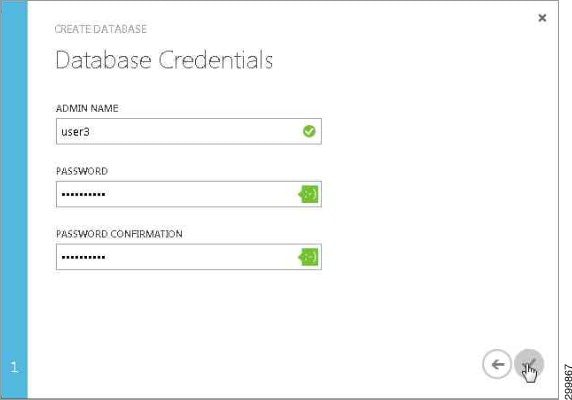
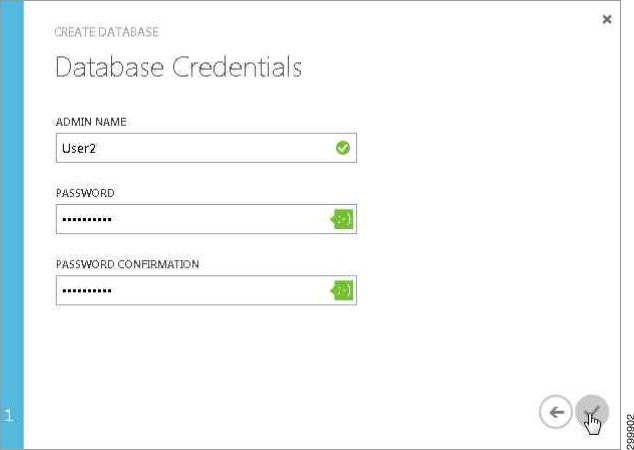
Step 7![]() Enter credentials for database access in the resulting view.
Enter credentials for database access in the resulting view.
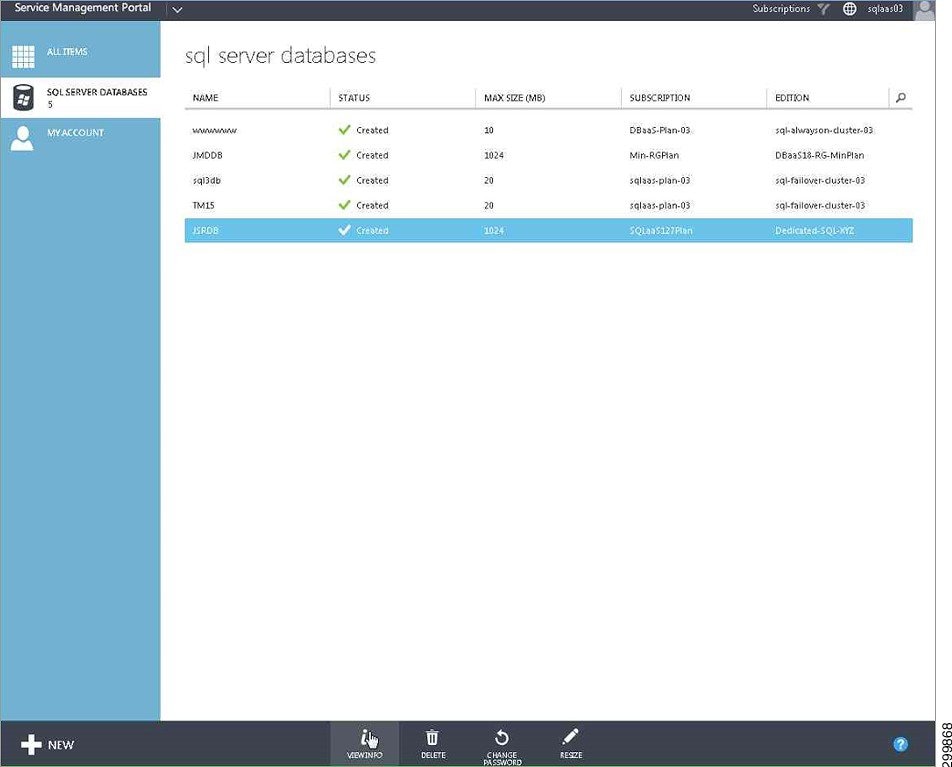
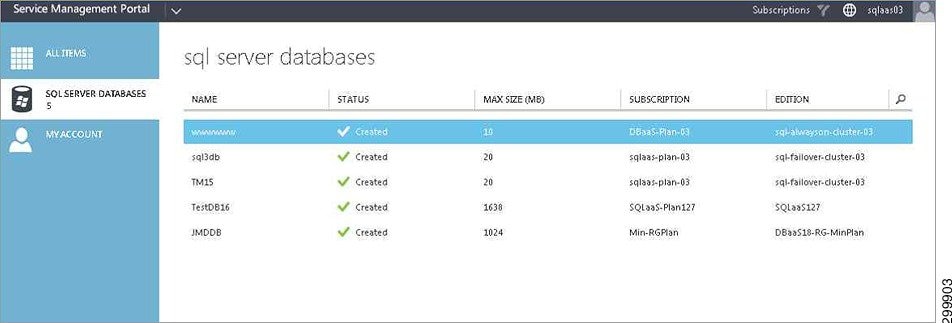
Step 8![]() View the list of defined SQL databases to verify that the newly created one is included.
View the list of defined SQL databases to verify that the newly created one is included.


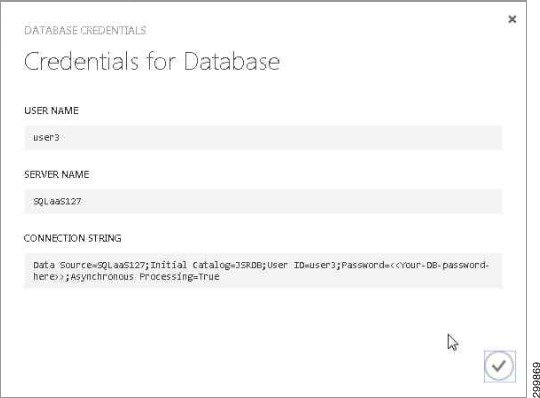
Step 9![]() View the Database Credentials. Select the newly created database from the list. From the bottom of the Tenant Service Management Portal, select View Info to see the SQL database access credentials for that database.
View the Database Credentials. Select the newly created database from the list. From the bottom of the Tenant Service Management Portal, select View Info to see the SQL database access credentials for that database.

 Feedback