Cisco Smart+Connected Personalized Spaces Administrator Guide
Bias-Free Language
The documentation set for this product strives to use bias-free language. For the purposes of this documentation set, bias-free is defined as language that does not imply discrimination based on age, disability, gender, racial identity, ethnic identity, sexual orientation, socioeconomic status, and intersectionality. Exceptions may be present in the documentation due to language that is hardcoded in the user interfaces of the product software, language used based on RFP documentation, or language that is used by a referenced third-party product. Learn more about how Cisco is using Inclusive Language.
- Updated:
- May 17, 2013
Chapter: Getting Started
Getting Started
This chapter provides an overview of the Cisco Smart+Connected Personalized Spaces (Smart+Connected PS) application.
•![]() Logging In to the Smart+Connected PS
Logging In to the Smart+Connected PS
•![]() Understanding the Administrator User Interface
Understanding the Administrator User Interface
About the Smart+Connected PS
The Smart+Connected PS application is a part of the Smart+Connected Communities (S+CC) solutions, and leverages the platform capabilities of the Cisco Service Delivery Platform (SDP). This application allows organizations to plan utilization of resources at workspaces by maximizing office usage and minimizing the energy consumption.The SDP allows you to add and manage locations and devices for the Smart+Connected PS through the SDP web interface.
The Smart+Connected PS allows you to perform the following tasks:
•![]() Book a workspace and set the workspace preferences.
Book a workspace and set the workspace preferences.
•![]() Check-in and check out of a reserved workspace
Check-in and check out of a reserved workspace
•![]() Manage configurations for all the devices located at a workspace.
Manage configurations for all the devices located at a workspace.
•![]() Create proxy bookings. For example, an executive administrator can book a workspace for a visiting executive.
Create proxy bookings. For example, an executive administrator can book a workspace for a visiting executive.
•![]() Generate and view reports for usage trends, user statistics, and so on.
Generate and view reports for usage trends, user statistics, and so on.
•![]() Creates default messages for the various fault cases, such as a non-functioning air conditioner in the workspace.
Creates default messages for the various fault cases, such as a non-functioning air conditioner in the workspace.
You can log in to the Smart+Connected PS application as a superadmin user (super administrator). When you install the Smart+Connected PS application, a superadmin user is created by default.
The Smart+Connected PS Mobile Application allows you to access the Smart+Connected PS application on your mobile devices, such as Android and iPhones. The Smart+Connected PS Mobile Application offers the following features:
•![]() Viewing your upcoming meeting and workspace reservation details.
Viewing your upcoming meeting and workspace reservation details.
•![]() Checking in and out of a reserved workspace.
Checking in and out of a reserved workspace.
•![]() Ad-hoc checking in from the list of available workspaces.
Ad-hoc checking in from the list of available workspaces.
•![]() Checking in and out using the QR code scanning feature.
Checking in and out using the QR code scanning feature.
•![]() Marking workspaces and people within an enterprise as favorites.
Marking workspaces and people within an enterprise as favorites.
•![]() Setting your preferences for a building and floor.
Setting your preferences for a building and floor.
•![]() Searching for workspace and people is an enterprise.
Searching for workspace and people is an enterprise.
•![]() Calling contacts or sending e-mails to them.
Calling contacts or sending e-mails to them.
•![]() Importing contacts from the LDAP directory into the mobile device.
Importing contacts from the LDAP directory into the mobile device.
Logging In to the Smart+Connected PS
The Smart+Connected PS application is compatible with the following web browsers:
•![]() Mozilla Firefox Versions 6.0, 14.0, and 15.0
Mozilla Firefox Versions 6.0, 14.0, and 15.0
•![]() Microsoft Internet Explorer Versions 8.0 and 9.0
Microsoft Internet Explorer Versions 8.0 and 9.0
•![]() Google Chrome Version 23.0
Google Chrome Version 23.0
The default login credentials are as follows:
•![]() Username—superadmin
Username—superadmin
•![]() Password—superadmin
Password—superadmin
To log in to the Smart+Connected PS application, perform the following steps:
Step 1 ![]() In the Address field of the browser, enter the application server URL: http://<host>:<port>/ipsapp, and press Enter.
In the Address field of the browser, enter the application server URL: http://<host>:<port>/ipsapp, and press Enter.
Where the host is the IP address or the DNS name of the host on which the Smart + Connected PS application has been deployed on the WebLogic/JBoss server, while the port is the port number that you have defined for the WebLogic/JBoss server.
The Smart+Connected PS Login page appears.
Step 2 ![]() Enter superadmin as the default username and password, and then click Login.
Enter superadmin as the default username and password, and then click Login.
The Smart+Connected PS home page appears.
Understanding the Administrator User Interface
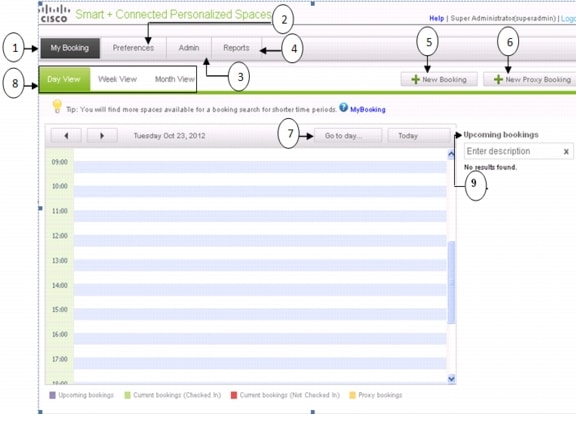
Figure 1-1 describes the elements of the Smart+Connected PS user interface for the administrator.
Figure 1-1 Elements of the Smart+Connected PS User Interface
 Feedback