Cisco Smart+Connected Meeting Spaces Administrator Guide
Bias-Free Language
The documentation set for this product strives to use bias-free language. For the purposes of this documentation set, bias-free is defined as language that does not imply discrimination based on age, disability, gender, racial identity, ethnic identity, sexual orientation, socioeconomic status, and intersectionality. Exceptions may be present in the documentation due to language that is hardcoded in the user interfaces of the product software, language used based on RFP documentation, or language that is used by a referenced third-party product. Learn more about how Cisco is using Inclusive Language.
- Updated:
- July 6, 2013
Chapter: Working with the Signage Content
Working with the Signage Content
This chapter how to work with the content that is displayed on the signage.
Managing Signage Content
Signage content is the content that is displayed on the digital signage/Cisco Interactive Experience Client (IEC), such as the building view, floor plan, and conference room details. The Signage Content tab in the Smart+Connected MS portal allows you to add, view, edit, and customize the contents for the digital signage/IEC for a specific location.

Note ![]() Ensure that the selected location has a digital media player (DMP)/IEC. You must have a DMP/IEC available to add signage content for the location.
Ensure that the selected location has a digital media player (DMP)/IEC. You must have a DMP/IEC available to add signage content for the location.
The templates allow you to add the details of a location for which you want to add the signage content. The Details tab allows you to select a template. After you select a template, you can associate conference rooms to the signage. The following templates are provided by the application:
•![]() Building View
Building View
•![]() Floor Plan
Floor Plan
•![]() Conference Room
Conference Room
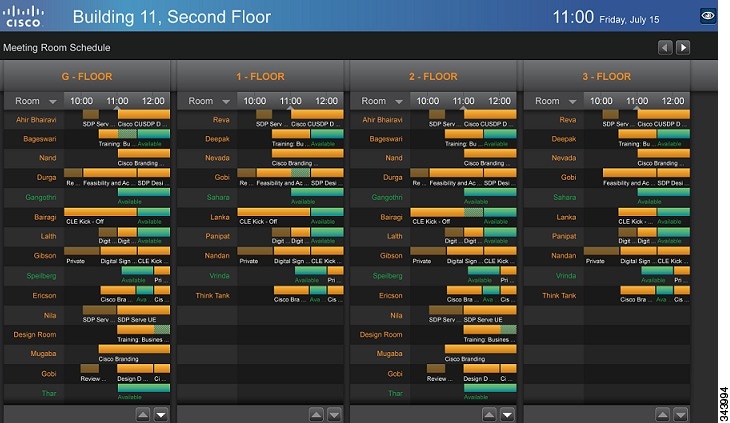
When you select the Building View template, you can choose rooms from all conference rooms available in the building. The schedule of these rooms is displayed on the signage.
Note ![]() You should add the Building View template only to a DMP/IEC that is added at the building level. Floor Plan templates should be added to DMPs/IECs at the floor level and Conference Room templates should be added to DMPs/IECs associated with conference rooms.
You should add the Building View template only to a DMP/IEC that is added at the building level. Floor Plan templates should be added to DMPs/IECs at the floor level and Conference Room templates should be added to DMPs/IECs associated with conference rooms.
Figure 6-1 displays the Building View as shown on the digital signage/IEC.
Figure 6-1 Building View
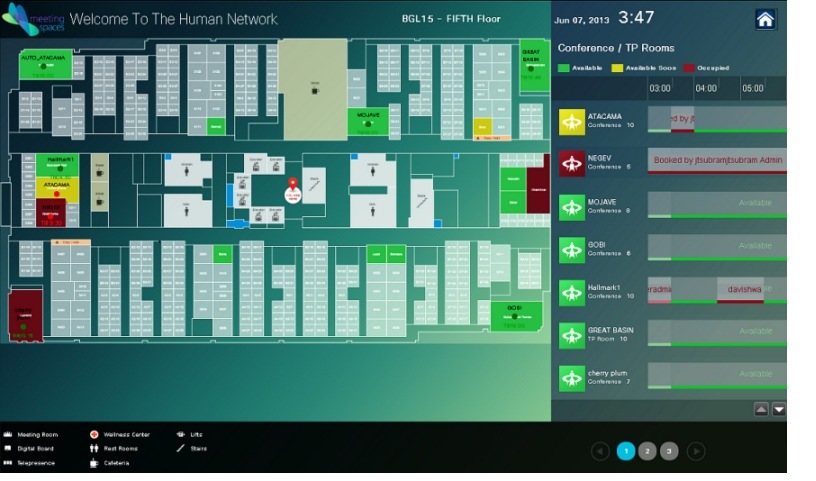
When you select the Floor Plan template, you can upload an image of the floor plan that you want and display the location of the conference rooms on the floor in the digital signage/IEC. You can upload the floor plan images in .png, .jpg, and .jpeg file formats.
Figure 6-2 displays the Floor Plan as shown on the digital signage/IEC.
Figure 6-2 Floor Plan
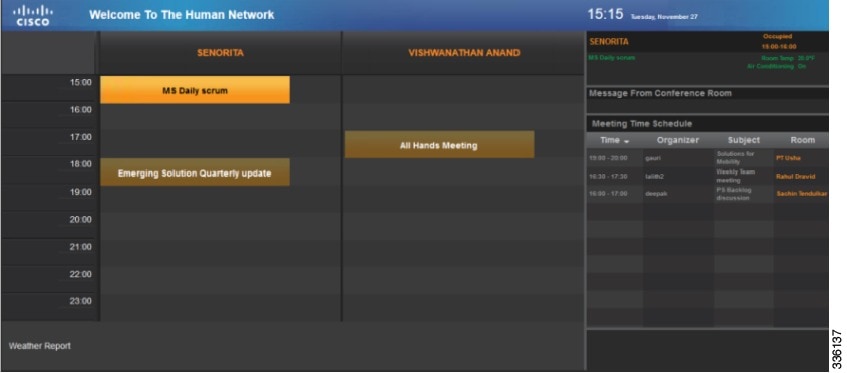
When you select the Conference Room template, you can choose the rooms that you want to associate to the digital signage/IEC on the current floor. Of these rooms, you can select any two conference rooms as the primary conference rooms. The Primary conference rooms are those whose schedule details are displayed prominently on the associated digital signage/IEC. Information about the other conference rooms that are associated with the same digital signage/IEC are displayed adjacent to the details of the primary conference rooms.
Figure 6-3 displays the Conference Room details as shown on the digital signage/IEC.
Figure 6-3 Conference Room Details
Adding Signage Content
You can add the building view, floor plan, and conference room details to a location using the Details tab. The content added to a digital media player is displayed on the digital signage/IEC for the selected location.
To add signage content, perform the following steps:
Step 1 ![]() Log in to the Smart+Connected MS portal.
Log in to the Smart+Connected MS portal.
The home page appears.
Step 2 ![]() Click the Signage Content tab.
Click the Signage Content tab.
The Digital Signage area appears. It is divided into two panes. The left pane displays the location hierarchy, and the right pane displays the Digital Signage details.
Step 3 ![]() In the left pane, right-click the Location Hierarchy folder, and click Expand to view all the associated locations. Alternatively, click the plus sign next to a location name to view its child locations.
In the left pane, right-click the Location Hierarchy folder, and click Expand to view all the associated locations. Alternatively, click the plus sign next to a location name to view its child locations.
Step 4 ![]() Click a location name in the Location Hierarchy folder.
Click a location name in the Location Hierarchy folder.
The DMPs/IECs that are associated with the location are displayed in the Digital Signage area. Only a certain number of devices are listed per page. Click the page number shown below the list to see the devices on the subsequent pages.
Step 5 ![]() Choose the desired device by clicking the device name.
Choose the desired device by clicking the device name.
The Details and Rooms tabs appear.
Step 6 ![]() Click the Details tab to choose the templates.
Click the Details tab to choose the templates.
The following templates are available: Building View, Floor Plan, and Conference Room.
Step 7 ![]() To add the building view as the signage content, perform the following steps:
To add the building view as the signage content, perform the following steps:
a. ![]() Choose Building View from the Template drop-down list.
Choose Building View from the Template drop-down list.
b. ![]() Enter the title of the template in the Title field.
Enter the title of the template in the Title field.
c. ![]() Click the Rooms tab.
Click the Rooms tab.
The Available Rooms and Included Rooms lists appear. The Available Rooms list contains the available rooms for a location. The Included Rooms list contains the conference rooms that are included for the building view.
d. ![]() To add a room to the template, choose the room and click
To add a room to the template, choose the room and click  .
.
e. ![]() To select and move all rooms from the Available List to the Included List, click
To select and move all rooms from the Available List to the Included List, click  .
.
f. ![]() To remove any of the included rooms from the configuration, select the room and click
To remove any of the included rooms from the configuration, select the room and click  .
.
g. ![]() To choose and move all rooms from the Included List to the Available List, click
To choose and move all rooms from the Included List to the Available List, click  .
.
h. ![]() To move a room to the top of the list, choose the room and click
To move a room to the top of the list, choose the room and click  .
.
i. ![]() To move a room to the bottom of the list, choose the room and click
To move a room to the bottom of the list, choose the room and click  .
.
j. ![]() To move the conference room up in the list, choose the room and click
To move the conference room up in the list, choose the room and click  .
.
k. ![]() To move the conference room down in the list, choose the room and click
To move the conference room down in the list, choose the room and click  .
.
Note ![]() These buttons are also available for the Floor Plan and Conference Room templates.
These buttons are also available for the Floor Plan and Conference Room templates.
Step 8 ![]() To add a floor plan as the signage content, perform the following steps:
To add a floor plan as the signage content, perform the following steps:
a. ![]() Choose Floor Plan from the Template drop-down list.
Choose Floor Plan from the Template drop-down list.
b. ![]() Enter the title of the template in the Title field.
Enter the title of the template in the Title field.
c. ![]() Click Browse and locate an image of the floor plan.
Click Browse and locate an image of the floor plan.
The Upload dialog box appears.
d. ![]() Click Upload to upload the image.
Click Upload to upload the image.
The uploaded image appears in the form of a hyperlink. Click the hyperlink to preview the uploaded image.
e. ![]() Click the Rooms tab to add the conference rooms to the floor plan.
Click the Rooms tab to add the conference rooms to the floor plan.
The Available Rooms and Included Rooms lists appear. The Available Rooms list contains the available rooms for a location. The Included Rooms list contains the rooms which are included for the floor plan.
f. ![]() To add a room to the template, choose the room and click .
To add a room to the template, choose the room and click .
g. ![]() Click Set Room Position to set the position of the rooms in the floor plan. The names of all the included conference rooms will be displayed at the top left.
Click Set Room Position to set the position of the rooms in the floor plan. The names of all the included conference rooms will be displayed at the top left.
h. ![]() Drag the room icon in the floor plan to set the location of the room in the floor plan.
Drag the room icon in the floor plan to set the location of the room in the floor plan.
i. ![]() Click Map Position and Close to confirm the setting of the room and close the window.
Click Map Position and Close to confirm the setting of the room and close the window.
Step 9 ![]() To add the signage content for the conference rooms, perform the following steps:
To add the signage content for the conference rooms, perform the following steps:
a. ![]() Choose Conference Room from the Template drop-down list.
Choose Conference Room from the Template drop-down list.
b. ![]() Enter the title of the template in the Title field.
Enter the title of the template in the Title field.
c. ![]() Click the Rooms tab.
Click the Rooms tab.
The Available Conference Rooms and Included Conference Rooms lists appear. The Available Rooms list contains the available rooms for the location. The Included Rooms list contains the conference rooms that are included for the conference room plan.
d. ![]() To add a conference room to the template, choose the room and click .
To add a conference room to the template, choose the room and click .
e. ![]() Choose a conference room from the Included Conference Room list, and check the Primary Conference Room check box to make the room the primary preference. You can add only two primary rooms for a conference room template.
Choose a conference room from the Included Conference Room list, and check the Primary Conference Room check box to make the room the primary preference. You can add only two primary rooms for a conference room template.
The schedule details of the primary conference rooms are displayed prominently on the digital signage/IEC.
Step 10 ![]() (Optional) Click Clear to clear the entry.
(Optional) Click Clear to clear the entry.
Step 11 ![]() Click Save to save the signage content.
Click Save to save the signage content.
Note ![]() The reserved conference rooms are displayed in orange, and the available conference rooms are displayed in green on the digital signage/IEC. The
The reserved conference rooms are displayed in orange, and the available conference rooms are displayed in green on the digital signage/IEC. The  icon is displayed for rooms released automatically or manually.
Step 12 ![]() (Optional) Click Cancel to cancel the addition of the signage.
(Optional) Click Cancel to cancel the addition of the signage.
Viewing Signage Content
To view the signage content, perform the following steps:
Step 1 ![]() Log in to the Smart+Connected MS portal.
Log in to the Smart+Connected MS portal.
The home page appears.
Step 2 ![]() Click the Signage Content tab.
Click the Signage Content tab.
The Digital Signage area appears. It is divided into two panes. The left pane displays the location hierarchy, and the right pane displays the digital signage details.
Step 3 ![]() In the left pane, right-click the Location Hierarchy folder, and click Expand to view all the associated locations. Alternatively, click the plus sign next to a location name to view its child locations.
In the left pane, right-click the Location Hierarchy folder, and click Expand to view all the associated locations. Alternatively, click the plus sign next to a location name to view its child locations.
Step 4 ![]() Click a location name in the Location Hierarchy.
Click a location name in the Location Hierarchy.
The DMPs/IECs that are associated with the location are displayed in the Digital Signage area. The following details are shown for the DMPs/IECs:
•![]() Device Name—Name of the digital media player.
Device Name—Name of the digital media player.
•![]() Model—Name of the model.
Model—Name of the model.
•![]() Location—Location with which the digital media player is associated.
Location—Location with which the digital media player is associated.
Step 5 ![]() Choose a DMP/IEC that you want by clicking the device name.
Choose a DMP/IEC that you want by clicking the device name.
The Details and Rooms tabs appear.
Click these tabs to view the following signage content:
•![]() Details—To view the signage template that is added to the DMP/IEC using this tab.
Details—To view the signage template that is added to the DMP/IEC using this tab.
•![]() Rooms—To view the conference room that is added to the signage content using this tab.
Rooms—To view the conference room that is added to the signage content using this tab.
Editing Signage Content
To edit the signage content, perform the following steps:
Step 1 ![]() Log in to the Smart+Connected MS portal.
Log in to the Smart+Connected MS portal.
The home page appears.
Step 2 ![]() Click the Signage Content tab.
Click the Signage Content tab.
The Digital Signage area appears. It is divided into two panes. The left pane displays the location hierarchy, and the right pane displays the digital signage details.
Step 3 ![]() In the left pane, right-click the Location Hierarchy folder, and click Expand to view all the associated locations. Alternatively, click the plus sign that is displayed next to a location name to view its child locations.
In the left pane, right-click the Location Hierarchy folder, and click Expand to view all the associated locations. Alternatively, click the plus sign that is displayed next to a location name to view its child locations.
Step 4 ![]() Click a location name in the Location Hierarchy folder.
Click a location name in the Location Hierarchy folder.
The DMPs/IECs that are associated to the location are displayed in the Digital Signage area.
Step 5 ![]() Choose a device that you want by clicking the device row.
Choose a device that you want by clicking the device row.
The Details and Rooms tabs appear.
Step 6 ![]() Make the necessary changes on the Details and Rooms tabs.
Make the necessary changes on the Details and Rooms tabs.
Step 7 ![]() Click Save to save the changes that you made.
Click Save to save the changes that you made.
 Feedback