Cisco Smart+Connected Meeting Spaces Customization Guide
Bias-Free Language
The documentation set for this product strives to use bias-free language. For the purposes of this documentation set, bias-free is defined as language that does not imply discrimination based on age, disability, gender, racial identity, ethnic identity, sexual orientation, socioeconomic status, and intersectionality. Exceptions may be present in the documentation due to language that is hardcoded in the user interfaces of the product software, language used based on RFP documentation, or language that is used by a referenced third-party product. Learn more about how Cisco is using Inclusive Language.
- Updated:
- October 20, 2013
Chapter: Customizing Cisco Smart+Connected Meeting Spaces
Customizing Cisco Smart+Connected Meeting Spaces
This chapter describes how to customize the Cisco Smart+Connected Meeting Spaces (Smart+Connected MS) admin and user portals and the icons that appear when you access the Smart+Connected MS thorough IP phones.
•![]() Customizing the Branding Images for the Admin Portal
Customizing the Branding Images for the Admin Portal
•![]() Customizing the Kiosk Interface
Customizing the Kiosk Interface
Customizing the User Portal
•![]() Changing the Login Screen Image
Changing the Login Screen Image
Creating a Theme
To create a theme for the user portal, you have to create a new skin.css file that includes the styles for all the application pages. You need to create a folder within the themes folder in the war, and add the theme images and the new CSS file to this folder. Once this is done, you have to update the properties file to point to the new CSS file.
To create a theme, perform the following steps:
Step 1 ![]() Navigate to the <SMART+CONNECTED MS_INSTALL_HOME>/pkg-apps directory and extract the Smart_Connected_Meeting_Spaces_and_Digital_Signage.ear file by using any archive utility.
Navigate to the <SMART+CONNECTED MS_INSTALL_HOME>/pkg-apps directory and extract the Smart_Connected_Meeting_Spaces_and_Digital_Signage.ear file by using any archive utility.

Note ![]() The <SMART+CONNECTED MS_INSTALL_HOME> tag refers to the path where you have installed the Smart+Connected MS application.
The <SMART+CONNECTED MS_INSTALL_HOME> tag refers to the path where you have installed the Smart+Connected MS application.
Step 2 ![]() In the extracted ear file, navigate to calendar/css/themes.
In the extracted ear file, navigate to calendar/css/themes.
Step 3 ![]() Create a new skin folder in the themes folder. For example, red.
Create a new skin folder in the themes folder. For example, red.
Step 4 ![]() Create a folder called images inside the new skin folder.
Create a folder called images inside the new skin folder.
Step 5 ![]() Place the images for the new theme inside the images folder.
Place the images for the new theme inside the images folder.
Step 6 ![]() Create a new css with the following classnames and definitions:
Create a new css with the following classnames and definitions:
a. ![]() Classnames for the login screen:
Classnames for the login screen:
–![]() .login-logo-name
.login-logo-name
–![]() .rounded_box
.rounded_box
–![]() .small_btn
.small_btn
–![]() .content_inner
.content_inner
–![]() .login-footer
.login-footer
–![]() body
body
b. ![]() Classnames for the home page:
Classnames for the home page:
–![]() #header_inner .page_name
#header_inner .page_name
–![]() .user_details
.user_details
–![]() .navigation_wrapper
.navigation_wrapper
–![]() .navigation li.active
.navigation li.active
–![]() ul.tabs li
ul.tabs li
–![]() .main_btn
.main_btn
–![]() .input_style
.input_style
–![]() .tab-content .search
.tab-content .search
–![]() .default_box
.default_box
–![]() .pagination li
.pagination li
c. ![]() Classnames for the Reservation Details page:
Classnames for the Reservation Details page:
–![]() .breadcrumbs_wrapper
.breadcrumbs_wrapper
–![]() .breadcrumbs li
.breadcrumbs li
–![]() .info_bar
.info_bar
–![]() .rounded_box
.rounded_box
–![]() .ui-state-default, .ui-widget-content .ui-state-default, .ui-widget-header .ui-state-default
.ui-state-default, .ui-widget-content .ui-state-default, .ui-widget-header .ui-state-default
–![]() textarea
textarea
–![]() .input_style
.input_style
d. ![]() Classnames for the booking popup:
Classnames for the booking popup:
–![]() .popup, #repeat_popup
.popup, #repeat_popup
–![]() .small_btn
.small_btn
e. ![]() Classnames for the Rooms and Participants page:
Classnames for the Rooms and Participants page:
–![]() .info_bar span, .info_bar span a
.info_bar span, .info_bar span a
–![]() .link_1
.link_1
–![]() .previous
.previous
–![]() .grid_header
.grid_header
–![]() .grid_time_list ul li
.grid_time_list ul li
–![]() .grid_title
.grid_title
–![]() .free
.free
–![]() .avail_grid
.avail_grid
–![]() .resource_result_list li
.resource_result_list li
Note ![]() You can provide your preferred colors in the class definitions, where ever applicable, while creating the css file.
You can provide your preferred colors in the class definitions, where ever applicable, while creating the css file.
Step 7 ![]() Name the css as skin_abc.css. Where abc refers to the skin color. For example, red.
Name the css as skin_abc.css. Where abc refers to the skin color. For example, red.
Step 8 ![]() Place the new css in the new theme folder created in Step 3.
Place the new css in the new theme folder created in Step 3.
Step 9 ![]() Navigate to the <SMART+CONNECTED MS_INSTALL_HOME>/pkg-apps/application.properties file.
Navigate to the <SMART+CONNECTED MS_INSTALL_HOME>/pkg-apps/application.properties file.
Step 10 ![]() To apply the new theme, update the skin_name property value to point to the new css. For example:
To apply the new theme, update the skin_name property value to point to the new css. For example:
skin_name=red
Note ![]() It is necessary that you restart the application to enable the changes.
It is necessary that you restart the application to enable the changes.
Changing the Login Screen Image
To change the login screen image, perform the following steps:
Step 1 ![]() Open the Smart_Connected_Meeting_Spaces_and_Digital_Signage.ear file.
Open the Smart_Connected_Meeting_Spaces_and_Digital_Signage.ear file.
Step 2 ![]() Navigate to the calendar/themes folder and replace the login.png image with the new login image.
Navigate to the calendar/themes folder and replace the login.png image with the new login image.
Note ![]() Ensure that the new image is of the same format and dimensions as the existing login screen image, that is, a JPEG image of 1024*643 (width*height).
Ensure that the new image is of the same format and dimensions as the existing login screen image, that is, a JPEG image of 1024*643 (width*height).
Customizing the User Portal
You can customize the Smart+Connected MS user portal by changing the images and other UI elements in the application pages.
To customize the images, you need to replace the existing images in the Smart_Connected_Meeting_Spaces_and_Digital_Signage.ear/calendar/images folder with the customized images.
Note ![]() For customizing the UI elements other than the images mentioned below, you need to provide details such as your preferred color, border, background and so on (where ever applicable) as the class definition. For more information, refer to the section "Creating a Theme" section.
For customizing the UI elements other than the images mentioned below, you need to provide details such as your preferred color, border, background and so on (where ever applicable) as the class definition. For more information, refer to the section "Creating a Theme" section.
•![]() Customizing the Reservation Details Page
Customizing the Reservation Details Page
•![]() Customizing the Booking Popup
Customizing the Booking Popup
•![]() Customizing the Rooms and Participants Page
Customizing the Rooms and Participants Page
Customizing the Login Screen
Figure 1-1 displays the images and UI elements you can customize in the login screen of the Smart+Connected MS user portal.
Figure 1-1
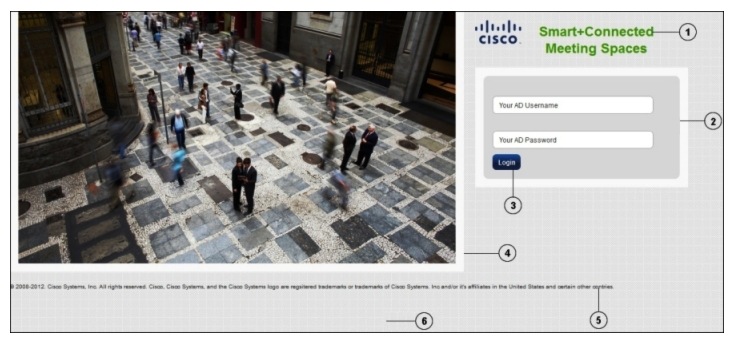
Customizable Aspects of the Login Screen
Table 1-1 lists the UI elements that can be customized and the details
NA=Not Applicable
Customizing the Home Page
Figure 1-2 displays the images and UI elements you can customize in the home page of the Smart+Connected MS user portal.
Figure 1-2
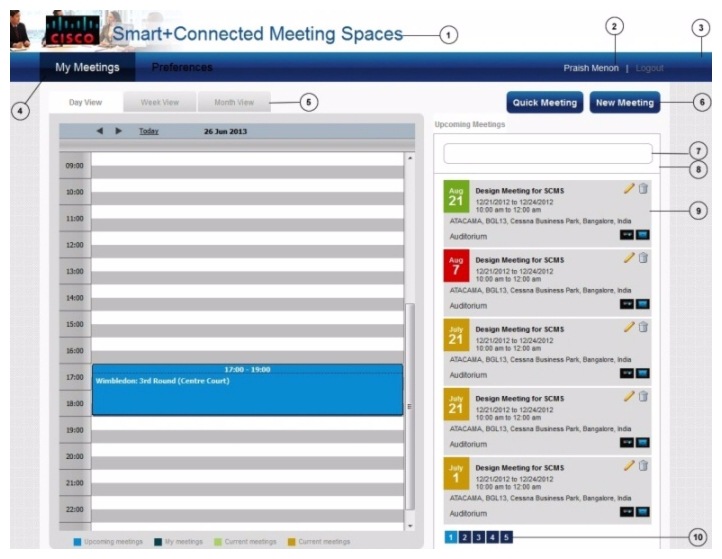
Customizable Aspects of the Home Page
Table 1-2 lists the UI elements that can be customized and the details for them.
NA=Not Applicable
Customizing the Reservation Details Page
Figure 1-3 displays the images and UI elements you can customize in the Reservation Details page.
Figure 1-3 Customizable Aspects of the Reservation Details Page
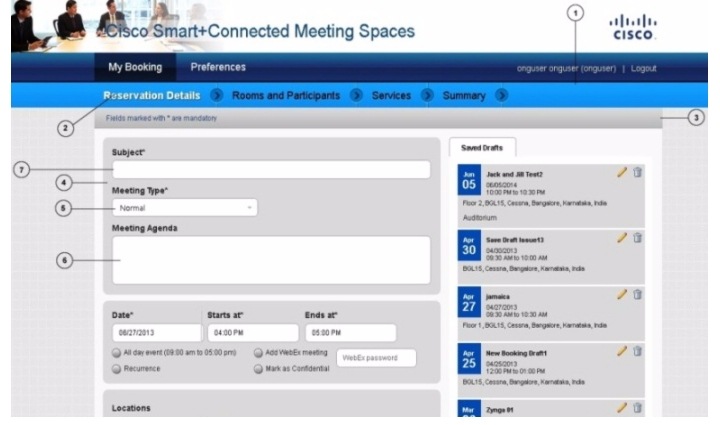
Table 1-3 lists the UI elements that can be customized and the details for them.
NA=Not Applicable
Customizing the Booking Popup
Figure 1-4 displays the elements you can customize in the booking popup.
Figure 1-4
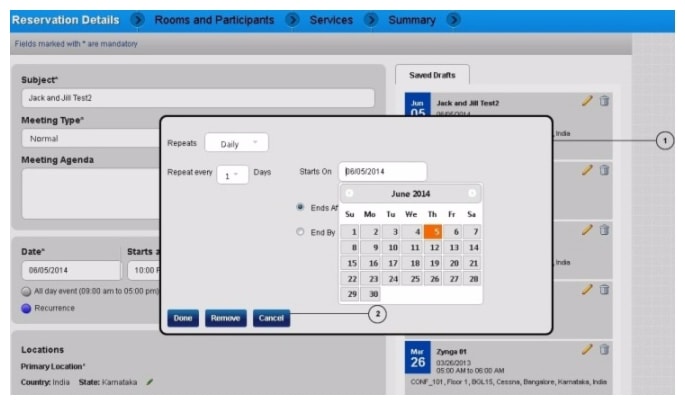
Customizable Aspects of the Booking Popup
Table 1-4 lists the UI elements that can be customized and the details for them.
|
|
|
|
|
|
|---|---|---|---|---|
1 |
Popup Appearance |
.popup, #repeat_popup |
NA |
NA |
2 |
Small Button Background |
btn_bg_small.png |
1 |
28 |
NA=Not Applicable
Customizing the Rooms and Participants Page
Figure 1-5 displays the images and UI elements you can customize in the Rooms and Participants page.
Figure 1-5
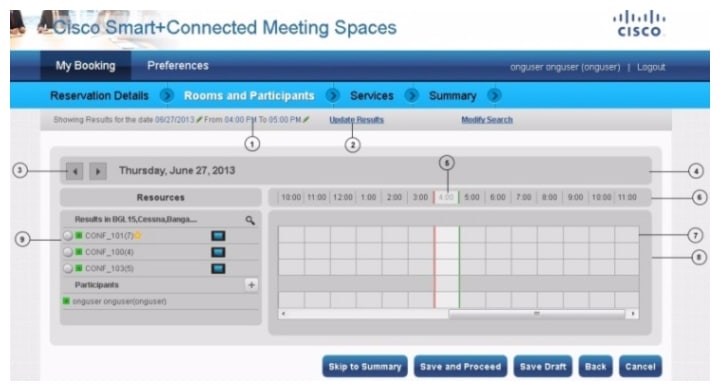
Customizable Aspects of the Room and Participants Page
Table 1-5 lists the UI elements that can be customized and the details for them.
NA=Not Applicable
Customizing the Branding Images for the Admin Portal
Certain images in the Smart+Connected MS admin portal can be changed or branded as per customer needs. You can customize the admin interface by changing one or more of these images.
The images that you replace must have the same name and dimensions as the per the specifications that are provided in the Table 1-6.
To customize the branding images, perform the following steps:
Step 1 ![]() Open the Smart_Connected_Meeting_Spaces_and_Digital_Signage.ear file.
Open the Smart_Connected_Meeting_Spaces_and_Digital_Signage.ear file.
Step 2 ![]() Navigate to the folders as mentioned in Table 1-6 to replace the Login page image and the logo images.
Navigate to the folders as mentioned in Table 1-6 to replace the Login page image and the logo images.
Note ![]() It is recommended to have transparent background images. You must re-deploy the Smart_Connected_Meeting_Spaces_and_Digital_Signage.ear file to enable changes to the branding images.
It is recommended to have transparent background images. You must re-deploy the Smart_Connected_Meeting_Spaces_and_Digital_Signage.ear file to enable changes to the branding images.
Customizing IP Phone Icons
You can customize the icons that appear when you use the Smart+Connected MS service through touchscreen IP phones. The Cisco Unified IP phone models 7975 and 9971 use similar icon images but with different resolution and dimensions. All the customizable images can be obtained as a zip file from the deployment team. This file contains separate image folders for 7975 and 9971.
Note ![]() Ensure that the customized images have the same image name and dimensions as that of the images provided to you.
Ensure that the customized images have the same image name and dimensions as that of the images provided to you.
Customizing the Kiosk Interface
•![]() Changing the Kiosk Interface Theme
Changing the Kiosk Interface Theme
•![]() Changing the Background Color for Neighborhoods
Changing the Background Color for Neighborhoods
Changing the Kiosk Interface Theme
By default, the theme of the kiosk interface is grey. You can change it to blue.
Step 1 ![]() Navigate to the <SMART+CONNECTED MS_INSTALL_HOME>/pkg-apps/application.properties file.
Navigate to the <SMART+CONNECTED MS_INSTALL_HOME>/pkg-apps/application.properties file.
Step 2 ![]() To change the theme to blue, update the maps_theme property value. For example:
To change the theme to blue, update the maps_theme property value. For example:
maps_theme=blue
Note ![]() It is necessary that you restart the application to enable the change.
It is necessary that you restart the application to enable the change.
Changing the Cisco Logo
You can change the Cisco logo that appears by default on the booking, check-in, and other dialogs of the kiosk interface and the kiosk web portal.
To change the Cisco logo, perform the following steps:
Step 1 ![]() Navigate to the <SMART+CONNECTED MS_INSTALL_HOME>/pkg-apps directory and extract the Smart_Connected_Meeting_Spaces_and_Digital_Signage.ear file by using any archive utility.
Navigate to the <SMART+CONNECTED MS_INSTALL_HOME>/pkg-apps directory and extract the Smart_Connected_Meeting_Spaces_and_Digital_Signage.ear file by using any archive utility.
Step 2 ![]() Navigate to the spaces/images folder and replace the logo.png image with the new login image.
Navigate to the spaces/images folder and replace the logo.png image with the new login image.
Note ![]() Ensure that the new image is of the same dimensions and format as the existing logo image, that is, a png image of the size 165*115 (width*height).
Ensure that the new image is of the same dimensions and format as the existing logo image, that is, a png image of the size 165*115 (width*height).
Changing the Background Color for Neighborhoods
You can change the background colors that mark the workspaces occupied by specific team or business units, that is, the different neighborhoods that are displayed on the kiosks and the kiosk web portal.
In the ORGANIZATIONS table in the Smart+Connected MS database, enter the required HTML color codes prefixed with a # in the COLOUR column for the neighborhoods.
 Feedback