Cisco 4x InfiniBand Switch Module for IBM Blade Center User Guide
Bias-Free Language
The documentation set for this product strives to use bias-free language. For the purposes of this documentation set, bias-free is defined as language that does not imply discrimination based on age, disability, gender, racial identity, ethnic identity, sexual orientation, socioeconomic status, and intersectionality. Exceptions may be present in the documentation due to language that is hardcoded in the user interfaces of the product software, language used based on RFP documentation, or language that is used by a referenced third-party product. Learn more about how Cisco is using Inclusive Language.
- Updated:
- March 20, 2015
Chapter: Installing and Configuring the Server Switch
Installing and Configuring the Server Switch
This chapter describes installing and configuring the Server Switch Module and configuring the password and system clock, Additional configuring includes synchronizing with NTP and extending an InfiniBand fabric
This chapter contains the following sections:
•![]() Installing the Server Switch Module
Installing the Server Switch Module
•![]() Downloading Operating System Software from Cisco.com
Downloading Operating System Software from Cisco.com
•![]() Configuring the Server Switch Module
Configuring the Server Switch Module
•![]() Connecting Beyond BladeCenter
Connecting Beyond BladeCenter
Installing the Server Switch Module
To install the Cisco Server Switch Module, follow these steps:
Step 1 ![]() Ensure that you are properly grounded by attaching the ESD wrist strap to bare skin and attaching the clip on the other end to unpainted metal.
Ensure that you are properly grounded by attaching the ESD wrist strap to bare skin and attaching the clip on the other end to unpainted metal.
Step 2 ![]() Choose the I/O slot into which you want to install the Server Switch Module. You must install the module in I/O slot 7 or slot 9.
Choose the I/O slot into which you want to install the Server Switch Module. You must install the module in I/O slot 7 or slot 9.
Step 3 ![]() Refer to your BladeCenter unit documentation for standard hardware module installation instructions.
Refer to your BladeCenter unit documentation for standard hardware module installation instructions.
Downloading Operating System Software from Cisco.com
The operating system associated with the Cisco 4x InfiniBand HCA Expansion Card for IBM BladeCenter can be downloaded from www.cisco.com by using the Technical Support & Documentation link. To download the software, follow these steps:
Step 1 ![]() Go to www.cisco.com and log in with your CCO user ID.
Go to www.cisco.com and log in with your CCO user ID.
Step 2 ![]() Click Technical Support & Documentation.
Click Technical Support & Documentation.
Step 3 ![]() Click Software Downloads.
Click Software Downloads.
Step 4 ![]() Click Server Networking & Virtualization Software.
Click Server Networking & Virtualization Software.
Step 5 ![]() Click Cisco InfiniBand Switch Module for IBM BladeCenter to obtain the operating system
Click Cisco InfiniBand Switch Module for IBM BladeCenter to obtain the operating system
TopspinOS v2.6.0.
The software is an ISO image.
Step 6 ![]() Burn the ISO image onto a CD.
Burn the ISO image onto a CD.
The ISO image contains the latest switch operating system software, release notes and other documentation.
Configuring the Server Switch Module
To configure the Cisco InfiniBand Server Switch Module, follow these steps:
Step 1 ![]() Open the BladeCenter Chassis Manager log-in screen by launching a Web browser and entering the IP address of the BladeCenter chassis in the address bar.
Open the BladeCenter Chassis Manager log-in screen by launching a Web browser and entering the IP address of the BladeCenter chassis in the address bar.
Step 2 ![]() Log in.
Log in.
The BladeCenter Chassis Manager interface appears.
Step 3 ![]() Expand I/O Module Tasks in the left-hand navigation tree.
Expand I/O Module Tasks in the left-hand navigation tree.
Step 4 ![]() Select Management under I/O Module Tasks in the left pane.
Select Management under I/O Module Tasks in the left pane.
An I/O Module Management heading appears in the display.
Step 5 ![]() Click the link of the physical slot that holds the Server Switch Module that you want to configure.
Click the link of the physical slot that holds the Server Switch Module that you want to configure.
A heading appears, where X is the number of the slot.
Step 6 ![]() Enter an IP address for the Server Switch Module in the IP address field of the New Static IP Configuration section.
Enter an IP address for the Server Switch Module in the IP address field of the New Static IP Configuration section.

Note ![]() The IP address of the Server Switch Module must fall in the same subnet as the modules in the other slots.
The IP address of the Server Switch Module must fall in the same subnet as the modules in the other slots.
Step 7 ![]() Enter a subnet mask or the Server Switch Module in the Subnet mask field of the New Static IP Configuration section.
Enter a subnet mask or the Server Switch Module in the Subnet mask field of the New Static IP Configuration section.
Note ![]() The subnet mask of the Server Switch Module must match the subnet mask of the modules in the other slots.
The subnet mask of the Server Switch Module must match the subnet mask of the modules in the other slots.
Step 8 ![]() Enter a gateway IP address for the Server Switch Module in the Gateway address field of the New Static IP Configuration section, and then click Save.
Enter a gateway IP address for the Server Switch Module in the Gateway address field of the New Static IP Configuration section, and then click Save.
Note ![]() The gateway address of the Server Switch Module must match the gateway address of the modules in the other slots.
The gateway address of the Server Switch Module must match the gateway address of the modules in the other slots.
Step 9 ![]() Open a Telnet session to the Server Switch Module with the IP address that you configured in Step 6. Log in to your Server Switch Module, and then proceed to "Changing the Default Password" to secure your Server Switch Module. Log in with the default user name of USERID and password of PASSW0RD, where the 0 in PASSW0RD is a zero.
Open a Telnet session to the Server Switch Module with the IP address that you configured in Step 6. Log in to your Server Switch Module, and then proceed to "Changing the Default Password" to secure your Server Switch Module. Log in with the default user name of USERID and password of PASSW0RD, where the 0 in PASSW0RD is a zero.
Switch(Cisco BladeCenter)
Cisco BladeCenter login: USERID
Password: xxxxxxxx
Cisco BladeCenter>
Changing the Default Password
Change the default password immediately to secure your Server Switch. To change the default administrative password, follow these steps:
Step 1 ![]() Switch to Privileged Exec mode by entering the enable command.
Switch to Privileged Exec mode by entering the enable command.
Cisco BladeCenterH> enable
Cisco BladeCenterH#Switch to Global Configuration mode by entering the configure terminal
command.
Cisco BladeCenterH# configure terminal
Cisco BladeCenterH(config)#
Step 2 ![]() Change the password of the user ID by entering the username command. Include the following:
Change the password of the user ID by entering the username command. Include the following:
•![]() User ID for which you need to change the password (in this case, USERID)
User ID for which you need to change the password (in this case, USERID)
•![]() password keyword
password keyword
•![]() New password that you want to apply to the user ID
New password that you want to apply to the user ID
Cisco BladeCenterH(config)# username USERID password n0accE$$
Step 3 ![]() Return to User Exec mode by entering the exit command with the all keyword.
Return to User Exec mode by entering the exit command with the all keyword.
Cisco BladeCenterH(config)# exit all
Cisco BladeCenterH>
Configuring the System Clock
Configure your system clock immediately so that all system messages include accurate timestamps. You can either configure the clock setting on the onboard Server Switch clock, or you can synchronize your Server Switch to a network time protocol (NTP) server.
To configure the clock settings on the onboard clock, follow these steps:
Step 1 ![]() Switch to Privileged Exec mode by entering the enable command.
Switch to Privileged Exec mode by entering the enable command.
Cisco BladeCenterH> enable
Cisco BladeCenterH#
Step 2 ![]() Set the on-board clock by entering the clock set command with the following variables:
Set the on-board clock by entering the clock set command with the following variables:
•![]() the time of day in hh:mm:ss format
the time of day in hh:mm:ss format
•![]() the day in dd format
the day in dd format
•![]() the month in mm format
the month in mm format
•![]() the year in yy format
the year in yy format
The example that follows sets the date to 1:45 am on June 3rd, 2004:
Cisco BladeCenterH# clock set 01:45:00 03 06 04
To configure primary, secondary, and tertiary NTP servers to synchronize the Server Switch with the network, follow these steps:
Step 1 ![]() Switch to Privileged Exec mode by entering the enable command.
Switch to Privileged Exec mode by entering the enable command.
Cisco BladeCenterH> enable
Cisco BladeCenterH#
Step 2 ![]() Switch to Global Configuration mode by entering the configure terminal command.
Switch to Global Configuration mode by entering the configure terminal command.
Cisco BladeCenterH# configure terminal
Cisco BladeCenterH(config)#
Step 3 ![]() Assign a primary NTP server by entering the ntp command with this information:
Assign a primary NTP server by entering the ntp command with this information:
•![]() server-one keyword
server-one keyword
•![]() IP address of the NTP server
IP address of the NTP server
Cisco BladeCenterH(config)# ntp server-one 10.2.0.13
Step 4 ![]() (Optional, Recommended) Assign a secondary NTP server by entering the ntp command with this information:
(Optional, Recommended) Assign a secondary NTP server by entering the ntp command with this information:
•![]() server-two keyword
server-two keyword
•![]() IP address of the NTP server
IP address of the NTP server
Cisco BladeCenterH(config)# ntp server-two 10.2.0.14
Step 5 ![]() (Optional, Recommended) Assign a tertiary NTP server by entering the ntp command with this information:
(Optional, Recommended) Assign a tertiary NTP server by entering the ntp command with this information:
•![]() server-three keyword
server-three keyword
•![]() IP address of the NTP server
IP address of the NTP server
Cisco BladeCenterH(config)# ntp server-three 10.2.0.15
Connecting Beyond BladeCenter
To extend your InfiniBand fabric beyond your BladeCenter cluster, you must configure the priority of the subnet manager on your Server Switch Module, then connect one or more of the external interfaces on your Server Switch Module to an outside InfiniBand fabric.
The device with the highest subnet manager priority becomes the master subnet manager in the InfiniBand network. To configure subnet manager priority, follow these steps:
Step 1 ![]() Switch to Privileged Exec mode by entering the enable command.
Switch to Privileged Exec mode by entering the enable command.
Cisco BladeCenterH> enable
Cisco BladeCenterH#
Step 2 ![]() Switch to Global Configuration mode by entering the configure command.
Switch to Global Configuration mode by entering the configure command.
Cisco BladeCenterH# configure
Cisco BladeCenterH(config)#
Step 3 ![]() Configure the priority of the subnet manager by entering the ib sm command with this information:
Configure the priority of the subnet manager by entering the ib sm command with this information:
•![]() subnet-prefix keyword
subnet-prefix keyword
•![]() Subnet prefix of the InfiniBand network to which the Server Switch belongs
Subnet prefix of the InfiniBand network to which the Server Switch belongs
•![]() priority keyword
priority keyword
•![]() Priority integer value of the subnet manager (1 is the lowest the priority)
Priority integer value of the subnet manager (1 is the lowest the priority)
Cisco BladeCenterH(config)# ib sm subnet-prefix fe:80:00:00:00:00:00:00 priority 1
Step 4 ![]() Exit Global Configuration mode.
Exit Global Configuration mode.
Cisco BladeCenterH(config)#exit
Cisco BladeCenterH#
Step 5 ![]() Save the configuration by entering the copy running-config startup-config command.
Save the configuration by entering the copy running-config startup-config command.
Cisco BladeCenterH# copy running-config startup-config
Cisco BladeCenterH#
After you configure your subnet manager priority, connect your Server Switch Module to the outside InfiniBand fabric. By default, the external interfaces on your Server Switch Module auto-negotiate speed with the fabric.
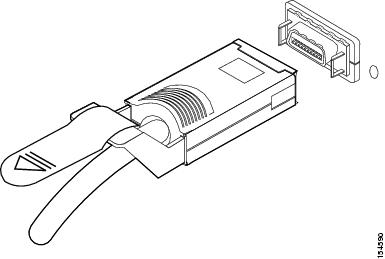
Connecting InfiniBand Cables
To plug in an InfiniBand cable, push the connector into the interface until you hear/feel a click.
To remove a cable with a pull connector, grasp the connector with one hand and push it toward the port, then pull the latch away from the port with your other hand and gently wiggle the connector away from the port.
Figure 2-1 Removing a Pull Connector
 Feedback