Manage Organizations and Users

This chapter describes how to manage organizations and users in Threat Grid. It includes the following topics:

Introduction

Threat Grid is installed on the appliance with a default organization and Admin user. Once the appliance is set up and the network configuration is completed, you can create additional organization and user accounts, so people can login and begin submitting malware samples for analysis.

Adding organizations, users, and administrators may require planning and coordination among multiple users and teams, depending on your organization.

Create New Organization

Users are always affiliated with an organization; before you can add users, you must first create the organization so you can add them to it.


Important


You cannot delete an organization from this interface once it has been created so plan this task carefully.


Procedure


Step 1

Log into the Threat Grid portal as Admin.

Step 2

Click the Administration menu and choose Manage Organization. The Organizations page opens shows all the organizations on the appliance.

Step 3

Click New Organization in the upper-right corner of the page to open the New Organization dialog.

Step 4

Complete the following information:

  • Name - Add a name for the organization (there is currently no size limit to the name).

  • Industry - Select the type of business from the Industry drop-down menu. If none of the industries on the list are applicable, then leave it set to Unknown, and contact Threat Grid support (support@threatgrid.com) to request that an option be added.

  • ATS Id - Enter the Advanced Threat Services ID.

Step 5

Click Submit. The new organization is created and is now visible in the list of Organizations.

Step 6

Edit the newly created organization and complete the following information:

  • Options - Complete as appropriate.

  • Rate Limit - Set the default user submission rate limit.

    The API rate limit is global for the appliance under the terms of the license agreement. This affects API submissions only, not manual sample submissions. The rate limit in the license applies to the organization.

    You can also set sample submission rates on individual users, as documented in Using Threat Grid in the online Help (from the navigation bar click Help > Using Threat Grid Online Help).

    Rate limits are based on a 24-hour window of rolling time, not to a calendar day. When the submission limit is exhausted, the next API submission will return a 429 error, plus a message about how long to wait before retrying.

Once the organization is created, the Admin or Organization Admin can manage it (see Managing Organizations in the online Help.


Manage Users

For instructions and documentation on creating and managing user accounts, including how to add users, see the Threat Grid Portal UI online help:

In the navigation bar, click Help > Using Threat Grid Online Help > Managing Threat Grid Users.


Note


Users can only be removed via the API, and only if they have submitted no samples.

Managing device user accounts for integrating Cisco Email Security Appliance, Web Security Appliance, and other devices is described in Activate New Device User Account.


Activate New Device User Account

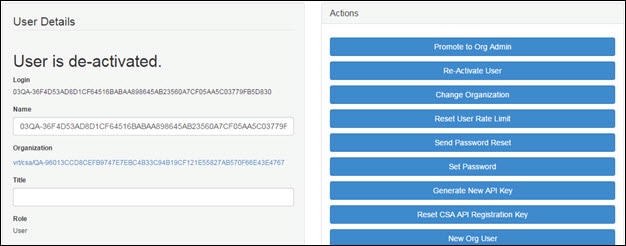
When the Cisco Email Security Appliance, Web Security Appliance, or other Cisco Sandbox API integration connects and registers itself with a Threat Grid Appliance, a new Threat Grid user account is automatically created. The initial status of the user account is de-activated. The device user account must be manually activated by a Threat Grid Appliance administrator before it can be used for submitting malware samples for analysis.

Procedure


Step 1

Log into the Threat Grid Portal UI as Admin.

Step 2

Click the Administration menu and choose Manage Users. The Threat Grid User Details page opens.

Step 3

Locate the device user account and open the User Details page. The user status is currently de-activated.

Figure 1. User Details

Step 4

Click Re-Activate User. A dialog opens asking you to confirm.

Step 5

On the confirmation dialog, click Re-Activate User to confirm the action.

The ESA/WSA or other integrating appliance or device can now communicate with the Threat Grid Appliance.