Centralized Policy, Virus, and Outbreak Quarantines

This chapter contains the following sections:

Overview of Centralized Quarantines

Messages processed by certain filters, policies, and scanning operations on an Email Security appliance can be placed into quarantines to temporarily hold them for further action. You can centralize quarantines from multiple Email Security appliances on a Cisco Content Security Management appliance.

Benefits of centralizing quarantines include the following:

  • You can manage quarantined messages from multiple Email Security appliances in one location.

  • Quarantined messages are stored behind the firewall instead of in the DMZ, reducing security risk.

  • Centralized quarantines can be backed up as part of the standard backup functionality on the Security Management appliance.

Anti-virus scanning, Outbreak Filters, and Advanced Malware Protection (File Analysis) each have a single dedicated quarantine. You create policy quarantines to hold messages that are caught by message filtering, content filtering, and Data Loss Prevention policies.

The Policy, Virus and Outbreak Quarantines section in the legacy web interface is labeled as Other Quarantines in the new web interface. For more information, see Viewing Messages in Quarantines.

For additional information about quarantines, see the documentation for your Email Security appliance.

Quarantine Types

Quarantine Type

Quarantine Name

Created by the System by Default?

Description

More Information

Advanced Malware Protection

File Analysis

Yes

Holds messages that are sent for file analysis, until a verdict is returned.

Virus

Virus

Yes

Holds messages that may be transmitting malware, as determined by the anti-virus engine.

Outbreak

Outbreak

Yes

Holds messages caught by Outbreak Filters as potentially being spam or malware.

Policy

Policy

Yes

Holds messages caught by message filters, content filters, and DLP message actions.

A default Policy quarantine has been created for you.

Unclassified

Yes

Holds messages only if a quarantine that is specified in a message filter, content filter, or DLP message action has been deleted.

You cannot assign this quarantine to any filter or message action.

(Policy quarantines that you create)

No

Policy quarantines that you create for use in message filters, content filters, and DLP message actions.

Spam

Spam

Yes

Holds spam or suspected spam messages for the message’s recipient or an administrator to review.

The spam quarantine is not included in the group of policy, virus, and outbreak quarantines and is managed separately from all other quarantines.

Spam Quarantine

Centralizing Policy, Virus, and Outbreak Quarantines

Procedure

  Command or Action Purpose
Step 1

If your Email Security appliance is in your DMZ and your Security Management appliance is behind your firewall, open a port in the firewall to allow the appliances to exchange centralized policy, virus, and outbreak quarantine data.

Firewall Information

Step 2

On the Security Management appliance, enable the feature.

Enabling Centralized Policy, Virus, and Outbreak Quarantines on the Security Management Appliance

Step 3

On the Security Management appliance, allocate disk space for non-spam quarantines.

Managing Disk Space

Step 4

(Optional)

  • Create centralized policy quarantines on the Security Management appliance with desired settings.

  • Configure settings for the centralized virus and outbreak quarantines, and for the default policy quarantines.

    If you configure these settings before migration, you can refer to the existing settings on your Email Security appliances.

    You can also create required quarantines while configuring custom migration, or quarantines will be created for you during automatic migration. All quarantines created during migration have default settings.

    Local quarantine settings are not retained in the centralized quarantine, even if the quarantine name is the same.

Step 5

On the Security Management appliance, add Email Security appliances to manage, or select the Policy, Virus and Outbreak Quarantines option from the centralized services of an already-added appliance.

  • If your Email Security appliances are clustered, all appliances that belong to a particular level (machine, group, or cluster) must be added to the Security Management appliance before you enable centralized Policy, Virus and Outbreak Quarantines on any Email Security appliance in the cluster.

Adding the Centralized Policy, Virus, and Outbreak Quarantine Service to Each Managed Email Security Appliance

Step 6

Commit your changes.

Step 7

On the Security Management appliance, configure migration of existing policy quarantines from Email Security appliances.

Configuring Migration of Policy, Virus, and Outbreak Quarantines

Step 8

On an Email Security appliance, enable the centralized policy, virus, and outbreak quarantines feature.

  • Important 

    If you have policy, virus, and outbreak quarantines configured on an Email Security appliance, migration of quarantines and all their messages begins as soon as you commit this change.

See the “Centralizing Services on a Cisco Content Security Management appliance” chapter in the documentation for your Email Security appliance, specifically the following sections:

  • “About Migration of Policy, Virus, and Outbreak Quarantines”

  • “Centralizing Policy, Virus, and Outbreak Quarantines”

Step 9

Migrate additional Email Security appliances.

  • Only one migration process can be in progress at any time. Do not enable centralized policy, virus, and outbreak quarantines on another Email Security appliance until the previous migration is complete.

Step 10

Edit centralized quarantine settings as needed.

  • Quarantines created during migration are created with default settings, not the settings in the originating local quarantines, even if the centralized and local quarantine names are the same.

Configuring Policy, Virus, and Outbreak Quarantines

Step 11

If message filters, content filters, and DLP message actions could not be automatically updated with the names of centralized quarantines, manually update those configurations on your Email Security appliances.

  • In cluster configurations, filters and message actions can be automatically updated on a particular level only if filters and message actions are defined at that level.

See the documentation for message filters, content filters, and DLP Message Actions in the online help or user guide for your Email Security appliance.

Step 12

(Recommended) Specify an Email Security appliance to process released messages if the originating appliance is not available.

Designating an Alternate Appliance to Process Released Messages

Step 13

If you delegate administration to custom user roles, you may need to configure access in a certain way.

Configuring Centralized Quarantine Access for Custom User Roles

Enabling Centralized Policy, Virus, and Outbreak Quarantines on the Security Management Appliance

Before you begin

Complete any steps preceding this procedure in the table in Centralizing Policy, Virus, and Outbreak Quarantines.

Procedure


Step 1

[New Web Interface Only] On the Security Management appliance, click to load the legacy web interface.

Step 2

Choose Management Appliance > Centralized Services > Policy, Virus, and Outbreak Quarantines.

Step 3

Click Enable.

Step 4

Specify the interface and port for communication with Email Security appliances:

  • Accept the default selections unless you have reason to change them.

  • If your Email Security appliances are not on the same network as your Security Management appliance, then you must use the Management interface.

  • Use the same port that you opened in the firewall.

Step 5

Click Submit.


What to do next

Return to the next step in the table in Centralizing Policy, Virus, and Outbreak Quarantines.

Enabling Centralized Policy, Virus, and Outbreak Quarantines on the New Web Interface of the Appliance

Before you begin

Complete any steps preceding this procedure in the table in Centralizing Policy, Virus, and Outbreak Quarantines.

Procedure


Click Enable once you are redirected to the legacy interface.


Adding the Centralized Policy, Virus, and Outbreak Quarantine Service to Each Managed Email Security Appliance

To see an consolidated view of all quarantines on all Email Security appliances, consider adding all Email Security appliances before centralizing any quarantines.

Before you begin

Make sure you have completed all procedures to this point in the table in Centralizing Policy, Virus, and Outbreak Quarantines.

Procedure


Step 1

[New Web Interface Only] On the Security Management appliance, click to load the legacy web interface.

Step 2

Choose Management Appliance > Centralized Services > Security Appliances.

Step 3

If you have already added the Email Security appliance to the list on this page:

  1. Click the name of an Email Security appliance.

  2. Select the Policy, Virus, and Outbreak Quarantines service.

Step 4

If you have not yet added the Email Security appliance:

  1. Click Add Email Appliance.

  2. In the Appliance Name and IP Address text fields, enter the appliance name and the IP address for the Management interface of the appliance you are adding.

    Note 
    If you enter a DNS name in the IP Address text field, it will be immediately resolved to an IP address when you click Submit.
  3. The Policy, Virus and Outbreak Quarantines service is pre-selected.

  4. Click Establish Connection.

  5. Enter the user name and passphrase for an administrator account on the appliance to be managed, and then click Establish Connection.

    Note 
    You enter the login credentials to pass a public SSH key for file transfers from the Security Management appliance to the remote appliance. The login credentials are not stored on the Security Management appliance.
  6. Wait for the Success message to appear above the table on the page.

Step 5

Click Submit.

Step 6

Repeat this procedure for each Email Security appliance for which you want to enable Centralized Policy, Virus, and Outbreak Quarantines.

For example, add the other appliances in the cluster.

Step 7

Commit your changes.


What to do next

Return to the next step in the table in Centralizing Policy, Virus, and Outbreak Quarantines.

Configuring Migration of Policy, Virus, and Outbreak Quarantines

Before you begin

  • Make sure that you have completed all procedures to this point in the table in Centralizing Policy, Virus, and Outbreak Quarantines
  • For caveats and information about the migration process, see the “About Migration of Policy, Virus, and Outbreak Quarantines” section in the “Centralizing Services on a Cisco Content Security Management appliance” chapter in the documentation for your Email Security appliance.

Procedure


Step 1

[New Web Interface Only] On the Security Management appliance, click to load the legacy web interface.

Step 2

Choose Management Appliance > Centralized Services > Policy, Virus, and Outbreak Quarantines.

Step 3

Click Launch Migration Wizard.

Step 4

Choose a migration method:

If

Choose

Additional Information

  • You want to migrate all existing policy quarantines from all associated Email Security appliances,

    and

  • Policy quarantines with the same names have identical settings on all Email Security appliances,

    and

  • You want to merge all policy quarantines with the same name on all Email Security appliances into a single centralized policy quarantine having that name.

Automatic

All centralized policy quarantines that are created using this process are automatically configured with default settings, regardless of the settings in the quarantines with the same names on the Email Security appliance.

You must update those settings after migration.

  • Policy quarantines with the same names have different settings on different Email Security appliances and you want to maintain the differences,

    or

  • You want to migrate some local quarantines and delete all others,

    or

  • You want to migrate local quarantines to centralized quarantines with different names

    or

  • You want to merge local quarantines with different names into a single centralized quarantine.

Custom

Any centralized policy quarantines that you create during migration, instead of before migration, will be configured with the default settings for new quarantines.

You should update those settings after migration.

Step 5

Click Next.

Step 6

If you selected Automatic:

Verify that the policy quarantines to be migrated and other information on this page match your expectations.

Virus, Outbreak, and File Analysis quarantines will also be migrated.

Step 7

If you selected Custom:

  • To select whether to show quarantines from all Email Security appliances or just one., choose an option from the Show Quarantines from: list.

  • Select which local policy quarantines move to each centralized policy quarantine.

  • Create additional centralized policy quarantines as needed. These will have default settings.

  • Quarantine names are case-sensitive.

  • Any quarantines remaining in the table on the left will not be migrated and will be deleted from the Email Security appliance upon migration.

  • You can change the quarantine mapping by selecting a quarantine from the table on the right and clicking Remove from Centralized Quarantine.

Step 8

Click Next as needed.

Step 9

Submit and commit your changes.


What to do next

Return to the next step in the table in Centralizing Policy, Virus, and Outbreak Quarantines.

Designating an Alternate Appliance to Process Released Messages

Normally, when a message is released from a centralized quarantine, the Security Management appliance returns it for processing to the Email Security appliance that originally sent it to the centralized quarantine.

If the Email Security appliance that originated a message is not available, a different Email Security appliance can process and deliver released messages. You designate the appliance for this purpose.

Before you begin

  • Verify that the alternate appliance can process and deliver released messages as expected. For example, configurations for encryption and antivirus rescanning should match the same configurations on your primary appliances.

  • The alternate appliance must be fully configured for centralized policy, virus, and outbreak quarantines. Complete the steps in the table in Centralizing Policy, Virus, and Outbreak Quarantines for that appliance.

Procedure


Step 1

[New Web Interface Only] On the Security Management appliance, click to load the legacy web interface.

Step 2

Choose Management Appliance > Centralized Services > Security Appliances.

Step 3

Click the Specify Alternate Release Appliance button.

Step 4

Choose an Email Security appliance.

Step 5

Submit and commit your changes.


What to do next

Related Topics

Releasing Messages When an Email Security Appliance Is Unavailable

Configuring Centralized Quarantine Access for Custom User Roles

In order to allow administrators with custom user roles to specify centralized policy quarantines in message and content filters and in DLP message actions on the Email Security appliance, you must grant those users access to the relevant policy quarantines on the Security Management appliance, and the custom user role names that you create on the Security Management appliance must match those on the Email Security appliance.

Related Topics

Disabling Centralized Policy, Virus, and Outbreak Quarantines

Generally, if you need to disable these centralized quarantines, you should do so on the Email Security appliance.

For information about disabling centralized policy, virus, and outbreak quarantines, including a list of impacts of doing so, see the online help or documentation for your Email Security appliance.

Releasing Messages When an Email Security Appliance Is Unavailable

Normally, when a message is released from a centralized quarantine, the Security Management appliance returns it for processing to the Email Security appliance that originally sent it to the centralized quarantine.

If the Email Security appliance that originated a message is not available, a different Email Security appliance can process and deliver released messages. You should designate an alternate release appliance for this purpose.

If the alternate appliance is unavailable, you can specify a different Email Security appliance as the alternate release appliance and that appliance will process and deliver queued messages.

After repeated unsuccessful attempts to reach an Email Security appliance. you will receive an alert.

Related Topics

Managing Policy, Virus, and Outbreak Quarantines

Disk Space Allocation for Policy, Virus, and Outbreak Quarantines

For information about allocating disk space, see Managing Disk Space.

Messages in multiple quarantines consume the same amount of disk space as a message in a single quarantine.

If Outbreak Filters and Centralized Quarantines are both enabled:

  • All disk space on the Email Security appliance that would have been allocated to local policy, virus, and outbreak quarantines is used instead to hold copies of messages in the Outbreak quarantine, in order to scan those messages each time outbreak rules are updated.

  • The disk space on the Security Management appliance for messages in the Outbreak quarantine from a particular managed Email Security appliance may be limited by the amount of available disk space for quarantined messages on that Email Security appliance.

  • For more information about this situation, see Retention Time for Messages in Quarantines

Related Topics

Retention Time for Messages in Quarantines

Messages are automatically removed from the quarantine under the following circumstances:

  • Normal Expiration—the configured retention time is met for a message in the quarantine. You specify a retention time for messages in each quarantine. Each message has its own specific expiration time, displayed in the quarantine listing. Messages are stored for the amount of time specified unless another circumstance described in this topic occurs.


    Note

    The normal retention time for messages in the Outbreak Filters quarantine is configured in the Outbreak Filters section of each mail policy, not in the outbreak quarantine.
  • Early Expiration—messages are forced from quarantines before the configured retention time is reached. This can happen when:
    • The size limit for all quarantines, as defined in Disk Space Allocation for Policy, Virus, and Outbreak Quarantines, is reached.

      If the size limit is reached, the oldest messages, regardless of quarantine, are processed and the default action is performed for each message, until the size of all quarantines is again less than the size limit. The policy is First In First Out (FIFO). Messages in multiple quarantines will be expired based on their latest expiration time.

      (Optional) You can configure individual quarantines to be exempt from release or deletion because of insufficient disk space. If you configure all quarantines to be exempt and the disk space reaches capacity messages will be held on the Email Security appliance until space is available on the Security Management appliance.

      Because the Security Management appliance does not scan messages, a copy of each message in the centralized outbreak quarantine is stored on the Email Security appliance that originally processed the message. This allows the Email Security appliance to rescan quarantined messages each time outbreak filter rules are updated, and tell the Security Management appliance to release messages that are no longer deemed a threat. Both copies of the outbreak quarantine should hold the same set of messages at all times. Therefore, in the rare situation when disk space on the Email Security appliance becomes full, then the copies of messages in the Outbreak quarantine on both appliances will expire early, even if the centralized quarantine still has space.

      You will receive alerts at disk-space milestones. See Alerts About Quarantine Disk-Space Usage.

  • You delete a quarantine that still holds messages.

When a message is automatically removed from a quarantine, the default action is performed on that message. See Default Actions for Automatically Processed Quarantined Messages.


Note

In addition to the above scenarios, messages can be automatically removed from quarantine based on the result of scanning operations (outbreak filters or file analysis.)

Effects of Time Adjustments on Retention Time

  • Daylight savings time and appliance time zone changes do not affect the retention period.
  • If you change the retention time of a quarantine, only new messages will have the new expiration time.
  • If the system clock is changed, messages that should have expired in the past will expire at the next most appropriate time.
  • System clock changes do not apply to messages that are in the process of being expired.

Default Actions for Automatically Processed Quarantined Messages

The default action is performed on messages in a policy, virus, or outbreak quarantine when any situation described in Retention Time for Messages in Quarantines, occurs.

There are two primary default actions:

  • Delete—The message is deleted.
  • Release—The message is released for delivery.

Upon release, messages may be rescanned for threats. For more information, see About Rescanning of Quarantined Messages.

In addition, messages released before their expected retention time has passed can have additional operations performed on them, such as adding an X-Header. For more information, see Configuring Policy, Virus, and Outbreak Quarantines.

Messages released from a centralized quarantine are returned to the originating Email Security appliance for processing.

Configuring Policy, Virus, and Outbreak Quarantines

Before you begin

Procedure


Step 1

You can configure Policy, Virus, and Outbreak Quarantines in any one of the following ways:

  • [ New Web Interface Only] Choose Quarantine > Other Quarantine > View > +.

  • Choose Email > Message Quarantine > Policy, Virus, and Outbreak Quarantines and do one of the following:

    • Click Add Policy Quarantine.

    • Click a quarantine to edit.

Step 2

Enter the following information:

Keep the following in mind:

  • Changing the retention time of the File Analysis quarantine from the default of one hour is not recommended.

  • If you do not want messages in this quarantine to be processed before the end of the Retention Period you specify, even when quarantine disk space is full, deselect Free up space by applying default action on messages upon space overflow.

    Do not select this option for all quarantines. The system must be able to make space by deleting messages from at least one quarantine.

  • If you select Release as the default action, you can specify additional actions to apply to messages that are released before their retention period has passed:

Option

Information

Modify Subject

Type the text to add and specify whether to add it to the beginning or the end of the original message subject.

For example, you might want to warn the recipient that the message may contain inappropriate content.

Note 
In order for a subject with non-ASCII characters to display correctly it must be represented according to RFC 2047.

Add X-Header

An X-Header can provide a record of actions taken on a message. This can be helpful for example when handling inquiries about why a particular message was delivered.

Enter a name and value.

Example:

Name = Inappropriate-release-early

Value = True

Strip Attachments

Stripping attachments protects against viruses that may be in such files.

Step 3

Specify the users who can access this quarantine:

User

Information

Local Users

The list of local users includes only users with roles that can access quarantines.

The list excludes users with Administrator privileges, because all Administrators have full access to quarantines.

Externally Authenticated Users

You must have configured external authentication.

Custom User Roles

You see this option only if you have created at least one custom user role with quarantine access.

Step 4

Submit and commit your changes.


What to do next

See Message Filters Page and Content Filters Page

  • If you have not yet migrated quarantines from the Email Security appliance:

    You will assign these quarantines to message and content filters and DLP message actions as part of the migration process.

  • If you have already migrated to centralized quarantines:

    Make sure your Email Security appliance has message and content filters and DLP message actions that will move messages to the quarantine. See the user guide or online help for the Email Security appliance.

About Editing Policy, Virus, and Outbreak Quarantine Settings


Note


To change quarantine settings, choose Email > Message Quarantine > Policy, Virus, and Outbreak Quarantines, and then click the name of a quarantine.

To change quarantine settings on the new web interface, navigate to Quarantine > Other Quarantine > View and click on the required quarantine or

To change quarantine settings on the legacy web interface, choose Email > Message Quarantine > Policy, Virus, and Outbreak Quarantines, and then click the name of a quarantine.

Determining the Filters and Message Actions to Which a Policy Quarantine Is Assigned

You can view the message filters, content filters, Data Loss Prevention (DLP) message actions, and DMARC verification profiles that are associated with a policy quarantine, and the Email Security appliance on which each is configured.

Procedure


Step 1

[New Web Interface Only] On the Security Management appliance, click on Quarantine > Other Quarantine > View.

Step 2

[New Web Interface Only] Select the required quarantine and click on the button.

Step 3

Choose Email > Message Quarantine > Policy, Virus, and Outbreak Quarantines.

Step 4

Click the name of the policy quarantine to check.

Step 5

Scroll to the bottom of the page and view the Associated Message Filters/Content Filters/DLP Message Actions.


About Deleting Policy Quarantines

  • Before you delete a policy quarantine, see if it is associated with any active filters or message actions. See Determining the Filters and Message Actions to Which a Policy Quarantine Is Assigned.
  • You can delete a policy quarantine even if it is assigned to a filter or message action.
  • If you delete a quarantine that is not empty, the default action defined in the quarantine will be applied to all messages, even if you have selected the option not to delete messages if the disk is full. See Default Actions for Automatically Processed Quarantined Messages.
  • After you delete the quarantine associated with a filter or message action, any messages subsequently quarantined by that filter or message action will be sent to the Unclassified quarantine. You should customize the default settings of the Unclassified quarantine before you delete quarantines.
  • You cannot delete the Unclassified quarantine.

Monitoring Quarantine Status, Capacity, and Activity

To View

Do This

Total space allocated for all non-spam quarantines

[New Web Interface Only] On the Security Management appliance, click to load the legacy web interface.

Choose Management Appliance > Centralized Services > Policy, Virus, and Outbreak Quarantines and look in the first section on the page.

To change allocations, see Managing Disk Space .

Currently available space for all non-spam quarantines

[New Web Interface Only] Choose Quarnatine > Other Quarantine.

or

Choose Email > Message Quarantine > Policy, Virus, and Outbreak Quarantines and look just below the table.

The available space for policy, virus and outbreak quarantine is displayed above the table in the Quarantines section

Total amount of space currently used by all quarantines

[New Web Interface Only] On the Security Management appliance, click to load the legacy web interface.

Choose Management Appliance > Centralized Services > System Status.

Amount of space currently used by each quarantine

[New Web Interface Only] Choose Quarantines Quarantine > Other Quarantine > View.

The table displays the amount of space currently used by each quarantine.

or

Choose Email > Message Quarantine > Policy, Virus, and Outbreak Quarantines, click the quarantine name, and look for this information in the table row directly below the quarantine name.

Total number of messages currently in all quarantines

[New Web Interface Only] On the Security Management appliance, click to load the legacy web interface.

Choose Management Appliance > Centralized Services > System Status.

Number of messages currently in each quarantine

[New Web Interface Only] Choose Quarantines Quarantine > Other Quarantine > View.

The table displays the total number of messages currently available for each quarantine.

or

Choose Email > Message Quarantine > Policy, Virus, and Outbreak Quarantines and look at the table row for the quarantine.

Total CPU usage by all quarantines

[New Web Interface Only] On the Security Management appliance, click to load the legacy web interface.

Choose Management Appliance > Centralized Services > System Status and look in the System Information section.

Date and time when the last message entered each quarantine (excluding moves between policy quarantines)

[New Web Interface Only] Choose Quarantines > Other Quarantine > View.

The table displays the date and time when the last message was quarantined.

or

Choose Email > Message Quarantine > Policy, Virus, and Outbreak Quarantines and look at the table row for the quarantine.

Date a policy quarantine was created

[New Web Interface Only] On the Security Management appliance, click to load the legacy web interface.

Choose Email > Message Quarantine > Policy, Virus, and Outbreak Quarantines, click the quarantine name, and look for this information in the table row directly below the quarantine name.

Creation date and creator name are not available for system-created quarantines.

Name of policy quarantine creator

Filters and message actions associated with a policy quarantine

See Determining the Filters and Message Actions to Which a Policy Quarantine Is Assigned.

Alerts About Quarantine Disk-Space Usage

An alert is sent whenever the total size of the policy, virus, and outbreak quarantine reaches or passes 75 percent, 85 percent, and 95 percent of its capacity. The check is performed when a message is placed in the quarantine. For example, if adding a message to a quarantine increases the size to or past 75 percent of the total capacity, an alert is sent.

Policy Quarantines and Logging

AsyncOS individually logs all messages that are quarantined:

Info: MID 482 quarantined to "Policy" (message filter:policy_violation)

The message filter or Outbreak Filters feature rule that caused the message to be quarantined is placed in parentheses. A separate log entry is generated for each quarantine in which the message is placed.

AsyncOS also individually logs messages that are removed from quarantine:

Info: MID 483 released from quarantine "Policy" (queue full)

Info: MID 484 deleted from quarantine "Anti-Virus" (expired)

The system individually logs messages after they are removed from all quarantines and either permanently deleted or scheduled for delivery, for example

Info: MID 483 released from all quarantines

Info: MID 484 deleted from all quarantines

When a message is re-injected, the system creates a new Message object with a new Message ID (MID). This is logged using an existing log message with a new MID “byline”, for example:

Info: MID 483 rewritten to 513 by Policy Quarantine

About Distributing Message Processing Tasks to Other Users

You can distribute message review and processing tasks to other administrative users. For example:

  • The Human Resources team can review and manage the Policy Quarantine.
  • The Legal team can manage the Confidential Material Quarantine.

You assign access privileges to these users when you specify settings for a quarantine. In order to add users to quarantines, the users must already exist.

Each user may have access to all, some, or none of the quarantines. A user who is not authorized to view a quarantine will not see any indication of its existence anywhere in the GUI or CLI listings of quarantines.

Related Topics

Which User Groups Can Access Policy, Virus, and Outbreak Quarantines

When you allow administrative users to access a quarantine, the actions that they can perform depend on their user group:

  • Users in the Administrators or Email Administrators groups can create, configure, delete, and centralize quarantines and can manage quarantined messages.
  • Users in the Operators, Guests, Read-Only Operators, and Help Desk Users groups, as well as custom user roles with quarantine management privileges, can search for, view, and process messages in a quarantine, but cannot change the quarantine’s settings, create, delete, or centralize quarantines. You specify in each quarantine which of these users have access to that quarantine.
  • Users in the Technicians group cannot access quarantines.

Access privileges for related features, such as Message Tracking and Data Loss Prevention, also affect the options and information that an administrative user sees on Quarantine pages. For example, if a user does not have access to Message Tracking, that user will not see message trackinginformation for quarantined messages.

Note: To allow custom user roles configured on the Security Management appliance to specify policy quarantines in filters and DLP message actions, see Configuring Centralized Quarantine Access for Custom User Roles.

End users do not have see or have access to policy, virus, and outbreak quarantines.

Working with Messages in Policy, Virus, or Outbreak Quarantines

Related Topics

Viewing Messages in Quarantines

To

Do This

View all messages in a quarantine

[New Web Interface Only] Choose Quarantine > Other Quarantine > View.

or

Choose Email > Message Quarantine > Policy, Virus, and Outbreak Quarantines.

In the row for the relevant quarantine, click the blue number in the Messages column of the table.

View messages in the Outbreak quarantine

[New Web Interface] Choose Quarantine > Other Quarantine > View.

or

Choose Email > Message Quarantine > Policy, Virus, and Outbreak Quarantines.

In the row for the relevant quarantine, click the blue number in the Messages column of the table.

See Manage by Rule Summary Link or Rule Summary View [New Web Interface Only].

Navigate through the list of messages in a quarantine

Click Previous, Next, a page number, or double-arrow link. The double arrows take you to the first (<<) or last (>>) page in the listing.

[New Web Interface Only] Scroll down on the table to display details of all the new messages.

Sort the list of messages in a quarantine

Click a column heading (except columns that could include multiple items or the “In quarantines” column).

Resize table columns

Drag the divider between column headings.

Customize table columns

Click and select the columns to display, and click Close

View the content that caused the message to be quarantined

See Viewing Matched Content.

Related Topics

Quarantined Messages and International Character Sets

For messages with subjects that contain characters from international character sets (double-byte, variable length, and non-ASCII encoded), the Policy Quarantine pages display subject lines in non-ASCII characters in their decoded form.

Searching for Messages in Policy, Virus, and Outbreak Quarantines


Note

  • Users can find and see only the messages in quarantines to which they have access.

  • Searches in Policy, Virus, and Outbreak quarantines do not find messages in the spam quarantine.


Procedure


Step 1

[New Web Interface Only] Choose Quarantine > Other Quarantine > Search.

Step 2

[New Web Interface Only] Click the blue number link of the corresponding quarantine.

Tip 

[New Web Interface Only] For the Outbreak Quarantine, you can also find all messages quarantined by each outbreak rule: Click the Rule Summary tab in the Outbreak quarantine, and then click the relevant rule.

Step 3

Choose Email > Message Quarantine > Policy, Virus, and Outbreak Quarantines.

Step 4

Click the Search Across Quarantines button.

Tip 

For the Outbreak Quarantine, you can also find all messages quarantined by each outbreak rule: Click the Manage by Rule Summary link in the Outbreak table row, and then click the relevant rule.

Step 5

(Optional) Enter other search criteria.

  • For Envelope Sender and Envelope Recipient: You can enter any character(s). No validation of your entry is performed.

  • Search results include only messages that match all of the criteria you specify. For example, if you specify an Envelope Recipient and a Subject, only messages that match the terms specified in both the Envelope Recipient and the Subject are returned.


What to do next

You can use the search results in the same way that you use the quarantine listings. For more information, see Manually Processing Messages in a Quarantine.

For information on modifying your search criteria, see Modifying Search Criteria.

Modifying Search Criteria

You can modify the search criteria to a custom time range or a different quarantine.

To modify the search criteria, click Modify.

Manually Processing Messages in a Quarantine

Manually processing messages means to manually select a Message Action for the message from the Message Actions page.

You can perform the following actions on messages:

  • Delete

  • Release

  • Delay Scheduled Exit from quarantine

  • Send a Copy of messages to email addresses that you specify

  • Move a message from one quarantine to another

Generally, you can perform actions on messages in the lists that are displayed when you do the following. However, not all actions are available in all situations.

  • From the list of quarantines on the Email > Message Quarantine > Policy, Virus, and Outbreak Quarantines page or [New Web Interface Only] Quarantine > Other Quarantine > View page, click the number of messages in a quarantine.

  • Click on the check box of the quarantine message and select the required actions.

You can perform these actions on multiple messages at one time by:

  • Choosing an option from the pick list at the top of the list of messages.

  • Selecting the check box beside each message listed on a page.

  • Selecting the check box in the table heading at the top of a list of messages. This applies the action to all messages visible on the screen. Messages on other pages are not affected.

Additional options are available for messages in the outbreak quarantine. See information about the Rule Summary view in the chapter on Outbreak Filters in the online help or user guide for the AsyncOS for Email Security Appliances.

Related Topics

Sending a Copy of the Message

Only users who belong to the Administrators group may send copies of a message.

To send a copy of the message, enter an email address in the Send Copy To: field and click Submit. Sending a copy of a message does not cause any other action to be performed on the message.

About Moving Messages Between Policy Quarantines

You can manually move messages from one policy quarantine to another on a single appliance.

When you move a message to a different quarantine:

  • The expiration time is unchanged. The message keeps the retention time of the original quarantine.
  • The reason the message was quarantined, including the matched content and other relevant details, does not change.
  • If a message is in multiple quarantines and you move the message to a destination that already holds a copy of that message, the expiration time and reason for quarantine of the moved copy of the message overwrite those of the copy of the message that was originally in the destination quarantine.

Messages in Multiple Quarantines

If a message is present in one or more other quarantines, the “In other quarantines” column in the quarantine message list will show “Yes,” regardless of whether you have permissions to access those other quarantines.

A message in multiple quarantines:

  • Is not delivered unless it has been released from all of the quarantines in which it resides. If it is deleted from any quarantine, it will never be delivered.
  • Is not deleted from any quarantine until it has been deleted or released from all quarantines in which it resides.

Because a user wanting to release a message may not have access to all of the quarantines in which it resides, the following rules apply:

  • A message is not released from any quarantine until it has been released from all of the quarantines in which it resides.
  • If a message is marked as Deleted in any quarantine, it cannot be delivered from any other quarantine in which it resides. (It can still be released.)

If a message is queued in multiple quarantines and a user does not have access to one or more of the other quarantines:

  • The user will be informed whether the message is present in each of the quarantines to which the user has access.
  • The GUI shows only the scheduled exit time from the quarantines to which the user has access. (For a given message, there is a separate exit time for each quarantine.)
  • The user will not be told the names of the other quarantine(s) holding the message.
  • The user will not see matched content that caused the message to be placed into quarantines that the user does not have access to.
  • Releasing a message affects only the queues to which the user has access.
  • If the message is also queued in other quarantines not accessible to the user, the message will remain in quarantine, unchanged, until acted upon by users who have the required access to the remaining quarantines (or until the message is released “normally” via early or normal expiration).

Message Details and Viewing Message Content

Click on the subject line of a message to view that message’s content and to access the Quarantined Message page.

The Quarantined Message page has two sections: Quarantine Details and Message Details.

From the Quarantined Message page, you can read the message, select a Message Action, or send a copy of the message. You can also see if a message will be encrypted upon release from the quarantine due to the Encrypt on Delivery filter action.

The Message Details section displays the message body, message headers, and attachments. Only the first 100 K of the message body is displayed. If the message is longer, the first 100 K is shown, followed by an ellipsis (...). The actual message is not truncated. This is for display purposes only. You can download the message body by clicking [message body] in the Message Parts section at the bottom of Message Details. You can also download any of the message’s attachments by clicking the attachment’s filename.


Note

The maximum limit for the attachment downloads on the Message Details page is restricted to 25 MB.


If you view a message that contains a virus and you have desktop anti-virus software installed on your computer, your anti-virus software may complain that it has found a virus. This is not a threat to your computer and can be safely ignored.

To view additional details about the message, click the Message Tracking link.


Note

For the special Outbreak quarantine, additional functionality is available. See The Outbreak Quarantine.

Related Topics

Viewing Matched Content

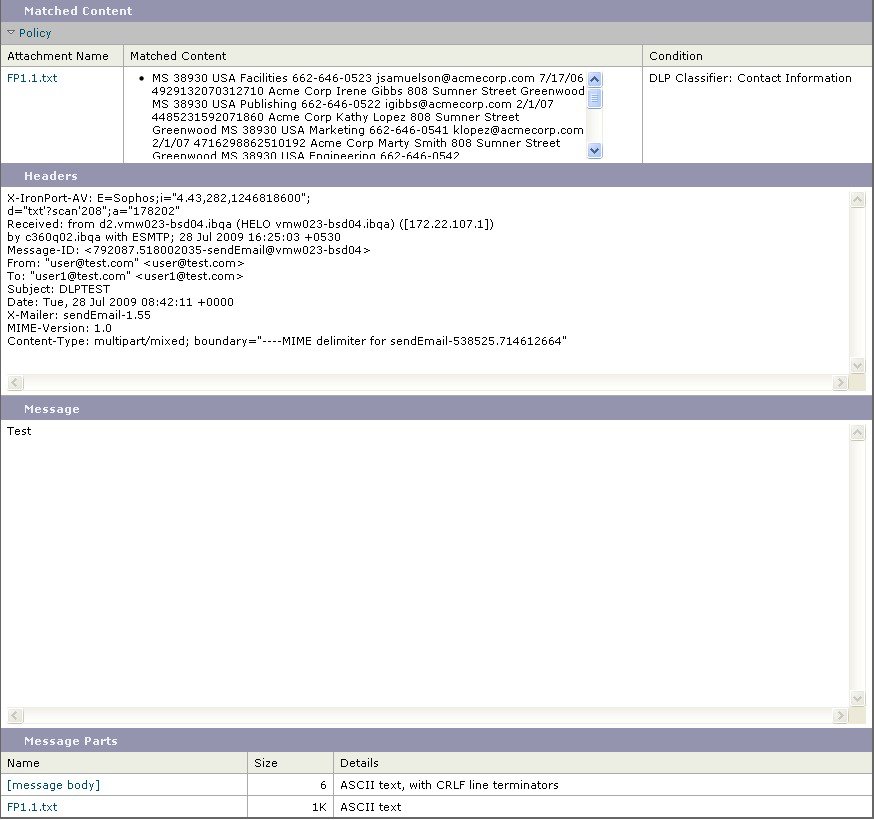
When you configure a quarantine action for messages that match Attachment Content conditions, Message Body or Attachment conditions, Message body conditions, or the Attachment content conditions, you can view the matched content in the quarantined message. When you display the message body, the matched content is highlighted in yellow, except for DLP policy violation matches. You can also use the $MatchedContent action variable to include the matched content from message or content filter matches in the message subject.

If the attachment contains the matched content, the attachment’s contents are displayed, as well as the reason it was quarantined, whether it was due to a DLP policy violation, content filter condition, message filter condition, or Image Analysis verdict.

When you view messages in the local quarantine that have triggered message or content filter rules, the GUI may display content that did not actually trigger the filter action (along with content that triggered the filter action). The GUI display should be used as a guideline for locating content matches, but does not necessarily reflect an exact list of content matches. This occurs because the GUI uses less strict content matching logic than is used in the filters. This issue applies only to the highlighting in the message body. The table that lists the matched strings in each part of the message, along with the associated filter rule, is correct.

Figure 1. Matched Content Viewed in the Policy Quarantine


Downloading Attachments

You can download a message attachment by clicking the attachment’s file name in the Message Parts or Matched Content section. AsyncOS displays a warning that attachments from unknown sources may contain viruses and asks you if you want to continue. Download attachments that may contain viruses at your own risk. You can also download the message body by clicking [message body] in the Message Parts section.

About Rescanning of Quarantined Messages

When a message is released from all queues in which is has been quarantined, the following rescanning occurs, depending on the features enabled for the appliance and for the mail policy that originally quarantined the message:

  • Messages released from Policy and Virus quarantines are rescanned by the anti-virus, advanced malware protection, and graymail engines.
  • Messages released from the Outbreak quarantine are rescanned by the anti-spam, AMP, and anti-virus engines.
  • Messages released from the File Analysis quarantine are rescanned for threats.
  • Messages with attachments are rescanned by the file reputation service upon release from Policy, Virus, and Outbreak quarantines.

Upon rescanning, if the verdict produced matches the verdict produced the previous time the message was processed, the message is not re-quarantined. Conversely, if the verdict is different, the message could be sent to another quarantine.

The rationale is to prevent messages from looping back to the quarantine indefinitely. For example, suppose a message is encrypted and therefore sent to the Virus quarantine. If an administrator releases the message, the anti-virus engine will still not be able to decrypt it; however, the message should not be re-quarantined or a loop will be created and the message will never be released from the quarantine. Since the two verdicts are the same, the system bypasses the Virus quarantine the second time.

The Outbreak Quarantine

The Outbreak quarantine is present when a valid Outbreak Filters feature license key has been entered. The Outbreak Filters feature sends messages to the Outbreak quarantine, depending on the threshold set. For more information, see the Outbreak Filters chapter in the online help or user guide for the Email Security appliance.

The Outbreak quarantine functions just like other quarantines—you can search for messages, release or delete messages, and so on.

The Outbreak quarantines has the following views:

The Outbreak quarantine has some additional features not available in other quarantines: the Rule Summary view, the Send to Cisco feature when viewing message details, and the option to sort messages in search results by the Scheduled Exit time.

If the license for the Outbreak Filters feature expires, you will be unable to add more messages to the Outbreak quarantine. Once the messages currently in the quarantine have expired and the Outbreak quarantine becomes empty, it is no longer shown in the Quarantines listing in the GUI.

Related Topics

Rescanning Messages in an Outbreak Quarantine

Messages placed in the Outbreak quarantine are automatically released if newly published rules deem the quarantined message no longer a threat.

If anti-spam and anti-virus are enabled on the appliance, the scanning engines scan every message released from the Outbreak quarantine based on the mail flow policy that applies to the message.

Rule Summary View

The Rule Summary view is available only in the new web interface.

In the Outbreak quarantine, click the Rule Summary tab to see the listing of the contents of Outbreak quarantine, grouped by Rule ID.

You can perform message actions (Release and Delete) on all of the messages in the quarantine based on which outbreak rule caused the message to be quarantined. This is ideal for clearing out large numbers of messages from the Outbreak quarantine. For more information, see Outbreak Quarantine and the Manage by Rule Summary View section of chapter “Outbreak Filters” in the online help or user guide of the AsyncOS for the Email Security Appliance.

Manage by Rule Summary Link

Click the Manage by Rule Summary link next to the Outbreak quarantine in the quarantine listing to view the Manage by Rule Summary page. You can perform message actions (Release, Delete, Delay Exit) on all of the messages in the quarantine based on which outbreak rule caused the message to be quarantined. This is ideal for clearing out large numbers of messages from the Outbreak quarantine. For more information, see information about the Manage by Rule Summary view in the Outbreak Filters chapter in the online help or user guide for the Email Security appliance

Reporting False Positives or Suspicious Messages to Cisco Systems

When viewing message details for a message in the Outbreak quarantine, you can send the message to Cisco to report false positives or suspicious messages.

Procedure

Step 1

Navigate to a message in the Outbreak quarantine.

Step 2

Enter the recipient address and click Send.


Troubleshooting Centralized Policy Quarantines

Messages Released from a Centralized Outbreak Quarantine Are Not Rescanned

Problem

Messages released from the Outbreak Quarantine should be scanned again before delivery. However, some contaminated messages have been delivered from the quarantine.

Solution

This can occur under the situation described in About Rescanning of Quarantined Messages