Cisco IP Camera Apps Reference Guide
Bias-Free Language
The documentation set for this product strives to use bias-free language. For the purposes of this documentation set, bias-free is defined as language that does not imply discrimination based on age, disability, gender, racial identity, ethnic identity, sexual orientation, socioeconomic status, and intersectionality. Exceptions may be present in the documentation due to language that is hardcoded in the user interfaces of the product software, language used based on RFP documentation, or language that is used by a referenced third-party product. Learn more about how Cisco is using Inclusive Language.
- Updated:
- May 20, 2016
Chapter: Video Tag App
Video Tag App
This chapter provides information about the Video Tag app for Cisco IP cameras. This app applies a tag to a live video image based on an external trigger. The tag appears as text on the video image from the IP camera. The app also can cause the IP camera to take a designated action.
About the Video Tag App
The Video Tag app causes a tag to appear on the live video image from the IP camera when the app detects a designated external trigger. The app also can cause the IP camera to take a designated action, which can include sending information in an email message or HTTP stream, sending information to a Syslog server, uploading a snapshot or video clip, and changing the state of the output 1 port on the IP camera.
A tag is preconfigured text, for example “Door open” or “Entry alarm activated.” You can configure the Video Tag app to respond to either or both of the following external trigger types:
- State change of an input port on the IP camera—The app displays a tag and optionally causes the camera to take an action when the state of an input port on the IP camera changes.
- An HTTP POST request in the appropriate format—The app listens for a request on a designated port. The app displays a tag and optionally causes the camera to take an action when it receives an appropriate request.
If you used the Video Overlay window in the IP Camera web-based user interface to configure overlay text, statistics, or an image, the tag from the Video Tag app replaces the configured overlay item or items. The configured overlay item or items redisplay when the tag is cleared.
Configuring the Video Tag App on an IP Camera
Before you can use the Video Tag app, you must configure it on each IP camera on which it will run. To configure this app, perform the following steps.
- Install the Video Tag app on the IP camera on which it will run. See the “Related Documentation” section for more information.
- If you want the app to display a tag when it detects a state change of an input port on the IP camera, configure the IP camera as described in the “Configuring the IP Camera for a GPIO Tag Trigger” section.
- If you want the app to display a tag when it detects and HTTP POST request, review the information in the “Sending an HTTP POST Request Tag Trigger” section.
- If you want the app to cause the IP camera to take an action when it detects a state change of an input port or an appropriate HTTP POST request, configure the IP camera as described in the “Configuring the IP Camera to Take an Action” section.
Step 1 From the IP camera web-based user interface, click the Setup link, click Application Manager to expand the menu, then click App Setup .
Step 2 Click the VideoTag radio button, then click Configure .
The Cisco Video Tag Application page appears.
Step 3 Enter appropriate values in the Cisco Video Tag Application page fields as described in the following table:
Step 4 Click the Save button in the Cisco Video Tag Application configuration page, and then click OK in the confirmation dialog box.
If you want to reset the options in the Cisco Video Tag configuration page to their default values, click the Reset button, click OK in the two dialog boxes that appear, click the Save button, and then click OK in the confirmation dialog box.
If you change configuration values while the Video Tag app is running, you must stop and then restart the app before the changes take effect.
Configuring the IP Camera for a GPIO Tag Trigger
If you want the Video Tag app to display a tag when it detects a state change of an input port on the IP camera, you must enable the Input 1 setting on the IP camera in addition to configuring the GPIO trigger options as described in the “Configuring the Video Tag App on an IP Camera” section.
To enable the Input 1 setting, follow these steps:
Step 1 From the IP camera web-based user interface, click the Setup link, click Events to expand the menu, then click Notification Settings .
Step 2 In the Event Triggering area on the Notification Settings page, check the Input 1 check box.
Step 3 Click Save at the bottom of the Notification Settings page.
Sending an HTTP POST Request Tag Trigger
If you want the Video Tag app to display a tag when it detects an HTTP POST request, you must configure the HTTP trigger options as described in the “Configuring the Video Tag App on an IP Camera” section. In addition, you must ensure that the request is sent in the format that this section describes.
An HTTP POST request can be generated from a third-party application or add-on, such as the Advanced REST Client Application for Google Chrome, the RESTClient add-on for Mozilla Firefox, or the Linux wget command. The app can receive the request from any external source that can send HTTP requests and that is on the same network as the IP camera on which the app is running.
The HTTP POST request should include the elements that Table 12-1 describes.
The following examples show two ways in which you can generate an HTTP POST trigger for the video tag app. In each example:
- The IP address of the IP camera is 10.110.0.00
- The View Video app is configured to listen for an appropriate HTTP request on port 48999
- The tag that this request generates appears as “Door Open” on the video image from the IP camera
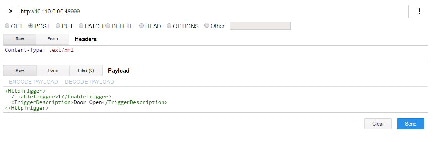
Example 12-1 Sending an HTTP POST Request by Using the REST Client Application for Google Chrome
Figure 12-1 shows an example of using the REST Client Application for Google Chrome to generate an HTTP POST trigger for the Video Tag app. The REST Client Application application receives the status message “200:OK” when the request is successfully sent.
Figure 12-1 HTTP POST Request Using the REST Client Application for Google Chrome
Example 12-2 Sending an HTTP POST Request by Using the Linux wget Command
The following example shows using the Linux wget command to generate data in the form of an HTTP POST request and send the request to the Video Tag app:
$
wget --header="Content-Type: text/xml" --post-data="<HttpTrigger><EnableTrigger>1
</EnableTrigger><TriggerDescription>Door Open</TriggerDescription></HttpTrigger>" 'http://10.110.0.00:48999'
Configuring the IP Camera to Take an Action
You can configure the IP camera to take any or all of the following actions when it detects a state change or an HTTP trigger:
- Send information in an email message to the designated recipient.
- Change the state of the output 1 port on the IP camera as defined in the IO Ports page in the IP Camera web-based user interface
- Send information a designated Syslog server
- Send information as an HTTP stream to a remote system
- Upload a snapshot or video clip of the event to an FTP server
To configure actions, follow these steps:
Step 1 From the IP camera web-based user interface, click the Setup link, click Events to expand the menu, then click Notification Settings .
Step 2 In the Event Triggering area on the Notification Settings page, check the App check box.
Step 3 Check the desired check boxes to designate that actions that the Video Tag app causes the IP camera to take when a trigger occurs:
- Email —Sends information about the event that caused the trigger in an email message to the designated recipient. You designate the recipient and configure other email options in other fields on the Notification Settings page.
- Output 1 —Changes the state of the output 1 port on the IP camera as defined in the IO Ports page in the IP Camera web-based user interface.
- Syslog —Sends information about the event that caused the trigger to a designated Syslog server.
- HTTP —Sends information about the event as an HTTP stream to a remote system.
- FTP —Uploads a snapshot or video clip of the event to an FTP server.
Step 4 In the Notifications page, configure related options for the actions that you chose, if needed.
For detailed instructions, see Cisco Video Surveillance IP Camera Configuration Guide for your IP camera mode, or click the Help link for the Notifications page in the IP camera web-based user interface.
Step 5 Click Save at the bottom of the Notification Settings page.
Running the Video Tag App
To run the Video Tag app on an IP camera, perform the following steps:
Step 1 From the IP camera web-based user interface, click the Setup link, click Application Manager to expand the menu, then click App Setup .
Step 2 Click the VideoTag radio button.
Step 3 (Optional) If you want the Video Tag app to run automatically each time the IP camera reboots, in the Installed Application List area, check the Start on Boot check box that corresponds to this app.
If you do not check this check box, you must run the app manually each time the IP camera reboots.
 Feedback