Upgrade Process
The upgrade process using CLI depends on the deployment type.
Upgrade a Standalone Node
You can use the application upgrade command directly, or the application upgrade prepare and proceed commands in the specified sequence to upgrade a standalone node.
You can run the application upgrade command from the CLI on a standalone node that assumes the Administration, Policy Service, pxGrid, and Monitoring personas. If you choose to run this command directly, we recommend that you copy the upgrade bundle from the remote repository to the Cisco ISE node's local disk before you run the application upgrade command to save time during upgrade.
Alternatively, you can use the application upgrade prepare and application upgrade proceed commands. The application upgrade prepare command downloads the upgrade bundle and extracts it locally. This command copies the upgrade bundle from the remote repository to the Cisco ISE node's local disk. After you have prepared a node for upgrade, run the application upgrade proceed command to complete the upgrade successfully.
We recommend that you run the application upgrade prepare and proceed commands as described below.
Before you begin
Ensure that you have read the instructions in the Prepare for Upgrade section.
Procedure
| Step 1 |
Create a repository on the local disk. For example, you can create a repository called "upgrade." Example: |
||
| Step 2 |
From the Cisco ISE command line interface (CLI), enter application upgrade prepare command. This command copies the upgrade bundle to the local repository "upgrade" that you created in the previous step and lists the MD5 and SHA256 checksum. Example: |
||
| Step 3 |
From the Cisco ISE CLI, enter the application upgrade proceed command.
Example:The upgrade is now complete. |
What to do next
Upgrade a Two-Node Deployment
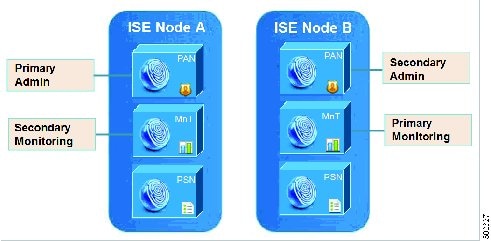
Use the application upgrade prepare and proceed commands to upgrade a two-node deployment. You do not have to manually deregister the node and register it again. The upgrade software automatically deregisters the node and moves it to the new deployment. When you upgrade a two-node deployment, you should initially upgrade only the Secondary Administration Node(node B). When the secondary node upgrade is complete, you upgrade the primary node thereafter(node A). If you have a deployment set up as shown in the following figure, you can proceed with this upgrade procedure.
Before you begin
-
Perform an on-demand backup (manually) of the configuration and operational data from the Primary Administration Node.
-
Ensure that the Administration and Monitoring personas are enabled on both the nodes in the deployment.
If the Administration persona is enabled only on the Primary Administration Node, enable the Administration persona on the secondary node because the upgrade process requires the Secondary Administration Node to be upgraded first.
Alternatively, if there is only one Administration node in your two-node deployment, then deregister the secondary node. Both the nodes become standalone nodes. Upgrade both the nodes as standalone nodes and set up the deployment after the upgrade.
-
If the Monitoring persona is enabled only on one of the nodes, ensure that you enable the Monitoring persona on the other node before you proceed.
Procedure
| Step 1 |
Upgrade the secondary node (node B) from the CLI. The upgrade process automatically removes Node B from the deployment and upgrades it. Node B becomes the upgraded primary node when it restarts. |
| Step 2 |
Upgrade node A. The upgrade process automatically registers node A to the deployment and makes it the secondary node in the upgraded environment. |
| Step 3 |
Promote node A, now to be the primary node in the new deployment. After the upgrade is complete, if the nodes contain old Monitoring logs, ensure that you run the application configure ise command and choose 5 (Refresh Database Statistics) on the nodes. |
What to do next
Upgrade a Distributed Deployment
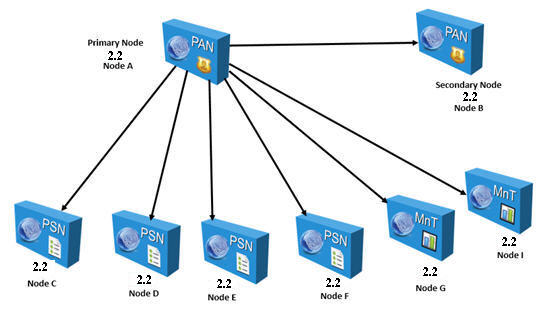
You must first upgrade the Secondary Administration Node to the new release. For example, if you have a deployment setup as shown in the following figure, with one Primary Administration Node (node A), one Secondary Administration Node (node B), and four Policy Service Nodes (PSNs) (node C, node D, node E, and node F), one Primary Monitoring Node (node G), and one Secondary Monitoring Node (node I), you can proceed with the following upgrade procedure.
 Note |
Do not manually deregister the node before an upgrade. Use the application upgrade prepare and proceed commands to upgrade to the new release. The upgrade process deregisters the node automatically and moves it to the new deployment. If you manually deregister the node before an upgrade, ensure that you have the license file for the Primary Administration Node before beginning the upgrade process. If you do not have the file on hand (for example, if your license was installed by a Cisco partner vendor), contact the Cisco Technical Assistance Center for assistance. |
Before you begin
-
If you do not have a Secondary Administration Node in the deployment, configure a Policy Service Node to be the Secondary Administration Node before beginning the upgrade process.
-
Ensure that you have read and complied with the instructions given in the Prepare for Upgrade section.
-
When you upgrade a complete Cisco ISE deployment, Domain Name System (DNS) server resolution (both forward and reverse lookups) is mandatory; otherwise, the upgrade fails.
Procedure
| Step 1 |
Upgrade the Secondary Administration Node (node B) from the CLI. The upgrade process automatically deregisters node B from the deployment and upgrades it. Node B becomes the primary node of the new deployment when it restarts. Because each deployment requires at least one Monitoring node, the upgrade process enables the Monitoring persona on node B even if it was not enabled on this node in the old deployment. If the Policy Service persona was enabled on node B in the old deployment, this configuration is retained after upgrading to the new deployment. |
| Step 2 |
Upgrade one of your Monitoring nodes (node G) to the new deployment. We recommend that you upgrade your Primary Monitoring Node before the Secondary Monitoring Node (this is not possible if your Primary Administration Node in the old deployment functions as your Primary Monitoring Node as well). Your primary Monitoring node starts to collect the logs from the new deployment and you can view the details from the Primary Administration Node dashboard. If you have only one Monitoring node in your old deployment, before you upgrade it, ensure that you enable the Monitoring persona on node A, which is the Primary Administration Node in the old deployment. Node persona changes result in a Cisco ISE application restart. Wait for node A to come up before you proceed. Upgrading the Monitoring node to the new deployment takes longer than the other nodes because operational data has to be moved to the new deployment. If node B, the Primary Administration Node in the new deployment, did not have the Monitoring persona enabled in the old deployment, disable the Monitoring persona on it. Node persona changes result in a Cisco ISE application restart. Wait for the Primary Administration Node to come up before you proceed. |
| Step 3 |
Upgrade the Policy Service Nodes (nodes C, D, E, and F) next. You can upgrade several PSNs in parallel, but if you upgrade all the PSNs concurrently, your network will experience a downtime. If your PSN is part of a node group cluster, you must deregister the PSN from the PAN, upgrade it as a standalone node, and register it with the PAN in the new deployment. After the upgrade, the PSNs are registered with the primary node of the new deployment (node B), and the data from the primary node (node B) is replicated to all the PSNs. The PSNs retain their personas, node group information, and profiling probe configurations. |
| Step 4 |
(If you have an IPN node in your deployment) Deregister the IPN node from the Primary Administration Node. Cisco ISE, Release 2.0 and later, does not support IPN nodes. |
| Step 5 |
If you have a second Monitoring node (node I) in your old deployment, you must do the following: Except for the Primary Administration Node (node A), you must have upgraded all the other nodes to the new deployment. |
| Step 6 |
Finally, upgrade the Primary Administration Node (node A). This node is upgraded and added to the new deployment as a Secondary Administration Node. You can promote the Secondary Administration Node (node A) to be the primary node in the new deployment. After the upgrade is complete, if the Monitoring nodes that were upgraded contain old logs, ensure that you run the application configure ise command and choose 5 (Refresh Database Statistics) on the Monitoring nodes. |
Example

Here is an example CLI transcript for a successful upgrade of a Secondary Administration node.
ise74/admin# application upgrade proceed
Initiating Application Upgrade...
% Warning: Do not use Ctrl-C or close this terminal window until upgrade completes.
-Checking VM for minimum hardware requirements
STEP 1: Stopping ISE application...
STEP 2: Verifying files in bundle...
-Internal hash verification passed for bundle
STEP 3: Validating data before upgrade...
STEP 4: De-registering node from current deployment...
STEP 5: Taking backup of the configuration data...
STEP 6: Running ISE configuration database schema upgrade...
- Running db sanity to check and fix if any index corruption
- Auto Upgrading Schema for UPS Model
- Upgrading Schema completed for UPS Model
ISE database schema upgrade completed.
% Warning: Sanity test found some indexes missing in CEPM schema. Please recreate missing indexes after upgrade using app configure ise cli
STEP 7: Running ISE configuration data upgrade...
- Data upgrade step 1/14, UPSUpgradeHandler(2.3.0.100)... Done in 48 seconds.
- Data upgrade step 2/14, UPSUpgradeHandler(2.3.0.110)... Done in 2 seconds.
- Data upgrade step 3/14, NetworkAccessUpgrade(2.3.0.145)... Done in 0 seconds.
- Data upgrade step 4/14, NodeGroupUpgradeService(2.3.0.155)... Done in 0 seconds.
- Data upgrade step 5/14, IRFUpgradeService(2.3.0.155)... Done in 0 seconds.
- Data upgrade step 6/14, UPSUpgradeHandler(2.3.0.158)... Done in 0 seconds.
- Data upgrade step 7/14, NetworkAccessUpgrade(2.3.0.178)... Done in 0 seconds.
- Data upgrade step 8/14, NetworkAccessUpgrade(2.3.0.182)... Done in 0 seconds.
- Data upgrade step 9/14, CertMgmtUpgradeService(2.3.0.194)... Done in 3 seconds.
- Data upgrade step 10/14, UPSUpgradeHandler(2.3.0.201)... Done in 0 seconds.
- Data upgrade step 11/14, NSFUpgradeService(2.3.0.233)... Done in 0 seconds.
- Data upgrade step 12/14, ProfilerUpgradeService(2.3.0.233)... Done in 1 seconds.
- Data upgrade step 13/14, GuestAccessUpgradeService(2.3.0.233)... Done in 9 seconds.
STEP 8: Running ISE configuration data upgrade for node specific data...
 STEP 9: Making this node PRIMARY of the new deployment. When other nodes are upgraded it will be added to this deployment.
STEP 10: Running ISE M&T database upgrade...
ISE M&T Log Processor is not running
ISE database M&T schema upgrade completed.

Gathering Config schema(CEPM) stats .....
Gathering Operational schema(MNT) stats ....
% NOTICE: Upgrading ADEOS. Appliance will be rebooted after upgrade completes successfully.
warning: file /opt/xgrid/gc/pxgrid-controller-1.0.4.18-dist.tar.gz: remove failed: No such file or directory

% This application Install or Upgrade requires reboot, rebooting now...

Broadcast message from root@IS133 (pts/1) (Fri Jun  2 12:36:51 2017):

Trying to stop processes gracefully. Reload might take approximately 3 mins

Broadcast message from root@IS133 (pts/1) (Fri Jun  2 12:36:51 2017):

Trying to stop processes gracefully. Reload might take approximately 3 mins

Broadcast message from root@IS133 (pts/1) (Fri Jun  2 12:37:12 2017):

The system is going down for reboot NOW

Broadcast message from root@IS133 (pts/1) (Fri Jun  2 12:37:12 2017):

The system is going down for reboot NOW
Here is an example CLI transcript of a successful PSN node upgrade.
ise/admin# application upgrade proceed
Initiating Application Upgrade...
% Warning: Do not use Ctrl-C or close this terminal window until upgrade completes.
-Checking VM for minimum hardware requirements
STEP 1: Stopping ISE application...
STEP 2: Verifying files in bundle...
-Internal hash verification passed for bundle
STEP 3: Validating data before upgrade...
STEP 4: De-registering node from current deployment.
STEP 5: Taking backup of the configuration data...
STEP 6: Registering this node to primary  of new deployment...
STEP 7: Downloading configuration data from primary  of new deployment...
STEP 8: Importing configuration data...
% Warning: Sanity test found some indexes missing in CEPM schema. Please recreate missing indexes after upgrade using app configure ise cli
STEP 9: Running ISE configuration data upgrade for node specific data...
STEP 10: Running ISE M&T database upgrade...
ISE M&T Log Processor is disabled
ISE database M&T schema upgrade completed.

Gathering Config schema(CEPM) stats ....
% NOTICE: Upgrading ADEOS. Appliance will be rebooted after upgrade completes successfully.
warning: file /opt/xgrid/gc/pxgrid-controller-1.0.4.18-dist.tar.gz: remove failed: No such file or directory

% This application Install or Upgrade requires reboot, rebooting now...

Broadcast message from root@IS136 (pts/1) (Fri Jun  2 15:16:14 2017):

Trying to stop processes gracefully. Reload might take approximately 3 mins

Broadcast message from root@IS136 (pts/1) (Fri Jun  2 15:16:14 2017):

Trying to stop processes gracefully. Reload might take approximately 3 mins

Broadcast message from root@IS136 (pts/1) (Fri Jun  2 15:16:35 2017):

The system is going down for reboot NOW

Broadcast message from root@IS136 (pts/1) (Fri Jun  2 15:16:35 2017):

The system is going down for reboot NOW
 Feedback