- Overview
- User Interface
- Plan Objects
- Traffic Demand Modeling
- Simulation
- Simulation Analysis
- Traffic Forecasting
- IGP Simulation
- MPLS Simulation
- RSVP-TE Simulation
- Segment Routing Simulation
- Layer 1 Simulation
- Quality of Service Simulation
- BGP Simulation
- Advanced Routing with External Endpoints
- VPN Simulation
- Multicast Simulation
- Metric Optimization
- LSP Optimization
- RSVP-TE Optimization
- Explicit and Tactical RSVP-TE LSP Optimization
- Segment Routing Optimization
- Capacity Planning Optimization
- L1 Circuit Path Optimization
- Changeover
- Patch Files
- Reports
- Cost Modeling
- Plot Legend for Design Layouts
Cisco WAE Design 7.0.1 User Guide
Bias-Free Language
The documentation set for this product strives to use bias-free language. For the purposes of this documentation set, bias-free is defined as language that does not imply discrimination based on age, disability, gender, racial identity, ethnic identity, sexual orientation, socioeconomic status, and intersectionality. Exceptions may be present in the documentation due to language that is hardcoded in the user interfaces of the product software, language used based on RFP documentation, or language that is used by a referenced third-party product. Learn more about how Cisco is using Inclusive Language.
- Updated:
- May 4, 2017
Chapter: Patch Files
Patch Files
A patch file is a compact way to represent differences between plan files. These differences or patches can be applied to other plan files or deployed to the network.
You can create, apply, view, and send patches by choosing Tools > Patches.
A common WAE Design use case is to create a plan file for deployment. One potential workflow for doing this is the following:
1.![]() Open a plan file from a WAE Automation server. (File > Open from > WAE Automation Server.)
Open a plan file from a WAE Automation server. (File > Open from > WAE Automation Server.)
2.![]() Duplicate the plan file by saving it as a different name.
Duplicate the plan file by saving it as a different name.
3.![]() Make LSP modifications as needed in the duplicated plan file.
Make LSP modifications as needed in the duplicated plan file.
4.![]() Open both plan files, and create a patch file. (Tools > Patches > Create.)
Open both plan files, and create a patch file. (Tools > Patches > Create.)
5.![]() Perform a dry run to test the patch before deploying it. (Tools > Patches > Send, Dry Run option.)
Perform a dry run to test the patch before deploying it. (Tools > Patches > Send, Dry Run option.)
6.![]() Deploy the patch file to the network. (Tools > Patches > Send.)
Deploy the patch file to the network. (Tools > Patches > Send.)
Opening a Remote Plan File
From the WAE Design GUI, you can open plan files residing on a remote WAE Automation server to make modifications before deploying LSPs.
- You must know the username and password of the WAE Automation server, or its authentication must be disabled.
- The WAE Automation server must be configured for the type of deployment you are using.
Step 1![]() Choose File > Open from > WAE Automation Server.
Choose File > Open from > WAE Automation Server.
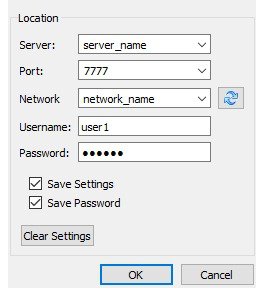
Step 2![]() Identify the remote server:
Identify the remote server:
a.![]() Enter or choose the hostname or IP address of the server.
Enter or choose the hostname or IP address of the server.
b.![]() Specify how to connect to the server by entering or choosing the port number and network.
Specify how to connect to the server by entering or choosing the port number and network.
To automatically populate the Network field with the list of available networks, click Refresh List of Networks.
c.![]() If authentication is enabled, enter the same username and password. If authentication is disabled, the username and password fields must be empty.
If authentication is enabled, enter the same username and password. If authentication is disabled, the username and password fields must be empty.
Creating Patch Files
The patch created identifies how to get from the plan file identified in the From Plan field to the plan file identified in the To Plan field. These patch files only include differences in new, modified, and deleted objects that are supported by the WAE YANG model.
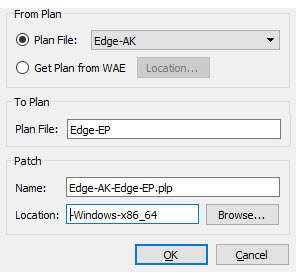
- If From Plan Edge-AK contains 33 LSPs and To Plan Edge-EP contains 23 LSPs, the patch file identifies which 10 LSPs to delete from plan Edge-AK to create plan Edge-EP.
- If From Plan Edge-AK contains 10 LSPs and To Plan Edge-EP contains 15 LSPs, the patch file identifies which 5 LSPs to add to plan Edge-AK to create plan Edge-EP.
- If both plan files contain the same LSP, but in From Plan Edge-AK the LSP has a SetupBW property equal to 100, whereas in the To Plan Edge-EP it does not, the patch file identifies the need to modify the SetupBW property of this LSP in plan Edge-AK so that it matches plan Edge-EP.
Step 1![]() Open the two plan files that you are using for the patch file creation.
Open the two plan files that you are using for the patch file creation.
Step 2![]() From the plan file used as the To Plan, which is the plan file you want to achieve using the patch file, choose Tools > Patches > Create.
From the plan file used as the To Plan, which is the plan file you want to achieve using the patch file, choose Tools > Patches > Create.
Step 3![]() In the From Plan field, choose one of the following options:
In the From Plan field, choose one of the following options:
Step 4![]() The default patch filename combines the From and To plan filenames. If needed, change the filename. It must have a.plp extension. Unless you want the patch file to be overwritten, the patch filename must be unique to its location.
The default patch filename combines the From and To plan filenames. If needed, change the filename. It must have a.plp extension. Unless you want the patch file to be overwritten, the patch filename must be unique to its location.
Step 5![]() Enter or browse to the location where you want the resulting patch file to reside.
Enter or browse to the location where you want the resulting patch file to reside.
Applying Patch Files
You can apply patch files to plan files.
Step 1![]() Open the plan file to which you want to apply the patch.
Open the plan file to which you want to apply the patch.
Step 2![]() Choose Tools > Patches > Apply.
Choose Tools > Patches > Apply.
Step 3![]() Enter or browse to the location where the patch file resides.
Enter or browse to the location where the patch file resides.
Step 4![]() Enter a unique name for the plan file you want to create as a result of this applied patch.
Enter a unique name for the plan file you want to create as a result of this applied patch.
Step 5![]() Specify whether you want to stop or continue in case of error.
Specify whether you want to stop or continue in case of error.
Step 6![]() To verify the patch file’s contents before applying it, click View Patch. (After viewing the patch, click Close.)
To verify the patch file’s contents before applying it, click View Patch. (After viewing the patch, click Close.)
Viewing Patch Files
Viewing patch files lets you ensure they meet your needs before applying or deploying them.
Step 1![]() Choose Tools > Patches > View.
Choose Tools > Patches > View.
Step 2![]() Browse to and choose the patch file, and then click Open.
Browse to and choose the patch file, and then click Open.
Step 3![]() View the patch and then click one of the following:
View the patch and then click one of the following:
- Send Patch —To deploy the patch as is.
- Edit Patch —To edit the patch before sending it. A dialog box opens, displaying the contents of the patch as XML text. You can save or discard the patch text edits. The tool warns you if you try to save invalid XML syntax. You can right-click in the patch text dialog and choose Undo to undo changes. Other standard text editing (cut, copy, paste, and so on) is also supported.
- Close —To close the dialog box without deploying the patch.
Sending Patch Files
When sending a patch file, it is applied to the specified network, and related deployment actions are triggered.
Step 1![]() Choose Tools > Patches > Send.
Choose Tools > Patches > Send.
Step 2![]() Browse to or enter the full path to the patch file.
Browse to or enter the full path to the patch file.
Step 3![]() Identify the remote server:
Identify the remote server:
a.![]() Enter or choose the hostname or IP address of the server.
Enter or choose the hostname or IP address of the server.
b.![]() Specify how to connect to the server by entering or choosing the port number and network.
Specify how to connect to the server by entering or choosing the port number and network.
To automatically populate the Network field with the list of available networks, click Refresh List of Networks.
c.![]() If authentication is enabled, enter the same username and password. If authentication is disabled, the username and password fields must be empty.
If authentication is enabled, enter the same username and password. If authentication is disabled, the username and password fields must be empty.
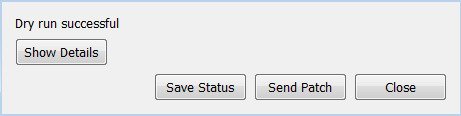
Step 4![]() (Optional) Check Dry Run.
(Optional) Check Dry Run.
Best practice is to perform a dry run to verify the patch file can be successfully applied. If you choose this option, a status popup shows whether the deployment of this patch would be successful, unsuccessful, or only partially successful. To save the status of the dry run, click Save Status.

Tip If you check Dry Run or set the Test Option to Test Only, and the patch dry run succeeds, you can deploy the patch easily. Click Send Patch in the status popup; you then return to the Send Patch dialog box with the patch preselected.
Step 5![]() Specify what to do in case of an error: roll back, stop, or continue.
Specify what to do in case of an error: roll back, stop, or continue.
Step 6![]() Click View Patch to ensure the patch meet your needs before deploying it. (After viewing the patch, click Close.)
Click View Patch to ensure the patch meet your needs before deploying it. (After viewing the patch, click Close.)
Saving and Clearing Settings
Step 1![]() To save all settings for use the next time you open the Send Patch dialog box, check Save Settings. This saves all settings whether the fields are empty or not.
To save all settings for use the next time you open the Send Patch dialog box, check Save Settings. This saves all settings whether the fields are empty or not.
Step 2![]() To save the authentication password, check Save Password.
To save the authentication password, check Save Password.
Step 3![]() To clear all current user-specified settings from the fields, click Clear Settings. Note that this does not clear the default port value, although any manual entries are cleared.
To clear all current user-specified settings from the fields, click Clear Settings. Note that this does not clear the default port value, although any manual entries are cleared.
Step 4![]() To delete all user-specific settings so the next time you open the Send Patch dialog box all fields are empty (except for the default port value), follow these steps:
To delete all user-specific settings so the next time you open the Send Patch dialog box all fields are empty (except for the default port value), follow these steps:
b.![]() Ensure that Save Settings is checked.
Ensure that Save Settings is checked.
d.![]() At the prompt to continue, click Yes.
At the prompt to continue, click Yes.
 Feedback