Cisco WAE 6.3.1 Network Visualization Guide
Bias-Free Language
The documentation set for this product strives to use bias-free language. For the purposes of this documentation set, bias-free is defined as language that does not imply discrimination based on age, disability, gender, racial identity, ethnic identity, sexual orientation, socioeconomic status, and intersectionality. Exceptions may be present in the documentation due to language that is hardcoded in the user interfaces of the product software, language used based on RFP documentation, or language that is used by a referenced third-party product. Learn more about how Cisco is using Inclusive Language.
- Updated:
- January 11, 2016
Chapter: Access Remote WAE Automation Server
Access Remote WAE Automation Server
From the WAE Design GUI, you can open plan files residing on a remote WAE Automation server to make modifications before deploying LSPs or saving the plan file back to the server.
To work with files being deployed to the network or saved to the WAE Automation server, you need to understand these two terms.
Prerequisites
For information on deployment prerequisites, see the WAE Platform Configuration Guide.
- You must know the username and password of the WAE Automation server, or its authentication must be disabled.
- If using the staging area, it must already exist on the server, and you must know the stage ID.
- The WAE Automation server must be configured for the type of deployment you are using, and there are further prerequisites for this server.
Open Remote Plan File
Step 1![]() Select the File->Open from->WAE menu.
Select the File->Open from->WAE menu.
Step 2![]() Identify the remote server using the steps outlined in the Identify Server Location section.
Identify the remote server using the steps outlined in the Identify Server Location section.
Step 3![]() If opening a plan file from a staging area, enter the stage ID. If left blank, the working plan file is opened.
If opening a plan file from a staging area, enter the stage ID. If left blank, the working plan file is opened.
Deploy to the Network
You have two options for deploying LSPs to the network. One is using a patch file, and the other is using a plan file.

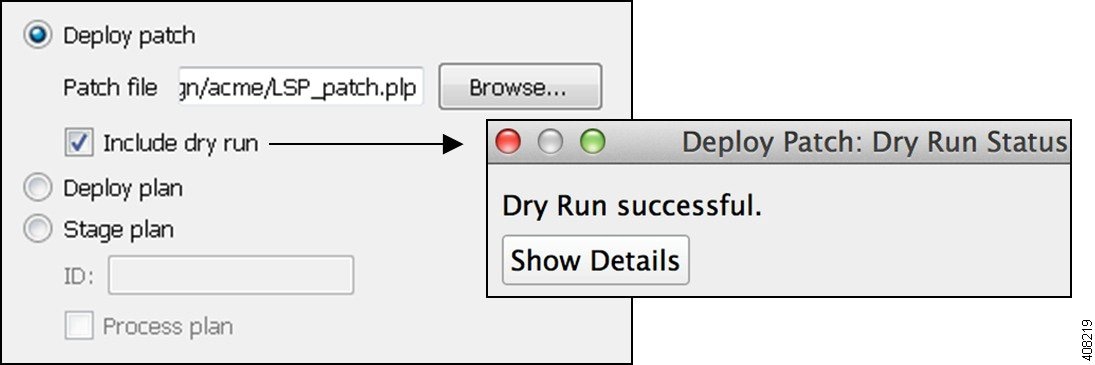
Note![]() It is strongly recommended that you verify a patch file or plan file before deploying LSPs to the network. The patch file can be verified via the View Dry Run option. Verification of the plan file is a manual process.
It is strongly recommended that you verify a patch file or plan file before deploying LSPs to the network. The patch file can be verified via the View Dry Run option. Verification of the plan file is a manual process.
Deploy Patch Files
When deploying a patch file, it is applied to the working plan file that currently resides on the server, and the working plan file is then deployed to the network.
For general descriptions of patch files and plan files, see the “Plan Files and Patch Files” chapter in the WAE Design User Guide. To create patch files, use the Compare Plans report tool; for information, see the “Reports” chapter in the WAE Design User Guide.
Note![]() You can only deploy new, modified, and deleted LSPs.
You can only deploy new, modified, and deleted LSPs.
WAE Design Patch Workflow
When deploying patch files, one potential workflow is the following.
1.![]() Open a plan file from a WAE Automation server.
Open a plan file from a WAE Automation server.
2.![]() Duplicate the plan file by saving it as a different name.
Duplicate the plan file by saving it as a different name.
3.![]() Make LSP modifications as needed in the duplicated plan file.
Make LSP modifications as needed in the duplicated plan file.
4.![]() Open both plan files, and create a comparison report of the two using the option to create a patch file.
Open both plan files, and create a comparison report of the two using the option to create a patch file.
Patch Deployment
Step 1![]() Select the File->Save to->WAE menu.
Select the File->Save to->WAE menu.
Step 2![]() Identify the remote server using the steps outlined in the Identify Server Location section.
Identify the remote server using the steps outlined in the Identify Server Location section.
If deploying a patch file, you can browse to or enter its full path. Best practice is to select View Dry Run to verify the patch file can be successfully applied to the working plan file on the server. If you choose this option, a dialog box appears showing the results as successful or failed on a per-LSP basis. To see more details, which can be helpful in troubleshooting issues before deploying, click the Show Details button. Once you have verified the information, click OK to close it.
Step 4![]() Click OK. A Deployment Status window opens, providing information as to the success or failure of the deployment to the network. Click the Show Details button for more information on a per-LSP basis.
Click OK. A Deployment Status window opens, providing information as to the success or failure of the deployment to the network. Click the Show Details button for more information on a per-LSP basis.
Deploy Plans
When deploying a plan file, it is compared to the working plan file that currently resides on the server, and then the LSP differences are deployed directly to the network. A copy of it is also saved to the working plan file area.
Step 1![]() Select the File->Save to->WAE menu.
Select the File->Save to->WAE menu.
Step 2![]() Identify the remote server using the steps outlined in the Identify Server Location section.
Identify the remote server using the steps outlined in the Identify Server Location section.
Save to the WAE Automation Server
You can save plan files to either the working plan file area or staging area. You can optionally “process” the plan so that upon querying a demand, worst-case analysis is automatically performed on interfaces, circuits, and SRLGs. Note that these plan files are not stored with the plan files generated by WAE Collector.
Saving the plan file to the working area overwrites the existing plan file. This means that any newly discovered or recently modified plan files are overwritten. For this reason, if you are not deploying a patch file or plan file, it is a best practice to save plan files to a staging area.
Step 1![]() Select the File->Save to->WAE menu.
Select the File->Save to->WAE menu.
Step 2![]() Identify the remote server using the steps outlined in the Identify Server Location section.
Identify the remote server using the steps outlined in the Identify Server Location section.
Step 3![]() Select the Save Plan option.
Select the Save Plan option.
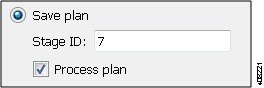
Step 4![]() If using a staging area for this access, enter the stage ID number. If this field is left empty, the plan file is saved to the working plan area.
If using a staging area for this access, enter the stage ID number. If this field is left empty, the plan file is saved to the working plan area.
Step 5![]() (Optional) to simulate failure scenarios such that upon querying a demand, worst-case analysis is automatically performed on interfaces, circuits, and SRLGs, select the Process Plan option.
(Optional) to simulate failure scenarios such that upon querying a demand, worst-case analysis is automatically performed on interfaces, circuits, and SRLGs, select the Process Plan option.
Identify Server Location
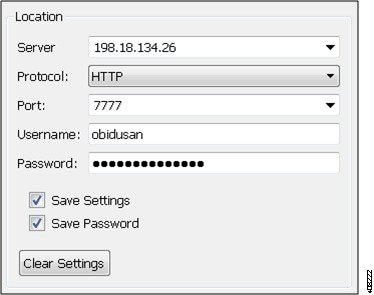
Step 1![]() After opening the dialog box, enter or select the hostname or IP address of the server.
After opening the dialog box, enter or select the hostname or IP address of the server.
Step 2![]() Identify how to connect to the server by selecting the appropriate protocol and by entering or selecting the port number (for example, HTTP 7777).
Identify how to connect to the server by selecting the appropriate protocol and by entering or selecting the port number (for example, HTTP 7777).
Step 3![]() If the authentication is enabled, enter the same username and password. If the authentication is disabled, the username and password fields must be empty.
If the authentication is enabled, enter the same username and password. If the authentication is disabled, the username and password fields must be empty.
Save and Clear Settings
- To save all settings for use the next time you open the remote access dialog box, click Save Settings. This saves all settings whether the fields and all entries in the drop-down lists are empty or not. You can optionally save the authentication password.
- To clear all current user-specified settings from the fields and from the drop-down lists, click Clear Settings. Note that this does not clear the default Protocol, Port, and Stage ID values, though manual entries in these fields are cleared.
- To delete all user-specific settings so the next time you open the remote access dialog box all fields and all drop-down lists are empty (except for the default Protocol, Port, and Stage ID values), follow these steps.
Ensure Save Settings is enabled.
Click OK to exit. Upon being prompted for whether to continue, click Yes.
 Feedback