- Introduction
- Getting Started with Cisco Virtual Topology System
- Managing Local Users and Groups
- Monitoring Cisco VTS
- Managing Inventory
- Managing Resources
- Creating and Managing Admin Domains
- Managing Templates
- Managing Tenants
- Deploying Security Groups
- Provisioning Overlay Networks
- Viewing Overlay Details
- Administering Cisco VTS
- Service Extension Templates-Supported Configuration Examples
- Supported Underlay Configuration Examples
- OpenStack Configuration for SR-IOV Support
- collectd Plugin Configuration for VTC and VTF
- collectd Output JSON Examples
Cisco Virtual Topology System (VTS) 2.6.1 User Guide
Bias-Free Language
The documentation set for this product strives to use bias-free language. For the purposes of this documentation set, bias-free is defined as language that does not imply discrimination based on age, disability, gender, racial identity, ethnic identity, sexual orientation, socioeconomic status, and intersectionality. Exceptions may be present in the documentation due to language that is hardcoded in the user interfaces of the product software, language used based on RFP documentation, or language that is used by a referenced third-party product. Learn more about how Cisco is using Inclusive Language.
- Updated:
- March 30, 2018
Chapter: Managing Templates
Managing
Templates
A template is a container of configurations, which can be applied to a target such as a device or a router.
- Overlay Templates—The
following types of overlay templates are supported.
-
Route templates—A route template is a template that lets you configure static routes and route targets. This template can be applied to a tenant or a router. It is supported in a set up that has only Cisco ASR 9000 Series Aggregation Services Routers as DCI.
Only integrated DCI mode is supported. VRF-peering mode is not supported.
-
L3 Service Extension templates—An L3 Service Extension template allows you to extend Cisco VTS Layer 3 service configuration on routers or tenants.
The configuration you define in the service extension template, along with the out-of-the-box Cisco VTS L3 configuration, will be pushed to the device to get the combined configuration on the device. Service extension templates do not allow you to configure any parameter that Cisco VTS configures out-of-the-box.
One device can have multiple templates. One template can be attached to multiple devices. The admin has to ensure that the templates do not have conflicting configuration.
Currently, L3 Service Extension templates are supported for the following platforms: You can modify any L3 service related configuration that is pushed on Cisco ASR 9000 series devices in integrated mode (DC gateway and DCI is the same physical box) or VRF peering mode. In VRF peering mode, Cisco Nexus 9000 series device has to be configured as the border leaf. You must have an external network, and the External network should be set as the Router gateway. If you do not have the external gateway set, the template will be attached to the router, but configuration will not be pushed. After you have your external network as the router gateway, it will push the configuration.
- L2 Service Extension
templates—An L2 Service Extension template allows you to extend Cisco VTS Layer
2 service configuration.
The creation of L2 Service Extension templates is done by authoring configuration that are specific to a device type. You can modify the L2 configuration that is attached to the network. The configuration is for the L2 construct which can be applied to the virtual interface. Following L2 service configuration templates are supported: -
L2 QoS—Supported on Cisco Nexus 9000 series. See Important Notes—L2 QoS Template.
-
VPLS—Supported on Cisco ASR 9000 series. The L2 Extension templates for Cisco ASR 9000 series devices include the VPLS configuration under the L2VPN and EVPN containers. See Important Notes—VPLS Template.
-
-
- Underlay
template—Underlay templates enables you to configure the Day Zero
configuration on underlay devices via the VTS UI.

Note
If device templates overwrite any VTS service configurations, these configurations would stay even after the device templates are detached/removed. To reinstate the service configurations, you need to redeploy the services.
The overlay template can be used with multiple routers or tenants. You can either associate the template while you create the router or tenant, or associate a template to a tenant or router you have already created, while you edit the tenant or router.
When you detach the overlay template from the tenant, it cleans up the configuration on the device.
Note | For route templates, you can have only one instance of a template type per tenant/router. For example, let the template types be Temp A and Temp B, and the instance of Temp A be Ins A and that of Temp B be Ins B. Now, Ins A and Ins B can be applied to a tenant/router. However, Ins A and Ins A’, where Ins A’ is a second instance of Temp A, cannot be applied at the same time on the tenant/router. |
Cisco VTS requires you to preview the template configuration before you attach, detach, or edit L2 Service Extension, L3 Service Extension, and Device Templates. See Previewing Template Configuration for details.
The following sections provide more details about working with templates:
- Creating Route Templates
- Creating L3 Extension Templates
- Editing Templates
- Copying a Template
- Deleting Templates
- Importing and Exporting Templates
- Attaching Templates to Routers
- Creating L2 Extension Templates
- Creating Underlay Templates
- Previewing Template Configuration
- Searching Template Content
Creating Route Templates
To create templates:
| Step 1 | Go to Templates > Overlay Template Management. The Templates / Overlay Template Management page appears. |
| Step 2 | Click Add (+). The Create Template page appears. |
| Step 3 | Enter a name for the template in the Template Name field. Only alphabets, numbers, and special characters ., _ and - are allowed. The maximum character limit is 128. |
| Step 4 | Enter a description for the template, in the Description field. This is optional. |
| Step 5 | Choose the Template Type. For route templates, select Route. |
| Step 6 | Click Add Configuration. The New Template page appears. |
| Step 7 | Enter a route target seed. This can be an integer value in the range of 1-16777215. Route Target with seed is pushed to DCI, and Leaf if eBGP is enabled. |
| Step 8 | Enable or Disable the Auto Route Target option. By default, it is enabled. See Disabling Auto Route Target Configuration for details. |
| Step 9 | Add Route Targets. See Adding Route Targets for details. |
| Step 10 | Click Save. The template is saved and listed in the Template Management page. |
Adding Route Targets
Adding Fabric Internal Route Targets
Adding Fabric External Route Targets
To add Fabric Eternal route targets to import/export route targets to the DCI:
| Step 1 | Click Fabric External RT tab. | ||
| Step 2 | If you want to use system defined RT, choose Auto RT- System Defined from the dropdown. Else, choose Auto RT - Custom. You must add at least two custom route targets. | ||
| Step 3 | Click
Add
(+). The Add Route Target(s) popup appears.
Enter the route targets to be shared across the different VRFs. The valid route target formats are: Where: | ||
| Step 4 | Specify
whether route targets are to be imported or exported. To do this, select the
desired value from the Direction drop-down.
The type will be Fabric External, by default. | ||
| Step 5 | Click Add (+). |
Disabling Auto Route Target Configuration
This is to make sure that when auto RT is disabled, the static route targets defined in the template (which will then be pushed to the DCI) are sufficient to enable the DCI to communicate with the TORs properly.
Whenever you enable Auto Route Target again, the route targets created using the route target seed (if provided) or ASN# gets pushed to devices. In addition, the RT seed text box gets enabled again.
Creating L3 Extension Templates
To create L3 Extension templates:
| Step 1 | Go to Templates > Overlay Template Management. The Templates / Overlay Template Management page appears. | ||||
| Step 2 | Click Add (+). The Create Template page appears. | ||||
| Step 3 | Enter a name for the template in the Template Name field. Only alphabets, numbers, and special characters ., _ and - are allowed. The maximum character limit is 128. | ||||
| Step 4 | Enter a description for the template, in the Description field. This is optional. | ||||
| Step 5 | Choose L3 Extension as the template type. | ||||
| Step 6 | Choose the Device Platform. Currently, the following platforms are supported: | ||||
| Step 7 | Click Add Configuration to add configuration to the template. The Author Template window appears. | ||||
| Step 8 | Click
Configuration icon to get the Add Configuration
menu. The flyout menu displays all the configuration options that are available
at the root level. You can search for the desired configuration in the Search
field.
| ||||
| Step 9 | Choose the
desired configuration. The configuration you chose gets added as a child node
in the Config tree, on the left pane.
You may add further configuration to the node that you have added by clicking the Configuration icon. If you want to delete the configuration, click the Delete (X) icon.
You can toggle between the views using the toggle button on the top right of the config pane. For configuration items which can take multiple instances, the Add Instance button appears in the authoring pane. You can add an instance by clicking Add Instance. Click Add (+) after you add configuration for the instance.
| ||||
| Step 10 | Click
Save
Template.
The template gets added to the Template Management screen. You can click on the template to get a summary of the template, in the Template Summary page. You can expand the Config node to view the template configuration. You can edit the template from the Summary screen, by clicking Edit Template Config. |
Supported System Variables
For certain configurations, some of the options that are available for selection have the %v suffix. The %v suffix denotes that it is a system variable. When the Cisco VTS comes across such a variable in the template, it translates that into the value that it had configured for that device.
Supported variables in Cisco Nexus 5000, Cisco Nexus 7000, and Cisco Nexus 9000 Series for L3 Service Extension:
Supported variables in Cisco Nexus 9000 Series for L2 Service Extension:
Supported variables in Cisco ASR 9000 Series for L3 Service Extension:
Supported variables in Cisco ASR 9000 Series for L2 Service Extension:
Editing Templates
You can modify a template that you have created.
| Step 1 | Go to Templates > Device Template Management or Templates > Device Template Management. The Templates / Device Template Management or the Templates / Overlay Template Management page lists all the templates you have created. | ||
| Step 2 | Select the check
box corresponding to the template you need to edit, and click the edit icon.
| ||
| Step 3 | Make the desired
changes, then click
Preview Config to view the configuration
summary for the device.
| ||
| Step 4 | Click Save and Apply. |
Copying a Template
You can copy a template and save it with a different name. You can also modify the parameters while you copy.
Deleting Templates
Note | You can delete a template only if it is not attached to either a tenant or router. If it is attached to a tenant or router, an error is displayed when you try to delete. You need to detach the template from tenant or router before deleting the template. |
| Step 1 | Go to Templates > Template Management. The Templates / Template Management page lists all the templates you have created. |
| Step 2 | Select the check
box corresponding to the template you need to delete, and click the
Delete
(X).
The Delete popup appears. |
| Step 3 | Click Delete (X) to delete the template. |
Importing and Exporting Templates
You can import and export Cisco VTS device templates and overlay templates.
If you have master templates created on a Cisco VTS lab instance, these can be exported to an external server. Modifications pertaining to the Cisco VTS production instance can be done on the server, and then the templates can be imported on the production instance. This helps you to avoid creating similar templates on multiple production instances.
Note | Templates that are imported into Cisco VTS need to be in the valid JSON format. You might encounter errors if the format is incorrect. |
The following sections give details about importing and exporting templates.
Importing Templates
You can import a device templates or overlay templates into Cisco VTS. You can import a single file containing single/multiple device templates at a time. You cannot import templates with names that conflict with existing templates in Cisco VTS .
To import templates:
Exporting Templates
You can export a device templates or overlay templates from Cisco VTS to an external server. You can export a single or template in bulk.
To export templates:
Attaching Templates to Routers
You can attach templates to routers while adding a router or while modifying an existing router. By default, router inherits the template from the tenant. You can override an inherited template while you create or modify a router, by selecting a different template, or creating a new template and attaching to the router.
Note | The configuration is pushed to the device only when Port Attach is done. If a router is created and template is applied to the tenant or router, but port is not attached, then the template configuration is not pushed. See Creating a Network using Cisco VTS GUI for details about attaching port. |
Attaching Templates while Adding Routers
You can attach L3 Extension templates or Route template while you add a router.
| Step 1 | Click Overlay > Router. The Overlay / Router page is displayed. | ||
| Step 2 | Click Add (+) icon. The Overlay / Network / Add Router page is displayed. | ||
| Step 3 | Click the Templates tab. The table displays the L3 extension templates and Route templates you have created for all supported device platforms. The drop-down list lets you display the desired template type for the desired device platform. | ||
| Step 4 | Select the
Template type from
Showing drop-down.
Template Type can be L3 Extension or Route. | ||
| Step 5 | Select the
template(s) and click the
Attach icon to attach the device(s).
| ||
| Step 6 | Selected
templates are listed in the Selected Templates pane. Select the desired
template from the list, and then select the device(s) you want to attach.
You may choose to apply the selected templates in bulk to all of the devices, or choose specific devices on which you may want to apply the template. You can remove the templates that you do not want to attach by clicking the Remove icon. | ||
| Step 7 | For L3
Extension templates, you must preview the configuration before you proceed.
Select the device(s), then click
Preview
Config.. The Preview Config Summary popup displays a preview of the
configuration summary for each of the devices. See
Previewing Template Configuration
section for details.
| ||
| Step 8 | Click Attach. The Overlay / Network / Add Router page appears. | ||
| Step 9 | Click
Save.
|
Attaching Template while Editing a Router
You can attach L3 Extension templates or Route template while you edit a router.
| Step 1 | Go to Overlay > Router. The Overlay / Router page lists all the routers. | ||
| Step 2 | Select the Router you want to attach the template to, then click Edit icon. The Overlay / Network / Edit Router page is displayed. | ||
| Step 3 | Click the Templates tab. The table displays the L3 extension templates and Route templates you have created for all supported device platforms. The drop-down list lets you display the desired template type for the desired device platform. | ||
| Step 4 | Select the
Template type from
Showing drop-down.
Template Type can be L3 Extension or Route. | ||
| Step 5 | Select the
template(s) and click the
Attach icon to attach the device(s).
| ||
| Step 6 | Selected
templates are listed in the Selected Templates pane. Select the desired
template from the list, and then select the device(s) you want to attach.
You may choose to apply the selected templates in bulk to all of the devices, or choose specific devices on which you may want to apply the template. You can remove the templates that you do not want to attach by clicking the Remove icon. | ||
| Step 7 | For L3
Extension templates, you must preview the configuration before you proceed.
Select the device(s), then click
Preview
Config.. The Preview Config Summary popup displays a preview of the
configuration summary for each of the devices. See
Previewing Template Configuration
section for details.
| ||
| Step 8 | Click Attach. The Overlay / Network / Add Router page appears. | ||
| Step 9 | Click
Save.
|
Creating L2 Extension Templates
To create L2 Extension templates:
| Step 1 | Go to Templates > Overlay Template Management. The Templates / Overlay Template Management page appears. | ||
| Step 2 | Click Add (+). The Create Template page appears. | ||
| Step 3 | Enter a name for the template in the Template Name field. Only alphabets, numbers, and special characters. , _ and - are allowed. The maximum character limit is 128. | ||
| Step 4 | Enter a description for the template, in the Description field. This is optional. | ||
| Step 5 | Choose L2 Extension as the template type. | ||
| Step 6 | Choose the Device Platform. Currently, the following platforms are supported: | ||
| Step 7 | Click Add Configuration to add configuration to the template. The Author Template window appears. | ||
| Step 8 | Click
Configuration icon to get the Add
Configuration menu. The flyout menu displays all the configuration options that
are available at the root level. You can search for the desired configuration
in the Search field or configuration items which can take multiple instances,
the Add Configurations pane appears in the authoring pane.
| ||
| Step 9 | Choose the desired configuration. The configuration you chose gets added as a child node in the Config tree, on the left pane. | ||
| Step 10 | Click
Add Instance
to add an instance. New Instance gets added on the left pane.
For configuration items which can take multiple instances, the Add Instance button appears in the authoring pane. Click Add (+) after you add the configuration for the instance.
You can toggle between the views using the toggle button on the top right of the config pane. | ||
| Step 11 | Click Save Template, after you finish adding the desired configuration. |
Important Notes—L2 QoS Template
Review the section below before you create QoS template:
- Policy map has to be created on the devices as part of Day Zero configuration or configured using underlay templates. Only those devices with the service policy map configured will be displayed in the template association UI.
-
Under the vlan configuration Cisco Nexus 9000 supports only service policy with type qos. Both input and output service policies may be configured in the same template.
-
While applying L2 QoS templates, only those devices with the service policy map configured will be shown. The policy map has to be configured on the device for the device to be displayed here.
Important Notes—VPLS Template
Review the section below before you create a VPLS template:
- Ensure that the necessary Day Zero configuration is complete on the DCI. See Cisco VTS Day Zero Configuration Examples document for details.
- Create the Admin Domain. Make sure you link the L2GW and DCGW, which is required for L2VNI. See Creating an Admin Domain for details.
- Create the DCI Interconnect profile with the specific details. See Creating DCI Interconnect Profiles for details.
- Associate the DCI Interconnect profile to the DCI in the Admin Domain under DCI Interconnect profile tab.
- Create the L2 Extended Network with an EVI ID assigned to the Network under L2VPN tab. See Creating a Network using Cisco VTS GUI for details.
- Make sure the subnets and port attach is done for the Network.
- You can create a template with just PW (pseudo wire) configuration, or just Access VFI configuration, or can have both configurations in one template. Make sure that you enter correct PW and Acess VFI under L2VPN, in the DC that is not managed by VTS.
-
The following are supported as system variables in VPLS templates:
Attaching Devices to L2 Extension Templates
You can attach a device to an L2 Extension template while you create a network, or to an existing network. To attach a device to an L2 Extension template:
| Step 1 | Click Overlay > Network. The Overlay / Network page is displayed. | ||
| Step 2 | Select the network for which you want to attach the L2 extension template, then click Edit icon. | ||
| Step 3 | Click the Templates tab. The table displays a list of all L2 extension templates you have created for all supported device platforms. The drop-down list lets you choose the desired device platform. | ||
| Step 4 | Select the
desired template(s), then click the
Attach icon.
| ||
| Step 5 | Selected
templates are listed in the Selected Templates pane. Select the desired
template from the list, and then select the device(s) you want to attach.
You may choose to apply the selected templates in bulk to all of the devices, or choose specific devices on which you may want to apply the template. You can remove the templates that you do not want to attach by clicking the Remove icon. | ||
| Step 6 | Select the device(s), then click Preview Config.. The Preview Config Summary popup displays a preview of the configuration summary for each of the devices. See Previewing Template Configuration section for details. | ||
| Step 7 | After you review the configuration changes, click Attach. | ||
| Step 8 | Click
Save .
|
Detaching Devices from L2 Extension Templates
You can detach a device from an L2 Extension template only to an existing network. To detach a device from an L2 Extension template:
| Step 1 | Click Overlay > Network. The Overlay / Network page is displayed. | ||
| Step 2 | Select the network for which you want to attach the L2 extension template, then click Edit icon. | ||
| Step 3 | Click the Templates tab. The table displays a list of all L2 extension templates you have created for all supported device platforms. The drop-down list lets you choose the desired device platform. | ||
| Step 4 | Select the
desired template(s), then click the
Detach icon.
| ||
| Step 5 | Selected
templates are listed in the Selected Templates pane. Select the desired
template from the list, and then select the device(s) you want to attach.
You may choose to apply the selected templates in bulk to all of the devices, or choose specific devices on which you may want to apply the template. You can remove the templates that you do not want to detach by clicking the Remove icon. | ||
| Step 6 | Select the device(s), then click Preview Config.. The Preview Config Summary popup displays a preview of the configuration summary for each of the devices. See Previewing Template Configuration section for details. | ||
| Step 7 | After you review the configuration changes, click Detach. | ||
| Step 8 | Click
Save.
|
Creating Underlay Templates
To create Underlay templates:
| Step 1 | Go to Templates > Device Template Management. The Templates / Device Template Management page appears. |
| Step 2 | Click Add (+). The Create Template page appears. |
| Step 3 | Enter a name for the template in the Template Name field. Only alphabets, numbers, and special characters., _ and - are allowed. The template name requires at least one alphabet or number. The maximum character limit is 128. |
| Step 4 | Enter a description for the template, in the Description field. This is optional. |
| Step 5 | Choose the Device Platform. Currently, the following platforms are supported: |
| Step 6 | Click
Add
Configuration to add configuration to the template.
The Author Template window appears. |
| Step 7 | Click Configuration icon to get the Add Configuration menu. The flyout menu displays all the configuration options that are available at the root level. You can search for the desired configuration in the Search field. |
| Step 8 | Choose the
desired configuration. The configuration you chose gets added as a child node
in the Config tree, on the left pane.
You may add further configuration to the node that you have added by clicking the Configuration icon. If you want to delete the configuration, click the Delete (X) icon. For configuration items which can take multiple instances, the Add Instance button appears in the authoring pane. You can add an instance by clicking Add Instance. Click Add (+) after you add the configuration for the instance. You can toggle between the views using the toggle button on the top right of the config pane. |
| Step 9 | Click
Save
Template.
The template gets added to the Template Management screen. You can click on the template to get a summary of the template, in the Template Summary page. You can expand the Config node to view the template configuration. You can edit the template from the Summary screen, by clicking Edit icon. |
Attaching Underlay Template to Devices
To attach an Underlay template to a device:
| Step 1 | Go to Inventory > Network Inventory. The Inventory > Network Inventory page appears. | ||
| Step 2 | Click
Device
Templates.
| ||
| Step 3 | Select the
template(s) and click the
Attach icon to attach the device(s).
You may choose to apply the selected templates in bulk to all of the devices, or choose specific devices on which you may want to apply the template. You can remove the templates that you do not want to attach by clicking the Remove icon. | ||
| Step 4 | Check
Devices(s) to attach the devices as per your requirement.
An attach icon is seen adjacent to the devices which have templates already attached. | ||
| Step 5 | Select the device(s), then click Preview Config.. The Preview Config Summary pop up displays a preview of the configuration summary for each of the devices. See Previewing Template Configuration section for details. | ||
| Step 6 | After you review the configuration changes, click
Attach.
The devices are successfully attached to the underlay template. |
Detaching Underlay Template from Devices
To detach an Underlay template from a device:
| Step 1 | Go to Inventory > Network Inventory. The Inventory > Network Inventory page appears. | ||
| Step 2 | Click
Device
Templates.
| ||
| Step 3 | Select the
template(s) and click the
Detach icon to attach the device(s).
You may choose to apply the selected templates in bulk to all of the devices, or choose specific devices on which you may want to apply the template. You can remove the templates that you do not want to attach by clicking the Remove icon. | ||
| Step 4 | Check Devices(s) to detach the devices. | ||
| Step 5 | Select the device(s), then click Preview Config.. The Preview Config Summary pop up displays a preview of the configuration summary for each of the devices. See Previewing Template Configuration section for details. | ||
| Step 6 | After you review the configuration changes, click
Detach.
The devices are successfully detached from the underlay template. |
Previewing Template Configuration
The Preview Config button displays the Preview Config Summary popup, which displays the configuration difference that will be pushed on each device. It also shows the timestamp at which the preview was run. The Change Summary gives a count of the number of configuration additions and deletions.
The configuration that is added to the device is shown in Green. The configuration that is removed is shown in Red. A + and - sign shows the additions and deletions respectively. You can click the > icon to get a preview of the configuration.
Preview Config Summary shows the configuration difference for all devices, including devices to which the template was previously attached. Devices to which the template has already been attached will be preselected and grayed out.
The Red out of sync icon indicates that the device is not in sync with the VTS database. You will not be able to attach, detach, or edit a template to the device, if the device is out of sync. You can perform the attach, detach, and edit operations only on those devices which are in sync with the VTS database (as indicated by the Green icon). However, you can still view the configuration difference with the current VTS database, using the drop-down arrow.
Note | You cannot deselect a device to which the template was previously attached, if the device is currently out of sync with VTS. This is because the UI does not allow you to deselect a device to which the template was already attached. You need to go to Network Inventory and sync the device with VTS before you proceed. |
To preview the template configuration while you edit a template, at least one device should be attached to the template before you edit the template. Otherwise, the option to preview is grayed out.
When you detach a template from a device, the Preview Config Summary shows the configuration difference, which includes the configuration that will be removed from the device upon template detachment, and the additional configuration that Cisco VTS adds to the device.
See Preview Template Configuration Examples to see examples of preview config summary for an attach, detach, and edit operation.
If the template application creates no change in the device configuration, the preview displays No difference.
For L2 Service Extension template, while you attach the template, the configuration summary shows the port configuration and the device configuration. If you have not created ports on a device during network creation, the summary will be shown as No difference for that device. This because the template configuration does not get pushed to the device unless you do a port attach.
For L3 Service Extension templates, the configuration summary shows the interface configuration and device configuration. If an interface is not attached to the Router, the configuration summary will be shown as No difference.
Under certain conditions, for instance, when the commands in the template are invalid, or if the feature is not supported by the device, the summary displays errors.
Preview Template Configuration Examples
The following images show examples of Read-only Config Preview and Preview Config during attach, detach, and edit operations, of an L2 Service Extension template, with ports on two devices, where one device is out of sync.
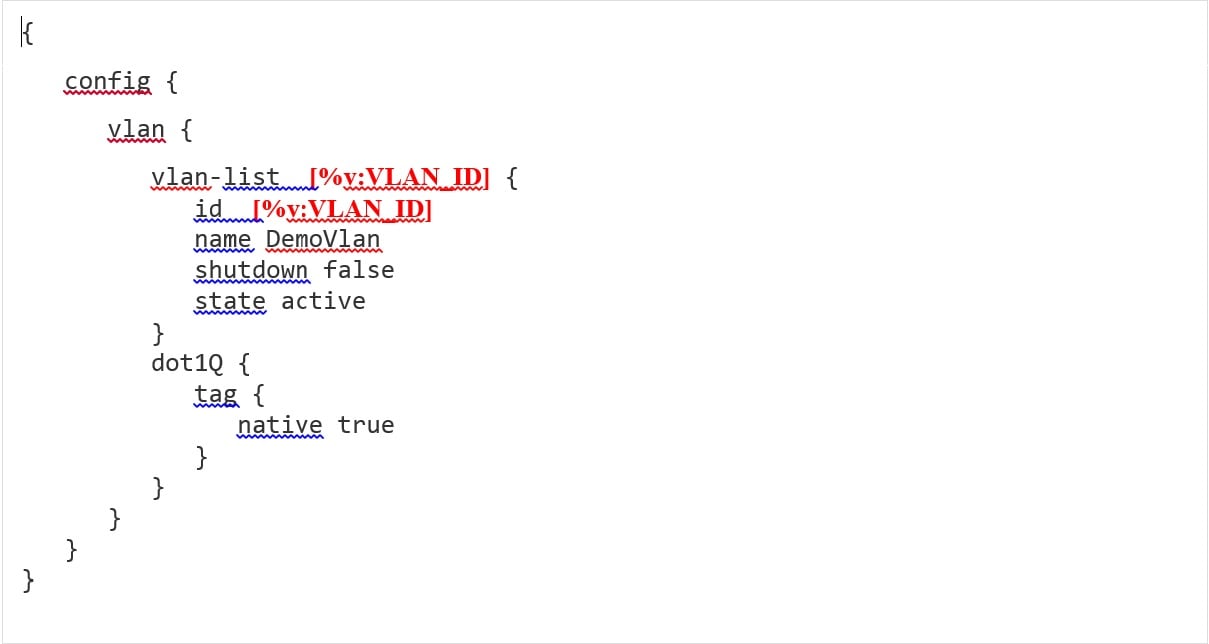
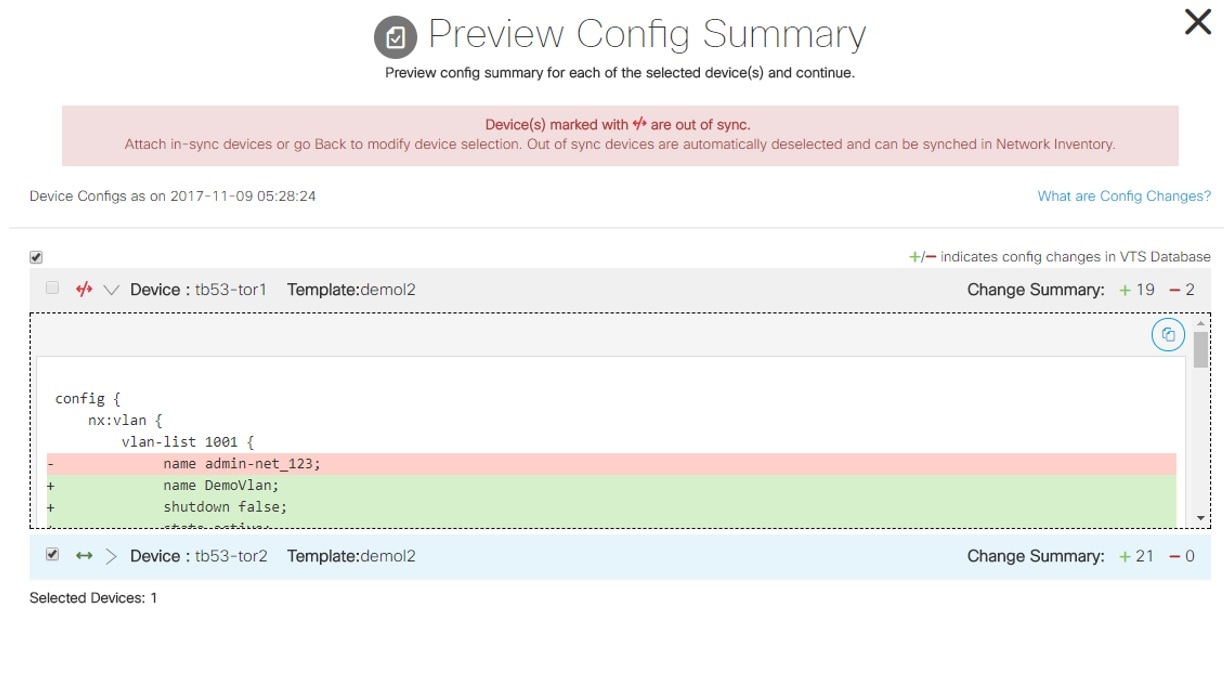
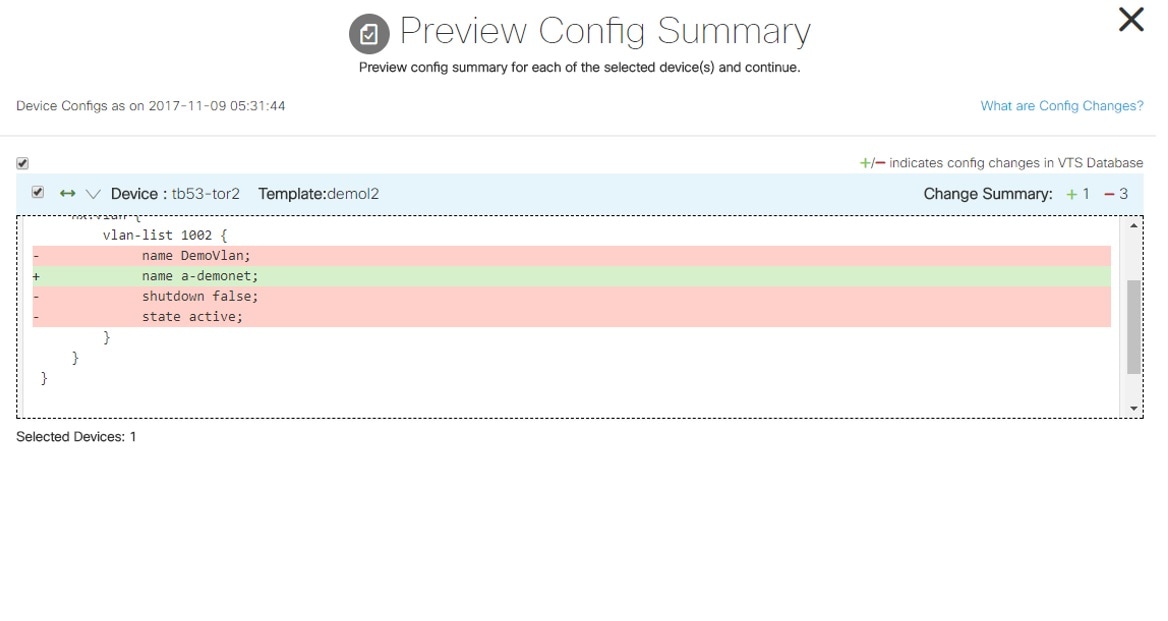
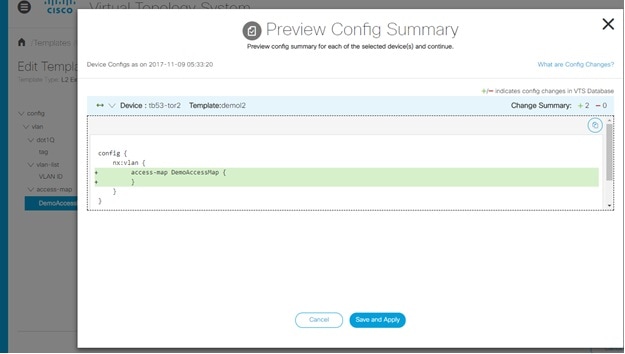
Searching Template Content
To perform a template search:
| Step 1 | Go to . The Templates / Device / Overlay Template Management page appears with a table showing a list of templates. | ||
| Step 2 | Enter the search text based on your requirement in the Search text box to search across the templates, and press Enter. The / Search Results page appears with the instances of the searched term highlighted. | ||
| Step 3 |
| ||
| Step 4 | Click the template name to view the summary page which lists the number of occurrence of the search term in that template. | ||
| Step 5 | Click on the < or > button adjacent to search term in the summary page to navigate to the instance in the search result. The summary page lists the number of occurrence of the search term in that template config (that is, in config path and config value). | ||
| Step 6 | Click Export or Edit if you want to export or edit the template. |
Using Search Hints
You can search template content using search hints. You can use the following search hints.
-
Text—Normal text-based search. For example: bgp - to search for all bgp matches
-
" "— Double quotes to search complete phrases and IP addresses. "service extension", "L3_TEMPLATE_N9K", "10.1.1.0/26", "2001:0db8:85a3:0000:0000:8a2e:0370:7334"
-
AND—Search where both terms exist. AND must be in uppercase. For example: vrf AND bgp
-
OR—Search where either of the term exists. OR must be in uppercase. For example: vrf OR bgp
-
NOT—Search excludes terms that are mentioned after NOT. NOT must be in uppercase. For example: vrf NOT bgp or (vrf AND bgp) NOT ipv6
-
*—Wildcard search. For example: *—to disp lay all search results
swi*—to search for any word that starts with 'swi'
virt*tch—to search for any word that starts with 'virt' and ends with 'tch'
-
?—Single character wildcard search. For example: te?t—to match test, text, and so on.
 Feedback