- Overview to Prime Performance Manager
- Managing Gateways and Units Using the CLI
- Managing the Web Interface
- Importing Devices From Other Cisco Prime Applications
- Discovering Devices With Prime Performance Manager
- Managing Users and Security
- Managing Reports, Dashboards, and Views
- Setting Up Reports for Specialized Technologies
- Managing Devices
- Managing Network Alarms and Events
- Creating and Managing Thresholds
- Displaying System Properties, Statuses, Messages, and Logs
- Managing Gateways and Units
- Managing High Availability
- Configuring Prime Performance Manager for Firewalls
- Managing Multi-Tenant Services
- Pushing Prime Performance Manager Data to Other Applications
- Backing Up and Restoring Prime Performance Manager
- Prime Performance Manager and IPv6
- Prime Performance Manager Commands
- Predefined Thresholds
- Compliance
Cisco Prime Performance Manager User Guide, 1.7
Bias-Free Language
The documentation set for this product strives to use bias-free language. For the purposes of this documentation set, bias-free is defined as language that does not imply discrimination based on age, disability, gender, racial identity, ethnic identity, sexual orientation, socioeconomic status, and intersectionality. Exceptions may be present in the documentation due to language that is hardcoded in the user interfaces of the product software, language used based on RFP documentation, or language that is used by a referenced third-party product. Learn more about how Cisco is using Inclusive Language.
- Updated:
- September 28, 2015
Chapter: Managing High Availability
- Managing Local High Availability
- Managing Geographical High Availability
- Displaying Geographical HA Status
- Switch the Primary and Secondary Geographical HA Gateways
- Configure Geographical HA
- Synchronizing the Geographical HA Gateways
- Freezing and Unfreezing Geographical HA Gateways
- Backing Up and Restoring Geographical HA Gateway Data
- Recovering From an HA Brain Split
- Accessing Geographical HA Gateways Using the GUI
- Managing Devices in Geographical HA Gateways
- Managing Users in Geographical HA Gateways
- Managing Reports, Views, and Groups in Geographical HA Gateways
- Managing Alarms and Events in Geographical HA Gateways
- Managing Thresholds and Upstream Alarm Hosts in Geographical HA Gateways
- Configuring SSL on Geographical HA Gateways and Remote Units
- Unit Redundancy Groups and Geographical HA
- Deploying Prime Performance Manager in an Integrated Geographical HA Configuration with Prime Central
Managing High Availability
Prime Performance Manager provides both local and geographical high availability. HA installations include:
Prime Performance Manager HA management procedures are provided in the following topics:
Managing Local High Availability
For local HA, Prime Performance Manager uses the Red Hat Cluster Suite (RHCS) provided with the Red Hat Enterprise Linux 5.5 (RHEL 5.5), Red Hat Enterprise Linux 5.7 (RHEL 5.7), Red Hat Enterprise Linux 5.8 (RHEL 5.8), Red Hat Enterprise Linux 5.9 (RHEL 5.9), Red Hat Enterprise Linux 5.10 (RHEL 5.10), Red Hat Enterprise Linux 5.11 (RHEL 5.11), Red Hat Enterprise Linux 6.5 (RHEL 6.5), Red Hat Enterprise Linux 6.7 (RHEL 6.7), Red Hat Enterprise Linux 6.8 (RHEL 6.8), Red Hat Enterprise Linux 6.9 (RHEL 6.9), and Red Hat Enterprise Linux 6.10 (RHEL 6.10) Advanced Program.
The RHCS cluster infrastructure provides the basic functions that allow the Prime Performance Manager gateways to work together as a cluster. RHCS components include:
- Cluster infrastructure—Provides fundamental functions for nodes to work together as a cluster: configuration-file management, membership management, lock management, and fencing.
- High Availability Service Management—Provides failover of services from one cluster node to another when a node becomes inoperative.
- Cluster administration tools—Provides configuration and management tools for setting up, configuring, and managing a Red Hat cluster including the cluster infrastructure components, the high availability and service management components, and storage.

Note![]() Before performing any RHCS configuration changes, follow the guidelines provided in Gateway HA Operations Notes.
Before performing any RHCS configuration changes, follow the guidelines provided in Gateway HA Operations Notes.
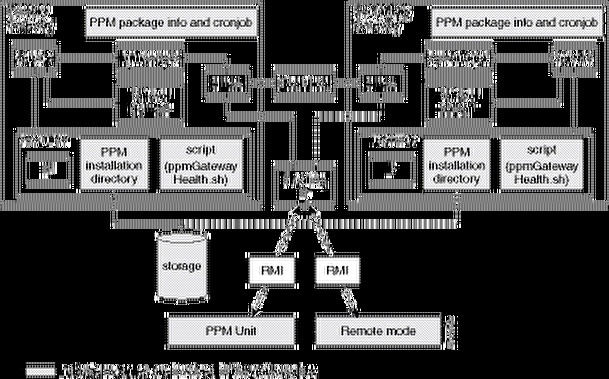
The Prime Performance Manager local HA utilizes a fencing hardware unit to cut off a gateway server from the shared storage. Fencing ensures data integrity and prevents a split brain scenario, where the gateway servers are disconnected from each other and each assumes the other has failed. If a failure occurs, the cut off can be accomplished by powering off the node with a remote power switch, disabling a switch channel, or revoking a host's SCSI 3 reservations. Figure 14-1 shows the local HA architecture.
Figure 14-1 Local High Availability Architecture
Note![]() Because of RHCS limitations, IPv6 is not supported on gateways configured for local HA.
Because of RHCS limitations, IPv6 is not supported on gateways configured for local HA.
Additional RHCS information can be found at the Red Hat website: http://www.redhat.com/.
Local HA Operations Notes
Before you perform any Prime Performance Manager local HA operation, review the following notes:
- To avoid data loss, never manually mount or unmount a gateway storage device while Prime Performance Manager local HA is running. Always stop the Prime Performance Manager local HA service first.
- Always mount a storage device to one HA gateway server; never mount the storage device to both local HA gateway servers.
- Never access the storage device directories while RHCS configuration is in progress. If RHCS configuration starts and a user accesses a storage mount directory, a mount/unmount failure will occur.
- If the local HA service is running and you want to stop, restart, or upgrade, Prime Performance Manager, or perform any similar action affecting Prime Performance Manager operations, you must:
1. Freeze the RHCS HA service following the Freezing and Unfreezing RHCS.
2. Complete the Prime Performance Manager operation.
3. Unfreeze the RHCS service following the Freezing and Unfreezing RHCS.
If you do not freeze RHCS, RHCS will consider the Prime Performance Manager action as a failure and begin the recovery process. This can include restarting and relocating Prime Performance Manager, or disabling the service, which will cause Prime Performance Manager stop working temporally.
Local HA Failovers and Switchovers
After the Prime Performance Manager gateway local HA cluster is deployed, failovers are automatic. If a single service failure occurs, RHCS attempts to restart the service. If the restart fails, the service is relocated and started on the second gateway server.
Human intervention is required only in exceptional cases, such as database corruption or a component failure, and the component is not configured for HA. Manual switchovers are performed using the RHCS web GUI or the CLI clusvcadm utility. After a failed node is repaired, you must perform a manual switchover to revert the cluster to its original configuration.
Note![]() For complete redundancy, a configuration with no single point of failure is recommended. See the RHCS documentation for recommended configurations.
For complete redundancy, a configuration with no single point of failure is recommended. See the RHCS documentation for recommended configurations.
Two general conditions can trigger Prime Performance Manager local HA failovers:
- The Linux server containing the RHCS that manages the local HA is not functioning properly, for example, network connectivity is down. If this occurs, the RHCS service is automatically relocated to the another RHCS server.
- The Prime Performance Manager gateway is not functioning properly, for example, it cannot access the database. If this occurs, RHCS initiates recovery based upon the user-configured recovery policy:
–![]() Restart (recommended)—RHCS restarts the gateway on the server where it is installed. If the restart does not succeed, RHCS initiates the Relocate policy.
Restart (recommended)—RHCS restarts the gateway on the server where it is installed. If the restart does not succeed, RHCS initiates the Relocate policy.
–![]() Relocate—RHCS switches to the backup gateway server immediately.
Relocate—RHCS switches to the backup gateway server immediately.
–![]() Disable—Do nothing; RHCS places the gateway service in disabled state.
Disable—Do nothing; RHCS places the gateway service in disabled state.
During failovers, the gateway does not respond to its attached units, so units cache their requests. After the gateway service is back up, either by restarting the primary gateway successfully or by switching to the secondary gateway, the unit resends cached requests, so no data is lost.
To change the recovery policy after RHCS configuration, use the Red Hat Conga application following procedures in the RHCS documentation. Conga runs on a standalone RHCS server; it is not part of the Prime Performance Manager local HA cluster.
Freezing and Unfreezing RHCS
If you must stop Prime Performance Manager for any reason, you must freeze RHCS so that it stops checking the Prime Performance Manager status. Freezing RHCS places it in maintenance mode. If you stop Prime Performance without freezing RHCS, the cluster will detect that the service is down and attempt to restart it.
To freeze or unfreeze the RHCS cluster service:
Step 1![]() Log into the primary local HA gateway as a root user.
Log into the primary local HA gateway as a root user.
Step 2![]() Change to the HA bin directory, for example:
Change to the HA bin directory, for example:
Step 3![]() To freeze the RHCS service, enter the following command:
To freeze the RHCS service, enter the following command:
Step 4![]() To unfreeze the RHCS service, enter the following command:
To unfreeze the RHCS service, enter the following command:
After you unfreeze the RHCS cluster service, the service returns to normal operations and checks the Prime Performance Manager HA status periodically.
Switching the RHCS Cluster Server
On occasion, you might need to switch over the RHCS cluster server. To switch the server:
Step 1![]() Log into the primary local HA gateway as a root user.
Log into the primary local HA gateway as a root user.
Step 2![]() Change to the HA lib bin directory, for example:
Change to the HA lib bin directory, for example:
Step 3![]() Enter the following command:
Enter the following command:
The RHCS service switches from the active to the standby gateway.
Note![]() All mount devices should only be accessed by Prime Performance Manager and not by other applications. For example, if you have another terminal accessing the mount device directories, use cd command to leave that directory.
All mount devices should only be accessed by Prime Performance Manager and not by other applications. For example, if you have another terminal accessing the mount device directories, use cd command to leave that directory.
Note![]() Do not perform a manual mount when the RHCS local HA service is running.
Do not perform a manual mount when the RHCS local HA service is running.
Changing the Floating IP Address
Use the following steps if, for any reason, you need to change the floating IP address for the primary and secondary local HA servers:
Step 1![]() Freeze RHCS following the Freezing and Unfreezing RHCS.
Freeze RHCS following the Freezing and Unfreezing RHCS.
Step 2![]() Stop the Prime Performance Manager gateway:
Stop the Prime Performance Manager gateway:
Step 3![]() Change the RHCS cluster service floating IP address using the Red Hat Conga GUI. (Conga runs on a standalone node and is not part of the cluster.)
Change the RHCS cluster service floating IP address using the Red Hat Conga GUI. (Conga runs on a standalone node and is not part of the cluster.)
Step 4![]() Verify that the new floating IP and its hostname mapping relationship are added in both the primary and the secondary gateways.
Verify that the new floating IP and its hostname mapping relationship are added in both the primary and the secondary gateways.
Step 5![]() On Prime Performance Manager gateway, enter the following command to change the gateway to the new floating IP address:
On Prime Performance Manager gateway, enter the following command to change the gateway to the new floating IP address:
Step 6![]() On Prime Performance Manager unit, enter the following command to change the unit to the new floating IP address:
On Prime Performance Manager unit, enter the following command to change the unit to the new floating IP address:
Step 7![]() Start Prime Performance Manager gateway and unit and make sure Prime Performance Manager gateway and unit status is OK.
Start Prime Performance Manager gateway and unit and make sure Prime Performance Manager gateway and unit status is OK.
Step 8![]() Use Conga or CLI to unfreeze the cluster service for Prime Performance Manager.
Use Conga or CLI to unfreeze the cluster service for Prime Performance Manager.
RHCS Log Messages
The RHCS log messages provide information about cluster-related issues, such as service failure. Every thirty seconds, RHCS issues status commands to check the Prime Performance Manager, internal database, and other processors. These messages are logged to /var/log/messages and can be viewed by the root user, or from the RHCS web GUI. Sample RHCS log messages are provided below:
Configuring the RHCS Conga Web Interface
The RHCS web interface is configured during installation. Use the information provided in this section only if you decide to change the web interface configuration after installation or if the web interface was not configured during installation.
Installing the RHCS web interface module on a standalone server instead of the dual primary or secondary gateway servers is recommended.
The RHCS luci web interface allows you to configure and manage storage and cluster behavior on remote systems. You will use it to manage the Cisco Prime Performance local HA. Before you begin this procedure, you should have the Red Hat Conga User Manual. It can be obtained at:
http://sources.redhat.com/cluster/conga/doc/user_manual.html
If your fencing device is supported by RHCS but not fence_ipmilan or fence_vmware_soap type, choose the Manual fencing option during the Prime Performance Manager installation. You can then configure RHCS manually using RHCS CLI or Conga GUI. Refer the Red Hat fencing configuration documentation using Conga.
Refer the following RHEL documentation:
https://access.redhat.com/documentation/en-US/Red_Hat_Enterprise_Linux/5/html/Configuration_Example_-_Fence_Devices/index.html
https://access.redhat.com/documentation/en-US/Red_Hat_Enterprise_Linux/6/html/Fence_Configuration_Guide/index.html
- The following procedure provides the general configuration of luci interface in RHEL 5. Refer the Red Hat Conga User Manual for complete procedure.
- To start and configure RHCS using luci in RHEL 6, refer https://access.redhat.com/documentation/en-US/Red_Hat_Enterprise_Linux/6/html/Cluster_Administration/ch-config-conga-CA.html
Step 1![]() As root user, run the following command and enter the needed details:
As root user, run the following command and enter the needed details:
Step 2![]() Edit /etc/sysconfig/luci to change the default port to an available port. (The default 8084 port is used by Prime Performance Manager.) For example:
Edit /etc/sysconfig/luci to change the default port to an available port. (The default 8084 port is used by Prime Performance Manager.) For example:
Step 3![]() As root the root user, enter:
As root the root user, enter:
Step 4![]() Enter the web interface using the following link:
Enter the web interface using the following link:
Step 5![]() In the luci web interface, add the cluster that was configured by the Prime Performance Manager installation. See the Red Hat Conga User Manual for details on performing the following:
In the luci web interface, add the cluster that was configured by the Prime Performance Manager installation. See the Red Hat Conga User Manual for details on performing the following:
Step 6![]() If your fencing device is supported by RHCS but not by Prime Performance Manager, use the Red Hat fencing configuration guide to configure the device.
If your fencing device is supported by RHCS but not by Prime Performance Manager, use the Red Hat fencing configuration guide to configure the device.
Note![]() If you provision a new fencing device, provision it as the primary fencing method. Keep the manual fencing agent as the backup fencing method.
If you provision a new fencing device, provision it as the primary fencing method. Keep the manual fencing agent as the backup fencing method.
Step 7![]() To use the web interface, connect to:
To use the web interface, connect to:
From the RHCS web interface you can stop, start, and relocate the services managed by the cluster.
Managing Geographical High Availability
The Prime Performance Manager geographical HA is installed in two different geographical locations, each configured with unique IP addresses. The two gateways work active-active on each site at the same time. The secondary gateway can take over immediately without administrative intervention if the primary site is not available.
This solution supports two kinds of deployment:
- Both sides are installed on single gateway.
- The primary gateway is deployed as a dual-end by the local HA and the secondary gateway is single.
Note![]() Do not install units within the primary or secondary geographical HA gateways.
Do not install units within the primary or secondary geographical HA gateways.
The Prime Performance Manager geographical redundancy gateway HA is based on database and file synchronization:
- Database synchronization—All database changes are synchronized from the primary to the secondary gateway. If the secondary gateway is not available when database changes occur, the primary gateway caches the changes. After secondary is up, the full synchronization will run the database synchronization first.
- File synchronization—If changes occur to dynamic and static files, they are synchronized to the secondary gateway.
Geographical HA management procedures are provided in the following topics:
- Displaying Geographical HA Status
- Switch the Primary and Secondary Geographical HA Gateways
- Configure Geographical HA
- Synchronizing the Geographical HA Gateways
- Freezing and Unfreezing Geographical HA Gateways
- Backing Up and Restoring Geographical HA Gateway Data
- Recovering From an HA Brain Split, page 14-14
- Managing Devices in Geographical HA Gateways
- Managing Users in Geographical HA Gateways
- Managing Reports, Views, and Groups in Geographical HA Gateways
- Managing Alarms and Events in Geographical HA Gateways
- Managing Thresholds and Upstream Alarm Hosts in Geographical HA Gateways
- Configuring SSL on Geographical HA Gateways and Remote Units
- Unit Redundancy Groups and Geographical HA
Displaying Geographical HA Status
To display the geographical HA status:
Step 1![]() Log into the primary geographical HA gateway as a root user.
Log into the primary geographical HA gateway as a root user.
Step 2![]() Enter the following command:
Enter the following command:
Prime Performance Manager provides static configuration and running status information for the primary and secondary gateway. Table 14-1 shows the primary gateway running status.
Table 14-2 shows the secondary gateway running status.
Switch the Primary and Secondary Geographical HA Gateways
On occasion, you might need to manually switch the primary and secondary geographical HA gateways, for example, to perform server maintenance or upgrades, or for other reasons. To manually switch geographical HA gateways:
Step 1![]() Log into the primary geographical HA gateway as a root user.
Log into the primary geographical HA gateway as a root user.
Step 2![]() Complete the Displaying Geographical HA Status to verify the gateway status. The following statuses are required:
Complete the Displaying Geographical HA Status to verify the gateway status. The following statuses are required:
Step 3![]() Enter the following command:
Enter the following command:
After the switchover, the following occurs:
- Prime Network cross-launch capability, if installed on the primary gateway, is uninstalled and installed in the new one. For information about Prime Network cross launching, see Importing Devices From Prime Network.
- No BQL update messages are sent to the old primary gateway.
- Users can edit the server from web access.
Configure Geographical HA
You can configure a parameters that affect geographical HA processes. To configure geographical HA:
Step 1![]() Log into the primary geographical HA gateway as a root user.
Log into the primary geographical HA gateway as a root user.
Step 2![]() Enter the following command and configuration option:
Enter the following command and configuration option:
- peergatewayname—Configures the IP address or hostname of peer gateway. If you are logged into the primary gateway, this would be the secondary gateway IP address or hostname. If you are logged into the secondary gateway, this would be the primary gateway IP address or hostname.
- peergatewayrmiport—Configures the RMI port of peer gateway. The RMI port is the port used for HA communications If you are logged into the primary gateway, this would be the secondary gateway RMI port.
- healthcheckinterval—Configures the frequency at which the primary and secondary gateways check their health status, in seconds.
- maxfailnum—Configures the maximum number of continuous tolerated connectivity failures before a failover is initiated.
- synccsv—Manually synchronizes the primary and secondary CSV files.
- ageout—Configures the primary database age out, in hours.
- cachelimit—The database differences cache records limitation.
Synchronizing the Geographical HA Gateways
If the primary and secondary gateway databases are out of synchronization, as indicated by the primary gateway Out of Sync parameter (see Displaying Geographical HA Status), complete the following steps to synchronize them:
Step 1![]() Log into the primary geographical HA gateway as a root user.
Log into the primary geographical HA gateway as a root user.
Step 2![]() Stop the secondary gateway.
Stop the secondary gateway.
For information, see Stopping Gateways and Units.
Step 3![]() Create a new directory on the primary gateway, for example:
Create a new directory on the primary gateway, for example:
Step 5![]() Remote copy the backupdb folder from the primary to the secondary gateway, for example:
Remote copy the backupdb folder from the primary to the secondary gateway, for example:
Step 6![]() Log into the secondary gateway and restore its database from the copied remote folder containing the primary database backup files, Prime Performance Manager starts after restoredb completes.
Log into the secondary gateway and restore its database from the copied remote folder containing the primary database backup files, Prime Performance Manager starts after restoredb completes.
Prime Performance Manager starts after restoredb is completed.
Step 7![]() Restart the secondary gateway:
Restart the secondary gateway:
For information, see Restarting Gateways and Units.
Freezing and Unfreezing Geographical HA Gateways
If you must stop the primary Prime Performance Manager gateway for any reason, you must freeze the geographical HA gateways to stop the primary and secondary gateway health checking. To freeze the geographical HA gateway;
Step 1![]() Log into the primary geographical HA gateway as a root user.
Log into the primary geographical HA gateway as a root user.
Step 2![]() Verify the secondary gateway is running. If not, you do not need to complete this procedure.
Verify the secondary gateway is running. If not, you do not need to complete this procedure.
Step 3![]() Enter the following command:
Enter the following command:
Health checking will stop on the secondary gateway.
Step 4![]() After you restart the primary gateway, unfreeze it to restart the secondary gateway health checking:
After you restart the primary gateway, unfreeze it to restart the secondary gateway health checking:
Backing Up and Restoring Geographical HA Gateway Data
Geographical HA backup and restore follows two general scenarios. You can restore the primary gateway HA data from the primary or peer gateway backup file:
- Primary gateway backup file—You reinstall the gateway OS or Prime Performance Manager. In these cases, the primary gateway backup file is available.
- Peer gateway backup file—The primary gateway suddenly is not available. After it is brought back online, you must restore it using the peer gateway backup file.
Backing Up the Geographical HA Gateway
To back up the geographical HA gateway:
Step 1![]() Locate the gateway backup file. For automatic gateway backups, the backup file is placed in the Prime Performance Manager install folder, which is /opt, by default. For example:
Locate the gateway backup file. For automatic gateway backups, the backup file is placed in the Prime Performance Manager install folder, which is /opt, by default. For example:
Step 2![]() If the gateway is not backed up automatically, back up the gateway manually:
If the gateway is not backed up automatically, back up the gateway manually:
Restore the Geographical HA Data From the Gateway Backup File
Step 1![]() Restore the geographical gateway using the gateway backup file:
Restore the geographical gateway using the gateway backup file:
Step 2![]() Start the gateway. See Starting Gateways and Units.
Start the gateway. See Starting Gateways and Units.
Restore the Geographical HA Data From the Peer Gateway Backup File
In the following procedure the HA gateways are PPM-1 and PPM-2. The down gateway is PPM-2. Its backup file is not available, so you restore PPM-2 using the PPM-1 backup file.
To restore the gateway using a peer gateway backup file:
Step 2![]() Copy the backup file from PPM-1 to PPM-2.
Copy the backup file from PPM-1 to PPM-2.
Step 3![]() Restore PPM-2 using the PPM-1 backup file:
Restore PPM-2 using the PPM-1 backup file:
After the restore, PPM-2 has the same configuration as PPM-1 including the HA configuration.
Step 4![]() Change the PPM-2 peergateway to PPM-1:
Change the PPM-2 peergateway to PPM-1:
Step 5![]() Start PPM-2. See Starting Gateways and Units.
Start PPM-2. See Starting Gateways and Units.
Recovering From an HA Brain Split
An HA brain split occurs when both HA servers run as the primary gateway. Complete the following steps to recover from an HA brain split. In the procedure, PPM-1 and PPM-2 are used to refer to the two HA gateways.
Step 1![]() Verify that an HA brain split has occurred by checking the status of each HA gateway:
Verify that an HA brain split has occurred by checking the status of each HA gateway:
Verify that no errors exist for PPM-1 and PPM-2 status and the HA configuration including peergatewayname, service name, and other attributes. For example, the PPM-2 peergateway should be PPM-1, and the PPM-1 peergateway should be PPM-2. If this is not the case, continue with the next step.
Step 2![]() Run the following command to see which gateway manages the unit servers:
Run the following command to see which gateway manages the unit servers:
Step 3![]() Stop the gateway that is not managing the units. For example, assuming the current unit servers’ GATEWAY_NAME is PPM-1, you would stop PPM-2:
Stop the gateway that is not managing the units. For example, assuming the current unit servers’ GATEWAY_NAME is PPM-1, you would stop PPM-2:
Step 4![]() Complete the Synchronizing the Geographical HA Gateways to synchronize the PPM-1 and PPM-2 databases,
Complete the Synchronizing the Geographical HA Gateways to synchronize the PPM-1 and PPM-2 databases,
Step 5![]() Restart PPM-2. It will function as the secondary gateway.
Restart PPM-2. It will function as the secondary gateway.
Step 6![]() Monitor the PPM-2 sgmConsoleLog.txt for database synchronization progress. The databases are synchronized when a Sync from Primary Gateway done message appears, for example:
Monitor the PPM-2 sgmConsoleLog.txt for database synchronization progress. The databases are synchronized when a Sync from Primary Gateway done message appears, for example:
Step 7![]() Verify the primary and then the secondary HA gateway status:
Verify the primary and then the secondary HA gateway status:
Accessing Geographical HA Gateways Using the GUI
You can view the primary and secondary gateways by choosing Gateways/Units from the System menu. Two gateways are displayed. One has an Active status and one has a Standby status. Any gateway edits can only be applied to the primary (Active) gateway. Changes to the user preference are automatically synchronized to secondary gateway.
Managing Devices in Geographical HA Gateways
You can only import Prime Network devices into the primary HA gateway. Additionally, you can only initiate Prime Performance Manager device discovery from the primary HA gateway. Device credentials added to the primary gateway are synchronized to the secondary gateway. If a switchover or failover occurs, the new primary gateway automatically imports the primary gateway devices.
If the Prime Network cross launch capability is implemented, Prime Network cross launches go to the primary HA gateway. After a switchover or failover, the new primary gateway reinstalls the cross launch capability.
Any changes to devices credentials are synchronized from the primary to secondary gateway. Device discovery seed files are also synchronized from the primary to secondary gateway.
For information about device discovery, see Chapter5, “Discovering Devices With Prime Performance Manager”
Note![]() You cannot update device information in the secondary HA gateway.
You cannot update device information in the secondary HA gateway.
Managing Users in Geographical HA Gateways
In a geographical HA environment, users are handled in the following manner:
- Primary gateway—User information is automatically synchronized from the primary to the secondary gateway when the secondary gateway starts and connects to the primary gateway.
- Secondary gateway—For the secondary gateway, choose the same user authentication type that is used on the primary gateway and agree to use the existing user database when enabling user access.
For more information, see Chapter6, “Managing Users and Security”
Managing Reports, Views, and Groups in Geographical HA Gateways
Changes to report settings in the primary gateway are synchronized to the secondary gateway. Report settings cannot be modified in the secondary gateway. Similarly, changes to the primary gateway views are synchronized to the secondary gateway. View modifications can only be performed on the primary gateway. The same principles apply to groups. Group settings cannot be changed on the secondary gateway. However, changes to the primary gateway groups are synchronized to the secondary gateway.
Managing Alarms and Events in Geographical HA Gateways
The two HA gateways will display the same alarms and events. Any change to the event, such as addition of notes, is synchronized to the secondary gateway. During switchover and failovers, the following events appear:
- Gateway $FailedGateway switched over to $SecondaryGateway.
- Gateway $FailedGateway failed over to $SecondaryGateway.
If two primary gateways detected, there will also be one alarm issued.
If Prime Performance Manager discovers dual primary gateways, the following event is displayed: $LocalPrimaryGateway, $PeerPrimaryGateway.
Managing Thresholds and Upstream Alarm Hosts in Geographical HA Gateways
Thresholds created on the primary gateway (see “Creating and Managing Thresholds” ) are synchronized to the secondary gateway. You cannot change thresholds on the secondary gateway. However, thresholds will operate after a switchover or failover to the secondary gateway. Threshold alarms raised on the primary gateway can be viewed on the secondary gateway.
If the OSS is enabled on the primary gateway (see Configuring Upstream Alarm Hosts and Tuning Event and Alarm Parameters), you can view the configuration results on the secondary gateway. The secondary gateway does not send any traps to its northbound interface unless a switchover or failover occurs.
Configuring SSL on Geographical HA Gateways and Remote Units
Use the following procedures to enable SSL on geographical HA gateways and remote units. For additional information, see Enabling SSL on a Gateway or Collocated Gateway and Unit.
To enable SSL on the primary gateway:
Step 1![]() Log into the primary gateway as the root user. (For login steps, see Logging In as the Root User.)
Log into the primary gateway as the root user. (For login steps, see Logging In as the Root User.)
Step 2![]() If the secondary gateway is up, complete the Freezing and Unfreezing Geographical HA Gateways to freeze the primary gateway and stop the secondary gateway health checking.
If the secondary gateway is up, complete the Freezing and Unfreezing Geographical HA Gateways to freeze the primary gateway and stop the secondary gateway health checking.
Step 4![]() Enter y if you want to restart the gateway now, or n if you want to restart it later.
Enter y if you want to restart the gateway now, or n if you want to restart it later.
Step 5![]() If you froze the primary gateway in Step 2, complete the Freezing and Unfreezing Geographical HA Gateways to unfreeze it.
If you froze the primary gateway in Step 2, complete the Freezing and Unfreezing Geographical HA Gateways to unfreeze it.
To enable SSL on the secondary gateway:
Step 1![]() Log into the secondary gateway as the root user. (For login steps, see Logging In as the Root User.)
Log into the secondary gateway as the root user. (For login steps, see Logging In as the Root User.)
Step 2![]() Enable SSL on the secondary gateway.
Enable SSL on the secondary gateway.
Step 3![]() Import the secondary certificate into the primary gateway:
Import the secondary certificate into the primary gateway:
Step 4![]() Import the secondary certificate to all remote units.
Import the secondary certificate to all remote units.
Step 5![]() Import the primary gateway certificate to the secondary gateway.
Import the primary gateway certificate to the secondary gateway.
Step 6![]() Import all the unit certificates to the secondary gateway.
Import all the unit certificates to the secondary gateway.
Step 7![]() Restart primary gateway. (For restart steps, see Restarting Gateways and Units
Restart primary gateway. (For restart steps, see Restarting Gateways and Units
Step 8![]() Restart secondary gateway.
Restart secondary gateway.
Step 10![]() Run the ppm primeha status command in the primary gateway to see if it is frozen. If yes, complete the Freezing and Unfreezing Geographical HA Gateways to unfreeze the primary gateway.
Run the ppm primeha status command in the primary gateway to see if it is frozen. If yes, complete the Freezing and Unfreezing Geographical HA Gateways to unfreeze the primary gateway.
Step 1![]() Log into the remote unit.
Log into the remote unit.
Step 2![]() Enable SSL on the unit.
Enable SSL on the unit.
Step 3![]() Import the unit certificate to the primary gateway
Import the unit certificate to the primary gateway
Step 4![]() Import the unit certificate to the secondary gateway.
Import the unit certificate to the secondary gateway.
Step 5![]() Import the primary gateway certificate to the unit.
Import the primary gateway certificate to the unit.
Step 6![]() Import the secondary gateway certificate to the unit.
Import the secondary gateway certificate to the unit.
Step 7![]() If secondary gateway is still up. complete the Freezing and Unfreezing Geographical HA Gateways to freeze the primary gateway.
If secondary gateway is still up. complete the Freezing and Unfreezing Geographical HA Gateways to freeze the primary gateway.
Step 8![]() Restart the primary gateway.
Restart the primary gateway.
Step 9![]() Restart the secondary gateway.
Restart the secondary gateway.
Step 10![]() Restart the remote unit.
Restart the remote unit.
Unit Redundancy Groups and Geographical HA
Changes to unit redundancy groups, for example create, add, or delete, are synchronized to the secondary gateway. If a failover occurs in the unit redundancy group or the gateway HA, complete the following steps to stop the servers:
Step 1![]() Disable unit redundancy groups. See Managing Unit Redundancy Groups.
Disable unit redundancy groups. See Managing Unit Redundancy Groups.
Step 2![]() Stop the protection unit. See Stopping Gateways and Units.
Stop the protection unit. See Stopping Gateways and Units.
Wait until all units are completely shut down.
Step 4![]() Stop the secondary gateway.
Stop the secondary gateway.
Deploying Prime Performance Manager in an Integrated Geographical HA Configuration with Prime Central
Complete the following procedure to deploy Prime Performance Manager in a geographical HA configuration when integrated with Cisco Prime Central when Prime Central is also configured for geographical HA.
Note![]() Cisco Prime Network must be integrated with Prime Central before you integrate Prime Performance Manager with Prime Central.
Cisco Prime Network must be integrated with Prime Central before you integrate Prime Performance Manager with Prime Central.
Step 1![]() Use procedures in the Cisco Prime Performance Manager 1.7 Quick Start Guide to install Prime Performance Manager gateways on two servers, referred to as PPM-1 and PPM-2.
Use procedures in the Cisco Prime Performance Manager 1.7 Quick Start Guide to install Prime Performance Manager gateways on two servers, referred to as PPM-1 and PPM-2.
Step 2![]() On both gateways, add the following lines to /opt/CSCOppm-gw/properties/System.properties:
On both gateways, add the following lines to /opt/CSCOppm-gw/properties/System.properties:
Step 3![]() Use procedures in the Cisco Prime Performance Manager 1.7 Quick Start Guide to install Prime Performance Manager units on two servers. Choose installation option 4) Install Prime Performance Manager Unit Only. These units will be referred to as Unit-1 and Unit-2. When asked to enter a gateway IP address or hostname, enter the IP address or hostname of PPM-1.
Use procedures in the Cisco Prime Performance Manager 1.7 Quick Start Guide to install Prime Performance Manager units on two servers. Choose installation option 4) Install Prime Performance Manager Unit Only. These units will be referred to as Unit-1 and Unit-2. When asked to enter a gateway IP address or hostname, enter the IP address or hostname of PPM-1.
Step 4![]() Integrate PPM-1 with the primary Prime Central server using the Integrating Prime Performance Manager with Prime Central.
Integrate PPM-1 with the primary Prime Central server using the Integrating Prime Performance Manager with Prime Central.
Step 5![]() Integrate PPM-2 with the secondary Prime Central server using the Integrating Prime Performance Manager with Prime Central.
Integrate PPM-2 with the secondary Prime Central server using the Integrating Prime Performance Manager with Prime Central.
Step 6![]() Use the Exporting SSL Certificates to exchange SSL certificates between the following:
Use the Exporting SSL Certificates to exchange SSL certificates between the following:
Step 7![]() Use the Restarting Gateways and Units to restart PPM-1, PPM-2, Unit-1, and Unit-2.
Use the Restarting Gateways and Units to restart PPM-1, PPM-2, Unit-1, and Unit-2.
Step 8![]() Log into the primary Prime Central server and restart the integration layer:
Log into the primary Prime Central server and restart the integration layer:
Step 9![]() On PPM-1, run the geographical HA script, ppmGeoHA.sh, to configure the geographical HA parameters. Set the Service Role as Primary Gateway, and configure PPM-2 as its peer gateway name.
On PPM-1, run the geographical HA script, ppmGeoHA.sh, to configure the geographical HA parameters. Set the Service Role as Primary Gateway, and configure PPM-2 as its peer gateway name.
Step 10![]() On PPM-1, create a backup directory, ppmgwbackup:
On PPM-1, create a backup directory, ppmgwbackup:
Step 11![]() Back up PPM-1 to the new backup directory:
Back up PPM-1 to the new backup directory:
Step 12![]() Copy the PPM-1 ppmgwbackup directory to the PPM-2 /opt/ directory,
Copy the PPM-1 ppmgwbackup directory to the PPM-2 /opt/ directory,
Step 13![]() Stop PPM-2. See Stopping Gateways and Units.
Stop PPM-2. See Stopping Gateways and Units.
Step 14![]() On PPM-2, run the geographical HA script, ppmGeoHA.sh, to configure the geographical HA parameters. Set the service role as Secondary Gateway, and configure PPM-1 as its peer gateway name.
On PPM-2, run the geographical HA script, ppmGeoHA.sh, to configure the geographical HA parameters. Set the service role as Secondary Gateway, and configure PPM-1 as its peer gateway name.
Step 15![]() Restore PPM-2 from the ppmgwbackup directory:
Restore PPM-2 from the ppmgwbackup directory:
Step 16![]() Verify the PPM-1 geographical HA status:
Verify the PPM-1 geographical HA status:
Step 17![]() Verify the PPM-2 geographical HA status.
Verify the PPM-2 geographical HA status.
Step 19![]() Use the Creating New Unit Redundancy Groups or the command, ppm redundancygroups, to set up a redundancy group for Unit-1 and Unit-2. Make Unit-1 the active unit, and Unit-2 the standby unit.
Use the Creating New Unit Redundancy Groups or the command, ppm redundancygroups, to set up a redundancy group for Unit-1 and Unit-2. Make Unit-1 the active unit, and Unit-2 the standby unit.
Performing Disaster Recovery When the Primary Prime Central Server is Not Available
Use the following procedure to test manual disaster recovery in the event the primary Prime Central server is not available. The initial PPM-1 and PPM-2 service roles, statuses, and HA freeze states are shown in Table 14-3 .
|
|
|
|
|
|
|---|---|---|---|---|
Note![]() In an actual disaster, skip the Step 1 and verify PPM-2 has connectivity to the PPM-1 daily backup file through the SAN.
In an actual disaster, skip the Step 1 and verify PPM-2 has connectivity to the PPM-1 daily backup file through the SAN.
To test the manual disaster recovery:
Step 1![]() If PPM-1 is still reachable, that is, you can establish an SSH session with it, set the PPM-1 HA service role to Secondary, then stop Prime Performance Manager:
If PPM-1 is still reachable, that is, you can establish an SSH session with it, set the PPM-1 HA service role to Secondary, then stop Prime Performance Manager:
After the restart, PPM-2 will be the primary gateway.
Step 3![]() Log into the primary Prime Central server and restart the integration layer if this is the first time the switch occurred:
Log into the primary Prime Central server and restart the integration layer if this is the first time the switch occurred:
Step 4![]() Check the PPM-2 and Unit-2 connection. If the unit has an Unknown status, provision the unit gateway as PPM-2:
Check the PPM-2 and Unit-2 connection. If the unit has an Unknown status, provision the unit gateway as PPM-2:
The switched PPM-1 and PPM-2 service roles, statuses, and HA freeze states are shown in Table 14-4 .
|
|
|
|
|
|
|---|---|---|---|---|
Switching Back to the Primary Gateway Following Disaster Recovery
After Prime Central and the primary Prime Performance Manager gateway return to normal service, complete the following steps to switch from the secondary gateway back to the primary gateway. The steps assume you performed the disaster recovery steps in Performing Disaster Recovery When the Primary Prime Central Server is Not Available, and the status of the primary (PPM-1) and secondary (PPM-2) gateways is shown in Table 14-4 .
To switch back to the primary gateway (PPM-1):
Step 1![]() If PPM-1 status is Secondary/Stopped, continue with Step 2. If not, complete the following commands:
If PPM-1 status is Secondary/Stopped, continue with Step 2. If not, complete the following commands:
Step 2![]() Back up PPM-2 to the PPM-1 /opt/ directory:
Back up PPM-2 to the PPM-1 /opt/ directory:
Step 3![]() Set the PPM-2 service role to secondary:
Set the PPM-2 service role to secondary:
Step 4![]() On PPM-1, verify the PPM-2 backup tar file exists on the PPM-1 /opt/ directory. If not, repeat Step 2.
On PPM-1, verify the PPM-2 backup tar file exists on the PPM-1 /opt/ directory. If not, repeat Step 2.
Step 5![]() Restore PPM-1 from the PPM-2 backup file:
Restore PPM-1 from the PPM-2 backup file:
Step 6![]() Set the PPM-1 service role to primary:
Set the PPM-1 service role to primary:
Step 7![]() Set the PPM-1 peer gateway as PPM-2:
Set the PPM-1 peer gateway as PPM-2:
Step 9![]() Verify the PPM-1 geographical HA status:
Verify the PPM-1 geographical HA status:
Step 10![]() Verify the PPM-2 geographical HA status:
Verify the PPM-2 geographical HA status:
The PPM-1 and PPM-2 service roles, statuses, and HA freeze states should match Table 14-4 . If not, repeat Steps 2 through 10 .
|
|
|
|
|
|
|---|---|---|---|---|
Managing Geographical and Local High Availability
If Prime Performance Manager gateway HA is installed with a local HA, the two local gateways are combined as the one active gateway for geographical HA, and the remote geographical HA gateway is the standby. To manage the local HA gateways, follow the procedures in Managing Local High Availability. To manage geographical HA, follow procedures in Managing Geographical High Availability.
Manual Disaster Recovery
If a disaster occurs and primary gateway become inoperable, the secondary gateway becomes active and Prime Performance Manager continues to function, with the following exceptions:
- Only administrator users can login to the secondary gateway.
- All primary gateway configurations appear on the secondary gateway with no changes.
- All web client sessions to the primary gateway and secondary gateway at the time of disaster are invalidated. All client users must log into the secondary gateway.
- If the secondary gateway is not connected to units, no reports are available.
After the primary gateway is restored, complete the following steps to bring it back online:
Step 1![]() Log into the secondary gateway as the root user.
Log into the secondary gateway as the root user.
Step 2![]() Enable SSL and user access. See Setting Up User Access and Security.
Enable SSL and user access. See Setting Up User Access and Security.
Step 3![]() Complete Backing Up and Restoring Geographical HA Gateway Data to create a backup file of the secondary gateway. Place the file in the directory specified by the value of SBACKUPDIR in System.properties.
Complete Backing Up and Restoring Geographical HA Gateway Data to create a backup file of the secondary gateway. Place the file in the directory specified by the value of SBACKUPDIR in System.properties.
Step 4![]() Complete Backing Up and Restoring Geographical HA Gateway Data to restore the primary gateway with the secondary gateway backup file.
Complete Backing Up and Restoring Geographical HA Gateway Data to restore the primary gateway with the secondary gateway backup file.
 Feedback