- Prime Network Customization Overview
- Modeling and Displaying Additional NE Properties
- Adding Support for New Devices, Software Versions and Modules Using the VCB
- Creating Commands and Command Scripts to Perform Device Configuration Operations
- Deploying Activation Workflows to Devices Using Transaction Manager
- Adding Support for New Events Using the VCB
- Adding New Threshold-Crossing Alarms
- Adding External Launch Points to the GUI Client
- Soft Properties: Supported Parsing Operators, Rules, and Regular Expressions
- VCB: CLI Commands and Template Reference
- Command Manager and Command Builder: Macro Language and Beanshell Reference
Cisco Prime Network Customization Guide, 4.3.2
Bias-Free Language
The documentation set for this product strives to use bias-free language. For the purposes of this documentation set, bias-free is defined as language that does not imply discrimination based on age, disability, gender, racial identity, ethnic identity, sexual orientation, socioeconomic status, and intersectionality. Exceptions may be present in the documentation due to language that is hardcoded in the user interfaces of the product software, language used based on RFP documentation, or language that is used by a referenced third-party product. Learn more about how Cisco is using Inclusive Language.
- Updated:
- March 2, 2016
Chapter: Adding Support for New Events Using the VCB
Adding Support for New Events Using the VCB
The VCB can be used to enable Prime Network to recognize additional events and to customize the way events are handled. For example, you might want Prime Network to recognize traps that are specific to a new technology or a custom syslog that you have defined. You might also want to change the settings of a system default event, for example, change the severity from major to minor.
In addition, you can define criteria for marking new or existing events as flapping events. Flapping events are events that rapidly change state and are identified based on the number of times and the frequency with which the change of state occurs. Prime Network does not send an event for each change of state but sends one event indicating that the event is flapping. Thereafter, no events are generated for any state change. The event is updated periodically if the flapping persists. A clearing event is sent when flapping has stopped.
You can also define expedite rules that will force polling whenever a specific event is received.
You can customize events using the VCB tool within Prime Network, or using VCB CLI commands. This chapter describes event customization using the Prime Network VCB GUI. For information on using the CLI method, see VCB CLI Reference: Events Commands.
These topics explain how to use the VCB to create support for events, and to change how events are handled:
- Enabling Support for Unsupported Traps
- Enabling Support for a Custom Syslog
- Testing Your New Events
- Customizing Events
For general information about the VCB, see VCB Overview. For information on the level of support for various features in the different types of VNEs, see Comparison of Generic SNMP VNEs, U-VNEs, and Developed VNEs.
Enabling Support for Unsupported Traps
This procedure describes how to add unsupported traps as events in Prime Network based on a particular MIB definition file. You have the following options for adding support for traps:
- Add each trap individually. In this case, you create a single event with one or more traps of the same type (i.e., with the same prefix) as sub-types of the event.
- Add multiple traps simultaneously, in bulk. In this case, you upload multiple traps at once, irrespective of their type. An event is created for each trap. This is useful if you need to add support for a large number of traps of different types.
Adding Support for a Trap
This procedure describes how to create a single event that represents a trap or a set of traps of the same type. If you want to add support for multiple traps of different types, see Adding Support for Multiple Traps Simultaneously.
Use the VCB to add support for an unsupported trap, as follows:
Step 1 In the VCB tool, go to the VNE Drivers tab.
Step 2 Click on the arrow next to the VNE driver on which you want the additional traps to be supported.
Figure 6-1 Expanded VNE Driver Properties Showing Parsing Rules
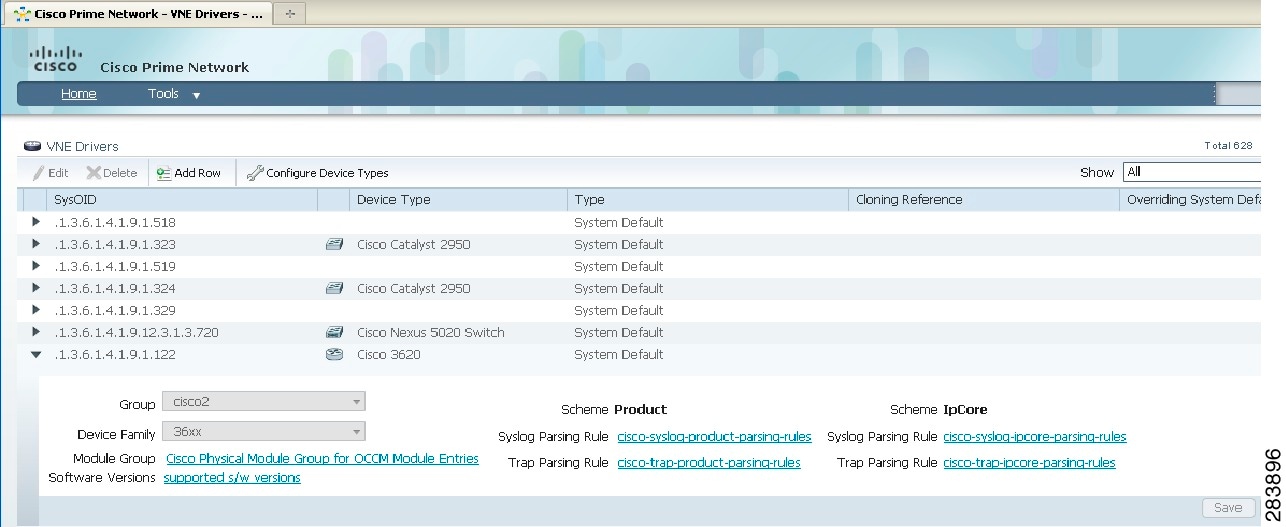
Step 3 Click the Trap Parsing Rule link to show a list of traps associated with this parsing rule.
Step 4 Click Add from MIB . This launches a wizard which enables you to analyze a specified MIB and select the traps to be supported.
Step 5 Click Browse and select the MIB file you want to upload to the Prime Network gateway. You can upload an individual MIB file or a zip file containing multiple MIB files. The file extension should be .mib or .my, .zip, or no extension. If you select a zip file, a list of the contained MIBs is displayed. You can select one or more of these MIBs to upload.
A list of MIB dependencies is displayed. A green check mark indicates that the dependency file has been found on the server.
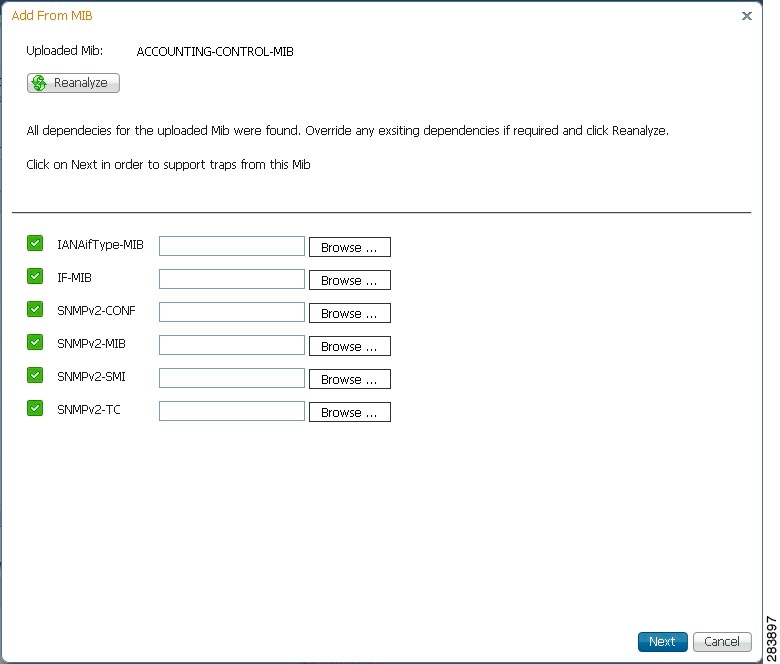
Step 6 If any of the dependencies is not found, click Browse and select the dependency file to upload.
Step 7 Click Next . A list of traps is displayed. A red icon to the left of the trap indicates that it is not supported. A green icon indicates that the trap is already supported.
Step 8 Check the check box next to the trap(s) to be supported. If you select multiple traps, they must be of the same type (i.e., they must have the same prefix). Click Next .
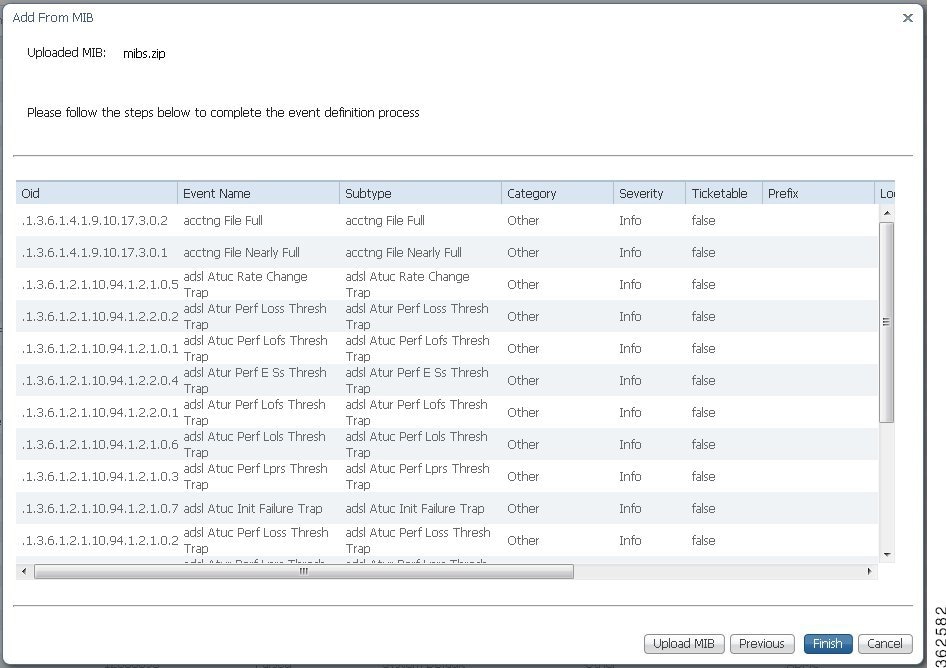
At this point, an event is created. Each trap you selected becomes a subtype of the new event. The Event Definition wizard is displayed to enable you to complete the definition of the new event.
Step 9 Click on Step 1 - Event Definition and provide the following information:
- Event name and OID—these are pre-populated but can be changed if necessary. The OID is the common prefix of the OIDs of the selected subtypes.
- Category—predefined category from 3GPP standards (according to ITU-T Recommendations X.733 and X.736). You can change the category if necessary.
- Nature—defines whether the event is automatically cleared by a clearing event or it needs to be manually cleared. Possible values are:
– ADAC (Automatically Detected Automatically Cleared)—The event is automatically detected and automatically cleared by the system. For example, “link down” event. Select this option if the event has a clearing event, for example, “link up”.
– ADMC (Automatically Detected Manually Cleared)—The event must be manually cleared by the user. For example, “DWDM fatal error” syslog. Select this option if the event does not have a clearing event.
Step 10 To define the criteria by which this trap will be considered a flapping event, check the Flapping check box. This would be relevant for network or communication related events that potentially could change state frequently. For example, link up/down, BGP neighbor up/down. When an event is flapping, Prime Network generates a single event indicating the flapping status and does not generate an additional event for each state change.
Enter the following information to define flapping criteria:
- Clear Interval—The flapping event will be cleared when the flapping has stopped for the specified time interval (in milliseconds).
- Flapping Interval and Flapping Threshold—To be defined as a flapping event, the event must change state every X milliseconds (Flapping Interval), and must occur Y consecutive times (Flapping Threshold). For example, if the Flapping Interval is 60000 msecs (one minute) and the Flapping Threshold is 5, the event must change state five times, every one minute, in order to be considered flapping.
- Update Interval and Update Threshold—An update event indicating that the event is still flapping will be sent either when the specified Update Interval has passed or when the event is received more times than the specified Update Threshold. For example, if the Update Interval is 100000 msecs and the Update Threshold is 500, an update event will be generated if the event remains flapping for longer than 100000 msecs or if the event is received more than 500 times, whichever occurs first.
Step 11 Click on Step 2 - Subtype Definition. You will see that a subtype has been created for each unsupported trap you selected. Edit the information for each subtype as required:
Enter a string that describes the event subtype. You can include dynamic values in the description string to provide more details. See Adding Parameter Values to Event Descriptions. |
|
Check the check box if you want Prime Network to create a ticket for this event if there is no root cause event to which it can be correlated. If you make a subtype ticketable, a ticket will be generated for it. When a non-ticketable subtype of the same event arrives (for example, a warning or clearing event), the ticket will be updated. |
|
Check the check box if you want Prime Network to automatically clear the event. Prime Network clears a ticket if all of its events either are cleared or are configured for automatic clearing. |
|
Check the check box if you want the event to be correlated to a root-cause alarm. |
In addition, if you selected the Flapping check box in the previous step, you will see that Flapping subtypes have been created. By default, the flapping subtype consists of the event name and the flapping subtype name. This can be changed as required; for example, you can also change the severity of the flapping subtype so that it matches the severity of the event.
Step 12 Click on Step 3 - Subtype Identification. In this step, you define how Prime Network will differentiate between the subtypes, as follows:
Step 13 Click on Step 4 - Association, in which you associate the event with the VNE. Specify the following information:
Step 14 Optionally, click on Step 5 - Expedite if you want the device to be polled immediately for inventory updates upon receipt of the event, instead of waiting for the next polling cycle which may take up to twenty four hours for VNEs using reduced polling. Click Add to create an expedite rule and provide the following information:

Note Command expedition might result in unnecessary polling of devices which puts a load on the device and might affect performance. Therefore, before creating command expedition rules, consider whether the event is specific to a particular VNE or common to all VNEs and might affect the performance of VNEs using regular polling.
Step 15 Click on Step 6 - Pattern to determine which VNE drivers will be extended to support this event. This is determined by selecting the parsing rule groups per scheme that will be extended. The event will be supported on all VNE drivers that use the specified parsing rule groups.
Step 16 Click Add to select additional parsing rule groups, as required, either for the Product or IpCore scheme.
Note Certain parsing rules groups inherit from other groups. If you select multiple groups, make sure that your selection does not include a base (parent) group as well as the group that inherits from the base group. See Parsing Rule Group Inheritance Structure for the relationship between parsing rule groups.
Step 17 Click Finish. A dialog box displays a list of the traps that were added.
Step 18 If you want to enable support for additional traps, click Select Different Trap, otherwise click Close.
Adding Support for Multiple Traps Simultaneously
This procedure describes how to add support for multiple traps at once. The traps do not have to be of the same type. This enables you to add support for traps in bulk, without having to add support for each trap individually. This procedure can be used if you want to add support for a large number of events that do not require complex processing, on the managed element level.
Note The traps added using this procedure will be associated at the managed element level only (not at the interface level or any other DC). In addition, you will not be able to expedite a command upon receiving events added using this method.
To add support for traps in bulk:
Step 1 In the VCB tool, go to the VNE Drivers tab.
Step 2 Click on the arrow next to the VNE driver on which you want the additional traps to be supported.
Figure 6-3 Expanded VNE Driver Properties Showing Parsing Rules
Step 3 Click the Trap Parsing Rule link to show a list of traps associated with this parsing rule.
Step 4 Click Add from MIB . This launches a wizard which enables you to analyze a specified MIB and select the traps to be supported.
Step 5 Click Browse and select the MIB file you want to upload to the Prime Network gateway. You can upload an individual MIB file or a zip file containing multiple MIB files. The file extension should be .mib or .my, .zip, or no extension. If you select a zip file, a list of the contained MIBs is displayed. You can select one or more of these MIBs to upload.
A list of MIB dependencies is displayed. A green check mark indicates that the dependency file has been found on the server.
Step 6 If any of the dependencies is not found, click Browse and select the dependency file to upload.
Step 7 Click Next . A list of traps is displayed. A red icon to the left of the trap indicates that it is not supported. A green icon indicates that the trap is already supported.
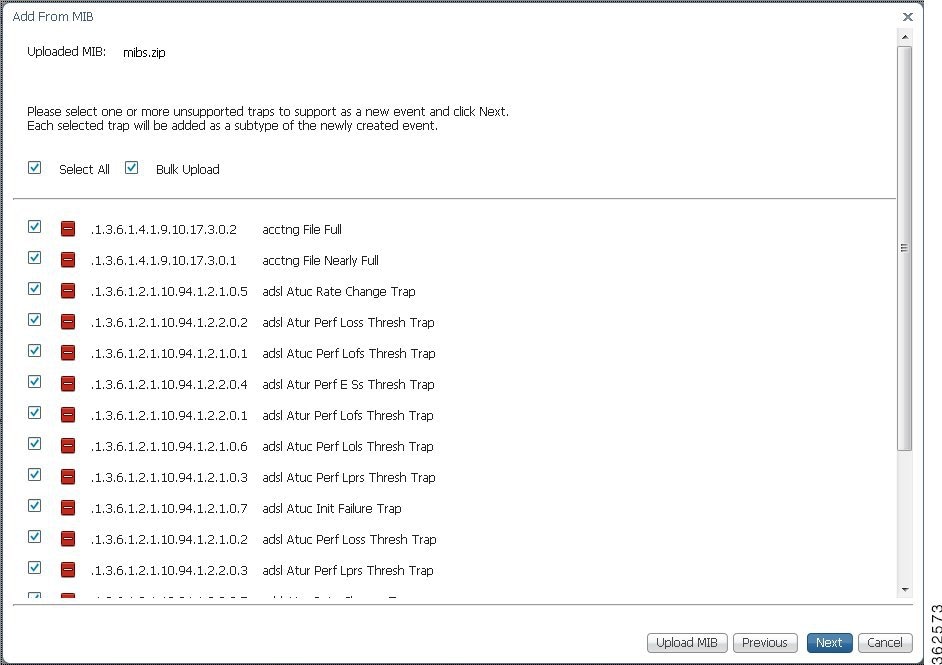
Step 8 Select the Bulk Upload check box.
Step 9 Select the traps you want to add or check the Select All check box.
Step 10 Click Next. At this point, an event is created for each selected trap. The traps are listed in a table. Default values are provided for all mandatory attributes of the traps. You can edit these values inline in the table.
Step 11 Optional. You can combine multiple traps in a single event as subtypes of the event. To do this, make the event name the same for all the traps you want to combine in a single event.
Step 12 Click Finish. A dialog box displays a list of the traps that were added.
Step 13 If you want to enable support for additional traps, click Select Different Trap, otherwise click Close. The traps you added now appear in the table of supported traps. You can edit a trap at any stage by selecting it and clicking Edit.
Enabling Support for a Custom Syslog
In this example, a custom syslog is generated by a router, using Embedded Event Manager (EEM), when the Windows XP server being monitored is not reachable. The custom syslog is %HA_EM-6-LOG: IPSLA-XP: Windows-XP unreachable. This event is sent to Prime Network but is not recognized or parsed.
Use the VCB to add support for this custom syslog, as follows:
Step 1 In the VCB tool, go to the VNE Drivers tab.
Step 2 Click on the arrow next to the VNE driver that represents the router that generates the custom syslog to expand its display. The Syslog Parsing Rule field shows the parsing rule used to parse events for this VNE driver, for both Product and IpCore schemes.
Step 3 Click the Syslog Parsing Rule link to show a list of syslog events associated with this parsing rule.
Step 4 Click the Add Row button to start defining the new syslog.
Step 5 Enter a unique name for the syslog in the Event Name field. For example, Monitoring XP Server.
Step 6 Check the Flapping check box if you want to define the criteria by which this trap will be considered a flapping event. This is relevant for network or communication related events that potentially could change state frequently. For example, link up/down, BGP neighbor up/down. When an event is flapping, Prime Network generates a single event indicating the flapping status and does not generate an additional event for each state change.
Enter the following information to define flapping criteria:
- Clear Interval—The flapping event will be cleared when the flapping has stopped for the specified time interval (in milliseconds).
- Flapping Interval and Flapping Threshold—To be defined as a flapping event, the event must change state every X milliseconds (Flapping Interval), and must occur Y consecutive times (Flapping Threshold). For example, if the Flapping Interval is 60000 msecs (one minute) and the Flapping Threshold is 5, the event must change state five times, every one minute, in order to be considered flapping.
- Update Interval and Update Threshold—An update event indicating that the event is still flapping will be sent either when the specified Update Interval has passed or when the event is received more times than the specified Update Threshold. For example, if the Update Interval is 100000 msecs and the Update Threshold is 500, an update event will be generated if the event remains flapping for longer than 100000 msecs or if the event is received more than 500 times, whichever occurs first.
Step 7 Click Next to go to the next step in the wizard which is to define the event subtypes. If you selected the Flapping check box in the previous step, you will see that flapping subtypes have been created. By default, the flapping subtype consists of the event name and the flapping subtype name. This can be changed as required. You can also change the severity of the flapping subtype so that it matches the severity of the event, for example.
Step 8 Enter the following information to define the first event subtype:
Step 9 Click Add to define a second subtype, for example, XP server accessible, with severity “Cleared”.
Step 10 Click Next to go to the next step in the wizard which is identification and association of the event. In this step, you will provide an example of the raw event and you will define parameters by which the event will be identified.
Step 11 Enter the following information to define event identification and association.
Note You can provide multi-word values for the following parameters in the Event Identification and Association section while creating a syslog event: Interface Identifier, Interface Name, Substring(s) to Ignore, Subtype Key, and Instance Identifier Prefix.
Step 12 Click Next to go to the next step in the wizard which is identification of the event subtypes. In this step, you will define values for each of the subtypes. In this example, the values could be “unreachable” for XP server inaccessible and “reachable” for XP server accessible.
Step 13 Optionally, go to Step 5 - Expedite if you want the device to be polled immediately for inventory updates upon receipt of the event, instead of waiting for the next polling cycle which may take up to twenty four hours for VNEs using reduced polling. Click Add to create an expedite rule and provide the following information:
Note Command expedition might result in unnecessary polling of devices which puts a load on the device and might affect performance. Therefore, before creating command expedition rules, consider whether the event is specific to a particular VNE or common to all VNEs and might affect the performance of VNEs using regular polling.
Step 14 Click Next to go to the next step in the wizard which determines which VNE drivers will be extended to support this event. This is determined by selecting the parsing rule groups per scheme that will be extended. The event will be supported on all VNE drivers that use the specified parsing rule groups.
Step 15 Click Add to select additional parsing rule groups, as required. In this example, all VNE drivers associated with group cisco-syslog-product-parsing-rules will be extended to support the new syslog. You can select additional groups for the Product scheme or you can select the IpCore scheme and a parsing rule group.
Note Certain parsing rules groups inherit from other groups. If you select multiple groups, make sure that your selection does not include a base (parent) group as well as the group that inherits from the base group. See Parsing Rule Group Inheritance Structure for the relationship between parsing rule groups.
Step 16 Click Finish . The event now appears in the list of syslogs for the cisco-syslog-product-parsing-rules group.
Parsing Rule Group Inheritance Structure
Table 6-1 shows the inheritance structure for parsing rule groups. The groups on the left inherit settings from the groups on the right. When you select a group that is high in the hierarchy, all of the groups (and subgroups) that inherit from it are included. You should not choose the lower groups to make sure they are included. For example:
cisco- asr90xx-syslog-ipcore -parsing-rules
cisco- iox-syslog-ipcore -parsing-rules
cisco- iox-syslog-product -parsing-rules
If you choose cisco- iox-syslog-product -parsing-rules (which is highest in the hierarchy), do not choose the other two groups; they are automatically included.
Testing Your New Events
After you have enabled support for a trap or syslog in the VCB, you can simulate the event to check that the operation has been successful. After you simulate the event and send it to the Prime Network gateway, it should appear in the Prime Network Events and Prime Network Vision GUI.
Step 1 Select the event you want to test.
Step 3 In the displayed Test Event dialog, select the device on which you want to simulate the event in the Device IP field.
Step 4 Provide any required information. For syslogs, the message box is automatically populated only if the message was included in the parsing rules when the event was created.
Step 5 Click Send . The event will be sent to the specified device.
Step 6 Open Prime Network Vision or Prime Network Events and check that the event appears in the list of events for the device. If it is not a correlated event, it will appear in the GUI almost immediately after the event is sent. If it is a correlated event, it could take up to three minutes before it appears in the GUI.
Note For VCB generated test events to be forwarded and processed by Prime Network, run the following commands as 'root' user on Prime Network GW:
iptables -t nat -A OUTPUT -o lo -p udp --dport 162 -j REDIRECT --to-port 1162
iptables -t nat -A OUTPUT -o lo -p udp --dport 514 -j REDIRECT --to-port 1514
This is applicable only for Prime Network versions, which are supporting RHEL 6.x and above.
Step 7 If the event does not appear in the GUI, you can troubleshoot by following the instructions in Troubleshooting Event Customization Using the VCB CLI.
Customizing Events
Using the VCB, you can change the way Prime Network deals with events. For example, you can change the severity of an event, or you can instruct the system to drop the event. Event customization is described in the following sections:
- Changing the Severity of an Event Subtype
- Dropping an Event
- Restoring a System Default Event
- Deleting Events
- Displaying MIB Names Instead of Numbers in Trap Details
- Adding Recommended Actions to Event Details
- Adding Parameter Values to Event Descriptions
Changing the Severity of an Event Subtype
The events that are supported by default in Prime Network are attributed with a specific severity. You can customize the event and change the severity if it is not appropriate for your organization. For example, the Prime Network system considers the event, “ASR5 port down” to have a severity of “Warning”. However, in your organization, this event might be considered to be “Major” and you want the event to be marked as such.
To change the severity of an event subtype:
Step 1 In the VCB tool, select Tools > Events or click on the Events tab.
Step 2 Click the arrow next to the event you want to customize to expand its display.
Step 3 Select the required severity from the Severity drop-down menu and click Save .
Dropping an Event
By default, when an event is received by Prime Network, it is archived and parsed. Only events that have been parsed will appear in Prime Network Events tables. You can choose to drop an event so that it no longer appears in the tables. The event will no longer be actionable, meaning that it will not be processed and parsed, but it will be archived. In the case of service events, the event will no longer be generated by the system so there will be no archiving.
When an event has been dropped, it cannot longer be edited or updated (but it can be restored).
Step 1 In the VCB tool, select Tools > Events or click on the Events tab.
Step 2 Select the event you want to drop and click Modify Inbound Handling .
Step 3 Click OK in the confirmation message. The Inbound Handling column for the event will change to Archived Only for syslogs and traps or to Disabled for system events.
Restoring a Dropped Event
Step 1 In the VCB tool, select Tools > Events or click on the Events tab.
Step 2 Select the event you want to restore and click Modify Inbound Handling .
Step 3 Click OK in the confirmation message. The Inbound Handling column for the event will change to Parsed.
Restoring a System Default Event
If you have edited a system default event and you want to go back to the original event, you can restore the system default event.
The Overriding System Default column indicates whether or not a system default event has been edited. The values for this column are true or false.
Note A VNE upgrade package might provide support for events that you previously added using the VCB. After you have upgraded the VNE driver, such events are marked as overriding the system default. Use this procedure to restore the system default event that is provided with the upgrade.
To restore a system default event:
Step 1 In the VCB tool, select Tools > Events or click on the Events tab.
Step 2 Select the event you want to restore and click Restore .
Step 3 Click OK in the confirmation message. The Overriding System Default column for the event will change to False.
Deleting Events
User-defined events can be deleted as long as they are not overrides of system default events. System default events cannot be deleted.
Note For system default overrides, a Restore button is provided instead of the Delete button.
Step 1 In the VCB tool, select Tools > Events or click on the Events tab.
Step 2 Select the event you want to delete and click Delete .
Step 3 Click OK in the confirmation message. The event is removed from the table.
Displaying MIB Names Instead of Numbers in Trap Details
Prime Network has a repository of pre-compiled MIBs that are used to resolve trap OIDs into a more readable and user-friendly form. When you use the VCB to add support for new traps via MIB, the repository is automatically updated and the trap details in Vision or Events contains the MIB name rather than the dotted notation representation of the MIB.
For supported traps that are showing unresolved trap OIDs in the trap details, you can manually compile the MIB and update the repository. After doing this, the trap details will show the MIB name instead of numbers. To compile the MIB in order to display the MIB name in the trap details:
Step 1 In the VCB tool, select Tools > Events or click on the Events tab.
Step 4 Upload the relevant MIB repository file or zip file and click Next.
Step 5 Select the MIB from which the trap is generated and click Next.
Step 6 Select the Compile Only check box.
Step 8 Verify that the trap OID has been translated by simulating the trap and viewing the trap details in the Prime Network Vision GUI. See Testing Your New Events, for instructions on how to simulate events.
Adding Recommended Actions to Event Details
Using the VCB, you can enhance the event details and make them more useful by outlining the actions that should be performed after receiving the event. The recommended actions will appear in the Troubleshooting section of the event or ticket properties (Details tab).
Figure 6-7 Example of Customized Recommended Actions for an Event

Recommended actions can be added when adding new traps or syslogs or at a later stage, by editing existing events.
For some traps, troubleshooting information is automatically extracted from the MIB and populated in the ticket/event properties. You can edit this information using the VCB. This information is not available for syslogs, therefore you would have to add recommended actions using the VCB, as described below.
To add recommended actions to existing traps or syslogs:
Step 1 In the VCB tool, select Tools > Events or click on the Events tab.
Step 2 Select the event for which you want to add recommended actions and expand its display in the table by clicking on the arrow on the left.
Step 3 Click on the arrow in the Recommended Action column to display a text box which allows you to enter free text.
Note If you are adding a new event or editing an event, this column is located in the Subtype Definition step of the wizard.
Figure 6-8 Adding the Recommended Actions
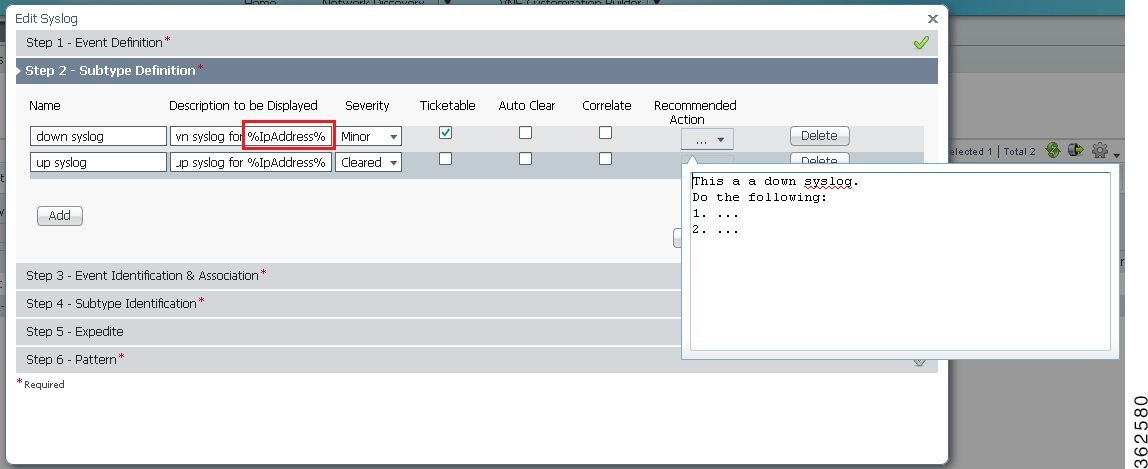
Step 4 Enter the recommended actions in the text box and click Save.
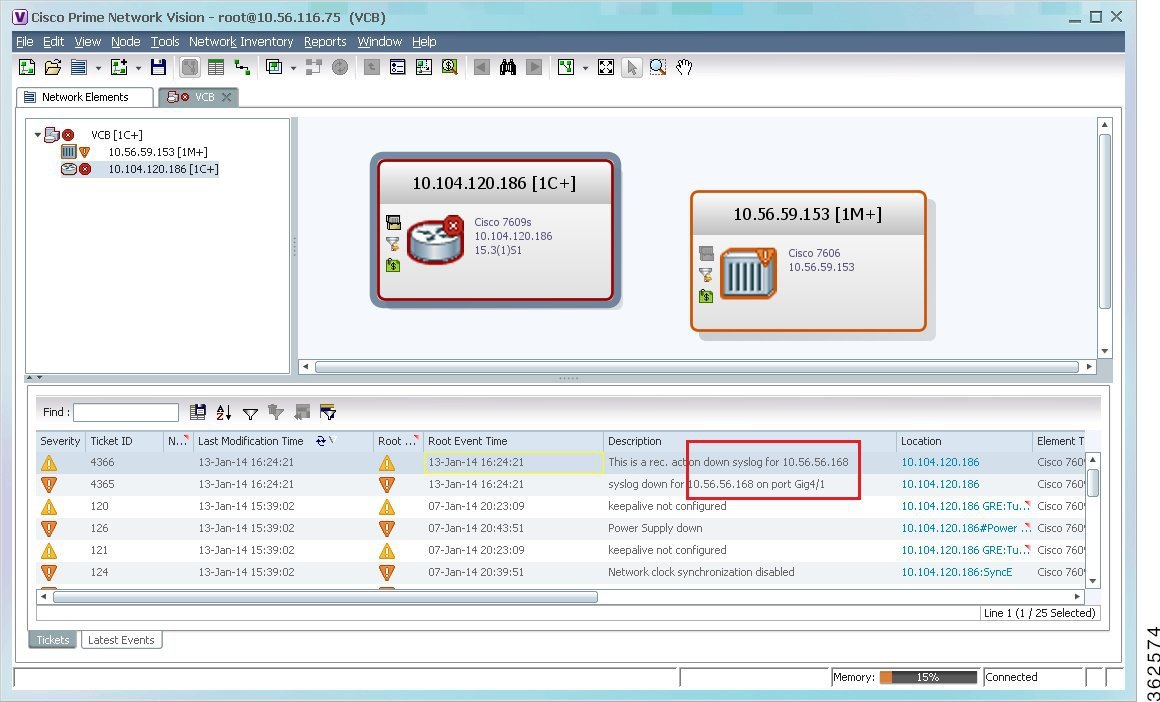
Step 5 Verify that the recommended actions have been added successfully by simulating the event and viewing the event details in the Prime Network Vision GUI. (See Testing Your New Events, for instructions on how to simulate events.)
Figure 6-9 Simulating the Event with Customized Recommended Actions
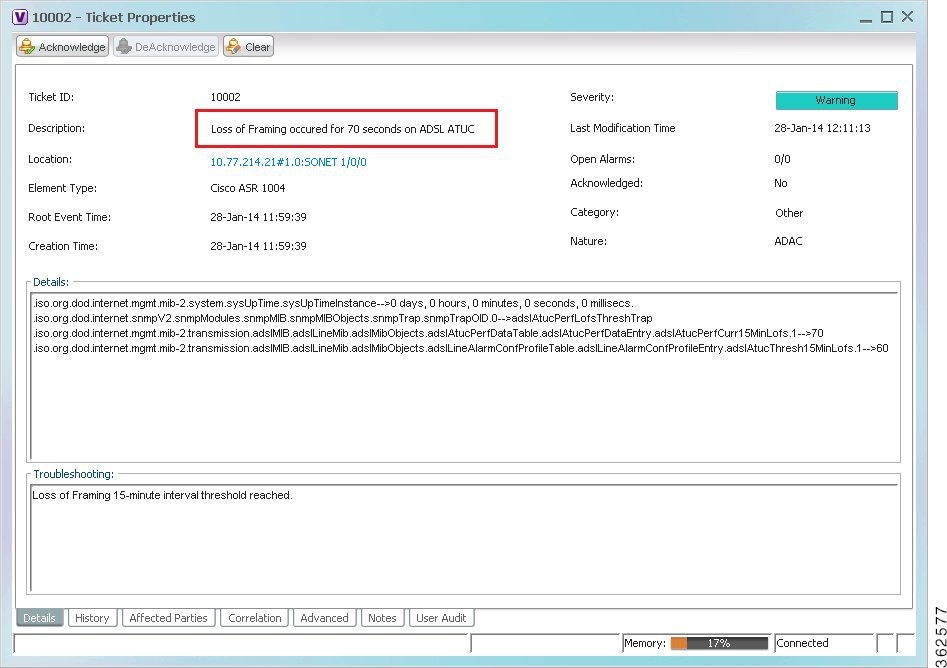
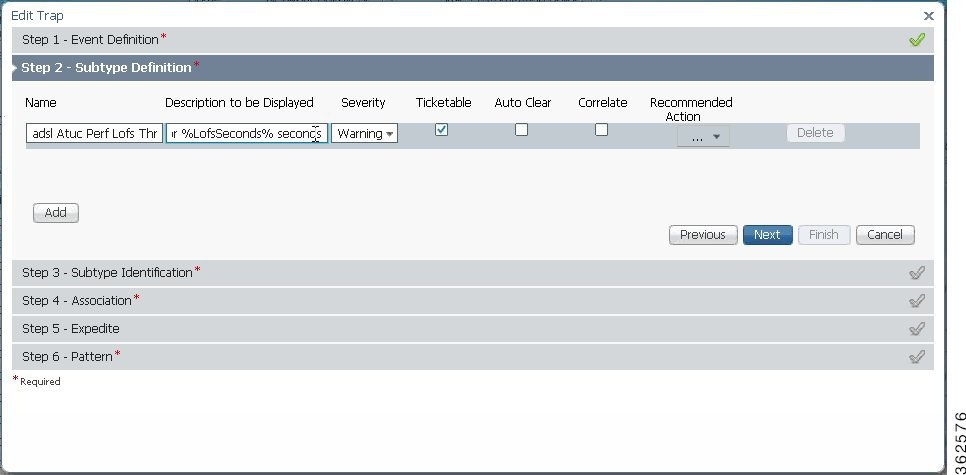
Adding Parameter Values to Event Descriptions
In previous versions of Prime Network, the event description was a static string and could not be changed. From Prime Network 4.2.2, you can define more descriptive event descriptions by including runtime parameters with dynamic values, such as interface names, threshold levels, and so on. These parameter values will be included in the event description displayed in Prime Network Vision or Events, making it easier to identify, at a glance, what the event is about without having to drill down to the event details.
This functionality applies to user-defined events only (not system-defined events). You can add parameter values to event descriptions when adding a new trap/syslog or when editing a trap/syslog.
Note When doing bulk upload of traps, parameter values cannot be added to event descriptions.
See Figure 6-10 and Figure 6-11 below for an example of a less detailed and more detailed event description.
Figure 6-10 Event Description Before Adding Dynamic Runtime Parameter Values
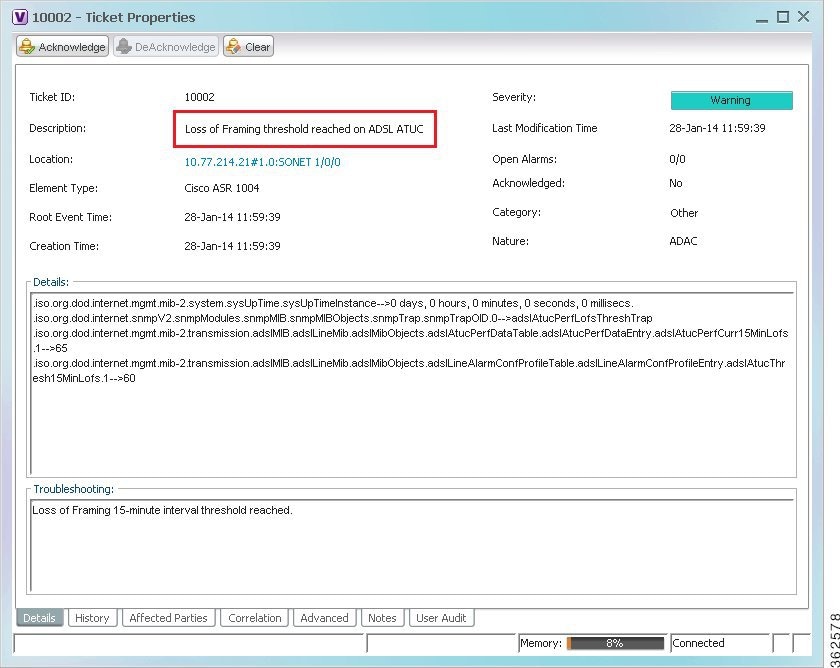
Figure 6-11 Event Description with New Dynamic Runtime Parameter Values
To add parameter values to event descriptions:
Step 1 In the VCB tool, select Tools > Events or click on the Events tab.
Step 2 Select the required trap/syslog and click Edit.
Step 3 Go to Subtype Definition.
Step 4 In the Description to be Displayed field, use a percentage (%) delimiter and specify the required parameter, for example, %LofsSeconds%.
Figure 6-12 Subtype Definition - Add Parameter to Description
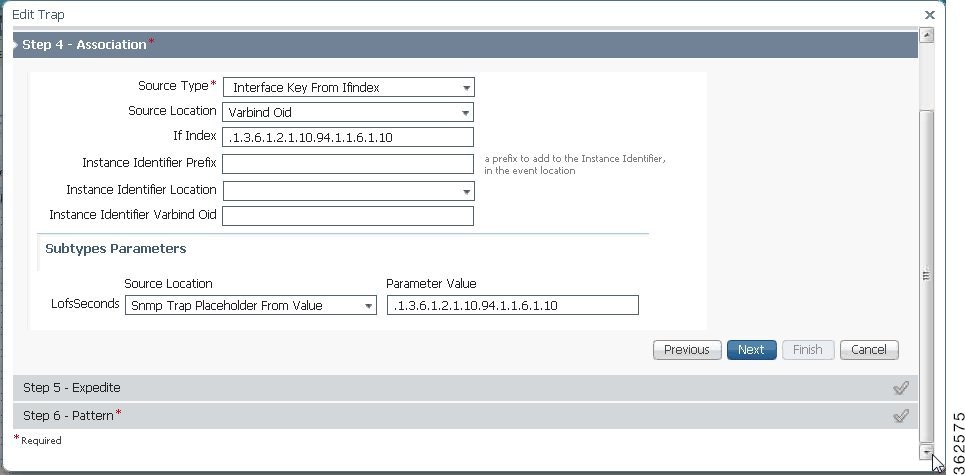
Step 5 Go to Association. The parameter you included in the description will appear under Subtype Parameters.
Step 6 Go to Pattern and click Finish.
Step 7 Verify that the parameter values have been added successfully by simulating the trap and viewing the event description in the Prime Network Vision GUI. See Testing Your New Events, for instructions on how to simulate events.
 Feedback