- Setting Up Prime Network and Using Prime Network with Cisco Prime Central
- Managing the Prime Network Software Image, Features, and Backups
- Managing Prime Network Components: Gateways, Units, and AVMs
- Configuring Device VNEs and Troubleshooting VNE Problems
- Managing Redundancy for Units and Processes
- Controlling Device Access and Authorization Using Device Scopes
- Managing User Accounts and Authentication
- Managing the Oracle Database and System Data
- Controlling Event Monitoring
- Managing Device Configuration Operations
- Managing System Security
- Changing VNE Polling, Reachability, Discovery, and Persistency and Working with Unmanaged Segments (Cloud VNEs)
- Configuring Devices So They Can Be Properly Modeled and Managed by Prime Network
- Changing System Defaults in the Registry
- Prime Network Log Files
- VNE Properties Reference
Cisco Prime Network Administrator Guide, 4.3.2
Bias-Free Language
The documentation set for this product strives to use bias-free language. For the purposes of this documentation set, bias-free is defined as language that does not imply discrimination based on age, disability, gender, racial identity, ethnic identity, sexual orientation, socioeconomic status, and intersectionality. Exceptions may be present in the documentation due to language that is hardcoded in the user interfaces of the product software, language used based on RFP documentation, or language that is used by a referenced third-party product. Learn more about how Cisco is using Inclusive Language.
- Updated:
- July 19, 2017
Chapter: Controlling Device Access and Authorization Using Device Scopes
- What Are Device Scopes?
- Creating New Device Scopes To Control Device Access
- Displaying Links Based On Whether Endpoints Are In User’s Scope
- Moving Devices In and Out of a Scope
- Changing a User’s Device Scope Security Level
- Deleting a Device Scope from Prime Network
- Tracking Device Scope-Related Events
Controlling Device Access and Authorization Using Device Scopes
These topics describe how to create and manage device scopes. Device scopes determine the devices a user can access, and the actions the user can perform on the devices. The same device scope can be applied to multiple user accounts, but you can specify more or less strict privileges on a per-user basis.

Note If Prime Network is installed with Cisco Prime Central, you can also cross-launch the Prime Network application (From the Prime Central menu, choose Administration > Scope Management > Prime Network) to create and mange device scopes. For more information, refer the Cisco Prime Central User Guide.
- What Are Device Scopes?
- Creating New Device Scopes To Control Device Access
- Displaying Links Based On Whether Endpoints Are In User’s Scope
- Moving Devices In and Out of a Scope
- Changing a User’s Device Scope Security Level
- Deleting a Device Scope from Prime Network
- Tracking Device Scope-Related Events
What Are Device Scopes?
Note If Prime Network is installed with Cisco Prime Central, you can also cross-launch the Prime Network application (From the Prime Central menu, choose Administration > Scope Management > Prime Network) to create and mange device scopes. For more information, refer the Cisco Prime Central User Guide.
In Prime Network , user roles and device scopes determine which tasks a user can perform. A user role is specified when you create the user’s account. The user role determines the GUI -based actions the user can perform.
The actions a user can perform on a device are controlled by device scopes. Device scopes are groups of devices that you assign to users. If a device is in a scope that is assigned to a user, then the user can access the device. Device scopes are listed in the Administration GUI client when you choose Scopes in the navigation tree.
This topic does not address authentication—that is, the process of verifying the identity of the user. For information on user authentication, see User Authentication.
When you create a new device scope, you specify a name for the scope and which devices to include in the scope (as many or as few as you want). This allows you to group devices in a way that fits your deployment—for example, by geography, by device type, by customer, and so forth. However, just because a user has access to a device does not mean they can perform all actions on the device. When you assign a device scope to a user, you also specify the security level for that scope. In this way, you control the devices a user can access, and what actions the user can perform on those devices.
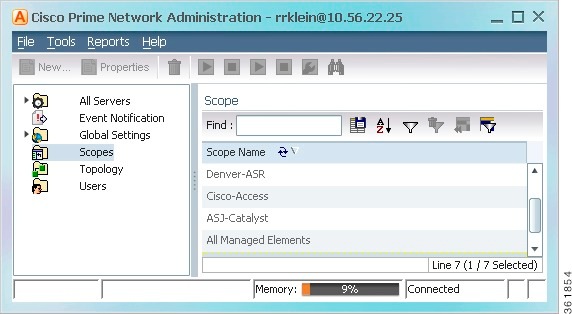
Creating scopes and assigning them to users is controlled from the Administration GUI client. If you create an account for a user but do not assign any device scopes to the account, the user will be able to open Prime Network but will not see any devices.
Figure 6-1 shows an example of the Prime Network Administration Scopes window.
Severity levels for device scopes can override GUI user access roles. For example:
1. John’s user access role (for GUI operations) is Operator.
2. John’s security level for the device scope CE-SJ is Configurator.
Prime Network will allow John to perform Configurator operations on any devices in the CE-SJ device scope.
The All Managed Elements Device Scope
The All Managed Elements device scope is a predefined scope that is automatically assigned to users with Administrator privileges. It contains all NEs that are managed by Prime Network and has a security level named Special. The Special security level only applies to this device scope, and only when the scope is assigned to Administrators.
New devices are automatically added to the All Managed Elements device scope when the VNEs are created.
Note You can edit the scope to have less privileges, or even delete it completely, but this is not recommended. It would result in Administrators only having access to GUI functions that do not affect devices.
You are permitted to assign the All Managed Elements device scope to non-Administrators.
Table 6-1 lists the device-based actions a user can perform, based on the device scope security level.
Note Users with higher user roles can perform all the actions for which lower roles are authorized. For example, the Configurator is authorized to perform all the actions that the Viewer, Operator, and OperatorPlus can perform.
Creating New Device Scopes To Control Device Access
Note If Prime Network is installed with Cisco Prime Central, you can also cross-launch the Prime Network application (From the Prime Central menu, choose Administration > Scope Management > Prime Network) to create and mange device scopes. For more information, refer the Cisco Prime Central User Guide.
Before you create a scope, consider the following:
- Which devices a user (or group of users) should be allowed to access
- The security level (user access role) that should be applied to the devices in the scope. (Remember security levels can override user access roles. For example, if a user has an Operator access role and a Configurator scope security level, the user will be allowed to perform Configurator-level operations on the devices in the scope.)
When you create a device scope, you must give it a name and choose the devices to include in the scope. When you assign a scope to a user, you adjust the security level to be more or less strict.
Note By default, users can only view links if both endpoints are in this scope. If you want to change this setting so that only one link endpoint is required, see Displaying Links Based On Whether Endpoints Are In User’s Scope.
Step 1 Right-click Scopes and choose New Scope to open the New Scope dialog box.
Step 2 In the Scope field, enter a name for the scope.
Step 3 Add devices to the scope by selecting them from the Available Devices list and moving them to the Selected Devices list.
Step 4 Click OK. The scope is saved and is displayed in the content area.
Displaying Links Based On Whether Endpoints Are In User’s Scope
Note If Prime Network is installed with Cisco Prime Central, you can also cross-launch the Prime Network application (From the Prime Central menu, choose Administration > Scope Management > Prime Network) to create and mange device scopes. For more information, refer the Cisco Prime Central User Guide.
By default, a user can view a link in Prime Network Vision only if both link endpoints are in the user’s device scope. If you want link to be viewable if only one endpoint is in a user’s scope, you must edit the registry as follows. Changes are applied to all device scopes in the system.
To change the settings that control whether these links are displayed, choose Tools > Registry Controller > Link Display from the main menu of the Administration GUI client.
Note You must restart the gateway to apply your changes. See Stopping and Restarting Prime Network Components
Moving Devices In and Out of a Scope
Note If Prime Network is installed with Cisco Prime Central, you can also cross-launch the Prime Network application (From the Prime Central menu, choose Administration > Scope Management > Prime Network) to create and mange device scopes. For more information, refer the Cisco Prime Central User Guide.
Create a new scope. You cannot change an existing scope’s name. |
|
Edit the security level in the user’s account. See Changing a User’s Device Scope Security Level |

Caution Changes you make to an existing device scope are applied to all users with access to the scope.
To add or remove devices from a scope:
Step 1 Select Scopes to populate the list of existing scopes.
Step 2 Right-click a scope and choose Properties .
Step 3 Modify the scope device list by selecting them from the Available Devices list and moving them to the Selected Devices list.
Note You can select multiple devices by using the Ctrl key.
Step 4 Click OK. The scope is updated and is displayed in the content area.
Changing a User’s Device Scope Security Level
Note If Prime Network is installed with Cisco Prime Central, you can also cross-launch the Prime Network application (From the Prime Central menu, choose Administration > Scope Management > Prime Network) to create and mange device scopes. For more information, refer the Cisco Prime Central User Guide.
This procedure explains how to change the security level for a device scope. This is done from the user accounts dialog box. When you change the security level, it only affects this user. (Scopes do not have a default security level; the security level is set when the scope is added to a user account.)
Step 1 Select Users to populate the list of existing user accounts.
Step 2 Double-click a user. The Properties dialog box appears.
Step 3 Click the Authorization tab.
Step 4 In the Device Security area, highlight the scope you want to edit and click Edit .
Step 5 In the Edit Scope dialog box, make sure the correct scope is highlighted, and click the new security level.
Deleting a Device Scope from Prime Network
Note If Prime Network is installed with Cisco Prime Central, you can also cross-launch the Prime Network application (From the Prime Central menu, choose Administration > Scope Management > Prime Network) to create and mange device scopes. For more information, refer the Cisco Prime Central User Guide.
Caution When you delete a scope using this procedure, the scope is removed from all user accounts it was assigned to.
Step 1 Select Scopes in the navigation pane.
Step 2 Right-click the scope you want to remove, then choose Delete .
Note You can select multiple scopes by using the Ctrl key.
The scope is deleted and is removed from the content area.
 Feedback