- Setting Up Prime Network and Using Prime Network with Cisco Prime Central
- Managing the Prime Network Software Image, Features, and Backups
- Managing Prime Network Components: Gateways, Units, and AVMs
- Configuring Device VNEs and Troubleshooting VNE Problems
- Managing Redundancy for Units and Processes
- Controlling Device Access and Authorization Using Device Scopes
- Managing User Accounts and Authentication
- Managing the Oracle Database and System Data
- Controlling Event Monitoring
- Managing Device Configuration Operations
- Managing System Security
- Changing VNE Polling, Reachability, Discovery, and Persistency and Working with Unmanaged Segments (Cloud VNEs)
- Configuring Devices So They Can Be Properly Modeled and Managed by Prime Network
- Changing System Defaults in the Registry
- Prime Network Log Files
- VNE Properties Reference
Cisco Prime Network Administrator Guide, 4.3.1
Bias-Free Language
The documentation set for this product strives to use bias-free language. For the purposes of this documentation set, bias-free is defined as language that does not imply discrimination based on age, disability, gender, racial identity, ethnic identity, sexual orientation, socioeconomic status, and intersectionality. Exceptions may be present in the documentation due to language that is hardcoded in the user interfaces of the product software, language used based on RFP documentation, or language that is used by a referenced third-party product. Learn more about how Cisco is using Inclusive Language.
- Updated:
- January 19, 2017
Chapter: Managing System Security
- Communication Security Between Prime Network Components
- Encrypting the External Oracle Database Schemas
- Securing Device Connections: SSH and SNMPv3
- Changing Default Password in SSL Key Store
- Registry Security
- Changing System Passwords (Oracle Database, Graphs Tool, root, bos* Users)
- Creating a GUI Client Banner Message
- Tracking Security-Related Events
Managing System Security
These topics provide an overview of the communication and data security mechanism used by Prime Network:
- Communication Security Between Prime Network Components
- Encrypting the External Oracle Database Schemas
- Securing Device Connections: SSH and SNMPv3
- Changing Default Password in SSL Key Store
- Registry Security
- Changing System Passwords (Oracle Database, Graphs Tool, root, bos* Users)
- Creating a GUI Client Banner Message
- Tracking Security-Related Events
Communication Security Between Prime Network Components
Figure 11-1 illustrates the different forms of secure communication that are implemented between the Prime Network gateway server, units, clients, and Oracle database. For information on the Infobright database used by Operations Reports, refer to the Cisco Prime Network 4.3.1 Operations Reports User Guide .
Figure 11-1 Prime Network Communication Architecture
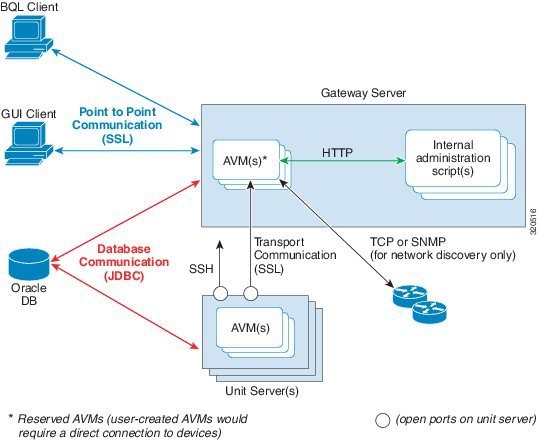
A socket factory service that runs on the gateway server implements SSL sockets between:
With SSL version 3.0, keys are created when you install Prime Network on the gateway server. All secured connections use the same private key and certificate for SSL authentication. After installation, these keys are distributed by the gateway to the clients and other units. SSL keys can be recreated (as described in the Cisco Prime Network Integration Developer Guide ).
Whenever a socket cannot be opened, a System event is generated and is displayed in Prime Network Events.
The gateway only connects directly to devices when using the Network Discovery feature to add VNEs to the system. Only reserved AVMs should run on the gateway because they do not host VNEs and thus do not require a direct connection to devices.
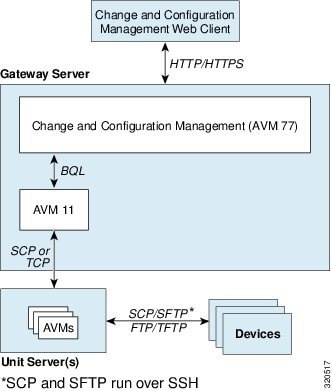
Figure 11-2 provides a simplified illustration of the methods and protocols that Change and Configuration Management, and devices use to communicate with each other.

Caution FTP is not a secure mode of transfer. Use SCP/SFTP instead, for secure device configuration and software image file transfers. You should also configure a special FTP user for file transfers. For information on how to do this, refer to the Change and Configuration Management information in the Cisco Prime Network 4.3.1 User Guide. If you want to change the SCP port that a device is using, be sure to also change it in the device’s VNE properties. You can do this by editing the setting in the VNE properties Telnet/SSH tab; see Telnet/SSH VNE Properties Reference.
Figure 11-2 Change and Configuration Management Communication Architecture
Gateway Server and Unit Communication Security
Communication between the gateway server and units is called transport communication. Transport connections are encrypted when the unit and gateway are on different machines, but are not encrypted when both are local to the same machine. Similarly, AVMs use transport communication, and communication between AVMs is encrypted when the AVMs are on different machines. There is no option to change this behavior in the GUI clients.
Prime Network uses the SSH protocol for administrative messages (such as SCP) between the gateway and units. A random certificate (that is privately signed) is generated on the gateway at installation time. When Prime Network is installed on any unit (or the unit is restarted), the keys are copied from the gateway to the unit.
If a gateway server is behind a firewall, you must open ports on the firewall. The gateway will to need publicly addressable IP address.
If any unit servers are located behind firewalls or NAT devices:
- The unit is displayed in Prime Network Administration GUI client with an IP address of 0.0.0.# . This is an artificial IP address used by the gateway server.
- You do not have to open special ports for the units. The units will always initiate communications.
- An Event Collector (AVM 100) must be running on at least one of the units behind the firewall. If you have several NAT sites with similar configuration, an Event Collector must be running on at least one unit at each site.
Gateway Server and Client (Including BQL) Communication Security
For gateway and client communication, Prime Network uses a proprietary protocol called PTP (Point to Point communication). This is encrypted using SSL. The SSL keys are downloaded to Prime Network clients using the JNLP (Webstart) protocol.
For BQL clients, the gateway server allows secured and unsecured connections from local clients (on port 9002), but only secured connections from clients on other machines. By default, port 9002 only allows unsecured connections. Information on how to change this behavior is described in the BQL documentation in the Cisco Prime Network Integration Developer Guide.
For a client to communicate with the Prime Network gateway using Perl, a certificate in .pem format is required. This can be generated from the .cer format using the two-stage process described in the Cisco Prime Network Integration Developer Guide.
If a client trusts all servers, the public key is automatically imported as part of the SSL handshake. However, for a client to validate a server's public key, the .truststore file must be manually copied from the server.
For more information on SSL sockets and BQL, such as the architecture and negotiation process, refer to the Cisco Prime Network Integration Developer Guide.
Oracle Database Connections
Prime Network is connected to the database using an Oracle encryption feature. All client-to-database connections are encrypted. Server-to-database connections are encrypted if are using an embedded Oracle database; otherwise, they are not.
To encrypt the database schemas, see Encrypting the External Oracle Database Schemas.
Device Connections
In Prime Network, protocol collectors are the components responsible for actively polling devices and transporting information between devices and the Prime Network gateway. Protocols collectors are part of the instrumentation layer of Prime Network VNEs. A device has a collector for each protocol it supports, such as one collector for SSH and another collector for SNMP. Each collector contains the necessary logic for its specific protocol.
The security of device communication is maintained by specifying SSH and SNMPv3 authentication and encryption methods when you create the VNE.
If there is a firewall between device and a GUI client, all attempted Telnet connections to the device will fail. The Prime Network Administration GUI client provides a device proxy feature that, when enabled, routes connections from the client through the gateway server and units, as required, to reach the device. Supported connections are Telnet, Ping, and SSH. When it is enabled, dedicated SSH connections are used between the gateway and the unit. For information on how to configure this feature, see Managing Configurations with Firewalls (Device Proxy).
For information on the security methods supported by each protocol (and how to change the SSHv2 settings not available from the VNE properties dialog), see Securing Device Connections: SSH and SNMPv3.
Encrypting the External Oracle Database Schemas
An external Oracle database can be connected to a gateway or unit. To encrypt the connection between the external Oracle database and the gateway or unit, use this procedure.

Note This procedure requires a Oracle database restart. You do not have to restart the gateway or unit (for unit-to-database connections).
Step 1 Make sure the values you set comply with the values set on the Oracle database server.
Step 2 Choose Tools > Registry Controller > System Security .
Step 3 Set the encryption setting level for each schema.
a. Select Database Schema Encryption . The following schemas are listed and are editable using the Registry Controller.
b. Choose the encryption level for each schema. The supported levels are listed below in order of increasing security. (For details about what these values mean, see your Oracle documentation.)
c. Verify your changes to ensure you want to overwrite the current registry settings because after you click Apply, you cannot retrieve your settings using the Restore button.
d. Click Apply to save your changes.
Step 4 Set the algorithms the connections can use (from Tools > Registry Controller > System Security ).
b. Edit the comma-separated list to add or remove MAC, key exchange, host key, and ciphers that the connections can use. All supported algorithms are listed in the window in parentheses.
c. Verify your changes to ensure you want to overwrite the current registry settings because after you click Apply, you cannot retrieve your settings using the Restore button.
d. Click Apply to save your changes.
Step 5 Restart the external Oracle database. You do not have to restart the gateway.
For more information on the Oracle database schemas, see Overview of the Prime Network Oracle Database and Schemas.
Securing Device Connections: SSH and SNMPv3
In Prime Network, protocol collectors are the components responsible for actively polling devices and transporting information between devices and the Prime Network gateway. Protocols collectors are part of the instrumentation layer of Prime Network VNEs. A device has a collector for each protocol it supports, such as one collector for SSH and another collector for SNMP. Each collector contains the necessary logic for its specific protocol.
The security of device communication is maintained by specifying SSH and SNMPv3 authentication and encryption methods when you create the VNE. Table 11-1 summarizes the security methods that are supported by each protocol.
The settings in Table 11-1 can be controlled from Prime Network Administration, as described in Telnet/SSH VNE Properties Reference. The exceptions are the SSHv2 key exchange algorithm, MAC algorithms, ciphers, and host key algorithms, which you can only change by editing the registry. By default, all of the SSHv2 algorithm settings in Table 11-2 are supported.
Note All changes to the registry should only be carried out with the support of Cisco. For details, contact your Cisco account representative. Manually editing the SSHv2 connection properties can cause the connection between the VNE (client) and device (server) to fail. Change these settings only if you are familiar with their functionality.
diffie-hellman-group1-sha1,diffie-hellman-group1-exchange-sha1, |
||
The following procedure shows how to check and change your current settings.
Step 1 Log into the gateway as pnuser and change to the Main directory.
Step 2 Issue the following command to check the current default SSHv2 security settings for VNE and device communication:
# .
/runRegTool.sh -gs 127.0.0.1 get 127.0.0.1 "agentdefaults/da/ip_default/protocols/telnet/connection/algorithms"
<key name="algorithms">

    <entry name="mac-alg">sha1,md5,sha1-96,md5-96,</entry>

    <entry name="keys-exchange-alg">diffie-hellman-group1-sha1,diffie-hellman-group1-exchange-sha1,</entry>

    <entry name="host-key-alg">dsa,rsa,</entry>

    <entry name="encryption-alg">3des,aes-128,aes-192,aes-256,</entry>

</key>
For example, the following command overwrites the encryption (ciphers) algorithms so that 3DES is no longer allowed for any newly-created VNEs:
Note Each algorithm type should have at least one algorithm entry (supported algorithm).
#
./runRegTool.sh -gs 127.0.0.1 set 0.0.0.0 "site/agentdefaults/da/ip_default/protocols/telnet/connection/algorithms/encryption-alg" “aes-128,aes-192,aes-256,”
Step 3 Restart the AVM by right-clicking it and choosing Actions > Stop , then Actions > Start .
Changing Default Password in SSL Key Store
Step 2 Navigate to the file location:
Step 3 Open the security.properties file in an editor and change the SSLpassword parameter value from the default value to the required value:
Step 4 Navigate to the command scripts location:
Step 5 Run the following SSL key command:
Step 6 Restart the Prime Network gateway using the following command:
Step 7 If you have a Prime Network Unit, restart the unit using the following command as a Prime user:
Registry Security
The Golden Source registry is the master registry responsible for maintaining, distributing, and updating registry configuration files to all Prime Network units and the Prime Network gateway. The master copy of the Golden Source files is centrally located on the gateway server at:
NETWORKHOME /Main/registry/ConfigurationFiles
Credentials data is encrypted. This includes the SNMP, Telnet, and SSH credentials for VNEs, and the Oracle database password. Sections that are encrypted are marked with an ENCRYPTED_ENTRY_AES prefix.
Changing System Passwords (Oracle Database, Graphs Tool, root, bos* Users)
These topics explain how to change system-level passwords:
- Changing Password for bosenable, bosconfig, and bosusrmanager, and root
- Changing Password for Oracle Database Schemas
- Changing Password for Monitoring (Graphs) Tool
For information on managing individual user passwords, see Managing User Accounts and Authentication.
Changing Password for bosenable, bosconfig, and bosusrmanager, and root
The passwords for bosenable, bosconfig, bosusermanager, and root are established during the Prime Network installation. Use the following to change the bos passwords.
To change the root password, you can use Configuring E-Mail Notification Address in Global Report Settings. If you have lost the root password, you can use this procedure to reset it.
Step 1 Log into the gateway as pnuser and change to the Main directory:
Step 2 Encrypt the new password in Prime Network using the following command:
java -classpath ./jars/classes.jar com.sheer.metromission.authentication2.PasswordEncrypt password
The encrypted password is listed in the command output (after the comma). You will need this information in Step 3.
For example, the following command creates a new password for test .
#
java -classpath ./jars/classes.jar com.sheer.metromission.authentication2.PasswordEncrypt test
The command returns the following output. The portion of the output that is in bold is what you will need in the subsequent step.
'test' -> 'PEv1:DC57A2A7', '
7E84D3A8F60F30B7B62946D532E24608
'
Step 3 Log into the Oracle database and change the password for bosenable, bosconfig, bosusermanager, and root in the database.
a. Log into the Oracle database as pnuser . In the following example, pnuser is pn41 and the pnuser password is admin .
b. Change the password using the following command, where xxx is the second string of output from Step 2, and user is bosenable , bosconfig , bosusermanager or root . In this example, the bosenable password is being changed:
update bosuser set ENCRYPTEDPASSWORD='xxx' where username='bosenable' ;
SQL>
update bosuser set ENCRYPTEDPASSWORD='7E84D3A8F60F30B7B62946D532E24608' where username='bosenable';
1 row updated.
To update the root user password, you would use the following command:
update bosuser set ENCRYPTEDPASSWORD='xxx' where username='root' ;
d. Repeat Step b and Step c for bosconfig and bosusermanager.
Changing Password for Oracle Database Schemas
By default, an operating system account for the Prime Network application is created when Prime Network is installed. When the Oracle database is created, it uses this operating system account name as the basis for naming the schemas. The following are the Oracle database schemas that are created by Prime Network. As an example, in the following table the Prime Network operating system account ( pnuser ) is named pn41 . (For more details about these schemas, see Overview of the Prime Network Oracle Database and Schemas.)
Prime Network Event Archive (event persistence and archiving data) |
||
Prime Network Change and Configuration Management, Compliance Manager, and Command Manager |
||
At installation time, the network-conf script assigns the same password to all of the schemas. After installation, you can assign different passwords to each schema. The following procedure describes how to change any or all of the passwords. Note that you have to change the password in two places: in the Oracle software and in the Prime Network software.
In the following procedure, pnuser-DB , pnuser-EP-DB , pnuser-DWE-DB , pnuser-admin-DB , and pnuser-XMP-DB are the user accounts for the four Oracle database schemas.
Step 1 Log into the Prime Network gateway server as pnuser .
Step 2 To change the pnuser-DB password (for the general data):
a. Enter the following sqlplus command to change the pnuser-DB password in the Oracle software:
sqlplus /nolog \@$ANAHOME/Main/unix/setPassword.sql DBA-username DBA-password pnuser-DB pnuser-DB-new-password DB-IP DB-port SID
#
sqlplus /nolog \@$ANAHOME/Main/unix/setPassword.sql system systempassword pn41 pn41newDBpassword 127.0.0.1 1521 MCDB
b. Enter the following to change the pnuser-DB password in the Prime Network software (the gateway server must be up and running):
#
cd $ANAHOME/Main
#
./runRegTool.sh -gs 127.0.0.1 setEncrypted 0.0.0.0 “site/persistency/nodes/main/PASS”
pnuser-DB-new-password
Step 3 To change the pnuser-EP-DB password (for the event persistence and archiving data):
a. Enter the following sqlplus command to change the pnuser-EP-DB password in the Oracle software:
sqlplus /nolog \@$ANAHOME/Main/unix/setPassword.sql DBA-username DBA-password pnuser-EP-DB pnuser-EP-DB-new-password DB-IP DB-port SID
#
sqlplus /nolog \@$ANAHOME/Main/unix/setPassword.sql system systempassword pn41_ep EPnewDBpassword 127.0.0.1 1521 MCDB
b. Enter the following to change the pnuser-EP-DB password in the Prime Network software (the gateway server must be up and running):
#
cd $ANAHOME/Main
#
./runRegTool.sh -gs 127.0.0.1 setEncrypted 0.0.0.0 “site/persistency/nodes/ep/PASS”
pnuser-EP-DB-new-password
Step 4 To change the pnuser-admin-DB password (for administration and maintenance data):
a. Enter the following sqlplus command to change the pnuser-admin-DB password in the Oracle software:
sqlplus /nolog \@$ANAHOME/Main/unix/setPassword.sql DBA-username DBA-password pnuser-admin-DB pnuser-admin-DB-new-password DB-IP DB-port SID
#
sqlplus /nolog \@$ANAHOME/Main/unix/setPassword.sql system systempassword pn41_admin adminnewDBpassword 127.0.0.1 1521 MCDB
b. Enter the following to change the pnuser-admin-DB password in the Prime Network software (the gateway server must be up and running):
#
cd $ANAHOME/Main
#
./runRegTool.sh -gs 127.0.0.1 setEncrypted 0.0.0.0 “site/persistency/nodes/admin/PASS”
pnuser-admin-DB-new-password
Step 5 To change the pnuser-XMP-DB password (for Change and Configuration Management, Compliance Manager, and Command Manager):
Note The password should not contain ampersand (@) or forward slash (/) characters. If you enter either of these special characters, future installations will fail.
a. Enter the following sqlplus command to change the pnuser-XMP-DB password in the Oracle software:
sqlplus /nolog \@$ANAHOME/Main/unix/setPassword.sql DBA-username DBA-password pnuser-XMP-DB pnuser-XMP-DB-new-password DB-IP DB-port SID
#
sqlplus /nolog \@$ANAHOME/Main/unix/setPassword.sql system systempassword pn41_xmp pn41XMPnewDBpassword 127.0.0.1 1521 MCDB
b. Enter the following to change the pnuser-XMP-DB password in the Prime Network software:
#
cd $XMP_HOME/bin
#
xmpchangepw.ksh
pnuser-XMP-DB-old-password pnuser-XMP-DB-new-password
Step 6 Stop the gateway server and units:
#
cd $ANAHOME/Main
#
networkctl stop
Step 7 Run the unlock command to ensure that the Prime Network Oracle accounts are not locked. A lock can happen if Prime Network accesses the Oracle database (which it does constantly) between the time when you run the sqlplus setpassword.sql command and the time when you run the runRegTool.sh or xmpchangepw.ksh scripts. In that period of time, the passwords are not in sync.
a. As the Oracle UNIX user, log into sqlplus:
#
sqlplus /nolog
SQL>
connect /as sysdba
b. Run the unlock command. You need only run the unlock command on accounts that were changed—in other words, in the following command, account-name can be pnuser , pnuser-EP-DB , pnuser-DWE-DB , or pnuser-XMP-DB from the previous steps.
SQL>
alter user
account-name
account unlock
Step 8 Start the gateway server and units:
#
cd $ANAHOME/Main
#
networkctl start
Changing Password for Monitoring (Graphs) Tool
The username and password for the Monitoring Tool (described in Using the Monitoring (Graphs) Tool (Examples)) is established during the Prime Network installation.
Step 1 Log into the Prime Network gateway as pnuser and change to the Main directory:
Step 2 Change the username and password for the Diagnostics tool using the following command:
#
utils/
operating-system
/
apache/bin/htpasswd ./Main/webroot/.passwd
new-username
The utility will prompt you for a new password for new-username .
Creating a GUI Client Banner Message
Prime Network Administration enables you to define a Message of the Day, or banner, that is displayed when a user logs into any client application. The user must accept the message before logging in. If the user does not accept the message, the user cannot log in. The message supports HTML format. Figure 11-3 provides an example.
Figure 11-3 Message of the Day Example
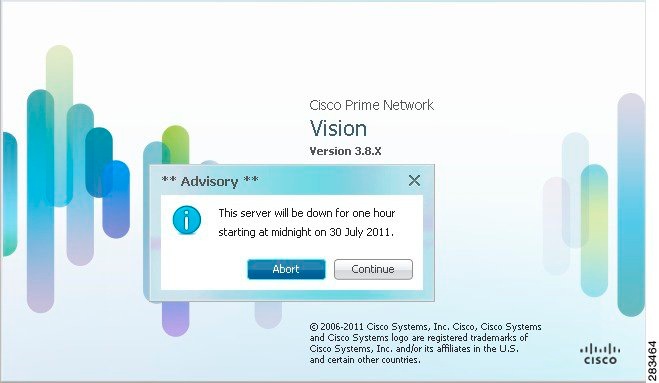
The message can be changed as required. However, only one message is applied at a time.
To create a message of the day:
Step 1 Choose Global Settings > Message of the Day . The Title and Message fields appear in the content area.
Step 2 In the Title field, enter a title for the message.
Step 3 In the Message field, enter the text that is to appear when users log in.
Because the Abort and Continue buttons are displayed in the message dialog box by default, you should phrase the message in terms of these buttons. For example, “Do you accept the terms of use in the Product License Agreement? Click Continue to proceed or click Abort to cancel.”
Step 4 Click Save. A confirmation message is displayed.
Step 5 Click OK. The message is displayed when a user logs into any client application.
To delete a message of the day, edit the message so that the Title and Message field is empty, and click Save .
Tracking Security-Related Events
The following table provides ways you can get historical information on issues related security.
AVM and other appropriate log files (see Log Files Reference) Detailed Security events report ( Reports > Run Report > Events Reports > Detailed Non-Network Events > Security Events ) Detailed System events report ( Reports > Run Report > Events Reports > Detailed Non-Network Events > System Events ) |
 Feedback