Add Devices to Prime Infrastructure
 Note |
Prime Infrastructure does not support the StackWise Virtual Link (SVL) for the Cisco 9k devices. |
Remember |
To make your Catalyst 9800 Series devices send AP and client operational data to Prime Infrastructure, ensure that:
|
Note |
You must configure the ASR 9900 set of devices with the netconf agent tty and xml agent tty commands for them to be effectively overseen by Prime Infrastructure. |
|
Supported Methods for Adding Devices |
See: |
|---|---|
|
Add multiple devices by discovering the neighbors of a seed device using: |
|
|
|
|
|
|
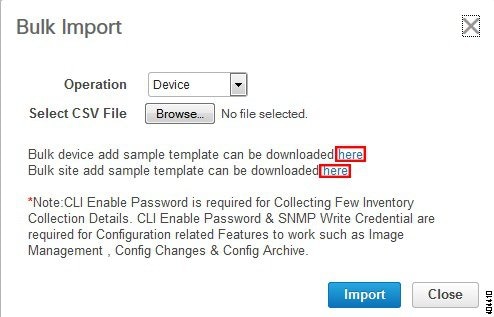
Add multiple devices using the settings specified in a CSV file |
|
|
Add a single device (for example, for a new device type) |
Understand the Discovery Process
Prime Infrastructure performs the following steps during the discovery process:
-
Using ICMP ping, determine if each device is reachable. If Prime Infrastructure is unable to reach the device, the device Reachability status is Unreachable.
-
Verify the SNMP credentials. If the device is reachable by ICMP, but the SNMP credentials are not valid, the device Reachability status is Ping Reachable.
If the device is reachable by both ICMP and SNMP, the device Reachability status is Reachable .
-
Verify Telnet and SSH credentials.
-
Modify the device configuration(s) to add a trap receiver in order for Prime Infrastructure to receive the necessary notifications.
-
Start the inventory collection process to gather all device information.
-
Add the devices to the page.
After running discovery, choose to verify that discovery is complete.
Add Devices Using Discovery
Prime Infrastructure supports two discovery methods:
-
Ping sweep from a seed device (Quick Discovery). The device name, SNMP community, seed IP address and subnet mask are required. See Run Quick Discovery
-
Using customized discovery methods (Discovery Settings)—This method is recommended if you want to specify settings and rerun discovery in the future. See Run Discovery With Customized Discovery Settings.
Note |
|
The discovery process of a device is carried out in the sequence of steps listed below. As Prime Infrastructure performs discovery, it sets the reachability state of a device, which is: Reachable, Ping Reachable, or Unreachable. A description of the states is provided in Device Reachability and Admin States.
-
Prime Infrastructure determines if a device is reachable using ICMP ping. If a device is not reachable, its reachability state is set to Unreachable.
-
Server checks if SNMP communication is possible or not.
-
If a device is reachable by ICMP but its SNMP communication is not possible, its reachability state is set to Ping Reachable.
-
If a device is reachable by both ICMP and SNMP, its reachability state is Reachable.
-
-
Verifies the device's Telnet and SSH credentials. If the credentials fail, details about the failure are provided in the Network Devices table in the Last Inventory Collection Status column (for example, Wrong CLI Credentials ). The reachability state is not changed.
-
Modifies the device configuration to add a trap receiver so that Prime Infrastructure can receive the necessary notifications (using SNMP).
-
Starts the inventory collection process to gather all device information.
-
Displays all information in the web GUI, including whether discovery was fully or partially successful.
Note |
When Prime Infrastructure verifies a device’s SNMP read-write credentials, the device log is updated to indicate that a configuration change has been made by Prime Infrastructure (identified by its IP address). |
Specify the Management IP Address Type (IPv4/IPv6) for Discovered Devices
For discovered dual-home (IPv4/IPv6) devices, specify whether you want Prime Infrastructure to use IPv4 or IPv6 addresses for management IP addresses.
Procedure
| Step 1 |
Choose , then choose . |
| Step 2 |
From the IPv4/IPv6 Preference for Management Address drop-down list, choose either V4 or V6. |
| Step 3 |
Click Save. |
Run Quick Discovery
Use this method when you want to perform a ping sweep using a single seed device. Only the device name, SNMP community, seed IP address and subnet mask are required. If you plan to use the configuration management features, you must provide the protocol, user name, password, and enable password.
You can view the guest users discovered by Prime Infrastructure by choosing Services > Network Services > Guest Users. To see the correct lifetime on guest user accounts after they are discovered, make sure the devices have the correct time settings specified.
Procedure
| Step 1 |
Choose , then click the Quick Discovery link at the top right of the window. |
| Step 2 |
At a minimum, enter the name, SNMP community, seed IP address, and subnet mask. |
| Step 3 |
Click Run Now. |
What to do next
Click the job hyperlink in the Discovery Job Instances area to view the results.
Run Discovery With Customized Discovery Settings
Prime Infrastructure can discover network devices using discovery profiles. A discovery profile contains a collection of settings that instructs Prime Infrastructure how to find network elements, connect to them, and collect their inventory. For example, you can instruct Prime Infrastructure to use CDP, LLDP, OSPF to discover devices, or just perform a simple ping sweep (an example of the results of a ping sweep is provided in Sample IPv4 IP Addresses for Ping Sweep.) You can also create filters to fine-tune the collection, specify credential sets, and configure other discovery settings. You can create as many profiles as you need.
After you create a profile, create and run a discovery job that uses the profile. You can check the results of the discovery job on the Discovery page. You can also schedule the job to run again at regular intervals.
Procedure
| Step 1 |
Choose Inventory > Device Management > Discovery, then click Discovery Settings at the top right of the window. (If you do not see a Discovery Settings link, click the arrow icon next to the Quick Discovery link.) |
| Step 2 |
In the Discovery Settings popup, click New. 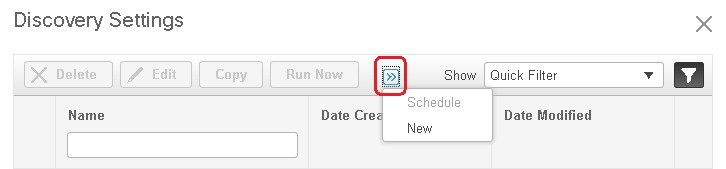 |
| Step 3 |
Enter the settings in the Discovery Settings window. Click "?" next to a setting to get information about that setting. For example, if you click "?" next to SNMPv2 Credentials, the help pop-up provides a description of the protocol and any required attributes. |
| Step 4 |
Click Run Now to run the job immediately, or Save to save your settings and schedule the discovery to run later. |
Sample IPv4 IP Addresses for Ping Sweep
The following table provides an example of the results of a ping sweep.
|
Subnet Range |
Number of Bits |
Number of IP Addresses |
Sample Seed IP Address |
Start IP Address |
End IP Address |
|
255.255.240.0 |
20 |
4094 |
205.169.62.11 |
205.169.48.1 |
205.169.63.254 |
|
255.255.248.0 |
21 |
2046 |
205.169.62.11 |
205.169.56.1 |
205.169.63.254 |
|
255.255.252.0 |
22 |
1022 |
205.169.62.11 |
205.169.60.1 |
205.169.63.254 |
|
255.255.254.0 |
23 |
510 |
205.169.62.11 |
205.169.62.1 |
205.169.63.254 |
|
255.255.255.0 |
24 |
254 |
205.169.62.11 |
205.169.62.1 |
205.169.63.254 |
|
255.255.255.128 |
25 |
126 |
205.169.62.11 |
205.169.62.1 |
205.169.63.127 |
|
255.255.255.192 |
26 |
62 |
205.169.62.11 |
205.169.62.1 |
205.169.63.62 |
|
255.255.255.224 |
27 |
30 |
205.169.62.11 |
205.169.62.1 |
205.169.63.30 |
|
255.255.255.240 |
28 |
14 |
205.169.62.11 |
205.169.62.1 |
205.169.63.14 |
|
255.255.255.248 |
29 |
6 |
205.169.62.11 |
205.169.62.9 |
205.169.63.14 |
|
255.255.255.252 |
30 |
2 |
205.169.62.11 |
205.169.62.9 |
205.169.63.10 |
|
255.255.255.254 |
31 |
0 |
205.169.62.11 |
||
|
255.255.255.255 |
32 |
1 |
205.169.62.11 |
205.169.62.11 |
205.169.62.11 |
Verify Discovery
When discovery is completed, you can verify if the process was successful.
To verify successful discovery, follow these steps:
Procedure
| Step 1 |
Choose . |
| Step 2 |
Choose the discovery job for which you want to view details. |
| Step 3 |
Choose from the left navigation pane and select the specific job. |
| Step 4 |
Under Discovery Job Instances, expand the arrow to view details about the devices that were discovered. If devices are missing:
|

 and choose
  next to settings icon. Any number of device details can be exported into this CSV file. But, you cannot use this CSV file
to import the devices.
next to settings icon. Any number of device details can be exported into this CSV file. But, you cannot use this CSV file
to import the devices.
 Feedback