- About This Book
- Using the Prime Fulfillment Graphical User Interface
- Setting Up Prime Fulfillment Services
- Managing Carrier Ethernet and L2VPN Services
- Managing RAN Backhaul Services
- Managing MPLS VPN Services
- Managing MPLS Transport Profile Services
- Managing MPLS Traffic Engineering Services
- Managing Service Requests
- Managing Templates and Data Files
- Monitoring
- Performing Diagnostics
- Using the Topology Tool
- Using Inventory Manager
- Administration Tasks
- Cisco Configuration Engine Server
- Property Settings
- WatchDog Commands
- XML Reference
- Terminating an Access Ring on Two N-PEs
- Repository Views
- Inventory - Discovery
- Adding Additional Information to Services
Cisco Prime Fulfillment User Guide 6.2
Bias-Free Language
The documentation set for this product strives to use bias-free language. For the purposes of this documentation set, bias-free is defined as language that does not imply discrimination based on age, disability, gender, racial identity, ethnic identity, sexual orientation, socioeconomic status, and intersectionality. Exceptions may be present in the documentation due to language that is hardcoded in the user interfaces of the product software, language used based on RFP documentation, or language that is used by a referenced third-party product. Learn more about how Cisco is using Inclusive Language.
- Updated:
- March 20, 2015
Chapter: Using Inventory Manager
Using Inventory Manager
This chapter explains how Inventory Manager provides a method of managing mass changes to inventory and service model data in the Cisco Prime Fulfillment provisioning process. In this process, Inventory Manager enables an operator to import network-specific data into the Prime Fulfillment Repository (Repository) in bulk mode. Prime Fulfillment now supports the import of inventory from Prime Network. The inventory that can be imported are device credentials, software version, and SNMP details. All other physical and logical inventory is retrieved from the device using collect configuration. It contains the following sections:
Inventory - Device Console
Inventory - Device Console is the starting point for many operations. Inventory Manager performs three primary functions:
•![]() Imports devices from configuration files and configures CPEs and PEs by associating devices with a Customer or Provider.
Imports devices from configuration files and configures CPEs and PEs by associating devices with a Customer or Provider.
•![]() Edits devices, CPEs or PEs stored in the Prime Fulfillment repository.
Edits devices, CPEs or PEs stored in the Prime Fulfillment repository.
•![]() Assigns a device to a provider or customer.
Assigns a device to a provider or customer.
To navigate through Device Console, follow these steps:
Step 1 ![]() Choose Inventory> Device Tools > Device Console and you receive a window as shown in the example in Figure 13-1.
Choose Inventory> Device Tools > Device Console and you receive a window as shown in the example in Figure 13-1.

Note ![]() The radio button last selected will be the one shown in Figure 13-1.
The radio button last selected will be the one shown in Figure 13-1.
Figure 13-1 Device Console window
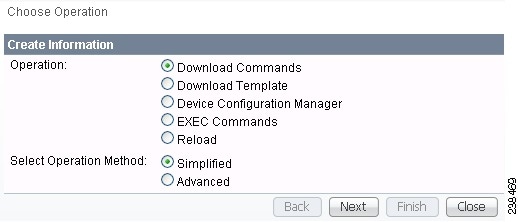
Step 2 ![]() To select one of the operations, click the radio button for one of the following selections and then click Next.
To select one of the operations, click the radio button for one of the following selections and then click Next.
Note ![]() All operations apply only to Live mode, not ECHO mode.
All operations apply only to Live mode, not ECHO mode.
•![]() Download Commands—Download operation commands and configlets. The Select Operation Method selections of Simplified and Advanced (via wizard) are only available for Download Commands and are explained in that section.
Download Commands—Download operation commands and configlets. The Select Operation Method selections of Simplified and Advanced (via wizard) are only available for Download Commands and are explained in that section.
•![]() Download Template—Downloads template configlets to the specified devices.
Download Template—Downloads template configlets to the specified devices.
•![]() Device Configuration Manager—Displays different versions of configuration files created on a repository per timestamp and writes to running-configuration or start-up configuration.
Device Configuration Manager—Displays different versions of configuration files created on a repository per timestamp and writes to running-configuration or start-up configuration.
•![]() EXEC Commands—Allows you to send to target devices any Cisco IOS commands that can be executed in enable mode.
EXEC Commands—Allows you to send to target devices any Cisco IOS commands that can be executed in enable mode.
•![]() Reload—Remotely reloads devices.
Reload—Remotely reloads devices.
Download Commands
To download commands, follow these steps:
Step 1 ![]() Choose Inventory> Device Tools > Device Console > Download Commands.
Choose Inventory> Device Tools > Device Console > Download Commands.
Step 2 ![]() The Select Operation Method default is Simplified, which indicates that in a single window you have the options for selecting the Devices, Device Groups, and Operation Commands. You do not need to multi-click. In a single window you can submit the required parameters to complete the task. Advanced (via wizard) indicates you must go to multiple windows to achieve the task. In this method, you select Device, click Next, select Device Groups, click Next, select Operation Command, and then the summary.
The Select Operation Method default is Simplified, which indicates that in a single window you have the options for selecting the Devices, Device Groups, and Operation Commands. You do not need to multi-click. In a single window you can submit the required parameters to complete the task. Advanced (via wizard) indicates you must go to multiple windows to achieve the task. In this method, you select Device, click Next, select Device Groups, click Next, select Operation Command, and then the summary.
Step 3 ![]() Click Next.
Click Next.
A window as shown in Figure 13-2.
Figure 13-2 Device Console—Download Commands: Select Devices
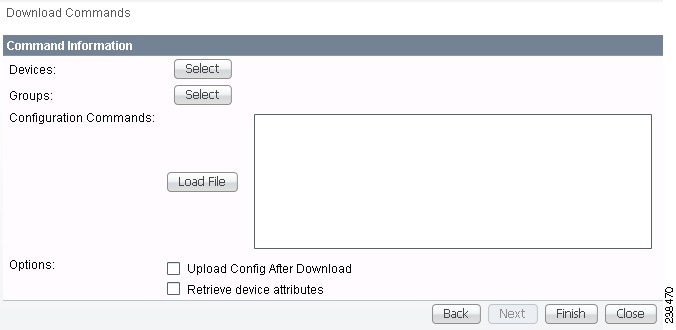
Step 4 ![]() In the Devices row, click Select/Deselect. In the new window, check the check box for each device you want. Uncheck a check box if you do not want this device. Then click Select. Figure 13-2 then reappears with the selected devices in the Devices row.
In the Devices row, click Select/Deselect. In the new window, check the check box for each device you want. Uncheck a check box if you do not want this device. Then click Select. Figure 13-2 then reappears with the selected devices in the Devices row.
Step 5 ![]() In the Groups row, click Select/Deselect. In the next window, check the check box for each group you want. Uncheck a check box if you do not want this group. Then click Select. The selected groups appear in the Groups row.
In the Groups row, click Select/Deselect. In the next window, check the check box for each group you want. Uncheck a check box if you do not want this group. Then click Select. The selected groups appear in the Groups row.
Step 6 ![]() In the Operation Commands field, enter the commands you want to download or click Load File to select a set of commands to place in the Operation Commands field.
In the Operation Commands field, enter the commands you want to download or click Load File to select a set of commands to place in the Operation Commands field.
If you leave the Upload Config After Download check box unchecked, you do not upload the configuration file after the download.
If you leave the Retrieve device attributes check box unchecked, you do not retrieve any device attributes. If you check the Retrieve device attributes check box, after the template is downloaded, SNMP is used to retrieve interface information and issue additional show commands, such as show version.
Step 7 ![]() Click OK to submit the download and you receive a window with the Device Console Operation Result and in the bottom left corner a Status. You can click Download or Done.
Click OK to submit the download and you receive a window with the Device Console Operation Result and in the bottom left corner a Status. You can click Download or Done.
Step 8 ![]() When you click Download, you return to Step 6 to download additional commands on the selected devices.
When you click Download, you return to Step 6 to download additional commands on the selected devices.
Step 9 ![]() When you click Done, you return to Figure 13-1.
When you click Done, you return to Figure 13-1.
Download Template
Note ![]() Multiple datafiles belonging to different templates cannot be downloaded through the device console.
Multiple datafiles belonging to different templates cannot be downloaded through the device console.
To download a template, follow these steps:
Step 1 ![]() Choose Inventory> Device Tools > Device Console .
Choose Inventory> Device Tools > Device Console .
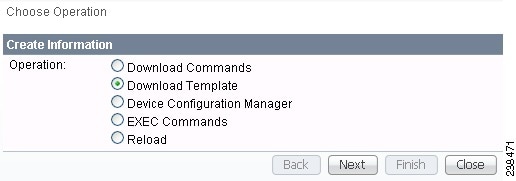
Step 2 ![]() Select Download Template and click Next.
Select Download Template and click Next.
A window as shown in Figure 13-3.
Figure 13-3 Device Console—Download Template: Select Devices
Step 3 ![]() Continue with Step 4 if you want to add devices; proceed to Step 9 to delete devices; or click Next to proceed to Step 11 for 3. Select Device Groups.
Continue with Step 4 if you want to add devices; proceed to Step 9 to delete devices; or click Next to proceed to Step 11 for 3. Select Device Groups.
Step 4 ![]() Click Add, as shown in Figure 13-3, to 2. Select Devices.
Click Add, as shown in Figure 13-3, to 2. Select Devices.
Step 5 ![]() From the resulting Device Selection window, check the check box(es) for each device you want to select. Then click Select.
From the resulting Device Selection window, check the check box(es) for each device you want to select. Then click Select.
Step 6 ![]() You return to Figure 13-3 with the added devices.
You return to Figure 13-3 with the added devices.
Step 7 ![]() For each device, you can click the added Clear button to clear the Upload to Customer/Site column to reflect none selected, or you can click the added Select button and a new window allows you to Create Customer, Create Site, Select, or Cancel. When you click Select in this new window, you return to Figure 13-3 with the added customer or site.
For each device, you can click the added Clear button to clear the Upload to Customer/Site column to reflect none selected, or you can click the added Select button and a new window allows you to Create Customer, Create Site, Select, or Cancel. When you click Select in this new window, you return to Figure 13-3 with the added customer or site.
Step 8 ![]() You can repeat Step 4 to Step 7 to add more devices, you can delete devices, as explained in Step 9, or you can proceed by going to Step 10.
You can repeat Step 4 to Step 7 to add more devices, you can delete devices, as explained in Step 9, or you can proceed by going to Step 10.
Step 9 ![]() To delete devices, check the check box(es) for the devices you want to delete and then click Delete. Select carefully, because there is no chance to confirm this deletion.
To delete devices, check the check box(es) for the devices you want to delete and then click Delete. Select carefully, because there is no chance to confirm this deletion.
Step 10 ![]() When you have all the devices you want, click Next. You proceed to 3. Select Device Groups, starting in Step 11.
When you have all the devices you want, click Next. You proceed to 3. Select Device Groups, starting in Step 11.
Step 11 ![]() Continue with Step 12 if you want to add device groups; proceed to Step 14 to delete device groups; or click Next to proceed to Step 16 for 4. Enter Download Commands.
Continue with Step 12 if you want to add device groups; proceed to Step 14 to delete device groups; or click Next to proceed to Step 16 for 4. Enter Download Commands.
Step 12 ![]() Click Add, as shown in Figure 13-4, to 3. Select Device Groups. Adding Device Groups is optional.
Click Add, as shown in Figure 13-4, to 3. Select Device Groups. Adding Device Groups is optional.
Figure 13-4 Device Group Selection
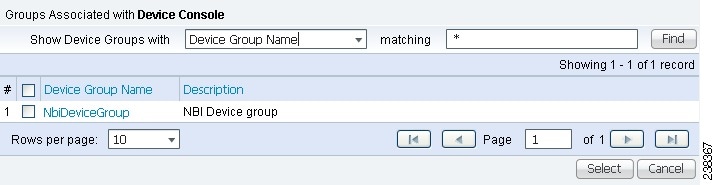
Step 13 ![]() From the resulting window, check the check box(es) for each device group you want to select. Then click Select.
From the resulting window, check the check box(es) for each device group you want to select. Then click Select.
You return to Figure 13-4 with the added device groups. You can repeat Step 12 to Step 13 to add more device groups, you can delete device groups, as explained in Step 14, or you can proceed by going to Step 15.
Step 14 ![]() To delete device groups, check the check box(es) for the devices you want to delete and then click Delete. Select carefully, because there is no chance to confirm this deletion.
To delete device groups, check the check box(es) for the devices you want to delete and then click Delete. Select carefully, because there is no chance to confirm this deletion.
Step 15 ![]() When you have all the device groups you want, click Next. You proceed to 4. Select Download Template, starting in Step 16.
When you have all the device groups you want, click Next. You proceed to 4. Select Download Template, starting in Step 16.
Step 16 ![]() For 4. Select Download Template, the resulting window is shown in Figure 13-5.
For 4. Select Download Template, the resulting window is shown in Figure 13-5.
Figure 13-5 Select Download Template

Step 17 ![]() In Figure 13-5, you can click the Select button.
In Figure 13-5, you can click the Select button.
A window as shown in Figure 13-6.
Step 18 ![]() Click Add to add templates or Remove to remove templates. When you have the templates you want, click OK.
Click Add to add templates or Remove to remove templates. When you have the templates you want, click OK.
When you click Add you get a Template Datafile Chooser window with the template choices in the tree. Click + to open the folders and subfolders in the tree, until you get the property you want to choose. Click on that property and it is added to your list. Repeat this until all the templates you want are in your list. In each added property, you can click View and you receive the configlet for that data file. To return, click OK. In Figure 13-6, check the check box(es) for the template(s) you want. In each template row, click the Action drop-down list and choose APPEND or PREPEND to add information after or before, respectively; check or uncheck the Active check box; and then click OK.
Figure 13-6 Add/Remove Templates

Step 19 ![]() You return to Figure 13-5 with the updated information.
You return to Figure 13-5 with the updated information.
Step 20 ![]() Click Next and you proceed to 5. Download Template Summary, as explained in Step 21.
Click Next and you proceed to 5. Download Template Summary, as explained in Step 21.
Step 21 ![]() For 5. Download Commands Summary, a window as shown in Figure 13-7.
For 5. Download Commands Summary, a window as shown in Figure 13-7.
Figure 13-7 Download Template Summary
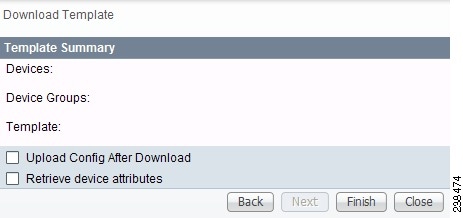
Step 22 ![]() In Figure 13-7, if you leave the Upload Config After Download check box unchecked, you do not upload the configuration file after the download. If you check the Upload Config After Download check box, you upload the new configuration file after you download the templates in . If you leave the Retrieve device attributes check box unchecked, you do not retrieve any device attributes. If you check the Retrieve device attributes check box, after the template is downloaded, SNMP is used to retrieve interface information and issue additional show commands, such as show version.
In Figure 13-7, if you leave the Upload Config After Download check box unchecked, you do not upload the configuration file after the download. If you check the Upload Config After Download check box, you upload the new configuration file after you download the templates in . If you leave the Retrieve device attributes check box unchecked, you do not retrieve any device attributes. If you check the Retrieve device attributes check box, after the template is downloaded, SNMP is used to retrieve interface information and issue additional show commands, such as show version.
Step 23 ![]() Click Back until you correct any information you want to change or click Finish to submit the download and you receive a window with the Download Template Results and in the bottom left corner a Status with a green check mark for Succeeded.
Click Back until you correct any information you want to change or click Finish to submit the download and you receive a window with the Download Template Results and in the bottom left corner a Status with a green check mark for Succeeded.
Step 24 ![]() Click Done and you return to Figure 13-1.
Click Done and you return to Figure 13-1.
Device Configuration Manager
To display the configuration, download the configuration to the startup configuration on the device, or download the configuration to the running configuration on the device, follow these steps:
Step 1 ![]() Choose Inventory> Device Tools > Device Console.
Choose Inventory> Device Tools > Device Console.
Step 2 ![]() Select Device Configuration Manager and click Next.
Select Device Configuration Manager and click Next.
A window as shown in Figure 13-8.
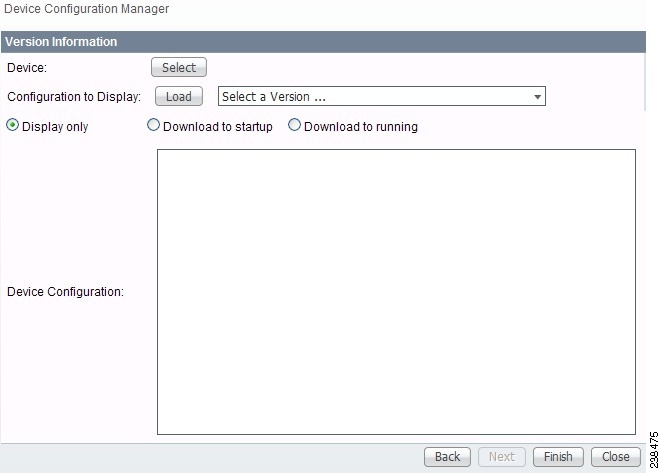
Figure 13-8 Device Configuration Manager
Step 3 ![]() In the Device row, click Select.
In the Device row, click Select.
Step 4 ![]() From the devices listed, click the radio button for the device you want to select. Then click Select.
From the devices listed, click the radio button for the device you want to select. Then click Select.
Step 5 ![]() You return to Figure 13-8 with the added device. You can repeat Step 3 to Step 4 to change the device.
You return to Figure 13-8 with the added device. You can repeat Step 3 to Step 4 to change the device.
Step 6 ![]() When you have selected the device you want, go to the Configuration to Display row and click the Select a Version... drop-down list. Click the version you want and then click Load to load that configuration file.
When you have selected the device you want, go to the Configuration to Display row and click the Select a Version... drop-down list. Click the version you want and then click Load to load that configuration file.
Step 7 ![]() Click one of the following radio buttons or keep the default:
Click one of the following radio buttons or keep the default:
•![]() Display only—The configuration file can only be viewed.
Display only—The configuration file can only be viewed.
•![]() Download to startup—The configuration file is downloaded to the start up configuration of the selected router.
Download to startup—The configuration file is downloaded to the start up configuration of the selected router.
Note ![]() For Download to startup, the Device Access Protocol (defined in device creation) must be either ftp or tftp. If this is not the case, the Device Configuration Manager Results window appears and indicates that you must set up either ftp or tftp. Dynamic Component Properties Library (DCPL) properties for DCS for both FTP and TFTP are specified in "Property Settings".
For Download to startup, the Device Access Protocol (defined in device creation) must be either ftp or tftp. If this is not the case, the Device Configuration Manager Results window appears and indicates that you must set up either ftp or tftp. Dynamic Component Properties Library (DCPL) properties for DCS for both FTP and TFTP are specified in "Property Settings".
•![]() Download to running The configuration file is downloaded to the router's running configuration file.
Download to running The configuration file is downloaded to the router's running configuration file.
Note ![]() When the DCPL property copy-running-to-startup in the GTL/ios folder is set to the default of true, the router's running configuration file is also copied to the start up configuration.
When the DCPL property copy-running-to-startup in the GTL/ios folder is set to the default of true, the router's running configuration file is also copied to the start up configuration.
Step 8 ![]() Click Finish. If in Step 7 you chose Display only, you automatically return to Figure 13-1. If in Step 7 you clicked Download to startup or Download to running, you get a Device Configuration Manager Results window. In the Status box, you get a green check mark for Succeeded or a red Failed status and you must click Done to return to Figure 13-1.
Click Finish. If in Step 7 you chose Display only, you automatically return to Figure 13-1. If in Step 7 you clicked Download to startup or Download to running, you get a Device Configuration Manager Results window. In the Status box, you get a green check mark for Succeeded or a red Failed status and you must click Done to return to Figure 13-1.
EXEC Commands
EXEC Commands allows you to send to target devices any Cisco IOS commands that can be executed in enable mode. You can only view the router information. You cannot edit or delete the information.
To execute EXEC Commands, follow these steps:
Step 1 ![]() Choose Inventory> Device Tools > Device Console.
Choose Inventory> Device Tools > Device Console.
Step 2 ![]() Select EXEC Commands and click Next.
Select EXEC Commands and click Next.
A window as shown in Figure 13-9.
Figure 13-9 Device Console—EXEC Commands: Select Devices

Step 3 ![]() Continue with Step 4 if you want to add devices; proceed to Step 7 to delete devices; or click Next to proceed to Step 9 for 3. Select Device Groups.
Continue with Step 4 if you want to add devices; proceed to Step 7 to delete devices; or click Next to proceed to Step 9 for 3. Select Device Groups.
Step 4 ![]() Click Add, as shown in Figure 13-9, to 2. Select Devices.
Click Add, as shown in Figure 13-9, to 2. Select Devices.
Step 5 ![]() From the resulting window, check the check box(es) for each device you want to select. Then click Select.
From the resulting window, check the check box(es) for each device you want to select. Then click Select.
Step 6 ![]() You return to Figure 13-9 with the added devices. You can repeat Step 4 to Step 5 to add more devices, you can delete devices, as explained in Step 7, or you can proceed by going to Step 8.
You return to Figure 13-9 with the added devices. You can repeat Step 4 to Step 5 to add more devices, you can delete devices, as explained in Step 7, or you can proceed by going to Step 8.
Step 7 ![]() To delete devices, check the check box(es) for the devices you want to delete and then click Delete in Figure 13-9. Select carefully, because there is no chance to confirm this deletion.
To delete devices, check the check box(es) for the devices you want to delete and then click Delete in Figure 13-9. Select carefully, because there is no chance to confirm this deletion.
Step 8 ![]() When you have all the devices you want, click Next.
When you have all the devices you want, click Next.
You proceed to 3. Select Device Groups, starting in Step 9.
Step 9 ![]() Continue with Step 10 if you want to add device groups; proceed to Step 13 to delete device groups; or click Next to proceed to Step 15 for 4. Enter EXEC Commands.
Continue with Step 10 if you want to add device groups; proceed to Step 13 to delete device groups; or click Next to proceed to Step 15 for 4. Enter EXEC Commands.
Step 10 ![]() Click Add, as shown in Figure 13-10, to 3. Select Device Groups.
Click Add, as shown in Figure 13-10, to 3. Select Device Groups.
Figure 13-10 Device Group Selection

Step 11 ![]() From the resulting window, check the check box(es) for each device group you want to select. Then click Select.
From the resulting window, check the check box(es) for each device group you want to select. Then click Select.
Step 12 ![]() You return to Figure 13-10 with the added device groups. You can repeat Step 10 to Step 11 to add more device groups, you can delete device groups, as explained in Step 13, or you can proceed by going to Step 14.
You return to Figure 13-10 with the added device groups. You can repeat Step 10 to Step 11 to add more device groups, you can delete device groups, as explained in Step 13, or you can proceed by going to Step 14.
Step 13 ![]() To delete device groups, check the check box(es) for the devices you want to delete and then click Delete. Select carefully, because there is no chance to confirm this deletion.
To delete device groups, check the check box(es) for the devices you want to delete and then click Delete. Select carefully, because there is no chance to confirm this deletion.
Step 14 ![]() When you have all the device groups you want, click Next. You proceed to 4. Enter EXEC Commands, starting in Step 15.
When you have all the device groups you want, click Next. You proceed to 4. Enter EXEC Commands, starting in Step 15.
Step 15 ![]() For 4. Enter EXEC Commands, the resulting window is shown in Figure 13-11.
For 4. Enter EXEC Commands, the resulting window is shown in Figure 13-11.
Figure 13-11 Operation Commands
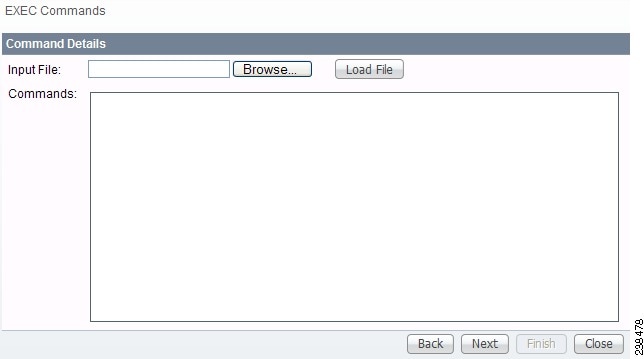
Step 16 ![]() In Figure 13-11, you can click the Browse button to input an existing file with Cisco IOS configuration commands. Then click the Load File button to put the file's information in the Commands field. Otherwise, you can enter the Cisco IOS configuration commands directly in the Commands field.
In Figure 13-11, you can click the Browse button to input an existing file with Cisco IOS configuration commands. Then click the Load File button to put the file's information in the Commands field. Otherwise, you can enter the Cisco IOS configuration commands directly in the Commands field.
Step 17 ![]() Click Next and you proceed to 5. EXEC Commands Summary, as explained in Step 18.
Click Next and you proceed to 5. EXEC Commands Summary, as explained in Step 18.
Step 18 ![]() For 5. EXEC Commands Summary, a window as shown in Figure 13-12.
For 5. EXEC Commands Summary, a window as shown in Figure 13-12.
Figure 13-12 EXEC Commands Summary
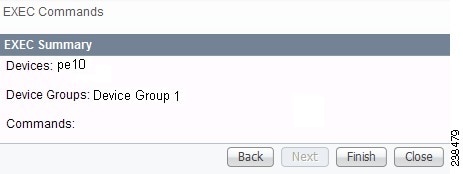
Step 19 ![]() Click Back until you correct any information you want to change or click Finish to retrieve the information from the router. You then receive a window with the EXEC Commands Results and a Status with a green check mark for Succeeded. You can click EXEC or Done.
Click Back until you correct any information you want to change or click Finish to retrieve the information from the router. You then receive a window with the EXEC Commands Results and a Status with a green check mark for Succeeded. You can click EXEC or Done.
Step 20 ![]() When you click EXEC, you return to Step 15 to enter additional commands on the selected devices.
When you click EXEC, you return to Step 15 to enter additional commands on the selected devices.
Step 21 ![]() When you click Done, you return to Figure 13-1.
When you click Done, you return to Figure 13-1.
Reload
To reload (reboot) the router, follow these steps:
Step 1 ![]() Choose Inventory> Device Tools > Device Console.
Choose Inventory> Device Tools > Device Console.
Step 2 ![]() Select Reload and click Next.
Select Reload and click Next.
A window as shown in Figure 13-13.
Figure 13-13 Device Console—Reload: Select Devices

Step 3 ![]() Continue with Step 4 if you want to add devices; proceed to Step 7 to delete devices; or click Next to proceed to Step 9 for 3. Select Device Groups.
Continue with Step 4 if you want to add devices; proceed to Step 7 to delete devices; or click Next to proceed to Step 9 for 3. Select Device Groups.
Step 4 ![]() Click Add, as shown in Figure 13-13, to 2. Select Devices.
Click Add, as shown in Figure 13-13, to 2. Select Devices.
Step 5 ![]() From the resulting window, check the check box(es) for each device you want to select. Then click Select.
From the resulting window, check the check box(es) for each device you want to select. Then click Select.
Step 6 ![]() You return to Figure 13-13 with the added devices. Repeat Step 4 to Step 5 to add more devices; delete devices, as explained in Step 7; or proceed by going to Step 8.
You return to Figure 13-13 with the added devices. Repeat Step 4 to Step 5 to add more devices; delete devices, as explained in Step 7; or proceed by going to Step 8.
Step 7 ![]() To delete devices, check the check box(es) for the devices you want to delete and then click Delete. Select carefully, because there is no chance to confirm this deletion.
To delete devices, check the check box(es) for the devices you want to delete and then click Delete. Select carefully, because there is no chance to confirm this deletion.
Step 8 ![]() When you have all the devices you want, click Next. You proceed to 3. Select Device Groups, starting in Step 9.
When you have all the devices you want, click Next. You proceed to 3. Select Device Groups, starting in Step 9.
Step 9 ![]() Continue with Step 10 if you want to add device groups; proceed to Step 13 to delete device groups; or click Next to proceed to Step 15 for 4. Reload Devices Summary.
Continue with Step 10 if you want to add device groups; proceed to Step 13 to delete device groups; or click Next to proceed to Step 15 for 4. Reload Devices Summary.
Step 10 ![]() Click Add, as shown in Figure 13-14, to 3. Select Device Groups.
Click Add, as shown in Figure 13-14, to 3. Select Device Groups.
Figure 13-14 Device Group Selection

Step 11 ![]() From the resulting window, check the check box(es) for each device group you want to select. Then click Select.
From the resulting window, check the check box(es) for each device group you want to select. Then click Select.
Step 12 ![]() You return to Figure 13-14 with the added device groups. Repeat Step 10 to Step 11 to add more device groups; delete device groups, as explained in Step 13; or proceed by going to Step 15.
You return to Figure 13-14 with the added device groups. Repeat Step 10 to Step 11 to add more device groups; delete device groups, as explained in Step 13; or proceed by going to Step 15.
Step 13 ![]() To delete device groups, check the check box(es) for the devices you want to delete in Figure 13-14 and then click Delete. Select carefully, because there is no chance to confirm this deletion.
To delete device groups, check the check box(es) for the devices you want to delete in Figure 13-14 and then click Delete. Select carefully, because there is no chance to confirm this deletion.
Step 14 ![]() When you have all the device groups you want, click Next. You proceed to 4. Reload Devices Summary, starting in Step 15.
When you have all the device groups you want, click Next. You proceed to 4. Reload Devices Summary, starting in Step 15.
Step 15 ![]() For 4. Reload Devices Summary, a window as shown in Figure 13-15.
For 4. Reload Devices Summary, a window as shown in Figure 13-15.
Figure 13-15 Reload Summary
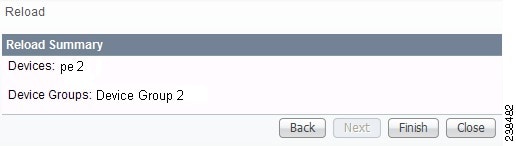
Step 16 ![]() Click Back until you correct any information you want to change or click Finish to submit the reload and you receive a window with the Reload Results and a Status with a green check mark for Succeeded.
Click Back until you correct any information you want to change or click Finish to submit the reload and you receive a window with the Reload Results and a Status with a green check mark for Succeeded.
Step 17 ![]() Click Finish and you return to Figure 13-1.
Click Finish and you return to Figure 13-1.
Prime Network Device Import
Prime Fulfillment now supports the import of inventory from Prime Network. The inventory that can be imported are device credentials, software version, and SNMP details. All other physical and logical inventory is retrieved from the device using collect configuration. Set the DCPL property from InventoryImport before importing Prime Network Device. For more information on setting DCPL properties, see Config in Chapter 14 "Administration Tasks".
Note ![]() This configuration is required for every new device added to the network.
This configuration is required for every new device added to the network.
This feature allows you to perform:
•![]() Device import from Prime Network
Device import from Prime Network
•![]() Automated Ring Discovery Process
Automated Ring Discovery Process
•![]() Customer Device Insertion via an integrated Single Screen
Customer Device Insertion via an integrated Single Screen
•![]() Enhanced Inventory Manager for Bulk import from Prime Network
Enhanced Inventory Manager for Bulk import from Prime Network
Cisco IOS routers that function as N-PE, U-PE, or PE-AGG are defined as devices from which Prime Fulfillment collects information. Every network element that Prime Fulfillment manages is defined as a device in the system.
The two ways to import devices from Prime Network are:
–![]() Single Device Import during Device Creation
Single Device Import during Device Creation
–![]() Bulk Import using Inventory Manager
Bulk Import using Inventory Manager
–![]() Import Prime Network certificate into Prime Fulfillment Trust Store
Import Prime Network certificate into Prime Fulfillment Trust Store
Single Device Import during Device Creation
To navigate through Devices and import a device manually, follow these steps:
Step 1 ![]() Choose Inventory > Physical Inventory > Devices.
Choose Inventory > Physical Inventory > Devices.
The Device List window appears. Click the Create button.
Step 2 ![]() Select Cisco Device from the drop-down menu.
Select Cisco Device from the drop-down menu.
The Create Cisco Device window appears.
See the following sections for descriptions of the fields:
•![]() Login and Password Attributes
Login and Password Attributes
•![]() Device and Configuration Access Information Attributes
Device and Configuration Access Information Attributes
Step 3 ![]() Select the device type as Customer Device or Provider Device from the drop-down menu under Roles section.
Select the device type as Customer Device or Provider Device from the drop-down menu under Roles section.
Enter the region name for the Provider that you are creating. To enter the provider region name follow these steps:
a. ![]() Click the Select button next in Provider Region Name.
Click the Select button next in Provider Region Name.
A list of provider region names appears.
b. ![]() Click the radio button next to provider region name and then Select.
Click the radio button next to provider region name and then Select.
Select the device role from the Role Type drop-down menu.
Note ![]() The Provider Region Name and PE Role Type options are enabled only if you choose Provider Device as the device type.
The Provider Region Name and PE Role Type options are enabled only if you choose Provider Device as the device type.
Step 4 ![]() Check the check box next to Config Collect to perform a configuration collection on saving the device.
Check the check box next to Config Collect to perform a configuration collection on saving the device.
Configuration Collection is performed at the device creation and device import stages. You can also navigate to Operate > Task Manager > Task to create a config task and select the devices created.
Step 5 ![]() Check the check box next to Ring Discovery to perform ring collection on saving the device. The devices associated with the REP rings are discovered from Active Network Abstration (ANA) and imported into Prime Fulfillment. You can perform ring discovery task from:
Check the check box next to Ring Discovery to perform ring collection on saving the device. The devices associated with the REP rings are discovered from Active Network Abstration (ANA) and imported into Prime Fulfillment. You can perform ring discovery task from:
–![]() Device Creation window
Device Creation window
–![]() Inventory Manager window
Inventory Manager window
Step 6 ![]() Check the check box next to MPLS-TP Discovery and MPLS Label Sync to access these details.
Check the check box next to MPLS-TP Discovery and MPLS Label Sync to access these details.
Step 7 ![]() To access the Additional Properties section of the Create Cisco Device, click Show.
To access the Additional Properties section of the Create Cisco Device, click Show.
The Additional Properties window appears.
See the following sections for descriptions of the Additional Properties fields:
•![]() Terminal Server Options Attributes
Terminal Server Options Attributes
•![]() Device Platform Information Attributes
Device Platform Information Attributes
Step 8 ![]() Enter any desired Additional Properties information for the Terminal Server device you are creating.
Enter any desired Additional Properties information for the Terminal Server device you are creating.
Step 9 ![]() Click Save.
Click Save.
Step 10 ![]() The Devices window reappears with the new imported device listed.
The Devices window reappears with the new imported device listed.
Bulk Import using Inventory Manager
Devices which already exist in ANA can be imported directly into Prime Fulfillment using the option available on the Inventory Manager window.
To perform bulk import of Cisco devices, follow these steps:
Step 1 ![]() Choose Inventory > Physical Inventory > Inventory Manager.
Choose Inventory > Physical Inventory > Inventory Manager.
The Device List window appears.
Step 2 ![]() Click the Import Devices button. Select ANA.
Click the Import Devices button. Select ANA.
Step 3 ![]() The Inventory Import Filter window appears.
The Inventory Import Filter window appears.
a. ![]() You can filter the import of devices from ANA before getting it into Prime Fulfillment.
You can filter the import of devices from ANA before getting it into Prime Fulfillment.
–![]() The devices available in ANA can be filtered based on Device Host Name, Management IP Address, Element Management Key and Software Version.
The devices available in ANA can be filtered based on Device Host Name, Management IP Address, Element Management Key and Software Version.
–![]() Once filteration is done, a success message displays the number of devices found matching the filter criteria.
Once filteration is done, a success message displays the number of devices found matching the filter criteria.
–![]() The devices found matching the criteria are displayed on the Inventory Manager window. You can perform additional configuration such as role assignment by clicking on Assign CE/PE button.
The devices found matching the criteria are displayed on the Inventory Manager window. You can perform additional configuration such as role assignment by clicking on Assign CE/PE button.
–![]() Select the device and click on Edit button to change any of the device parameters before saving the device.
Select the device and click on Edit button to change any of the device parameters before saving the device.
–![]() Click Save button to import and save the device into Prime Fulfillment.
Click Save button to import and save the device into Prime Fulfillment.
b. ![]() If you want to import all the devices available in ANA, click OK button without providing any filtering criteria on the filter screen.
If you want to import all the devices available in ANA, click OK button without providing any filtering criteria on the filter screen.
Step 4 ![]() The Device List window appears.
The Device List window appears.
Step 5 ![]() The Config Collect and Ring Discovery can be scheduled during device import. Click on Action button to schedule:
The Config Collect and Ring Discovery can be scheduled during device import. Click on Action button to schedule:
–![]() Config Collect
Config Collect
–![]() Config Collect + Ring Discovery
Config Collect + Ring Discovery
–![]() Ring Discovery
Ring Discovery
Step 6 ![]() Click Save.
Click Save.
The Devices window reappears with the new devices added.
Import Prime Network certificate into Prime Fulfillment Trust Store
To perform import of Prime Network certificate, follow these steps:
Step 1 ![]() Add the Prime Network server details in Prime Fulfillment and log into the Prime Network server.
Add the Prime Network server details in Prime Fulfillment and log into the Prime Network server.
Step 2 ![]() Navigate to <Installation-Path>/ Main/resourcebundle/com/sheer directory and provide (ls -alrt) list command.
Navigate to <Installation-Path>/ Main/resourcebundle/com/sheer directory and provide (ls -alrt) list command.
Note ![]() Make sure the files .keystore & security.properties are available.
Make sure the files .keystore & security.properties are available.
Step 3 ![]() Export the server certificate from a server keystore (.keystore) using the following command:
Export the server certificate from a server keystore (.keystore) using the following command:
keytool -export -alias ana -file <certificate-name>.cer -keystore <keystore-name>
<certificate-name> can be - sheer.cer (must end with .cer)
<keystore-name> must be - .keystore
Example: keytool -export -alias ana -file sheer.cer -keystore .keystore
Step 4 ![]() Transfer (FTP) the certificate (sheer.cer)to Prime Fulfillment server installation, etc directory, i.e., <PRIMEF_INSTALLATTION-DIR>/etc/.
Transfer (FTP) the certificate (sheer.cer)to Prime Fulfillment server installation, etc directory, i.e., <PRIMEF_INSTALLATTION-DIR>/etc/.
Step 5 ![]() Run the following command from the <PRIMEF_INSTALLATTION-DIR> directory to source the environment:
Run the following command from the <PRIMEF_INSTALLATTION-DIR> directory to source the environment:
./prime.sh shell
Step 6 ![]() Run the following command from <PRIMEF_INSTALLATTION-DIR>/etc/ directory to import the certificate to Prime Fulfillment keystore:
Run the following command from <PRIMEF_INSTALLATTION-DIR>/etc/ directory to import the certificate to Prime Fulfillment keystore:
keytool -import -file <certificate-name>.cer -keystore <keystore-name> -alias
<alias-name>
<certificate-name> - must be the name of the Prime Network certificate.
<keystore-name> - must be prime.keystore
<alias-name> - unique name to identify the certificate.
Example: keytool -import -file sheer.cer -keystore prime.keystore -alias anacer
Step 7 ![]() The keytool will prompt for the password. Use the password as changeit.
The keytool will prompt for the password. Use the password as changeit.
Note ![]() In order to confirm the password, check the security. properties file present in the <PRIMEF_INSTALLATTION-DIR>, etc directory.
In order to confirm the password, check the security. properties file present in the <PRIMEF_INSTALLATTION-DIR>, etc directory.
Step 8 ![]() A keytool confirmation to import the certificate while executing the command occurs.
A keytool confirmation to import the certificate while executing the command occurs.
Enter Yes to import. The message Certificate was imported successfully appears.
Step 9 ![]() To ensure if the certificate is imported, run the following command that lists the trusted certificates added to the keystore:
To ensure if the certificate is imported, run the following command that lists the trusted certificates added to the keystore:
keytool -list -v -keystore prime.keystore
Restart the server to reflect the changes.
 Feedback