Cisco Prime Central 1.5.2 User Guide
Bias-Free Language
The documentation set for this product strives to use bias-free language. For the purposes of this documentation set, bias-free is defined as language that does not imply discrimination based on age, disability, gender, racial identity, ethnic identity, sexual orientation, socioeconomic status, and intersectionality. Exceptions may be present in the documentation due to language that is hardcoded in the user interfaces of the product software, language used based on RFP documentation, or language that is used by a referenced third-party product. Learn more about how Cisco is using Inclusive Language.
- Updated:
- October 13, 2016
Chapter: Managing Customers
Managing Customers
This section describes how to manage customers in Prime Central and associate them with compute, network, and device resources.
As a network administrator, you can create and manage customers for your assurance solution. You can associate physical and virtual devices and network services with a customer, and assess the impact that network-generated alarms and events have on that customer.
This section contains the following topics:
Customer Management Portlet
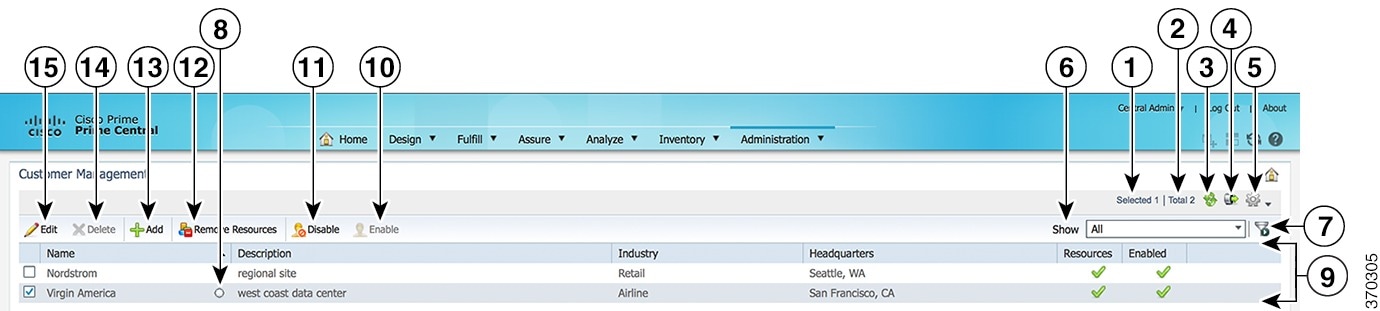
The following figure shows the Customer Management portlet, where you perform all customer management tasks.
|
Show drop-down list |
|||
- Managing Customers
- Associating Resources to Customers
- Removing Resources from Customers
- Exporting Customer Data
Managing Customers
You can add, edit, and delete customers; associate customers with resources monitored in the Data Center page; disable and enable customer accounts; and export customer data.
- Adding a Customer
- Customer Information Constraints
- Customer Information in the Customer 360° View
- Editing a Customer
- Deleting a Customer
Adding a Customer
| Step 1 | From the Prime Central menu, choose . | ||
| Step 2 | In the Customer Management portlet, click Add. | ||
| Step 3 | In the Add Customer window, enter general information about the new customer, including name (required), industry, contact information, and website URL. The variables that you define must adhere to the constraints described in Customer Information Constraints. | ||
| Step 4 | (Optional) Add a customer logo image: | ||
| Step 5 | Click
Add.
The new customer is displayed in the Customer Management portlet.
|
Customer Information Constraints
When adding or editing a customer, the variables that you define must adhere to the constraints listed in the following table.
|
The name must: |
|
|
Description |
Can contain up to 4000 characters. All characters are allowed. |
|
Industry |
Can contain up to 255 characters. All characters are allowed. |
|
Headquarters |
Can contain up to 255 characters. All characters are allowed. |
|
Products |
Can contain up to 2000 characters. All characters are allowed. |
|
URL |
Can contain up to 255 characters. All characters are allowed. |
|
Stock Symbol |
Can contain up to 255 characters. All characters are allowed. |
|
Main Contact |
Can contain up to 255 characters. All characters are allowed. |
|
|
Can contain up to 255 characters. All characters are allowed. |
|
Phone |
Can contain up to 255 characters. All characters are allowed. |
|
Note |
Can contain up to 2000 characters. All characters are allowed. |
|
Photo |
Must be in .png, .jpg, or .jpeg format. The logo cannot exceed 128 x 128 pixels or 60 KB. |
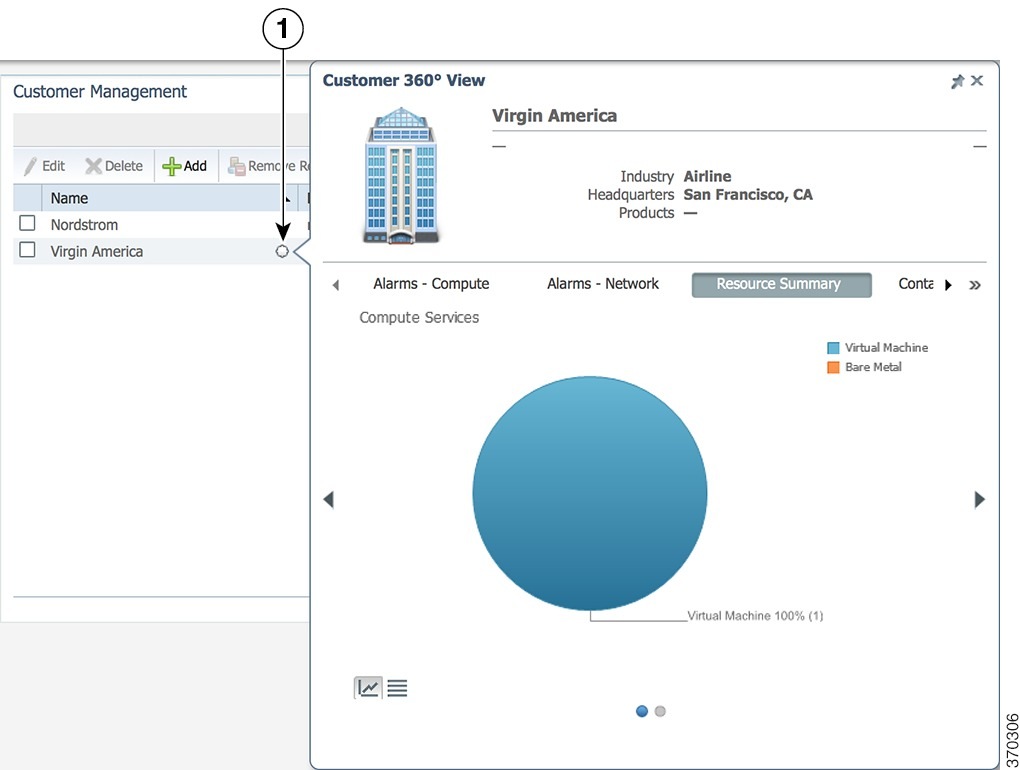
Customer Information in the Customer 360° View
Editing a Customer
| Step 1 | From the Prime Central menu, choose . |
| Step 2 | In the Customer Management portlet, select the customer that you want to edit and click Edit. |
| Step 3 | In the Edit Customer window, edit the customer's general information, as required. The variables that you define must adhere to the constraints described in Customer Information Constraints. |
| Step 4 | Click
Save.
The updated customer is displayed in the Customer Management portlet. |
Deleting a Customer
Associating Resources to Customers
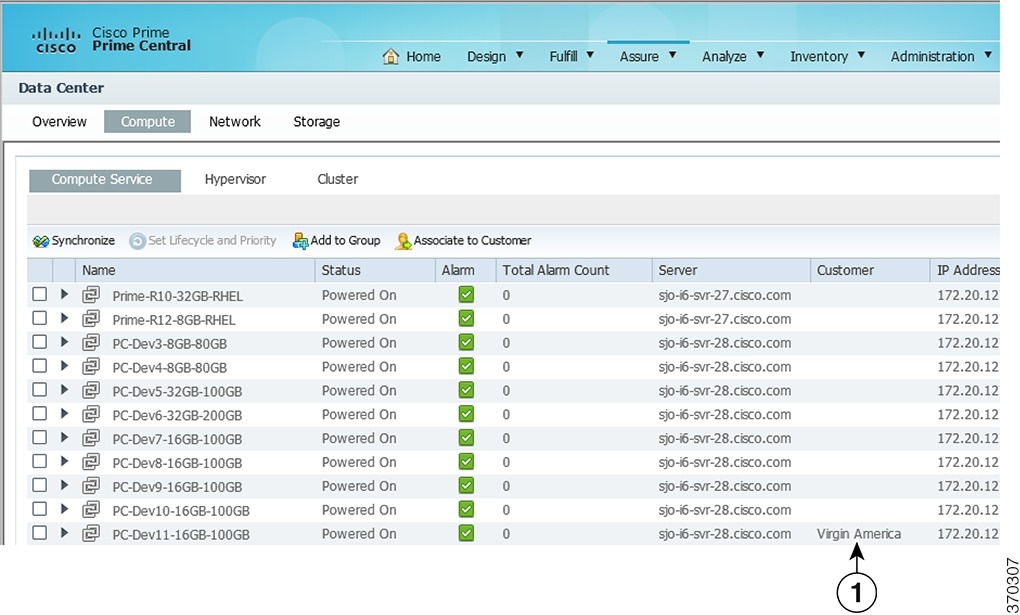
You can associate resources—virtual machines, bare metal blades, and network services—to customers. A single customer can be associated with multiple resources.

Removing Resources from Customers
| Step 1 | From the Prime Central menu, choose . | ||
| Step 2 | In the Customer
Management portlet, select the desired customer and click
Remove
Resources.
| ||
| Step 3 | In the
Remove
Resources window, check the check box of the resource that you want
to remove; then, click
Remove.
The resource is removed from the customer. |
Exporting Customer Data
Prime Central lets you export customer data to Microsoft Excel. Opening the exported file with any program other than Excel is not recommended.
If you sort or filter the data before exporting it, the exported data is likewise sorted or filtered. Each row in the exported data has a check box. If you check the left-most check box for a row before export, the corresponding check box in the exported data is also checked.
To export customer data to an Excel file:
| Step 1 | From the Prime Central menu, choose . | ||
| Step 2 | In the Customer Management portlet, click the Export icon. | ||
| Step 3 | At the prompt to open or save
the Excel file, click
Open.
| ||
| Step 4 | Click
Yes at the following prompt:
The file you are trying to open, ’filename’, is in a different format than specified by the file extension. Verify that the file is not corrupted and is from a trusted source before opening the file. Do you want to open the file now? |
 Feedback