Cisco Prime Central 1.5.2 HA Guide
Bias-Free Language
The documentation set for this product strives to use bias-free language. For the purposes of this documentation set, bias-free is defined as language that does not imply discrimination based on age, disability, gender, racial identity, ethnic identity, sexual orientation, socioeconomic status, and intersectionality. Exceptions may be present in the documentation due to language that is hardcoded in the user interfaces of the product software, language used based on RFP documentation, or language that is used by a referenced third-party product. Learn more about how Cisco is using Inclusive Language.
- Updated:
- October 14, 2016
Chapter: Installing Prime Central in a Bare-Metal HA Environment
- Installation Overview
- RHCS Components and Functionality
- Supported RHCS Fencing Options
- RHCS HA Local Redundancy Requirements
- Configuring Hardware for Prime Central RHCS Local Redundancy HA
- Configuring the OS for Prime Central Local Redundancy HA Managed by RHCS
- Installing the Red Hat Cluster Service
- Verifying the Prime Central RHCS HA Installation
- Installing Prime Central and an Embedded Database in a Local Redundancy HA Configuration
- Installing Prime Central Fault Management in a Local Redundancy HA Configuration
- Before You Begin
- Installing RHEL 6.5
- Installing RHEL 6.7
- Configuring Multipath
- Adding Shared Partitions
- Setting Up the Prime Central Fault Management Virtual Machine
- Distributing the Node .tar File
- Distributing the Virtual Machine .tar File
- Installing Prime Central Fault Management on the Virtual Machine
- Setting Up the Fault Management Cluster Service
- Checking the Cluster Services
- Next Steps
- Troubleshooting
- Upgrading to Prime Central 1.5.2 in a Local Redundancy HA Configuration
- Upgrading to Prime Central Fault Management 1.5.2 in a Local Redundancy HA Configuration
- Uninstalling Prime Central Fault Management
- Uninstalling Prime Central
Installation Overview
The Prime Central RHCS local redundancy HA configuration in a Bare-metal environment has the following characteristics and requirements:
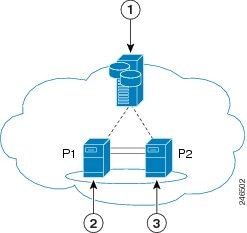
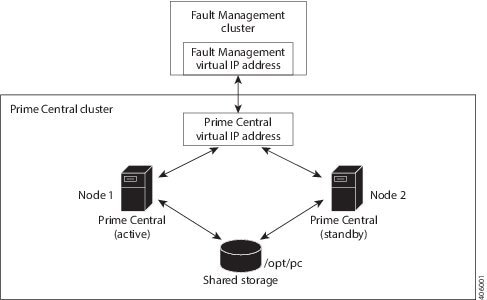
- Prime Central and the embedded database are installed in a dual-node cluster. Figure 1-1 shows a basic dual-node, local redundancy cluster.
- RHCS must be installed on both cluster nodes. Each node has the platform to run both Prime Central and the database services. RHCS manages the local HA setup.
- RHCS requires a disk resource that is mountable from both nodes.
- The Prime Central installer places Prime Central and the database on the node where you ran the installation. After installation, you can relocate them as needed.
- Prime Central, the Integration Layer, and the database services must placed on the same server.
- Prime Central and the embedded database are always mounted with external shared storage.
- Prime Central does not recognize RHCS. RHCS continuously obtains the cluster status by running a set of scripts. If a problem occurs, RHCS unmounts, then remounts the appropriate server and database. Therefore, every node in the HA setup must be able to mount the storage.
- The Prime Central and oracle home directories must be created manually under the mounted storage. This ensures that the operating system (OS) user created on both servers has a home directory available, even if the storage is moved to another node. These directories must have relevant permissions for the network user and oracle user.
- Each service has its own virtual IP address (virtual IP). This means Prime Central clients treat a failover or switchover like a local service restart.
- Only one instance of the Prime Central files exists, and it is located on the shared storage. Duplicate user and home directories are created on each node as placeholders. If a switchover occurs, the storage unmounts from one node and mounts on the other.
- A local redundancy configuration requires a fencing hardware unit for cutting off a node from the shared storage. Fencing ensures data integrity and prevents a “split-brain scenario” where servers are disconnected from each other, and each assumes the other server failed. If a failure occurs, the cutoff can be performed by:
– Powering off the node with a remote power switch
– Disabling a switch port fiber channel
– Revoking a host’s SCSI 3 reservations
If a problem with the cluster node occurs, RHCS invokes the fencing device with the peer and waits for the success signal.
Figure 1-1 Prime Central Dual-Node, Local Redundancy Cluster
RHCS Components and Functionality
RHCS is included with the Red Hat Enterprise Linux 6.5 or 6.7 (RHEL 6.5 or 6.7) Advanced Program and has the following components:
- Cluster infrastructure—Basic functions that enable a group of computers (nodes) to work together as a cluster. The RHCS cluster infrastructure performs cluster management, lock management, fencing, and cluster configuration management.
- High availability service management—Failover of services from one cluster node to another when a node becomes inoperative.
- Cluster administration tools—Configuration and management tools for setting up, configuring, and managing a Red Hat cluster, including cluster infrastructure components, high availability service management components, and storage.
Supported RHCS Fencing Options
A fencing device cuts off a node from shared storage to ensure data integrity. The supported fencing options are:
- fence_ilo —Cisco validated Prime Central HA with the HP Integrated Lights-Out (HP iLO) fence_ilo automatic fencing method; other automatic fencing methods can be used but have not been validated.
- fence_manual —Assigns the manual fencing agent. This fencing agent is temporary; you should not use it in production because it does not perform automated actions. If a cluster problem occurs, you must manually disconnect the node and storage, or use another fencing agent to disconnect them. If you choose this option during the installation because you want to add a different Red Hat-supported fencing device, use the RHCS GUI to provision the device after installation. Be sure to add it as the main fencing method, and move the manual fencing agent to the backup method, as shown in Figure 1-2 and Figure 1-3.
- In Figure 1-2, the HP iLO host 1 is 192.168.1.10.
- In Figure 1-3, the HP iLO host 2 is 192.168.1.11.
- To prevent fencing loops, the cluster interconnect and power fencing (for example, HP iLO) should use the same network, such as bond0.
- If the main fencing device is a remote power switch, define all ports that simultaneously supply power to the node.

Note For general information about the RHCS web GUI, see Verifying the Prime Central RHCS HA Installation. For complete information about using the RHCS web GUI, see the Red Hat Conga User Guide. For information about provisioning and managing dual-node cluster fencing devices, see the RHCS user documentation.
Figure 1-2 RHCS GUI Fencing Method Window—Node 1
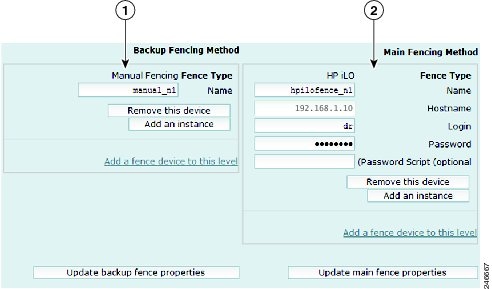
Figure 1-3 RHCS GUI Fencing Method Window—Node 2

The fencing methods shown in Figure 1-2 and Figure 1-3 change the following sections in the cluster.conf file:
RHCS HA Local Redundancy Requirements
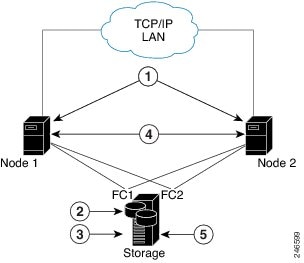
We strongly recommend that you use a hardware installation designed to avoid a single point of failure. See Figure 1-4.
Figure 1-4 Local Redundancy Hardware Installation Designed to Avoid a Single Point of Failure
Configuring Hardware for Prime Central RHCS Local Redundancy HA
Figure 1-5 shows the recommended hardware configuration for Prime Central RHCS local redundancy HA.
Figure 1-5 Prime Central Dual-Node Cluster for Local Redundancy HA
Configure the external storage so all disks and logical unit numbers (LUNs) are accessible from both servers in the cluster. The disk and LUN configuration depends on the storage type:
- If you are using JBOD disks, provide enough physical disks to create the volumes listed in Table 1-2 to satisfy the Oracle performance requirements.
- If you are using storage that supports hardware RAID, divide the physical disks into LUNs so that the volumes listed in Table 1-2 can be created and configured to satisfy the Oracle performance requirements and can be protected with RAID5, RAID1, or RAID10. The Oracle volumes can be created on a single LUN.
Configuring the OS for Prime Central Local Redundancy HA Managed by RHCS
1. Install the OS and all recommended patches on both servers in the cluster. Installations on both servers must be identical.
2. Verify that access is available to all external disks.
3. Create the internal disk partitions listed in Table 1-3 . Placing the individual directories in separate partitions is recommended, but not required.
4. Complete the internal disk partitions for both servers.
5. Keep the nodes synchronized:
Installing the Red Hat Cluster Service
Using the procedures in the Red Hat user documentation, install RHEL 6.5 or 6.7 with the RHCS. When you set up the RHCS disk groups and volumes, keep the following in mind:
Verifying the Prime Central RHCS HA Installation
Installing Prime Central and an Embedded Database in a Local Redundancy HA Configuration
Installing Prime Central in an RHCS local HA configuration is a three-part process:
1. Install RHEL 6.5 or 6.7 on both nodes.
2. Use multipath shared storage and install Prime Central on node 1.
3. Configure and enable clustering so that Prime Central can relocate between nodes.
The examples provided use the following host names and IP addresses; yours will be different:
- Node 1—prime-ha-node1.cisco.com (192.168.1.110)
- Node 2—prime-ha-node2.cisco.com (192.168.1.120)
- Virtual IP address—prime-service.cisco.com (192.168.1.130)
- Gateway—192.168.1.1
- Domain Name System (DNS)—192.168.1.2
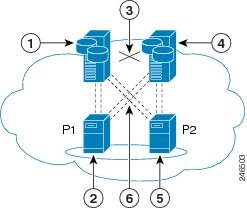
Figure 1-6 shows an example of a Prime Central cluster in an HA configuration.
Figure 1-6 Prime Central Cluster in an HA Configuration
Before You Begin
- Verify that your system meets all the hardware and software requirements in “Installation Requirements” in the Cisco Prime Central 1.5.2 Quick Start Guide .
- Set up two nodes that have:
– Static IP addresses and host names that are registered correctly in the DNS.
– The same root password, which cannot contain a percent sign (%, ^, $, *).
- Set up one virtual IP address and host name that are registered correctly in the DNS. In this section, the virtual IP address is 192.168.1.130.
- Set up shared storage that is compatible with RHEL device-mapper (DM) multipath and cluster fencing.
- Install RHEL 6.5 or 6.7 on both nodes.
- If the default folder location and names are changed, look for the section “Require Manual Definition” to make corresponding changes in the below mentioned files:
– /root/ha-stuff/pc/PrimeCentral.sh
Adding Clustering to the Installed Red Hat Server
To add clustering to the newly installed Red Hat server, complete the following steps in parallel on both nodes, except where noted:
Step 1 Create local directories named /rhel and /cdrom.
Step 2 Copy the .iso file that was used for the virtual machine (VM) RHCS installation to the /rhel directory.
Step 3 Mount the /rhel .iso file to /cdrom:
Note To permanently mount the drive, update the /etc/fstab file. See http://docs.redhat.com/docs/en-US/Red_Hat_Enterprise_Linux/4/html/Introduction_To_System_Administration/s2-storage-mount-fstab.html.
Step 4 Create a file named /etc/yum.repos.d/local.repo. Use UNIX format and be sure there are no spaces before lines.
Step 5 Save the newly created file in local.repo, as follows:
Step 6 Install the clustering package:
Step 7 Add the information for both nodes to the /etc/hosts file; for example:
Step 8 Generate a Secure Shell (SSH) key for the root user:
Step 9 (On the first node only) Share the node’s public key with the other node so that dynamically creating a secure shell between the nodes does not prompt for a password:
Step 10 Verify that the .ssh directory has 700 permission and the .ssh/id_rsa file has 600 permission:
Step 11 Verify that your SSH is working without an authentication or password prompt:

a. On node prime-ha-node1.cisco.com, enter:
b. On node prime-ha-node2.cisco.com, enter:
c. If you are prompted for a password, check the permissions of all folders and files that you modified in the preceding steps.
d. If you are prompted to continue connecting, enter yes . (The prompt should appear only the first time you use SSH to connect to the node.)
Step 12 Verify that the virtual IP address is accessible from outside the cluster’s subnet:
Step 13 On a computer outside the cluster’s subnet, ping the virtual IP address:
If you do not get a valid response, determine which part of the OS or network setup is blocking.
Adding Shared Partitions
To add shared partitions, complete the following steps in parallel on both nodes, except where noted:
Note The examples provided use device mapping names such as mpath2 and mpath2p1; yours will be different.
Step 2 Check for available disks:
In the output, note mpath2 , which is the multipath virtual device or disk that you will use later as shared storage.
Note If you previously set up a partition on the disk, you might see output such as mpath2p. You must delete that partition before proceeding to the next step.
Step 3 (On the first node only) Create a 100-GB, shared partition:
Step 5 Check for new partitions:
Step 6 (On the first node only) Format the new shared partition:
Step 7 Create target locations:
Step 8 Verify that both nodes can mount and unmount the shared storage:
a. On the first node, mount the shared storage and save a file that contains only the value 1 to the shared storage. The test.txt file should exist in the list of contents of /opt/pc:
b. On the second node, mount the shared storage and verify that the test.txt file exists and contains the value 1 :
If you cannot mount or unmount the shared storage, or if the test.txt file does not exist when you mount it to the second node, your multipath is not set up correctly.
Accessing and Distributing the Prime Central .tar File
Step 1 Insert the Cisco Prime Central 1.5.2 USB, navigate to the High Availability/RHCS KVM VMWare ESXi Local HA/Prime Central folder, and locate the primecentral_v1.5.2_ha_vm.tar.gz file.
Step 2 Use SSH to connect to the first node.
Step 3 Copy the primecentral_v1.5.2_ha_vm.tar.gz file to the first node.
Step 4 Back up the following directories on both nodes:
Step 5 Distribute the file on both nodes:
Step 6 Navigate to the Base Application folder and copy primecentral_v1.5.2.bin and all available zip files into the /root/ha-stuff/pc directory:
Installing Prime Central on the First Node in an HA Setup
To install Prime Central on the first node only:
Step 1 Mount the shared partitions:
Step 2 Add a virtual IP cluster service address for the Prime Central service:
Step 3 Update the install.properties file and verify that all required properties have values. Review the comments at the top of the install.properties file for details.
Note To install Prime Central silently, you must edit the /root/ha-stuff/pc/install.properties file. See “Sample install.properties Files” in the Cisco Prime Central 1.5.2 Quick Start Guide.
Note You run the PrimeCentral.sh script by adding the preceding command-line parameters. If you do not add the command-line parameters, you are prompted for the required data.
Step 5 In another terminal window, check the installation process:
Step 6 After the installation succeeds, start Prime Central:
Step 7 Verify that Prime Central is running correctly; then, stop it:
Step 8 Remove the virtual IP addresses:
Step 9 Unmount the shared partitions:
Setting Up the Prime Central Cluster Service
To set up and manage a cluster, you can use the CLI or the GUI. This section explains how to use the CLI. To use the GUI, see the Red Hat Enterprise Linux 5 Cluster Administration Guide , sections 3 and 4.
To set up the Prime Central cluster service, complete the following steps in parallel on both nodes, except where noted:
Step 1 Modify the /etc/cluster/cluster.conf file by setting unique values for the parameters listed in Table 1-5 .
Step 2 Copy the edited cluster.conf file to the /etc/cluster/ directory.
Whenever you modify the cluster.conf file, increment the config_version value so the cluster.conf file propagates correctly to the nodes. To propagate the cluster.conf file manually, you must stop the cluster, copy the file, and then start the cluster.
Step 3 Start the cluster services:
Enter each command on one node and then immediately enter the same command on the other node.
For example, when cman starts on a node, it waits for the other node to start cman. If the other node takes too long to start cman, cman times out on the first node.
Step 4 (For the RHCS luci GUI only) Using the username admin , start the RHCS ricci service:
Step 5 (For the RHCS luci GUI only) On the first node only, start the RHCS luci services:
Step 6 To test failover, relocate the service to another node:
Step 7 After the Prime Central service is running in an HA cluster, you cannot restart its components (such as the portal, integration layer, and database) without first freezing the cluster. After you restart the component, you can unfreeze the cluster.
For example, attaching or detaching an application to or from Prime Central requires an integration layer restart. On the active node, freeze the HA cluster, restart the integration layer, and unfreeze the cluster:
Modifying Parameters in the cluster.conf File
The following table lists the parameters in the /etc/cluster/cluster.conf file for which you must set unique values.
The multicast address must be unique per subnet and must be working before you start your cluster. For a tool to verify that your multicast address is correct, see Troubleshooting. |
||
Next Steps
Complete the following steps on both nodes, except where noted:
Step 1 Configure cman, rgmanager, and ricci to start automatically upon bootup:
Step 2 (On the first node only) Configure luci to start automatically upon bootup:
Step 3 Verify that the required ports are open. For a list of ports that Prime Central requires, see “Prime Central Protocols and Ports” in the Cisco Prime Central 1.5.1 Quick Start Guide .
Step 5 Disable Security-Enhanced Linux (SELinux):
Installing Prime Central Fault Management in a Local Redundancy HA Configuration
Installing the Prime Central Fault Management component in a dual-node, RHCS HA configuration is a three-part process:
1. Install Red Hat Enterprise Linux 6.5 (RHEL 6.5) with HA and kernel-based virtual machine (KVM) packages on each node.
2. Create a single virtual machine installed with RHEL 6.5/6.7 and running the Prime Central Fault Management component.
3. Use multipath shared storage that contains the virtual machine image.
The examples provided use the following host names and IP addresses; yours will be different:
- Node 1—fm-ha-node1.cisco.com (192.168.1.150)
- Node 2—fm-ha-node2.cisco.com (192.168.1.160)
- Virtual IP address—fm-service.cisco.com (192.168.1.170)
- Gateway—192.168.1.1
- DNS—192.168.1.2
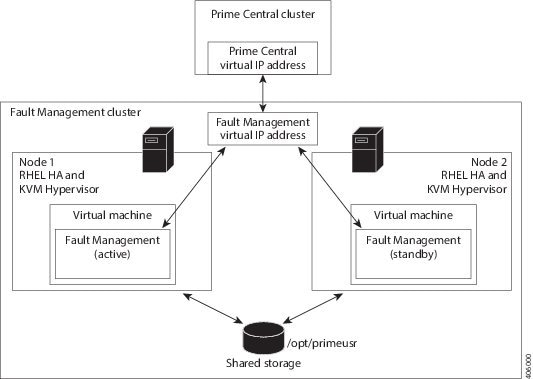
Figure 1-7 shows an example of a Fault Management cluster in an HA configuration.
Figure 1-7 Fault Management Cluster in an HA Configuration
Before You Begin
- Verify that your system meets all the hardware and software requirements in “Installation Requirements” in the Cisco Prime Central 1.5.2 Quick Start Guide .
- If you changed the default installation folder (/opt/primeusr/faultmgmt), make the equivalent changes in the following files (look for the section titled “Require manual definition” in each file):
Installing RHEL 6.5
To install RHEL 6.5, complete the following steps in parallel on both nodes, except where noted:
Step 1 Configure specialized storage devices, high availability, and virtualization. See the Red Hat documentation for instructions.
Step 2 Verify that the following options are checked:
Step 3 Create local directories named /rhel and /cdrom-6.5.
Step 4 Copy the .iso file that was used for the node installation to the /rhel directory.
Step 5 Mount the /rhel .iso file to /cdrom-6.5:
Note To permanently mount the drive, update the /etc/fstab file. See http://docs.redhat.com/docs/en-US/Red_Hat_Enterprise_Linux/4/html/Introduction_To_System_Administration/s2-storage-mount-fstab.html.
Step 6 Create a file named /etc/yum.repos.d/local.repo. Use UNIX format and be sure there are no spaces before lines.
Step 7 Save the newly created file in local.repo, as follows:
Step 8 (Optional) If you forget the HA package and want to install it later, enter:
Step 9 (Optional) If you forget the desktop and want to install it later, enter:
Then, change id:3:initdefault: to id:5:initdefault: and reboot the server.
Step 10 Temporarily disable the firewall and SELinux to enable initial testing of the cluster:
a. To disable the firewall, enter:
Step 11 Keep the nodes synchronized:
Step 12 Switch network daemons:
Step 13 Edit the /etc/hosts file to add the node information; for example:
Step 14 Generate an SSH key for the root user:
Step 15 (On the first node only) Share the node’s public key with the other node so that dynamically creating a secure shell between the nodes does not prompt for a password:
Step 16 Verify that the .ssh directory has 700 permission and the .ssh/id_rsa file has 600 permission:
Step 17 Verify that your SSH is working without an authentication or password prompt:
a. On node prime-ha-node1.cisco.com, enter:
b. On node prime-ha-node2.cisco.com, enter:
c. If you are prompted for a password, check the permissions of all folders and files that you modified in the preceding steps.
d. If you are prompted to continue connecting, enter yes . (The prompt should appear only the first time you use SSH to connect to the node.)
Installing RHEL 6.7
To install RHEL 6.7 in place of RHEL 6.5, follow the Install RHEL 6.5 procedural Step 1 through Step 17.
Configuring Multipath
To configure multipath, complete the following steps in parallel on both nodes, except where noted:
Note These steps set up a non clustered drive. If you want to do a live migration of your virtual machines, you must set up a clustered drive such as the Clustered Logical Volume Manager (CLVM).
Step 2 Configure and start the services:
Step 3 Check for available disks. The names of the multipath disks must be identical on both nodes:
In the output, note mpathc , which is the multipath virtual device or disk that you will use later as shared storage.
Adding Shared Partitions
To add shared partitions, complete the following steps in parallel on both nodes, except where noted:
Note The examples provided use device mapping names such as mpathc and mpathcp1; yours will be different.
Step 1 (On the first node only) Create a 100-GB, shared partition:
Step 3 Check for new partitions:
Step 4 Create target locations on both nodes:
Step 5 Check if the new partition is mapped to another server:
If the mount fails due to an invalid file type, the partition is not a link to an existing partition; skip to Step 6.
Otherwise, run a directory listing of /images. If the listing contains data from an existing partition, do not reformat this partition. Instead, leave this partition as is and return to Step 1 to create another partition.
Step 6 (On the first node only) Format the new shared partition:
Step 7 Verify that both nodes can mount and unmount the shared storage:
a. On the first node, mount the shared storage and save a file that contains only the value 1 to the shared storage. The test.txt file should exist in the list of contents of /images:
b. On the second node, mount the shared storage and verify that the test.txt file exists and contains the value 1 :
If you cannot mount or unmount the shared storage, or if the test.txt file does not exist when you mount it to the second node, your multipath is not set up correctly.
Setting Up the Prime Central Fault Management Virtual Machine
Step 1 Mount the newly created partition on the first node:
Step 2 (On the first node only) Add a new storage pool:
a. Run vncserver and use the VNC client to access the node.
c. Click Edit Connection Details .
e. Click the + button to add a new storage pool.
f. In the Add a New Storage Pool: Step 1 of 2 window, enter fm_images as the storage pool name, choose fs: Pre-Formatted Block Device as the type, and click Forward .
g. In the Add a New Storage Pool: Step 2 of 2 window, verify that the settings are as follows; then, click Finish :
– Source Path: /dev/mapper/mpathcp1
Step 3 (On the first node only) Add a new storage volume:
a. In the virt-manager, click the Storage tab.
b. Click the New Volume button.
c. In the Add a Storage Volume window, enter the following values; then, click Finish :
– Name: fm_vm (.img is appended)
– Max Capacity (MB): Use all available storage space from the pool.
Step 4 Create a virtual network:
a. On each node, add a bridge to the host, to enable the virtual machines to use the same physical network as the nodes:
Note The IPADDR has the same value as the node to which you are adding this file. This example is for node 1.
b. On each node, update the /etc/sysctl.conf file to allow forwarding to the virtual machines:
Step 5 Create a new virtual machine:
a. Copy the RHEL 6.5/6.7 .iso file to the /rhel directory.
b. In the virt-manager window, click the create a new virtual machine button.
c. In the Step 1 of 5 window, enter fm_vm as the virtual machine name, click Local install media , and click Forward .
d. In the Step 2 of 5 window, click Use ISO image and specify the location of the RHEL 6.5/6.7 .iso image. Verify that the OS type is Linux and the version is Red Hat Enterprise Linux 5.4 or later . Then, click Forward .
e. In the Step 3 of 5 window, enter the amount of RAM and CPUs to use for the virtual machine. For recommendations, see “Installation Requirements” in the Cisco Prime Central 1.5.2 Quick Start Guide . Then, click Forward .
f. In the Step 4 of 5 window, check Enable storage for this virtual machine . Click Select managed or other existing storage and browse to /images/fm_vm.img (which you created in Step 3 c ). Then, click Forward .
g. In the Step 5 of 5 window, verify that the settings are as follows; then, click Finish :
– Advanced options: Host device eth0 (Bridge 'br0')
Step 6 Install RHEL 6.5/6.7 on the new virtual machine. The OS library, kernel-headers, is required; choose the Software Development option when installing RHEL to ensure that the kernel-headers library is installed.
Step 7 Temporarily disable the firewall and SELinux to enable initial testing of the cluster:
a. To disable the firewall, enter:
Step 8 Update the /etc/hosts file on the virtual machine:
Step 9 From the virtual machine, ping both nodes. If the ping fails, add both nodes to the virtual machine’s /etc/hosts file. For example:
Step 10 Save the /etc/hosts file; then, run the following tests:
If any of the tests return incorrect results, check the /etc/hosts file for typos. Also check the /etc/sysconfig/network file and verify that the HOSTNAME entry contains your server’s FQDN (fm-service.cisco.com in this example).
Step 11 Generate an SSH key for the virtual machine’s root user and share it with both nodes:
Step 12 On the virtual machine, verify that the .ssh directory has 700 permission and the .ssh/id_rsa file has 600 permission:
Step 13 Verify that your SSH is working without an authentication or password prompt:
a. On node prime-ha-node1.cisco.com, enter:
b. On node prime-ha-node2.cisco.com, enter:
c. If you are prompted for a password, check the permissions of all folders and files that you modified in the preceding steps.
d. If you are prompted to continue connecting, enter yes . (The prompt should appear only the first time you use SSH to connect to the node.)
Step 14 Distribute the virtual machine:
a. Click the running virtual machine and choose Shutdown > Save .
b. On the first node, copy the virtual machine definitions file to the shared directory:
c. On the second node, copy the virtual machine definition to the second node:
Distributing the Node .tar File
Step 1 Insert the Cisco Prime Central 1.5.2 USB, navigate to the High Availability/RHCS Bare Metal Local HA/Fault Management folder, and locate the primefm_v1.5.2_ha_node.tar.gz file.
Step 2 Use SSH to connect to the first node.
Step 3 Copy the primefm_v1.5.2_ha_node.tar.gz file to the first node.
Step 4 Back up the /etc/cluster/ and /images directories.
Step 6 Edit the fm_status.sh file by changing VM_FQDN to your virtual machine’s FQDN:
Distributing the Virtual Machine .tar File
Step 1 Insert the Cisco Prime Central 1.5.2 USB, navigate to the High Availability/RHCS Bare Metal Local HA/Fault Management folder, and locate the primefm_v1.5.2_ha_vm.tar.gz file.
Step 2 Mount the shared drive. (The shared storage should still be mounted to the first node. If not, verify that the shared storage is not mounted to the other node; then, mount it to the first node.)
Step 3 Launch the virtual machine:
Step 4 Use SSH to connect to the virtual machine.
Step 5 Copy the primefm_v1.5.2_ha_vm.tar.gz file to the virtual machine.
Step 6 Back up the /root/ha-stuff/fm and /usr/local/bin directories.
Installing Prime Central Fault Management on the Virtual Machine
You can use the GUI to install Fault Management on the virtual machine, or you can install it silently. The following procedures explain both the GUI-based and silent installation options; choose your preferred option.
GUI-Based Installation
Step 1 Use SSH to connect to the virtual machine.
Step 3 Install Prime Central Fault Management:
At the installer prompts, enter the information described in the Cisco Prime Central 1.5.1 Quick Start Guide , section “Installing Prime Central Fault Management on the Server.”
Step 4 In another terminal window, check the installation process:
Step 5 After the installation succeeds, use SSH to connect to the Prime Central HA active server and enter:
Step 6 To test the Prime Central Fault Management installation, open a browser, log in to the Prime Central portal, and verify that the Prime Central Fault Management component is running.
Silent Installation
Step 1 Use SSH to connect to the virtual machine.
Step 3 Edit the fm_install.properties file to match your setup.
Step 4 Install Prime Central Fault Management:
Step 5 In another terminal window, check the installation process:
Step 6 The silent installation does not report errors. To see if any errors occurred, check the log files—starting with primefm.log—in the /opt/primeusr/faultmgmt/install/log folder.
Step 7 After the installation succeeds, use SSH to connect to the Prime Central HA active server and enter:
Step 8 To test the Prime Central Fault Management installation, open a browser, log in to the Prime Central portal, and verify that the Prime Central Fault Management component is running.
Step 9 Remove the fm_install.properties file, which contains your server’s passwords used during the silent installation.
Setting Up the Fault Management Cluster Service
Step 1 Run the 6.5 or 6.7 cluster workaround on both nodes (see https://access.redhat.com/knowledge/solutions/67583 ):
Step 2 Verify that the system contains a user named ricci . If the ricci user is missing, enter:
Step 3 On both nodes, edit and save the vm.sh agent to allow a longer start time for the Fault Management virtual machine. (If you are using different hardware, you might need to increase the timeout value.)
b. Locate the timeout value (in seconds):
c. Change the timeout value to:
Step 4 Modify the /etc/cluster/cluster.conf file and set unique values. The multicast address must be unique per subnet and must be working before you start your cluster. For a tool to verify that your multicast address is correct, see Troubleshooting.
Step 5 Copy the edited cluster.conf file to the /etc/cluster/ directory on both nodes.
If the cluster is not up and running when you change the cluster.conf file, manually copy cluster.conf to the other node; then, restart the cluster:
Step 6 Validate the cluster.conf file:
Step 7 Install luci and ricci (if they are not already installed):
Step 8 Start the ricci service on both nodes:
Note Enter the passwd ricci command only once; doing so creates a password for the user ricci.
Step 9 Start the cluster services on both nodes:
Step 10 (Only if you are using the RHCS luci GUI) On the first node only, start the luci service:
Step 11 (Only if you are using the RHCS luci GUI) Log in to luci on the node where you started the luci service; for example:
Checking the Cluster Services
Step 1 Review the cluster log file in /var/log/messages.
Step 2 Check the status of the cluster:
The output is similar to the following:
Step 3 Test the Prime Central Fault Management installation:
a. Open a browser, log in to the Prime Central portal, and verify that the Prime Central Fault Management component is running.
b. Relocate the virtual machine:
c. After the relocation is complete, reverify that the Fault Management component is running on the Prime Central portal.
Step 4 After the Fault Management service is running in an HA cluster, you cannot restart its components (such as Netcool/Impact, OMNIbus, and Tivoli Common Reporting [TCR]) without first freezing the cluster. After you restart the component, you can unfreeze the cluster.
To restart a Fault Management component:
a. On the active Fault Management node, enter:
b. Use SSH to connect to the Fault Management virtual machine and enter:
c. Use SSH to connect to the active Fault Management node and enter:
Next Steps
Complete the following steps on both nodes, except where noted:
Step 1 Configure cman, rgmanager, and ricci to start automatically upon bootup:
Step 2 (On the first node only) Configure luci to start automatically upon bootup:
Step 3 Verify that the required ports are open. For a list of ports that the Fault Management component requires, see “Prime Central Protocols and Ports” in the Cisco Prime Central 1.5.2 Quick Start Guide .
Step 4 (On both nodes and on the virtual machine) Enable the firewall:
Troubleshooting
The following troubleshooting steps help to solve common problems in an HA configuration.
Problem The HA installation fails.
Solution Check the log files to locate the problem and take the appropriate action. Log files contain detailed information about request processing and exceptions and are your best diagnostic tool for troubleshooting. See “Troubleshooting the Installation” in the Cisco Prime Central 1.5.2 Quick Start Guide .
Problem Prime Central does not start in a clustered setup.
Solution Check the /var/log/messages files for failure to either mount the shared storage or add the virtual IP address. If the shared storage failed to mount, shut down the cluster and verify that you can manually add the shared storage to a node. (Be sure to unmount it after your test.)
If the virtual IP address was not added, verify that it is in the same subnet as the nodes and is not in use by any other computer in the network.
If you find that /usr/local/bin/pc.sh start failed, check /var/halogs/pc.log, which will tell you if the database or other Prime Central components failed to start. Then, to determine which component failed to start:
1. Stop the luci, ricci, rgmanager, and cman services on both nodes to shut down the cluster.
2. On the node where you originally installed Prime Central:
b. Add the virtual IP address.
c. Verify that all services have stopped:
e. Check the output from each of the preceding commands to locate the problem.
Problem You receive the error “<err> 'fsck -p /dev/mapper/mpath2p1' failed, error=4; check /tmp/fs-vmpcfs.fsck.log.mq4986 for errors.”
Solution Enter the following command and reboot when it is finished running:
Problem You receive the error “Timeout exceeded while waiting for ‘/images/fm_status.sh’” in /var/log/messages.
Solution Verify that you can use SSH to connect to each node and virtual machine without an authentication or password prompt. If SSH prompts for authentication or a password, the Prime Central and Fault Management services cannot start.
Problem Your environment uses the wrong fencing device.
Solution The examples in this guide use fence_manual and fence_virsh, which are test fencing devices and cannot be used for production. For information about which fencing device to use in your environment, see the Red Hat Enterprise Linux 6 Cluster Administration: Configuring and Managing the High Availability Add-On .
Problem The cman and rgmanager services do not start.
Solution Check the log files in /var/log/messages and /var/log/cluster. Use the following tool to verify that your multicast address is correct: http://juliandyke.wordpress.com/2010/12/03/testing-multicasting-for-oracle-11-2-0-2-grid-infrastructure/.
Problem Cannot perform a live migration.
Solution To support live migration of the virtual machines, confirm that the shared storage is set up as a clustered file system, such as Global File System (GFS) or CLVM.
Problem Cannot stop the cluster.
Solution Use luci or the command line to shut down your cluster:
- luci—Select the cluster; then, from the drop-down list, choose Stop this cluster .
- Command line—Alternating between the two nodes, shut down the services in the reverse order in which you started them. For example, enter the stop command for rgmanager on node1; then, enter it on node2. Enter the stop command for cman on node1; then, enter it on node2.
Problem When trying to unmount the shared storage, a “device is busy” message is returned.
Solution Verify that all cluster services have stopped and that you have closed all terminal sessions that are accessing the shared storage location. To determine which user is accessing the shared storage, enter:
Problem You do not know if the node can support virtualization.
If the command returns no output, the node does not support virtualization.
If the command output contains vmx or svm flags, the node supports virtualization. For example:
Problem You receive the error “operation failed: domain 'fm_vm' already exists with uuid...”
Solution An fm_vm.xml file might already exist on the second node due to a previous attempt to define the file. Do the following:
1. Verify that /images is unmounted from the first node.
2. On the second node (that is, the node on which you did not create the virtual machine), enter:
Problem Cannot test the cluster.conf file.
Solution Use rg_test commands. For example:
Problem When you reboot one or both nodes, the node is fenced before it can join the cluster.
Solution To start up, the node might require an additional fencing delay. Edit your cluster.conf file by increasing the value of the post_join_delay attribute:
Problem After you relocate the Prime Central service, the integration layer is shown in the Prime Central Suite Monitoring portlet > Applications tab, but its state is Down.
Solution On servers where the hardware requirements are at or below the minimum for Prime Central high availability, the integration layer requires more time to start up. Do the following:
1. On the active node where Prime Central is running, locate the /opt/pc/primecentral/esb/etc/com.cisco.prime.esb.jms.cfg file.
2. Edit the file by increasing the waitForStart attribute for the jmsvm.internalBrokerURL property. (If the line is commented, uncomment it.)
The default waitForStart value is 10,000 milliseconds; increase it depending on the slowness of your server. For example, to increase the waitForStart value to 30 seconds, enter:
Problem The Prime Central portal does not look correct.
Solution The cluster manager might have relocated the server. Clear your browser cache and refresh your screen; then, log back into the Prime Central portal.
Problem You need to restart a Prime Central or Fault Management component in an HA environment.
Solution Prime Central contains components such as the portal, integration layer, and database. Fault Management contains components such as Netcool/Impact, OMNIbus, and TCR. If you need to perform maintenance on a specific component, you must freeze the HA cluster before you can stop the component. After you restart the component, you can unfreeze the cluster.
Problem After adding multipath, you cannot see the multipath names when listing the /dev/mapper directory.
2. Change the find_multipaths value to no .
You should now see the multipath names.
Problem You receive the following error while mounting the storage:
Problem The fmctl status command shows that Fault Management started in KVM, but hangs in “starting” status in the cluster.
Solution Check the SSH password-less connection between the two nodes and KVM.
Upgrading to Prime Central 1.5.2 in a Local Redundancy HA Configuration
Step 2 Insert the Cisco Prime Central 1.5.2 USB, navigate to the High Availability/RHCS Bare Metal Local HA/Prime Central folder, and locate the primecentral_v1.5.2_ha_vm.tar.gz file.
Step 3 Use SSH to connect to the first node.
Step 4 Copy the primecentral_v1.5.2_ha_vm.tar.gz file to the first node.
Step 5 Back up the following directories on both nodes:
Step 7 Navigate to the Base Application folder and copy primecentral_v1.5.2.bin and all available .zip files to the /root/ha-stuff/pc directory:
Step 8 On the first node only, do the following:
a. Mount the shared partitions:
b. Add a virtual IP cluster service address for the Prime Central service:
c. Update the install.properties file and verify that all required properties have values. Review the comments at the top of the install.properties file for details.
Note To install Prime Central silently, you must edit the /root/ha-stuff/pc/install.properties file. See “Sample install.properties Files” in the Cisco Prime Central 1.5.1 Quick Start Guide.
Note You run the PrimeCentral.sh script by adding the preceding command-line parameters. If you do not add the command-line parameters, you are prompted for the required data.
e. In another terminal window, check the upgrade process:
f. After the upgrade succeeds, start Prime Central:
g. Verify that Prime Central is running correctly; then, stop it:
h. Remove the virtual IP addresses:
i. Unmount the shared partitions:
When the upgrade completes, the log files are available in ~/upgrade/1.5.1.0-1.5.2.0/upgrade.log.
Upgrading to Prime Central Fault Management 1.5.2 in a Local Redundancy HA Configuration
Step 2 Insert the Cisco Prime Central 1.5.2 USB, navigate to the High Availability/RHCS Bare Metal Local HA/Fault Management folder, and locate the primefm_v1.5.2_ha_node.tar.gz file.
Step 3 Use SSH to connect to the first node.
Step 4 Copy the primefm_v1.5.2_ha_node.tar.gz file to the first node.
Step 5 Back up the /etc/cluster/ and /images directories.
Step 7 Navigate to the top-level Fault Management folder and copy FM1.5.2Build.tar.gz to the /root/ha-stuff/fm directory:
Step 8 Edit the fm_status.sh file by changing VM_FQDN to your virtual machine’s FQDN:
Step 9 Return to the High Availability/RHCS Bare Metal Local HA/Fault Management folder and locate the primefm_v1.5.2_ha_vm.tar.gz file.
Step 10 Mount the shared drive. (The shared storage should still be mounted to the first node. If not, verify that the shared storage is not mounted to the other node; then, mount it to the first node.)
Step 11 Launch the virtual machine:
Step 12 Use SSH to connect to the virtual machine.
Step 13 Copy the primefm_v1.5.2_ha_vm.tar.gz file to the virtual machine.
Step 14 Back up the /root/ha-stuff/fm and /usr/local/bin directories.
Step 17 Edit the fm_install.properties file to match your setup.
Step 19 In another terminal window, check the upgrade process:
Step 20 To see if any errors occurred, check the log files—starting with primefm.log—in the /opt/primeusr/faultmgmt/upgrade/logs folder.
Step 21 After the upgrade succeeds, use SSH to connect to the Prime Central HA active server and enter:
Step 22 To test the Prime Central Fault Management upgrade, open a browser, log in to the Prime Central portal, and verify that the Prime Central Fault Management component is running.
Step 23 Remove the fm_install.properties file, which contains your server’s passwords.
Uninstalling Prime Central Fault Management
Note If you are also uninstalling Prime Central, you must uninstall the Fault Management component first.
Step 1 From the Prime Central portal, choose Administration > System > Suite Monitoring > Applications tab, and remove Fault Management.
Step 2 Use SSH to connect to the Prime Central active node and do the following:
a. Freeze the Prime Central cluster:
b. Restart the integration layer:
c. Unfreeze the Prime Central cluster:
Step 3 Use SSH to connect to the Prime Central Fault Management active node and freeze the Fault Management cluster service:
Step 4 Use SSH to connect to the Prime Central Fault Management virtual machine and do the following:
a. Navigate to the /var/adm/cisco/uninstall/Uninstall_Prime_Central_Fault_Management directory.
The uninstall folder contains the installvariables.properties file.
b. Uninstall Prime Central Fault Management:
The uninstallation log files are available at /var/adm/cisco/uninstall/PrimeFM-uninstall.log- time-stamp .
Step 5 Stop and disable the Fault Management cluster service on both nodes:
Uninstalling Prime Central
Step 1 Stop and disable the Prime Central cluster service on both nodes:
Step 2 Mount and add the virtual IP address to the node that was used for the Prime Central installation:
Step 3 Uninstall the application:
a. As the root user, log in to the Prime Central server. (If you logged in previously as a nonroot user, enter the su - command to become the root user.)
In the preceding command, 192.168.1.120 is the IP address of the second node.
The uninstallation log files are available at /var/adm/cisco/uninstall/UNINSTALL_LOG_ time-stamp .
Step 4 Unmount and remove the virtual IP address:
 Feedback