Installation Guide for Cisco Network Registrar 7.2
Bias-Free Language
The documentation set for this product strives to use bias-free language. For the purposes of this documentation set, bias-free is defined as language that does not imply discrimination based on age, disability, gender, racial identity, ethnic identity, sexual orientation, socioeconomic status, and intersectionality. Exceptions may be present in the documentation due to language that is hardcoded in the user interfaces of the product software, language used based on RFP documentation, or language that is used by a referenced third-party product. Learn more about how Cisco is using Inclusive Language.
- Updated:
- March 20, 2015
Chapter: Installing and Upgrading Cisco Network Registrar Virtual Appliance
Installing and Upgrading
Cisco Network Registrar Virtual Appliance
The Cisco Network Registrar virtual appliance includes all the functionality available in a version of Cisco Network Registrar 7.2 installed on any Linux operating system.
This chapter describes how to install Cisco Network Registrar virtual appliance and includes the following sections:
•![]() Installing and Configuring Cisco Network Registrar Virtual Appliance
Installing and Configuring Cisco Network Registrar Virtual Appliance
•![]() Configuring Virtual Appliance to Automatically Power Up
Configuring Virtual Appliance to Automatically Power Up
•![]() Upgrading Cisco Network Registrar Virtual Appliance
Upgrading Cisco Network Registrar Virtual Appliance
•![]() Managing Cisco Network Registrar Virtual Appliance
Managing Cisco Network Registrar Virtual Appliance
System Requirements
The memory and storage parameters are specified in the OVF file. However, you should ensure that sufficient resources are available on the host that you are targeting for the deployment to meet these requirements.
The OVF deployment allocates 2 GB of RAM to the virtual appliance. In addition, you may find that you also will need disk space beyond the 14 GB minimum allocation provided when the virtual appliance is installed. It is possible to expand the disk usage after the virtual appliance is installed.

Note ![]() It is worth some effort to determine the likely amount of disk storage that you need at the time you first install the virtual appliance. If you increase the size of the disk space after you have configured and used the product, you must back up all the work that you have done prior to increasing the disk storage. However, if you increase the disk storage when you first install the product, no backup is necessary, since in the unlikely event something goes wrong while expanding the disk storage, nothing valuable would be lost. At worst, you would simply have to reinstall the virtual appliance.
It is worth some effort to determine the likely amount of disk storage that you need at the time you first install the virtual appliance. If you increase the size of the disk space after you have configured and used the product, you must back up all the work that you have done prior to increasing the disk storage. However, if you increase the disk storage when you first install the product, no backup is necessary, since in the unlikely event something goes wrong while expanding the disk storage, nothing valuable would be lost. At worst, you would simply have to reinstall the virtual appliance.
The Cisco Network Registrar virtual appliance is supported only on VMware ESXi 4.1 and later systems that are themselves supported ESXi 4.1 systems. You can run ESXi 4.1 on hardware systems that do not meet the minimum support requirements for ESXi 4.1. In this case it will run, but some features or capabilities will not be available. VMware provides a bootable program which helps you identify whether the hardware on which it is run supports ESXi 4.1.
Installing and Configuring Cisco Network Registrar Virtual Appliance
Cisco Network Registrar virtual appliance is supported for production use on VMware ESXi 4.x and can be accessed or managed using vSphere client of VMware. The Cisco Network Registrar virtual appliance is installed using the Open Virtualization Format (OVF) package.
The VMware vSphere client can be connected directly to your ESXi installation, or it can be connected to a vCenter server which in turn is connected to your vSphere installation. Connecting through vCenter provides a number of capabilities that connecting directly to ESXi does not. If a vCenter server is available and associated with the ESXi installation, it should be used.
See Also
Preparing to Deploy Cisco Network Registrar Virtual Appliance
Deploying Cisco Network Registrar Virtual Appliance
Booting and Configuring Cisco Network Registrar Virtual Appliance
Preparing to Deploy Cisco Network Registrar Virtual Appliance
In order to deploy the Cisco Network Registrar virtual appliance and configure its network connection, you have to answer several questions. Some of these questions concern the networking environment in which the virtual appliance is being deployed, and some of them concern values which are unique to the particular virtual appliance being deployed.
The questions that are unique to the installation of this particular virtual appliance are listed below. You must decide on answers to these questions before you deploy the virtual appliance.
•![]() A virtual machine name for the deployed virtual appliance.
A virtual machine name for the deployed virtual appliance.
•![]() A root password for the underlying Linux CentOS operating system.
A root password for the underlying Linux CentOS operating system.
•![]() An IPv4 address for the virtual appliance.
An IPv4 address for the virtual appliance.
•![]() A DNS name associated with the IPv4 address of the virtual appliance.
A DNS name associated with the IPv4 address of the virtual appliance.
•![]() A username and password for the initial administrator account for the Cisco Network Registrar application.
A username and password for the initial administrator account for the Cisco Network Registrar application.
The questions concerning the networking environment are as follows. The answers to these questions are not unique to the virtual appliance, but are instead values that are determined by the environment in which you will deploy the virtual appliance:
•![]() The IP address or DNS name of the ESXi installation on which you intend to deploy the virtual appliance.
The IP address or DNS name of the ESXi installation on which you intend to deploy the virtual appliance.
•![]() The IP address or DNS name of any vCenter server associated with the ESXi installation, above.
The IP address or DNS name of any vCenter server associated with the ESXi installation, above.
•![]() The network mask associated with the IP address of the virtual appliance itself.
The network mask associated with the IP address of the virtual appliance itself.
•![]() The default gateway address for the virtual appliance.
The default gateway address for the virtual appliance.
•![]() The IP address of at least one DNS server that can be accessed by the virtual appliance, although it is best if you have the IP address of two DNS servers to provide additional availability.
The IP address of at least one DNS server that can be accessed by the virtual appliance, although it is best if you have the IP address of two DNS servers to provide additional availability.
•![]() Any proxy values necessary for the virtual appliance to access the Internet (if you want the virtual appliance to have access to the Internet).
Any proxy values necessary for the virtual appliance to access the Internet (if you want the virtual appliance to have access to the Internet).
Deploying Cisco Network Registrar Virtual Appliance
Note ![]() Before deploying the virtual appliance, verify that your VMware server is running on VMware supported hardware. If you are not sure whether your environment can support a 64-bit client, you can verify by downloading and running the VMware "CPU Identification Utility" which indicates 64-bit VMware support. This utility can be found on the VMware site at: http://www.vmware.com/download/shared_utilities.html
Before deploying the virtual appliance, verify that your VMware server is running on VMware supported hardware. If you are not sure whether your environment can support a 64-bit client, you can verify by downloading and running the VMware "CPU Identification Utility" which indicates 64-bit VMware support. This utility can be found on the VMware site at: http://www.vmware.com/download/shared_utilities.html
To install the Cisco Network Registrar virtual appliance, you must first download the correct installation file. There are two files available, a regional virtual appliance and a local cluster virtual appliance. Each of these virtual appliances are provided as a zip file.
The names are:
•![]() cnr_7_2_local_ovf.zip for the local virtual appliance
cnr_7_2_local_ovf.zip for the local virtual appliance
•![]() cnr_7_2_regional.ovf.zip for the regional virtual appliance
cnr_7_2_regional.ovf.zip for the regional virtual appliance
Download the virtual appliance of your choice, and unzip the contents of the .zip file into an empty directory of your choice.
Note ![]() You should unzip each virtual appliance into separate directories if you are using both regional and local. Do not attempt to have them share the same directory.
You should unzip each virtual appliance into separate directories if you are using both regional and local. Do not attempt to have them share the same directory.
Using vSphere, connect directly to the ESXi installation or the vCenter server, and select the ESXi installation where the OVF is to be deployed.
If you have a vCenter server available, you can connect the ESXi hypervisor to your existing vCenter server and manage it through that vCenter server. Managing all your VMware hypervisors through a common vCenter server provides many benefits.
The screens that you see while managing the ESXi hypervisor with a vSphere client through a vCenter server are different from the screens that you see while connecting the vSphere client directly to the ESXi hypervisor. You can see additional screens if connected through vCenter server. These screens do not actually provide any benefit for the operations in which you will engage to deploy the Cisco Network Registrar virtual appliance. The benefits to using the vCenter server approach come after the initial deployment of the virtual appliance.
Step 1 ![]() From vSphere menu, choose File > Deploy OVF Template.
From vSphere menu, choose File > Deploy OVF Template.
The Deploy OVF Template Source window appears.
Step 2 ![]() To import the OVF file from hard disk, click Browse and choose the OVF file (.ovf) available in the local machine where the vSphere is running, usually CNR_local_OVF10.ovf (or CNR_regional_OVF10.ovf) in the directory in which you unzipped the file earlier. You can also enter a URL to download and install the OVF package from the internet.
To import the OVF file from hard disk, click Browse and choose the OVF file (.ovf) available in the local machine where the vSphere is running, usually CNR_local_OVF10.ovf (or CNR_regional_OVF10.ovf) in the directory in which you unzipped the file earlier. You can also enter a URL to download and install the OVF package from the internet.
Note ![]() You cannot deploy a zipped file. You cannot browse for URLs and you must enter the full path to the .ovf file.
You cannot deploy a zipped file. You cannot browse for URLs and you must enter the full path to the .ovf file.
Step 3 ![]() Click Next.
Click Next.
The OVF Template Details window appears. It displays the product name, the size of the OVF file, and the amount of disk space that needs to be available for the virtual appliance.
Figure 3-1 OVF Template Details
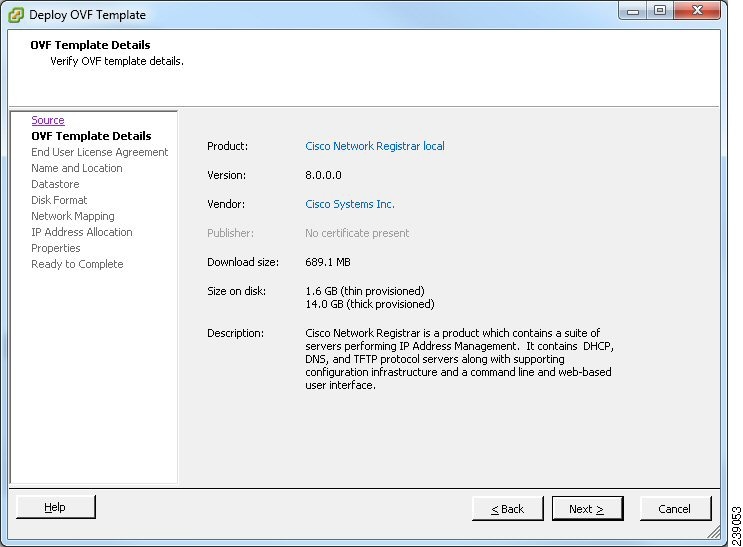
Step 4 ![]() Verify the OVF template details and click Next.
Verify the OVF template details and click Next.
The End User License Agreement window appears.
Step 5 ![]() If you accept the license terms, check the Accept check box and click Next.
If you accept the license terms, check the Accept check box and click Next.
The Name and Location window appears.
Step 6 ![]() Enter the name of the new virtual appliance. If you are using the vCenter to manage the virtual machine, then you have the option of selecting the location of the inventory too. Click Next to continue.
Enter the name of the new virtual appliance. If you are using the vCenter to manage the virtual machine, then you have the option of selecting the location of the inventory too. Click Next to continue.
The default name is generic. You may want to change it to something more specific, such as Cisco Network Registrar 7.2 Local or Cisco Network Registrar 7.2 Regional.
Note ![]() You can change the name of the virtual machine running the virtual appliance after the virtual appliance is deployed. However, while the name of the virtual machine will change, the original name (entered in Step 6) continues to be used as the location of the disk files that describe the virtual machine. Thus, confusion may arise in the future as whatever name you enter on this page remains for the life of the virtual machine and the virtual machine name and the disk file names will differ.
You can change the name of the virtual machine running the virtual appliance after the virtual appliance is deployed. However, while the name of the virtual machine will change, the original name (entered in Step 6) continues to be used as the location of the disk files that describe the virtual machine. Thus, confusion may arise in the future as whatever name you enter on this page remains for the life of the virtual machine and the virtual machine name and the disk file names will differ.
If you are using the vCenter to manage the virtual machine, then the Host/Cluster window appears. Go to Step 7.
If you are managing the ESXi host directly, then the Disk Format window appears. Go to Step 8.
Step 7 ![]() Choose the destination host on which you want to deploy the virtual machine and click Next.
Choose the destination host on which you want to deploy the virtual machine and click Next.
The Disk Format window appears.
Step 8 ![]() The Thick provisioned format is selected by default. Click Next to continue.
The Thick provisioned format is selected by default. Click Next to continue.
Note ![]() Choosing thin provisioning may have performance implications.
Choosing thin provisioning may have performance implications.
If you are using the vCenter to manage the virtual machine, then the Network Mapping window appears. Go to Step 9.
If you are managing the ESXi host directly, then the Ready to Complete window appears. Go to Step 13.
Step 9 ![]() To map the networks used in this OVF template to the networks in your inventory, select the current destination network and choose the destination network from the Destination Networks drop-down list. Click Next.
To map the networks used in this OVF template to the networks in your inventory, select the current destination network and choose the destination network from the Destination Networks drop-down list. Click Next.
The IP Address Allocation window appears.
Step 10 ![]() The Fixed check box is checked by default. Click Next to continue.
The Fixed check box is checked by default. Click Next to continue.
The Properties window appears.
Step 11 ![]() Enter the IP address in the Network 1 IP Address field provided.
Enter the IP address in the Network 1 IP Address field provided.
Note ![]() You should not enter the root password in this window.
You should not enter the root password in this window.
Step 12 ![]() Click Next.
Click Next.
The Ready to Complete window appears.
Step 13 ![]() Review the setting details of your deployment and click Finish to complete the deployment.
Review the setting details of your deployment and click Finish to complete the deployment.
Booting and Configuring Cisco Network Registrar Virtual Appliance
To boot and then configure the Cisco Network Registrar virtual appliance:
Step 1 ![]() After deploying the Virtual Appliance OVF, select the virtual machine name in vSphere, right-click on it and select Open Console.
After deploying the Virtual Appliance OVF, select the virtual machine name in vSphere, right-click on it and select Open Console.
Step 2 ![]() Click the Power on button (
Click the Power on button ( ) on the console and click in the window after clicking the Power on button.
During the initial boot of the newly deployed machine, you will be prompted to enter a root (system) password, which is not the Cisco Network Registrar password.
Note ![]() This is the root password for the underlying Linux operating system on which the Cisco Network Registrar 7.2 application is installed. You will be asked to enter this password twice. You will need root access to the underlying Linux operating system at various times in the future, so make sure that you remember this password.
This is the root password for the underlying Linux operating system on which the Cisco Network Registrar 7.2 application is installed. You will be asked to enter this password twice. You will need root access to the underlying Linux operating system at various times in the future, so make sure that you remember this password.
The boot process can take a while, both before you are asked for a root password, as well as after you enter the root password. Eventually the console will display the configuration window, as shown in Figure 3-2.
Figure 3-2 Configuration Window
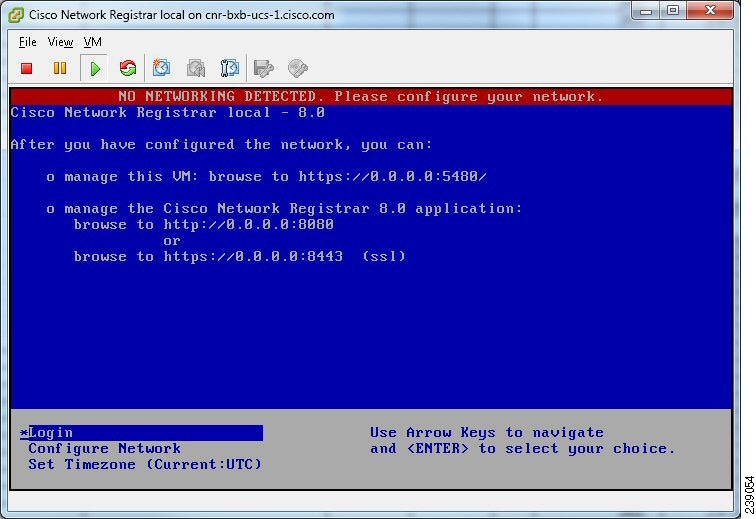
Step 3 ![]() Use the Arrow Keys to highlight Configure Network option, and press Enter. You must configure the virtual appliance to use a static address, so answer n (No) and configure the following:
Use the Arrow Keys to highlight Configure Network option, and press Enter. You must configure the virtual appliance to use a static address, so answer n (No) and configure the following:
•![]() IP Address of the virtual appliance
IP Address of the virtual appliance
•![]() Netmask of the virtual appliance
Netmask of the virtual appliance
•![]() Gateway of the network in which you are creating virtual appliance
Gateway of the network in which you are creating virtual appliance
•![]() DNS Server 1
DNS Server 1
•![]() DNS Server 2
DNS Server 2
•![]() Hostname of the virtual appliance
Hostname of the virtual appliance
•![]() Whether or not you need a proxy set
Whether or not you need a proxy set
Step 4 ![]() To save the settings, select y (Yes) when prompted, after reviewing the settings. Select n (No) if you do not want to save the settings.
To save the settings, select y (Yes) when prompted, after reviewing the settings. Select n (No) if you do not want to save the settings.
Step 5 ![]() Using the arrow keys, highlight Set Timezone and press Enter. Follow the instructions to set the timezone.
Using the arrow keys, highlight Set Timezone and press Enter. Follow the instructions to set the timezone.
See Also
Configuring Cisco Network Registrar
Configuring Cisco Network Registrar with CLI on Virtual Appliance
Configuring Cisco Network Registrar
The URLs for managing the virtual appliance and Cisco Network Registrar application will be displayed in the console window after network configuration.
Note ![]() If the console window does not get displayed or is corrupted, press CTRL+C or Enter a few times.
If the console window does not get displayed or is corrupted, press CTRL+C or Enter a few times.
To recover your mouse cursor after interacting with the console window on vSphere, press CTRL and ALT simultaneously.
The URLs to manage Cisco Network Registrar are the URLs displayed on the Console screen under manage the Cisco Network Registrar 7.2 application.
Both the insecure as well as the secure access links are provided on the Configuration Window after successfully entering the network configuration.
Note ![]() The local server and regional server use different ports for both standard and secure access.
The local server and regional server use different ports for both standard and secure access.
To manage the Cisco Network Registrar 7.2 application, do the following:
Step 1 ![]() Browse to any URL displayed under manage the Cisco Network Registrar 7.2 application (either secure or standard access).
Browse to any URL displayed under manage the Cisco Network Registrar 7.2 application (either secure or standard access).
Note ![]() If you are using secure access for login, choose I understand the risks when you get the warning 'This Connection is Untrusted' and click Add Exception and Confirm Security Exception for this page.
If you are using secure access for login, choose I understand the risks when you get the warning 'This Connection is Untrusted' and click Add Exception and Confirm Security Exception for this page.
The Cisco Network Registrar New Product Installation page is displayed.
Step 2 ![]() Use the browser to locate the Cisco Network Registrar FLEXlm license file for Cisco Network Registrar 7.2, and enter it on this page.
Use the browser to locate the Cisco Network Registrar FLEXlm license file for Cisco Network Registrar 7.2, and enter it on this page.
For more details regarding the FLEXlm licenses, see "Obtaining Cisco Network Registrar License Files" section on page 2-2".
Step 3 ![]() Enter the Name and Password for the superuser administrator in the New Product Installation > Add Superuser Administrator page.
Enter the Name and Password for the superuser administrator in the New Product Installation > Add Superuser Administrator page.
Note ![]() This account is different from the root password which you entered earlier. This is an account in the Cisco Network Registrar product for the most privileged Cisco Network Registrar administrator, who will have permission to create additional administrator accounts in the Cisco Network Registrar product.
This account is different from the root password which you entered earlier. This is an account in the Cisco Network Registrar product for the most privileged Cisco Network Registrar administrator, who will have permission to create additional administrator accounts in the Cisco Network Registrar product.
Step 4 ![]() Create other administrators now if you wish. To create and manage administrators in the future you can login with the account that you just created.
Create other administrators now if you wish. To create and manage administrators in the future you can login with the account that you just created.
To manage the virtual appliance, do the following:
Step 1 ![]() Browse to the initial URL displayed in the console window under manage this VM to manage the virtual appliance. This URL displays the Virtual Appliance Management Infrastructure (VAMI) which provides a Web console to configure network settings, review basic system information for the virtual appliance, and stop or restart the virtual appliance.
Browse to the initial URL displayed in the console window under manage this VM to manage the virtual appliance. This URL displays the Virtual Appliance Management Infrastructure (VAMI) which provides a Web console to configure network settings, review basic system information for the virtual appliance, and stop or restart the virtual appliance.
Step 2 ![]() Choose I understand the risks when you get the warning 'This Connection is Untrusted'.
Choose I understand the risks when you get the warning 'This Connection is Untrusted'.
Step 3 ![]() Click Add Exception and Confirm Security Exception for this page.
Click Add Exception and Confirm Security Exception for this page.
The virtual appliance login page is displayed.
Configuring Cisco Network Registrar with CLI on Virtual Appliance
The Cisco Network Registrar command line interpreter (CLI) can be used to configure the virtual appliance in two ways:
•![]() You can use the nrcmd CLI on the virtual appliance directly by using SSH to connect into the underlying Linux operating system on the virtual appliance. You can use any username and password which you have created on the virtual appliance for the SSH login, and you must use an administrator username and password for the Cisco Network Registrar to use the nrcmd CLI to configure Cisco Network Registrar.
You can use the nrcmd CLI on the virtual appliance directly by using SSH to connect into the underlying Linux operating system on the virtual appliance. You can use any username and password which you have created on the virtual appliance for the SSH login, and you must use an administrator username and password for the Cisco Network Registrar to use the nrcmd CLI to configure Cisco Network Registrar.
Note ![]() As distributed, there is only one valid user for the Linux operating system—root. While you can login as root to use the Cisco Network Registrar CLI, you might want to add additional users to the system. Use the useradd program to add additional users. You can type man useradd for more information on how to add additional users.
As distributed, there is only one valid user for the Linux operating system—root. While you can login as root to use the Cisco Network Registrar CLI, you might want to add additional users to the system. Use the useradd program to add additional users. You can type man useradd for more information on how to add additional users.
•![]() Alternatively, you can use the nrcmd CLI on some other system in the network to configure and manage Cisco Network Registrar on the virtual appliance the same way that you would use it to manage any remote installation of Cisco Network Registrar. This requires installing Cisco Network Registrar (either the entire product or client-only installation) on this other system.
Alternatively, you can use the nrcmd CLI on some other system in the network to configure and manage Cisco Network Registrar on the virtual appliance the same way that you would use it to manage any remote installation of Cisco Network Registrar. This requires installing Cisco Network Registrar (either the entire product or client-only installation) on this other system.
Configuring Virtual Appliance to Automatically Power Up
You can configure the ESXi hypervisor to automatically power up the Cisco Network Registrar virtual appliance when power is restored to the ESXi hypervisor layer. Do the following for configuring automatic power up:
Step 1 ![]() In the vSphere client, select the ESXi machine to which you are connected. It is not a specific virtual machine that you have to select but the ESXi hypervisor on which they reside.
In the vSphere client, select the ESXi machine to which you are connected. It is not a specific virtual machine that you have to select but the ESXi hypervisor on which they reside.
Step 2 ![]() Select the Configuration tab.
Select the Configuration tab.
Step 3 ![]() Click the Virtual Machine Startup/Shutdown link under the Software area. You should see the virtual machine in the list shown in window.
Click the Virtual Machine Startup/Shutdown link under the Software area. You should see the virtual machine in the list shown in window.
Step 4 ![]() Click the Properties... link present at the top right corner of the page. If you do not see that, resize the window until you do.
Click the Properties... link present at the top right corner of the page. If you do not see that, resize the window until you do.
The Virtual Machine Startup and Shutdown page is displayed.
Step 5 ![]() Check the Allow virtual machines to start and stop automatically with the system check box.
Check the Allow virtual machines to start and stop automatically with the system check box.
Step 6 ![]() Select the virtual machine running the Cisco Network Registrar virtual appliance and use the Move Up button on the right to move it up into the group labelled Automatic Startup.
Select the virtual machine running the Cisco Network Registrar virtual appliance and use the Move Up button on the right to move it up into the group labelled Automatic Startup.
Click OK.
This ensures that whenever power is restored to the ESXi hypervisor the Cisco Network Registrar appliance powers up automatically.
Upgrading Cisco Network Registrar Virtual Appliance
This section describes the procedure for upgrading Cisco Network Registrar to Cisco Network Registrar virtual appliance and upgrading the operating system for Cisco Network Registrar virtual appliance.
See Also
Upgrading Cisco Network Registrar Installation to run on Cisco Network Registrar Virtual Appliance
Upgrading Cisco Network Registrar Virtual Appliance Operating System
Upgrading Cisco Network Registrar Installation to run on Cisco Network Registrar Virtual Appliance
This section describes how to upgrade an existing installation of Cisco Network Registrar to become a Cisco Network Registrar virtual appliance.
Note ![]() This procedure upgrades a current version of Cisco Network Registrar running on a Linux operating system to a current version of the Cisco Network Registrar virtual appliance. If you need to move from a different platform, you have to first convert to the Linux platform prior to upgrading to a virtual appliance. If you need to move from a different version of Cisco Network Registrar to the current version of the virtual appliance, you have to first upgrade to the current version of Cisco Network Registrar on an external Linux system before upgrading to the virtual appliance. See "Installation and Upgrade Procedure" section on page 2-3.
This procedure upgrades a current version of Cisco Network Registrar running on a Linux operating system to a current version of the Cisco Network Registrar virtual appliance. If you need to move from a different platform, you have to first convert to the Linux platform prior to upgrading to a virtual appliance. If you need to move from a different version of Cisco Network Registrar to the current version of the virtual appliance, you have to first upgrade to the current version of Cisco Network Registrar on an external Linux system before upgrading to the virtual appliance. See "Installation and Upgrade Procedure" section on page 2-3.
Step 1 ![]() Install the Cisco Network Registrar virtual appliance.
Install the Cisco Network Registrar virtual appliance.
Step 2 ![]() Shut down the Cisco Network Registrar system being upgraded using the following command: /etc/init.d/nwreglocal stop
Shut down the Cisco Network Registrar system being upgraded using the following command: /etc/init.d/nwreglocal stop
Step 3 ![]() Copy the file cnr_prepareforupgrade from /opt/nwreg2/{local | regional}/usrbin from the virtual appliance system to the Cisco Network Registrar installation being upgraded.
Copy the file cnr_prepareforupgrade from /opt/nwreg2/{local | regional}/usrbin from the virtual appliance system to the Cisco Network Registrar installation being upgraded.
Note ![]() You have to choose either local or regional from {local | regional} based on the upgrade that you are doing, that is, local upgrade or regional upgrade.
You have to choose either local or regional from {local | regional} based on the upgrade that you are doing, that is, local upgrade or regional upgrade.
You can do it using sftp, for example:
[root@cnr-machine-being-upgraded usrbin]# sftp 10.10.10.12
Connecting to 10.10.10.12...
Warning: Permanently added '10.10.10.12' (RSA) to the list of known hosts.
root@10.10.10.12's password:
sftp> cd /opt/nwreg2/local/usrbin
sftp> get cnr_prepareforupgrade
Fetching /opt/nwreg2/local/usrbin/cnr_prepareforupgrade to cnr_prepareforupgrade
/opt/nwreg2/local/usrbin/cnr_prepareforupgrad 100% 3265 3.2KB/s 00:00
Step 4 ![]() Execute cnr_prepareforupgrade on the system being upgraded.
Execute cnr_prepareforupgrade on the system being upgraded.
Step 5 ![]() If the version of Cisco Network Registrar which you are moving to the virtual appliance is a version earlier than Cisco Network Registrar 7.2, then perform the following steps:
If the version of Cisco Network Registrar which you are moving to the virtual appliance is a version earlier than Cisco Network Registrar 7.2, then perform the following steps:
a. ![]() Download the upgrade preparation kit, cnr_mcdexport_linux5.tar, from Cisco.com.
Download the upgrade preparation kit, cnr_mcdexport_linux5.tar, from Cisco.com.
b. ![]() Untar the downloaded archive and run the script cnr_mcdexport.
Untar the downloaded archive and run the script cnr_mcdexport.
Step 6 ![]() Tar the existing install-path/local/data directory using the command:
Tar the existing install-path/local/data directory using the command:
tar cvf tarfile.tar data
Step 7 ![]() Copy the tar file created to the new virtual appliance.
Copy the tar file created to the new virtual appliance.
Step 8 ![]() Shut down Cisco Network Registrar on the new virtual appliance using the command:
Shut down Cisco Network Registrar on the new virtual appliance using the command:
/etc/init.d/nwreglocal stop
Step 9 ![]() Rename the existing database to .orig using the command:
Rename the existing database to .orig using the command:
mv /var/nwreg2/local/data /var/nwreg2/local/data.orig
Step 10 ![]() Untar the latest database, transferred in Step 4, using tar xvf tarfile.tar
Untar the latest database, transferred in Step 4, using tar xvf tarfile.tar
Step 11 ![]() Reboot the Cisco Network Registrar virtual appliance using VMware vSphere.
Reboot the Cisco Network Registrar virtual appliance using VMware vSphere.
If an upgrade is not required, then the Cisco Network Registrar will start up normally and will display a message to the console that no upgrade is required. But, if an upgrade is required, Cisco Network Registrar will not start and will instead display a message on the console that an upgrade is required before startup.
Step 12 ![]() Run the following if you get a message that an upgrade is required:
Run the following if you get a message that an upgrade is required:
/opt/nwreg2/{local | regional}/usrbin/cnr_upgradedata
This upgrades the database to the latest version.
Upgrading Cisco Network Registrar Virtual Appliance Operating System
To upgrade the operating system for an existing Cisco Network Registrar virtual appliance, install a new virtual appliance which has the new operating system version on it, and then move the data and configuration from the existing virtual appliance to the new virtual appliance. To do this:
Step 1 ![]() Deploy the latest Cisco Network Registrar virtual appliance (with the new OS version) on the ESXi machine where an existing Cisco Network Registrar virtual appliance resides.
Deploy the latest Cisco Network Registrar virtual appliance (with the new OS version) on the ESXi machine where an existing Cisco Network Registrar virtual appliance resides.
Step 2 ![]() Shut down Cisco Network Registrar on the existing virtual appliance.
Shut down Cisco Network Registrar on the existing virtual appliance.
Step 3 ![]() Run cnr_prepareforupgrade on the existing appliance.
Run cnr_prepareforupgrade on the existing appliance.
Step 4 ![]() Shut down the virtual machine of the existing appliance.
Shut down the virtual machine of the existing appliance.
Step 5 ![]() Copy the data disk from the existing virtual appliance to the new virtual appliance. Use vSphere to make this copy. Ensure that you have shut down the virtual appliances before copying.
Copy the data disk from the existing virtual appliance to the new virtual appliance. Use vSphere to make this copy. Ensure that you have shut down the virtual appliances before copying.
Step 6 ![]() Select the ESXi platform in vSphere. It is not a particular virtual machine that you have to select, but rather the container in which these virtual machines appear.
Select the ESXi platform in vSphere. It is not a particular virtual machine that you have to select, but rather the container in which these virtual machines appear.
Step 7 ![]() Select the Configuration tab and click the Storage link under Hardware area. You can now see the datastores in the right hand window. Determine the datastore in which the files for your virtual machines reside.
Select the Configuration tab and click the Storage link under Hardware area. You can now see the datastores in the right hand window. Determine the datastore in which the files for your virtual machines reside.
Note ![]() You should have selected the datastore when you deployed the virtual machines, if you have more than one datastore. If you have only one, no selection was required at the time of deployment.
You should have selected the datastore when you deployed the virtual machines, if you have more than one datastore. If you have only one, no selection was required at the time of deployment.
Step 8 ![]() Right-click the datastore that contains the existing virtual machine. Select Browse Datastore.... A Datastore Browser is displayed which shows you the file structure of your ESXi datastore.
Right-click the datastore that contains the existing virtual machine. Select Browse Datastore.... A Datastore Browser is displayed which shows you the file structure of your ESXi datastore.
Note ![]() The directories which you see in the Datastore Browser use the names given to the virtual appliances when they were first deployed, which may or may not be the current names of the virtual appliances. If you changed the name of a virtual appliance after it was deployed, that name change will not be reflected in the file structure in the datastore.
The directories which you see in the Datastore Browser use the names given to the virtual appliances when they were first deployed, which may or may not be the current names of the virtual appliances. If you changed the name of a virtual appliance after it was deployed, that name change will not be reflected in the file structure in the datastore.
Step 9 ![]() Select the folder for the existing virtual appliance from the tree structure displayed at the left pane of the Database Browser window. You can see the files which are associated with the existing virtual appliance in the right pane of the Database Browser window. Find the existing data disk from the list of files displayed in the right pane. The name of the file ends with _1.vmdk and is the largest file in the virtual machine.
Select the folder for the existing virtual appliance from the tree structure displayed at the left pane of the Database Browser window. You can see the files which are associated with the existing virtual appliance in the right pane of the Database Browser window. Find the existing data disk from the list of files displayed in the right pane. The name of the file ends with _1.vmdk and is the largest file in the virtual machine.
Step 10 ![]() Right-click the file you found in Step 9 and select Copy.
Right-click the file you found in Step 9 and select Copy.
Step 11 ![]() Select the folder of the new virtual appliance in the left pane of the Datastore Browser window. You can see the files currently associated with the new virtual appliance in the right pane of the window. Right-click in the right pane, and not on a particular file, and select Paste. Since the file you are copying may be rather large, you can see a progress popup which shows the copy progress. Close the Datastore Browser window when the copy is complete.
Select the folder of the new virtual appliance in the left pane of the Datastore Browser window. You can see the files currently associated with the new virtual appliance in the right pane of the window. Right-click in the right pane, and not on a particular file, and select Paste. Since the file you are copying may be rather large, you can see a progress popup which shows the copy progress. Close the Datastore Browser window when the copy is complete.
Step 12 ![]() Select the new virtual appliance in the left pane of the vSphere client window and select Edit virtual machine settings. The Virtual Machine Properties window is displayed. The Hardware tab is selected by default. If it is not, then select it.
Select the new virtual appliance in the left pane of the vSphere client window and select Edit virtual machine settings. The Virtual Machine Properties window is displayed. The Hardware tab is selected by default. If it is not, then select it.
Step 13 ![]() Select Hard disk 2 and click Remove. Accept the default Removal Option of Remove from virtual machine which does not delete the virtual disk file itself, but rather just removes it from the virtual machine.
Select Hard disk 2 and click Remove. Accept the default Removal Option of Remove from virtual machine which does not delete the virtual disk file itself, but rather just removes it from the virtual machine.
Step 14 ![]() Select the new virtual appliance in the left pane of the vSphere client window and select Edit virtual machine settings again. Click Add in the Virtual Machine Properties window to add the hard disk you copied from the existing virtual machine.
Select the new virtual appliance in the left pane of the vSphere client window and select Edit virtual machine settings again. Click Add in the Virtual Machine Properties window to add the hard disk you copied from the existing virtual machine.
The Add Hardware window is displayed.
Step 15 ![]() Choose Hard Disk from the list of device types and click Next.
Choose Hard Disk from the list of device types and click Next.
Step 16 ![]() Check the Use an existing virtual disk check box to reuse the previously configured virtual disk and click Next.
Check the Use an existing virtual disk check box to reuse the previously configured virtual disk and click Next.
Step 17 ![]() Click Browse to locate the disk file path. Select the datastore where you placed the copy of the virtual disk in the Browse Datastore window. Click Open and you can see the list of virtual machines on this datastore. Select the directory of the new virtual appliance from the list and click Open. You can see the list of virtual disks in the directory for that virtual machine. Probably two of them will be named the same as the new virtual machine, and one of them will be named based on the existing virtual machine. Select the one named for the existing virtual machine and click OK. Click Next.
Click Browse to locate the disk file path. Select the datastore where you placed the copy of the virtual disk in the Browse Datastore window. Click Open and you can see the list of virtual machines on this datastore. Select the directory of the new virtual appliance from the list and click Open. You can see the list of virtual disks in the directory for that virtual machine. Probably two of them will be named the same as the new virtual machine, and one of them will be named based on the existing virtual machine. Select the one named for the existing virtual machine and click OK. Click Next.
Step 18 ![]() Click Next again to accept the Advanced Options unchanged.
Click Next again to accept the Advanced Options unchanged.
Step 19 ![]() Click Finish to complete the operation.
Click Finish to complete the operation.
This takes you back to the Virtual Machine Properties window, and the list of hardware in the virtual machine now has the New Hard Disk (adding) in the list. Click OK to finish.
You can now start the new virtual machine.
Managing Cisco Network Registrar Virtual Appliance
You can manage the underlying Linux operating system, which is based on CentOS 5.4, by logging in as the root user. You may use SSH to login to the virtual appliance with the username root and the root password you specified when you first booted the virtual appliance.
You will probably want to create additional users on the Linux system so that people can access the Linux system with a username other than root.
The Linux system which is included on the virtual appliance is stripped down to a considerable degree and thus does not include things that are not required to run or manage the Cisco Network Registrar application, such as a window system manager and its associated GUI user interface. However, all the tools necessary to support and manage the Cisco Network Registrar application are included on the Linux operating system used inside of the virtual appliance.
You may also want to take additional steps to secure the SSH connection. For instance, configuring it to prevent logging on as root, and requiring a user to su to gain root privileges after logging on as another user.
You may wish to perform other configuration changes on the underlying Linux operating system in order to lock it down in ways appropriate to your environment.
Note ![]() The 'vsftpd' FTP server is available on the operating system, but it is not started by default. You can issue the command /etc/init.d/vsftpd start to start the vsftpd server. Even if you start it, you cannot log into it as root, but only as some other user.
The 'vsftpd' FTP server is available on the operating system, but it is not started by default. You can issue the command /etc/init.d/vsftpd start to start the vsftpd server. Even if you start it, you cannot log into it as root, but only as some other user.
 Feedback