Creating and Viewing Reports
Available Languages
Table Of Contents
Viewing the Basic Reports Table
Enabling and Disabling Reports
Selecting the Application Report Parameters
Selecting Host Report Parameters
Selection Host Conversation Report Parameters
Selecting VLAN Report Parameters
Selecting Differentiated Services Report Parameters
Selecting Application Response Time Report Parameters
Selecting Switch Port Report Parameters
Moving a Custom Report to a Different Folder
Creating and Viewing Reports
The reports function allows you to store and retrieve short and medium term historical data about the network traffic monitored by the NAM. The Reports tabs provides options for creating and viewing basic and custom reports. The tabs have options for:
Basic Reports
Basic reports allow you to view reports about a specific target, such as a network host or protocol. Basic reports can be customized and combined to create custom reports. For more information on customized reports, see the "Custom Reports" section. These topics allow you to manage your basic reports:
•
Viewing the Basic Reports Table.
Viewing the Basic Reports Table
Report data is stored in the NAM database for 100 days. Report data older than 100 days is overwritten sequentially by new report data.
Step 1
Step 2
The Basic Reports Table (Table 5-1) is displayed.
Enabling and Disabling Reports
Reports can be enabled or disabled directly from the Basic Reports table.
•
•

Note
Renaming a Report
Step 1
A text window appears.
Step 2
•
•
Creating New Reports
Before you can create reports, you should make sure the applicable network traffic is being sent to the NAM and that monitoring functions are enabled for the type of statistic and data sources. For more information on enabling monitoring functions, see the "Setting Up Data Collections" section.
Note
Step 1
Step 2
The Basic Reports table is displayed.
Step 3
The Create Historical Report wizard is displayed. The following table shows the steps used to create a historical report.
Step 1
Select Report Type
Step 2
Select Parameters
•
•
•
•
•
•
•
Selecting the Report Type
Step 1
Step 2
•
•
•
•
•
•
•
Selecting the Application Report Parameters
The Application Report Parameters Dialog Box (Table 5-2) is displayed.
Do one of the following:
•
•
Selecting Host Report Parameters
The Host Report Parameters Dialog Box (Table 5-3) is displayed.
Do one of the following:
•
•
Selection Host Conversation Report Parameters
The Host Conversation Report Parameters Dialog Box (Table 5-4) is displayed.
Do one of the following:
•
•
Selecting VLAN Report Parameters
The VLAN Report Parameters Dialog Box (Table 5-5) is displayed.
Note
Do one of the following:
•
•
Selecting Differentiated Services Report Parameters
The Differentiated Services Report Parameters Dialog Box (Table 5-6) is displayed.
Do one of the following:
•
•
Selecting Application Response Time Report Parameters
The Application Response Time Report Parameters Dialog Box (Table 5-7) is displayed.
Do one of the following:
•
•
Selecting Switch Port Report Parameters
The Switch Port Report Parameters Dialog Box (Table 5-8) is displayed.
Do one of the following:
•
•
Deleting a Report
To delete a report, select the report from the Basic Reports table and click Delete.
Viewing Reports
To view a report, click the report name in the Basic Reports table, or select report and click View. The Reports Window (Figure 5-1) is displayed.
Figure 5-1 Reports Window
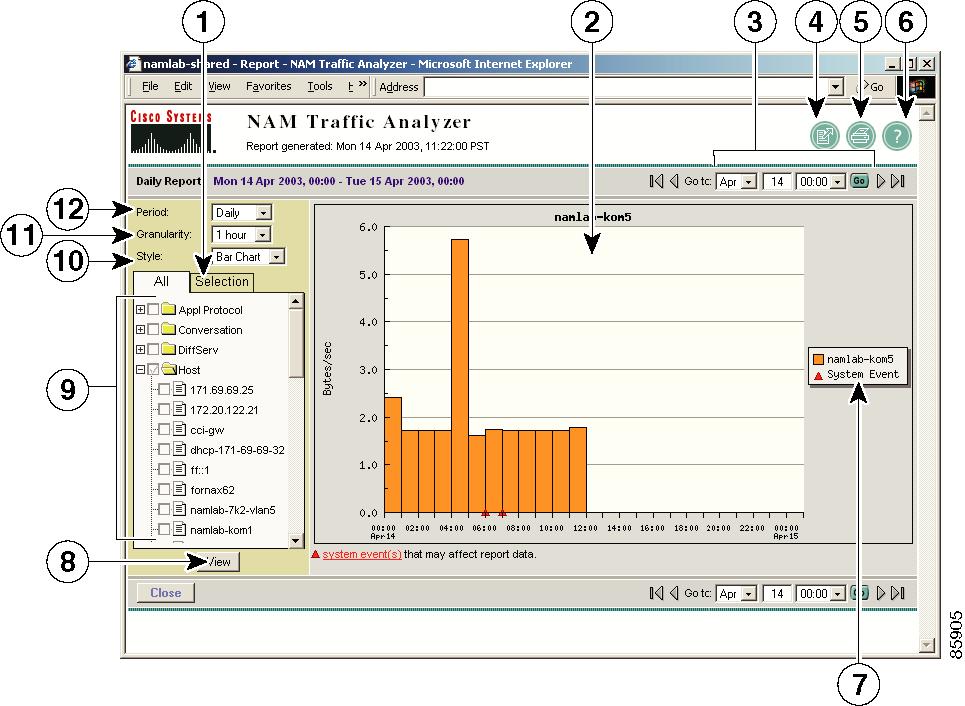
Multiple target reports can be selected and displayed in the same graph. If you select multiple reports with different units, they will be displayed as subreports in the report graph area.
Note
Report granularity cannot exceed the polling frequency of the report. For example, a report with a 15-minute polling interval cannot be displayed with a
5-minute granularity. If you select a report granularity lower than the polling frequency, the report data will be aggregated accordingly.A red exclamation mark will be displayed in the report selector for disabled reports and reports with error conditions. For more information on reports with error conditions, see the Report Error Conditions table (Table 5-9). System events that affect report data collection, such as changes in SPAN data sources are displayed as red triangles in tabular reports. Click system events to view a list of these events.

Tip
Use the tabular report style to view numeric data and information about the errors or exception conditions related to the report data collection.
Custom Reports
After you create reports in the Basic Reports table, you can combine and customize them in the Custom Reports section.
These topics allow you to manage your custom reports:
Creating a Custom Report
Step 1
Step 2
The Custom Reports table is displayed.
Step 3
The Create Custom Report Dialog Box (Table 5-10) is displayed.
Step 4
•
•
Creating a New Folder
You can create a new folder directly from the Custom Reports table to store additional custom reports.
Step 1
A text box appears.
Step 2
The new folder appears in the Custom Reports table.
Editing a Custom Report
Step 1
Step 2
The Custom Reports table is displayed.
Step 3
The Edit Custom Reports dialog box is displayed.
Step 4
•
•
Deleting a Custom Report
To delete a custom report, select it in the Custom Report table, then click Delete.
Viewing a Custom Report
Step 1
Step 2
The Custom Reports table is displayed.
Step 3
The Reports Window (Figure 5-1) is displayed.
Moving a Custom Report to a Different Folder
Step 1
Step 2
The Custom Reports table is displayed.
Step 3
The Edit Custom Reports dialog box is displayed.
Step 4
 Feedback