Table Of Contents
Installing MWTM from the DVD-ROM
Installing the MWTM Client for Windows Using the Web Server
Uninstalling MWTM After a Failed Uninstall
Installing MWTM on Windows
The MWTM client software can be installed on a Windows 2000 Professional or Windows XP Professional system from the DVD-ROM or downloaded from the MWTM server's Web Server. This chapter describes how to install the MWTM client software, how to verify installation, and how to uninstall and reinstall MWTM on Windows.
This chapter includes the following information:
•Installing MWTM from the DVD-ROM
•Installing the MWTM Client for Windows Using the Web Server
•Uninstalling MWTM After a Failed Uninstall
Installing MWTM from the DVD-ROM
Before you run the MWTM installation program, make sure your Windows system meets the requirements listed in the MWTM README.txt file located on your DVD-ROM.
Tip When you run the MWTM installation program, you are asked for the name of the host on which the MWTM server software is installed and an MWTM server port number, and, optionally, a CiscoWorks server name and Web port number. Verify this information with the system administrator who installed the MWTM server software before running the program.
To begin the installation of the MWTM client software:
Step 1 Insert the MWTM DVD-ROM in the DVD-ROM drive on the workstation. The MWTM program files are automatically extracted from the DVD-ROM. When all the files are extracted, the Cisco MWTM Client Setup window appears, with the text, "Welcome to the InstallShield Wizard for the Cisco MWTM Client."
Note If the setup window does not appear automatically when you insert the DVD-ROM, go to the root directory and run the setup.exe command. If you are having trouble reading the DVD-ROM, make sure your DVD-ROM drive complies with the ISO 9660 standard.
Step 2 Click Next. The License Agreement window appears.
Step 3 If you accept the license agreement, click Yes. The Choose Destination Location window appears.
Step 4 Accept the default location, enter a location, or browse to find a location, then click Next. The Select Program Folder window appears.
Step 5 Accept the default folder, enter a folder name, or browse to find a folder, then click Next. MWTM displays the MWTM Server Options window.
Step 6 In the ServerHost field, enter the name of the host on which the MWTM server software is installed.
Step 7 (Optional) In the ServerPort field, enter a numeric server port number. The default is 44742.
If the MWTM server is using a different port number, enter that number in this field. The MWTM client and server can communicate only if they are configured for the same port number.
Do not enter a non-numeric port number. If you do, you are prompted to enter a numeric port number.
Step 8 Click Next. MWTM displays the CiscoWorks Server Options window.
Step 9 (Optional) If you do not have a CiscoWorks server, skip to Step 12.
Otherwise, in the ServerHost field, enter the name of the host on which the CiscoWorks server software is installed. The CiscoWorks server can be the same as the MWTM server, or it can be a different server.
Step 10 (Optional) In the WebPort field, enter a numeric CiscoWorks Web port number. The default is 1741.
Do not enter a non-numeric port number. If you do, you are prompted to enter a numeric port number.
Step 11 (Optional) In the SecurePort field, enter a numeric CiscoWorks Secure Web port number. The default is 443.
Do not enter a non-numeric port number. If you do, you are prompted to enter a numeric port number.
Step 12 Click Next. The Setup Status window appears and the files are copied. When all of the files have been copied, the InstallShield Wizard Complete window appears. Installation is complete.
Step 13 (Optional) To view the README file, select the checkbox.
Step 14 Click Finish and remove the DVD-ROM from the drive.
Installing the MWTM Client for Windows Using the Web Server
You can use the MWTM Web Server to access the client installation software if you do not have access to the DVD-ROM, or if you prefer to download the MWTM client software from the MWTM server to run the installation.
To install the MWTM client on a Windows system from the MWTM Web Server:
Step 1 From your browser, go to the URL for the MWTM Web Server:
http://your_mwtm_server:1774where your_mwtm_server is the name or IP address of the MWTM Web Server and 1774 is the Web port being using by MWTM. (1774 is the default port number.) If you do not know the name or Web port of the MWTM Web Server, contact the system administrator who installed the MWTM server software.
The MWTM Server Home Page is displayed (Figure 4-1).
Figure 4-1 MWTM Server Home Page
Step 2 Click Download Windows Client. The MWTM Client for Windows page is displayed.
Step 3 Click Download MWTM Client for Windows 2000/XP to download the installation setup program for Windows 2000 Professional or Windows XP Professional.
Step 4 When queried, specify the directory into which you want to download the installation software file.
Step 5 Go to the download directory and double-click the setup.exe command to install the software. The installation files automatically uncompress into a temporary directory, and the Cisco MWTM Client Setup window appears, with the text, "Welcome to the InstallShield Wizard for the Cisco MWTM Client."
Step 6 Continue with Step 2 in the "Installing MWTM from the DVD-ROM" section.
Verifying MWTM Installation
To verify the MWTM client installation:
Step 1 Make sure the MWTM server is available.
Step 2 Make sure the MWTM client icon appears on the desktop.
Step 3 Make sure the following options are in the Start > Programs > Cisco MWTM Client menu:
•Launch MWTM Client
•Launch MWTM Event Configurator
•Modify Default MWTM Server Name
•Modify Default MWTM Telnet Path
•MWTM DOS Prompt
•MWTM SSL Certificate Tool
•Uninstall MWTM Client
•View README
Step 4 To start the MWTM client, use one of the following methods:
•Select Start > Programs > Cisco MWTM Client > Launch MWTM Client.
•Double-click the MWTM Client icon on the Windows desktop.
If the MWTM server and client installation was successful, and if you did not configure the MWTM server to automatically discover your network the first time the server starts after installation, MWTM displays the Discovery Dialog (Figure 4-2) and the MWTM Main Window (Figure 4-3).
Figure 4-2 Discovery Dialog
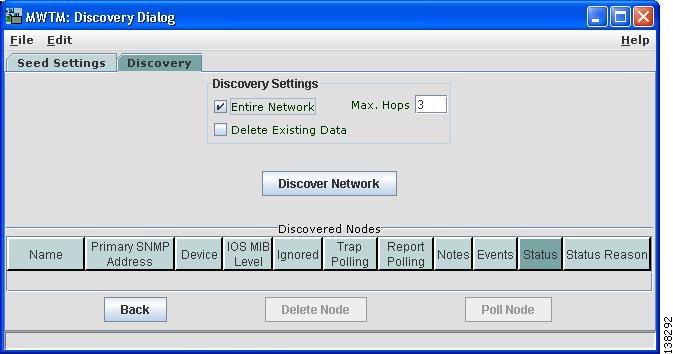
Figure 4-3 MWTM Main Window
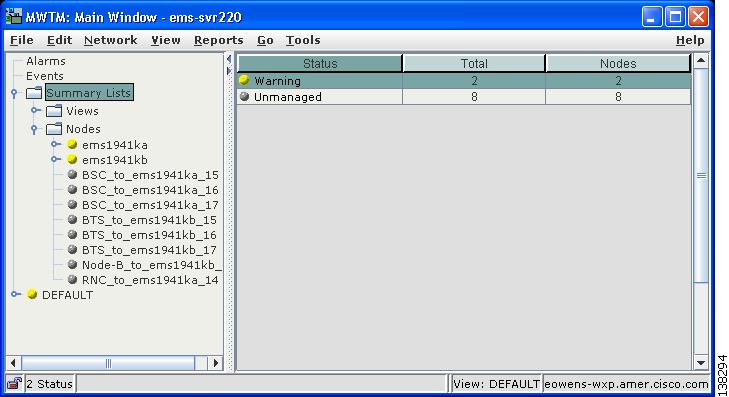
Because the MWTM database contains no information, the MWTM Main Window is initially blank. The database is populated, and reflected in the MWTM Main Window, when you run Discovery for the first time; MWTM displays the Discovery Dialog to make it easier for you to do so. In fact, any time you start the MWTM client and the MWTM database is empty, MWTM automatically opens the Discovery Dialog so you can run Discovery and populate the database. For more information about Discovery, see the "Discovering Your RAN-O Networks Using MWTM" chapter of the Cisco Mobile Wireless Transport Manager User Guide.
Uninstalling MWTM
You can use the standard Add/Remove Programs icon in the Windows Control Panel to uninstall MWTM, or you can uninstall MWTM from the Windows Start menu.
To uninstall MWTM:
Step 1 Exit all open MWTM windows.
Step 2 From the Windows Start menu, select Start > Programs > Cisco MWTM Client > Uninstall MWTM Client.
Note You can also uninstall MWTM from the Windows Control Panel, by clicking Add/Remove Programs, selecting Cisco MWTM Client, and clicking Change/Remove, but using the Windows Start Menu is the recommended method.
Step 3 Click OK in the Confirm File Deletion window. The MWTM components are removed.
Step 4 Click Finish. MWTM has been successfully uninstalled.
Uninstalling MWTM After a Failed Uninstall
If for some reason the uninstall procedure fails before the MWTM client is completely uninstalled, MWTM prompts you to uninstall the client again. However, this might not be possible using the above procedure. If you cannot uninstall the MWTM client using the above procedure, use the following procedure:
Step 1 Delete the MWTM client installation directory and its contents:
•If you installed the MWTM client in the default directory, C:\Program Files, then the installation directory is C:\Program Files\mwtmClient\.
•If you installed the MWTM client in a different directory, then the installation directory is located in that directory.
Step 2 Delete the following directory: /Program Files/Installshield Installation Information/{FD024E16-48AE-11D5-934C-00108335E3DE}.
Note This directory might be hidden.
Step 3 Delete the Cisco MWTM Client registry key and its contents:
HKEY_LOCAL_MACHINE\SOFTWARE\Cisco Systems, Inc.\
Cisco MWTM ClientStep 4 Delete the MWTM Client entries from the Windows Start menu.