User Guide for Cisco Hosted Collaboration Mediation 1.1
Bias-Free Language
The documentation set for this product strives to use bias-free language. For the purposes of this documentation set, bias-free is defined as language that does not imply discrimination based on age, disability, gender, racial identity, ethnic identity, sexual orientation, socioeconomic status, and intersectionality. Exceptions may be present in the documentation due to language that is hardcoded in the user interfaces of the product software, language used based on RFP documentation, or language that is used by a referenced third-party product. Learn more about how Cisco is using Inclusive Language.
- Updated:
- April 15, 2011
Chapter: Chapter 1: Introduction
- Overview of HCM
- Terminology Used In HCM
- HCM Dashboard Architecture
- Starting HCM Dashboard
- Starting and Stopping HCM Mediation
- Configuring Session Timeout Value
- Modifying Database User Password in HCM Dashboard Configuration File
- Modifying ACS Password in HCM Dashboard Configuration File
- Modifying Database User Password in the HCM Mediation Configuration File
- Understanding HCM Dashboard User Interface
- Understanding HCM Dashboard Roles
Introduction
This chapter describes the Hosted Collaboration Mediation (HCM) software. It includes:
•![]() Starting and Stopping HCM Mediation
Starting and Stopping HCM Mediation
•![]() Configuring Session Timeout Value
Configuring Session Timeout Value
•![]() Modifying Database User Password in HCM Dashboard Configuration File
Modifying Database User Password in HCM Dashboard Configuration File
•![]() Modifying ACS Password in HCM Dashboard Configuration File
Modifying ACS Password in HCM Dashboard Configuration File
•![]() Modifying Database User Password in the HCM Mediation Configuration File
Modifying Database User Password in the HCM Mediation Configuration File
•![]() Understanding HCM Dashboard User Interface
Understanding HCM Dashboard User Interface
•![]() Understanding HCM Dashboard Roles
Understanding HCM Dashboard Roles
Overview of HCM
HCM is intended for use in a Managed Service Provider (MSP) Network Operations Center (NOC). HCM consists the following two components:
HCM Dashboard
HCM Dashboard provides a single pane view of assurance data in the hosted environment and provides various summaries and reports. HCM Dashboard acts as a bridge among customer-specific implementations of the following domain managers, in a virtualized environment:
•![]() Cisco Unified Operations Manager (CUOM)
Cisco Unified Operations Manager (CUOM)
•![]() VMware vCenter
VMware vCenter
•![]() Cisco Fabric Manager Server (FMS)
Cisco Fabric Manager Server (FMS)
•![]() Cisco Unified Computing System Manager (UCSM)
Cisco Unified Computing System Manager (UCSM)
HCM Dashboard aggregates data from multiple instances of these domain managers, so that a user logging into HCM Dashboard, can view aggregated customer data in a single window. HCM Dashboard comprises a set of Administration and Dashboard portlets and a Diagnostics portlet.
The Dashboard portlets enable you to aggregate data from each virtualized instance of CUOM, vCenter, FMS, and UCSM.
The Administration portlets enable you to cross-launch to the web pages of the individual instances of CUOM, vCenter, FMS, and UCSM for customer-centric views.
The portlets leverage the existing APIs and make API calls to retrieve information from domain managers. HCM Dashboard supports a VMWare-based deployment and can be installed and operated alongside other portal servers or applications.
HCM Mediation Layer
The HCM Mediation layer component uses the TM Forum Shared Information/Data Model (SID) as the foundation data model. HCM Mediation implements the SID as its common model to create and maintain the data interoperability layer in Hosted Communications Services (HCS). It provides SID-based normalized API to the underlying domain managers.
HCM 1.1 Mediation layer supports the VOSS connector.

Note ![]() For more information about how to use and administer the HCM Mediation Layer, see the Programmer's Guide for Cisco Hosted Collaboration Mediation Interface 1.1.
For more information about how to use and administer the HCM Mediation Layer, see the Programmer's Guide for Cisco Hosted Collaboration Mediation Interface 1.1.
Terminology Used In HCM
The following list explains the terminology used in HCM:
•![]() ACS—Cisco Secure Access Control Server. An access policy control platform that is used for authentication and access control.
ACS—Cisco Secure Access Control Server. An access policy control platform that is used for authentication and access control.
•![]() CUOM—Cisco Unified Operations Manager. A product from the Cisco Unified Communications Management Suite. It provides a comprehensive and efficient solution for network management and monitoring of Cisco Unified Communications deployments.
CUOM—Cisco Unified Operations Manager. A product from the Cisco Unified Communications Management Suite. It provides a comprehensive and efficient solution for network management and monitoring of Cisco Unified Communications deployments.
•![]() VMware vCenter—VMware vCenter provides centralized control and visibility at every level of virtual infrastructure and unlocks the power of vSphere through proactive management.
VMware vCenter—VMware vCenter provides centralized control and visibility at every level of virtual infrastructure and unlocks the power of vSphere through proactive management.
•![]() FMS—Cisco Fabric Manager Server. FMS is the management tool for storage networking across all Cisco SAN and unified fabrics. FMS provides server federation, historical performance monitoring for network traffic hotspot analysis, centralized management services, and advanced application integration.
FMS—Cisco Fabric Manager Server. FMS is the management tool for storage networking across all Cisco SAN and unified fabrics. FMS provides server federation, historical performance monitoring for network traffic hotspot analysis, centralized management services, and advanced application integration.
•![]() UCSM—Cisco Unified Computing System Manager. UCSM provides unified, embedded management of all software and hardware components of the Cisco Unified Computing System, across multiple chassis and thousands of virtual machines.
UCSM—Cisco Unified Computing System Manager. UCSM provides unified, embedded management of all software and hardware components of the Cisco Unified Computing System, across multiple chassis and thousands of virtual machines.
•![]() JBOSS_HOME—The path in which JBoss is installed. The JBOSS_HOME is HCM_Dashboard_Install_Directory/thirdparty/jboss.
JBOSS_HOME—The path in which JBoss is installed. The JBOSS_HOME is HCM_Dashboard_Install_Directory/thirdparty/jboss.
HCM Dashboard Architecture
Figure 1-1 shows the HCM Dashboard architecture.
Figure 1-1 HCM Dashboard Architecture
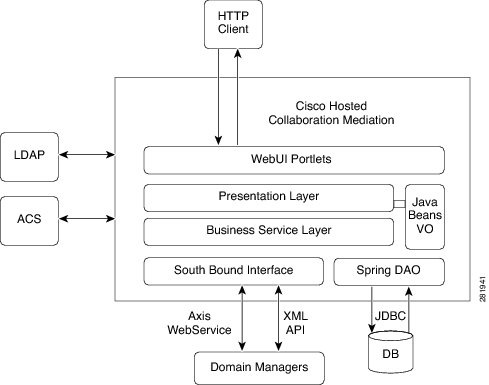
In Figure 1-1, the portal client logs into HCM Dashboard with the provided username and password. The username and password details are stored in Cisco Secure ACS. Cisco Secure ACS is used to authenticate a user. After the user is authenticated, the client can log into HCM Dashboard.
HCM interfaces with Cisco Secure ACS 5.1 for client authentication. In Cisco Secure ACS 5.1, the default authorization policy for device administration is set to Deny. You must edit the authorization policy for device administration and set it to permitAccess for the HCM server.
For detailed information, see the ACS 5.x Policy Model Chapter in User Guide for the Cisco Secure Access Control System 5.1.
HCM uses HTTP or HTTPS protocols for communication and supports a VMware-based deployment and JBoss Clustering. VMware-JBoss Clustering is used so that the server is always available to the client.
The Scheduler periodically collects data from multiple CUOM, vCenter, and UCSM instances, deployed in a virtualized environment. It does this, using Web Services API and XML-based API.
The collected data is then updated in the HCM database.
Pluggable user interface (UI) components called portlets, act as an individual application that retrieves data from various domain managers and displays information.
When you cross-launch the CUOM, FMS, and UCSM web pages, HCM Dashboard uses single sign-on to cross launch these applications, using the HTTPS connection. HCM Dashboard does not support single sign-on for vCenter. When you cross-launch the vCenter web page, you must sign in by entering the vCenter username and password.
HCM Dashboard cross-launches the domain managers that support web-based UI. For domain managers without web-based UI, the alarm or event is retrieved using API calls and it is displayed in a separate window. HCM Dashboard communicates with the domain managers using Web Services APIs and XML-based APIs.
Starting HCM Dashboard
You can launch HCM Dashboard from your web browser.
To launch HCM Dashboard:
Step 1 ![]() In your web browser, enter http://Portal_Server:Port_Number
In your web browser, enter http://Portal_Server:Port_Number
Portal_Server is the IP address or the machine name of the server on which HCM Dashboard is installed and Port_Number is the port number used.
HCM Dashboard login page appears.
Step 2 ![]() Enter your login credentials in the username and password fields.
Enter your login credentials in the username and password fields.
Step 3 ![]() Click Sign In to log into HCM Dashboard.
Click Sign In to log into HCM Dashboard.
HCM Dashboard page appears.
An error message is displayed if the login credentials are wrong. To clear the wrong username and password, click Clear
HCM Dashboard users are subject to user privileges. Depending on your user profile, you might not see certain portlets or have access to certain functions. For more information about user privileges, see Understanding HCM Dashboard Roles.
Starting and Stopping HCM Mediation
To start HCM Mediation:
Step 1 ![]() Go to the HCM_Mediation_Root_Directory.
Go to the HCM_Mediation_Root_Directory.
For example, /opt/hcm/bin.
Step 2 ![]() Run start-hcm.sh.
Run start-hcm.sh.
To stop HCM Mediation:
Step 1 ![]() Go to the HCM_Mediation_Root_Directory.
Go to the HCM_Mediation_Root_Directory.
For example, /opt/hcm/bin.
Step 2 ![]() Run stop-hcm.sh.
Run stop-hcm.sh.
Configuring Session Timeout Value
The default session timeout value is 30 minutes. The session times out after 30 minutes of inactivity. If the session is not active for 29 minutes, a message appears and you are prompted to extend the session.
•![]() If you select the Extend option, the session will be extended.
If you select the Extend option, the session will be extended.
•![]() If you do not select the Extend option, the session will timeout after 30 minutes.
If you do not select the Extend option, the session will timeout after 30 minutes.
You can configure the session timeout value in the web.xml file.
To configure the session timeout value:
Step 1 ![]() Go to the HCM_Root_Directory\thirdparty\jboss\server\default\deploy\ROOT.war\WEB-INF directory.
Go to the HCM_Root_Directory\thirdparty\jboss\server\default\deploy\ROOT.war\WEB-INF directory.
Step 2 ![]() Open the web.xml file.
Open the web.xml file.
Step 3 ![]() Edit the value within the
Edit the value within the <session-timeout> and </session-timeout> tags.
For example, after changing the user timeout value to 60 minutes, the <session-config> element in the web.xml file should look like:
<session-config>
<session-timeout>60</session-timeout>
</session-config>
Step 4 ![]() Restart the HCM Dashboard server:
Restart the HCM Dashboard server:
a. ![]() Go to the HCM_Root_Directory/bin directory.
Go to the HCM_Root_Directory/bin directory.
b. ![]() Run ./stop-hcm.sh.
Run ./stop-hcm.sh.
c. ![]() Run ./start-hcm.sh.
Run ./start-hcm.sh.
Modifying Database User Password in HCM Dashboard Configuration File
You can modify the database user password by editing the configuration file. To do this:
Step 1 ![]() From the JBoss home directory, enter the following command and change the password instance with the new password:
From the JBoss home directory, enter the following command and change the password instance with the new password:
../jdk/bin/java -cp lib/jboss-common.jar:lib/jboss-jmx.jar:server/default/lib/jbosssx.jar:server/default/lib/jboss-jca.jar org.jboss.resource.security.SecureIdentityLoginModule password
The encoded password appears.
For example, encoded password—5dfc52b51bd35553df8592078de921bc.
Step 2 ![]() Copy the encoded password that is generated.
Copy the encoded password that is generated.
Step 3 ![]() Go to the HCM_Root _Directory/thirdparty/jboss/server/default/conf directory.
Go to the HCM_Root _Directory/thirdparty/jboss/server/default/conf directory.
Step 4 ![]() Open the login-config.xml file.
Open the login-config.xml file.
Step 5 ![]() Edit the value and paste the encoded password that you copied within the
Edit the value and paste the encoded password that you copied within the <module-option name="password"> and </module-option> tags.
Note ![]() The
The <module-option name="password"> and </module-option> tags appear twice in the login-config.xml file. You must edit the value at both instances.
The following is a sample of the login-config.xml file after the encoded password is modified. The <module-option name="password"> and </module-option> tags have been highlighted.
<!-- Security domains for HCM encrypted database password jca framework -->
<application-policy name="HCMEncryptDBPassword">
<authentication>
<login-module code="org.jboss.resource.security.SecureIdentityLoginModule" flag="required">
<module-option name="username">db_username</module-option>
<module-option name="password">5dfc52b51bd35553df8592078de921bc </module-option>
<module-option name="managedConnectionFactoryName">jboss.jca:name=HCM_PORTAL,service=LocalTxCM</module-option>
</login-module>
</authentication>
</application-policy>
<!-- Security domains for HCM encrypted database password jca framework -->
<application-policy name="HCMEncryptLocalDBPassword">
<authentication>
<login-module code="org.jboss.resource.security.SecureIdentityLoginModule" flag="required">
<module-option name="username">db_username</module-option>
<module-option name="password">5dfc52b51bd35553df8592078de921bc </module-option>
<module-option name="managedConnectionFactoryName">jboss.jca:name=HCM_LOCAL,service=LocalTxCM</module-option>
</login-module>
</authentication>
</application-policy>
Modifying ACS Password in HCM Dashboard Configuration File
You can modify the ACS password by editing the configuration file. To do this:
Step 1 ![]() Enter the following command and change the password instance with the new password:
Enter the following command and change the password instance with the new password:
../jdk/bin/java -cp server/default/lib/msdtportal.jar:server/default/lib/bcprov-jdk15-142.jar com.cisco.util.Encryptor password
The encoded password appears.
For example, encoded password—47|-112|-52|126|-82|31|-15|46|-40|32|-87|45|72|-65|18|-15.
Step 2 ![]() Copy the encoded password that is generated.
Copy the encoded password that is generated.
Step 3 ![]() Go to the HCM_Root_Directory//thirdparty/jboss/server/default/deploy/ROOT.war/WEB-INF directory.
Go to the HCM_Root_Directory//thirdparty/jboss/server/default/deploy/ROOT.war/WEB-INF directory.
Step 4 ![]() Open the acs.properties file.
Open the acs.properties file.
Step 5 ![]() Paste the encoded password that you copied in the ACS_SECRETKEY parameter.
Paste the encoded password that you copied in the ACS_SECRETKEY parameter.
The following is a sample of the acs.properties file after the encoded password is modified. The ACS_SECRETKEY parameter has been highlighted.
#ip address of the ACS server
ACS_IPADDRESS=172.20.120.145
#port number of the ACS Server
ACS_PORTNUMBER=49
#Secret Key Used for ACS Communication
ACS_SECRETKEY=47|-112|-52|126|-82|31|-15|46|-40|32|-87|45|72|-65|18|-15
Modifying Database User Password in the HCM Mediation Configuration File
You can modify the database user password by editing the configuration file. To do this:
Step 1 ![]() From the JBoss home directory, enter the following command and change the password instance with the new password:
From the JBoss home directory, enter the following command and change the password instance with the new password:
HCM_Root_Directory/thirdparty/jdk/bin/java -cp lib/jboss-common.jar:lib/jboss-jmx.jar:server/default/lib/jbosssx.jar:server/default/lib/jboss-jca.jar org.jboss.resource.security.SecureIdentityLoginModule password
The encoded password appears.
For example, encoded password—5dfc52b51bd35553df8592078de921bc.
Step 2 ![]() Copy the encoded password that is generated.
Copy the encoded password that is generated.
Step 3 ![]() Go to the HCM_Root_Directory/thirdparty/jboss/server/hcm/conf directory.
Go to the HCM_Root_Directory/thirdparty/jboss/server/hcm/conf directory.
Step 4 ![]() Open the login-config.xml file.
Open the login-config.xml file.
Step 5 ![]() Paste the encoded password that you copied within the
Paste the encoded password that you copied within the <module-option name="password"> and </module-option> tags.
The following is a sample of the login-config.xml file after the encoded password is modified. The <module-option name="password"> and </module-option> tags have been highlighted.
<!-- Security domains for HCM encrypted database password jca framework -->
<application-policy name="HCMEncryptDBPassword">
<authentication>
<login-module code="org.jboss.resource.security.SecureIdentityLoginModule" flag="required">
<module-option name="username">username</module-option>
<module-option name="password">5dfc52b51bd35553df8592078de921bc </module-option>
<module-option name="managedConnectionFactoryName">jboss.jca:name=HCSDatabaseDS,service=LocalTxCM</module-option>
</login-module>
</authentication>
</application-policy>
Understanding HCM Dashboard User Interface
HCM Dashboard offers an intuitive UI. This section describes the key components of the HCM Dashboard UI:
•![]() Common UI Elements and Options
Common UI Elements and Options
•![]() Changing the Look and Feel of the Portlet
Changing the Look and Feel of the Portlet
Common UI Elements and Options
Figure 1-2 shows the common elements and options in the HCM Dashboard UI.
Figure 1-2 HCM Dashboard User Interface
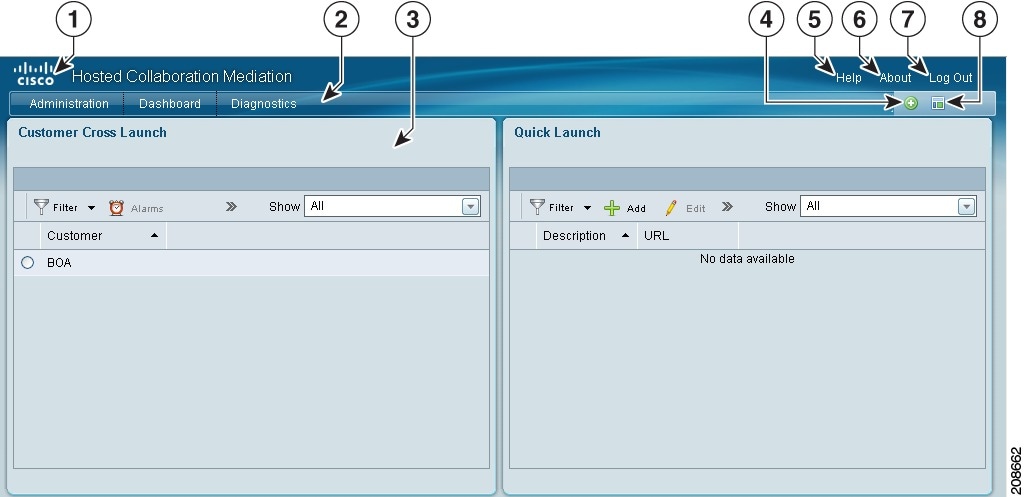
Table 1-1 describes the common elements and options in the HCM Dashboard UI.
|
|
|
|
|---|---|---|
1 |
Cisco Logo |
Click to display the official Cisco web site. |
2 |
Navigation Bar |
Displays the primary navigation tabs and the Add Portlet and Change Layout buttons. |
3 |
Portlet |
Portlet is a pluggable UI component. For detailed information about the purpose and function of each portlet, see Chapter 2, "Working with Portlets" |
4 |
Add Portlet |
Enables you to add portlets to HCM Dashboard pages. See Adding Portlets |
5 |
Help |
Click to see the HCM User Guide. |
6 |
About |
Click to display the software version of HCM Dashboard. |
7 |
Log Out |
Click to log out of HCM Dashboard. |
8 |
Change Layout |
Enables you to specify the layout of the portlets. See Managing Screen Layout |
Adding Portlets
You must log in as an admin user to add portlets. The Add Portlet button in the Navigation Bar enables you to add portlets to the HCM Dashboard pages.
To add portlets:
Step 1 ![]() Navigate to the page to which you wish to add the portlet to.
Navigate to the page to which you wish to add the portlet to.
Step 2 ![]() Click the Add Portlet button in the Navigation Bar.
Click the Add Portlet button in the Navigation Bar.
The Add Application dialog box appears, displaying a list of portlet categories.
Step 3 ![]() Click Hosted Collaboration Mediation.
Click Hosted Collaboration Mediation.
A list of portlets belonging to the Hosted Collaboration Mediation category appear.
Step 4 ![]() Drag the portlet that you want to add to the content area or click the Add button corresponding to the portlet that you want to add.
Drag the portlet that you want to add to the content area or click the Add button corresponding to the portlet that you want to add.
The portlet that you select, appears in the page that you are currently viewing.
The Add Application dialog box provides options that enable you to search for portlets.
To search for a portlet and then add it to the page:
Step 1 ![]() In the Search Applications field, enter the name of the portlet.
In the Search Applications field, enter the name of the portlet.
The search results corresponding to the criteria that you specify appear.
Step 2 ![]() Drag the portlet that you want to add to the content area or click the Add button corresponding to the portlet that you want to add.
Drag the portlet that you want to add to the content area or click the Add button corresponding to the portlet that you want to add.
The portlet that you select, appears in the page that you are currently viewing.
Managing Screen Layout
The Change Layout button in the Navigation Bar enables you to manage the layout of portlets that appear in the content area. You can change the layout of portlets, according to a set of available layout templates.
To change the layout of the portlets that appear in the content area:
Step 1 ![]() Click the Change Layout button in the Navigation Bar.
Click the Change Layout button in the Navigation Bar.
The Layout dialog box appears, displaying a list of available layout templates.
Figure 1-3 shows the Layout dialog box.
Figure 1-3 Layout Dialog Box
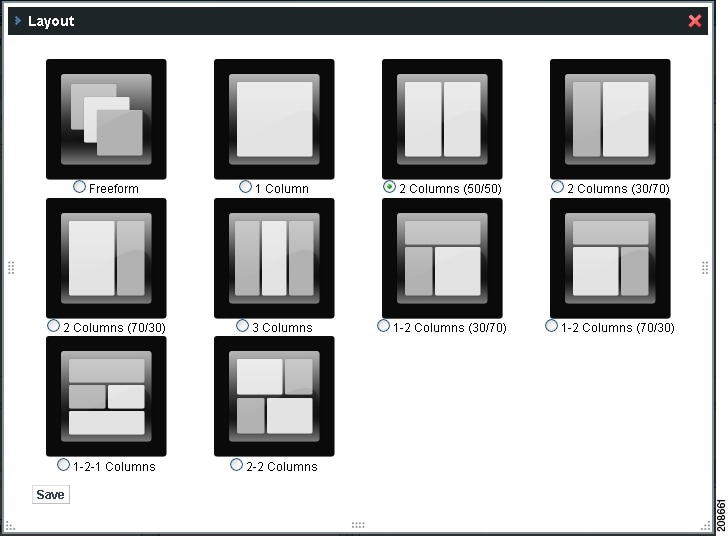
Step 2 ![]() Click the radio button corresponding to the layout template that you want to choose.
Click the radio button corresponding to the layout template that you want to choose.
Step 3 ![]() Click Save.
Click Save.
The portlets in the content area align, according to the layout that you selected in the Layout dialog box.
Understanding Portlets
HCM Dashboard aggregates data from multiple virtualized instances of domain managers and displays summary information, using pluggable UI components called portlets. Each portlet acts as an individual application that retrieves data from various domain managers to display information.
You can cross-launch the domain managers that support web-based UI from the portlet. In addition to displaying information, the portlets also act as entities from where the functionality of HCM Dashboard flows. UI options that enable you to perform various workflow activities, appear inside the portlets.
Figure 1-4 shows a sample portlet.
Figure 1-4 Sample Portlet
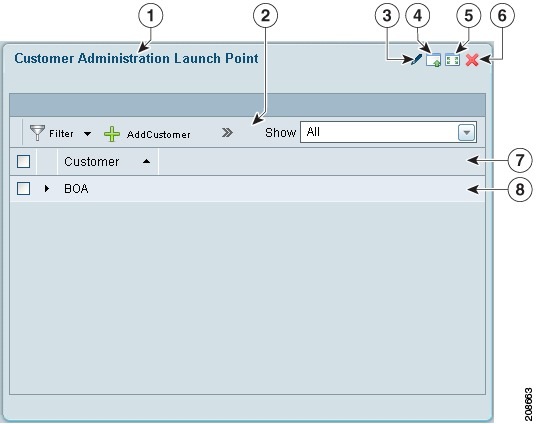
Table 1-2 describes the common UI options that appear in every portlet.
For detailed information about each portlet, see Chapter 2, "Working with Portlets".
|
|
|
|---|---|
1 |
Portlet Title—Displays the title of the portlet. Click the Portlet Title to edit it. |
2 |
Portlet Toolbar—Displays the various UI options that are available in the portlet. These options differ from portlet to portlet. |
3 |
Look and Feel—Click to change look and feel of the portlet. See Changing the Look and Feel of the Portlet |
4 |
Minimize—Click to minimize the portlet. |
5 |
Maximize—Click to maximize the portlet. |
6 |
Remove—Click to remove the portlet. |
7 |
Column Header Row—Displays a check box and the column header for each column in the table. |
8 |
Portlet Table—Information is displayed in tabular format in the portlet. |
Changing the Look and Feel of the Portlet
Using the Look and Feel button in the portlet, you can set or alter the display properties corresponding to each portlet.
To set or alter the display properties corresponding to a portlet:
Step 1 ![]() In any portlet, click the Look and Feel button.
In any portlet, click the Look and Feel button.
The Look and Feel dialog box appears.
Step 2 ![]() Use the following UI options available in the Look and Feel dialog box to set or alter the display properties, corresponding to the portlet:
Use the following UI options available in the Look and Feel dialog box to set or alter the display properties, corresponding to the portlet:
•![]() Portlet Configuration
Portlet Configuration
•![]() Text Styles
Text Styles
•![]() Background Styles
Background Styles
•![]() Border Styles
Border Styles
•![]() Margin and Padding
Margin and Padding
•![]() Advanced Styling
Advanced Styling
•![]() WAP Styling
WAP Styling
Step 3 ![]() Click Save.
Click Save.
Understanding HCM Dashboard Roles
A role is associated with a specific job function or functions and provides the necessary permissions to perform these functions. The following types of roles are available for the HCM Dashboard component:
Admin
An admin user has all administrative privileges. An admin user can create a user with admin or operator privileges. The username and password details are maintained in the Cisco Secure ACS and the HCM database. The HCM database must be synchronized with the username and password details. You must configure the user in Cisco Secure ACS and then map the user in HCM Dashboard.
Note ![]() The default admin username is portaladmin and the default password is admin.
The default admin username is portaladmin and the default password is admin.
When you log in as an admin user with the default username and password and provision a Cisco Secure ACS user as a SuperAdmin, the default admin user will be disabled and you will not be able to log into the HCM server.
All the portlets will be available for the admin user:
•![]() Customer Cross Launch
Customer Cross Launch
•![]() Quick Launch
Quick Launch
•![]() Configuration
Configuration
•![]() User Administration
User Administration
•![]() Customer Administration Launch Point
Customer Administration Launch Point
•![]() Alarm Summary
Alarm Summary
•![]() Phone Summary
Phone Summary
•![]() Diagnostics Test
Diagnostics Test
For detailed information about portlets, see Chapter 2, "Working with Portlets"
Operator
An operator has only monitoring privileges for a customer or a set of customers. An operator cannot add or modify any portlets. The following summary portlets are available for an operator:
•![]() Quick Launch
Quick Launch
•![]() Customer Cross Launch
Customer Cross Launch
•![]() Alarm Summary
Alarm Summary
•![]() Phone Summary
Phone Summary
For detailed information about portlets, see Chapter 2, "Working with Portlets".
 Feedback