Cisco Prime Service Catalog 12.1 Administration and Operation Guide
Bias-Free Language
The documentation set for this product strives to use bias-free language. For the purposes of this documentation set, bias-free is defined as language that does not imply discrimination based on age, disability, gender, racial identity, ethnic identity, sexual orientation, socioeconomic status, and intersectionality. Exceptions may be present in the documentation due to language that is hardcoded in the user interfaces of the product software, language used based on RFP documentation, or language that is used by a referenced third-party product. Learn more about how Cisco is using Inclusive Language.
- Updated:
- August 31, 2017
Chapter: Integrating with Prime Service Catalog
- Configuring Email Notification on VDC Creation
- Generating Orderable Services for UCS Director Entities
- Integrating UCS Director (UCSD) or VACS with Prime Service Catalog
- Managing UCS Director Synchronization
- Configuring Permissions and Presentation for Private and Hybrid Cloud Services
- Mapping Templates for UCSD Services
- Users and User Groups Imported from UCS Director
- Prime Service Catalog System Defined Roles for UCS Director Integration
- Configuring Display Categories for Private Cloud Services
- Providing Multi-Tenant IaaS
- Generating Orderable Services for CloudCenter Applications
- Integrating CloudCenter with Prime Service Catalog
- Configuring Permissions and Presentation for CloudCenter Services
- Mapping Application Templates for CloudCenter
- User Management in Prime Service Catalog and CloudCenter Integration
- Supported CloudCenter Features
- Generating Orderable Services for Process Orchestrator Applications
- Integrating Process Orchestrator with Prime Service Catalog
- Configuring Permissions and Presentation for Process Orchestrator Services
- Mapping Workflow Templates for Process Orchestrator Services
- Modifying Form Presentation Process Orchestrator Workflow Service
- Limitations
Integrating with
Prime Service Catalog
This chapter consist of the following topics:
- Overview
- Integrating with Third Party Applications
- Creating Custom Integrations
- Providing Infrastructure as a Service (IaaS) using Prime Service Catalog
- Providing CloudCenter Applications as a Service
- Integrating Performance Manager with Prime Service Catalog
- Integrating with Process Orchestrator
- SAML Configurations
- Managing AMQP Connections
- Managing Webservices Connections
- Enabling Web Based SSH or RDP to VMs
- Integrating Apache Solr Search Platform
Overview
-
The Internal tab allows you to connect with and manage the third party applications integrated with Prime Service catalog such as UCSD, CloudCenter, Process Orchestrator, AMQP, Web Services, Guacamole servers, Solr and so on. For details on integrating Prime Service Catalog with each of the supported applications see section Integrating with Third Party Applications .
-
The Custom tab allows you to create and manage service groups and Service Item Groups. For detailed information on creating and managing custom Integrations see Creating Custom Integrations. 
Note
Service Groups and Service Item Groups can no longer be created from Service Designer module.
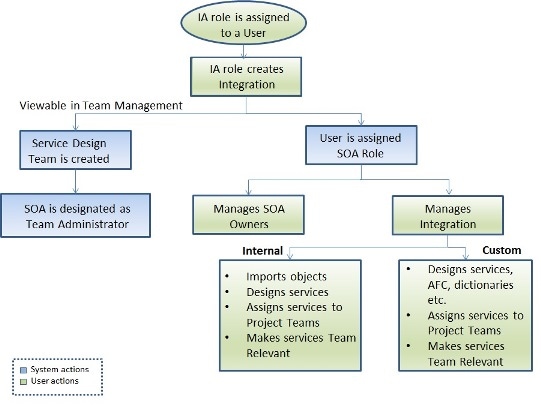
Site Administrator can create and manage all integrations in the system. However, the site administrator can choose to delegate this responsibility to another user. To create an integration, the user must be assigned the Integrations Administrator (IA) role. See section Creating Integrations Administrator to assign IA role to a user. A user with IA role can now access Integrations module. On the Integrations page, only those connections are displayed that are owned by the logged in user.
Using the New Integrations option IA can create a new internal or custom integration. On creation of an integration, the IA user is assigned System Operations Administrator (SOA) role automatically and can manage that particular integration. This implies, SOA role is specific to the integration and all the operations within that connection. The SOA can now perform operations such as Manage SOA Owner, Assign Services to Project Teams, and Making Services Team Relevant. For more details on each of these roles see section Understanding Roles and Capabilities.
For each Integration, the system generates a corresponding Service Design team and the SOA is designated as Team Administrator of this team. If Team Management is activated, the Service Design team details is viewable in Team Management module. The purpose of Service Design team is to provide the SOA and members of the team a comprehensive view of all the data pertaining to the integration in one place. For more details on Service Design teams see section Service Design Teams.
Understanding Roles and Capabilities
This section covers the roles and capabilities of all the roles within the scope of Integrations module.
Site Administrator
This module is mainly used by the Integrations Administrator and Service Operations Administrator to create and manage the integrations (internal and custom). However, some integrations can be created and managed only by the Site Administrator, such as AMQP, Web Services, and Apache Solr.
Creating Integrations Administrator
As a Site Administrator you must create an Integrations Administrator, who is well aware of the applications to be integrated with Prime Service Catalog. The Integrations Administrator role creates and manages UCSD, CloudCenter, Process Orchestrator, and UCS PM Integrations. This role can also create and manage custom integrations such as Service groups and Service item group.
The very first Integrations Administrator must be created by ordering the service Create Integrations Administrator from Service Catalog. Assign a user in the system as Integrations Administrator from the Search for Recipient pop up and click Submit.
In case you have upgraded from previous version of Prime service Catalog, for all existing integrations you must manually map the user who manages those integrations with the Service Operations Administrator role.
Note | The Service Administrator role in Prime Service Catalog 12.0 release has been deprecated in the 12.1 release. In case you are upgrading from Prime Service Catalog 12.0 to 12.1 release, all users who were granted Service Administrator role will automatically be granted the role of Integrations Administrator. |
Integrations Administrator (IA)
The Integrations Administrator (IA) role creates connection with third party applications such as UCSD, CloudCenter, UCS PM, and so on. The IA also has capabilities to create custom integrations. When an IA creates a connection, the SOA role specific to the connection or Service Group is automatically assigned to the IA. In addition, for every connection a corresponding Service Design Team and Service Groups are created. The SOA is assigned as the team admin for the Service Design Team.
Initially, the IA is allowed to access Integrations and Order Management modules. Once the IA creates a connection and imported the objects, the IA gains access to the Service Designer and Service Item Manager modules as well.
Service Operations Administrator (SOA)
SOA role is a integration specific role i.e., the SOA can access and manage only the integration owned by the SOA. As a result SOA can also view service items and orders of entire integration in the Service Designer module. SOA user is allowed access to the Integrations, Service Designer, User Management, Service Manager and Service Item Manager modules. This user has the capability to assign or unassign the services of the connection to project teams. Only the assigned services will be available for the team administrator to make them orderable for the users.
Integrating with Third Party Applications
|
Application |
Permissions |
Reference to sections |
|---|---|---|
|
Cisco UCS Director |
IA- Create integration SOA- Manage integration |
Integrating UCS Director (UCSD) or VACS with Prime Service Catalog |
|
Cisco CloudCenter |
IA- Create integration SOA- Manage integration |
Integrating CloudCenter with Prime Service Catalog |
|
Cisco UCS Performance Manager |
IA- Create integration SOA- Manage integration |
Integrating Performance Manager with Prime Service Catalog |
|
Cisco Process Orchestrator |
IA- Create integration SOA- Manage integration |
Integrating Process Orchestrator with Prime Service Catalog |
|
AMQP |
Only Site Administrator can create and manage the integration |
Managing AMQP Connections |
|
Generic Web Service |
IA- Create integration SOA- Manage integration |
Managing Webservices Connections |
|
Single Sign-On such as SAML |
Only Site Administrator can create and manage the integration |
SAML Configurations |
|
Generic Guacamole server |
IA- Create integration SOA- Manage integration |
Integrating Guacamole Server with Prime Service Catalog |
|
Apache Solr |
Only Site Administrator can create and manage the integration |
Integrating Apache Solr Search Platform |
Note | The Manage Connection option in Administration module has been deprecated. If you have upgraded from a previous version of Prime Service Catalog, all existing connections will show up on the Integrations page. |
Manage Integrations
Once the new integration is added, depending on the type of applications it offers different options to manage the integration. The below explained tasks may not be applicable for all types of integrations.
The Manage Integration option allows the SOA of the connections to modify the connection and handle connection specific tasks.
Manage SOA Owner
Once the IA has created a connection he assumes the role of SOA for that connection automatically. This person can, however, choose to share or transfer the SOA role for this connection with any other user. This option is available only for the connections with UCSD, CloudCenter, Process Orchestrator, and Performance Manager and custom integrations.
The Manage Integration Owners page lists all the SOAs for this connection.
To share or transfer SOA role:
Show Log
The show log option displays the status logs pertaining to the connection. These logs help you analyze the status of the services imported and the time of the last sync. Refresh triggers sync between Prime Service Catalog and the application, and updates any changes in the services imported.
Test Connectivity
Once the connection is created, use the Test Connectivity option to authenticate the credentials.
Remove
You can delete a integration by selecting the Remove option. This will delete the integration along with:
-
Its imported entities such as virtual machines, VDCs, containers, templates, catalogs, and workflows.
-
All SOA roles of the integration.
-
All permissions on the services related to the integration for a custom role.
Note | As an exception, when a CloudCenter connection is deleted, all the associated entities pertaining to this connection would remain in the system. |
Launch VM Client
When this option is selected you can access the VMs on the web browser without any SSH Client. This option is available only if Guacamole or VMRC Server is configured in Prime Service Catalog.
Assign Services to Project Teams
Once the services are imported to Prime Service Catalog, you must manually assign the services to teams that are authorized to avail these services. Only the assigned services can be ordered by the project team members. Assigning services to project teams alone will not allow the team members to order the services. The team administrator of the Project team, however, can use their discretion to choose from these assigned services and makes them orderable to the team members.
To assign services to teams:
| Step 1 | For the selected connection, select Manage Integrations. |
| Step 2 | From the Discovered panel, select the Services tab. |
| Step 3 | Choose the services that you want to assign a team and click Assign to Teams. From the Select Teams pop-up, choose the teams that are authorized to order this service and click OK. |
The selected teams and their assigned services are displayed in the Teams with Assigned Services panel.
To remove the assigned services:
From the Teams with Assigned Services panel, choose the services to be unassigned from the team and click Remove.
Creating Custom Integrations
Service Groups and Service Item Group can now be created only as a Custom integration. However, the service groups and service item groups must be configured in Service Designer module. Service Groups and Service Item Group are logically grouped and assigned to the SOA role.
Service groups are created to group similar services. At the service group level you can configure authorization processes, ordering permissions, and escalation notifications. These configurations are inherited by all the services in the group. You can also set whether the service group is Team Relevant or not at Service group level or at service level. For detailed information on configuring service groups, see section Configuring a Service Group of Cisco Prime Service Catalog Designer Guide.
Service Item group is a logical grouping of various service items. You must create a service item group to add related service items. For example, create a service item group called hardware to be able to add various service items like laptop, mouse, and so on. On the custom integration page only those integrations are displayed that are owned by the logged in user. For detailed information on configuring service Item groups, see section Managing the Services and Attributes in Cisco Prime Service Catalog Designer Guide.
To create a service group:
| Step 1 | Choose Custom tab in the Integrations module. |
| Step 2 | Click New Custom Integration. |
| Step 3 | Enter a Name and Description for the Service Group and Service Item Group and click Add. The name for the Service Group should be specific to your organization and needs. End users do not see this name, and the name is editable after service group creation. Sample names include "End User IT Desktop Support," "End User IT Desktop Software," or "Identity Management". A brief description for the service group; optional but recommended. |
The Service Group that you created is displayed as one of the custom integration under the Custom tab.
On each Custom Integration you can perform tasks such as, Manage Integration, Manage SOA Owners, Remove, and Navigate to Service Designer.
Manage Integrations
Manage Integrations option from the settings allows you to edit the service group. This page displays the general details of the group, whether the group is marked as relevant or not, and displays the services belonging to the service group.
To edit a service group:
| Step 1 | Choose Custom tab in the Integrations module. |
| Step 2 | Select the Service Group that needs to be edited and choose Manage Integration option from the settings. |
| Step 3 | Click Edit to update the general details and to set 'Team Relevant' status at group level. For more information on team relevant services, see section Making Services Team Relevant. To set only certain services within the service group as team relevant, you would need to navigate to service designer module. For more information see section Setting Services as Team Relevant in Cisco Prime Service catalog Designer Guide. |
| Step 4 | Click Update. |
Manage SOA Owners for Custom Integrations
The manage SOA is similar to managing SOA for internal connections. For more details see section Manage SOA Owners.
To share or transfer SOA role for Custom Integrations:
| Step 1 | Choose connection and select Manage SOA Owners option from the settings icon. | ||
| Step 2 | Click Associate SOA. | ||
| Step 3 | Choose
Share or
Transfer
based on your requirement and click
Submit.
|
Assigning Services to teams
Assigning Services to team for custom integrations is similar to the internal integration. For detailed procedure see section Assign Services to Teams.
Remove
To delete a Service group:
Navigate to Service Designer
To proceed further with tasks listed below click on the Navigate to Service Designer module.
Providing Infrastructure as a Service (IaaS) using Prime Service Catalog
Cisco Prime Service Catalog integrated with UCS Director provides single self-service ITaaS catalog for the self-service provisioning and lifecycle management of VMs in the private and hybrid cloud workloads. You can provide services such as provisioning virtual machines on a private cloud using UCS Director and perform the lifecycle operations on these public and private VMs. This section covers the infrastructure services such as virtual machines, fenced containers, Virtual Application Container Services (VACS), and APIC Container Catalog on UCS Director.
Note |
|
Note | Prime Service Catalog currently does not support the popup table input type for UCS Director advance catalog workflow. |
- Create orderable services for VMs and infrastructure containers in hybrid cloud using a unified web interface after integrating with UCS Director. For more information, see Creating Orderable Services for UCSD and ICFB Entities.
- Create orderable services for VACS bound VMs and containers.
- Create orderable services for UCS Director based advance catalogs.
- Provide multi-tenant IaaS based on ACI using UCS Director. For more information, see Providing Multi-Tenant Infrastructure as a Service (IaaS).
- Configuring Email Notification on VDC Creation
- Generating Orderable Services for UCS Director Entities
- Providing Multi-Tenant IaaS
Configuring Email Notification on VDC Creation
You receive an email notification when you create a VDC or a standard virtual machine. A VDC can be an APIC, fenced, or VACS container, and a virtual machine can be a standard virtual machine or a cloned virtual machine. You also get an email notification while adding a virtual machine to a Fenced and VACS container.
When you order a new VDC successfully, an email notification is sent out, which includes VDC service item details, VDC subscription data, and specific details of the VDCs such as name, display name, description, cloud name, and status of the VDC with its corresponding virtual machines. You can view the details of all the virtual machines of a particular VDC.
For information on VDC creation, see the "Virtual Data Centers" section in the Cisco Prime Service 11.1.1 User Guide.
-
Set the SMTP properties in the Administration module. These properties are, "Mail Server Address", "Mail Server Port", and "Support Email Address".
-
FTL files must adhere to the following guidelines:
-
FTL files are well formed. This includes naming the tags properly, ensuring that every opening tag has a closing tag, ensuring that at least one "to" address exists, in addition to the other precautions mentioned above.
-
FTL files must be placed in some custom template folder and the fully qualified path name to the folder must be specified in Administration > Settings > Path of the folder containing the FTL files. The path should navigate to the folder containing the FTL files and not the files itself. By default, these FTL files are available in the "RequestCenter.war/WEB-INF/classes/config/templates/ folder.
-
The FTL file path must be in Linux convention (which is a/b/c/d and not a\b\c\d) andmust mandatorily end with '/'.
-
For clustered environments, the URL ObjectCache.Application.URL must be hardcoded in the Newscale.properties file.
-
For clustered environments, each node must have the FTL files in the same folder, and this folder must exist in every node.
-
FTL files naming convention must not be changed. The FTL files should remain as follows: -
create_vdc_fen.ftl—For creating Fenced Container VDC
-
create_vdc_apic.ftl—For creating APIC Container VDC
-
create_vdc_vacs.ftl—For creating VACS Container VDC
-
add_vm_fen.ftl—For adding a VM of a Fenced container
-
add_vm_vacs.ftl—For adding a VM to a VACS container
-
vm_operation.ftl—For cloning a VM of a Fenced container and an APIC container, and creating a Standard VM.
-
-
-
You can view, modify, show, hide, or remove the FTL file according to your requirement, but do not change the naming convention of the FTL files, as mentioned above. You can view all the details that are included in the email notification.
Note | By default, the <from> field has ToBeFilled as the value. If you want to use the <from> field, edit this field with an appropriate and valid email address. If you do not want to use the <from> field, remove this field or comment it out in the FTL. If the FTL is used as is as provided out of the box, then it would result in an error, since ToBeFilled is not a valid email address. |
Apart from the customizations mentioned above, you can also add any static text inside of the FTL template. For this, no special tags need to be used. You can just mention the static text as is. The "subject" field of the email template can also be customized with a custom subject line for the email.
Generating Orderable Services for UCS Director Entities
|
|
Steps |
Topics |
|---|---|---|
|
Step 1 |
Integrate UCS Director with Prime Service Catalog. |
Integrating UCS Director (UCSD) or VACS with Prime Service Catalog |
|
Step 2 |
Discover the IaaS entities from UCS Director. |
|
|
Step 3 |
Set up automatic or manual synchronization with UCS Director. |
Managing UCSD or ICFB Synchronization |
|
Step 4 |
|
Based on the permissions, end users can now order the hybrid cloud services and perform lifecycle operations on the provisioned containers and virtual machines. For more information on ordering these services, and on the available lifecycle operations for the UCS Director entities, see Cisco Prime Service Catalog 12.1 User Guide.
- Integrating UCS Director (UCSD) or VACS with Prime Service Catalog
- Managing UCS Director Synchronization
- Configuring Permissions and Presentation for Private and Hybrid Cloud Services
- Mapping Templates for UCSD Services
- Users and User Groups Imported from UCS Director
- Prime Service Catalog System Defined Roles for UCS Director Integration
- Configuring Display Categories for Private Cloud Services
Integrating UCS Director (UCSD) or VACS with Prime Service Catalog
-
Container templates, container catalogs, standard catalogs, and advance catalogs from UCS Director
-
Container catalog services and container template services from VACS. VACS template services includes a CSR Virtual Machine, VSG Virtual Machine, and application Virtual Machines.
- To establish an SSL connection, you must add an SSL certificate to the UCS Director or VACS. You can use:
- If LDAP is integrated, Prime Service Catalog and UCS Director must be integrated with the same LDAP to support single sign-on.
-
If you are planning to connect to a UCS Director instance that is integrated with an LDAP, do the following in Prime Service Catalog :
Failing to map the above attributes may result in duplicate user accounts in Prime Service Catalog after the UCS Director import.
- Make sure the UCS Director is configured in English.
| Step 1 | Login to Prime Service Catalog as the Integration Admin user. | ||||||
| Step 2 | From the main
menu, choose
Advanced Configuration > Integrations
and click
New
Integrations.
| ||||||
| Step 3 | Select Cisco UCS Director. The client/server side validation happens, on successful creation it navigates to Manage Integrations page. | ||||||
| Step 4 | Enter the details to connect to the server where UCS Director is installed. For https connections, import the root CA certificate of the UCS Director server. Copy the content of the root CA certificate of the server and paste it in the text area. If the root certificate is a chain of certificates, paste the content one below the other. The connection would fail, in case the SSL certificate of the server becomes invalid or untrusted. You can skip the certificate validation by selecting the Skip Certificate Validation option. | ||||||
| Step 5 | Check Sync User with IaaS option to sync this user with IaaS. | ||||||
| Step 6 | Check
Enable
Poller if you want to configure automatic polling for the subsequent
connections with UCS Director connections.
| ||||||
| Step 7 | Click Create Integration. | ||||||
| Step 8 | Select the connection from the Integrations page and choose Test Connectivity option from Manage Integration drop-down to authenticate the credentials. | ||||||
| Step 9 | After the
connection is successful, click
Import
all Objects
option from
Manage
Integration drop-down. The system starts to discover the data from UCS
Director. For more information on data discovered from UCS Director, see
Cisco Prime Service Catalog 12.1 Designer Guide.
You can now set the timeout period for UCS Director synchronization initiated using the Connect and Import option. Set the ucsddata.killSession parameter in the newscale.properties file to set the timeout. The UCS Director synchronization will end after this set period is elapsed.
| ||||||
| Step 10 | On the
Discovered
Panel, you can:
Deleting a UCS Director connection As a Service Operations Administrator, you can delete a UCS Director connection by selecting the Remove option either from Integrations > Setting drop down or Manage Integrations page > Manage Integrations drop down. This option will delete the connection along with its imported entities such as virtual machines, VDCs, containers, templates, catalogs, and workflows.
However, entities such as users, user groups, images, template definitions, and organization units will remain in Prime Service Catalog. |
Enabling Single Sign-On in Prime Service Catalog
If you are using Prime Service Catalog in the Cisco ONE Enterprise Cloud Suite, you must enable single Sign-on (SSO) when integrating Prime Service Catalog with UCS Director.
 Caution | You cannot configure both LDAP and SAML configured for SSO login in Prime Service Catalog. If you wish to use LDAP SSO, the SAML SSO must be manually disabled, failing which will lead to incorrect login behavior. To disable SAML login, go to Integrations > Single Sign-On Integration and uncheck Enable SSO For SAML and click Save. |
Prime Service Catalog and UCS Director use LDAP authentication to handle permissions for catalog items and service items. With LDAP integration, group permissions for the catalog items and virtual machines in UCS Director are synchronized with the service items and catalog items in Prime Service Catalog. For example, if a specific group owns a virtual machine in UCS Director, the users in that group can view the same virtual machine in Prime Service Catalog. In addition, if a specific group can access a catalog item in UCS Director, the users in that group can order the same catalog item from Prime Service Catalog.
Use the procedure below to enable the single sign-on:
| Step 1 | Set up LDAP integration in Prime Service Catalog. For more information, see the Configuring LDAP integration section in Cisco Prime Service Catalog 12.1 Integration Guide. | ||
| Step 2 | Set up LDAP
integration in UCS Director. For more information, see the
LDAP
Integration section in
Cisco UCS Director 5.3
Administration Guide.
| ||
| Step 3 | Integrate UCS
Director with Prime Service Catalog. For instructions on integrating UCS
Director with Prime Service Catalog, see
Integrating UCS Director (UCSD) or VACS with Prime Service Catalog.
|
Managing UCS Director Synchronization
- Scheduling UCS Director Synchronization
- Manually Importing UCS Director Synchronization
- Scheduling the Collection of Reporting Data from UCS Director
Scheduling UCS Director Synchronization
You can automatically discover UCS Director instances at scheduled intervals using the scheduler. Use the below procedure to configure the scheduler.
| Step 1 | Edit the
following properties files. These files can be located in the
RequestCenter.war/WEB-INF/classes/config
directory.
| ||
| Step 2 | In
page, select the
UCSD
Scheduler
option.
|
Manually Importing UCS Director Synchronization
If Prime Service Catalog and UCS Director are integrated with LDAP, it is recommended to manually poll users information using the web interface whenever the user roles are changed in UCS Director. This is to ensure synchronization of the user’s RBAC permission to Prime Service Catalog services with the changes made in UCS Director.
You can manually import UCS Director instances using the UCS Director Integration page. When you perform this process, all entities including users and roles are synchronized.
This process is used in the following scenarios:
- If you do not want to use a Scheduler.
- If you are using a Scheduler and UCS Director and Prime Service Catalog are integrated with LDAP. To improve the performance, the Scheduler does not synchronize users and roles. Because of this behavior, if an administrator makes changes to users and roles in UCS Director, these changes are not communicated to Prime Service Catalog. To synchronize these changes with Prime Service Catalog, you must manually import UCS Director instances, which in turn synchronizes the users and roles.
Scheduling the Collection of Reporting Data from UCS Director
You can discover the reporting data for all VMs from the UCS Director at scheduled intervals, using the scheduler, automatically. You can also configure the number of days, months, weeks and beginner of the week for which the data needs to be imported and displayed in the Prime Service Catalog. Use the following procedure to configure the scheduler and the reporting data settings.
|
Configuring Permissions and Presentation for Private and Hybrid Cloud Services
Based on the permissions granted to an end user, the discovered services from UCS Director becomes orderable in the Service Catalog module.
To understand the UCS Director groups and roles mapping to Prime Service Catalog groups and roles, see Prime Service Catalog Roles Mapping with UCSD and ICFB Roles and Users and User Groups Imported from UCSD and ICFB.
Depending on the UCS Director integration, you can discover standard catalogs, container catalogs, and container templates services for end-user provisioning and maintenance of VMs on private and public cloud. Using these services, end users can:
Order services created based on service container catalog, standard catalog, advanced catalog, and fenced container templates from UCS Director.
Discover the Services from UCS Director by integrating with the UCS Director instance. For more information on integrating UCS Director, see Integrating UCSD or ICFB with Prime Service Catalog.
| Step 1 | Select the connection from the Integrations page and select Manage Integration option from Settings drop down. | ||||
| Step 2 | Click Services button in Discovered panel. | ||||
| Step 3 | Double-click on the service to be customized. | ||||
| Step 4 | In the
Details
panel, enter Service Name, Description, and add Categories.
| ||||
| Step 5 | In the Presentation panel, click Attach, to select an image to be associated with the service or select Image URL to enter the URL of the image. Default option selected is Image File. | ||||
| Step 6 | Select an image from the list of Select Image window and click Add. Cisco provides a number of images out-of-box that you can assign to the service. You can also upload an image to be used for the service. | ||||
| Step 7 | Enter a description for the service by selecting the Overview or Service Form options, and click Save. | ||||
| Step 8 | In the Facets panel, choose the required options and click Save. | ||||
| Step 9 | In the
Permissions
panel, do the following:
| ||||
| Step 10 | Click Save. The new service will be displayed in the Service Catalog module based on the category you have selected. |
Mapping Templates for UCSD Services
Prime Service Catalog provides out-of-box templates using which you can map to the UCSD services. The template service defines the way the entities of UCSD appear as a service in Service Catalog module. In UCSD, templates can be mapped at catalogs or templates level.
Custom templates can be created based on the out-of-box UCSD templates provided by Prime Service Catalog and used for mapping to the UCSD services. For more information on creating custom templates see, Create Custom Templates in Cisco Prime Service Catalog Designer Guide.
To map a template:
| Step 1 | Select the connection from the Integrations page, choose Manage Connection from the settings. |
| Step 2 | Click Objects in the Discovered panel. |
| Step 3 | Choose the Template or Catalog from the left hand side and for the selected entry, choose the custom template from the Select Base Template drop-down list. |
| Step 4 | You can do one
of the following from the settings option:
|
Users and User Groups Imported from UCS Director
Note | In a single pane of glass, where Prime Service Catalog, UCS Director are connected to LDAP:
|
When Prime Service Catalog connects to a UCS Director for the first time, Prime Service Catalog creates a:
Where <ID> is the 3-letter identifier of the UCS Director server. This group will be the parent group for all groups imported from this UCS Director server.
Where <ID> is the 3-letter identifier of the UCS Director server. There will be group for each group in the UCS Director. All such groups are grouped under the parent group. Users belonging to various groups in the UCS Director are imported to the respective groups in Prime Service Catalog.
- Default group. The default group is grouped under the parent group. Users without a group in the UCS Director are imported to this group.
All the imported users from the UCS Director are assigned an Organizational Unit (OU) in Prime Service Catalog. During the subsequent connections, Prime Service Catalog checks for group membership changes and updates the records accordingly.
Note | For container templates, container catalogs, standard catalogs, and advance catalogs services created in Prime Service Catalog for UCS Director:
For those users who are not imported from UCSD, the user must be manually be added to any one of the UCSD imported groups to be able to order UCSD services. Also in order to perform life cycle operations on the VMs that is provisioned by the user, the user must be granted UCSD End User role.
|
Prime Service Catalog System Defined Roles for UCS Director Integration
Prime Service Catalog creates the following system-defined roles for the UCS Director roles it discovers. The following table lists the mapping of the UCS Director to Prime Service Catalog system-defined roles.
|
UCS Director Roles |
Prime Service Catalog System Defined Roles |
Description |
|---|---|---|
|
System Admin |
UCSD Sys Admin |
UCSD Sys Admin user can view the details of Containers, vDC's and VM's as service items in My Products and Services based on the Group permissions assigned to each of the UCS Director Service Item in Service Item Manager. Only users with this role can order Container Template Services. |
|
All Policy Admin |
||
|
Computing Admin |
||
|
Service End-User, Group Admin, Operation roles |
UCSD End User |
UCSD End User can view the details of Containers, vDC's and VM's as service items in My Stuff based on the Group permissions assigned to each of the UCS Director Service Item in Service Item Manager. Users with this role can order services based on the group to which user belongs and catalogs which are assigned to a group in UCS Director. |
|
All other roles |
UCSD Operator |
Users with this role can only view and use the self-service portal but cannot order the services. |
Note | In a single pane of glass, where Prime Service Catalog, UCS Director are connected to LDAP:
|
Configuring Display Categories for Private Cloud Services
The new service will be displayed in the Service Catalog module based on the category you have selected.
Discover the Services from UCS Director by integrating with the UCS Director instance. For more information, see Integrating UCSD or ICFB with Prime Service Catalog.
| Step 1 | Choose Advanced Configuration > Integrations and select the connection from the Integrations page. |
| Step 2 | Click Manage Integration option from drop down and click on the Services tab in the Discovered panel double-click on the service. |
| Step 3 | In the Details panel, do the following: |
| Step 4 | Click Save. |
Providing Multi-Tenant IaaS
This feature enables service providers to use Cisco ONE Enterprise Cloud Suite to provide multi-tenant Infrastructure as a Service (IaaS) on ACI. The components required for this functionality are: Prime Service Catalog, UCS Director (in Managed Service Provider mode), and ACI.
The Tenant Management module in Prime Service Catalog provides infrastructure services to multiple tenants quickly and efficiently. Using this module, tenants can manage their own set of services, and offer these infrastructure services to their end users. A tenant can contain several organizations and each organization can contain several users.
The tenant workflow (for example: create, update, and delete tenants), VDC, and VM operations are executed through Advanced and Service Container Catalog workflow in UCS Director. Prime Service Catalog creates services for these advance and service container catalog workflows during the UCS Director discovery process. For this feature to work seamlessly, a site administrator must map these UCS Director discovered services to the Tenant Management workflow in Prime Service Catalog. For more information, see Setting Up Tenant Management Module and Mapping Tenant and VDC Workflows from UCSD.
- Tenant Workflow Configurations in UCS Director for Multi-Tenant IaaS
- Setting Up Tenant Management Module
- Mapping Tenant, VDC, and Firewall Rule Workflows from UCS Director
- Onboarding a Tenant
- Deleting a Tenant
Tenant Workflow Configurations in UCS Director for Multi-Tenant IaaS
For seamless multi-tenant IaaS operations, an administrator must ensure that multi-tenant IaaS-related objects are created and configured in UCS Director. An administrator need to configure only four of these multi-tenant IaaS workflows. Remaining workflow are pre-defined and configured during the installation process.
Note | Do not use hyphen in UCS Director Advance Catalog name. This is to avoid the synchronization issues after integrating with Prime Service Catalog. |
|
UCS Director Workflow |
UCS Director Advance or Service Container Catalog Fields |
|---|---|
|
VNX Tenant Onboarding |
|
|
Update Tenant |
|
|
APIC Service Container catalog |
No specific fields to configure for APIC Service Container catalog. Make sure an APIC Service Container catalog is available in UCS Director for VDC workflows. |
|
Firewall Rule Action Configuration |
Setting Up Tenant Management Module
A site administrator must perform the following steps for seamless multi-tenant IaaS operations.
| Step 1 | Integrate Prime Service Catalog with UCS Director and discover the infrastructure entities from UCS Director. For instructions, see Integrating UCS Director with Prime Service Catalog. |
| Step 2 | Map the Advanced Catalog/Container Catalog services from UCS Director to the Prime Service Catalog workflow. For more information, see Mapping Tenant and VDC Workflows from UCSD. |
| Step 3 | Invoke workflow for creating tenants in Prime Service Catalog. For more information, see Onboarding a Tenant. |
Mapping Tenant, VDC, and Firewall Rule Workflows from UCS Director
When Prime Service Catalog is integrated with UCS Director, the discovery process creates services based on UCS Director Advanced Catalogs and APIC service container catalog. The advance and the APIC service container catalogs in UCS Director are used for publishing workflow for creating, managing a tenant and creating a VDC respectively.
Note | Only four of the Prime Service Catalog tenant management workflows need mapping from an administrator. The remaining workflows are pre-defined and are configured during the installation process. For information on the workflows that needs mapping in Prime Service Catalog, see the table below. |
Integrate Prime Service Catalog with UCS Director instance that is in the Service Provider mode. For more information, see Integrating UCSD with Prime Service Catalog.
| Step 1 | Discover the UCS Director entities in Prime Service Catalog. | ||
| Step 2 | On the discovery page in Prime Service Catalog, select a workflow from the Manage Workflows section and click to open manage workflow page. , and select an advance or a service container catalog service from the Services drop down on the right-hand side. For information on which services to select in this drop down, see the table below. | ||
| Step 3 | Based on the
type of advance or service container catalog service selected in the previous
step, select the values for the remaining workflow attributes and click
Save.
| ||
| Step 4 | Navigate to
Tenant
Management module and invoke workflow for creating tenants. For VDC and
Firewall Rule Workflows, navigate to
Service
Catalog module
My Products
& Services >
Virtual Data
Centers to create VDC and add Firewall Rule.
The status of the service request is displayed as Completed, if the operation on UCS Director is successful.
|
Prime
Service Catalog Workflow
Create
Tenant
Advance
Catalog based on
VNX
Tenant Onboarding workflow
Manage
Tenant
Advance
Catalog based on
Update
Tenant workflow
Create VDC
Advance
Catalog based on any
APIC
Service Container Catalog
Create
Firewall
Advance
Catalog based on
Firewall Rule Action Configuration workflow
UCSD Advance/Service
Container Catalogs
Onboarding a Tenant
As a site administrator, you can create a tenant administrator. A Tenant administrator can create and manage users, Organization Units (OUs), and VDCs. In addition, the tenant administrator can specify which tasks the users can perform on their virtual machines and services, and can place quotas on computing resources and virtual machines.
When you create a Tenant Admin, the Organization and Tenant User dashlets are automatically created and associated for that Tenant.
Note | These prerequisites are also applicable for creating a VDC. |
-
Add a UCS Director connection that is in the Manage Service Provider (MSP) mode. You can connect to a UCS Director instance in and click New Integrations.
-
Map the advance/service container catalog services with the Prime Service Catalog workflows. For more information, see Mapping Tenant and VDC Workflows from UCSD.
-
UCSD Agent must be up and running in the Service Link module.
| Step 1 | Log in as Site Administrator. | ||
| Step 2 | Go to Tenant Management. | ||
| Step 3 | Click Add Tenant from the Tenant Management Dashboard. | ||
| Step 4 | In the
Tenant
Information tab, enter details such as name of the tenant, address,
disaster recovery protection information, L2 VLAN ID, L2 IP Subnet, Tenant IP
Pool, and Resource Selection (For ND).
| ||
| Step 5 | Specify the
reservation details for vDC in the
Quota
Management tab (based on the vDC template).
UCS Director uses this information for resource allocation and to provision that tenant. The Tenant Administrator can then create and manage OUs, vDC, and users for each of the associated Tenant. When the Tenant is in the Being provisioned status, the Tenant Admin icon will be disabled on Tenant Dashboard restricting the user (site admin) to view the User Management. An information icon 'i' is displayed in Status in the Tenant Dashboard and when clicked, displays an overlay of requisition, provisioning workflow summary, comments with date and timestamp. |
You can also search and edit only the quota/capacity details (and not any other details associated to a VDC) by navigating to . The Tenant Administrator can navigate to Organization, Users, and VDCs from the User Dashboard.
Note |
|
Deleting a Tenant
The following instructions are specific only to the customers who have access to the Tenant Management module.
To delete a tenant from the Tenant Management dashboard, make sure that you delete all the physical servers, VMs, VDCs, Organization users, or any service items associated with that tenant. Follow the steps in the same sequence as listed below.
There might be slight variations in steps depending on the database you are using.
| Step 1 | (As a Tenant Administrator) Go to Service Item Manager > Manage Service Items, then click the delete icon to delete physical servers for the tenant. |
| Step 2 | Go to My Products & Services > Virtual Data Center, then select the VDCs corresponding to the tenant. |
| Step 3 | Delete the load balancer. To delete, select the Load Balancer from the Load Balancer tab and click the delete icon. |
| Step 4 | Delete the Firewall rule. To delete, select the Firewall rule from the Firewall Rule tab and click the delete icon. |
| Step 5 | Delete the VMs. To delete, click the Virtual Machines corresponding to the VDC. On the right of each VM, click the gear icon to delete it. |
| Step 6 | Delete the VDCs. Click the delete icon on the existing VDC to delete it. |
| Step 7 | (For Oracle only ) Go to the Administration > Utilities and purge all the requisitions for the specific users. |
| Step 8 | Go to the
Organisation Designer module and do the following:
|
| Step 9 | (As a Site Administrator) Go to the Tenant Management module and click the delete icon next to the tenant, which you want to delete. |
Providing CloudCenter Applications as a Service
Cisco Prime Service Catalog offers a direct integration with Cisco CloudCenter. You can set up the connection from Prime Service Catalog to CloudCenter, resulting in the automated import of the application deployment workflows, ready to be published to the catalog.
CloudCenter lets users define cloud-agnostic blueprints of their multi-tier applications and then deploy them to private, public, or hybrid clouds based on cost and performance metrics provided by CloudCenter. CloudCenter can manage the lifecycle of an application with auto-aging policy and the ability to scale-out and scale-in individual tiers of a multi-tier app based on application performance.
- Generating Orderable Services for CloudCenter Applications
- Integrating CloudCenter with Prime Service Catalog
- Configuring Permissions and Presentation for CloudCenter Services
- Mapping Application Templates for CloudCenter
- User Management in Prime Service Catalog and CloudCenter Integration
- Supported CloudCenter Features
Generating Orderable Services for CloudCenter Applications
|
|
Steps |
Topics |
|---|---|---|
|
Step 1 |
Integrate CloudCenter with Prime Service Catalog. |
|
|
Step 2 |
Discover application profiles. |
|
|
Step 3 |
Configure search facets, permissions, and presentation for hybrid cloud provisioning services in Prime Service Catalog. |
Configuring Permissions and Presentation for CloudCenter Services |
Based on the permissions, end users can now deploy the application services.
Integrating CloudCenter with Prime Service Catalog
To integrate CloudCenter with Prime Service Catalog follow the below procedure:
| Step 1 | Login to Prime Service Catalog as the Integrations Administrator (or Site Administrator) user. |
| Step 2 | From the main menu, choose and click New Integrations. |
| Step 3 | Select Cisco CloudCenter. |
| Step 4 | Enter the
details and click
Create
Integration to connect to the CloudCenter server.
|
| Step 5 | Choose Test Connectivity option from Manage Integration drop-down to validate the credentials and the server details. |
| Step 6 | After the connection is successful, click Import all Objects option from Manage Integration drop-down. The system starts to discover and import the published CloudCenter application profile. |
| Step 7 | In the
Discovered
panel, you can:
|
Deleting a CloudCenter Connection
You can delete a CloudCenter connection by choosing Remove option from Manage Integration or by choosing Remove option from Settings drop down in the Integrations page. This option will delete the connection along with its imported entities such as applications and activation profiles.
Note | Even if the connection is deleted, all the associated entities pertaining to the connection is retained in the system. |
Configuring Permissions and Presentation for CloudCenter Services
Based on the permissions granted to the user, the discovered application services become available in the Service Catalog module. Using the options described in the below procedure you can grant deploying permission of these services to OUs, users, groups or roles in prime Service Catalog, or customize the services by adding more presentation details, descriptions, categories, etc. However, the services are ready to be deployed as is without any additional definitional changes.
Discover the Application Profiles from CloudCenter by integrating with the CloudCenter. For more information on integrating, see Integrating CloudCenter with Prime Service Catalog.
| Step 1 | Select the connection from the Integrations page and click Services in the Discovered panel or select Manage Integration option from Settings drop down and click Services in the Discovered panel. | ||
| Step 2 | Select the service to be customized. | ||
| Step 3 | In the
Details
panel, enter Service Name, Description, and add Categories. And click
Save.
Select Yes in the Overwrite Form Definition field, if you want to overwrite Custom Form Rules, Display Properties, and Dictionary Names for these services. And click Save.
| ||
| Step 4 | In the Presentation panel, click Attach, to select an image to be associated with the service or select Image URL to enter the URL of the image. Default option selected is Image File. | ||
| Step 5 | Select an image from the list of Select Image window and click Add. Cisco provides a number of images out-of-box that you can assign to the service. You can also upload an image to be used for the service. | ||
| Step 6 | Enter a description for the service by selecting the Overview or Service Form options, and click Save. | ||
| Step 7 | In the Facets panel, choose the required options and click Save. | ||
| Step 8 | In the Permissions panel, do the following: | ||
| Step 9 | Click Save. The new service will be displayed in the Service Catalog module based on the category you have selected. |
Mapping Application Templates for CloudCenter
You can set a base template for the services for a chosen connection or the application profile. This template defines the way the application appears as a service in Service Catalog module.
The templates can be mapped at two levels:
-
Connection level: You can map the template when you add a new connection or modify the connection later to map a new template. On import all the applications associated with that connection inherit the template assigned at the connection level.
Note
Only those template will continue to inherit connection level template which were inheriting before connection level template is changed.
-
Application Profile level: Templates can also be assigned at application profile level. You can create custom templates in Service Designer based on the out-of-box template for CloudCenter, these custom templates will then be available for mapping to the Application Profiles. For more information, see Cisco Prime Service Catalog Designer Guide.
Note
It is recommended to apply the custom templates at application profile level only in the case current template for that application profile is updated and you want the service to have those changes.
To map templates at application profile level follow the below procedure:
User Management in Prime Service Catalog and CloudCenter Integration
In Prime Service catalog 12.0, user was pushed in to CloudCenter and associated to the default Activation Profile only when the user joined or created a Team for the first time. However, from 12.1 release onwards, the behavior has been changed such that the user need not be part of the team for the user to be pushed to CloudCenter. Users are pushed into CloudCenter when the user is imported from LDAP or SAML on login event or users are created manually by importing through Catalog Deployer, Organization Designer or NSAPI. This will allow Prime Service Catalog-CloudCenter integration to operate independent of the Prime Service Catalog Team Management module.
Supported CloudCenter Features
Prime Service Catalog now supports the following features of CloudCenter:
Multiple CloudCenter Connections
You can now add more than one CloudCenter connection. In case of multi CloudCenter connections, users are pushed into multiple CloudCenter environments when imported on to Prime Service Catalog.
Prime Service Catalog imports application profile for every connection and generate service for each application profile by default. If two connections are having the same application profile, Prime Service Catalog generates two services one for each connection with short name appended in the Service Name to distinguish them.
Governance Mode
Prime Service Catalog supports CloudCenter system tags, aging policies, and rules-based governance. It means that the tags created in CloudCenter when associated with the deployment takes various automatic actions based on the tags that are associated with resources and the system tag matching rules that are defined. This is applicable only if rules-based governance is enabled on CloudCenter. In case aging policy is defined for an application in CloudCenter, after the set duration the new status of application is updated. For example, if an application is set to terminate or suspend after certain duration, the same application will be deleted or suspended in Prime Service Catalog. However, the status of the application may not reflect right away in Prime Service Catalog. The status of the application syncs with Prime Service Catalog based on the poller settings. By default this cron job is set to run every day at 1 a.m.
The poller property cloudcenterdata.poller.cron in newscale.properties file allows you to set the frequency of the data sync between Prime Service Catalog and CloudCenter.
For detailed information on system tags, aging policies, and rules-based governance see Cisco CloudCenter Documentation.
Integrating Performance Manager with Prime Service Catalog
As a Integrations Administrator you can add a connection to Performance Manager server. Data points for performance reports are generated in UCS Performance Manager. Prime Service Catalog imports these data points through an API call functionality. For each Performance Manager application profile, Prime Service Catalog automatically creates a service. You can view the performance report for a vDC for an hour, 6 hours, and 1 week. You can also customize the time interval for which you need the performance report. For more information on performance reports, see section Viewing Performance reports in Cisco Prime Service Catalog User Guide.
Ensure to have UCSD connection established and VMs created by UCSD user in Prime Service Catalog.
| Step 1 | Login to Prime Service Catalog as the Integrations Administrator user. | ||
| Step 2 | From the main menu, choose Advanced Configuration > Integrations and click New Integrations. | ||
| Step 3 | Select Cisco UCS Performance Manager. | ||
| Step 4 | Enter the details to connect to the server where UCS Performance Manager is installed. For https connections, import the root CA certificate of the UCS Performance Manger server. Copy the content of the root CA certificate of the server and paste it in the text area. If the root certificate is a chain of certificates, paste the content one below the other. The connection would fail, in case the SSL certificate of the server becomes invalid or untrusted. You can skip the certificate validation by selecting the Skip Certificate Validation option. | ||
| Step 5 | Click Create Integration. | ||
| Step 6 | Select the
connection from the Integrations page to and choose
Test
Connectivity
option from
Manage
Integration drop-down to authenticate the credentials.
|
Configuring Performance Reports
Performance is a real time data and it's not stored in the Prime Service Catalog tables. Using the Performance tab, you can view the line charts representation of the performance of the resources under a vDC. Data points for performance reports are generated in UCS Performance Manager. Prime Service Catalog imports these data points through an API call functionality. You can view the performance report for a vDC for an hour, 6 hours, and 1 week. You can also customize the time interval for which you need the performance report.
Poller connects to a UCS Performance Manager instance, ensures automatic synchronization and collection of reporting data for all VMs from the UCS Performance Manager at scheduled intervals. The polling interval can be configured in the newscale.properties file. You can edit the newscale.properties file located at RequestCenter.war/WEB-INF/classes/config directory to configure the polling interval.
###### UCSPM Data Poller Settings ###################
# In non-cluster mode: this should be enabled for the Requisitions Data script to be run from the Poller
# In clustered mode: this can be either enabled on all nodes in the cluster OR on a specific node in the cluster
# - only 1 node in the cluster will run at any given time, even if this is enabled on
multiple nodes in a cluster (which ever node starts it first)
ucspmData.poller.enable=true
###########################################
-
In the newscale.properties file, change the interval of polling, as shown in the example below:
###########################################
#UCSPM Data Poller
###########################################
#Cron Expression wakes up poller every 5, 35 minutes of an hour
ucspmdata.poller.cron=0 5/30 * * * ?
#Cron Expression wakes up health check 12 minute thereafter of the hour ex: 12, 42 minutes
ucspmdata.poller.health.check.cron=0 12/30 * * * ?
#High Availability Health checks threshold, this should be greater than Poller cron time specified in minutes, Poller will be killed if its running more than 2 hours 7 minutes
ucspmdata.healthCheck.threshold=127
############################################
For information on UCSPM integration, see Integrating Performance Manager with Prime Service Catalog section of Cisco Prime Service Catalog 12.1 Administration and Operation Guide.
For more information on the charts and description for Performance Report on the , see section Viewing Performance Reports of Cisco Prime Service Catalog User Guide.
Deleting a UCS Performance Manager Connection
As a Service Administrator, you can delete a UCS Performance Manager connection by selecting the Remove option either from Integrations > Setting drop down or Manage Integrations page > Manage Integrations drop down. This option will delete the connection along with its imported entities such as application and activation profiles, clouds, and deployment environments..
Integrating with Process Orchestrator
Cisco Process Orchestrator is an automation pack that is included with the Cisco Prime Service Catalog license. These packs are designed to further enhance Cisco Prime Service Catalog's automation capabilities as well as integrate with available workplace and data center services. Cisco Process Orchestrator can help with IT process automation processes and tasks that IT staff would otherwise perform manually. The integration of these two solutions greatly improves alignment with best practices and security, quality, and productivity functions when integrated with other IT automated processes. With the Integration feature, the workflows exposed from Process Orchestrator are imported to Prime Service Catalog. Prime Service Catalog also supports the features on Process Orchestrator.
Generating Orderable Services for Process Orchestrator Applications
For creating orderable services for deploying Process Orchestrator applications in cloud, you must perform the following steps:
Integrating Process Orchestrator with Prime Service Catalog
As an Integrations Administrator, you can add a connection to Process Orchestrator server, and import Process Orchestrator work flows from Process Orchestrator. For each Process Orchestrator workflow, Prime Service Catalog automatically creates a service.
To integrate Process Orchestrator with Prime Service Catalog follow the below procedure:
-
On Prime Service Catalog, configure and set up AMQP connection For more information see Managing AMQP Connections.
-
On Cisco Process Orchestrator configure the following settings: For more details on these settings, see Cisco Process Orchestrator User Guide 3.5.
| Step 1 | Login to Prime Service Catalog as the Integrations Administrator user. |
| Step 2 | From the main menu, choose Advanced Configuration > Integrations and click New Integrations. |
| Step 3 | Select Cisco Process Orchestrator. |
| Step 4 | Enter the
details and click
Create
Integration to connect to the Process Orchestrator server.
|
| Step 5 | Choose Test Connectivity option from Manage Integration drop-down to validate the credentials and the server details. |
| Step 6 | After the connection is successful, click Import all Objects option from Manage Integration drop- down. The system starts to discover and import the published workflow. |
| Step 7 | In the
Discovered
panel, you can:
|
Deleting a Process Orchestrator Connection
You can delete a Process Orchestrator connection by choosing Remove option from Manage Integration or by choosing Remove option from Settings drop down in the Integrations page. This option will delete the connection along with its imported workflows.
Configuring Permissions and Presentation for Process Orchestrator Services
After you have completed the Integrating Process Orchestrator with Prime Service Catalog, you can grant deploying permission of these services to OUs, users, groups or roles in prime Service Catalog, or customize the services by adding more presentation details, descriptions, categories, etc. The procedure is similar to customizing the CloudCenter services, for the detailed steps see, section Configuring Permissions and Presentation for CloudCenter Services.
Mapping Workflow Templates for Process Orchestrator Services
A base template for the services allows you to maintain a uniform style and presentation for the services from a particular connection. You can set a base template for the services for a chosen connection. This template defines the way the application appears as a service in Service Catalog module.
Note | Custom templates are not supported in workflow definitions. |
To map templates to the workflow follow the below procedure:
Modifying Form Presentation Process Orchestrator Workflow Service
Prime Service Catalog supports the below features of Process Orchestrator that can be used to configure the presentation of the Process Orchestrator Workflow Service :
-
Creating CPO Workflow Attribute Metadata Template. For more details see section Workflow Attribute Metadata.
-
CPO table Type-These are treated as grid dictionaries in Prime Service Catalog.
-
Rearranging the variables of the Process using Move Up and Move Down options.
Workflow Attribute Metadata
Using the variable metadata options in Process Orchestrator you can configure the presentation of the workflow attribute. If the variables are not configured, all the attributes appear as plain text boxes in Prime Service Catalog Service Items page. Variable metadata templates allows you to represent Process Orchestrator workflow attribute fields as combos, radio options, check-box selection, multi-select options, text area, hide attribute, password, or read-only. For information on adding variable metadata to a process see section Adding Variables to a Process of Cisco Process 3.5 Orchestrator User Guide.
|
Display Type |
Sample Template |
|---|---|
|
Silgle Select |
[{"DisplayType":"select","Values":[{"label":"Meher","value":"Meher"},{"label":"Gary","value":"Gary"},
{"label":"David","value":"David"}],"EndPoint":"","OptionLabelColumn":"","OptionValueColumn":""}]
|
|
Radio |
[{"DisplayType":"radio","Values":[{"label":"RTP","value":"RTP"},{"label":"SJC","value":"SJC"},
{"label":"IND","value":"IND"}],"EndPoint":"","OptionLabelColumn":"","OptionValueColumn":""}]
|
|
Checkbox |
[{"DisplayType":"checkbox","Values":[{"label":"8080","value":"8080"},{"label":"9010","value":"9010"},
{"label":"8088","value":"8088"}],"EndPoint":"","OptionLabelColumn":"","OptionValueColumn":""}]
|
|
Multi-select |
[{"DisplayType":"multiselect","Values":[{"label":"Meraki-1","value":"Meraki-1"},
{"label":"APICEM-2","value":"APICEM-2"},{"label":"CDO-1","value":"CDO-1"}],
"EndPoint":"","OptionLabelColumn":"","OptionValueColumn":""}][{"DisplayType":"hidden"}][{"DisplayType":"textarea"}]
|
|
Password |
[{"DisplayType":"password"}]
|
|
Hidden |
[{"DisplayType":"hidden"}]
|
|
Textarea |
[{"DisplayType":"textarea"}]
|
Workflow-level Metadata Templates
Variable metadata can also be added at workflow-level. Below is an example:
[  {"AttributeName": "Employee", "EndPoint": "/api/v1/GlobalVariables/QueryTable?nameOrId=Employee&filterExpression=[Department] like '#Department#' ",
   "OptionLabelColumn": "FirstName", "OptionValueColumn": "Department"  },
   {"AttributeName": "FirstName", "EndPoint": "/api/v1/GlobalVariables/QueryTable?nameOrId=EmpService&filterExpression=[FirstName] like '*' ",
   "OptionLabelColumn": "FirstName",    "OptionValueColumn": "EmpID"  }]
Limitations
SAML Configurations
Note | The Prime Service Catalog supports only one IDP connection to authenticate a user at login. |
For detailed information on SAML Configurations, see the Configuring SSO Using SAML chapter of Cisco Prime Service Catalog Integration Guide.
SAML Configuration
This section provides information on how to configure the SAML configuration in the Prime Service Catalog:
Ensure to configure your IDP. Instructions to configure your chosen IDP is not in the scope of this document. Refer to the respective documentation for instructions.
| Step 1 | Login to Prime Service Catalog as an Administrator. | ||
| Step 2 | From the main menu, choose Advanced Configuration > Integrations, and click New Integrations. | ||
| Step 3 | Choose Single Sign-on and check the Enable SSO for SAML check-box. | ||
| Step 4 | (Optional) Choose Enable SAML Authentication for API to authenticate the APIs with SAML. For more information see section, Enabling SAML Authentication for API. | ||
| Step 5 | Click Save to save the changes. | ||
| Step 6 | Click Configure to proceed with SAML configuration. | ||
| Step 7 | In the
Configuration
Details
area, click
Configure
SAML >
Edit and
enter the following mandatory information:
These field are automatically populated with the Prime Service Catalog certificate and private key once the server boots up. However, you could use a CA or Self-Signed certificates generated from the Open-SSL or Java Key tool. Certificates should be in Bas-64 encoded format. | ||
| Step 8 | Click
Save.
| ||
| Step 9 | To download the
metadata, click
Configure
SAML >
Download MetaData.
Download metadata is an XML file that contains the SP entity ID and certificate. This metadata is used to register into the respective IDP so that IDP can identity the SP when the request comes from SP. |
Enabling SAML Authentication for API
Use Enable SAML Authentication for API option to restrict only SAML authentication on Prime Service Catalog REST APIs. If this setting is disabled and SAML is enabled for the Prime Service Catalog, then it means that user can make nsAPI calls by providing header authentication or SAML token based authentication.
Enable SAML Authentication for API option is available only when Enable SSO For SAML is checked. Click Save to save the new settings.
Configuring IDP Mappings
This section provides information on how to configure the SAML mappings in the Prime Service Catalog:
Download the IDP metadata from the IDP you prefer to use and keep it handy. For example, for ADFS, you can download the metadata from the URL: https://<server_domain_Name>/FederationMetadata/2007-06/FederationMetadata.xml.
| Step 1 | Login to Prime Service Catalog as an Administrator. |
| Step 2 | From the main menu, choose Advanced Configuration > Integrations, and click New Integrations. |
| Step 3 | Choose Single Sign-on and check the Enable SSO for SAML check-box. |
| Step 4 | Click Save to save the changes. |
| Step 5 | Click Configure to proceed with SAML configuration. |
| Step 6 | In the IDP Mappings panel, click Add IDP to add a mapping in SAML Dashboard. |
| Step 7 | Enter the following mandatory information in the Mapping Information page: |
| Step 8 | Enter the other
Mapping
Information. The attributes prefixed with an asterisk (*) are mandatory.
Additional (optional) attributes are available under
Optional
tab.
|
| Step 9 | Click Save. |
Note |
|
Refresh MetaData
Click the gear icon and select the option Refresh Metadata to refresh the node on cluster before it kicks off the scheduled refresh activity every 24 hours.
Update
From the gear icon select Update to edit the IDP mapping.
Managing AMQP Connections
The AMQP username and password along with other AMQP settings can be used to establish connection with the RabbitMQ server. From this release onwards, multiple AMQP Connections are supported. The AMQP Public Key is used to secure the sensitive field using the public key and this secure field will be decrypted by the external system by using the corresponding private key. The AMQP Secure String Format is the format in which the data is encrypted. The default secure string format is Bytes. For information on configuring AMQP tasks for publishing service request to an external system, see Cisco Prime Service Catalog Designer Guide.
- Connecting to RabbitMQ Server
- Managing AMQP Tasks and Queue on RabbitMQ Server
- Republishing AMQP Messages on RabbitMQ Server
Connecting to RabbitMQ Server
RabbitMQ connection is automatically added when Prime Service Catalog node is installed from the Virtual Appliance. From the Integrations module, you can establish communication with another RabbitMQ server by providing the AMQP credentials, under Advanced Configuration > Integrations, click New Integration and select AMQP. After you provide the details ensure to save your setting and click Test AMQP Connection to validate.
When you click Test AMQP Connection, the AMQP connection information is directly inserted into the database without going through the UI. The connection is saved only if AMQP connection authentication is successful. For more details, refer to REST-based nsAPIs section of the Integrating with AMQP chapter in Cisco Prime Service Catalog Integration Guide.
|
Field |
Description |
||
|---|---|---|---|
|
Identifier |
Enter a unique identifier for the connection. |
||
|
Name |
Enter a name for the connection. |
||
|
Host Name or IP Address |
Enter the IP address or the host name of the server where RabbitMQ is installed. If you are using cluster, enter the IP address or the host name of the server where RabbitMQ HA proxy is installed. |
||
|
Protocol |
Select the supported protocol from the drop-down, TCP or SSL. |
||
|
Port |
Displays the port number for RabbitMQ to connect with Prime Service Catalog. This field is auto populated based on the port number you select in AMQP Port Type. Default is 5672.
|
||
|
Root CA Certificate |
|
||
|
Skip Certificate Validation |
Check this check box to skip the certificate validation . |
||
|
User Name |
Enter the username to connect to the RabbitMQ server. |
||
|
Password |
Enter the password to connect to the RabbitMQ server. |
||
|
Virtual Host |
Enter the virtual host to connect to the RabbitMQ Server, either locally or via remote client. Default corresponds to '/' in RabbitMQ server. |
||
|
Public Key |
The AMQP Public Key is used to secure the sensitive field using the public key and this secure field is decrypted by the external system by using the corresponding private key. |
||
|
Secure String Format |
The AMQP Secure String Format is the format in which the data is encrypted. The default secure string format is Bytes. |
||
|
Server Down Notification |
Select an e-mail template to notify one or more users if the AMQP cluster nodes goes down when a service request is ordered. The system will generate e-mail notifications for any of the following tasks: pre, post, or main tasks. |
||
|
Recovery Interval |
The AMQP recovery Interval is the interval between recovery attempts in minutes for AMQP Connection. Default value is 5 and value range is 1 to 60. |
||
|
Inbound Queue |
Enter the queue to which Service Catalog listens to for inbound messages. For inbound messages a dedicated queue psc_inbound_queue is created in RabbitMQ. This name can be modified if required. |
||
|
Message Type |
Select the message type format from the drop-down. This defines the default message processing format for all the outbound and inbound messages for the particular connection. |
Note | Prime Service Catalog assumes that the RabbitMQ server is installed with a username and password. |
- If SSL is supported, the required configuration changes must be done and the ports must be enabled on SSL. For more information on enabling SSL for RabbitMQ server, refer to RabbitMQ documentation.
- AMQP tasks, configured in the Service Definition, use the connection information provided in the Administration module for message publishing. In addition, this information is used by the Overview API to return RabbitMQ details to the caller.
- When the particular connection is saved successfully, a persistent AMQP connection from Prime Service Catalog to the AMQP Server is established to do the following:
-
The AMQP Public Key created in the Administration > Settings > Public/Private Keys will be available for selection for every new AMQP connection that is created.
Managing AMQP Tasks and Queue on RabbitMQ Server
Prime Service Catalog includes an administrative utility that allows you access the AMQP tasks queue on RabbitMQ Server instead of managing them on the RabbitMQ Server. You can access this console from Administration > Utilities> AMQP Topics. You can view all the available tasks for the chosen connection and delete any unwanted tasks. You can filter the available tasks for the selected connection based on one of the following criteria:
-
All Exchanges: List all exchanges on RabbitMQ server
-
In Used Exchanges: Exchanges for service requests that are in progress or are in active state and exchanges at service definition time.
-
Orphan Exchanges. Exchanges that do not have references to any service definitions or are created by an external system.
Republishing AMQP Messages on RabbitMQ Server
Prime service Catalog offers an administrative utility that allows you to manually republish the AMQP messages to the RabbitMQ Server for the services that you have ordered.
Managing Webservices Connections
| Step 1 | Choose Advanced Configuration > Integrations, click New Integration and select Generic Web Services. | ||||||||||||||||||||||||||||||
| Step 2 | Enter the
following details to connect to the server.
| ||||||||||||||||||||||||||||||
| Step 3 | Click Save and click Test Connection to authenticate the credentials. |
Note |
|
Note | For more information on how to export and import of a service, see Exporting and Importing a Service in Cisco Prime Service Catalog 12.1 Designer Guide. |
Enabling Web Based SSH or RDP to VMs
Prime Service Catalog uses a Guacamole or VMRC server to enable web based SSH or RDP to application VMs launched during the application lifecycle process. These are optional components that you may choose to configure. Guacamole server supports VMs from both UCSD and CloudCenter. Whereas, VMRC supports VMs only from UCSD.
Once the parameters are updated, you can access all the imported VMs on the web browser using the Launch VM action in the Service Items page.
Integrating Guacamole Server with Prime Service Catalog
Apache Guacamole is a clientless remote desktop gateway. In order to access the VMs imported as part of UCSD or CloudCenter Integration, you must integrate with the Guacamole Server from the Integrations module. Once the Guacamole server is configured, you can launch the VMs on the web browser from the Service Items page.
To integrate Guacamole Server with Prime Service Catalog, configure Guacamole server using Prime Service Catalog Virtual Appliance. Once the configuration is complete, a Guacamole server integration appears in the Integrations module automatically. However, you can edit this connection or add a new Guacamole connection from the integrations UI. For information on configuration see section Installing Guacamole node in Cisco Prime Service Catalog Virtual Appliance Quick Start Guide.
Note | Apache Guacamole server can be configured only on Prime Service Catalog Virtual Appliance and is not supported on the standard installer. |
To add a new guacamole connection:
End user whose going to perform action called "Launch VM Action" should have permission on this Standard Table Data.
| Step 1 | Login to Prime Service Catalog as the Integrations Administrator user. |
| Step 2 | From the main menu, choose Advanced Configuration > Integrations and click New Integrations. |
| Step 3 | Select Generic Guacamole server. |
| Step 4 | Enter the details to connect to the Guacamole server. Click Create Integration. |
| Step 5 | Select the connection from the Integrations page to and choose Test Connectivity option from Manage Integration drop-down to authenticate the credentials. |
| Step 6 | Choose Refresh option from Manage Integration drop-down to update the parameters of the UCSD and CloudCenter connections. |
Configuring VMRC Server
VMware Remote Console (VMRC) is a remote desktop application that can be used in conjunction with VMware vSphere Web Client to access VMs. VMRC connects to an instance of Virtual Server and provides access to its virtual machines remotely. VMRC is supported only for UCS Director VMs.
To configure VMRC:
| Step 1 | Go to Service Item Manager module > Manage Standards. |
| Step 2 | Choose UCSD Cloud Information from the UCS Director group and enter the vSphere credentials. |
| Step 3 | Navigate to Design Service Items > UCS Director > Virtual Machine and select the Associated Services tab. |
| Step 4 | Add service called Launch VM Client. |
Once the connection is successful, go to Service Catalog > Service Items, for UCSD Virtual Machine a new option Launch VM is available. Click this option to launch the VM in VMRC console.
Integrating Apache Solr Search Platform
Solr search enhances the search user experience when configured on any Web site. Apache Solr can index and search multiple sites and return recommendations for related content based on the search query's taxonomy. Integrate Prime Service Catalog with Solr to improve the performance of the Service Catalog search functionality. Currently, Prime Service Catalog supports Solr integration only for Microsoft SQL Server databases.
For Prime Service Catalog to connect to Solr, you must first enable Solr from the Administration module. This will add the option to create a Solr connection on the Integrations module. Once a connection to a running Solr server has been added, Service Catalog search uses the Solr platform. If Solr search is disabled or Solr server is unreachable for some reason, Prime Service Catalog will automatically fall back to querying the database for search results.
Configuring Apache Solr
In preparation of Solr integration with Prime Service catalog, follow the below procedure to configure the Solr server.
To configure Apache Solr:
Ensure to create Solr Core before proceeding with the configuration.
| Step 1 | Stop the Apache Solr server | ||
| Step 2 | Copy the configuration files located under the <PSC_Install_Directory>/solr/sqlserver directory to the conf directory inside your Solr core location <Solr_Install_Directory>/server/solr/{core_name}/conf, overwriting the existing files. | ||
| Step 3 | Update the overwritten solr-data-config.xml file to specify the database connection details. | ||
| Step 4 | Start the Solr server. | ||
| Step 5 | Access the Solr administrative console and select the particular core from the Core Selector drop-down. Navigate to the Data Import tab, and click Execute to import the Service Catalog data into Solr. | ||
| Step 6 | Once the import is complete, navigate to the Query tab and query
the engine to ensure that the data is correctly populated.
|
Connecting to Solr Server
The Manage Integrations option for Solr allows you to review and edit the server connection details.
To integrate Prime Service Catalog with Solr:
-
Configure Apache Solr for Prime Service Catalog. For more information see section Configuring Apache Solr .
-
Enable Solr Search option from Administration > Settings > Common Settings.
| Step 1 | Login to Prime Service Catalog as Site Administrator user. |
| Step 2 | From the main menu, choose Advanced Configuration > Integrations and click New Integrations. |
| Step 3 | Select Apache Solr. |
| Step 4 | Specify the server details and the name of your Solr core. For https connections, import the root CA certificate of the Solr server. Copy the content of the root CA certificate of the server and paste it in the text area. If the root certificate is a chain of certificates, paste the content one below the other. The connection would fail, in case the SSL certificate of the server becomes invalid or untrusted. You could Skip the certificate validation by selecting the Skip Certificate Validation option. |
| Step 5 | Click Create Integration to connect to the Apache Solr server. |
 Feedback