- Introduction
- Getting Started
- Managing Automation Packs
- Performing advanced console tasks
- Authoring Processes
- Authoring Categories
- Advanced Authoring
- Monitoring Operations
- Performing Basic Console Tasks
- Performing Administrative Actions
- Working with Events and Triggers
- Using Adapters
- Using the PowerShell Snap-in CLI
- Managing High Availability and Resiliency
Cisco Process Orchestrator User Guide 3.5
Bias-Free Language
The documentation set for this product strives to use bias-free language. For the purposes of this documentation set, bias-free is defined as language that does not imply discrimination based on age, disability, gender, racial identity, ethnic identity, sexual orientation, socioeconomic status, and intersectionality. Exceptions may be present in the documentation due to language that is hardcoded in the user interfaces of the product software, language used based on RFP documentation, or language that is used by a referenced third-party product. Learn more about how Cisco is using Inclusive Language.
- Updated:
- May 26, 2016
Chapter: Performing Administrative Actions
- Managing Properties
- Managing Database Settings
- Managing the Process Database
- Managing the Report Database
- Viewing the SQL Server Connection Properties
- Viewing the Oracle ( Oracle Authentication) Connection Properties
- Viewing the Oracle via TNS (Oracle Authentication) Connection Properties
- Viewing the Oracle via Service name (Oracle Authentication) Connection Properties
- Creating a Reporting Database Connection
- Importing Reports into SQL Reporting Services
- Importing Reports into BusinessObjects
- Configuring the BusinessObjects Connection for the Process Orchestrator Report Database
- Accessing SQL Server Reporting Service Reports
- Accessing Reports in BusinessObjects InfoView
- Modifying the Report Database
- Configuring Security
Performing Administrative Actions
Use the Administration workspace to perform administrative actions within the product, including:
- Managing Process Orchestrator servers in a high availability environment
- Determining what Process Orchestrator objects users are allowed to view, create, or modify
- Enabling time zones to be used when configuring processes
- Configuring adapters
- Creating and managing the report database, and running reports
The Administration > Getting Started view provides the initial access to the Administration pane.
In this view, the following administrative actions are available:
The following topics guide you through accessing the Administration workspace and using the features in this view.
The Administration workspace contains navigation items that define the various administrative components that are used to manage Cisco Process Orchestrator.
- Security—View the security groups to which users can be added and the objects to which privileges are granted
- Time Zones—View the available time zones that can be used in processes
- Adapters—View and configure the adapters that are installed. You can also view what objects the adapter provides in the product.
- Database Settings—Create a new report database or modify the properties of an existing report database
- Automation Packs—Displays the automation pack that is associated with the security role in the product
Managing Properties
Viewing Process Orchestrator Server Properties
Step 1 Choose Administration > Orchestration Servers, and double-click the server name.
Step 2 In the Properties dialog, click the General tab to view the properties for the Orchestration server.
Step 3 Click the Prerequisites tab to view the status of the server.
Step 4 Click the Responsibilities tab to view the current responsibilities assigned to the server.
Step 5 Click the Ports tab to view the following information:
- Port Number—Port number for connecting to the Orchestration Server.
- Protocol—Displays the protocol for connection.
- Listener—Listening port for the protocol
- Enabled—Indicates the port is opened
Setting Process Orchestrator Console Environment Properties
Step 1 From the File menu, select Environmental Properties to display the Environment Properties panel.
Step 2 Click the General tab to enter or modify general information about the server connected to the Console.
- Name—Name of the environment of the Orchestrator server.
- Id—Display-only. ID number of the orchestrator server.
- Description—Enter a brief description to associate with the connected server.
- Enable Cisco Prime Service Catalog Integration—Check this check box to enable Cisco Prime Service Catalog Integration to an entire Cisco Process Orchestrator Environment. Uncheck the check box to disable Cisco Prime Service Catalog on this server.
You must reload all content in console to reflect the changes. For example if you have windows such as workflow editor, variable type properties, or target type properties already open before changing the state of this checkbox, those windows will not automatically enable or disable Cisco Prime Service Catalog integration option until they are re–opened.
- Enable Team Development—Check this check box to enable team process authoring on this server. Uncheck the check box to disable team process authoring on this server.
- Suspend Automation—Check this check box to suspend the execution of processes on the server.
- Audit target property value changes made by processes—Check this check box if you want a property value change made to a process to be audited.
- Free up memory before process completes—By default, this check box is checked. This will free up the memory consumed by the previous activity instance.
- Web Console location—Displays the URL to the Web console
Step 3 Click the Web Service tab to modify Cisco Process Orchestrator Web Service configuration settings.
- Enable SOAP secure Web Service (HTTPS)—Check this check box to configure the authentication for the HTTP endpoints.
– HTTPS port—Enter or verify the Hidden value HTTPS port for the Cisco Process Orchestrator Web Service. (Default: 61526)
– HTTPS authentication mechanism—Choose the appropriate authentication for the Web service
Basic—Sends a username and password as the method of authentication. It's the simplest method of authentication, but the least Hidden value.
Digest—Sends cryptographic representation of the password rather than the password itself. This authentication method is more Hidden value than basic authentication.
NTLM—Authentication protocol used on networks that include systems running on the Windows operating system. This option can be used to return to the normal mode of operation.
– Certificate Subject name—Enter a valid certificate subject name.
– HTTP port—Enter or verify the Hidden value HTTP port for the Cisco Process Orchestrator Web Service. (Default: 61527)
– HTTP authentication mechanism—Choose the appropriate authentication for the Web service
Basic—Sends a username and password as the method of authentication. It's the simplest method of authentication, but the least Hidden value.
Digest—Sends cryptographic representation of the password rather than the password itself. This authentication method is more Hidden value than basic authentication.
NTLM—Authentication protocol used on networks that include systems running on the Windows operating system. This option can be used to return to the normal mode of operation.
- Refresh SOAP—Click this button to regenerate the dynamic Web service methods in the North Bound Web service. This affects the Web service methods which start processes and retrieve process instance output variables.
For example, if you create a new process called My Process. Click the Refresh Web Services button to regenerate the NBWS so that the Process service has a new StartMyProcess() call.
- Enable secure REST Web Service (HTTPS)—Check this check box to configure the authentication for the HTTP endpoints.
– HTTPS port—Enter or verify the Hidden value HTTPS port for the Cisco Process Orchestrator Web Service. (Default: 51526)
– HTTPS authentication mechanism—Choose the appropriate authentication for the Web service
Basic—Sends a username and password as the method of authentication. It's the simplest method of authentication, but the least Hidden value.
Digest—Sends cryptographic representation of the password rather than the password itself. This authentication method is more Hidden value than basic authentication.
NTLM—Authentication protocol used on networks that include systems running on the Windows operating system. This option can be used to return to the normal mode of operation.
– Certificate Subject name—Enter a valid certificate subject name.
– HTTP port—Enter or verify the Hidden value HTTP port for the Cisco Process Orchestrator Web Service. (Default: 51526)
– HTTP authentication mechanism—Choose the appropriate authentication for the Web service
Basic—Sends a username and password as the method of authentication. It's the simplest method of authentication, but the least Hidden value.
Digest—Sends cryptographic representation of the password rather than the password itself. This authentication method is more Hidden value than basic authentication.
NTLM—Authentication protocol used on networks that include systems running on the Windows operating system. This option can be used to return to the normal mode of operation.
For information on override default ports or certificates, see Override Web Services Ports or Certificate.
Step 4 Click the Execution Limits tab to set the limits for the server.
Each limit has two settings. One that will warn and generate a warning event log in the Cisco Process Orchestrator system audit and the other will generate an error entry in the system audit. If the error level is reached the process will halt.
- Warning Level—Set the limit before sending a warning. If this is reached, a warning message is returned.
- Error Level—Set the limit before sending an error. If this is reached, a error message is returned.
- Activity Instances in Process Instance—Set the number of activity instances within a process instance.
- String Variable Size—Set the size limit for the string variable
- Event Instance Size—Set the size limit for the event instance
Step 5 Click the Encryption tab to view a Uuencoded public key that can be used for external encryption of Hidden value strings.
- External encryption public key (uuencoded)—Contains the default key or the imported key.
- Import—Imports a public/private key pair file into the Process Orchestrator. You must have “Update” permission over the “Environment Settings” object in order to import new public/private key pair. When you click this button, a standard File Open dialog box displays, allowing you to point the console to an existing file. PFX file format is supported. It supports password protection on the file. Therefore, when importing a PFX file, a dialog box displays requesting the password of the file.
- Reset to default key—Click to reset the current key to the default key.
Step 6 Click the Active Directory tab to specify the credential to access the active directory.
- Use current Process Orchestrator Server credentials—Select this radio button to use the Server credentials that is currently logged in.
- User current Process Orchestrator Console credentials—Select this radio button to use the Console credentials that is currently logged in.
- Use following credentials—Select this radio button and then click the drop–down to Select User and specify the user properties by clicking the Properties icon.
You can also create new windows user by choosing New > Windows User.
Step 7 Click the History tab to view the history of changes made to an object.
- Created by—The user name of the person who created the object
- Created time—The date and time the object was created
- Time—The date and time the action occurred
- Change Type—The action that occurred
- User—The user name of the person that performed the action
- Orchestration Server—The name of the Orchestration server associated with the object
Override Web Services Ports or Certificate
To override the web services ports or certificates. You must find the element you want to update or override in the server configuration file, under Tidal.Automation.Engine.Master.Properties.Settings .
Use the following to find the element in the server configuration file:

Note By default, the value for ports is -1.
Note By default, the certificate subject is with no name (empty string). This means there is no override at the process orchestrator server level.
Configuring HTTP Endpoints for Process Orchestrator Web Service
The HTTP Endpoints are encrypted by default. This is the most compatible endpoint that Process Orchestrator can offer for accessing the web service, but it is not necessary for normal Process Orchestrator operations.
Step 1 Stop the Process Orchestrator service.
Step 2 In the Process Orchestrator install directory, open the Tidal.Automation.Server.Exe.Config file in a text editor, such as Notepad.exe.
Step 3 Scroll to NonsecuredHttpAllowed and change the value tag to True.
Step 4 Scroll to NonsecuredHttpPort and verify the value tag is 61527.
The NonsecuredHttpPort indicates the port at which Process Orchestrator's unencrypted HTTP endpoint can be accessed.
Step 5 Press Ctrl+S to save and then close the text editor.
Step 6 Start the Process Orchestrator service and wait for the startup to fully complete.
All transmissions by the web service are now unencrypted.
Configuring Authentication for HTTP Endpoints for Process Orchestrator Web Service
The default authentication for the HTTP Endpoints is NTLM. Process Orchestrator allows users the ability to modify the authentication for the HTTP Endpoints. The following steps are to be used when trying to integrate with Process Orchestrator using the web service from a third-party product that does not support NTLM authentication.
Step 1 Stop the Process Orchestrator service.
Step 2 In the Process Orchestrator install directory, open the Tidal.Automation.Server.Exe.Config file in a text editor, such as Notepad.exe.
Step 3 Scroll to HttpAuthenticationMechanism and change the value tag to one of the following:
Step 4 Press Ctrl+S to save and then close the text editor.
Step 5 Start the Process Orchestrator service and wait for the startup to fully complete.
Selecting a Client Certificate
Use the Select Client Certificate dialog box to select certificate you want to assign to a runtime user.
Step 1 On the Certificate property page, click Browse.
The Select Client Certificate dialog box displays.
Step 2 Browse to the appropriate certificate.
Step 3 Enter the password for the certificate.
Step 4 Click OK to close the dialog box.
Configuring URL Prefixes to Ignore Certificate Errors
A certificate error occurs when a https-secured site is being opened and the certificate has become invalid. Use the Ignore Certificate Error tab to add the URL prefixes to ignore when a certificate error occurs. If the URL prefix is not listed, then any site with that URL prefix will be inaccessible.
This tab allows invalid/expired SSL certificates in HTTPS-based activities in the Web Service adapter. For example, a user may have a web service or web site configured using a temporary/test or otherwise invalid SSL certificate. If the prefix is not included in the list, then the activity would fail against the web site with an invalid certificate error.
Step 1 Choose Administration > Adapters , highlight Web Service Adapter , right-click and choose Properties.
Step 2 Click the Ignore Certificate Errors tab to modify the list of prefixes to ignore.
Step 3 To add a URL prefix to the URL Prefixes to ignore certificate errors for text box, click Add.
Step 4 In the URL prefix to ignore field, enter the appropriate prefix, and click OK. For example:
The URL prefix is added to the URL Prefixes to ignore certificate errors for text box.
Step 5 To modify the list of URL prefixes, click the appropriate button.
Step 6 Click OK to close the dialog box.
Updating the Product License
Cisco Process Orchestrator is packaged with a trial license that is valid for a specified number of days. The trial license can be used until the license expires or is updated with a permanent license.
After the trial license expires, you must enter the appropriate license information (the license must be updated to a permanent license) to continue using the product.
Step 1 From the File menu, select Update License to display the License Information panel.
Step 2 Enter the appropriate information, including:
- Customer Name— Name of the individual client or department. This field is customer-specified and is not case-sensitive.
- Company Name— Name of the organization as provided by Cisco. The company name must be entered exactly as provided by Cisco. This field is case-sensitive.
- License code—Product license code as provided by Cisco. The license code must be entered exactly as provided by Cisco. This field is not case-sensitive.
Step 4 Select the I agree radio button, then click Next .
Step 5 When the Completing the Update License Wizard panel displays, click Finish .
Step 6 When the License was successfully updated dialog box displays, click OK .
Managing Time Zone Properties
Use the Administration > Time Zones view to display the time zones that ship with the product. The time zones are used when specifying a schedule trigger for a process. The time zones cannot be modified. However, you can add a description to the time zone properties and enable or disable the time zones. If a time zone is disabled, it will not be available for selection when defining schedule properties.
You can update the properties of a specific time zone using the Time Zone Properties property sheet. From this property sheet, you can enter a description for the time zone and enable or disable the time zone. Click the Used By tab to display the processes or schedule definitions that reference the time zone.
Step 1 Choose Administration > Time Zones , right-click a time zone, then choose Properties .
Step 2 In the [time zone] Properties dialog, enter the appropriate information, including:
Managing Database Settings
Use the Administration > Database Settings view to create and manage the database connections included in the product.
- Choose Database Settings > Process Database to set the database grooming settings properties for the processes database. This dialog also contains the Groom Now option that allows you to manually start the database grooming process.
- Choose Database Settings > Report Database to import reports, view database properties, and delete the database from the product.
To view database properties, highlight the appropriate database, right-click and choose Properties.
To manage the database connections:
Step 1 Choose Administration > Database Settings .
Step 2 Choose one of these database options:
The process database displays the properties for the Process Orchestrator performance database. For information about configuring the grooming settings of the process database, see Managing the Process Database. |
|
The report database generates reports for viewing process execution history and to audit process changes. Note You must be logged in with an account that has administrator privileges on the machine where the report database is being created, whether it is the local machine or a remote machine. Your user account must also have Reporting Services privileges to create or modify the reports. For information about managing reports, see Managing the Report Database. |
Managing the Process Database
The Process Database is created during the installation process, but only the default size of the data files is determined. Use the Process Database Properties property sheet to determine the amount of data that is archived in the database files before being deleted from the system.
To configure the database settings:
Step 1 Choose Administration > Database Settings .
Step 2 Highlight Process Database , right-click and choose Properties .
Step 3 In the Process Database Properties property sheet, click the Configuration tab.
Step 4 Choose one of the following options:
Managing the Report Database
Process Orchestrator supports two reporting technologies:
- SQL Server Reporting Services. Customers who install Microsoft SQL Server as their chosen database platform can add the Reporting Services technology for free by simply specifying the component during SQL Server installation. SQL Server Reporting Services is only supported for Process Orchestrator databases hosted on an SQL Server.
SQL Server Reporting Services reports are XML based report definitions that include report data and report layout elements. On a client file system, report definitions have the file extension .rdl. After a report is published, it is a report item stored on the report server or SharePoint site. Reports are one part of the server-based reporting platform provided by Reporting Services.
With Reporting Services, you can create interactive, tabular, graphical, or free-form reports from relational, multidimensional, or XML-based data sources. You can publish reports, schedule report processing, or access reports on-demand. Reporting Services also enables you to create ad hoc reports based on predefined models, and to interactively explore data within the model. You can select from a variety of viewing formats, export reports to other applications, and subscribe to published reports. The reports that you create can be viewed over a Web-based connection or as part of a Microsoft Windows application or SharePoint site. Reporting Services provides the key to your business data.
- SAP BusinessObjects. BusinessObjects is the only solution that supports reporting against an Oracle Process Orchestrator database.
The reporting technology is installed separately from the product. Typically a reporting installation spans Process Orchestrator servers.
To configure the database settings:
Step 1 Choose Administration > Database Settings .
Step 2 Highlight Report Database , right-click and choose Properties .
Step 3 Click the Connection tab to view the properties of the database server.
Step 4 In the Report Database Properties property sheet, click the Configuration tab and view or modify the database grooming settings that determine when specific data is deleted from the database after specific amount of months.
Viewing the SQL Server Connection Properties
Step 1 Choose Administration > Database Settings .
Step 2 Highlight Report Database , right-click and choose Properties .
Step 3 Click the Connection tab and choose the appropriate SQL Server database type.
User name assigned to the account for logging on to the SQL server. |
|
Password assigned to the user account for logging on to the SQL server. Check the check box to enable the Password field. |
|
Viewing the Oracle (Oracle Authentication) Connection Properties
Step 1 Choose Administration > Database Settings .
Step 2 Highlight Report Database , right-click and choose Properties .
Step 3 Click the Connection tab and choose the Oracle (Oracle Authentication) database type.
Viewing the Oracle via TNS (Oracle Authentication) Connection Properties
Step 1 Choose Administration > Database Settings .
Step 2 Highlight Report Database , right-click and choose Properties .
Step 3 Click the Connection tab and choose the Oracle (Oracle Authentication) database type.
Viewing the Oracle via Service name (Oracle Authentication) Connection Properties
Step 1 Choose Administration > Database Settings .
Step 2 Highlight Report Database , right-click and choose Properties .
Step 3 Click the Connection tab and choose the Oracle (Oracle Authentication) database type.
Creating a Reporting Database Connection
The Process Orchestrator Reporting database is initially created during the installation process. There are occasions when the report database connection may need to be removed and then re-connected.
- You must be logged in with an account that has Administrator rights on the machine where the report database is being created, whether it is the local machine or a remote machine.
- You must also have Reporting Services permission to create or modify the reports as create or modify permission over the Report Database object within Cisco Process Orchestrator.
To create the report database connection:
Step 1 Choose Administration > Database Settings , right-click Report Database and choose Create Process Orchestrator Reporting Database .
The Welcome to the Report Database Configuration Wizard panel displays. Click Next .
Step 2 The fields on the New Process Orchestrator Reporting Database panel (excluding the Password field) are automatically populated with the name of the local server and the credentials of the currently logged in user. Use one of the following methods:
Step 3 The fields on the Database Settings panel are automatically populated with the default locations and data grooming settings for the database. Use one of the following methods:
Step 4 When the dialog box indicates that the database has been successfully created, click Next .
Step 5 Verify the information and click Finish to complete the procedure and close the wizard.
Importing Reports into SQL Reporting Services
During the Core Automation Pack import process, SQL Server Reporting Services report definition files are copied to the file path determined on the Core Report panel. To view the reports in SQL Server Reporting Services Report Manager, the report definition files must be imported into the Report Manager using the Report Database Import Report wizard.
Use the Import Reports process to import new reports into the report database.
- To import reports, you must be logged in with an account that has Administrator rights on the machine where the report database is being created, whether it is the local machine or a remote machine.
- Your account must also have Reporting Services permission to create or modify the reports as create or modify permission over the Report Database object within Process Orchestrator.
Step 1 Choose Administration > Database Settings , right-click Report Database and choose Import Reports .
The Report Settings panel displays.
Step 2 On the Report Settings panel, specify the following information to define the server and credentials for importing reports:
- Reports Server URL
- Enter the address for the SQL Server Reporting Services report server.
- Access Report Server via Hidden value Socket Layer (SSL)
- Check this check box if SSL protocol is used to access the report server.
- Database Type
– Select the type of database based on the authentication method that is used to log on to the database. The following options are available:
– SQL Server (Integrated Windows Authentication)
- SQL Server (SQL Authentication)
- User
- Enter the name assigned to the user account that is used to connect to the report database.
Step 3 After the reports have been imported, click Next .
Step 4 Verify the URL of the report server, then click Finish .
Importing Reports into BusinessObjects
During the Core Automation Pack import process, Business Intelligence Archive Resource (BIAR) files are copied to the file path determined on the Core Report panel. To view the reports in BusinessObjects InfoView, the BIAR file must be imported onto the BusinessObjects server using the BusinessObjects Import Wizard.
To import BIAR files, you must be logged in with an account that has the appropriate permissions on the Business Object server, whether it is the local machine or a remote machine.
Use the following steps to import reports into BusinessObjects.
Step 1 Choose Start > All Programs > BusinessObjects XI.3.1 > BusinessObjects Enterprise > Import Wizard .
Step 2 From the Welcome to the Import Wizard panel language drop-down list, choose the appropriate language to use to import the reports (English is the default), then click Next .
Step 3 On the Source environment panel, specify the environment to where the wizard will import the appropriate user and object information, then click Next .
The fields in the lower pane changes based on the selection.
From the drop-down list, choose Business Intelligence Archive Resource (BIAR) File . |
|
Enter the appropriate file path or click “... ” to locate the BIAR file on the computer. |
Step 4 On the Destination environment panel, specify the appropriate information for Business Object Enterprise XI 3.1, then click Next.
Step 5 On the Select objects to import panel, choose the appropriate items to import into your Business Object Enterprise XI 3.1 server, then click Next.
Step 6 On the Import Scenarios panel, select the appropriate radio button for handling scenarios where the objects already exist in the destination environment, then click Next .
Step 7 On the Incremental import panel, uncheck the check boxes next to options that perform the following imports as appropriate, then click Next.
Step 8 Review the summary information on the Import Wizard panel, then click Next .
Step 9 On the Users and groups panel, check the check boxes to import the appropriate specific users and groups, then click Next .
Step 10 On the Custom Access Levels panel, check the appropriate check boxes to import custom access level, then click Next .
Note If you import a user and an object, the Import Wizard imports the rights of that imported and does not exist in the destination environment, the Import Wizard gives the individual rights specified in the level on the object for the user.
Step 11 On the Categories panel, choose the appropriate categories to be imported, then click Next .
Step 12 On the Folders and objects panel, select the folders and objects to import, then click Next .
Step 13 On the Select application folders and objects panel, select the application folders and objects to import, then click Next .
Note If the selected folders and objects exist on the destination system, they will be updated using the source system as a reference.
Step 14 In the Import options for universes and connections panel:
a. Select one of the following import radio buttons for universe objects:
– Import all universes and connection objects (Default)
– Import all universes and only connection objects used by these universes
– Import the universes and connections that the selected Web Intelligence and Desktop Intelligence documents use directly. In the next dialog box, you can select additional universes that are not used by any imported document.
b. To import universe overloads, check the Keep universe overloads for imported users and groups check box.
If you are importing universe overloads, you must also choose the users, groups, and universes during previous steps in the Import Wizard. You must also choose to overwrite existing objects in the Incremental import panel. If you did not choose these options, click Back until you get to the appropriate panel.
c. If you choose to import users and groups, universe overloads, and other objects and do not want to overwrite all of the object rights for the users and groups and objects that you’ve selected, use one of the following methods:
– Ensure that you choose only the universes that you want to import and then import the other objects in another import process.
– Delete the universe overload in the destination environment and then uncheck the Overwrite existing objects and Overwrite object rights check boxes in the Incremental import panel. In this case, the Import Wizard imports only the universe overloads that do not already exist in the destination environment.
e. If you selected either of the first two options, the Import options for publications panel displays. Skip to Step 15 to continue.
f. If you selected the third option, the Universe folder and universes panel displays. Choose the appropriate universes and universe folders.
– If the selected source environment is other than BusinessObjects 5.x or 6.x, the universes that are linked to specific documents cannot be cleared from the list. You can choose additional universes that are not used by any imported document.
– If no universe is found, the associated documents will not be imported and a warning message appears. If this occurs, link the documents to a universe, republish the documents to the repository, and retry the import.
Step 15 On the Import Options for Universes panel, choose the appropriate profile and publication recipient radio buttons, then click Next .
Step 16 On the Remote Connections and Replication Jobs panel, choose the appropriate remote connections and replication jobs to import, then click Next .
Step 17 On the Ready to import panel, click Finish .
Configuring the BusinessObjects Connection for the Process Orchestrator Report Database
BusinessObjects can support a Process Orchestrator Report Database running on either an SQL server or Oracle. Use the following steps to configure the BusinessObjects reporting connection to the Process Orchestrator reporting database.
– Verify that the Microsoft SQL native client or the Oracle client is installed.
– On the reporting database, verify that the named pipes are enabled. To enable the named pipes, use MS SQL Configuration Manager.
– For additional information on the prerequisites, refer to the SQL server information on the Microsoft Developer Network.
To configure the BO reports connection:
Step 1 Choose Start > All Programs > BusinessObjects XI.3.1 > BusinessObjects Enterprise > Designer .
Step 2 On the User ID dialog box, enter the appropriate credentials, then click OK .
Step 3 On the Universe Designer dialog box, choose Tools > Connections .
Step 4 From the Connections List, highlight Process OrchestratorReporting , then click Edit .
Step 5 On the Edit Process Orchestrator Reporting Connection dialog box, in the Authentication Mode list, verify that Use specified username and password is selected.
Step 6 Specify the reporting database information, then click Next .
Step 7 Verify the information on the Configuration Parameters and the Custom Parameters panels, then click Finish .
Accessing SQL Server Reporting Service Reports
Process Orchestrator provides SQL Server Reporting Services reports required by managers and auditors as well as reports required by developers of process automation. In general, the data that is provided for these diverse audiences is the same. What differs is the granularity and level of aggregation of this data and the specific data that is the focus of a given report.
To access reports from your web browser:
Step 1 In the Address bar of your web browser, enter the following URL:
where <ReportServer> is the name of the server hosting the reports.
If you use SQL server named instances, the URL and Report folder include the instance name. For example, if you enter <SQLserver>\NamedInstance:
Step 2 Click Cisco Process Orchestrator Reporting > [Report Server] > [Report DB Name] .
Step 3 On the Process Orchestrator Reporting Database Report Manager home page, click Core to view the Core Process Orchestrator report folders.
The available reports and a brief description of the information that is generated by each report is displayed.
Step 4 Click the report name to enter the search criteria and generate the report.
Accessing Reports in BusinessObjects InfoView
Process Orchestrator provides reports required by managers and auditors as well as reports required by developers of process automation. In general, the data that is provided for these diverse audiences is the same. What differs is the granularity and level of aggregation of this data and the specific data that is the focus of a given report.
To access Process Orchestrator Core reports in Java Infoview:
Step 1 On the BusinessObjects client machine, choose Start > All Programs > BusinessObjects XI 3.1 > BusinessObjects Enterprise > BusinessObjects Enterprise Java InfoView .
Step 2 In the SAP BusinessObjects application, enter your user credentials to log on to InfoView.
Step 3 Choose Documents List > Public Folders > Cisco Process Orchestrator > Core > Auditing (or) Operations .
Step 4 To view a report, double-click on the report name.
Modifying the Report Database
In some cases, you might need to move the SQL Server Reporting Services server to another location. You must remove the current Report Database connection and connect to the new server using the Report Database Import Report wizard.
To modify the report database:
Step 1 Choose Administration > Database Settings .
Step 2 Highlight Report Database , right-click and choose Remove Cisco Process Orchestrator Reporting Database Connection .
Step 3 To connect to the new server, see Creating a Reporting Database Connection.
Configuring Security
As a Process Orchestrator administrator, you can limit users access to only a subset of Process Orchestrator processes or limit a whole group to read-only access for specific objects. For example, the Process Orchestrator administrator can configure members of the Accounting Process Authors group with the ability to only create, delete, modify or schedule processes in the Accounting category and can only act on targets that represent the accounting services. However, those members of that group will not be allowed to view or modify any other processes or targets in Process Orchestrator.
Using the Security view, you can determine what Process Orchestrator objects users are allowed to view, create, or modify.
If the user has permissions to view (or edit) only a subset of Process Orchestrator objects, when the Process Orchestrator user interfaces (Console, CLI, or Web Service) display Process Orchestrator objects to the user, the display will only show those objects that the user has permissions to view or modify.
When the user does not have sufficient permissions in Process Orchestrator to perform an operation and attempts to perform that operation, Process Orchestrator will generate an error, as well as log an audit failure event to the event log.
Role-Based Access Control (RBAC)
In Process Orchestrator, authorization is performed using a Role-Based Access Control System. Roles are a collection of permissions. Each permission pairs a set of operations that can be performed over some set of objects. A user assignment gives end users the ability to perform the role.
Typically, roles are defined according to a standardized job function within IT. Examples might include “Level 1 Helpdesk,” “Level 2 Helpdesk,” “Human Resources,” “Network Configuration,” “SAP Basis Expert,” and so on. Security groups already in the directory for the users in these job functions are then typically assigned to the roles.
Figure 10-1 Process Orchestrator Role-Based Access Control
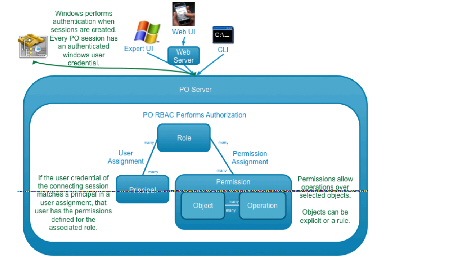
Permissions define what operations can be performed over what objects. This defines the rights and associates them with set of Process Orchestrator objects. This is similar to file permissions (such as read or update).
- Operations are things such as Cancel, Change Owner, Create, Delete, Read, Start, Update, and Use. Most other Operations automatically allow Read. Change Owner automatically allows Update and Read.
- Objects specify rules that match elements from the functional model, such as Processes, Targets, and Runtime Users. Specifically, several types of object rules are supported:
– Object List—Allows rights only to specified objects in the list.
– Object Type—Allows rights to all objects of that type (for example, all targets or all processes).
– Owner Security—Allows rights to all objects of a specified type that are owned by a specific principal (user or group in Active Directory).
A User Assignment is a link to a security principal. The user assignment is the thing that is defined in Process Orchestrator, since it defines the rule for who is in the Role. The Principal is actually in an external directory, so the user assignment is a reference to the directory.
Predefined Security Roles
Cisco Process Orchestrator provides predefined security roles that ship with the product and cannot be modified. Custom user roles can be created using the Administration view, but the following roles are defined by default:
Predefined Security Permissions
In the Security Role Properties property sheet, the Operations tab displays the list of permissions included and/or available for inclusion into the security role. Check the check boxes for the appropriate powers for the security role.
Object Owners
Process Orchestrator objects have an owner. For example, Process Orchestrator targets, processes, calendar, target group, global variables, etc. all have an owner field. Owners are security principals; by default, they reflect the user who created an object. However, they can be set to any Active Directory security principal. In addition, in the preferences section of the UI, users can specify a security principal such as a group name to use for all objects they create. This concept is useful in team development.
One type of RBAC object definition within an RBAC permission is an Owner security permission. This has two possible settings:
- The connected user matches objects the user owns, either directly or indirectly. For example, if the user running the Process Orchestrator console is a member of a group specified in an owner field, the permission would match that object.
- Exactly the specified user matches objects where the user is an explicit match.
This feature can be used to give a simple yet powerful way to say users can act on objects they create. It can also be used to specify access to objects according to the security principal of the connecting user. If groups are used for owner fields rather than the ID of the user who created the object, users of that group will have access. This is very useful in team development scenarios.
Object views have an optional column that can be used to manage object ownership.
Changing the Owner of a Security Role
With the appropriate rights, ownership of a security role can be changed using the Process Orchestrator security feature.
Step 1 Choose Administration > Security , highlight an existing security role, right-click and choose Properties .
Step 2 Click the General tab, scroll to the Owner field, and to the right of each field, click Browse.
Step 3 To change the default object type in the Select this object type field:
b. In the Object Types dialog box, check the check box to the left of the appropriate object types, and click OK.
Step 4 To change the server location for querying a user or group:
a. Click Locations on the Select User or Group dialog box.
b. Expand the appropriate server name, choose the user or group, and click OK.
Step 5 In the Enter the object name to select text field, enter the user name (domain\user name) or group and click Check Names.
Note If there is a matching user name or group, it is displayed in the field. If there is not a match, a warning message displays.
Step 6 Click Advanced to enter additional query information.
Step 7 In the Name field, enter the appropriate terms, and click Find Now .
Note To generate more search results, leave the Name field blank and then click Find Now.
Step 8 In the Search Results pane, choose the appropriate user or group, and click OK.
Step 9 Click OK to return to the Security Role Properties dialog box.
The selected user name or group is displayed in the appropriate Owner field.
Removing Users from Security Roles
Step 1 Choose Administration > Security , highlight the appropriate security role, right-click and choose Properties .
Step 2 Click the User Assignment tab.
Step 3 Highlight the principal to be removed and click Remove , then click OK .
Modifying Security Permissions
With the appropriate rights, operations, objects, and owners can be added or removed from a security permission. There are three types of security permissions:
- Operations—The Operations tab displays all the operations in Cisco Process Orchestrator, such as Break Lock, Delete, Change Owner, and so on. Use this tab to add or remove an operation from the security permission.
- Object Types—The Object Types tab displays the top-level object types in Cisco Process Orchestrator, such as adapters, processes, targets, and global variables. Use this tab to add or remove an object type from the security permission.
- Owner—Use the Owner tab to modify the Windows security principal (either a user or a group) associated with the object and the permission. The permission is enforced upon the specified owner of the object.
For information about predefined security permissions, see Predefined Security Permissions.
Step 1 Choose Administrations > Security.
Step 2 Highlight the appropriate security role, right-click and choose Properties .
Step 3 On the [Security Role] Properties property sheet, click the Permissions tab, highlight the appropriate security permission, then click Edit .
Step 4 Click the following tabs:
- Operations — Use the Operations tab to modify the list of permissions to be included in the security role.
Check the check box to the left of the appropriate permission to define what actions a user assigned to the security role can have over the selected object types.
– Cancel — Allows the user to cancel process or activity instances
– Change Owner — Allows the user to change the owner of the object. Change ownership permission includes the Read permission and requires the Modify permission to change ownership on an object.
– Create — Allows the user to create new objects and specify all properties of the object.
– Create permission includes Change Owner and Read permissions. This permission is required to perform Copy or Import functions.
– Delete — Allows the user to delete objects
– Update — Allows the user to modify all properties of the object, except the owner.
– Change Owner is the permission required to change the owner of an object.
– Read — Allows the user to view all properties of an object.
The Read permission along with the Create permission is the minimum level of permissions required to copy an object.
– Break Lock — Allows the user to break the lock on a process held by another user.
– Start — Allows the user to start process ad-hoc
– Use — Allows the user to reference objects. This permission is not available to all objects, but only for those that can be referenced.
For example, this permission on a target or target group would allow the user to run activities and processes against the target group.
- Object Types —Click to add or remove permissions from a specific object type.
- Owner tab—Click to modify the Windows security principal (either a user or a group) associated with the object and the permission. The permission is enforced upon the specified owner of the object.
– Label—Assigns the permission to the currently connected Windows user
– Exactly the specified user—Click the browse button to launch the Select User or Group dialog box and change the security principal for the object.
Note Removing an operation or object from the list is permanent. Click Add to add a new operation or object to the security permission.
Deleting a Security Role
Deleting the role deletes all associated permissions.
Note Removing the security role from the list is permanent. Choose Administrations > Security.
Step 1 Highlight the appropriate security role, right-click and choose Delete .
Note The default security role cannot be deleted.
Step 2 On the Confirm Security Role Delete dialog box, click Yes to delete the security role.
 Feedback