Cisco Configuration Professional Express 3.4 Administration Guide
Bias-Free Language
The documentation set for this product strives to use bias-free language. For the purposes of this documentation set, bias-free is defined as language that does not imply discrimination based on age, disability, gender, racial identity, ethnic identity, sexual orientation, socioeconomic status, and intersectionality. Exceptions may be present in the documentation due to language that is hardcoded in the user interfaces of the product software, language used based on RFP documentation, or language that is used by a referenced third-party product. Learn more about how Cisco is using Inclusive Language.
- Updated:
- April 28, 2015
Chapter: Installing CCP Express
Downloading Cisco CP Express Admin View
To download Cisco CP Express Admin View, perform these steps:
Step 1 Launch the browser, and go to the following web link:
https://software.cisco.com/download/release.html?i=!y&mdfid=281795035&softwareid=282159854&release=3.4&os
Step 2 When a login page appears, enter your login credentials and click
Log In
.
If you do not have login credentials, register and obtain login credentials. Click
Register
(at the top of the page) to complete the registration process, and then return to this page. The Download Software page displays.
Step 3 From the Download Software page, choose the release to download.
Step 4 Select the Cisco Configuration Professional Express 3.4 package link and click Download to download the compressed file, cisco-config-pro-exp-admin-k9-3_4-en.zip to the system.
This compressed file contains the Cisco CP Express Admin View installation files.
Installing Cisco CP Express Admin View
To install the Cisco CP Express Admin View on the router’s flash memory, perform these steps:
Step 1 Download the compressed file, cisco-config-pro-exp-admin-k9-3_4-en.zip from the following web link:
https://software.cisco.com/download/release.html?i=!y&mdfid=281795035&softwareid=282159854&release=3.4&os

Note For Japanese version, download cisco-config-pro-exp-admin-k9-3_4-ja.zip then follow the remaining instructions.
Step 2 Extract the compressed file, cisco-config-pro-exp-admin-k9-3_4-en.zip file into the system.
The cisco-config-pro-exp-admin-k9-3_4-en.zip file contains these files: ccpexpressAdmin3_4_en.tar and ccpExpress_ap_express-security_en.shtml.gz.
Step 3 Using an FTP or TFTP server, copy the extracted files onto the router’s flash memory.
Step 4 Specify the IP address of the FTP or TFTP server, as shown in this example:
where xxx.xxx.xxx.xxx is the IP address of the FTP or TFTP server.
Step 5 Specify the name of the source file that is to be copied onto the router’s flash memory, as shown in this example:
Step 6 Specify the name of the destination file, as shown in this example:
Step 7 Extract the ccpexpressAdmin31.tar file onto the router’s flash memory, as shown in this example:
Step 8 If the router supports a wireless configuration, configure it, thus:
a. Telnet to the WAP of the router, as shown in this example:
b. Verify that the ccpExpress_ap_express-security_en.shtml.gz file already exists on the “ap-801-” or “ap802-” folder of the wireless flash memory, as shown in this example:
Note By default, the ccpExpress_ap_express-security_en.shtml.gz file is available on some versions of the IOS AP.
c. If the ccpExpress_ap_express-security_en.shtml.gz file is not available on the wireless flash memory, proceed to step d. Otherwise proceed to step 9.
d. Copy the ccpExpress_ap_express-security_en.shtml.gz file to the wireless flash, as shown in this example:
Note Ensure that you copy the ccpExpress_ap_express-security_en.shtml.gz file to that folder with a name beginning with the prefix “ap-801-” or “ap802-”, and ensure that this folder contains the html/level/15/ sub-directories under it.
e. Specify the IP address of the FTP or TFTP server, as shown in this example:
where xxx.xxx.xxx.xxx is the IP address of the FTP or TFTP server.
f. Specify the name of the source file that is to be copied onto the router’s flash memory, as shown in this example:
g. Specify the name of the destination file, as shown in this example:
Step 9 After the installation is complete, delete the ccpexpressAdmin_3_4_en.tar file from the flash memory of the router, as shown in this example:
Step 10 Press Return to confirm the deletion.
Using Cisco CP Express Admin View
This section contains the following:
Prerequisites
Before you launch the Cisco CP Express Admin View, gather the following information from your service provider:
- Virtual Channel Identifier (VCI) and Virtual Path Identifier (VPI) values if you use Asymmetric Digital Subscriber Line (ADSL) as a Wide Area Network (WAN)
- Username and password to access the Password Authentication Protocol (PAP) or Challenge Handshake Authentication Protocol (CHAP) if you use ADSL as a WAN
- (Optional) Primary and secondary DNS IP addresses
- IP subnet
- DHCP pool network
Enabling HTTP Server or Secure Server
Cisco CP Express can be accessed in one of these two modes:
- Secure mode—Uses HTTPS and requires HTTP Secure Server to be enabled on the router.
- Non-Secure mode—Uses HTTP and requires HTTP Server to be enabled on the router.
Note By default, the HTTP and secure server are enabled for factory fresh routers.
You must enable HTTP or HTTPS before launching the Cisco CP Express.
The login to the http service must point to the local database on the router, because the Cisco CP Express End User View is configured locally on the router.
1. To configure the router as an http server, execute this command:
2. To configure the router as an https server, execute this command:
Prerequisite
Before you proceed with launching the Cisco CP Express Admin View, you must complete tasks detailed in the Cisco CP Express Quick Start Guide at the following web link:
http://www.cisco.com/c/en/us/td/docs/net_mgmt/cisco_configuration_professional_express/v3_2/guides/quick_start/CiscoCPExpress_qsg.html
Procedure
To launch the Cisco CP Express Admin View, perform these steps:
Step 2 In the address bar, type the IP address of the router where Cisco CP Express Admin View is installed.
For example, type http://10.10.10.1 or https://10.10.10.1
Step 3 Specify the username and the password of the router.

If you are using the router for the first time, use the one-time username and password (by default, cisco/cisco) configured for the router.
Step 4 Click
Log In
.
The Cisco CP Express Admin View launches and is ready for use.
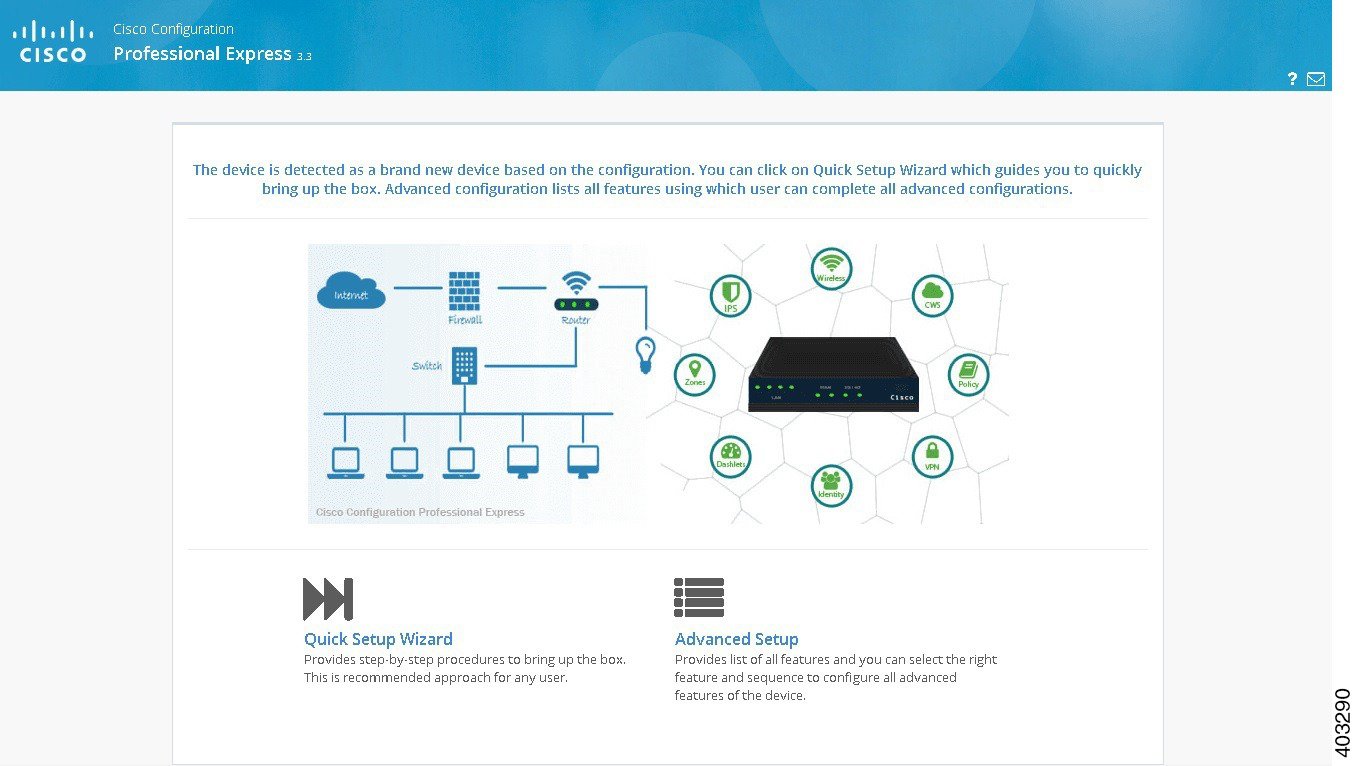
Figure 2 shows the Cisco CP Express Admin View page.
Figure 2 The Cisco CP Express Admin View page
 Feedback