- Preface
- Broadband Access Center Overview
- Broadband Access Center Architecture
- Configuration Workflows
- CPE Provisioning Overview
- Configuration Templates Management
- DOCSIS Configuration
- PacketCable Voice Configuration
- CableHome Configuration
- Managing Broadband Access Center
- Monitoring Broadband Access Center
- Understanding the Administrator User Interface
- Using the Administrator User Interface
- Configuring Broadband Access Center
- Support Tools and Advanced Concepts
- Database Management
- Troubleshooting Broadband Access Center
- Alert and Error Messages
- Option Support
- Mapping PacketCable DHCP Options to BAC Properties
- Provisioning API Use Cases
- FAQs on Provisioning Broadband Access Center
- Glossary
- Index 4.1
Cisco Broadband Access Center Administrator Guide 4.1
Bias-Free Language
The documentation set for this product strives to use bias-free language. For the purposes of this documentation set, bias-free is defined as language that does not imply discrimination based on age, disability, gender, racial identity, ethnic identity, sexual orientation, socioeconomic status, and intersectionality. Exceptions may be present in the documentation due to language that is hardcoded in the user interfaces of the product software, language used based on RFP documentation, or language that is used by a referenced third-party product. Learn more about how Cisco is using Inclusive Language.
- Updated:
- April 30, 2010
Chapter: PacketCable Voice Configuration
PacketCable Voice Configuration
This chapter describes the tasks you must perform to bring a PacketCable voice deployment into service.
This chapter contains information on these variants of PacketCable:
•![]() PacketCable Secure eMTA Provisioning
PacketCable Secure eMTA Provisioning
•![]() PacketCable Basic eMTA Provisioning
PacketCable Basic eMTA Provisioning
For information that will help you solve issues in a PacketCable voice technology deployment, see Troubleshooting PacketCable eMTA Provisioning.
This chapter assumes that you are familiar with the contents of the PacketCable Multimedia Terminal Adapter (MTA) Device Provisioning Specification, PKT-SP-PROV1.5-I03-070412. For details, see the PacketCable website.
PacketCable Secure eMTA Provisioning
This section deals exclusively with Secure PacketCable voice provisioning. PacketCable Secure is designed to minimize the possibility of theft of telephony service, malicious disruption of service, and so on. PacketCable Secure depends on the Kerberos infrastructure to mutually authenticate the MTA and the provisioning system; in Cisco BAC, the Key Distribution Center (KDC) functions as the Kerberos server. SNMPv3 is also used to secure the conversation between the MTA and the provisioning system.
Cisco BAC PacketCable Secure Provisioning Flow
All PacketCable provisioning flows are defined as a sequence of steps.
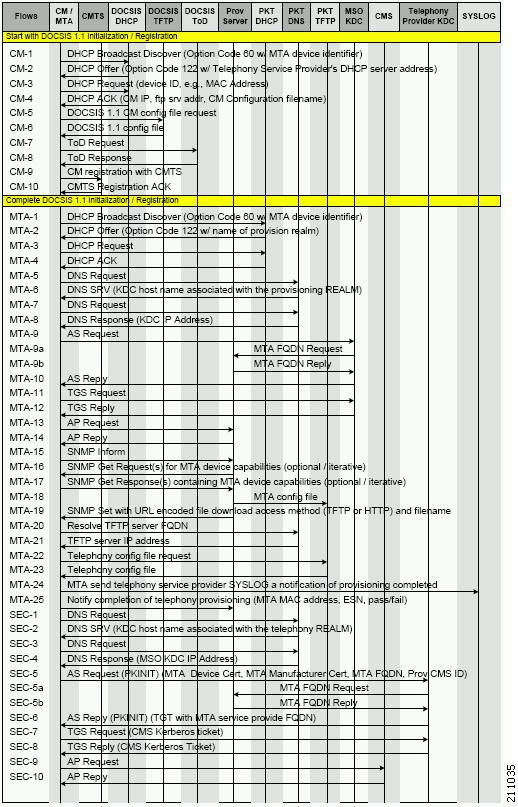
Figure 7-1 illustrates the Secure provisioning flow for PacketCable eMTAs.
Figure 7-1 Embedded-MTA Secure Power-On Provisioning Flow

Note ![]() It is strongly recommended that you use a protocol analyzer (protocol sniffer) with the ability to capture data packets to understand exactly which step is failing.
It is strongly recommended that you use a protocol analyzer (protocol sniffer) with the ability to capture data packets to understand exactly which step is failing.
In addition, the content of the KDC log file is critical to understanding the root cause of any KDC failure.
When diagnosing problems in provisioning an embedded Multimedia Terminal Adapters (eMTA), the flow description in Table 7-1 helps identify which step in the PacketCable provisioning flow is failing.
|
|
|
|
|---|---|---|
CM-1 |
DHCP Broadcast Discover |
This is similar to the DOCSIS cable modem (CM) boot flow for DHCPv4 or DHCPv6 with DHCP options added to provide the MTA with a list of PacketCable DHCP servers from which the MTA is allowed to accept DHCP offers. |
CM-2 |
DHCP Offer |
|
CM-3 |
DHCP Request |
|
CM-4 |
DHCP Ack |
|
CM-5 |
DOCSIS 1.1 CM Config File Request |
|
CM-6 |
DOCSIS 1.1 Config File |
|
CM-7 |
ToD Request |
|
CM-8 |
ToD Response |
|
CM-9 |
CM Registration with CMTS (cable modem termination system) |
|
CM-10 |
CMTS Registration Ack |
|
MTA-1 |
DHCP Broadcast Discover |
Using DHCP, the MTA announces itself as a PacketCable MTA and provides information on the capabilities and provisioning flows it supports (Secure, Basic, and so on.). The MTA also obtains addressing information and DHCP Option 122. DHCP Option 122 contains the PacketCable provisioning server address and the security realm name. This information is used to allow the MTA to contact the KDC and provisioning server. Some key troubleshooting hints are: • • • • • If a packet trace reveals that the MTA is cycling between steps MTA-1 and MTA-2, there could be a problem with the configuration of DHCP Option 122 (realm name or provisioning server FQDN suboptions), DHCP Option 12 (hostname), or DHCP Option 15 (domain name). |
MTA-2 |
DHCP Offer |
|
MTA-3 |
DHCP Request |
|
MTA-4 |
DHCP Ack |
|
MTA-5 |
DNS Request |
MTA uses the security realm name (delivered within DHCP Option 122) to perform a DNS SRV lookup on the KDC service and then resolves the KDC IP address. Some key troubleshooting hints are: • • • |
MTA-6 |
DNS Srv |
|
MTA-7 |
DNS Request |
|
MTA-8 |
DNS Response |
|
MTA-9 |
AS Request |
The AS-REQ request message is used by the KDC to authenticate the MTA. Some key troubleshooting hints are: • • |
MTA-9a |
MTA FQDN Request |
The KDC extracts the MTA MAC address from the MTA certificate and sends it to the provisioning server for validation. If the provisioning server has the FQDN for that MAC address, it is returned to the KDC. The KDC then compares the FQDN received from the MTA to the FQDN received in the FQDN-REP reply message. Some key troubleshooting hints are: • • |
MTA-9b |
MTA FQDN Reply |
|
MTA-10 |
AS Reply (AS-REP) |
The KDC grants a provisioning service ticket to the MTA and also sends the Service Provider, Local System Provider (optional), and KDC certificate to the MTA. The MTA then verifies if the certificates sent by the KDC chain to the Service Provider Root certificate stored in the MTA. If these certificates do not chain, the MTA loops back to step MTA-1 of the provisioning flow. See Using the PKCert.sh Tool, for additional information on the KDC.cer file. A key troubleshooting hint: Verify if the KDC log files show that the AS-REP message was sent to the device. If a packet trace reveals the MTA is cycling between steps MTA-1 and MTA-10, there is a problem with the service provider certificate chain. |
MTA-11 |
TGS Request |
The MTA receives either a service ticket or a ticket-granting-ticket (TGT) following step MTA-10. If the MTA had obtained a TGT instead of a service ticket in step MTA-10, it contacts the ticket-granting-server (KDC) to obtain a service ticket. |
MTA-12 |
TGS Reply |
The KDC sends a service ticket in the TGS Reply to the MTA. |
MTA-13 |
AP Request (AP-REQ) |
The MTA presents the ticket (received at step MTA-10) to the provisioning server specified by DHCP Option 122. |
MTA-14 |
AP Reply (AP-REP) |
The provisioning server uses the KDC shared secret to decrypt the AP-REQ, validates the provisioning server ticket presented by the MTA, and sends AP-REP with SNMPv3 keys. SNMPv3 is now authenticated and (optionally) encrypted. |
MTA-15 |
SNMP Inform |
The MTA signals to the provisioning server that it is ready to receive provisioning information. |
MTA-16 |
SNMP Get Request |
SNMPv3—If the provisioning server (DPE) requires additional device capabilities, it sends the MTA one or more SNMPv3 Get requests to obtain the required information on MTA capability. The provisioning server (DPE) may use a GetBulk request to request a bulk of information in a single message. |
MTA-17 |
SNMP Get Response |
SNMPv3—The MTA sends to the provisioning server (DPE) a response for each GetRequest that contains information on MTA capabilities requested in step MTA-16. |
MTA-18 |
MTA Config file |
Using information made available in steps MTA-16 and MTA-17, the provisioning server (DPE) determines the contents of the MTA configuration data file. |
MTA-19 |
SNMP Set |
SNMPv3—The provisioning server performs an SNMPv3 Set to the MTA containing the URL for the MTA configuration file, encryption key for the file, and the file hash value. |
MTA-20 |
Resolve TFTP Server FQDN |
DNS Request—If the URL-encoded access method contains an FQDN instead of an IPv4 address, the MTA uses the DNS server of the service provider network to resolve the FQDN into an IPv4 address of the TFTP server or the HTTP server. |
MTA-21 |
TFTP Server IP Address |
DNS Response—The DNS server returns the IPv4 IP address of the service provider network as requested in step MTA-20. |
MTA-22 |
Telephony Config File Request |
The MTA proceeds to download the VoIP configuration file from the specified TFTP server. Note that Cisco BAC integrates the TFTP server into the DPE component. |
MTA-23 |
Telephony Config File |
|
MTA-24 |
MTA Send |
The MTA optionally sends a syslog notification to the service provider that provisioning is complete. |
MTA-25 |
Notify completion of telephony provisioning |
The MTA signals to the provisioning server if the new configuration is acceptable. |
SEC-1 to SEC-10 |
These steps are the post-MTA provisioning security flow and are not applicable to |
|
KDC in Provisioning PacketCable Secure eMTAs
PacketCable Secure depends on the Kerberos infrastructure to mutually authenticate the MTA and the provisioning system; in Cisco BAC, the KDC functions as the Kerberos server. For an overview of the KDC component, see Key Distribution Center.
For important information related to the KDC, see:
Default KDC Properties
The KDC has several default properties that are populated during a Cisco BAC installation into the BPR_HOME/kdc/solaris/kdc.ini properties file. You can edit this file to change values as operational requirements dictate.
Note ![]() Be careful in editing the kdc.ini file if operational requirements dictate. Incorrect values can render the KDC inoperative. If you do make changes, restart the KDC.
Be careful in editing the kdc.ini file if operational requirements dictate. Incorrect values can render the KDC inoperative. If you do make changes, restart the KDC.
The default properties are:
•![]() interface address—Specifies the IP address of the local Ethernet interface that you want the KDC to monitor for incoming Kerberos messages.
interface address—Specifies the IP address of the local Ethernet interface that you want the KDC to monitor for incoming Kerberos messages.
For example:
interface address = 10.10.10.1
•![]() FQDN—Identifies the fully qualified domain name (FQDN) on which the KDC is installed.
FQDN—Identifies the fully qualified domain name (FQDN) on which the KDC is installed.
For example:
FQDN = kdc.example.com
Note ![]() You must enter the interface address and FQDN values through the KDC Realm Name screen during installation. For specific information, see the Installation and Setup Guide for Cisco Broadband Access Center 4.1.
You must enter the interface address and FQDN values through the KDC Realm Name screen during installation. For specific information, see the Installation and Setup Guide for Cisco Broadband Access Center 4.1.
•![]() maximum log file size—Specifies the maximum size, in kilobytes, that the log file that is generated by the KDC can reach. The KDC creates a new log file only when the current file reaches this maximum size.
maximum log file size—Specifies the maximum size, in kilobytes, that the log file that is generated by the KDC can reach. The KDC creates a new log file only when the current file reaches this maximum size.
For example:
maximum log file size = 1000
•![]() n saved log files—Defines the number of old log files that the KDC saves. The default value is 7. You can specify as many as required.
n saved log files—Defines the number of old log files that the KDC saves. The default value is 7. You can specify as many as required.
For example:
n saved log files = 10
•![]() log debug level—Specifies the logging level for the log file.
log debug level—Specifies the logging level for the log file.
log debug level = 5
Table 7-2 describes the available logging levels for the KDC log file.
•![]() minimum (maximum) ps backoff—Specifies the minimum (or maximum) time, in tenths of a second, that the KDC waits for Cisco BAC to respond to the FQDN-Request.
minimum (maximum) ps backoff—Specifies the minimum (or maximum) time, in tenths of a second, that the KDC waits for Cisco BAC to respond to the FQDN-Request.
For example:
minimum ps backoff = 150
Using the sample values shown above, a sample INI file might contain data similar to that shown in Example 7-1.
Example 7-1 Sample kdc.ini Configuration File
interface address = 10.10.10.1
FQDN = kdc.example.com
maximum log file size = 1000
n saved log files = 10
log debug level = 5
minimum ps backoff = 150
maximum ps backoff = 300
You can set the times for both minimum and maximum ticket duration to effectively smooth out excessive numbers of ticket requests that could occur during deployment. This setting is beneficial given that most deployments occur during traditional working hours and excessive loading might, from time to time, adversely affect performance.
Note ![]() Shortening the ticket duration forces the MTA to authenticate to the KDC much more frequently. While this results in greater control over the authorization of telephony endpoints, it also causes heavier message loads on the KDC and increased network traffic. In most situations, the default setting is appropriate and should not be changed.
Shortening the ticket duration forces the MTA to authenticate to the KDC much more frequently. While this results in greater control over the authorization of telephony endpoints, it also causes heavier message loads on the KDC and increased network traffic. In most situations, the default setting is appropriate and should not be changed.
•![]() maximum ticket duration—Defines the maximum duration for tickets generated by the KDC. The default unit is hours; however, by appending an m or d, you can change the units to minutes or days, respectively.
maximum ticket duration—Defines the maximum duration for tickets generated by the KDC. The default unit is hours; however, by appending an m or d, you can change the units to minutes or days, respectively.
The default value is 168, or seven days. We recommend that you not change this value because this value is the length of time required to conform to the PacketCable security specification.
For example:
maximum ticket duration = 168
•![]() minimum ticket duration—Defines the minimum duration for tickets generated by the KDC. The default unit is hours; however, by appending an m or d, you can change the units to minutes or days, respectively.
minimum ticket duration—Defines the minimum duration for tickets generated by the KDC. The default unit is hours; however, by appending an m or d, you can change the units to minutes or days, respectively.
The default value is 144, or six days. We recommend that you not change this value.
For example:
minimum ticket duration = 144
KDC Certificates
The certificates used to authenticate the KDC are not shipped with Cisco BAC. You must obtain the required certificates from Cable Television Laboratories, Inc. (CableLabs), and the content of these certificates must match the content in the certificates installed in the MTA.
Note ![]() Certificates are required for the KDC to function.
Certificates are required for the KDC to function.
You can use the PKCert tool to install, and manage, the certificates that the KDC requires for its operation. The PKCert tool installs the CableLabs service provider certificates as certificate files. For information on running this tool, see Using the PKCert.sh Tool.
The PKCert tool is available only if you have installed the KDC component.
KDC Licenses
Obtain a KDC license from your Cisco representative and then install it in the correct directory.
To install a KDC license file:
Step 1 ![]() Obtain your license file from your Cisco representative.
Obtain your license file from your Cisco representative.
Step 2 ![]() Log in to the Cisco BAC host as root.
Log in to the Cisco BAC host as root.
Step 3 ![]() Copy the license file to the BPR_HOME/kdc directory.
Copy the license file to the BPR_HOME/kdc directory.

Do not copy KDC license files between operating systems because the transfer process may damage the file.
Step 4 ![]() To restart the KDC server and make the changes take effect, run the bprAgent restart kdc command from the /etc/init.d directory.
To restart the KDC server and make the changes take effect, run the bprAgent restart kdc command from the /etc/init.d directory.
Multiple Realm Support
The Cisco BAC KDC supports the management of multiple realms, for which a complete set of valid PacketCable X.509 certificates and a KDC private key must be present. These certificates must reside in the BPR_HOME/kdc/solaris/packetcable/certificates directory.
Cisco BAC supports additional realms by installing subdirectories under the BPR_HOME/kdc/solaris/packetcable/certificates directory; each subdirectory is named after a specific realm.
Table 7-3 lists the different certificates, with their corresponding filenames, that must be available in the BPR_HOME/kdc/solaris/packetcable/certificates directory.
The primary realm is set up during installation of the KDC component. For the primary realm, the KDC certificate (KDC.cer) resides in the BPR_HOME/kdc/solaris/packetcable/certificates directory. Its private key (KDC_private_key.pkcs8) resides in the BPR_HOME/kdc/solaris/ directory.
To configure additional realms, follow this procedure, which is described in detail subsequently.
Step 1 ![]() Locate the directory containing your KDC certificates.
Locate the directory containing your KDC certificates.
Step 2 ![]() Create a subdirectory under the directory that stores the KDC certificates.
Create a subdirectory under the directory that stores the KDC certificates.
Note ![]() Match the name of the subdirectory with the name of the specific realm. Use only uppercase characters while naming the subdirectory.
Match the name of the subdirectory with the name of the specific realm. Use only uppercase characters while naming the subdirectory.
Step 3 ![]() Place the KDC certificate and the private key for the realm in the subdirectory you created.
Place the KDC certificate and the private key for the realm in the subdirectory you created.
Step 4 ![]() If the new realm is not chained to the same service provider as the KDC certificate, include all additional higher-level certificates that differ from those in the certificates directory.
If the new realm is not chained to the same service provider as the KDC certificate, include all additional higher-level certificates that differ from those in the certificates directory.
Note ![]() Because all realms must be rooted in the same certificate chain, a KDC installation supports only one locale (North American PacketCable or Euro PacketCable) at any given point.
Because all realms must be rooted in the same certificate chain, a KDC installation supports only one locale (North American PacketCable or Euro PacketCable) at any given point.
Table 7-4 describes the directory structure and files for a primary realm (for example, CISCO.COM) with two secondary realms (for example, CISCO1.COM and CISCO2.COM). The structure assumes that the higher-level certificates are similar for the primary realm and its secondary realms.
Configuring the KDC for Multiple Realms
This section describes the workflow to configure the KDC for multiple realms. Before proceeding, complete the installation of the RDU, the DPE, and the Network Registrar extensions. For installation instructions, see the Installation and Setup Guide for the Cisco Broadband Access Center 4.1.
The following workflow uses sample realms and directories to describe how to configure the KDC for multiple realms. The primary realm used here is CISCO.COM and its secondary realms are CISCO1.COM and CISCO2.COM.
The setup featured in the following workflow provisions three MTAs: a Motorola SBV 5120 MTA, a Linksys CM2P2 MTA, and an SA WebStar DPX 2203 MTA. Each MTA is to be provisioned in one realm: the Motorola in the CISCO.COM realm, the Linksys MTA in the CISCO1.COM realm, and the SA MTA in the CISCO2.COM realm.
Note ![]() The sample output shown in the following procedure has been trimmed for demonstration purposes.
The sample output shown in the following procedure has been trimmed for demonstration purposes.
To configure the KDC for multiple realms:
Step 1 ![]() Verify the following configuration settings on the DPE:
Verify the following configuration settings on the DPE:
a. ![]() Ensure that PacketCable services are enabled, by using the show run command.
Ensure that PacketCable services are enabled, by using the show run command.
To enable the PacketCable service, use the service packetcable 1..1 enable command.
For example:
dpe# show run
aaa authentication local
dpe port 49186
dpe provisioning-group primary default
service packetcable 1 enable
snmp-server location equipmentrack5D
snmp-server udp-port 8001
tacacs-server retries 2
tacacs-server timeout 5
For details on the commands, see the Cisco Broadband Access Center DPE CLI Reference 4.1.
b. ![]() Ensure that the security used for communication between the KDC and a DPE is set, by using the show run command.
Ensure that the security used for communication between the KDC and a DPE is set, by using the show run command.
To generate and set the security key, use the service packetcable 1..1 registration kdc-service-key command.
For example:
dpe# show run
aaa authentication local
debug dpe events
dpe port 49186
service packetcable 1 enable
service packetcable 1 registration kdc-service-key <value is set>
snmp-server contact AceDuffy-ext1234
For details on the commands, see the Cisco Broadband Access Center DPE CLI Reference 4.1.
c. ![]() Ensure that the security key that permits secure communication between the DPE and the RDU for PacketCable SNMPv3 cloning is set. Again, use the show run command. To generate and set the security key, use the service packetcable 1..1 snmp key-material command.
Ensure that the security key that permits secure communication between the DPE and the RDU for PacketCable SNMPv3 cloning is set. Again, use the show run command. To generate and set the security key, use the service packetcable 1..1 snmp key-material command.
For example:
dpe# show run
aaa authentication local
debug dpe events
dpe port 49186
service packetcable 1 enable
service packetcable 1 registration kdc-service-key <value is set>
service packetcable 1 snmp key-material <value is set>
For details on the commands, see the Cisco Broadband Access Center DPE CLI Reference 4.1.
Note ![]() When you configure PacketCable settings on the DPE, ensure that you run the dpe reload command so that the changes take effect.
When you configure PacketCable settings on the DPE, ensure that you run the dpe reload command so that the changes take effect.
Step 2 ![]() In the configuration file for Network Registrar extension points (cnr_ep.properties), verify if the /ccc/kerb/realm parameter is set to the primary realm; in this case, CISCO.COM. To do this, run the more cnr_ep.properties command from the BPR_HOME/cnr_ep/conf directory.
In the configuration file for Network Registrar extension points (cnr_ep.properties), verify if the /ccc/kerb/realm parameter is set to the primary realm; in this case, CISCO.COM. To do this, run the more cnr_ep.properties command from the BPR_HOME/cnr_ep/conf directory.
For example:
/opt/CSCObac/cnr_ep/conf# more cnr_ep.properties
#DO NOT MODIFY THIS FILE.
#This file was created on Wed, March 4 06:34:34 EDT 2007
/rdu/port=49187
/rdu/fqdn=dpe4.cisco.com
/cache/provGroupList=Default
/cnr/sharedSecret=fggTaLg0XwKRs
/pktcbl/enable=enabled
/ccc/tgt=01
/ccc/kerb/realm=CISCO.COM
/ccc/dhcp/primary=10.10.0.1
/ccc/dns/primary=10.10.0.1
Step 3 ![]() Enable static routes appropriately to ensure Cisco BAC connectivity with devices behind the CMTS.
Enable static routes appropriately to ensure Cisco BAC connectivity with devices behind the CMTS.
Step 4 ![]() Create DNS realm zones for the DNS server that is listed in the cnr_ep.properties file. You can add zones using the Network Registrar administrator user interface via the DNS > Forward Zones > List/Add Zones pages.
Create DNS realm zones for the DNS server that is listed in the cnr_ep.properties file. You can add zones using the Network Registrar administrator user interface via the DNS > Forward Zones > List/Add Zones pages.
Note ![]() Ensure that the zones you add contain the SRV record and the DNS `A' record for the KDC server, and that the SRV record for each zone (in this example, CISCO.COM, CISCO1.COM, and CISCO2.COM) point to one KDC.
Ensure that the zones you add contain the SRV record and the DNS `A' record for the KDC server, and that the SRV record for each zone (in this example, CISCO.COM, CISCO1.COM, and CISCO2.COM) point to one KDC.
For information on configuring zones from the administrator user interface, see the User Guide for Cisco Network Registrar 7.1.
Step 5 ![]() Configure certificates using the PKCert.sh tool.
Configure certificates using the PKCert.sh tool.
a. ![]() Create directories for the secondary realms (for example, CISCO1.COM and CISCO2.COM) under BPR_HOME/kdc/solaris/packetcable/certificates.
Create directories for the secondary realms (for example, CISCO1.COM and CISCO2.COM) under BPR_HOME/kdc/solaris/packetcable/certificates.
For example:
/opt/CSCObac/kdc/solaris/packetcable/certificates# mkdir CISCO1.COM
/opt/CSCObac/kdc/solaris/packetcable/certificates# mkdir CISCO2.COM
For more information on creating directories, see Solaris documentation.
b. ![]() Create a directory in which you can copy the following certificates:
Create a directory in which you can copy the following certificates:
–![]() CableLabs_Service_Provider_Root.cer
CableLabs_Service_Provider_Root.cer
–![]() Service_Provider.cer
Service_Provider.cer
–![]() Local_System.cer
Local_System.cer
–![]() MTA_Root.cer
MTA_Root.cer
–![]() Local_System.der
Local_System.der
For example:
# cd /var
# mkdir certsInput
Note ![]() The /certsInput directory created under the /var directory is only an example. You can choose to create any directory under any other directory. For more information on creating directories, see Solaris documentation.
The /certsInput directory created under the /var directory is only an example. You can choose to create any directory under any other directory. For more information on creating directories, see Solaris documentation.
c. ![]() Copy the certificates mentioned in the previous step into the directory that you created. For information on copying files, see Solaris documentation on the cp command.
Copy the certificates mentioned in the previous step into the directory that you created. For information on copying files, see Solaris documentation on the cp command.
d. ![]() Copy the following certificates to the BPR_HOME/kdc/solaris/packetcable/certificates directory:
Copy the following certificates to the BPR_HOME/kdc/solaris/packetcable/certificates directory:
–![]() CableLabs_Service_Provider_Root.cer
CableLabs_Service_Provider_Root.cer
–![]() Service_Provider.cer
Service_Provider.cer
–![]() Local_System.cer
Local_System.cer
–![]() MTA_Root.cer
MTA_Root.cer
For information on copying files, see Solaris documentation on the cp command.
e. ![]() Create the KDC certificate and its associated private key for the primary realm.
Create the KDC certificate and its associated private key for the primary realm.
For example:
# ./opt/CSCObac/kdc/PKCert.sh -c "-s /var/certsInput -d /var/certsOutput
-k /var/certsInput/Local_System.der -c /var/certsInput/Local_System.cer
-r CISCO.COM -n 100 -a bactest.cisco.com -o"
Pkcert Version 1.0
Logging to pkcert.log
Source Directory: /var/certsInput
Destination Directory: /var/certsOutput
Private Key File: /var/certsInput/Local_System.der
Certificate File: /var/certsInput/Local_System.cer
Realm: CISCO.COM
Serial Number: 100
DNS Name of KDC: bactest.cisco.com
WARNING - Certificate File will be overwritten
SP Cert subject name: C=US,O=CableLabs\, Inc.,OU=ABC Cable Company,CN=Shared-01
CableLabs Local System CA
File written: /var/certsOutput/KDC_private_key.pkcs8
File written: /var/certsOutput/KDC_private_key_proprietary.
File written: /var/certsOutput/KDC_PublicKey.der
File written: /var/certsOutput/KDC.cer
KDC Certificate Successfully Created at /var/certsOutput/KDC.cer
Copy KDC.cer to the KDC certificate directory (i.e. /opt/CSCObac/kdc/solaris/
packetcable/certificates)
Copy KDC_private_key.pkcs8 to the KDC platform directory (i.e. /opt/CSCObac/
kdc/solaris)
Copy KDC_private_key_proprietary. to the KDC platform directory (i.e. /opt/CSCObac/
kdc/solaris)
For more information on the tool, see Using the PKCert.sh Tool.
f. ![]() Copy the KDC.cer file to the KDC certificate directory (BPR_HOME/kdc/solaris/
Copy the KDC.cer file to the KDC certificate directory (BPR_HOME/kdc/solaris/
packetcable/certificates). For information on copying files, see Solaris documentation on the cp command.
g. ![]() Copy the private key KDC_private_key.pkcs8 to the KDC platform directory (BPR_HOME/
Copy the private key KDC_private_key.pkcs8 to the KDC platform directory (BPR_HOME/
kdc/solaris). For information on copying files, see Solaris documentation on the cp command.
h. ![]() Copy the private key KDC_private_key_proprietary. to the KDC platform directory (BPR_HOME/
Copy the private key KDC_private_key_proprietary. to the KDC platform directory (BPR_HOME/
kdc/solaris). For information on copying files, see Solaris documentation on the cp command.
i. ![]() Create the KDC certificate and its associated private key for the secondary realm; in this case, CISCO1.COM.
Create the KDC certificate and its associated private key for the secondary realm; in this case, CISCO1.COM.
For example:
# ./opt/CSCObac/kdc/PKCert.sh -c "-s /var/certsInput -d /var/certsOutput
-k /var/certsInput/Local_System.der -c /var/certsInput/Local_System.cer
-r CISCO1.COM -n 100 -a bactest.cisco.com -o"
Pkcert Version 1.0
Logging to pkcert.log
Source Directory: /var/certsInput
Destination Directory: /var/certsOutput
Private Key File: /var/certsInput/Local_System.der
Certificate File: /var/certsInput/Local_System.cer
Realm: CISCO.COM
Serial Number: 100
DNS Name of KDC: bactest.cisco.com
WARNING - Certificate File will be overwritten
SP Cert subject name: C=US,O=CableLabs\, Inc.,OU=ABC Cable Company,CN=Shared-01
CableLabs Local System CA
File written: /var/certsOutput/KDC_private_key.pkcs8
File written: /var/certsOutput/KDC_private_key_proprietary.
File written: /var/certsOutput/KDC_PublicKey.der
File written: /var/certsOutput/KDC.cer
KDC Certificate Successfully Created at /var/certsOutput/KDC.cer
Copy KDC.cer to the KDC certificate directory (i.e. /opt/CSCObac/kdc/solaris/
packetcable/certificates)
Copy KDC_private_key.pkcs8 to the KDC platform directory (i.e. /opt/CSCObac/
kdc/solaris)
Copy KDC_private_key_proprietary. to the KDC platform directory (i.e. /opt/CSCObac/
kdc/solaris)
For more information on the tool, see Using the PKCert.sh Tool.
j. ![]() Copy KDC.cer to the secondary realm directory; for example, the /CISCO1.COM directory under BPR_HOME/kdc/solaris/packetcable/certificates. For information on copying files, see Solaris documentation on the cp command.
Copy KDC.cer to the secondary realm directory; for example, the /CISCO1.COM directory under BPR_HOME/kdc/solaris/packetcable/certificates. For information on copying files, see Solaris documentation on the cp command.
k. ![]() Copy the private key KDC_private_key.pkcs8 to the secondary realm directory; for example, the /CISCO1.COM directory under BPR_HOME/kdc/solaris/packetcable/certificates. For information on copying files, see Solaris documentation on the cp command.
Copy the private key KDC_private_key.pkcs8 to the secondary realm directory; for example, the /CISCO1.COM directory under BPR_HOME/kdc/solaris/packetcable/certificates. For information on copying files, see Solaris documentation on the cp command.
l. ![]() Copy the private key KDC_private_key_proprietary. to the secondary realm directory; for example, the /CISCO1.COM directory under BPR_HOME/kdc/solaris/packetcable/certificates. For information on copying files, see Solaris documentation on the cp command.
Copy the private key KDC_private_key_proprietary. to the secondary realm directory; for example, the /CISCO1.COM directory under BPR_HOME/kdc/solaris/packetcable/certificates. For information on copying files, see Solaris documentation on the cp command.
m. ![]() Create the KDC certificate and its associated private key for the secondary CISCO2.COM realm.
Create the KDC certificate and its associated private key for the secondary CISCO2.COM realm.
For example:
# ./opt/CSCObac/kdc/PKCert.sh -c "-s /var/certsInput -d /var/certsOutput
-k /var/certsInput/Local_System.der -c /var/certsInput/Local_System.cer
-r CISCO2.COM -n 100 -a bactest.cisco.com -o"
Pkcert Version 1.0
Logging to pkcert.log
Source Directory: /var/certsInput
Destination Directory: /var/certsOutput
Private Key File: /var/certsInput/Local_System.der
Certificate File: /var/certsInput/Local_System.cer
Realm: CISCO.COM
Serial Number: 100
DNS Name of KDC: bactest.cisco.com
WARNING - Certificate File will be overwritten
SP Cert subject name: C=US,O=CableLabs\, Inc.,OU=ABC Cable Company,CN=Shared-01
CableLabs Local System CA
File written: /var/certsOutput/KDC_private_key.pkcs8
File written: /var/certsOutput/KDC_private_key_proprietary.
File written: /var/certsOutput/KDC_PublicKey.der
File written: /var/certsOutput/KDC.cer
KDC Certificate Successfully Created at /var/certsOutput/KDC.cer
Copy KDC.cer to the KDC certificate directory (i.e. /opt/CSCObac/kdc/solaris/
packetcable/certificates)
Copy KDC_private_key.pkcs8 to the KDC platform directory (i.e. /opt/CSCObac/
kdc/solaris)
Copy KDC_private_key_proprietary. to the KDC platform directory (i.e. /opt/CSCObac/
kdc/solaris)
For information on the tool, see Using the PKCert.sh Tool.
n. ![]() Copy KDC.cer to the secondary realm directory; for example, the /CISCO2.COM directory under BPR_HOME/kdc/solaris/packetcable/certificates. For information on copying files, see Solaris documentation on the cp command.
Copy KDC.cer to the secondary realm directory; for example, the /CISCO2.COM directory under BPR_HOME/kdc/solaris/packetcable/certificates. For information on copying files, see Solaris documentation on the cp command.
o. ![]() Copy the private key KDC_private_key.pkcs8 to the secondary realm directory; for example, the /CISCO2.COM directory under BPR_HOME/kdc/solaris/packetcable/certificates. For information on copying files, see Solaris documentation on the cp command.
Copy the private key KDC_private_key.pkcs8 to the secondary realm directory; for example, the /CISCO2.COM directory under BPR_HOME/kdc/solaris/packetcable/certificates. For information on copying files, see Solaris documentation on the cp command.
p. ![]() Copy the private key KDC_private_key_proprietary. to the secondary realm directory; for example, the /CISCO2.COM directory under BPR_HOME/kdc/solaris/packetcable/certificates. For information on copying files, see Solaris documentation on the cp command.
Copy the private key KDC_private_key_proprietary. to the secondary realm directory; for example, the /CISCO2.COM directory under BPR_HOME/kdc/solaris/packetcable/certificates. For information on copying files, see Solaris documentation on the cp command.
Step 6 ![]() Generate PacketCable service keys by using the KeyGen tool.
Generate PacketCable service keys by using the KeyGen tool.
Note ![]() Ensure that the password that you use to generate a service key matches the password that you set on the DPE by using the packetcable registration kdc service-key command.
Ensure that the password that you use to generate a service key matches the password that you set on the DPE by using the packetcable registration kdc service-key command.
For example:
# /opt/CSCObac/kdc/keygen bactest.cisco.com CISCO.COM changeme
# /opt/CSCObac/kdc/keygen bactest.cisco.com CISCO1.COM changeme
# /opt/CSCObac/kdc/keygen bactest.cisco.com CISCO2.COM changeme
For details, see Using the KeyGen Tool.
Step 7 ![]() Ensure that the service keys you generated in Step 6 exist in the BPR_HOME/kdc/solaris/keys directory.
Ensure that the service keys you generated in Step 6 exist in the BPR_HOME/kdc/solaris/keys directory.
For example:
/opt/CSCObac/kdc/solaris/keys# ls -l
total 18
-rw-r--r-- 1 root other 2 Nov 4 09:44 krbtgt,CISCO1.COM@CISCO1.COM
-rw-r--r-- 1 root other 2 Nov 4 09:44 krbtgt,CISCO2.COM@CISCO2.COM
-rw-r--r-- 1 root other 2 Nov 4 09:44 krbtgt,CISCO.COM@CISCO.COM
-rw-r--r-- 1 root other 2 Nov 4 09:44 mtafqdnmap,bactest.cisco.com@CISCO1.COM
-rw-r--r-- 1 root other 2 Nov 4 09:44 mtafqdnmap,bactest.cisco.com@CISCO2.COM
-rw-r--r-- 1 root other 2 Nov 4 09:44 mtafqdnmap,bactest.cisco.com@CISCO.COM
-rw-r--r-- 1 root other 2 Nov 4 09:44 mtaprovsrvr,bactest.cisco.com@CISCO1.COM
-rw-r--r-- 1 root other 2 Nov 4 09:44 mtaprovsrvr,bactest.cisco.com@CISCO2.COM
-rw-r--r-- 1 root other 2 Nov 4 09:44 mtaprovsrvr,bactest.cisco.com@CISCO.COM
For more information, see Solaris documentation.
Step 8 ![]() Ensure that the various certificates and service keys exist in the BPR_HOME/kdc directory.
Ensure that the various certificates and service keys exist in the BPR_HOME/kdc directory.
For example:
/opt/CSCObac/kdc# ls
PKCert.sh internal keygen lib pkcert.log solaris bacckdc.license
/opt/CSCObac/kdc# cd /internal/bin
/internal/bin# ls
kdc runKDC.sh shutdownKDC.sh
# cd /opt/CSCObac/kdc/lib
# ls
libgcc_s.so.1 libstdc++.so.5 libstlport_gcc.so
# cd /opt/CSCObac/solaris/logs
# ls
kdc.log kdc.log.1
# cd /opt/CSCObac/solaris
# ls
logs kdc.ini packetcable KDC_private_key_proprietary.
# cd keys
# ls
krbtgt,CISCO1.COM@CISCO1.COM
krbtgt,CISCO2.COM@CISCO2.COM
krbtgt,CISCO.COM@CISCO.COM
mtafqdnmap,bactest.cisco.com@CISCO1.COM
mtafqdnmap,bactest.cisco.com@CISCO2.COM
mtafqdnmap,bactest.cisco.com@CISCO.COM
mtaprovsrvr,bactest.cisco.com@CISCO1.COM
mtaprovsrvr,bactest.cisco.com@CISCO2.COM
mtaprovsrvr,bactest.cisco.com@CISCO.COM
# cd ./solaris/packetcable/certificates
# ls
KDC.cer
Local_System.cer
CableLabs_Service_Provider_Root.cer MTA_Root.cer
CISCO1.COM Service_Provider.cer
CISCO2.COM
# cd ./solaris/packetcable/certificates/CISCO1.COM
# ls
KDC.cer
KDC_private_key_proprietary.
# cd ./solaris/packetcable/certificates/CISCO2.COM:
# ls
KDC.cer
KDC_private_key_proprietary.
For more information, see Solaris documentation.
Step 9 ![]() Restart the KDC.
Restart the KDC.
For example:
# /etc/init.d/bprAgent restart kdc
For more information, see Using the Cisco BAC Process Watchdog from the Command Line.
Step 10 ![]() Configure the Cisco BAC administrator user interface for multiple realms.
Configure the Cisco BAC administrator user interface for multiple realms.
a. ![]() Add DHCP Criteria for the secondary realm; in this case, CISCO1.COM.
Add DHCP Criteria for the secondary realm; in this case, CISCO1.COM.
For example:
1. ![]() From Configuration > DHCP Criteria > Manage DHCP Criteria, click the Add button.
From Configuration > DHCP Criteria > Manage DHCP Criteria, click the Add button.
2. ![]() The Add DHCP Criteria page appears.
The Add DHCP Criteria page appears.
3. ![]() Enter cisco1 in the DHCP Name field.
Enter cisco1 in the DHCP Name field.
4. ![]() Click Submit.
Click Submit.
5. ![]() Return to the Manage DHCP Criteria page, and click the cisco1 DHCP criteria. The Modify DHCP Criteria page appears.
Return to the Manage DHCP Criteria page, and click the cisco1 DHCP criteria. The Modify DHCP Criteria page appears.
6. ![]() Under Property Name, select /ccc/kerb/realm and enter CISCO1.COM in the Property Value field.
Under Property Name, select /ccc/kerb/realm and enter CISCO1.COM in the Property Value field.
7. ![]() Click Add and Submit.
Click Add and Submit.
For more information, see Configuring DHCP Criteria.
b. ![]() Add DHCP Criteria for the secondary realm; in this case, CISCO2.COM.
Add DHCP Criteria for the secondary realm; in this case, CISCO2.COM.
For example:
1. ![]() From Configuration > DHCP Criteria > Manage DHCP Criteria, click the Add button.
From Configuration > DHCP Criteria > Manage DHCP Criteria, click the Add button.
2. ![]() The Add DHCP Criteria page appears.
The Add DHCP Criteria page appears.
3. ![]() Enter cisco2 in the DHCP Name field.
Enter cisco2 in the DHCP Name field.
4. ![]() Click Submit.
Click Submit.
5. ![]() Return to the Manage DHCP Criteria page, and click the cisco2 DHCP criteria. The Modify DHCP Criteria page appears.
Return to the Manage DHCP Criteria page, and click the cisco2 DHCP criteria. The Modify DHCP Criteria page appears.
6. ![]() Under Property Name, select /ccc/kerb/realm and enter cisco2.COM in the Property Value field.
Under Property Name, select /ccc/kerb/realm and enter cisco2.COM in the Property Value field.
7. ![]() Click Add and Submit.
Click Add and Submit.
For more information, see Configuring DHCP Criteria.
c. ![]() Add templates as files to Cisco BAC for each of the devices being provisioned; in this step, for the Motorola MTA.
Add templates as files to Cisco BAC for each of the devices being provisioned; in this step, for the Motorola MTA.
For example:
1. ![]() Choose Configuration > Files. The Manage Files page appears.
Choose Configuration > Files. The Manage Files page appears.
2. ![]() Click Add, and the Add Files page appears.
Click Add, and the Add Files page appears.
3. ![]() Select the CableLabs Configuration Template option from the File Type drop-down list.
Select the CableLabs Configuration Template option from the File Type drop-down list.
4. ![]() Add the mot-mta.tmpl file. This file is the template used to provision a Motorola MTA. For template syntax, see Example 7-2.
Add the mot-mta.tmpl file. This file is the template used to provision a Motorola MTA. For template syntax, see Example 7-2.
5. ![]() Click Submit.
Click Submit.
For more information, see Managing Files.
d. ![]() Add templates as files to Cisco BAC for each of the devices being provisioned; in this step, for the Linksys MTA.
Add templates as files to Cisco BAC for each of the devices being provisioned; in this step, for the Linksys MTA.
For example:
1. ![]() Choose Configuration > Files. The Manage Files page appears.
Choose Configuration > Files. The Manage Files page appears.
2. ![]() Click Add, and the Add Files page appears.
Click Add, and the Add Files page appears.
3. ![]() Select the CableLabs Configuration Template option from the File Type drop-down list.
Select the CableLabs Configuration Template option from the File Type drop-down list.
4. ![]() Add the linksys-mta.tmpl file. This file is the template used to provision a Linksys MTA. For template syntax, see Example 7-3.
Add the linksys-mta.tmpl file. This file is the template used to provision a Linksys MTA. For template syntax, see Example 7-3.
5. ![]() Click Submit.
Click Submit.
For more information, see Managing Files.
e. ![]() Add templates as files to Cisco BAC for each of the devices being provisioned; in this step, for the SA MTA.
Add templates as files to Cisco BAC for each of the devices being provisioned; in this step, for the SA MTA.
For example:
1. ![]() Choose Configuration > Files. The Manage Files page appears.
Choose Configuration > Files. The Manage Files page appears.
2. ![]() Click Add, and the Add Files page appears.
Click Add, and the Add Files page appears.
3. ![]() Select the CableLabs Configuration Template option from the File Type drop-down list.
Select the CableLabs Configuration Template option from the File Type drop-down list.
4. ![]() Add the sa-mta.tmpl file. This file is the template used to provision an SA MTA. For template syntax, see Example 7-4.
Add the sa-mta.tmpl file. This file is the template used to provision an SA MTA. For template syntax, see Example 7-4.
5. ![]() Click Submit.
Click Submit.
For more information, see Managing Files.
f. ![]() Add a Class of Service for the primary realm; in this case, CISCO.COM.
Add a Class of Service for the primary realm; in this case, CISCO.COM.
For example:
1. ![]() Choose Configuration > Class of Service.
Choose Configuration > Class of Service.
2. ![]() Click Add. The Add Class of Service page appears.
Click Add. The Add Class of Service page appears.
3. ![]() Enter mot-mta as the name of the new Class of Service for the CISCO.COM realm.
Enter mot-mta as the name of the new Class of Service for the CISCO.COM realm.
4. ![]() Choose the Class of Service Type as PacketCableMTA.
Choose the Class of Service Type as PacketCableMTA.
5. ![]() Select /cos/packetCableMTA/file from the Property Name drop-down list and associate it to the mot-mta.tmpl template file (which is used to provision the Motorola MTA in the primary CISCO.COM realm).
Select /cos/packetCableMTA/file from the Property Name drop-down list and associate it to the mot-mta.tmpl template file (which is used to provision the Motorola MTA in the primary CISCO.COM realm).
6. ![]() Click Add and Submit.
Click Add and Submit.
For more information, see Configuring Class of Service.
g. ![]() Add a Class of Service for the secondary realm; in this case, CISCO1.COM.
Add a Class of Service for the secondary realm; in this case, CISCO1.COM.
For example:
1. ![]() Choose Configuration > Class of Service.
Choose Configuration > Class of Service.
2. ![]() Click Add. The Add Class of Service page appears.
Click Add. The Add Class of Service page appears.
3. ![]() Enter linksys-mta as the name of the new Class of Service for the CISCO1.COM realm.
Enter linksys-mta as the name of the new Class of Service for the CISCO1.COM realm.
4. ![]() Choose the Class of Service Type as PacketCableMTA.
Choose the Class of Service Type as PacketCableMTA.
5. ![]() Select /cos/packetCableMTA/file from the Property Name drop-down list and associate it to the linksys-mta.tmpl template file (which is used to provision the Linksys MTA in the secondary CISCO1.COM realm).
Select /cos/packetCableMTA/file from the Property Name drop-down list and associate it to the linksys-mta.tmpl template file (which is used to provision the Linksys MTA in the secondary CISCO1.COM realm).
6. ![]() Click Add and Submit.
Click Add and Submit.
For more information, see Configuring Class of Service.
h. ![]() Add a Class of Service for the secondary realm; in this case, CISCO2.COM.
Add a Class of Service for the secondary realm; in this case, CISCO2.COM.
For example:
1. ![]() Choose Configuration > Class of Service.
Choose Configuration > Class of Service.
2. ![]() Click Add. The Add Class of Service page appears.
Click Add. The Add Class of Service page appears.
3. ![]() Enter sa-mta as the name of the new Class of Service for the CISCO1.COM realm.
Enter sa-mta as the name of the new Class of Service for the CISCO1.COM realm.
4. ![]() Choose the Class of Service Type as PacketCableMTA.
Choose the Class of Service Type as PacketCableMTA.
5. ![]() Select /cos/packetCableMTA/file from the Property Name drop-down list and associate it to the sa-mta.tmpl template file (which is used to provision the SA MTA in the secondary CISCO2.COM realm).
Select /cos/packetCableMTA/file from the Property Name drop-down list and associate it to the sa-mta.tmpl template file (which is used to provision the SA MTA in the secondary CISCO2.COM realm).
6. ![]() Click Add and Submit.
Click Add and Submit.
For more information, see Configuring Class of Service.
Step 11 ![]() Bring the devices online and provision them. See the following examples that describe the provisioning process.
Bring the devices online and provision them. See the following examples that describe the provisioning process.
Example 1
The following example describes how you can provision the Motorola SBV5120.
a. ![]() Provision the cable modem part of the device by setting it to use the sample-bronze-docsis Class of Service.
Provision the cable modem part of the device by setting it to use the sample-bronze-docsis Class of Service.
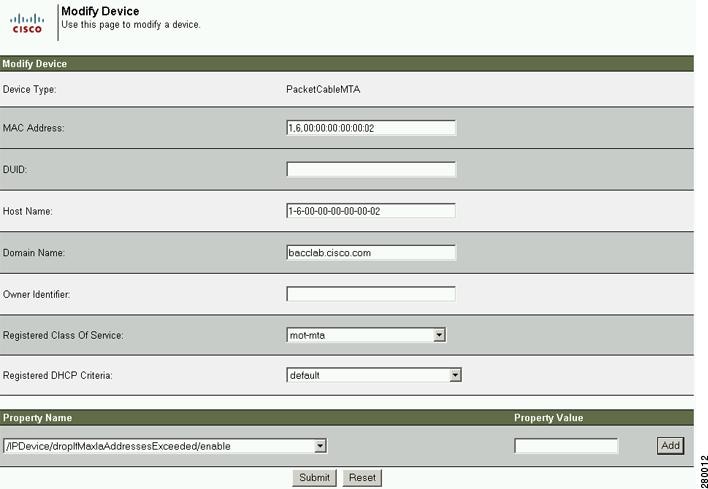
b. ![]() To provision the MTA part, go to the Devices > Manage Devices page. Search and select the PacketCable device you want to provision. The Modify Device page appears.
To provision the MTA part, go to the Devices > Manage Devices page. Search and select the PacketCable device you want to provision. The Modify Device page appears.
c. ![]() Set the domain name. This example uses bacclab.cisco.com.
Set the domain name. This example uses bacclab.cisco.com.
d. ![]() From the drop-down list corresponding to Registered Class of Service, select mot-mta. This is the Class of Service that you added in Step 10-f.
From the drop-down list corresponding to Registered Class of Service, select mot-mta. This is the Class of Service that you added in Step 10-f.
e. ![]() From the drop-down list corresponding to Registered DHCP Criteria, select the default option.
From the drop-down list corresponding to Registered DHCP Criteria, select the default option.
f. ![]() Click Submit.
Click Submit.
Figure 7-2 lists device details for the Motorola MTA.
Figure 7-2 Provisioning Motorola MTA-Device Details
Example 2
The following example illustrates how you can provision the Linksys CM2P2.
a. ![]() Provision the cable modem part of the device by setting it to use the sample-bronze-docsis Class of Service.
Provision the cable modem part of the device by setting it to use the sample-bronze-docsis Class of Service.
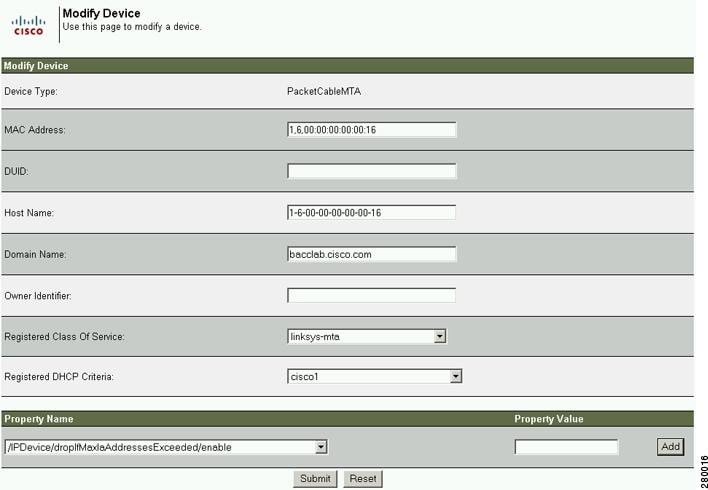
b. ![]() To provision the MTA part, go to the Devices > Manage Devices page. Search and select the PacketCable device you want to provision. The Modify Device page appears.
To provision the MTA part, go to the Devices > Manage Devices page. Search and select the PacketCable device you want to provision. The Modify Device page appears.
c. ![]() Set the domain name. This example uses bacclab.cisco.com.
Set the domain name. This example uses bacclab.cisco.com.
d. ![]() From the drop-down list corresponding to Registered Class of Service, select linksys-mta. This is the Class of Service that you added in Step 10-g.
From the drop-down list corresponding to Registered Class of Service, select linksys-mta. This is the Class of Service that you added in Step 10-g.
e. ![]() From the drop-down list corresponding to Registered DHCP Criteria, select the cisco1 option. This is the DHCP Criteria that you added for the secondary CISCO1.COM realm in Step 10-a.
From the drop-down list corresponding to Registered DHCP Criteria, select the cisco1 option. This is the DHCP Criteria that you added for the secondary CISCO1.COM realm in Step 10-a.
f. ![]() Click Submit.
Click Submit.
Figure 7-3 lists device details for the Linksys MTA.
Figure 7-3 Provisioning Linksys MTA-Device Details
Example 3
The following example illustrates how you can provision the SA WebStar DPX 2203.
a. ![]() Provision the cable modem part of the device by setting it to use the sample-bronze-docsis Class of Service.
Provision the cable modem part of the device by setting it to use the sample-bronze-docsis Class of Service.
b. ![]() To provision the MTA part, go to the Devices > Manage Devices page. Search and select the PacketCable device you want to provision. The Modify Device page appears.
To provision the MTA part, go to the Devices > Manage Devices page. Search and select the PacketCable device you want to provision. The Modify Device page appears.
c. ![]() Set the domain name. This example uses bacclab.cisco.com.
Set the domain name. This example uses bacclab.cisco.com.
d. ![]() From the drop-down list corresponding to Registered Class of Service, select sa-mta. This is the Class of Service that you added in Step 10-h.
From the drop-down list corresponding to Registered Class of Service, select sa-mta. This is the Class of Service that you added in Step 10-h.
e. ![]() From the drop-down list corresponding to Registered DHCP Criteria, select the cisco2 option. This is the DHCP Criteria that you added for the secondary CISCO2.COM realm in Step 10-b.
From the drop-down list corresponding to Registered DHCP Criteria, select the cisco2 option. This is the DHCP Criteria that you added for the secondary CISCO2.COM realm in Step 10-b.
f. ![]() Click Submit.
Click Submit.
Figure 7-4 lists device details for the SA MTA.
Figure 7-4 Provisioning SA MTA-Device Details

Step 12 ![]() Verify if multiple realm support is operational by using an ethereal trace. See the sample output from the KDC and DPE log files shown here from the sample setup used in this procedure.
Verify if multiple realm support is operational by using an ethereal trace. See the sample output from the KDC and DPE log files shown here from the sample setup used in this procedure.
Example 1
The following example features excerpts from the KDC and DPE log files for the Motorola SBV 5120 MTA provisioned in the primary CISCO.COM realm:
KDC Log Sample Output-Motorola MTA
INFO [Thread-4] 2007-02-07 07:56:21,133 (DHHelper.java:114) - Time to create DH key
pair(ms): 48
 INFO [Thread-4] 2007-02-07 07:56:21,229 (DHHelper.java:114) - Time to create DH key
pair(ms): 49
 INFO [Thread-4] 2007-02-07 07:56:21,287 (DHHelper.java:150) - Time to create shared
secret: 57 ms.
 INFO [Thread-4] 2007-02-07 07:56:21,289 (PKAsReqMsg.java:104) - ##MTA-9a Unconfirmed AS
Request: 1133717956 Received from /10.10.1.2
 INFO [Thread-4] 2007-02-07 07:56:21,298 (KRBProperties.java:612) - Replacing property:
'minimum ps backoff' Old Value:'150' New Value: '150'
 INFO [Thread-4] 2007-02-07 07:56:21,324 (KDCMessageHandler.java:257) - AS-REQ contains
PKINIT - QA Tag.
 INFO [Thread-4] 2007-02-07 07:56:21,325 (KDCMessageHandler.java:279) - PK Request from
MTA received. Client is MTA - QA Tag
 INFO [Thread-4] 2007-02-07 07:56:21,365 (KDCMessageHandler.java:208) - ##MTA-9b KDC Reply
AS-REP Sent to /10.10.1.2:1039 Time(ms): 290
WARN [main] 2005-11-07 07:56:23,193 (KDC.java:113) - Statistics Report ASREP's: 1
INFO [main] 2005-11-07 07:56:23,195 (KDC.java:121) - /pktcbl/mtaAsRepSent: 10
INFO [main] 2005-11-07 07:56:23,195 (KDC.java:121) - /pktcbl/DHKeygenTotalTime: 1043
INFO [main] 2005-11-07 07:56:23,196 (KDC.java:121) - /pktcbl/mtaAsReqRecvd: 10
INFO [main] 2005-11-07 07:56:23,197 (KDC.java:121) - /pktcbl/DHKeygenNumOps: 20
INFO [main] 2005-11-07 07:56:23,197 (KDC.java:121) - /pktcbl/total: 60
DPE Log Sample Output-Motorola MTA
dpe.cisco.com: 2007 02 07 07:56:24 EST: %BAC-DPE-6-4178: Adding Replay Packet: []
dpe.cisco.com: 2007 02 07 07:56:24 EST: %BAC-PKTSNMP-6-0764: [System Description for MTA:
<<HW_REV: 1.0, VENDOR: Motorola Corporation, BOOTR: 8.1, SW_REV:
SBV5120-2.9.0.1-SCM21-SHPC, MODEL: SBV5120>>]
dpe.cisco.com: 2007 02 07 07:56:24 EST: %BAC-PKTSNMP-6-0764: [##MTA-15 SNMPv3 INFORM
Received From 10.10.1.2.]
dpe.cisco.com: 2007 02 07 07:56:24 EST: %BAC-DPE-6-0688: Received key material update for
device [1,6,01:11:82:61:5e:30]
dpe.cisco.com: 2007 02 07 07:56:24 EST: %BAC-PKTSNMP-6-0764: [##MTA-19 SNMPv3 SET Sent to
10.10.1.2]
dpe.cisco.com: 2007 02 07 07:56:24 EST: %BAC-TFTP-6-0310: Finished handling [read] request
from [10.10.1.2:1190] for [bpr0106001182615e300001]
dpe.cisco.com: 2007 02 07 07:56:25 EST: %BAC-PKTSNMP-6-0764: [##MTA-25 SNMP Provisioning
State INFORM Received from 10.10.1.2.  Value: 1]
Example 2
The following example features excerpts from the KDC and DPE log files for the Linksys CM2P2 MTA provisioned in the secondary CISCO1.COM realm:
KDC Log Sample Output-Linksys MTA
 INFO [Thread-8] 2007-02-07 08:00:10,664 (DHHelper.java:114) - Time to create DH key
pair(ms): 49
 INFO [Thread-8] 2007-02-07 08:00:10,759 (DHHelper.java:114) - Time to create DH key
pair(ms): 49
 INFO [Thread-8] 2007-02-07 08:00:10,817 (DHHelper.java:150) - Time to create shared
secret: 57 ms.
 INFO [Thread-8] 2007-02-07 08:00:10,819 (PKAsReqMsg.java:104) - ##MTA-9a Unconfirmed AS
Request: 1391094112 Received from /10.10.1.5
 INFO [Thread-8] 2007-02-07 08:00:10,828 (KRBProperties.java:612) - Replacing property:
'minimum ps backoff' Old Value:'150' New Value: '150'
 INFO [Thread-8] 2007-02-07 08:00:10,860 (KDCMessageHandler.java:257) - AS-REQ contains
PKINIT - QA Tag.
 INFO [Thread-8] 2007-02-07 08:00:10,862 (KDCMessageHandler.java:279) - PK Request from
MTA received. Client is MTA - QA Tag
 INFO [Thread-8] 2007-02-07 08:00:10,901 (KDCMessageHandler.java:208) - ##MTA-9b KDC Reply
AS-REP Sent to /10.10.1.5:3679 Time(ms): 296
WARN [main] 2007-02-07 08:00:13,383 (KDC.java:113) - Statistics Report ASREP's: 1
INFO [main] 2007-02-07 08:00:13,384 (KDC.java:121) - /pktcbl/mtaAsRepSent: 11
INFO [main] 2007-02-07 08:00:13,384 (KDC.java:121) - /pktcbl/DHKeygenTotalTime: 1141
DPE Log Sample Output-Linksys MTA
dpe.cisco.com: 2007 02 07 08:00:10 EST: %BAC-DPE-6-4112: Adding Replay Packet: []
dpe.cisco.com: 2007 02 07 08:00:12 EST: %BAC-DPE-6-4178: Adding Replay Packet: []
dpe.cisco.com: 2007 02 07 08:00:12 EST: %BAC-PKTSNMP-6-0764: [System Description for MTA:
Linksys Cable Modem with 2 Phone Ports (CM2P2) <<HW_REV: 2.0, VENDOR: Linksys, BOOTR:
2.1.6V, SW_REV: 2.0.3.3.11-1102, MODEL: CM2P2>>]
dpe.cisco.com: 2007 02 07 08:00:12 EST: %BAC-PKTSNMP-6-0764: [##MTA-15 SNMPv3 INFORM
Received From 10.10.1.5.]
dpe.cisco.com: 2007 02 07 08:00:12 EST: %BAC-DPE-6-0688: Received key material update for
device [1,6,00:0f:68:f9:42:f6]
dpe.cisco.com: 2007 02 07 08:00:12 EST: %BAC-PKTSNMP-6-0764: [##MTA-19 SNMPv3 SET Sent to
10.10.1.5]
dpe.cisco.com: 2007 02 07 08:00:18 EST: %BAC-TFTP-6-0310: Finished handling [read] request
from [10.10.1.5:1032] for [bpr0106000f68f942f60001]
dpe.cisco.com: 2007 02 07 08:00:18 EST: %BAC-PKTSNMP-6-0764: [##MTA-25 SNMP Provisioning
State INFORM Received from 10.10.1.5.  Value: 1]
Example 3
The following example features excerpts from the KDC and DPE log files for the SA WebStar DPX 2203 MTA provisioned in the secondary CISCO2.COM realm:
KDC Log Sample Output-SA MTA
 INFO [Thread-6] 2007-02-07 08:01:31,556 (DHHelper.java:114) - Time to create DH key
pair(ms): 49
 INFO [Thread-6] 2007-02-07 08:01:31,652 (DHHelper.java:114) - Time to create DH key
pair(ms): 50
 INFO [Thread-6] 2007-02-07 08:01:31,711 (DHHelper.java:150) - Time to create shared
secret: 57 ms.
 INFO [Thread-6] 2007-02-07 08:01:31,715 (PKAsReqMsg.java:104) - ##MTA-9a Unconfirmed AS
Request: 575634000 Received from /10.10.1.50
 INFO [Thread-6] 2007-02-07 08:01:31,727 (KRBProperties.java:612) - Replacing property:
'minimum ps backoff' Old Value:'150' New Value: '150'
 INFO [Thread-6] 2007-02-07 08:01:31,752 (KDCMessageHandler.java:257) - AS-REQ contains
PKINIT - QA Tag.
 INFO [Thread-6] 2007-02-07 08:01:31,753 (KDCMessageHandler.java:279) - PK Request from
MTA received. Client is MTA - QA Tag
 INFO [Thread-6] 2007-02-07 08:01:31,792 (KDCMessageHandler.java:208) - ##MTA-9b KDC Reply
AS-REP Sent to /10.10.1.50:3679 Time(ms): 292
WARN [main] 2007-02-07 08:01:33,423 (KDC.java:113) - Statistics Report ASREP's: 1
INFO [main] 2007-02-07 08:01:33,424 (KDC.java:121) - /pktcbl/mtaAsRepSent: 12
INFO [main] 2007-02-07 08:01:33,425 (KDC.java:121) - /pktcbl/DHKeygenTotalTime: 1240
INFO [main] 2007-02-07 08:01:33,425 (KDC.java:121) - /pktcbl/mtaAsReqRecvd: 12
INFO [main] 2007-02-07 08:01:33,426 (KDC.java:121) - /pktcbl/DHKeygenNumOps: 24
INFO [main] 2007-02-07 08:01:33,426 (KDC.java:121) - /pktcbl/total: 72
DPE Log Sample Output-SA MTA
dpe.cisco.com: 2007 02 07 08:01:31 EST: %BAC-DPE-6-4112: Adding Replay Packet: []
dpe.cisco.com: 2007 02 07 08:01:33 EST: %BAC-DPE-6-4178: Adding Replay Packet: []
dpe.cisco.com: 2007 02 07 08:01:33 EST: %BAC-PKTSNMP-6-0764: [System Description for MTA:
S-A WebSTAR DPX2200 Series DOCSIS E-MTA Ethernet+USB (2)Lines VOIP <<HW_REV: 2.0, VENDOR:
S-A, BOOTR: 2.1.6b, SW_REV: v1.0.1r1133-0324, MODEL: DPX2203>>]
dpe.cisco.com: 2007 02 07 08:01:33 EST: %BAC-PKTSNMP-6-0764: [##MTA-15 SNMPv3 INFORM
Received From 10.10.1.50.]
dpe.cisco.com: 2007 02 07 08:01:33 EST: %BAC-DPE-6-0688: Received key material update for
device [1,6,00:0f:24:d8:6e:f5]
dpe.cisco.com: 2007 02 07 08:01:33 EST: %BAC-PKTSNMP-6-0764: [##MTA-19 SNMPv3 SET Sent to
10.10.1.50]
dpe.cisco.com: 2007 02 07 08:01:38 EST: %BAC-TFTP-6-0310: Finished handling [read] request
from [10.10.1.50:1037] for [bpr0106000f24d86ef50001]
dpe.cisco.com: 2007 02 07 08:01:39 EST: %BAC-PKTSNMP-6-0764: [##MTA-25 SNMP Provisioning
State INFORM Received from 10.10.1.50.  Value: 1]
Authoring Template for Provisioning Devices in Multiple Realms
You can use the template syntax described here to provision devices in a particular realm. The examples shown here are specific to the Motorola SBV5120 MTA (Example 7-2), the Linksys CM2P2 MTA (Example 7-3), and the SA WebStar DPX2203 MTA (Example 7-4).
Note ![]() You must modify these templates to suit the specifics of the MTA in your network.
You must modify these templates to suit the specifics of the MTA in your network.
Example 7-2 Template Used to Provision a Motorola MTA
#
# Example PacketCable MTA template: mot-mta.tmpl
#
# Note that this template is specific to the TI 401 MTA.
# This template must be modified to the specifics of your MTA.
#
# First, the start marker.
#
option 254 1
#
# Enable MTA
#
option 11 .pktcMtaDevEnabled.0,INTEGER,true
#
# Set CMS FQDN for each endpoint on the MTA.
# NOTE: the indexes (9 and 10 here) will differ per manufacturer.
#
option 11
.pktcNcsEndPntConfigTable.pktcNcsEndPntConfigEntry.pktcNcsEndPntConfigCallAgentId.9,STRING
,CMS.CISCO.COM
option 11
.pktcNcsEndPntConfigTable.pktcNcsEndPntConfigEntry.pktcNcsEndPntConfigCallAgentId.10,STRIN
G,CMS.CISCO.COM
#
# Set the realm org name.  This MUST match that contained in the cert chain used by the
device.
#
# "CableLabs, Inc."
option 11
.pktcMtaDevRealmTable.pktcMtaDevRealmEntry.pktcMtaDevRealmOrgName.'CISCO.COM',STRING,"Cabl
eLabs, Inc."
#
# Set the realm name and IPSec control for the CMS.
#
option 11
.pktcMtaDevCmsTable.pktcMtaDevCmsEntry.pktcMtaDevCmsIpsecCtrl.'CMS.CISCO.COM',INTEGER,true
option 11
pktcMtaDevCmsTable.pktcMtaDevCmsEntry.pktcMtaDevCmsKerbRealmName.'CMS.CISCO.COM',STRING,CI
SCO.COM
#
# Finally, the end marker.
#
option 254 255
Example 7-3 Template Used to Provision a Linksys MTA
Note that, in this template, the realm has been set to CISCO1.COM.
#
# Example PacketCable MTA template: linksys-mta.tmpl
#
# Note that this template is specific to the TI 401 MTA.
# This template must be modified to the specifics of your MTA.
#
# First, the start marker.
#
option 254 1
#
# Enable MTA
#
option 11 .pktcMtaDevEnabled.0,INTEGER,true
#
# Set CMS FQDN for each endpoint on the MTA.
# NOTE: the indexes (9 and 10 here) will differ per manufacturer.
#
option 11
.pktcNcsEndPntConfigTable.pktcNcsEndPntConfigEntry.pktcNcsEndPntConfigCallAgentId.9,STRING
,CMS.CISCO.COM
option 11
.pktcNcsEndPntConfigTable.pktcNcsEndPntConfigEntry.pktcNcsEndPntConfigCallAgentId.10,STRIN
G,CMS.CISCO.COM
#
# Set the realm org name.  This MUST match that contained in the cert chain used by the
device.
#
# "CableLabs, Inc."
option 11
.pktcMtaDevRealmTable.pktcMtaDevRealmEntry.pktcMtaDevRealmOrgName.'CISCO1.COM',STRING,"Cab
leLabs, Inc."
#
# Set the realm name and IPSec control for the CMS.
#
option 11
.pktcMtaDevCmsTable.pktcMtaDevCmsEntry.pktcMtaDevCmsIpsecCtrl.'CMS.CISCO.COM',INTEGER,true
option 11
pktcMtaDevCmsTable.pktcMtaDevCmsEntry.pktcMtaDevCmsKerbRealmName.'CMS.CISCO.COM',STRING,CI
SCO1.COM
#
# Finally, the end marker.
#
option 254 255
Example 7-4 Template Used to Provision an SA MTA
Note that, in the template, the realm has been set to CISCO2.COM.
#
# Example PacketCable MTA template: sa-mta.tmpl
#
# Note that this template is specific to the TI 401 MTA.
# This template must be modified to the specifics of your MTA.
#
# First, the start marker.
#
option 254 1
#
# Enable MTA
#
option 11 .pktcMtaDevEnabled.0,INTEGER,true
#
# Set CMS FQDN for each endpoint on the MTA.
# NOTE: the indexes (9 and 10 here) will differ per manufacturer.
#
option 11
.pktcNcsEndPntConfigTable.pktcNcsEndPntConfigEntry.pktcNcsEndPntConfigCallAgentId.9,STRING
,CMS.CISCO.COM
option 11
.pktcNcsEndPntConfigTable.pktcNcsEndPntConfigEntry.pktcNcsEndPntConfigCallAgentId.10,STRIN
G,CMS.CISCO.COM
#
# Set the realm org name.  This MUST match that contained in the cert chain used by the
device.
#
# "CableLabs, Inc."
option 11
.pktcMtaDevRealmTable.pktcMtaDevRealmEntry.pktcMtaDevRealmOrgName.'CISCO2.COM',STRING,"Cab
leLabs, Inc."
#
# Set the realm name and IPSec control for the CMS.
#
option 11
.pktcMtaDevCmsTable.pktcMtaDevCmsEntry.pktcMtaDevCmsIpsecCtrl.'CMS.CISCO.COM',INTEGER,true
option 11
pktcMtaDevCmsTable.pktcMtaDevCmsEntry.pktcMtaDevCmsKerbRealmName.'CMS.CISCO.COM',STRING,CI
SCO2.COM
#
# Finally, the end marker.
#
option 254 255
Configuring SRV Records in the Network Registrar DNS Server
You must configure the Network Registrar DNS server to operate with the KDC. To set up this configuration, see your Network Registrar documentation and these instructions.
Note ![]() We recommend that you create a zone name that matches the desired realm name, and that the only DNS record in this special zone (other than the records required by the DNS server to maintain the zone) should be the SRV record for the realm. This example assumes that the desired Kerberos realm is voice.example.com, and that all other KDC, Network Registrar, and DPE configurations have been performed. The FQDN of the KDC is assumed to be kdc.example.com.
We recommend that you create a zone name that matches the desired realm name, and that the only DNS record in this special zone (other than the records required by the DNS server to maintain the zone) should be the SRV record for the realm. This example assumes that the desired Kerberos realm is voice.example.com, and that all other KDC, Network Registrar, and DPE configurations have been performed. The FQDN of the KDC is assumed to be kdc.example.com.
Step 1 ![]() Start the nrcmd command-line tool (which resides, by default, in the /opt/nwreg2/local/usrbin directory).
Start the nrcmd command-line tool (which resides, by default, in the /opt/nwreg2/local/usrbin directory).
Step 2 ![]() Enter your username and password.
Enter your username and password.
Step 3 ![]() To create a zone for the Kerberos realm, enter:
To create a zone for the Kerberos realm, enter:
nrcmd> zone voice.example.com create primary address_of_nameserver hostmaster
where address_of_nameserver specifies the IP address of the name server.
Step 4 ![]() To add the SRV record to the new zone, enter:
To add the SRV record to the new zone, enter:
nrcmd> zone voice.example.com. addRR _kerberos._udp. srv 0 0 88 KDC_FQDN
where KDC_FQDN specifies the FQDN of the KDC.
Step 5 ![]() To save and reload the DNS server, enter:
To save and reload the DNS server, enter:
nrcmd> save
nrcmd> dns reload
Configuring SNMPv3 Cloning on the RDU and DPE for Secure Communication with PacketCable MTAs
Cisco BAC lets you enable an external network manager for SNMPv3 access to MTA devices. Additionally, the RDU is capable of performing SNMPv3 operations in a specific MTA.
To enable this capability, set the security key material at the DPEs and RDU. After the key material has been set, the Cisco BAC application programming interface (API) calls that are used to create cloned SNMPv3 entries are enabled.
Note ![]() Enabling this capability impacts provisioning performance.
Enabling this capability impacts provisioning performance.
Creating the Key Material and Generating the Key
Creating the key material is a two-step process:
1. ![]() Run a script command on the RDU.
Run a script command on the RDU.
2. ![]() Run a CLI command on the DPE.
Run a CLI command on the DPE.
Note ![]() This shared secret is not the same shared secret as the CMTS or the Cisco BAC shared secrets.
This shared secret is not the same shared secret as the CMTS or the Cisco BAC shared secrets.
To create the key material:
Step 1 ![]() From the BPR_HOME/rdu/bin directory, run this script on the RDU:
From the BPR_HOME/rdu/bin directory, run this script on the RDU:
# generateSharedSecret.sh password
where password is any password, from 6 to 20 characters, that you create. This password is then used to generate a 46-byte key. This key is stored in a file, called keymaterial.txt, that resides in the BPR_HOME/rdu/conf directory.
Step 2 ![]() Run the service packetcable 1..1 snmp key-material DPE CLI command, with the password used in Step 1 to generate that key, on all DPEs for which this voice technology is enabled. This command generates the same 46-byte key on the DPE and ensures that the RDU and DPEs are synchronized and can communicate with the MTA securely.
Run the service packetcable 1..1 snmp key-material DPE CLI command, with the password used in Step 1 to generate that key, on all DPEs for which this voice technology is enabled. This command generates the same 46-byte key on the DPE and ensures that the RDU and DPEs are synchronized and can communicate with the MTA securely.
PacketCable Basic eMTA Provisioning
Cisco BAC also supports PacketCable Basic, which offers a simpler, DOCSIS-like, non-secure provisioning flow. Table 7-5 describes the BASIC.1 flow using the provisioning workflow in Figure 7-1.
The BASIC.2 flow is identical to BASIC.1, with the following exceptions:
•![]() "BASIC.2" is populated into the MTA's DHCP Option 122 suboption 6.
"BASIC.2" is populated into the MTA's DHCP Option 122 suboption 6.
•![]() The MTA issues a provisioning status SNMPv2c INFORM at the very end of the flow, MTA-25 (DHCP Option 122 suboption 3 specifies the Inform target).
The MTA issues a provisioning status SNMPv2c INFORM at the very end of the flow, MTA-25 (DHCP Option 122 suboption 3 specifies the Inform target).
The PacketCable Basic flow is similar to the DOCSIS flow with the following differences:
•![]() There is no ToD exchange between MTA and the provisioning system.
There is no ToD exchange between MTA and the provisioning system.
•![]() The MTA configuration file contains an integrity hash. Specifically, the SHA1 hash of the entire content of the configuration file is populated into a pktcMtadevConfigFileHash SNMP VarBind and placed within a TLV 11 just before the end of file TLV.
The MTA configuration file contains an integrity hash. Specifically, the SHA1 hash of the entire content of the configuration file is populated into a pktcMtadevConfigFileHash SNMP VarBind and placed within a TLV 11 just before the end of file TLV.
•![]() BASIC.2 flow issues a provisioning status SNMPv2c Inform after the MTA receives and processes its configuration file. This Inform notifies Cisco BAC if MTA provisioning completed successfully. If there is a problem, an error is generated and an event sent from the DPE to the RDU, then on to a Cisco BAC client. This Inform is useful while debugging configuration file issues.
BASIC.2 flow issues a provisioning status SNMPv2c Inform after the MTA receives and processes its configuration file. This Inform notifies Cisco BAC if MTA provisioning completed successfully. If there is a problem, an error is generated and an event sent from the DPE to the RDU, then on to a Cisco BAC client. This Inform is useful while debugging configuration file issues.
For additional information about the DOCSIS flow, see Chapter 6 "DOCSIS Configuration."
Note ![]() Before using the PacketCable Basic provisioning flow, ensure that you are using a PacketCable Basic-capable eMTA. The eMTA must report that it is Basic-capable with its DHCP Discover Option 60, TLV 5.18 (supported flows).
Before using the PacketCable Basic provisioning flow, ensure that you are using a PacketCable Basic-capable eMTA. The eMTA must report that it is Basic-capable with its DHCP Discover Option 60, TLV 5.18 (supported flows).
PacketCable TLV 38 and MIB Support
Cisco BAC supports the complete set of PacketCable 1.5 MIBs.
Cisco BAC supports TLV 38 in PacketCable configuration templates. This TLV lets you configure multiple SNMP notification targets. Configuration of this TLV means that all notifications are also issued to the targets configured through TLV 38.
SNMP v2C Notifications
Cisco BAC supports both SNMP v2C TRAP and INFORM notifications from the PacketCable MTA.
Euro PacketCable
Euro-PacketCable services are essentially the European equivalent of North American PacketCable services with the following differences:
•![]() Euro PacketCable uses different MIBs.
Euro PacketCable uses different MIBs.
•![]() Euro PacketCable uses a different set of device certificates (MTA_Root.cer) and service provider certificates (Service Provider Root).
Euro PacketCable uses a different set of device certificates (MTA_Root.cer) and service provider certificates (Service Provider Root).
For Euro-PacketCable certificates, the kdc.ini file must have the euro-packetcable property set to true. The KDC supports Euro-PacketCable (tComLabs) certificate chains. The following is a sample Euro PacketCable-enabled KDC configuration file.
[general]
interface address = 10.10.10.1
FQDN = servername.cisco.com
maximum log file size = 10000
n saved log files = 100
log debug level = 5 minimum
ps backoff = 150 maximum
ps backoff = 300
euro-packetcable = true
When using Euro PacketCable, ensure that the value of the PacketCable property /pktcbl/prov/locale is set to EURO. The default is NA (for North America). You can specify the locale in the Configuration File utility. See Using the Configuration File Utility for Template, for more information.
Euro-PacketCable MIBs
Euro-PacketCable MIBs are essentially snapshots of draft-IETF MIBs. MTA configuration files consist of SNMP VarBinds that reference the MIBs. There are substantial differences between the North American PacketCable and Euro-PacketCable MIBs; therefore, the North American PacketCable and Euro-PacketCable configuration files are incompatible. During installation, sample files for North American PacketCable (cw29_config.tmpl) and Euro PacketCable (ecw15_mta_config.tmpl) are copied to the BPR_HOME/rdu/samples directory.
Cisco BAC ships with the following Euro-PacketCable MIBs:
•![]() DOCS-IETF-BPI2-MIB
DOCS-IETF-BPI2-MIB
•![]() INTEGRATED-SERVICES-MIB
INTEGRATED-SERVICES-MIB
•![]() DIFFSERV-DSCP-TC
DIFFSERV-DSCP-TC
•![]() DIFFSERV-MIB
DIFFSERV-MIB
•![]() TCOMLABS-MIB
TCOMLABS-MIB
•![]() PKTC-TCOMLABS-MTA-MIB
PKTC-TCOMLABS-MTA-MIB
•![]() PKTC-TCOMLABS-SIG-MIB
PKTC-TCOMLABS-SIG-MIB
Configuring Euro-PacketCable MIBs
To configure Cisco BAC to use Euro-PacketCable MIBs, you must change the Cisco BAC RDU property that specifies the MIBs to be loaded. By default, this property contains the PacketCable MIBs.
You can change the property in one of the following ways:
•![]() Modify rdu.properties and restart the RDU.
Modify rdu.properties and restart the RDU.
•![]() On the administrator user interface, navigate to Configuration > Defaults > System Defaults and replace the MIB list with the list shown below. You do not need to restart the RDU.
On the administrator user interface, navigate to Configuration > Defaults > System Defaults and replace the MIB list with the list shown below. You do not need to restart the RDU.
•![]() Use the Prov API changeSystemDefaults() call. You do not need to restart the RDU.
Use the Prov API changeSystemDefaults() call. You do not need to restart the RDU.
The property name is /snmp/mibs/mibList (properties file) or SNMPPropertyKeys.MIB_LIST (the Prov API constant name). The property value is a comma-separated value (CSV) consisting of the required MIB names, as shown:
/snmp/mibs/mibList=SNMPv2-SMI,SNMPv2-TC,INET-ADDRESS-MIB,CISCO-SMI,CISCO-TC,SNMPv2-MIB,RFC
1213-MIB,IANAifType-MIB,IF-MIB,DOCS-IF-MIB,DOCS-IF-EXT-MIB,DOCS-BPI-MIB,CISCO-CABLE-SPECTR
UM-MIB,CISCO-DOCS-EXT-MIB,SNMP-FRAMEWORK-MIB,DOCS-CABLE-DEVICE-MIB,DOCS-QOS-MIB,CISCO-CABL
E-MODEM-MIB,DOCS-IETF-BPI2-MIB,INTEGRATED-SERVICES-MIB,DIFFSERV-DSCP-TC,DIFFSERV-MIB,TCOML
ABS-MIB,PKTC-TCOMLABS-MTA-MIB,PKTC-TCOMLABS-SIG-MIB
 Feedback