Cisco APIC Layer 2 Networking Configuration Guide, Release 6.2(x)

PDF

Cisco APIC Layer 2 Networking Configuration Guide, Release 6.2(x)

Configure Port, PC, and vpc connections to FEX devices

Want to summarize with AI?

Log in

Describes the configuration of port, port channel, and virtual port channel connections to Fabric Extender (FEX) devices in ACI environments.


Port, PC, and vPC connections to FEX devices are network configurations that

  • define connectivity between FEX devices and Cisco Application Centric Infrastructure (ACI) leaf switches

  • configure FEX ports connected to servers for data transmission, and

  • support creation through GUI, NX-OS-style CLI, or REST API using interface profiles since Cisco Application Policy Infrastructure Controller (APIC) 3.0(1k) release.

Configuration steps

The configuration consists of two key steps:

  1. Defining the connectivity between the FEX and the Cisco Application Centric Infrastructure (ACI) leaf switch

  2. Configuring the FEX ports connected to the servers

After you configure the FEX connectivity to the Cisco ACI leaf switch, the configuration of the FEX host-facing ports is no different than the configuration of Cisco ACI leaf switch ports as individual interfaces, port channels, or vPCs.

For information on how to configure ports, PCs, and vPCs using the GUI, the NX-OS-style CLI, or the REST API, see the following sections:

Guidelines for ACI FEX deployment

Observe the following guidelines when deploying a FEX:

  • Assuming that no leaf switch front panel ports are configured to deploy and EPG and VLANs, a maximum of 10,000 port EPGs are supported for being deployed using a FEX.

  • For each FEX port or vPC that includes FEX ports as members, a maximum of 20 EPGs per VLAN are supported.

  • A vPC with FEX interfaces ignores the minimum and maximum number of links configured in its port-channel policy. The vPC remains up even if the number of links is less than the minimum or greater than the maximum.

  • Each FEX LACP supports up to eight active member ports in a single port-channel. You can add eight more ports as a hot-standby to the same port-channel.

  • The LACP min-link/max-link configuration from APIC is not supported. FEX always uses eight as the max-link parameter.

  • Configuring port-channel across two Fexes on the same leaf switch is not supported.


FEX virtual port channels

A FEX virtual port channel is a server-side virtual port channel (vPC) configuration that

  • supports Cisco Fabric Extender (FEX) connectivity in the ACI fabric

  • enables straight-through vPC functionality, and

  • allows both VTEP and non-VTEP hypervisors behind a FEX.

Supported FEX vpc configurations

Note

When creating a vPC domain between two leaf switches, ensure that the hardware of the two leaf switches that are going to be part of the same vPC pair is compatible. For more information, see Virtual port channels in Cisco ACI.

The following figure shows the supported FEX vPC topologies:

Figure 1. Supported FEX vpc topologies

Supported FEX vPC port channel topologies include the following:

  • Both VTEP and non-VTEP hypervisors behind a FEX.

  • Virtual switches (such as AVS or VDS) connected to two FEXs that are connected to the ACI fabric (vPCs directly connected on physical FEX ports is not supported - a vPC is supported only on port channels).

Note

When using GARP as the protocol for notification of IP-to-MAC binding changes to different interfaces on the same FEX, you must set the bridge domain mode to ARP Flooding and enable EP Move Detection Mode: GARP-based Detection, on the L3 Configuration page of the bridge domain wizard. This workaround is only required with Generation 1 switches. With Generation 2 switches or later, this is not an issue.


Configure a FEX connection to the ACI leaf switch using the GUI

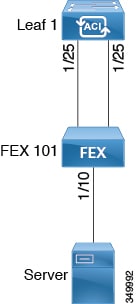
This configuration establishes the necessary infrastructure to attach devices to a Cisco Application Centric Infrastructure (ACI)-attached FEX. The procedure applies to connecting any device to an ACI-attached FEX, including servers.

Figure 2. Basic FEX Configuration


Note

Configuring FEX connections with FEX IDs 165 to 199 is not supported in the APIC GUI. To use one of these FEX IDs, configure the profile using the NX-OS style CLI. For more information, see Configuring FEX Connections Using Interface Profiles with the NX-OS Style CLI.

Before you begin

  • The Cisco ACI fabric is installed, Cisco Application Policy Infrastructure Controllers (APICs) are online, and the Cisco APIC cluster is formed and healthy.

  • An Cisco APIC fabric administrator account is available that will enable creating the necessary fabric infrastructure configurations.

  • The target leaf switches, interfaces, and protocols are configured and available.

  • The FEX is powered on and connected to the target leaf switch interfaces

Note

A maximum of eight members are supported in fabric port channels connected to FEXs.

Follow these steps to configure a FEX connection to the ACI leaf switch using the GUI:

Procedure

  1. On the menu bar, choose Fabric > Access Policies.

  2. In the Navigation pane, choose Interface Configuration.

  3. In the Work pane, choose Actions > Fabric Extender.

  4. In the Fabric Extender dialog, perform the following actions:

    1. For Node, click Select Node, put a check in the box for the desired node, then click OK. You can select multiple nodes.
    2. For Interfaces For All Switches, enter the range of desired interfaces.
    3. For Connected FEX ID, enter the ID of the FEX.

      You must configure FEX IDs 165 - 199, using the NX-OS-style CLI. See Configuring FEX Connections Using Interface Profiles with the NX-OS Style CLI.

    4. Click Save.
      The Cisco APIC auto-generates the necessary FEX profile (switch-policy-name_FexPFEX-ID) and selector (switch-policy-name_ifselctor).

    Verification: Use the CLI show fex command on the switch where the FEX is attached to verify that the FEX is online.

  5. You can now configure FEX interfaces, such as regular Cisco ACI leaf switch interfaces by using Fabric > Fabric Access > Interface Configuration.

What to do next

Note

While this configuration enables hardware connectivity, no data traffic can flow without a valid application profile, EPG, and contract that is associated with this hardware configuration.


Configure FEX connectivity to an ACI leaf switch using profiles with the NX-OS-style CLI

Use this procedure to configure FEX connections to leaf nodes using the NX-OS style CLI.

Note

Configuring FEX connections with FEX IDs 165 to 199 is not supported in the Cisco Application Policy Infrastructure Controller (APIC) GUI. To use one of these FEX IDs, configure the profile using the following commands.

Follow these steps to configure FEX connectivity to an ACI leaf switch using profiles:

Procedure

  1. configure

    Enters global configuration mode.

    Example:

    apic1# configure
  2. leaf-interface-profile name

    Specifies the leaf interface profile to be configured.

    Example:

    apic1(config)# leaf-interface-profile fexIntProf1
  3. leaf-interface-group name

    Specifies the interface group to be configured.

    Example:

    apic1(config-leaf-if-profile)# leaf-interface-group leafIntGrp1
  4. fex associate fex-id [template template-typefex-template-name]

    Attaches a FEX module to a leaf node. Use the optional template keyword to specify a template to be used. If it does not exist, the system creates a template with the name and type you specified.

    Example:

    apic1(config-leaf-if-group)# fex associate 101

This merged example configures a leaf interface profile for FEX connections with ID 101.

apic1# configure
apic1(config)# leaf-interface-profile fexIntProf1
apic1(config-leaf-if-profile)# leaf-interface-group leafIntGrp1
apic1(config-leaf-if-group)# fex associate 101