| Step 1 |
Open Cisco Application Services
Engine GUI.
|
| Step 2 |
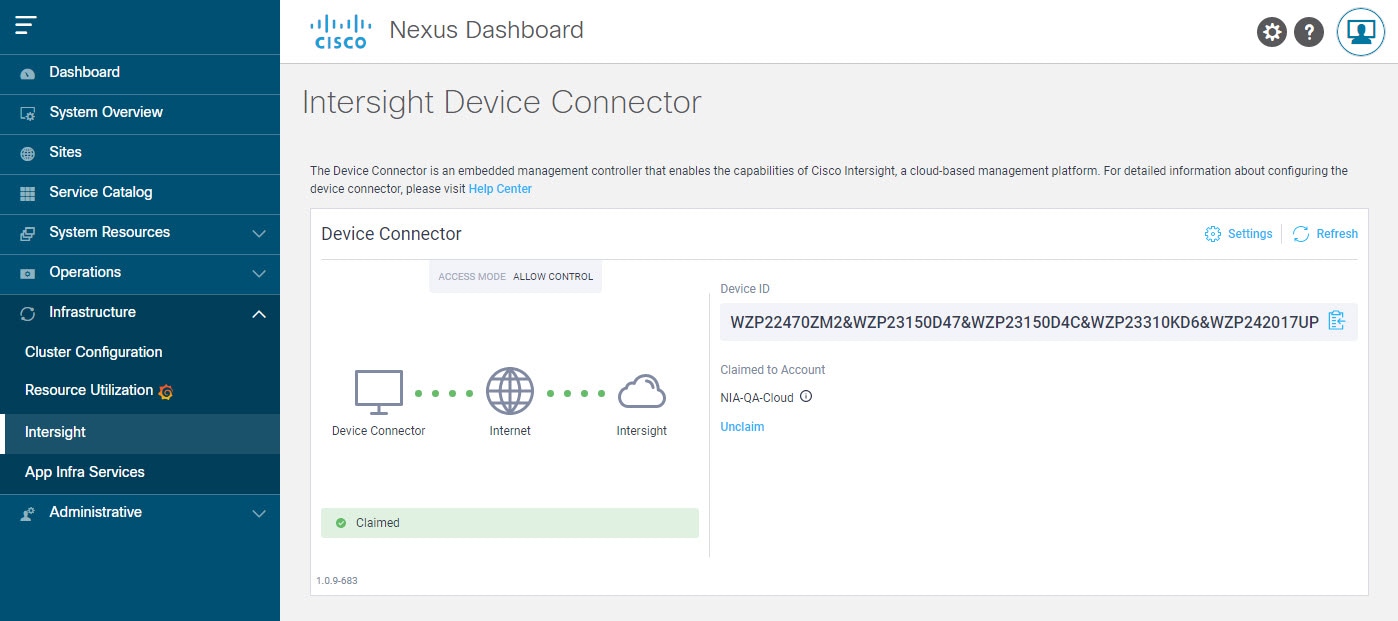
In the Navigation pane, click Infrastructure then Intersight.
-
If you see green dotted lines connecting Internet to Intersight in the Device Connector page, and the text Claimed, then your Intersight Device Connector is already configured and connected to the Intersight cloud service, and the device
is claimed.
-
If you see yellow dotted lines and a caution icon connecting Internet to Intersight in the Device Connector page, and the text Not Claimed, then your Intersight Device Connector is not yet configured and connected to the Intersight service, and the device is not
yet claimed. Follow these procedures to configure the Intersight Device Connector and connect to the Intersight cloud service,
and claim the device.
| Note
|
Red dotted lines connecting Internet to Intersight in the Device Connector page, indicate that you have configured the proxy incorrectly in step 8.
|
|
| Step 3 |
Determine if you would like to update the software at this time, if there is a new Device Connector software version available.
If there is a new Device Connector software version available and you do not have the Auto Update option enabled, you will see a message towards the top of the screen,informing that Device Connector has important updates
available (refer to step 5c).
-
If you do not want to update the software at this time, go to step 5 to begin configuring the Intersight Device Connector.
-
If you would like to update the software at this time, click one of the two links in the yellow bar towards the top of the
page, depending on how you would like to update the software:
-
Update Now: Click this link to update the Device Connector software immediately.
-
Enable Auto Update: Click this link to go to the General page, where you can toggle the Auto Update field to ON, which allows the system to automatically update the Device Connector software. See step 6c for more information.
|
| Step 4 |
Locate the Settings link to the right of the Device Connector heading and click the Settings link.
The Settings page appears, with the General tab selected by default.
|
| Step 5 |
In the General page, configure the following settings.
-
In the Device Connector field, determine if you want to allow communication between the device and Cisco Intersight.
The Device Connector option (enabled by default) enables you to claim the device and leverage the capabilities of Intersight. If it is turned
OFF, no communication will be allowed to Cisco Intersight.
-
In the Access Mode field, determine if you want to allow Intersight the capability to make changes to this device.
Access Mode enables you to allow full read or write operations from the cloud or restrict changes made to this device from Cisco Intersight.
-
The Allow Control option (selected by default) enables you to perform full read or write operations from the cloud, based on the features available
in Cisco Intersight.
-
The Read-only option ensures that no changes are made to this device from Cisco Intersight. For example, actions such as upgrading firmware
or a profile deployment will not be allowed in the Read-Only mode. However, the actions depend on the features available for
a particular system.
-
In the Auto Update field, determine if you want to allow the system to automatically update the software.
We recommend that you toggle the Auto Update option to ON so that the system automatically updates the software. Note that toggling the Auto Update option to ON means that the Device Connector will automatically upgrade its image whenever there is any upgrade push from
Intersight.
-
Toggle ON to allow the system to automatically update the software.
-
Toggle OFF so that you can manually update the software when necessary. You will be asked to manually update the software
when new releases become available in this case.
| Note
|
If the Auto Update option is turned OFF, that may periodically cause the Device Connector to be out-of-date, which could affect the ability
of the Device Connector to connect to Cisco Intersight.
|
|
| Step 6 |
When you have completed the configurations in the General page, click Save.
The Intersight - Device Connector overview pages appears again. At this point, you can make or verify several configure settings for the Intersight Device
Connector:
-
If you want to configure the proxy that the Device Connector will use to communicate with the Cisco Intersight cloud, go to
step 8.
-
If you want to manage certificates with the Device Connector, go to step 11.
| Note
|
The Cisco Application Services
Engine requires you to configure the Proxy Settings for the Intersight Device Connector.
|
|
| Step 7 |
If you want to configure the proxy that the Device Connector will use to communicate with the Cisco Intersight cloud, click
Settings, then click Proxy Configuration.
The Proxy Configuration page appears.
|
| Step 8 |
In the Proxy Configuration page, configure the following settings.
In this page, you can configure the proxy that the Device Connector will use to communicate with the Cisco Intersight cloud.
| Note
|
The Device Connector does not mandate the format of the login credentials; they are passed as-is to the configured HTTP proxy
server. Whether or not the username must be qualified with a domain name depends on the configuration of the HTTP proxy server.
|
-
In the Enable Proxy field, toggle the option to ON to configure the proxy settings.
-
In the Proxy Hostname/IP field, enter a Proxy Hostname and the IP address.
-
In the Proxy Port field, enter a proxy port number.
-
In the Authentication field, toggle the Authentication option to ON to configure the proxy authentication settings, then enter a proxy username and password for authentication.
|
| Step 9 |
When you have completed the configurations in the Proxy Configuration page, click Save.
The Intersight - Device Connector overview pages appears again.
If you want to make manage certificates with the Device Connector, go to the next step.
|
| Step 10 |
If you want to manage certificates with the Device Connector, click Settings, then click Certificate Manager.
The Certificate Manager page appears.
|
| Step 11 |
In the Certificate Manager page, configure the following settings.
By default, the device connector trusts only the built-in svc.ucs-connect.com certificate. If the device connector establishes
a TLS connection and a server sends a certificate that does not match the built-in svc.ucs-connect.com certificate, the device
connector terminates TLS connections because it cannot determine if the server is a trusted device or not.
Click Import to import a CA signed certificate. The imported certificates must be in the *.pem (base64 encoded) format. After a certificate
is successfully imported, it is listed in the list of Trusted Certificates and if the certificate is correct, it is shown in the In-Use column.
View these details for a list of certificates that are used to connect to svc.ucs-connect.com (intersight.com):
-
Name—Common name of the CA certificate.
-
In Use—Whether the certificate in the trust store was used to successfully verify the remote server.
-
Issued By—The issuing authority for the certificate.
-
Expires—The expiry date of the certificate.
Delete a certificate from the list of Trusted certificates. However, you cannot delete bundled certificates (root+intermediate certificates) from the list. The lock icon represents
the bundled certificates.
|
| Step 12 |
When you have completed the configurations in the Certificate Manager page, click Close.
|
 Feedback