Cisco Crosswork Change Automation and Health Insights 3.1 User Guide
Bias-Free Language
The documentation set for this product strives to use bias-free language. For the purposes of this documentation set, bias-free is defined as language that does not imply discrimination based on age, disability, gender, racial identity, ethnic identity, sexual orientation, socioeconomic status, and intersectionality. Exceptions may be present in the documentation due to language that is hardcoded in the user interfaces of the product software, language used based on RFP documentation, or language that is used by a referenced third-party product. Learn more about how Cisco is using Inclusive Language.
Networks maintain a large amount of data that spans thousands of devices. Cisco Crosswork Change Automation and Health Insights Collection Service collects and manages this data through its integral component - Cisco Crosswork Data Gateway.
This section contains the following topics:
Overview of Cisco Crosswork Data Gateway
When Cisco Crosswork Change Automation and Health Insights and Cisco Crosswork Change Automation and Health Insights are deployed together, Cisco Crosswork Change Automation and Health Insights acts as the controller application for the Cisco Crosswork Data Gateway instance. You can use the UI to add and manage additional instances of Cisco Crosswork Data Gateway no matter if they are forwarding data to Cisco Crosswork Change Automation and Health Insights or other compatible data consumers. The number of Cisco Crosswork Data Gateway you need depends on the number of devices being supported, the amount of data being processed and your network architecture.
Cisco Crosswork Data Gateway can also be deployed with other Crosswork products and in that case, will have a different controller application.
Note
This chapter explains only the Cisco Crosswork Data Gateway features that can be accessed via Cisco Crosswork Change Automation and Health Insights UI.
Cisco Crosswork Data Gateway is initially deployed with just a basic VM called the Base VM (containing only enough software to register itself with its
controller).
It follows the instructions from Crosswork - collects data as requested and sends it to the defined output destination.
Depending on your private network's size and configuration, you may require one or more Cisco Crosswork Data Gateway instances for collection. It may be necessary to deploy multiple Cisco Crosswork Data Gateway instances to address the requirements for:
Geo-separated regions
Massive scale
Cisco recommends the simplest approach of a fixed configuration of devices to a particular instance (such as x to y for CDG1
and (y+1) to z for CDG2).
Note
More complicated approaches for resource optimization and dynamic assignment of tasks are possible and if desired, we recommend
working with Cisco Customer Experience team to design the behavior.
Cisco Crosswork Data Gateway features can be accessed via Crosswork Network Automation UI.
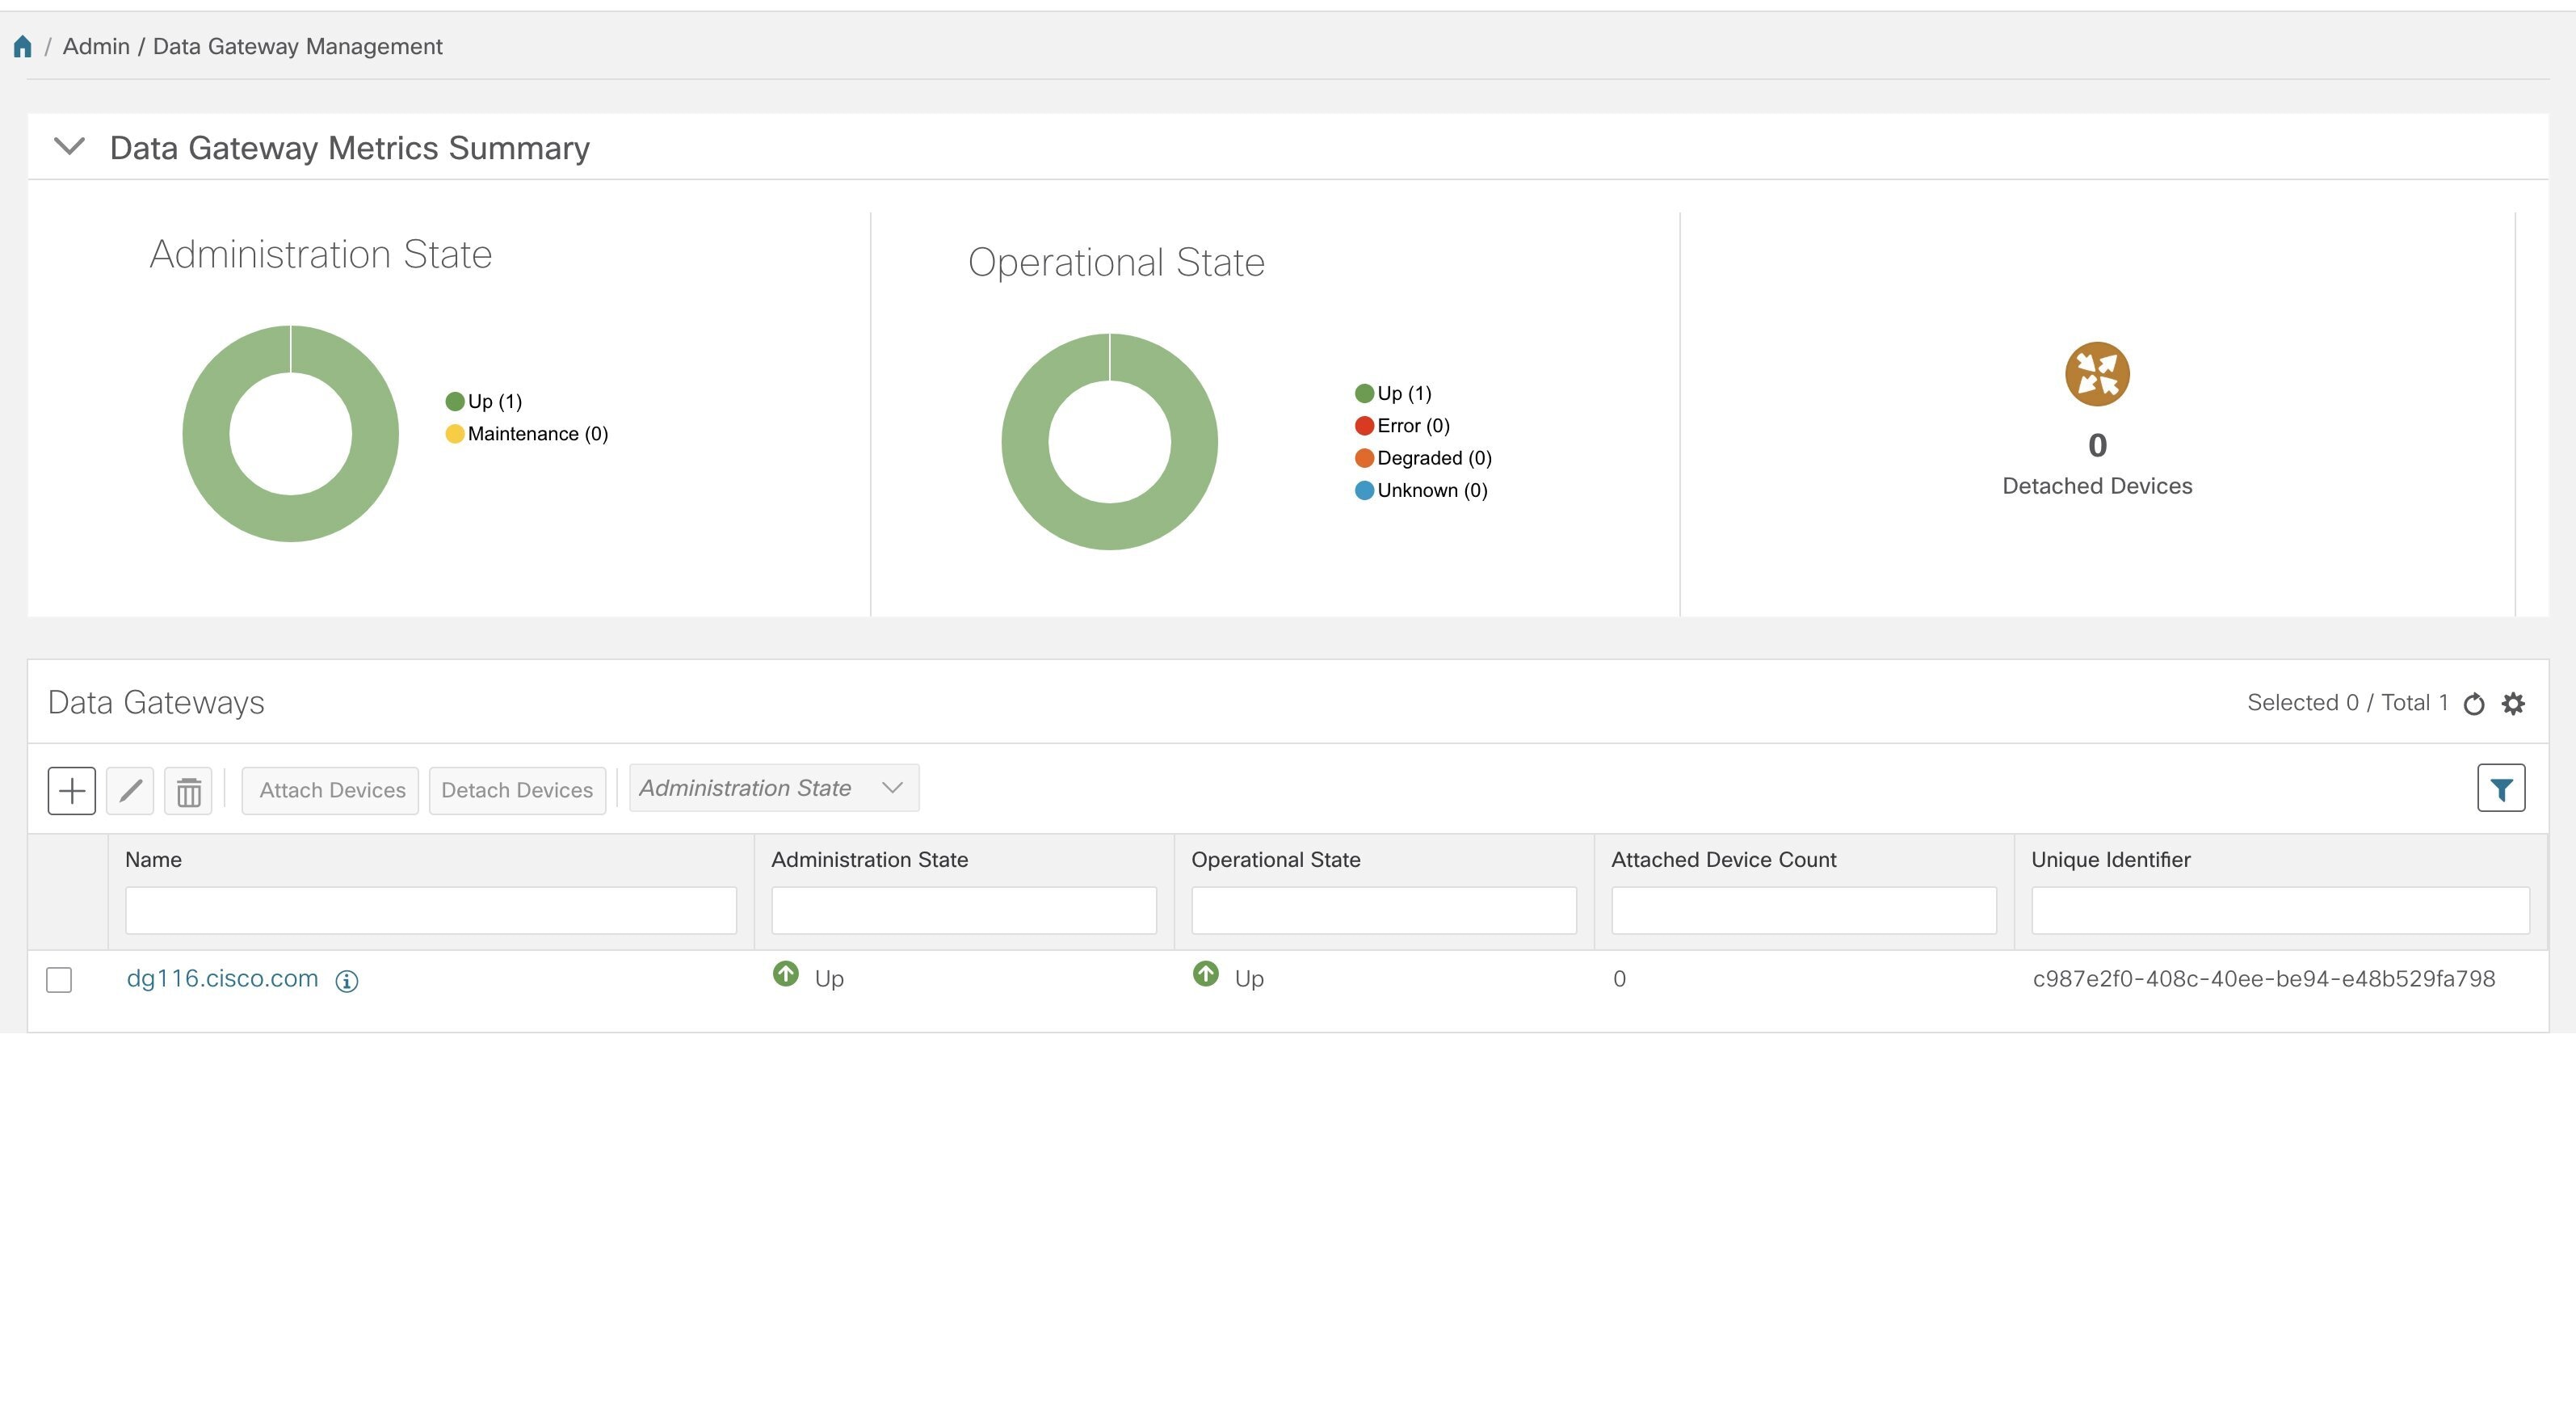
To open Cisco Crosswork Data Gateway management view, choose Admin > Data Gateway Management from the left navigation bar in the Crosswork Network Automation UI.
Figure 1. Data Gateway Management View
Item
Description
Data Gateway Metrics Summary Pane
Summarizes the overall metrics of all Cisco Crosswork Data Gateway instances currently enrolled with Crosswork:
Administration State Tile: shows the number of Cisco Crosswork Data Gateway instances in each adminstration state i.e., Up and Maintenance.
Operational State Tile: shows the number of Cisco Crosswork Data Gateway instances in each operational state i.e., Up, Error, Degraded, and Unknown.
Detached Devices Tile: Shows the number of devices that are currently not attached to any Cisco Crosswork Data Gateway instance.
Data Gateways Pane
Provides options to add, edit, and delete Cisco Crosswork Data Gateway VMs, attach/detach devices, change administration state, and filter options.
It also displays the following details for the individual Cisco Crosswork Data Gateway instances:
Name: Name of the Cisco Crosswork Data Gateway VM.
Administration State: Adminstration state of the Cisco Crosswork Data Gateway VM. A Cisco Crosswork Data Gateway VM has either of the two states at a time:
Up: The VM is currently active.
Maintenance: The VM is not operational ("down") and has been set to "Maintenance" mode by the user. No new jobs are submitted to Cisco Crosswork Data Gateway while it is in this mode.
Operational State: Operational state of the Cisco Crosswork Data Gateway VM. A Crosswork Data Gateway VM has either of the four states at a time:
Up: The VM is operational and all individual components are "OK".
Error:
The VM's operational state is in an error condition. It is either not reachable or all the critical components on the VM are
"not OK".
Degraded:
The VM's operational state is degraded as one or more critical components on the VM are "not OK".
Unknown:
The VM's operational state is unknown as it has enrolled itself with Crosswork, but hasn't established a session yet.
From the Data Gateways pane, you can add a new Cisco Crosswork Data Gateway instance, update the settings configured for an existing instance, de-enroll an instance, attach devices to an instance,
detach devices from a instance, or change adminstration state of an instance.
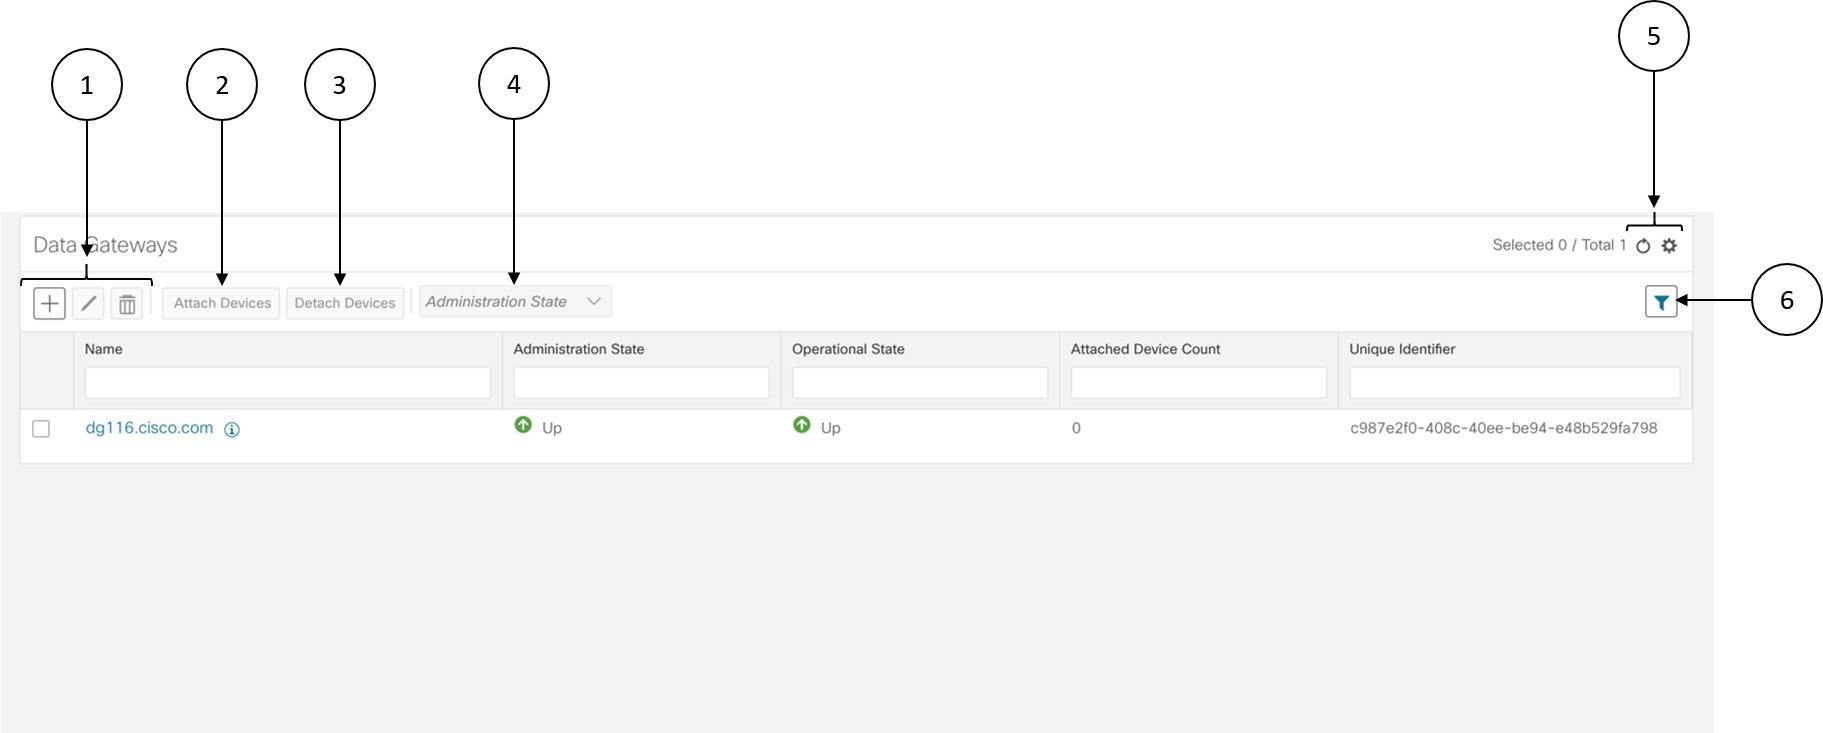
Click to set filter criteria on one or more columns in the Data Gateways window.
Click the Clear All Filters link to clear any filter criteria you may have set.
The Data Gateways pane displays the following details of the enrolled Cisco Crosswork Data Gateway instances:
Field
Description
Name
Name of the Cisco Crosswork Data Gateway.
Administration State
Adminstration state of the Cisco Crosswork Data Gateway instance.
Operational State
Operational state of the Cisco Crosswork Data Gateway instance.
Attached Device Count
Number of devices attached to the Cisco Crosswork Data Gateway instance.
Unique Identifier
Unique identifier of the Cisco Crosswork Data Gateway instance.
Add a Cisco Crosswork Data Gateway Instance
After installing Cisco Crosswork Data Gateway, you must enroll it with Cisco Crosswork Change Automation and Health Insights.
After enrolling, you must verify that the operational state of the Cisco Crosswork Data Gateway instance is Up before beginning to use it.
Note
Watch out for "alerts" at the top of the Data Gateway page while the Cisco Crosswork Data Gateway is not operationally up.
Procedure to enroll a Cisco Crosswork Data Gateway instance is described in Cisco Crosswork Change Automation and Health Insights 3.1 Installation Guide in Section: Enroll Cisco Crosswork Data Gateway With Cisco Crosswork Change Automation and Health InsightsCisco Crosswork Optimization Engine
Update Cisco Crosswork Data Gateway Instance Enrollment Settings
If there's an update for the Cisco Crosswork Data Gateway VM, you can regenerate a new enrollment package and upload it to Crosswork by following these steps:
Before you begin
Ensure that you have manually copied the new enrollment package to your local PC as per the procedure described in the
Cisco Crosswork Change Automation and Health Insights 3.1 Installation Guide in Section: Export Enrollment Package.
Procedure
Step 1
From the main menu, choose Admin > Data Gateway Management. The Data Gateway Management view opens.
Step 2
From the Data Gateways window, select the Cisco Crosswork Data Gateway instance you want to update.
Step 3
Click to edit the settings for the selected Cisco Crosswork Data Gateway instance.
Step 4
In the Update Data Gateway pop up, click Browse to select the new enrollment package.
Select the admin state in which you want to bring up the Cisco Crosswork Data Gateway instance.
Step 5
Click Enroll.
View Enrollment Details
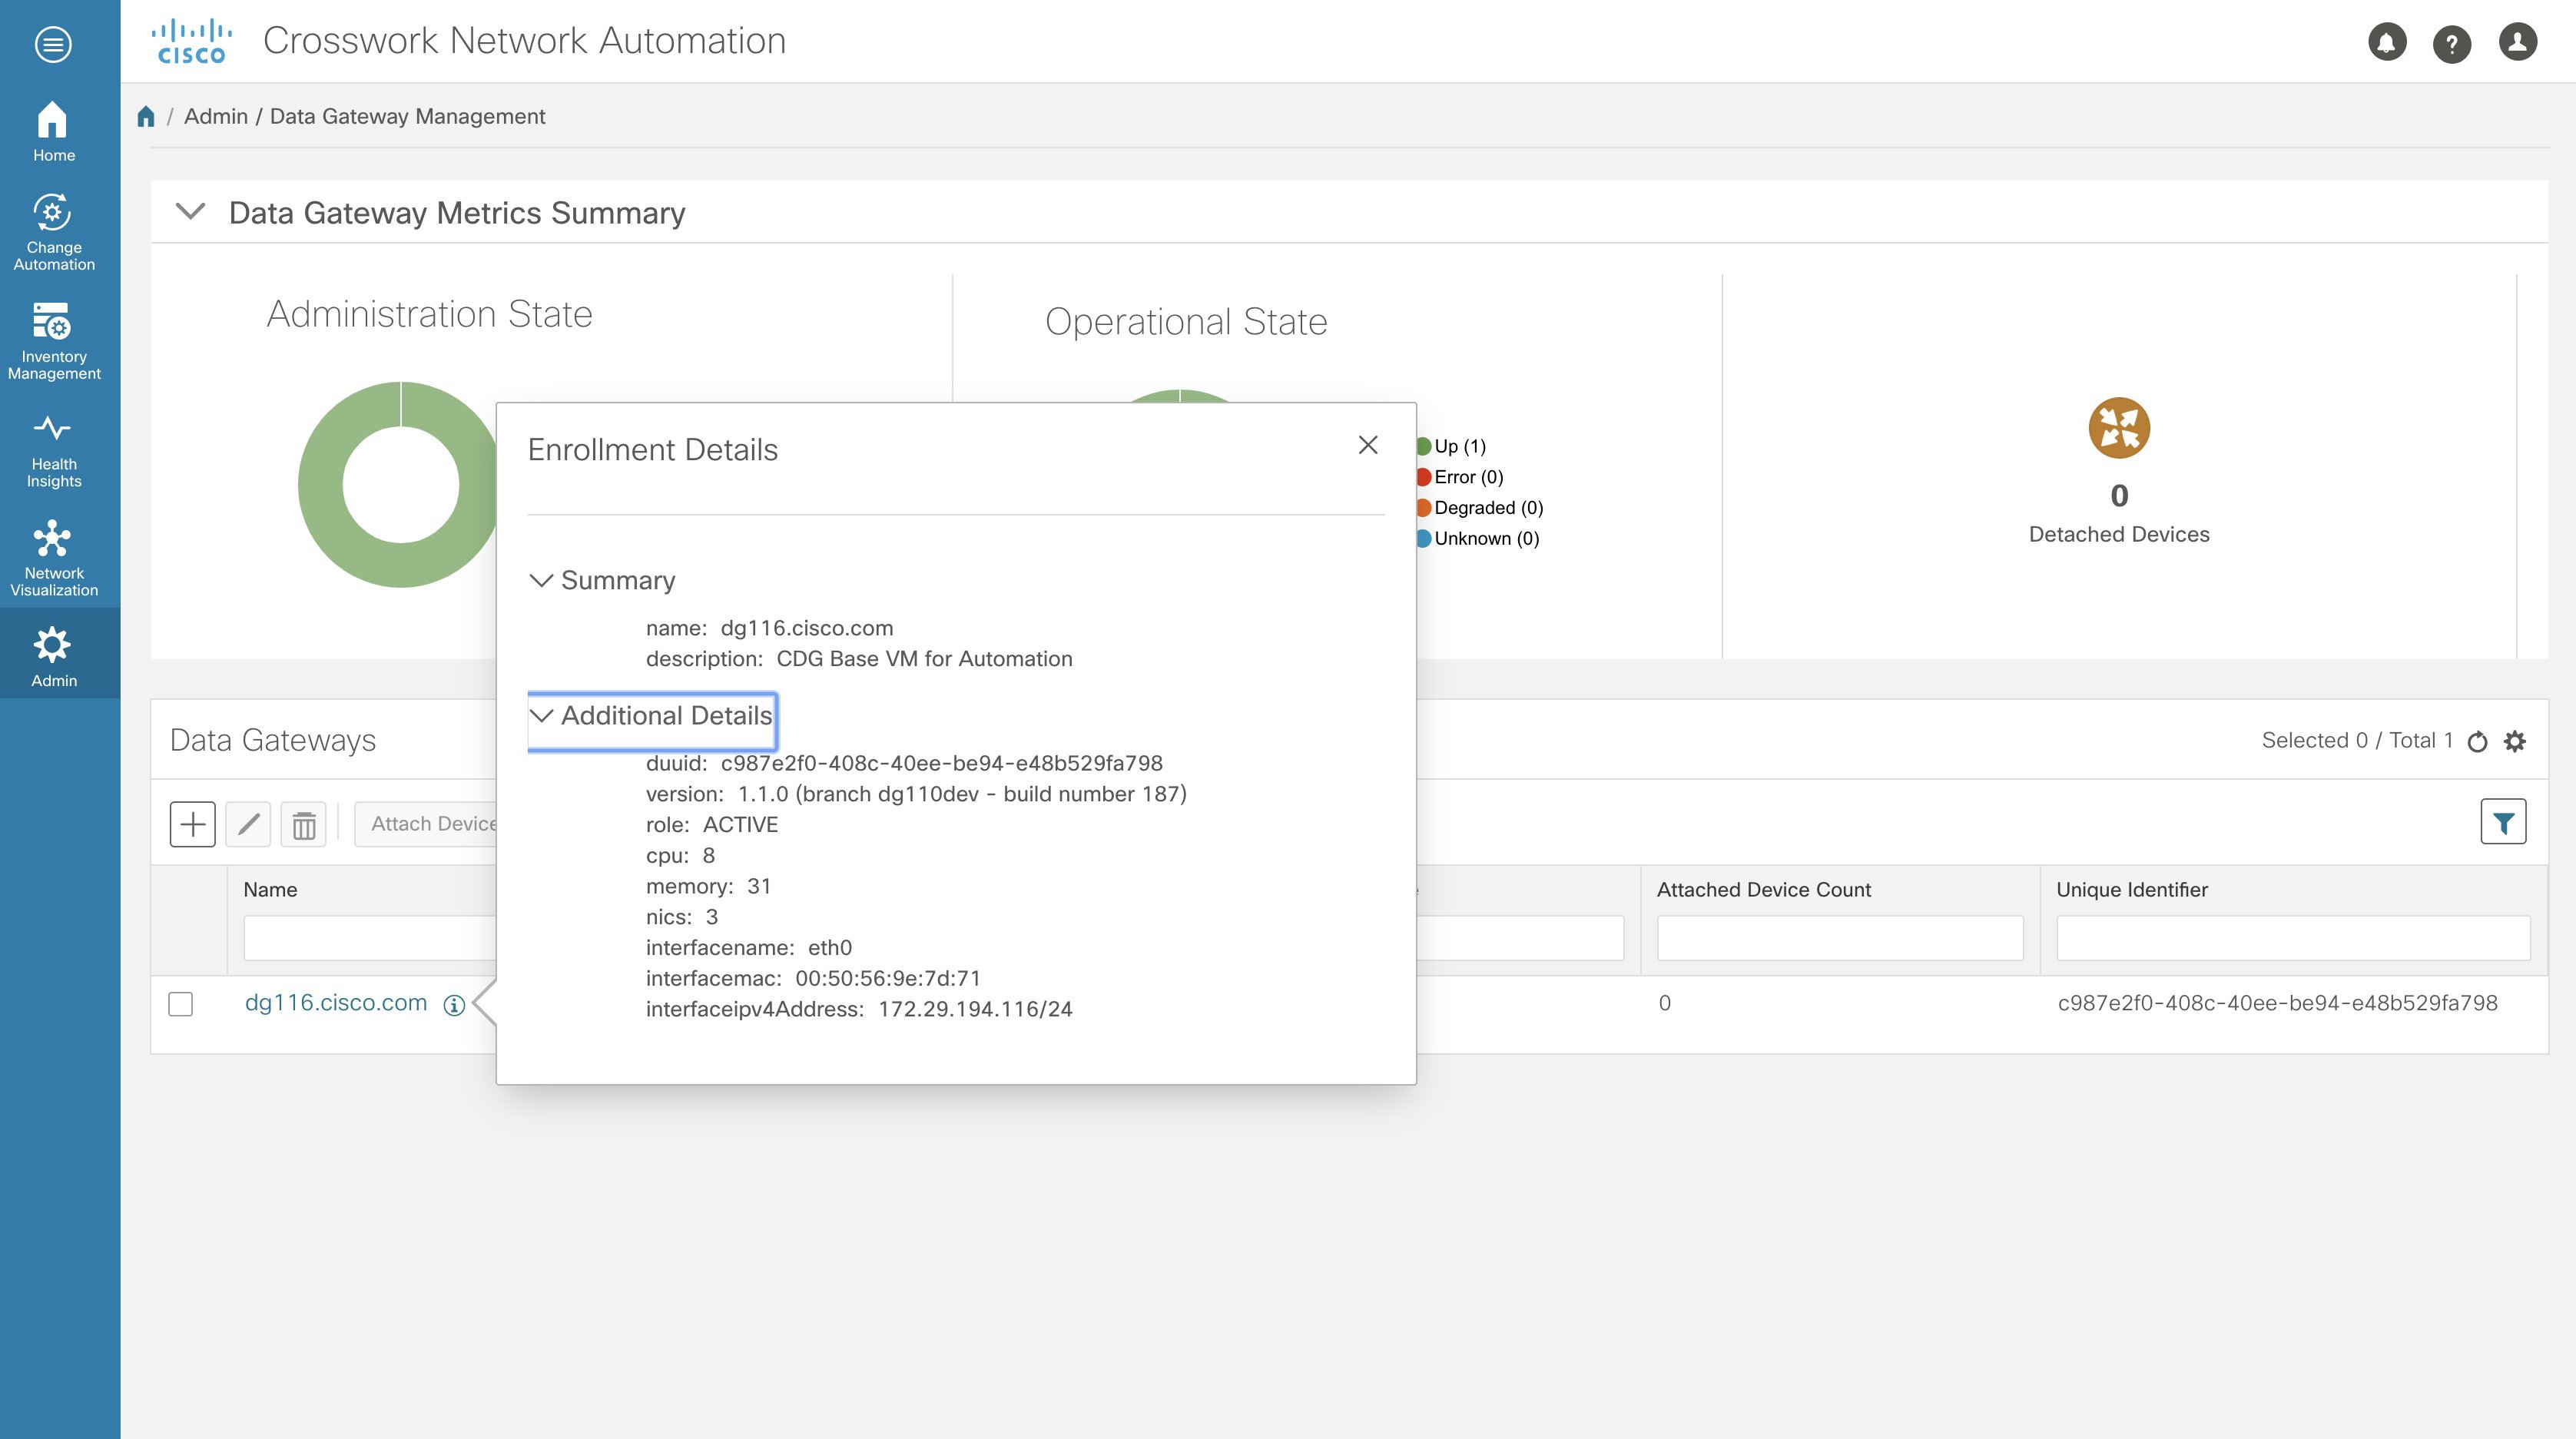
To view enrollment details of a Cisco Crosswork Data Gateway instance, in the Data Gateways pane, click icon next to the Cisco Crosswork Data Gateway name as shown in the following figure.
Note
Some of these details are the OVF parameters that were configured in the OVA Template while installing Cisco Crosswork Data Gateway. For description of these parameters, see Section: Install Crosswork Data Gateway in Cisco Crosswork Change Automation and Health Insights 3.1 Installation Guide.
Following enrollment details are displayed:
Field
Description
Summary
name
Name of the Cisco Crosswork Data Gateway instance.
description
User-friendly description to be displayed in the controller i.e., Crosswork.
Additional Details
duuid
Unique identifier for the Cisco Crosswork Data Gateway instance.
version
Currently installed version of Cisco Crosswork Data Gateway.
role
Is the Cisco Crosswork Data Gateway instance active or in maintenance mode.
cpu
Number of vCPUs.
memory
Amount of total memory.
nics
Number of NICs being used by Cisco Crosswork Data Gateway. This is 3 in case of on-premise installation i.e., for Cisco Crosswork Change Automation and Health Insights.
interfacename
Name of the interface.
interfacemac
MAC address of the interface
interfaceIPv4address/interfaceIPv6address
IPv4/IPv6 address of the interface.
cert_chain
Certificate used for handshake between Cisco Crosswork Data Gateway instance and Cisco Crosswork Change Automation and Health Insights.
Change the Administration State of a Cisco Crosswork Data Gateway Instance
You can change the adminstration state of a Cisco Crosswork Data Gateway instance via Crosswork UI.
Note
If the maintenance activities are affecting the communication between Crosswork and Cisco Crosswork Data Gateway, the collection is interrupted and resumes when the communication is restored.
While an instance is in in Maintenance mode, no new jobs are submitted to it. During downtime, admin can do modifications to Cisco Crosswork Data Gateway, such as updating the certificates, changing management address, etc.
Once changes are done, Admin can change the administration state to Up. Once the Cisco Crosswork Data Gateway is up, Crosswork resumes sending jobs to it.
Follow the steps below to change the administration state of a Cisco Crosswork Data Gateway instance.
Procedure
Step 1
From the main menu, choose Admin > Data Gateway Management. The Data Gateway Management view opens.
Step 2
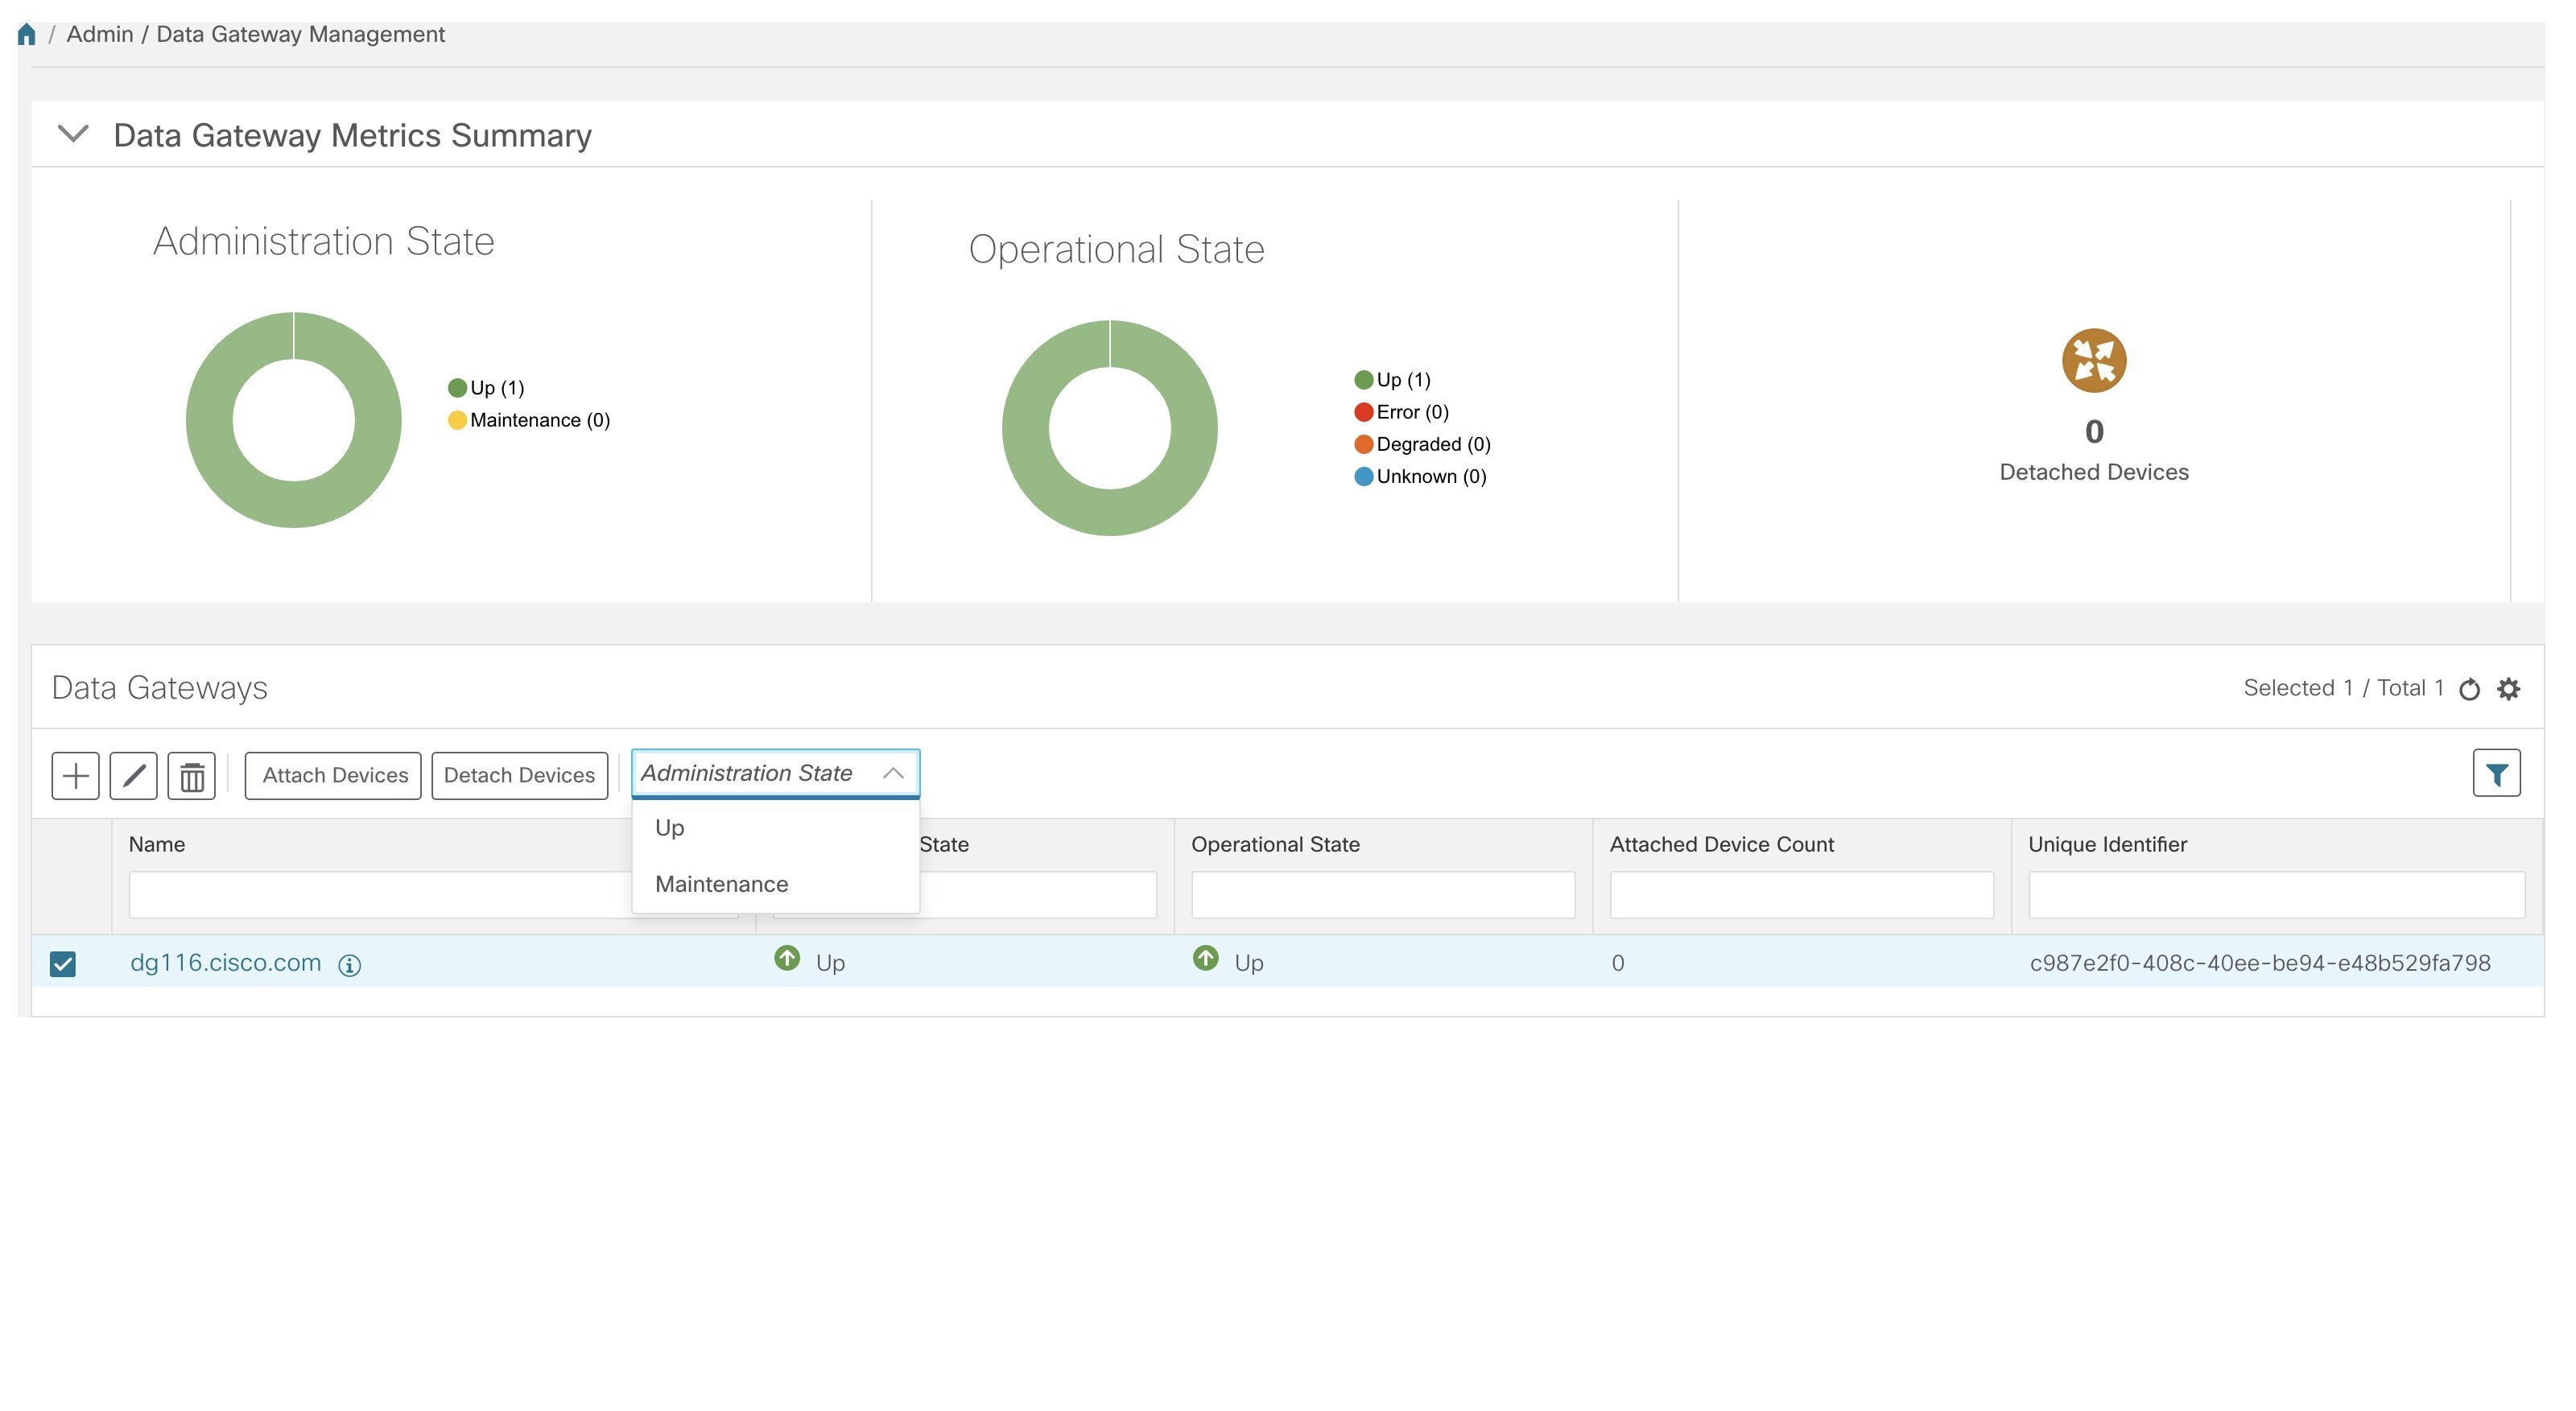
From the Data Gateways window, select the Cisco Crosswork Data Gateway instance whose administration state you want to change.
Step 3
From the Administration State dropdown, select the state to which you want to switch to.
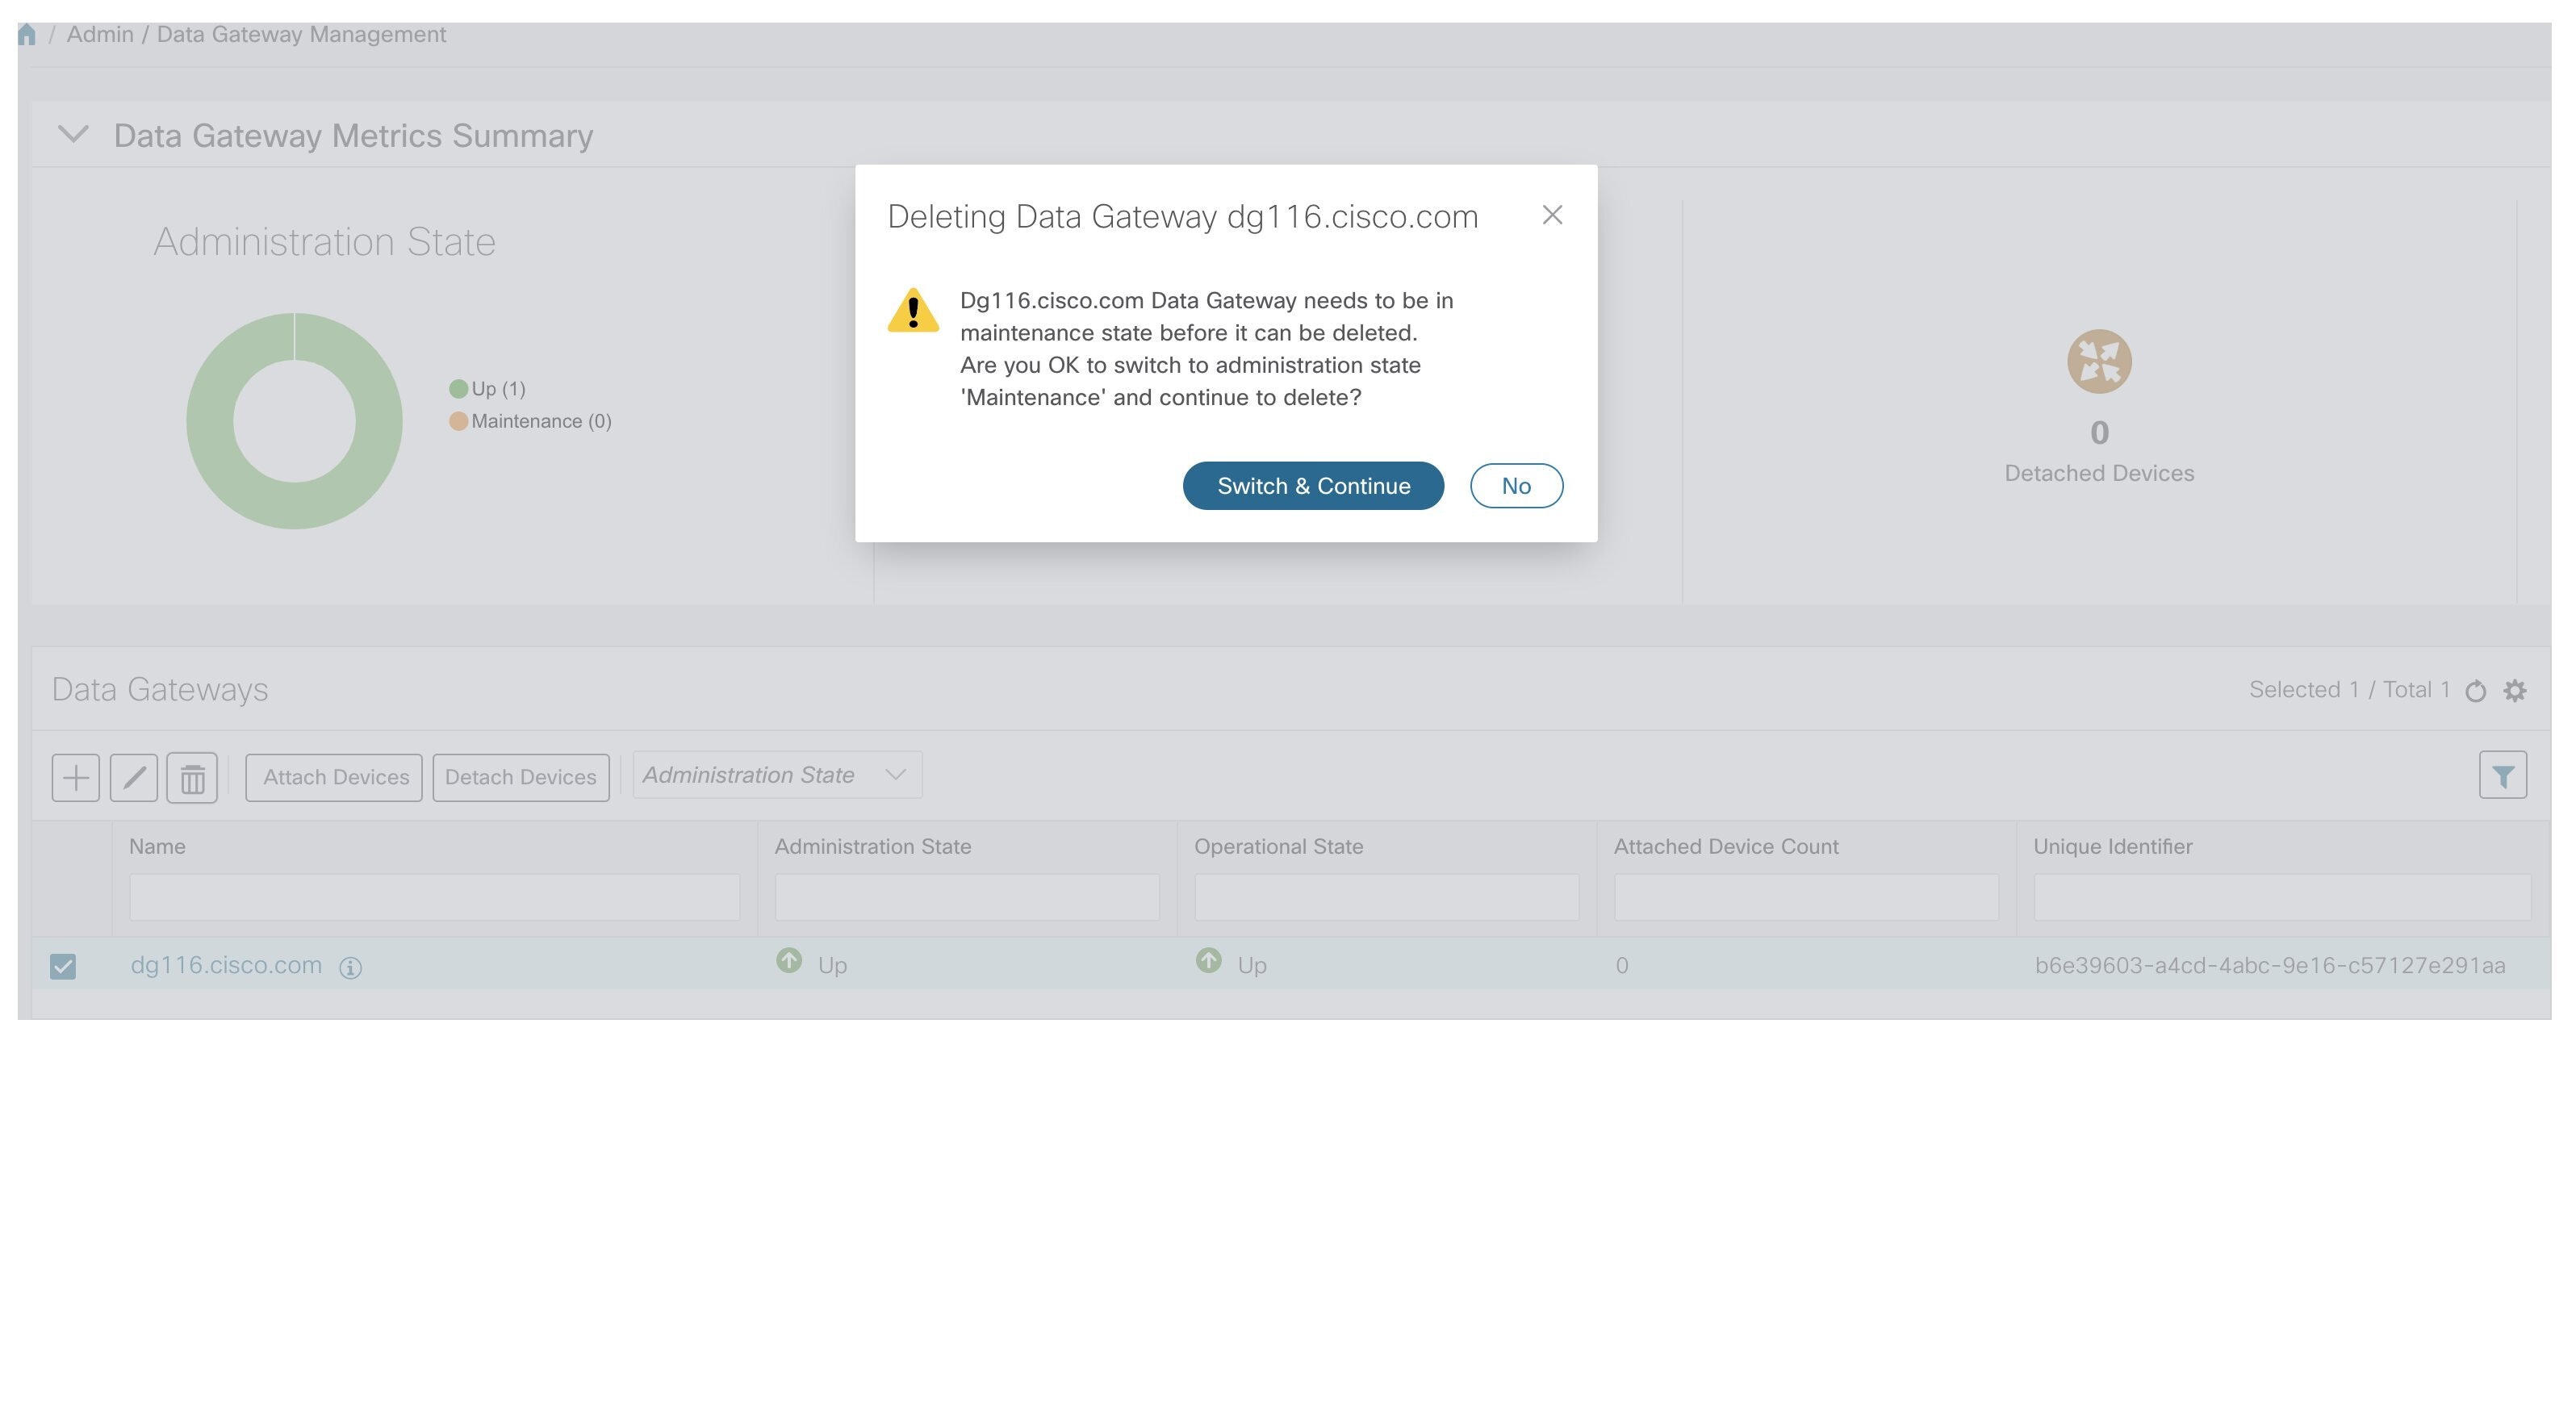
De-enroll a Cisco Crosswork Data Gateway Instance
Follow the steps below to de-enroll a Cisco Crosswork Data Gateway instance.
Procedure
Step 1
From the main menu, choose Admin > Data Gateway Management. The Data Gateway Management view opens.
Step 2
From the Data Gateways window, select the Cisco Crosswork Data Gateway instance you want to delete.
Step 3
Click .
Step 4
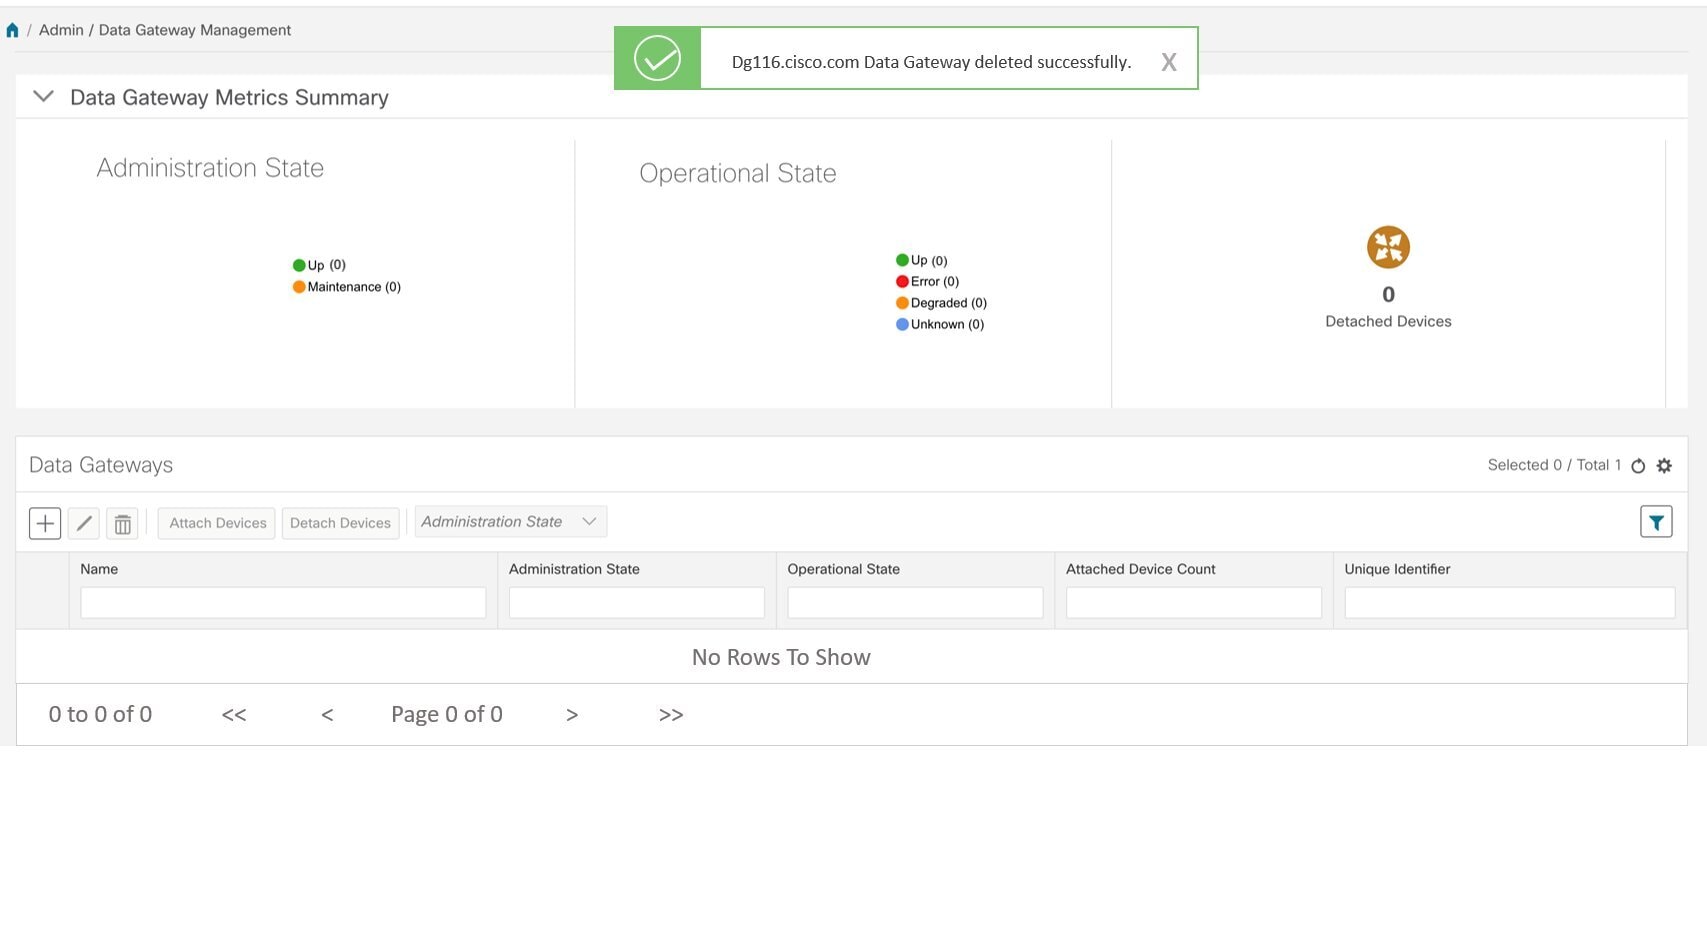
A Cisco Crosswork Data Gateway instance must be in maintenance mode to be deleted. Click Switch & Continue when prompted to switch to Maintenance mode.
The selected Cisco Crosswork Data Gateway instance is deleted.
Attach a Device to a Cisco Crosswork Data Gateway Instance
Note
A device can only be attached to one Cisco Crosswork Data Gateway instance.
Follow the steps below to attach a device to a Cisco Crosswork Data Gateway instance.
Before you begin
For optimal performance, it is recommended that device attaching to Cisco Crosswork Data Gateway instance should be done in batches of no more than 300 devices.
You can add more than 300 devices. However, doing so may cause a performance impact.
Ensure that both the adminstration state and operational state of the Cisco Crosswork Data Gateway instance to which you want to attach devices is "Up". Only then proceed with attaching devices.
Procedure
Step 1
From the main menu, choose Admin > Data Gateway Management. The Data Gateway Management view opens.
Step 2
From the Data Gateways window, select the Cisco Crosswork Data Gateway instance which you want to attach devices to.
Step 3
Click Attach Devices. The Attach Devices window opens. It lists all the devices available for attaching.
Step 4
To attach all the devices click Attach All Devices. Otherwise, select the devices you want to attach and click Attach Selected Devices.
What to do next
To verify if the devices were attached to the VM, check the Attached Device Count under Data Gateways pane. The count would have increased.
Click on icon next to the attached device count to see the list of all devices attached to the selected instance as shown in the following
figure.
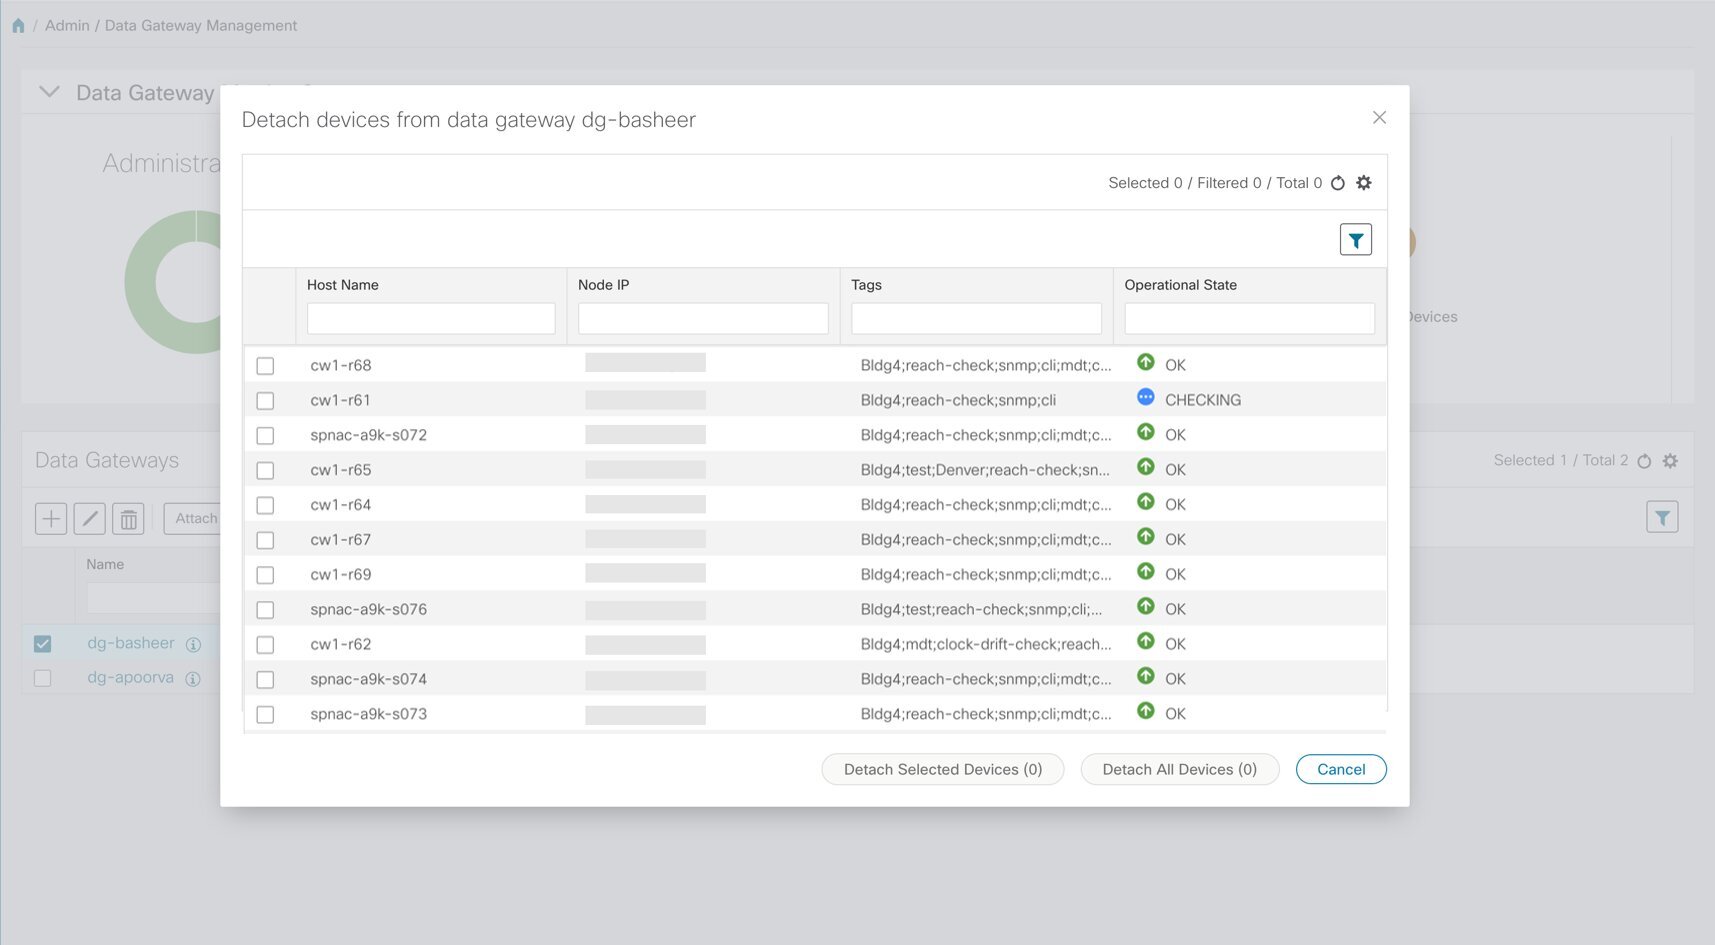
Detach a Device From a Cisco Crosswork Data Gateway Instance
Follow the steps below to detach a device from a Cisco Crosswork Data Gateway instance.
Procedure
Step 1
From the main menu, choose Admin > Data Gateway Management. The Data Gateway Management view opens.
Step 2
From the Data Gateways window, select the Cisco Crosswork Data Gateway instance from which you want to detach devices.
Step 3
Click Detach Devices. The Detach Devices window opens. It lists all the devices attached to the selected Cisco Crosswork Data Gateway instance.
Step 4
To detach all the devices click Detach All Devices. Otherwise, select the devices you want to detach and click Detach Selected Devices.
What to do next
To verify if the devices were detached from the VM, check the Attached Device Count under Data Gateways window. The count would have decreased.
View Cisco Crosswork Data Gateway Instance Health
Cisco Crosswork Data Gateway comprises of various containerized services running on an Ubuntu VM. Its overall health depends on health of each containerized
service.
Cisco Crosswork Data Gateway collects host and container metrics and writes them to a container mounted path in vitals.json file and sends it to the Crosswork.
Vitals also contains the health information of individual container services running on the Cisco Crosswork Data Gateway instance and their resource consumption.
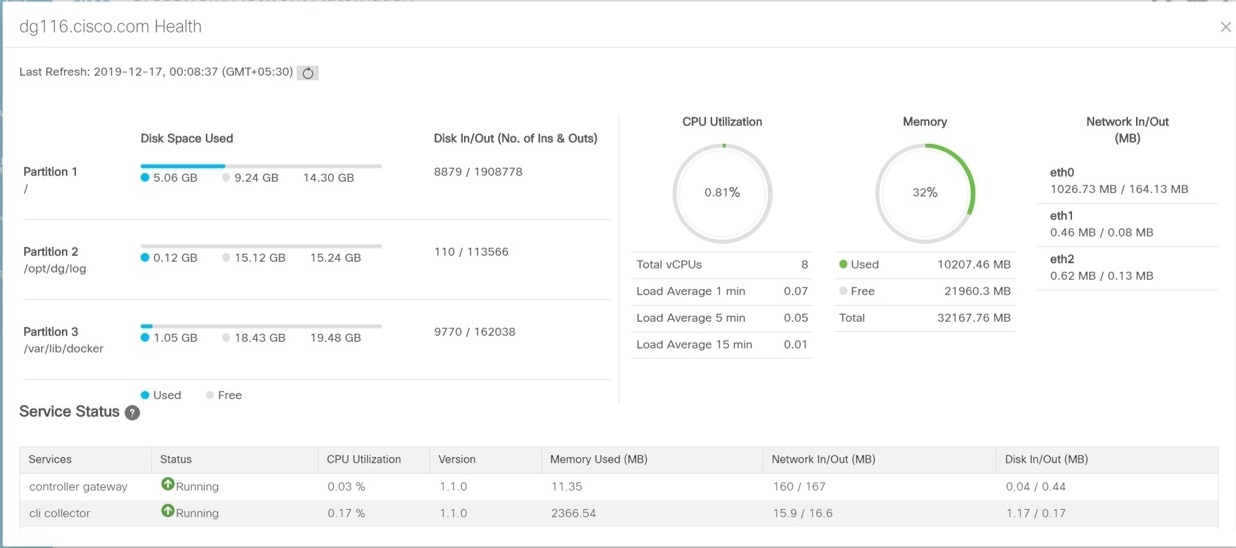
To view health of a Cisco Crosswork Data Gateway instance, in the Data Gateways window, click the name of the Cisco Crosswork Data Gateway instance whose health you want to view as shown in the following figure.
The Health pop up displays the following details:
Field
Description
Host VM
Last Refresh
Date and time of the last refresh.
Click to refresh the Data Gateway Health pop up.
Disk Space Used
Percentage of the disk space used for partitions:
/
/opt/dg/log
/var/lib/docker
Disk In/Out
Number of read/write or input/output operations involving a disk for the partitions:
/
/opt/dg/log
/var/lib/docker
Note
This is a cumulative counter, not a delta time series.
CPU Utilization
Amount of actively used CPU and total number of vCPUs.
Load
Load average – is the average system load over a given period of time of 1, 5, and 15 minutes.
Memory
Amount of memory used and available memory.
Network In/Out
The amount of data sent/received in MB for NIC interfaces:
eth0
eth1
eth2
Note
This is a cumulative counter, not a delta time series.
Service Status
Service
Name of the Cisco Crosswork Data Gateway service.
Status
Status of the service:
Running
Degraded
Error
CPU Utilization
Percentage of actively utilized CPU by the service.
Version
Version of the service deployed.
Memory Used (MB)
Amount of memory being used by the service.
Network In/Out
The amount of data sent/received in MB by the service over its interface.
Note
This is a cumulative counter, not a delta time series.
Disk In/Out
Number of read/write or input/output operations that the service has done involving a disk.
Note
This is a cumulative counter, not a delta time series.
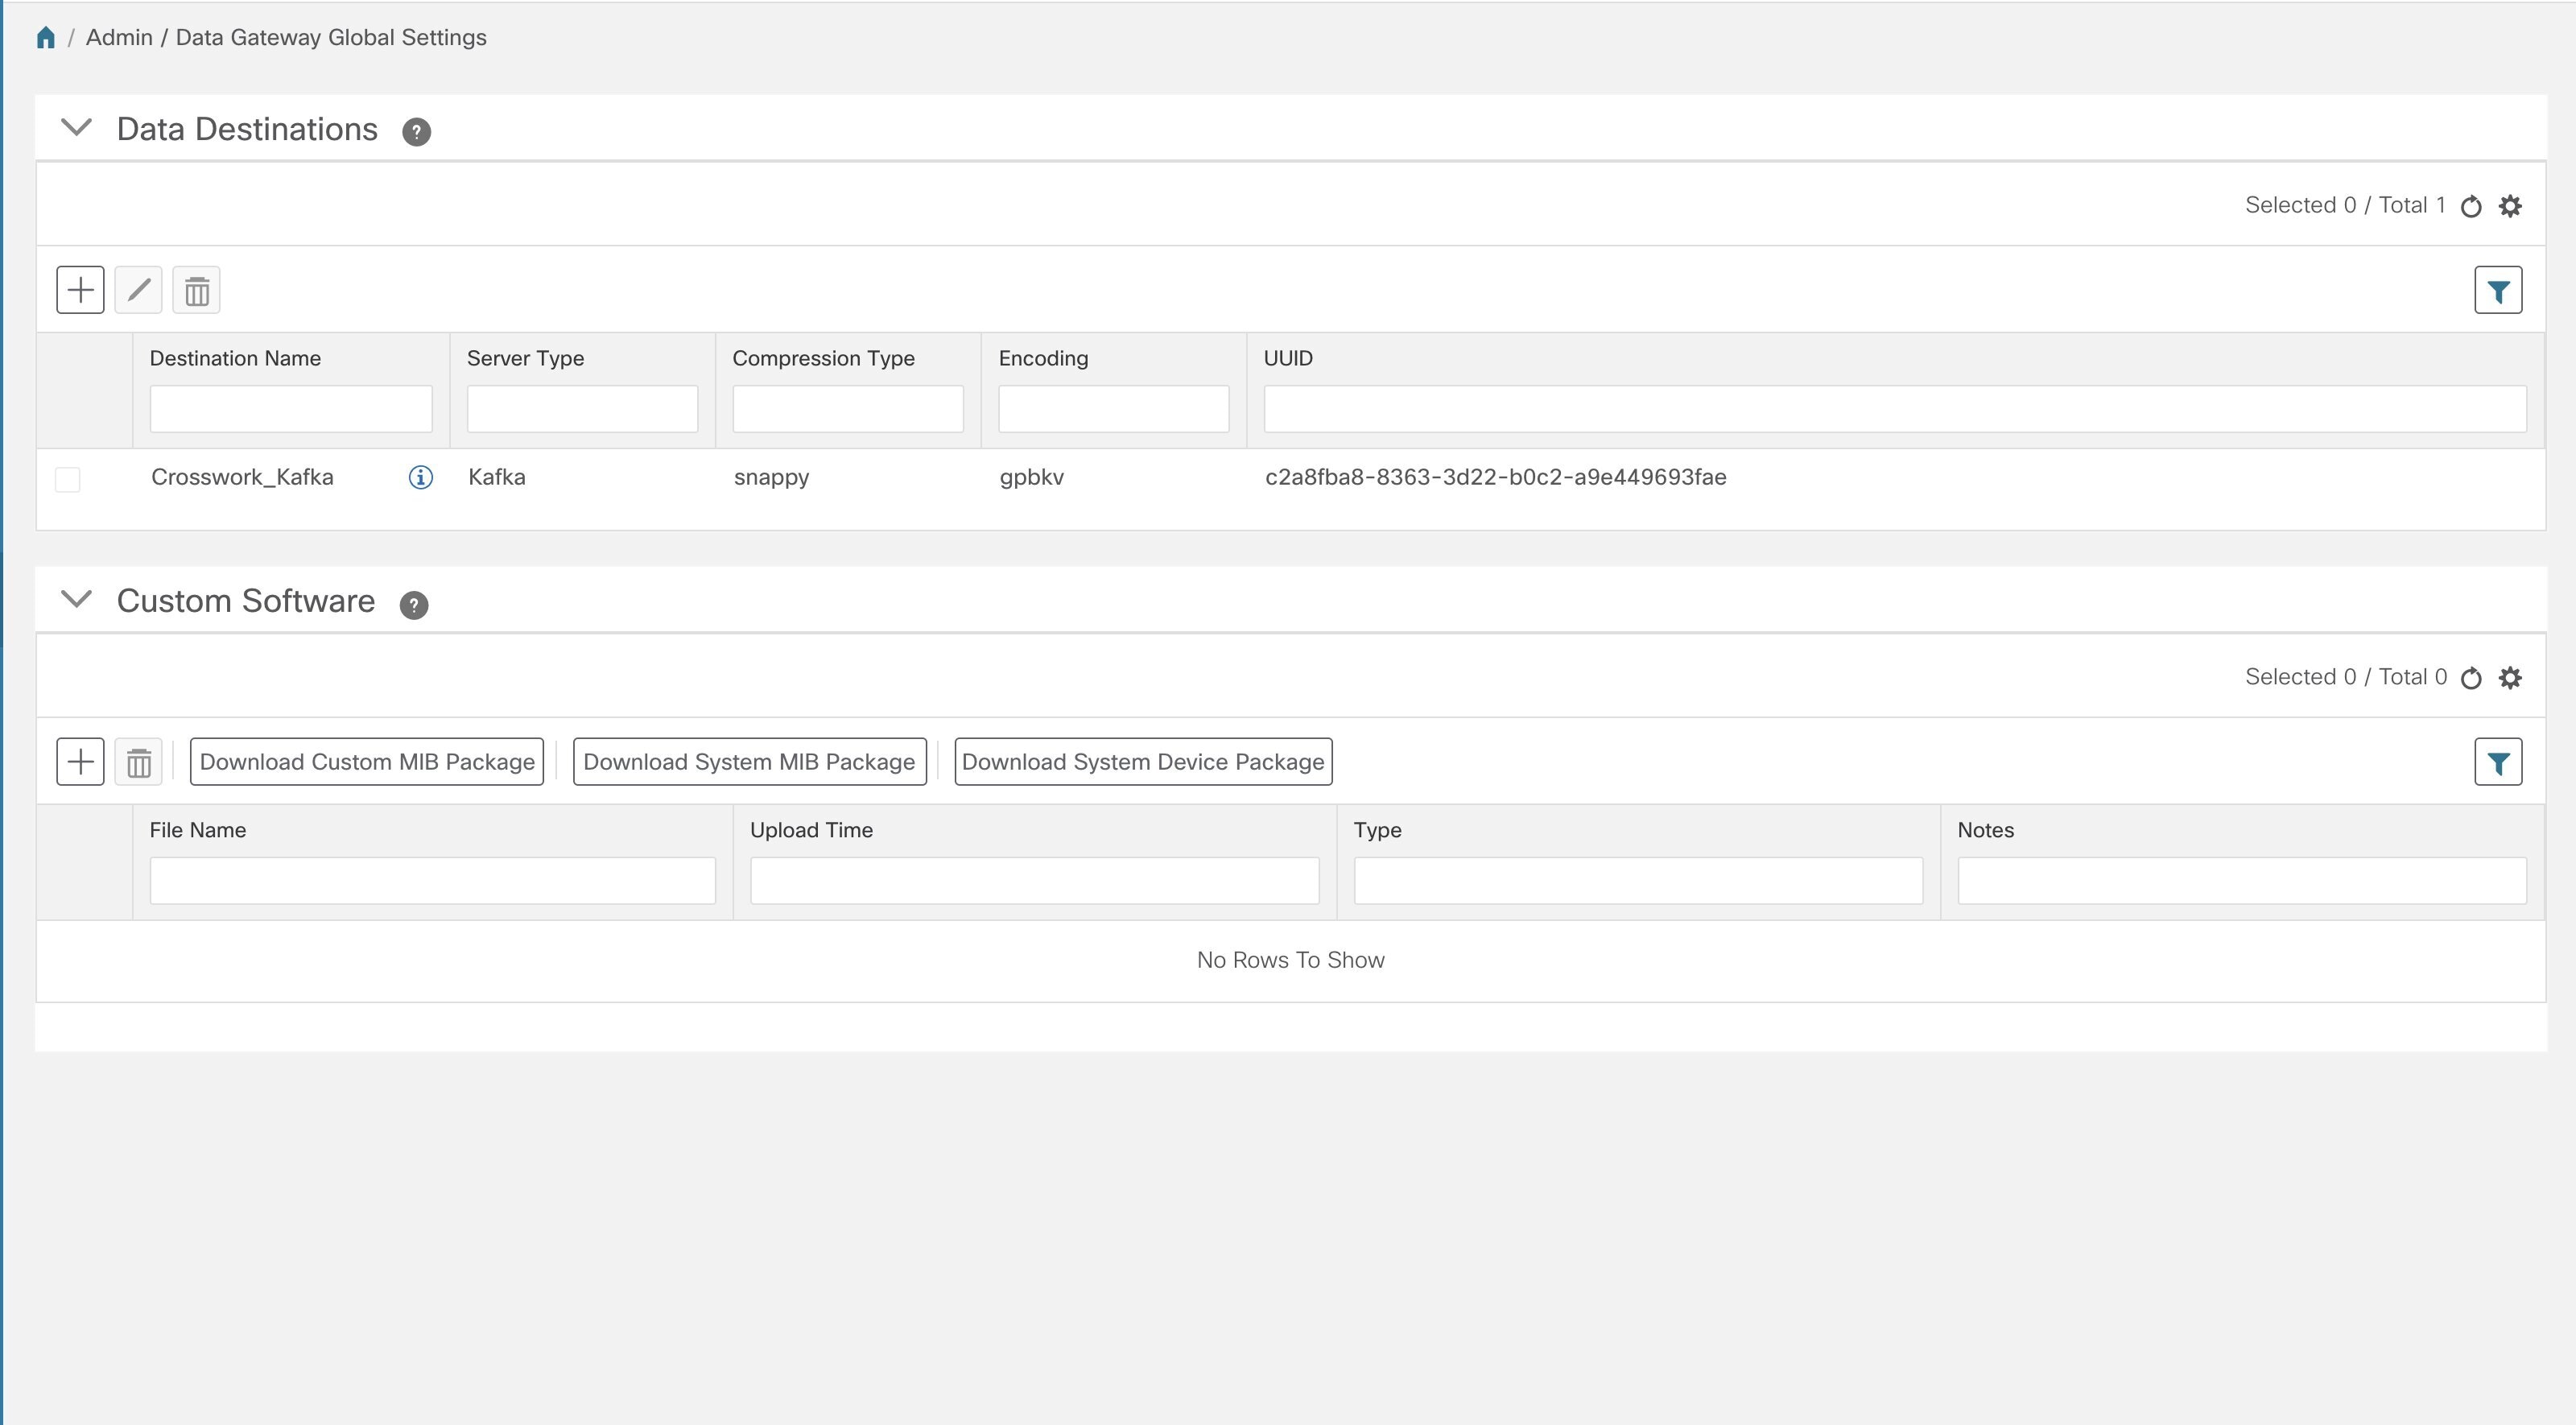
Configure Cisco Crosswork Data Gateway Settings
This section describes how to configure global settings for Cisco Crosswork Data Gateway i.e., managing data destinations and custom software packages.
To open Cisco Crosswork Data Gateway global settings view, choose Admin > Data Gateway Global Settings from the left navigation bar in the Cisco Crosswork Change Automation and Health Insights window.
Figure 3. Data Gateway Global Settings View
Item
Description
Data Destinations Pane
Shows approved external data destinations that can be used by collection jobs to deposit their data and provides options to
add, edit, and delete data destinations.
Custom Software Pane
Provides options to:
add and delete custom MIBs and device packages
download custom MIBs, system MIBs, and device packages
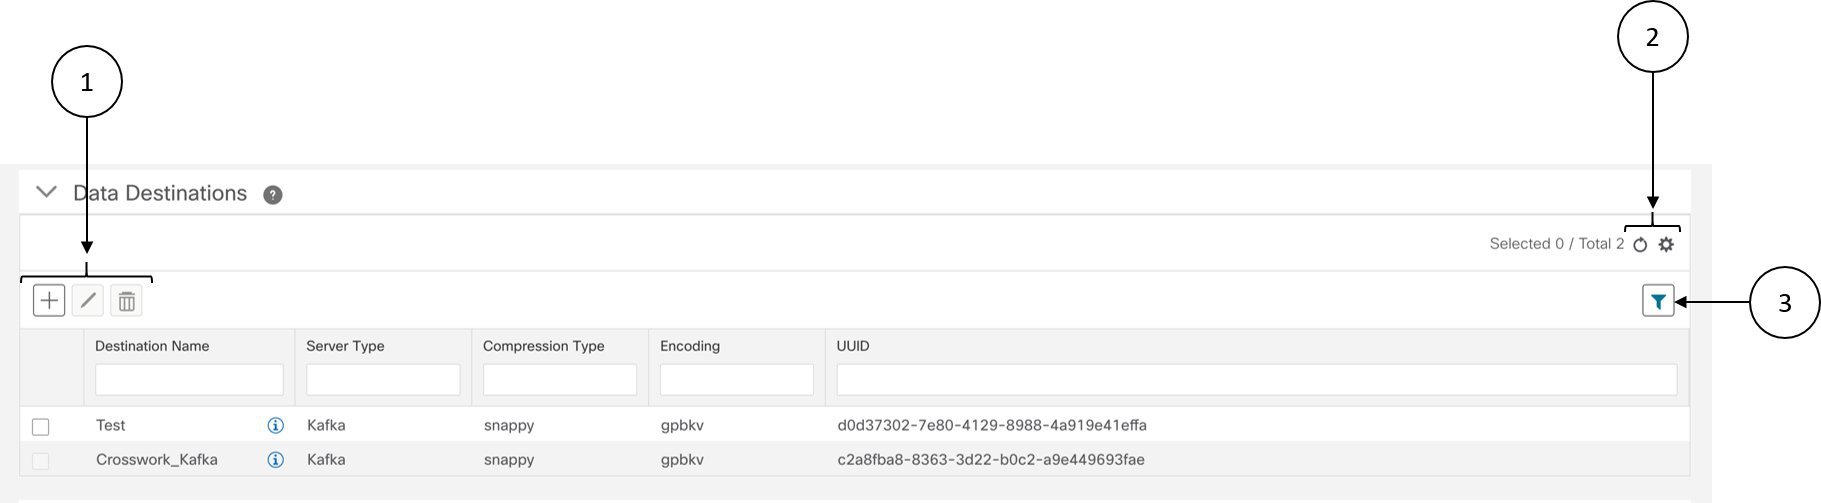
Manage Data Destinations
From the Data Destinations pane, you can add a new data destination, update the settings configured for an existing data destination, and delete a data
destination.
Note
The Crosswork_Kafka data destination in the below figure is Cisco Crosswork Change Automation and Health Insights's internal data destination and hence, it cannot be updated or deleted.
Click to set filter criteria on one or more columns in the Data Destinations window.
Click the Clear All Filters link to clear any filter criteria you may have set.
Data Destination pane displays the following details of the data destinations:
Field
Description
Destination Name
Name of the data destination
Server Type
Server type of the data destination i.e., external Kafka or gRPC server.
Compression Type
Compression type being used for the data destination. Crosswork
Encoding
Encoding type being used for the data destination.
UUID
Unique identifier for the data destination. This ID is automatically generated by Crosswork when an external data destination
is created and is a required parameter for collection job creation.
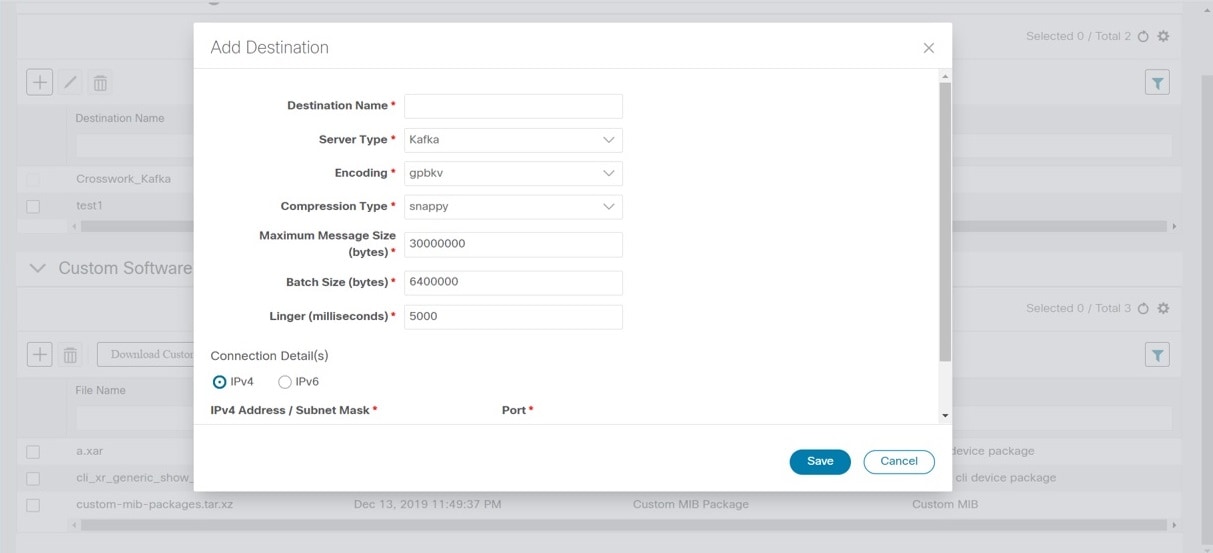
Add a Data Destination
Note
If you reinstall an already existing external Kafka data destination with the same IP address, then the collectors need to
be restarted for changes to take place .
Follow the steps below to add a new data destination. You can then use this data destination for data collection. You can
add multiple data destinations.
Before you begin
If you are using an external Kafka server for data collection, ensure the following:
You have configure the following properties on the external Kafka server:
Note
Refer your Kafka documentation for description and usage of these properties as this explanation is out of scope of this document.
num.io.threads = 8
num.network.threads = 3
message.max.bytes= 30000000
Create Kafka topics that you want to be used for data collection.
Procedure
Step 1
From the main menu, choose Admin > Data Gateway Global Settings.
Step 2
From Data Destinations pane, choose .
Step 3
In the Add Destination pop-up, enter the values for the following fields as per the table below:
Field
Value
Destination Name
Enter a descriptive data destination name. The name can contain a maximum of 128 alphanumeric characters, plus underscores
("_") or hyphens ("-"). No other special characters are allowed.
If you will have many data destinations, make the name as informative as possible to be able to distinguish later.
Server Type
From the drop down, select the server type of your data destination (Kafka/gRPC).
Encoding
From the drop down, select the encoding (json/gpbkv).
Compression Type
From the drop down, select the compression type:
Compression types supported for Kafka are snappy, gzip, lz4, zstd, and none)
Note
zstd compression type is supported only for Kafka 2.0 or higher.
Compression types supported for gRPC are snappy, gzip, and deflate.
Maximum Message Size (bytes) (Kafka-only)
Enter the maximum message size in bytes.
Default Value: 30000000 bytes/ 30 MB
Min: 1000000 bytes/1 MB
Max: 30000000 bytes/ 30 MB
For Maximum Message Size property, you can input a value lesser than the default, but not more.
Batch Size (bytes) (Kafka-only)
Enter the required batch size in bytes.
Default Value: 6400000 bytes/6.4 MB
Min: 16384 bytes/ 16.38 KB
Max: 6400000 bytes/6.4 MB
Note
For Batch Size property, you can input a value lesser than the default, but not more.
Linger (milliseconds) (Kafka-only)
Enter the required linger time in milliseconds.
Default Value: 5000 ms
Min: 0 ms
Max: 5000 ms
Step 4
Select a protocol from the Connection Details options. Cisco Crosswork Data Gateway supports both IPv4 and IPv6.
Step 5
Complete the Connection Details fields as described in the following table. The fields displayed will vary with the connectivity type you chose. The values
you enter must match the values configured on the device.
Connectivity Type
Fields
IPv4
Enter the required IPv4 Address/ Subnet Mask, and Port. You can add multiple IPv4 addresses by clicking + Add Another
IPv6
Enter the required IPv6 Address/ Subnet Mask, and Port. You can add multiple IPv6 addresses by clicking + Add Another.
Step 6
Click Save.
What to do next
Create the Kafka topics prior to submitting the job to Crosswork. Depending on external Kafka and how topics are managed in
that external Kafka, Cisco Crosswork Data Gateway logs may show the exception listed when and if the topic does not exist at the time of dispatching the collected data to
that specific external Kafka / topic. This could be either due to the topic is not yet created or topic got deleted prior
to the completion of the requested collection job and dispatching the collected data.
destinationContext: topicmdt4
org.apache.kafka.common.errors.UnknownTopicOrPartitionException: This server does not host this topic-partition.
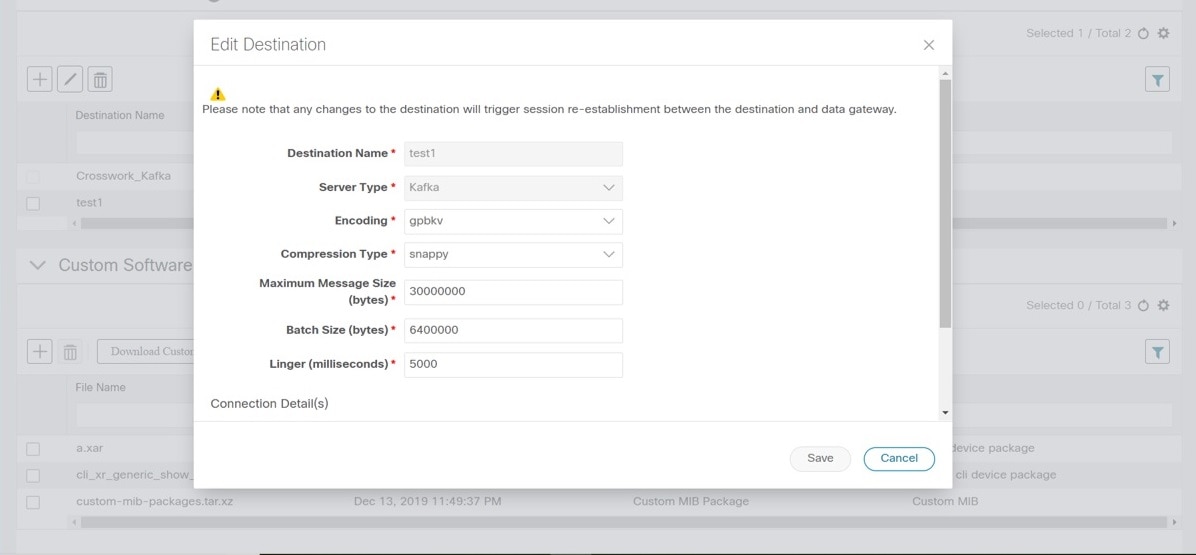
Update a Data Destination
Note
Updating a data destination causes the Cisco Crosswork Data Gateway instance using it to re-establish a session with that data destination. Thus, the data collection is paused and resumes once
the session is re-established.
Follow the steps below to update a data destination.
Procedure
Step 1
From Data Destinations window, select the destination you want to update.
Step 2
Click .
Step 3
In the Edit Destination pop up, make the required changes.
Note
In Edit mode, you cannot update Destination Name and Server Type.
Step 4
Click Save.
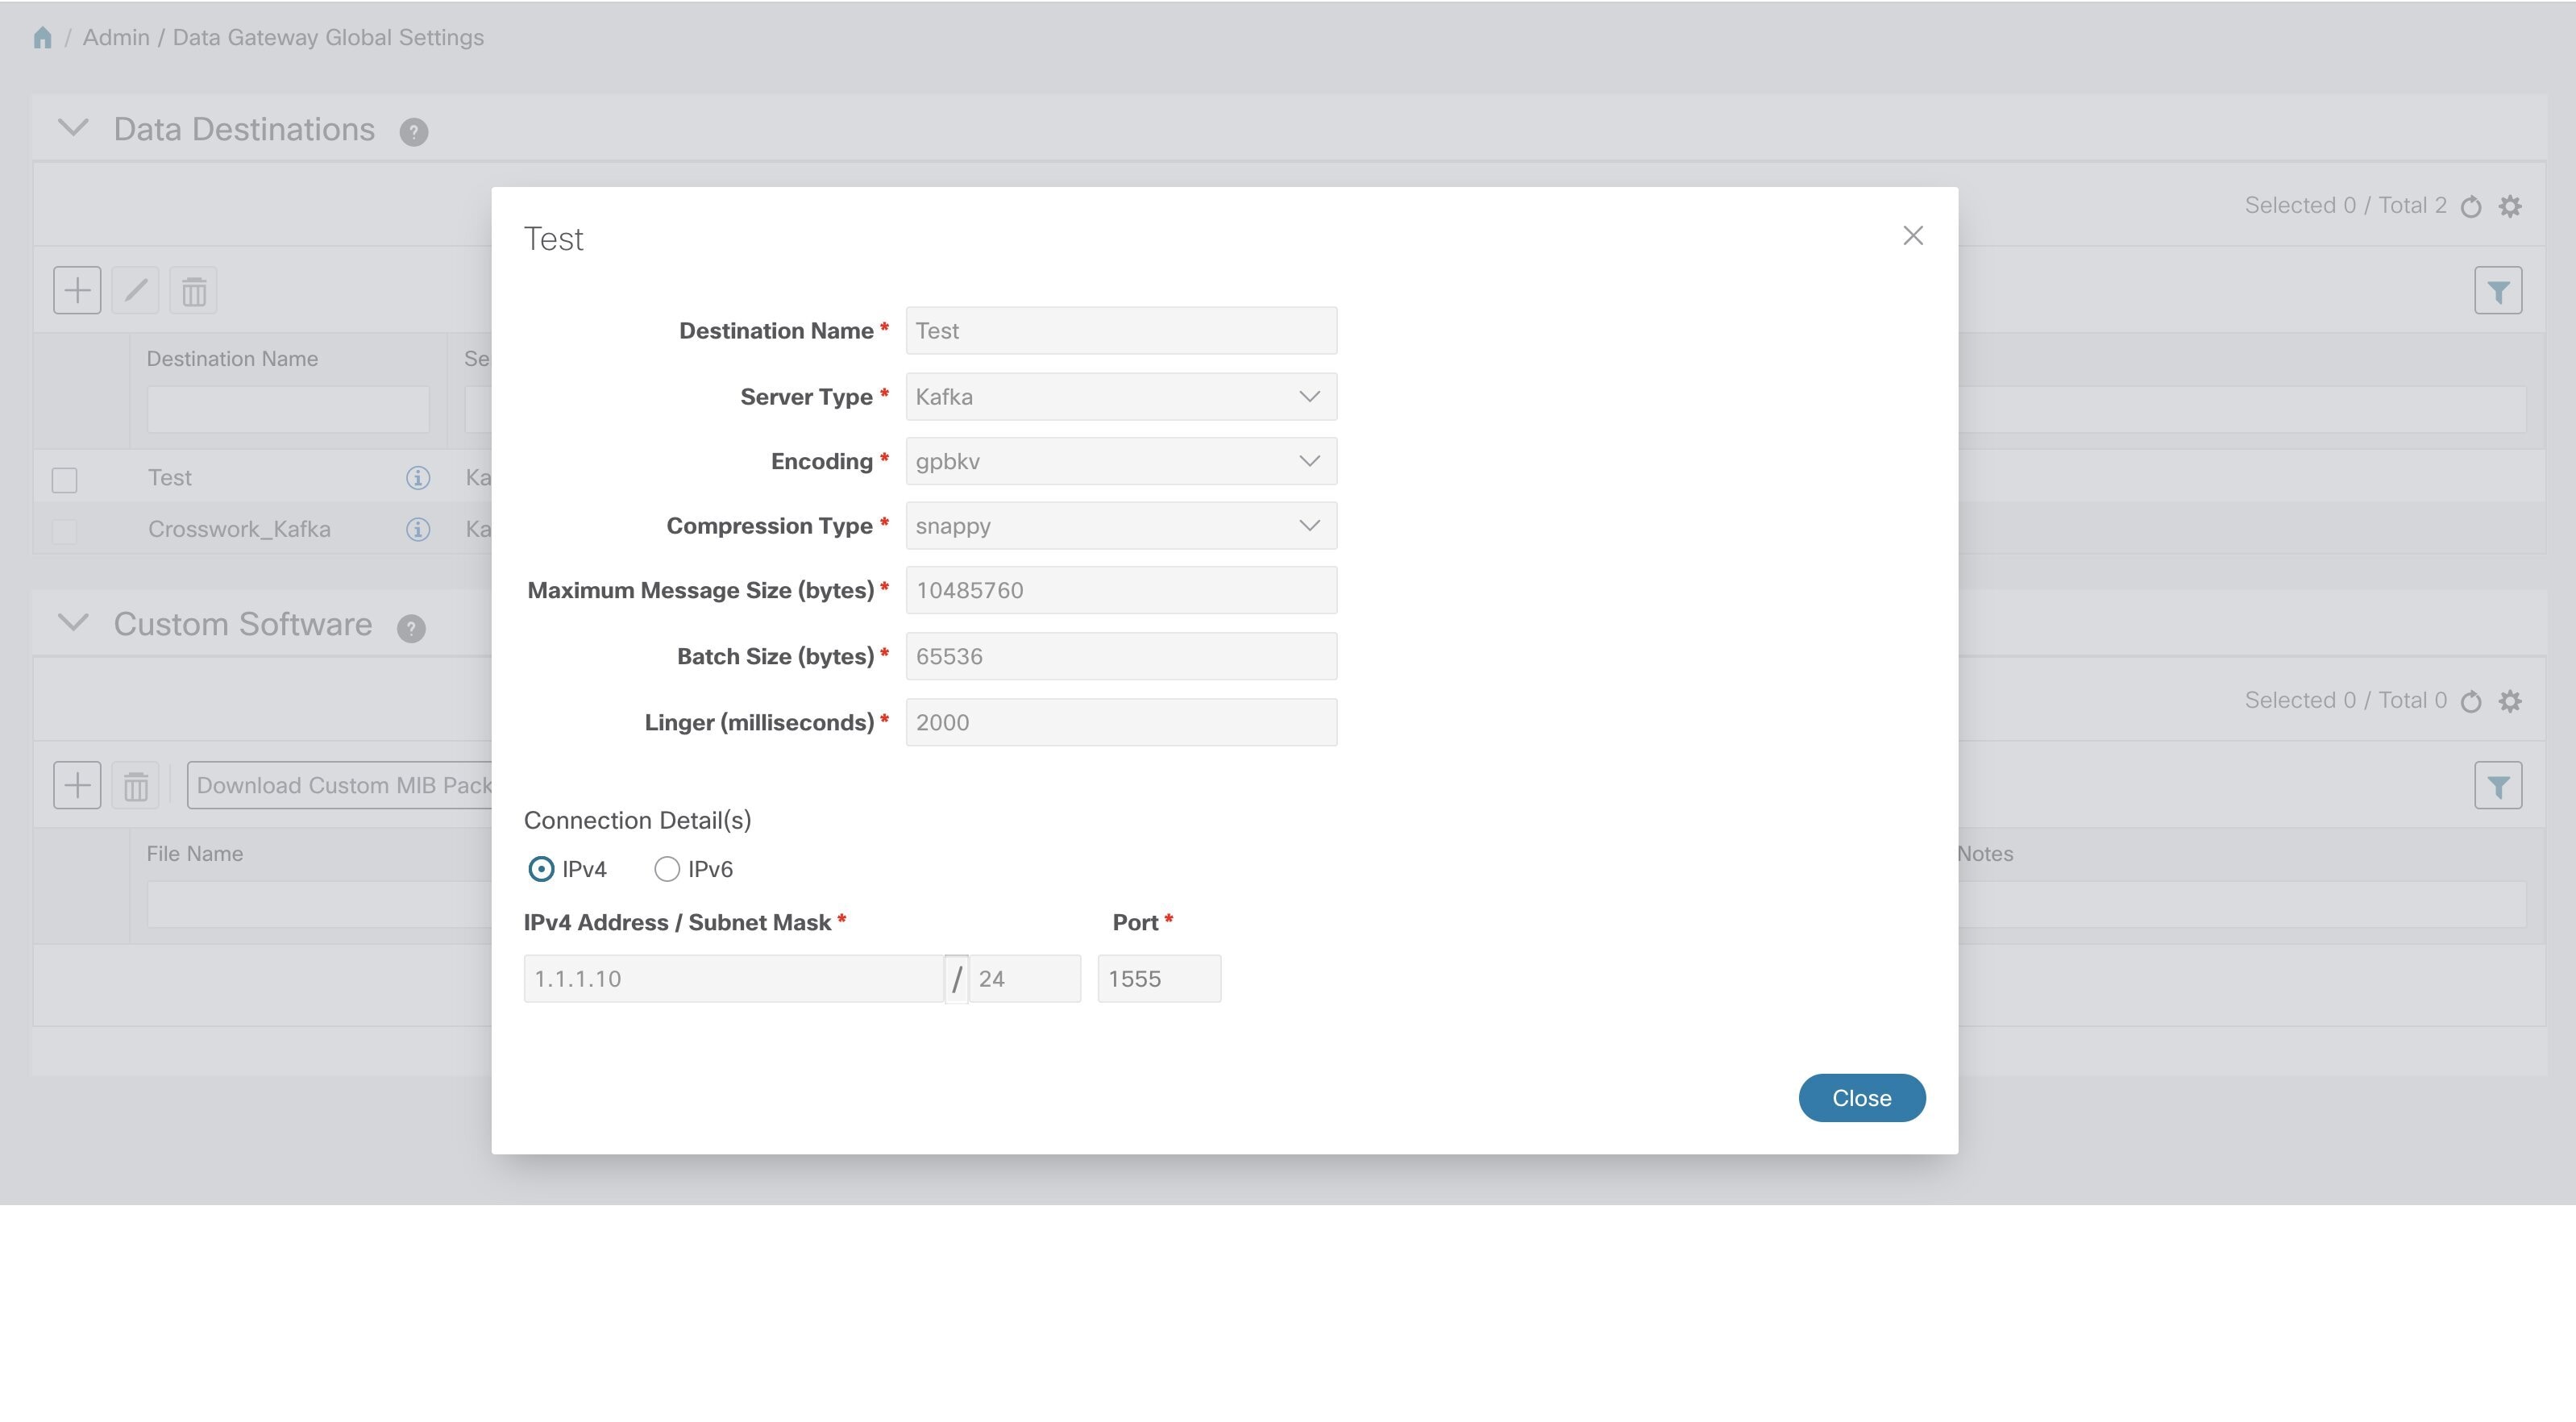
View Data Destination Details
To view details of a data destination, in the Data Destinations pane, click icon next to the data destination name whose details you want to see. Cisco Crosswork Data Gateway displays the details as shown in the following figure.
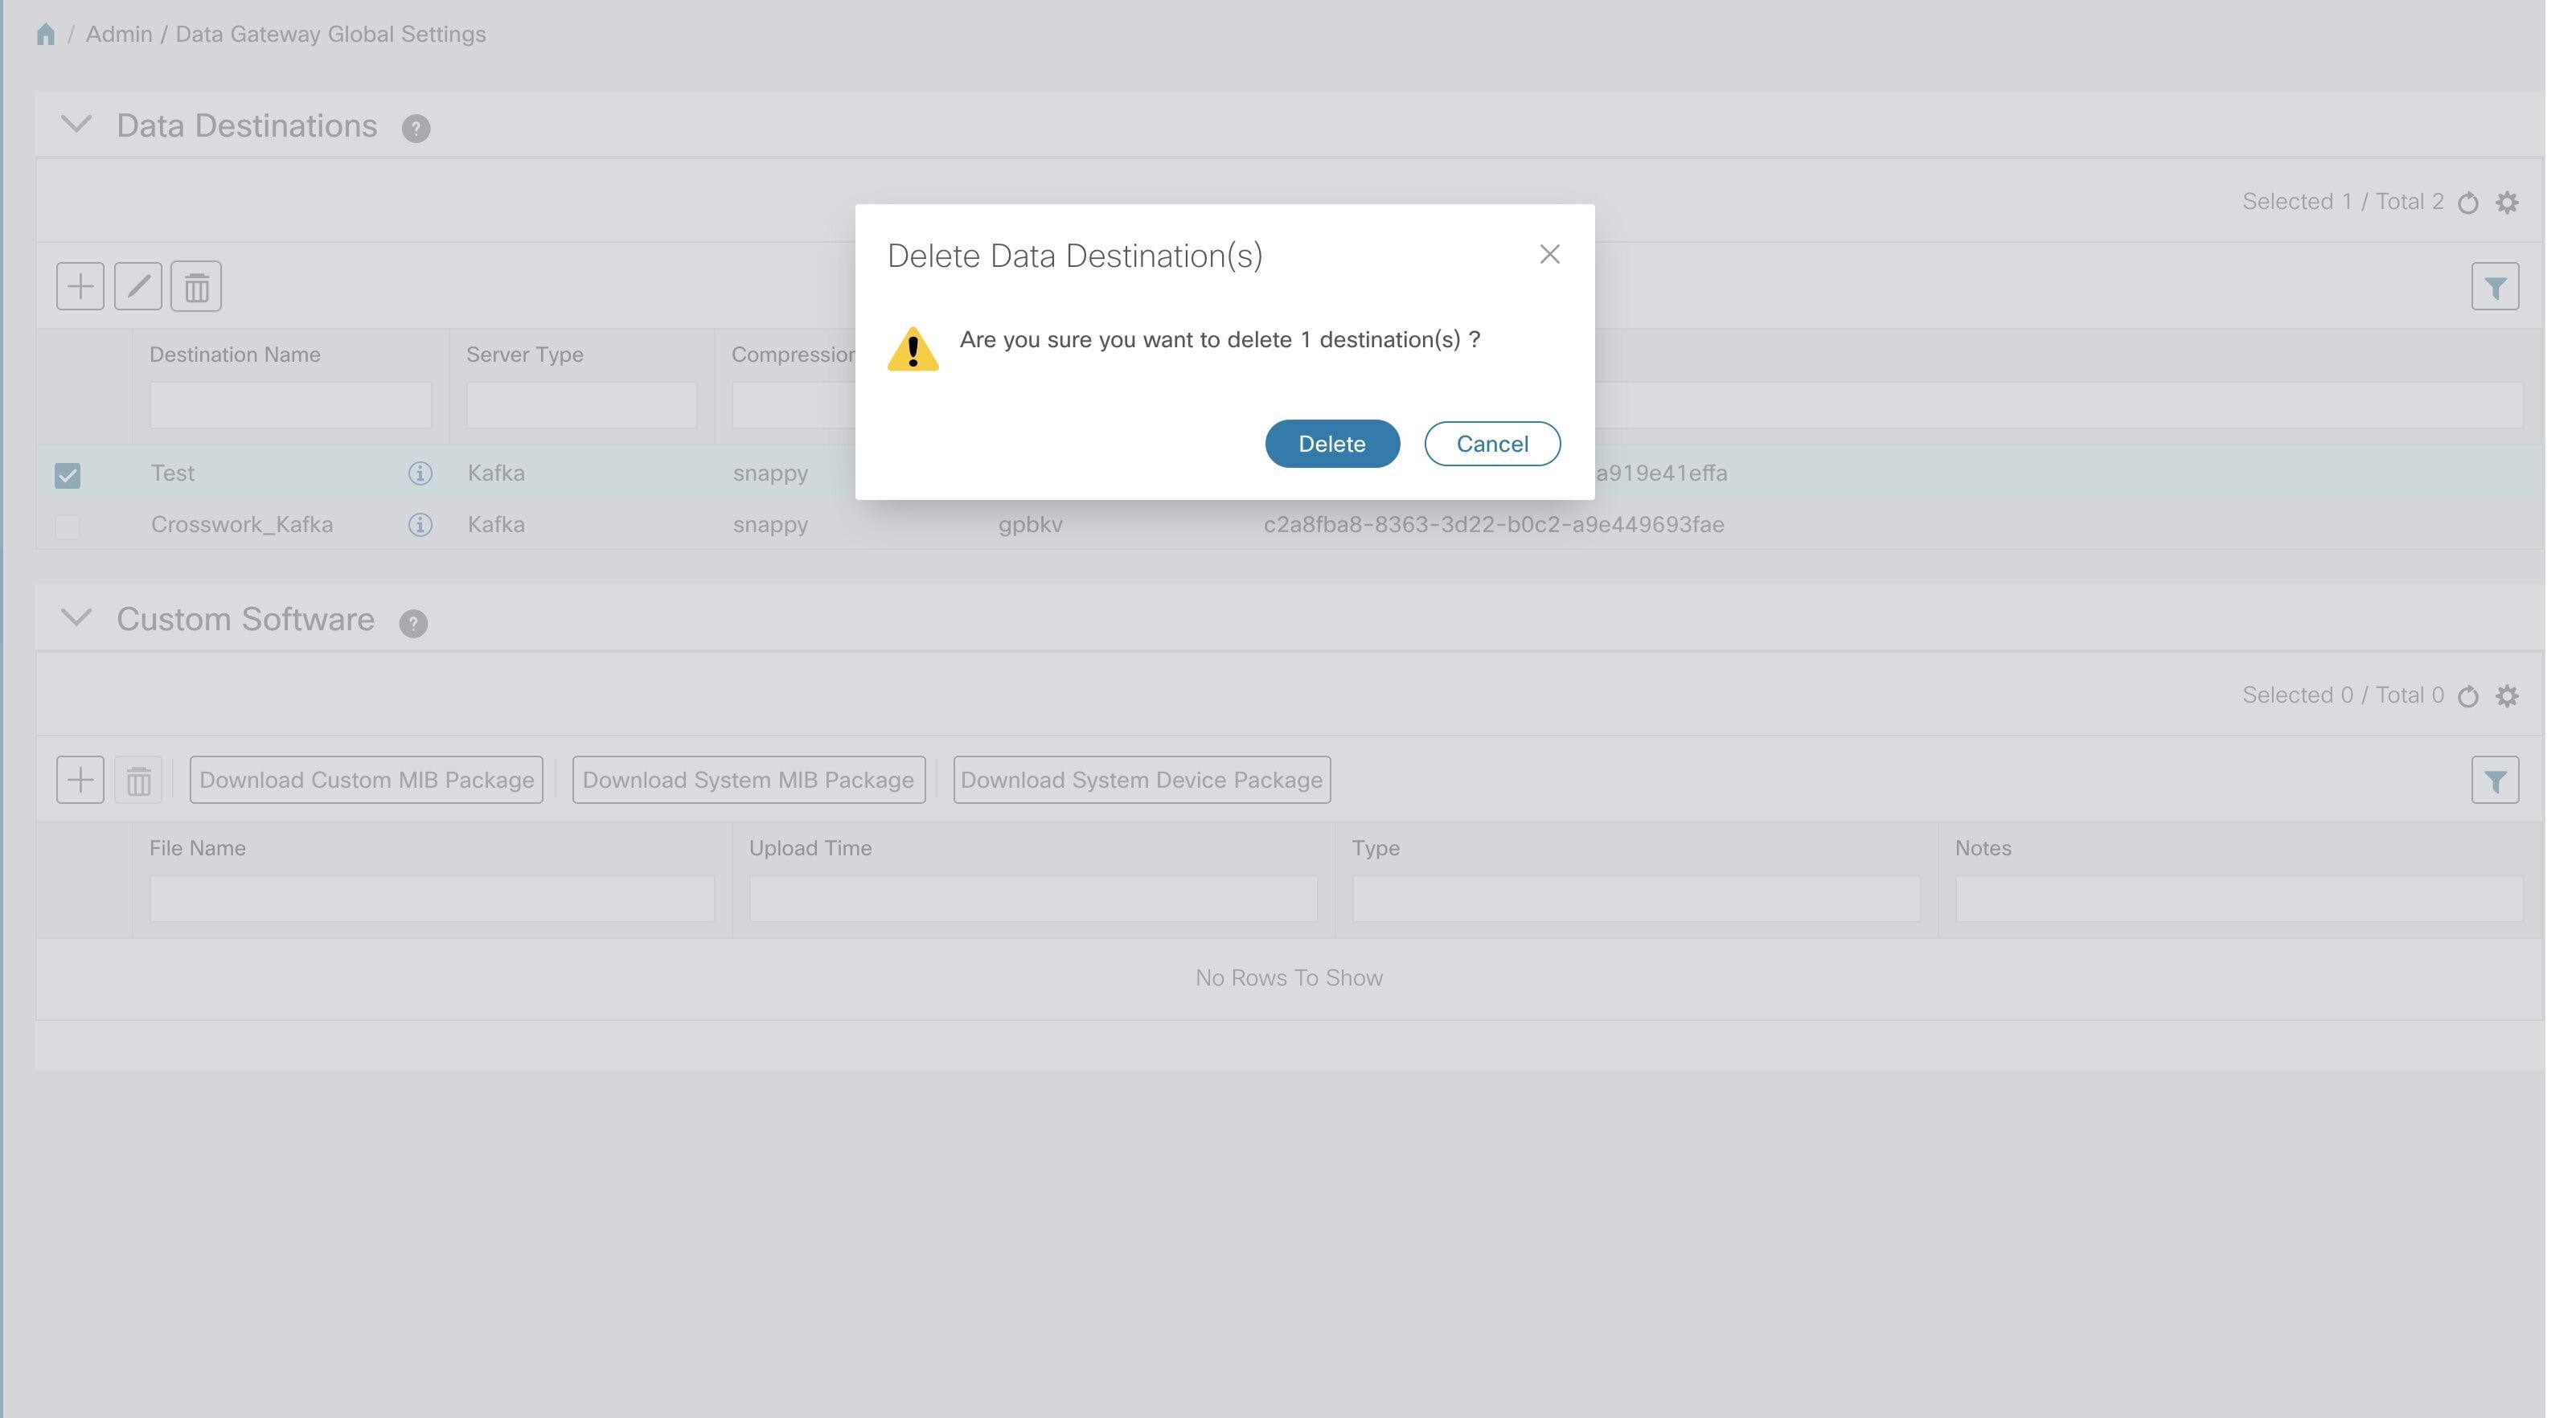
Delete a Data Destination
Follow the steps below to delete a data destination.
Before you begin
A data destination can only be deleted if it is not associated with any collection job. We recommend to check in the Collection Jobs view to see if any collection jobs are using the data destination. See Monitoring Collection Jobs.
Procedure
Step 1
From the main menu, choose Admin > Data Gateway Global Settings.
Step 2
From the Data Destinations pane, select the Data destination(s) you want to delete.
Step 3
Click .
Step 4
In Delete Data Destination(s) pop up, click Delete to confirm.
Manage Custom Software Packages
To support third party device CLI and SNMP MIBs, Cisco Crosswork Data Gateway allows you to import the device packages and MIBs to the collectors. Device packages can be imported to allow Cisco Crosswork Data Gateway to retrieve CLI and SNMP data and convert it into xml for third party devices. You can extend the SNMP coverage of Cisco Crosswork Change Automation and Health Insights by uploading Custom MIB Packages with any additional MIB and YANG descriptions you require. If you only wish raw SNMP data,
no additional files are needed, the system will fold the entire data package into the the Cisco Crosswork Data Gateway data payload.
Note
MIBs are required only if the collection request references MIB TABLE names or SCALAR names. However, if the requests are
OID-based, then MIBs are not required.
Cisco Crosswork Data Gateway allows you to register and deploy three types of custom software packages:
CLI Device Package: provides instructions for how to speak to a device using CLI and parse the results into the desired xml.
Custom MIB Packages:
SNMP Device Package: provides instructions for how to speak to a device using SNMP and parse the results into the desired xml.
Custom MIBs and device packages can be specific to third party devices or be used to filter the collected data or format it
differently for Cisco devices. These are editable by the user.
Cisco Crosswork Data Gateway also allows you to download Custom MIB package, System MIB package, and System Device package.
System Device and MIB Packages are bundled in the Crosswork software and are automatically downloaded to the Cisco Crosswork Data Gateway instances. These are NOT modifiable by the user. Custom Device Packages can be downloaded when required for interfacing with
third-party devices.
From the Custom Software pane, you can add a new custom package, delete a custom package, and download custom packages.
Click to set filter criteria on one or more columns in the Custom Software window.
Click the Clear All Filters link to clear any filter criteria you may have set.
Custom Software pane displays the following details for the available custom software packages:
Field
Description
File Name
Name of the custom software package.
Upload Time
Time of the file upload.
Type
Type of the custom software package.
Notes
Notes related to the custom software package entered by the user while importing the package.
Add a Custom Software Package
Crosswork allows you to upload Custom Device Packages in case you want to filter/format the collected raw data differently.
There are two types of upload:
Custom MIB Package upload (a single file custom-mib-packages.tar.xz): which is archive of all custom MIBs/YANGs file
Individual Device Package Upload
When uploading new MIBs as a part of Custom MIB Package, it’s required that those new MIBs files are loadable within collectors
along with existing System MIB files i.e., all dependencies in the files get resolved properly. An offline tool steps are
provided for you to ensure that their new MIBs gets parsed and uploaded properly. Accordingly, you can prepare the Custom
MIB Package and upload.
Crosswork doesn't allow Custom MIB package files to overwrite the System MIB Package files. It results in a failed upload
attempt.
Using UI, Admin can upload CLI device packages, custom MIB packages, and SNMP device packages. This gets downloaded on the
Cisco Crosswork Data Gateway instance to mounted path of respective collectors.
Follow these steps to import a custom software package into Cisco Crosswork Data Gateway:
Note
Ensure that the custom software package TAR file has just the device package folders and none of the parent folder or hierarchy
of folders as part of the TAR file. If not imported properly, Cisco Crosswork Data Gateway throws exceptions when executing the job with custom device package.
Crosswork does not implement any control on the files being uploaded other than checking the file extension.
Procedure
Step 1
From the main menu, choose Admin > Data Gateway Global Settings.
Step 2
From Custom Software window, choose .
Step 3
From the Add Custom Software pop up, select the type of custom software package you want to import from the Type dropdown.
Step 4
Click in the blank field of Software Location to open the file browser window and select the custom software package to import and click Import File.
Step 5
Add a description of the custom software package in the Notes field. This is recommended if you have many packages, to be able to distinguish among them.
Step 6
Click Upload.
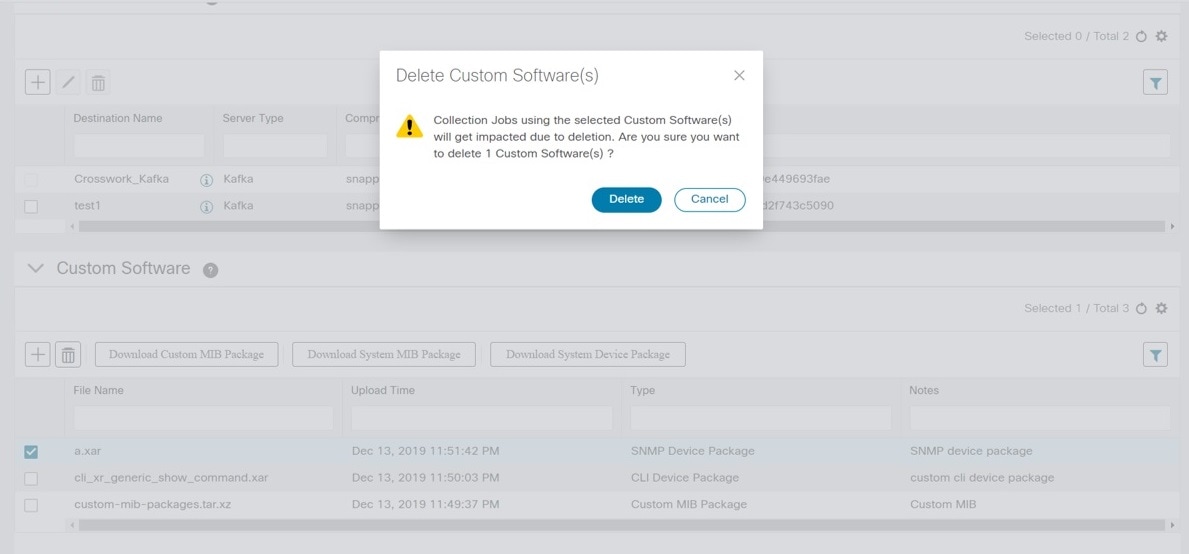
Delete a Custom Software Package
Follow the steps below to delete a custom software package.
Procedure
Step 1
From the main menu, choose Admin > Data Gateway Global Settings.
Step 2
From the Custom Software pane, select the custom package you want to delete.
Step 3
Click .
Step 4
In the Delete Custom Software pop up, click Delete to confirm.
Download Custom or System MIBs and Packages
Cisco Crosswork Data Gateway has some pre-loaded MIBs and device packages. You can download them to obtain a tarball of the custom MIBs and device packages
from the Crosswork UI, add more custom MIBs and device packages and re-upload them to the Crosswork. See List of Pre-loaded Traps and MIBs for SNMP Collection.
System MIB Packages and System Device Packages are downloadable only. This is only if you want to know the abilities that
already exists in the system. These cannot be modified.
If you have a new version, you can delete the existing one and upload the new one.
Follow the below steps to download custom software packages from Crosswork UI.
Procedure
Step 1
From the main menu, choose Admin > Data Gateway Global Settings.
Step 2
From Custom Software pane, choose based on the following table:
If you want to download
Click...
Custom MIB Package
Download Custom MIB Package
System MIB Package
Download System MIB Package
System Device Package
Download System Device Package
Step 3
In the download window, navigate to the location where you want to download the file and click Save.

 to refresh the
  to choose the columns to make visible in the


 Feedback