Cisco Crosswork Data Gateway 1.1.4 Installation and Configuration Guide for Cloud Deployment
Bias-Free Language
The documentation set for this product strives to use bias-free language. For the purposes of this documentation set, bias-free is defined as language that does not imply discrimination based on age, disability, gender, racial identity, ethnic identity, sexual orientation, socioeconomic status, and intersectionality. Exceptions may be present in the documentation due to language that is hardcoded in the user interfaces of the product software, language used based on RFP documentation, or language that is used by a referenced third-party product. Learn more about how Cisco is using Inclusive Language.
Cisco Crosswork Data Gateway is initially deployed as a VM called Base VM (containing only enough software to register itself with Crosswork Cloud). It
can be geographically separate from the controller running inside Crosswork Cloud.
Based on the size of your network, you can deploy more than one Cisco Crosswork Data Gateway instances. Crosswork Cloud orchestrates
the collection from the distributed Cisco Crosswork Data Gateway instances.
The Cisco Crosswork Data Gateway VM is delivered as an OVA file and the additional functional/collection images are delivered as Docker images from the controller
running inside Crosswork Cloud.
The Base VM (OVA) is pre-packaged with basic functionality required to reach the controller.
The Cisco Crosswork Data Gateway VM (OVA) contains the following pre-packaged contents:
Cisco hardened Ubuntu distribution of Linux
Cisco Crosswork Data Gateway services:
Vitals Monitor - Monitors the start and stop status of the container services running on the Cisco Crosswork Data Gateway VM.
Controller Gateway – Establishes trusted connection with the controller application via the Controller Gateway and downloads
functional images and configuration files.
Image Manager – Coordinates between the Cisco Crosswork Data Gateway and the controller application to download functional images and configuration files.
Route Manager – Allows functional/collection images to program routes, so the traffic to devices can directed on different
south-bound network.
Docker IPv6nat - Programs IPv6 routes for docker containers.
Cisco Crosswork Data Gateway OVF Parameters and Deployment Scenarios
Before you begin installing Cisco Crosswork Data Gateway, read below about OVF parameters and possible deployment scenarios.
Note
* Denotes the mandatory parameters. Others are optional. You might choose them based on the kind of deployment scenrio you
require. Deployment scenarios are explained wherever applicable.
** Denotes parameters that can be entered during install or addressed using additional procedures.
Table 1. Cisco Crosswork Data Gateway OVF Parameters and Deployment Scenarios
OVF Parameter
Description
Deployment Scenario
Host Information
Hostname*
Hostname of the server specified as a fully qualified domain name (FQDN).
Note
For larger systems it is likely that you will have more than one Cisco Crosswork Data Gateway instance. The Cisco Crosswork Data Gateway hostname should, therefore, be unique and created in a way that makes identifying a specific instance easy.
Description*
A detailed description of the Cisco Crosswork Data Gateway instance.
Label
Label used by Crosswork to categorize and group multiple Cisco Crosswork Data Gateway instances.
Active vNICs*
Number of vNICs to use for sending traffic.
You can choose to use either 1 or 2 vNICs as per the following combinations:
1 - sends all traffic through vNIC0.
2 - sends management traffic through vNIC0 and all data traffic through vNIC1.
Private Key URI
SCP URI to private key file for session key signing. You can retrieve this using SCP (user@host:path/to/file).
Crosswork uses self-signed certificates for handshake with Cisco Crosswork Data Gateway. These certificates are generated upon installation.
However, if you want to use third-party or your own certificate files, then you must input these three parameters.
Note
The host with the URI files must be reachable on the network (from the vNIC0 interface via SCP) and files must be present
at the time of install.
Certificate File URI
SCP URI to PEM formatted signing certificate chain for this VM. You can retrieve this using SCP (user@host:path/to/file).
Certificate File and Key Passphrase
SCP user passphrase to retrieve the Cisco Crosswork Data Gateway PEM formatted certificate file and private key.
Passphrases
dg-admin Password*
The password you have chosen for the dg-admin user.
Note
Keep a note of these usernames and passwords as they will be required to login.
dg-oper Password*
The password you have chosen for the dg-oper user.
Note
Cisco Crosswork Data Gateway supports either IPv4 or IPv6 for vNIC0, vNIC1, and vNIC2 interfaces. For the interface(s) and protocol you choose to use,
select Method as Static and enter information in Address, Netmask, and Gateway fields. The default value is None.
1vNIC0 IPv4 Address
vNIC0 IPv4 Method*
How the vNIC0 interface gets its IPv4 address.
vNIC0 IPv4 Address
IPv4 address of the vNIC0 interface.
vNIC0 IPv4 Netmask
IPv4 netmask of the vNIC0 interface in dotted quad format.
vNIC0 IPv4 Gateway
IPv4 address of the vNIC0 gateway.
1vNIC0 IPv6 Address
vNIC0 IPv6 Method*
How the vNIC0 interface gets its IPv6 address.
vNIC0 IPv6 Address
IPv6 address of the vNIC0 interface.
vNIC0 IPv6 Netmask
IPv6 prefix of the vNIC0 interface.
vNIC0 IPv6 Gateway
IPv6 address of the vNIC0 gateway.
1vNIC1 IPv4 Address
vNIC1 IPv4 Method*
How the vNIC1 interface gets its IPv4 address.
vNIC1 IPv4 Address
IPv4 address of the vNIC1 interface.
vNIC1 IPv4 Netmask
IPv4 netmask of the vNIC1 interface in dotted quad format.
vNIC1 IPv4 Gateway
IPv4 address of the vNIC1 gateway.
1vNIC1 IPv6 Address
vNIC1 IPv6 Method*
How the vNIC1 interface gets its IPv6 address.
vNIC1 IPv6 Address
IPv6 address of the vNIC1 interface.
vNIC1 IPv6 Netmask
IPv6 netmask of the vNIC1 interface in dotted quad format.
vNIC1 IPv6 Gateway
IPv6 address of the vNIC1 gateway.
1vNIC2 IPv4 Address
Note
vNIC2 interface is not applicable to Cloud Deployment.
vNIC2 IPv4 Method*
How the vNIC2 interface gets its IPv4 address.
vNIC2 IPv4 Address
IPv4 address of the vNIC2 interface.
vNIC2 IPv4 Netmask
IPv4 netmask of the vNIC2 interface in dotted quad format.
vNIC2 IPv4 Gateway
IPv4 address of the vNIC2 gateway.
1vNIC2 IPv6 Address
Note
vNIC2 interface is not applicable to Cloud Deployment.
vNIC2 IPv6 Method*
How the vNIC2 interface gets its IPv6 address.
vNIC2 IPv6 Address
IPv6 address of the vNIC2 interface.
vNIC2 IPv6 Netmask
IPv6 netmask of the vNIC2 interface in dotted quad format.
vNIC2 IPv6 Gateway
IPv6 address of the vNIC2 gateway.
DNS and NTP
DNS Address*
Space-delimited list of IPv4/IPv6 addresses of the DNS server accessible from the management interface.
DNS Search Domain*
DNS search domain
NTP Servers*
Space-delimited list of IPv4/IPv6 addresses or hostnames of the NTP servers accessible from the management interface.
You must enter a value here, such as pool.ntp.org. NTP server is critical for time synchronization between Cisco Crosswork Data Gateway VM, Cisco Crosswork Cloud, and devices. Using a non-functional or dummy address may cause issues when Crosswork and Cisco Crosswork Data Gateway try to communicate with each other. If you are not using an NTP server, ensure that time gap between Cisco Crosswork Data Gateway and Cisco Crosswork Cloud is not more than 24 hours. Else, Cisco Crosswork Data Gateway will fail to connect.
Syslog Servers
Server Address
IPv4 or IPv6 address of a syslog server accessible from the management interface.
Note
If you are using an IPv6 address, it must be surrounded by square brackets ([1::1]).
If you want to use an external syslog server, you must specify these 7 settings.
Note
If you have configured an external syslog server, the service (CLI/MDT/SNMP) events are sent to that external syslog server.
Otherwise, they are logged only to the Cisco Crosswork Data Gateway VM. To obtain logs, from the main menu, go to 5 Troubleshooting > Run show-tech.
Note
The host with the URI files must be reachable on the network (from vNIC0 interface via SCP) and files must be present at the
time of install.
Syslog Port
Port number of the syslog server.
Syslog Protocol
Use UDP, TCP, or RELP when sending syslog.
Use Syslog over TLS?
Use TLS to encrypt syslog traffic.
TLS Peer Name
Syslog server's hostname exactly as entered in the server certificate SubjectAltName or subject common name.
Syslog Root Certificate File URI
PEM formatted root cert of syslog server retrieved using SCP.
Syslog Certificate File Passphrase
Password of SCP user to retrieve Syslog certificate chain.
Controller Settings
Proxy Server URL
URL of management network proxy server.
If you want to use a proxy server, you must specify these parameters.
In Cloud deployment, Cisco Crosswork Data Gateway must connect to the Internet via TLS, and a proxy server may be required
if present in your environment.
A symptom of missing proxy server is that the Cisco Crosswork Data Gateway will fail to connect to Crosswork Cloud correctly.
If a proxy server is required, then additional configuration may be required and will vary based on the environment.
Proxy Server Bypass List
Space-delimited list of subnets and domains that will not be sent to the proxy server.
Authenticated Proxy Username
Username for authenticated proxy servers.
Authenticated Proxy Passphrase
Passphrase for authenticated proxy servers.
HTTPS Proxy SSL/TLS Certificate File URI
HTTPS proxy PEM formatted SSL/TLS certificate file retrieved using SCP.
HTTPS Proxy SSL/TLS Certificate File passphrase
Password of SCP user to retrieve proxy certificate chain.
Auto Enrollment Package
Enrollment Destination Host and Path**
SCP host and path to transfer the enrollment package using SCP (user@host:/path/to/file ).
Enrollment package is required for enrolling Cisco Crosswork Data Gateway with Crosswork. The enrollment package is automatically transferred once Cisco Crosswork Data Gateway boots up for the first time if you specify these parameters during the installation.
If you do not specify these parameters during installation, then you must export enrollment package manually by following
the procedure Export Enrollment Package.
Enrollment Passphrase**
SCP user passphrase to transfer enrollment package.
1Either an IPv4 or IPv6 address must be specified for the interface(s) you choose to use. Selecting None for both will result in a non-functional deployment.
Note
If you are not using the default SCP port 22, you can specify the port as a part of the SCP command. For example,
-P55 user@host:path/to/file
where 55 is a custom port.
Install Cisco Crosswork Data Gateway Via vCenter
Before you begin
Ensure the following:
You are creating the Cisco Crosswork Data Gateway VM on a recommended VMware version (See Virtual Machine (VM) Requirements for supported versions). To know which vCenter build you have, check on the vSphere web client under Help menu.
The Cisco Crosswork Data Gateway VM has allocated to it a minimum of 32 GB of RAM, 8 vCPUs, and 70 GB of hard drive space.
During installation, Cisco Crosswork Data Gateway creates two default accounts:
A Cisco Crosswork Data Gateway administrator, with the username dg-admin and password set during installation. The product administrator uses this ID to log in to and troubleshoot the Cisco Crosswork
Data Gateway.
A Cisco Crosswork Data Gateway operator, with the username dg-oper and password set during installation. This is a read-only user and has permissions to perform all ‘read’ operations and some
limited ‘action’ commands. To know what operations can an operator perform, see Table: Permissions Per Role in the Chapter Manage Users.
Note
These two pre-defined usernames are reserved and cannot be changed.
Change of password would be allowed from the console for both the accounts.
In case of lost or forgotten passwords, the user would have to create a new VM, destroy the current VM, and re-enroll the
new one on the Crosswork Cloud.
Procedure
Step 1
Download the Cisco Crosswork Data Gateway1.1.4 image file (*.ova) from CCO.
Note
If you have trouble downloading the software, please reach out to your Cisco representative.
Warning
The default VMware vCenter deployment timeout is 15 minutes. If the time taken to fill the OVF template exceeds 15 minutes,
vCenter times out and you will have to start over again. To prevent this, Cisco recommends that you set the vCenter deployment
timeout to a much longer period (such as one hour). Refer your vCenter guide.
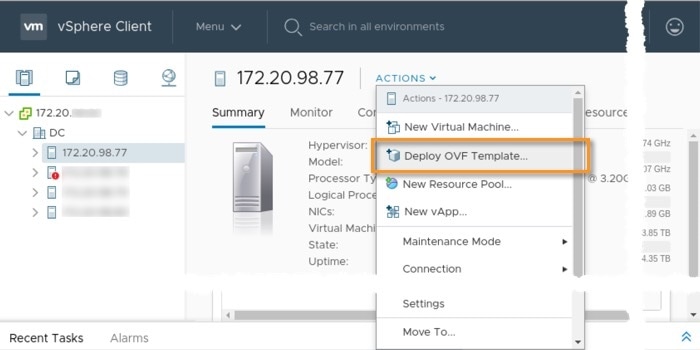
Step 2
Connect to vCenter vSphere Client. Then select Actions > Deploy OVF Template, as shown in the following figure:
Step 3
The VMware Deploy OVF Template wizard appears and highlights the first step, 1 Select template.
Click Browse to navigate to the location where you downloaded the OVA image file and select it.
Once selected, the filename is displayed in the window.
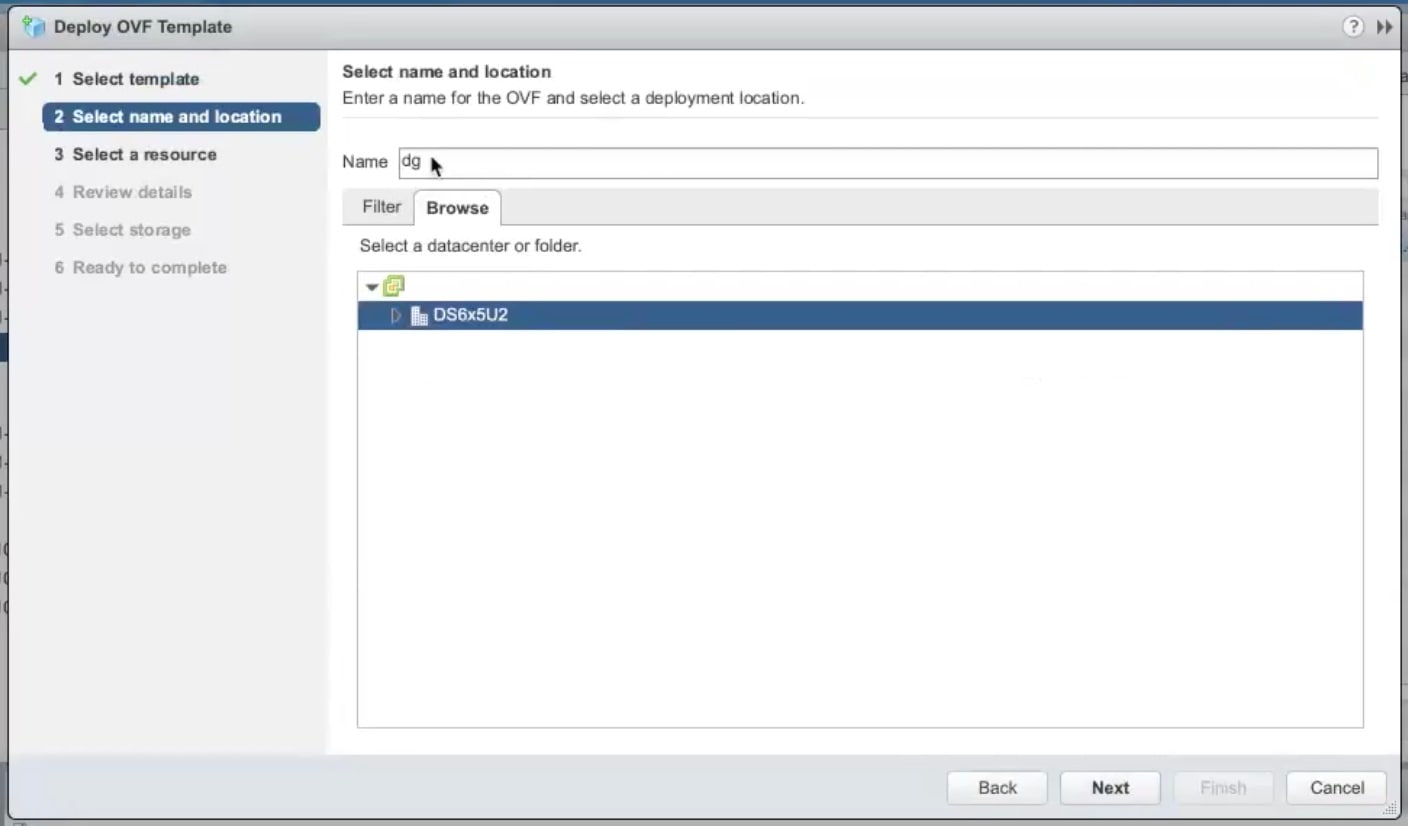
Step 4
Click Next to go to 2 Select name and location, as shown in the following figure.
Enter a name for the Cisco Crosswork Data Gateway VM you are creating.
In the Select a location for the virtual machine list, choose the datacenter under which the Cisco Crosswork Data Gateway VM will reside.
Step 5
Click Next to go to 3 Select a resource. Choose the VM’s host.
Step 6
Click Next. The VMware vCenter Server validates the OVA. Network speed will determine how long validation takes. When the validation
is complete, the wizard moves to 4 Review details. Review the OVA’s information and then click Next.
Take a moment to review the OVF template you are deploying.
Note
This information is gathered from the OVF and cannot be modified.
Step 7
Click Next to go to 5 accept license agreements. Review the End User License Agreement and click Accept.
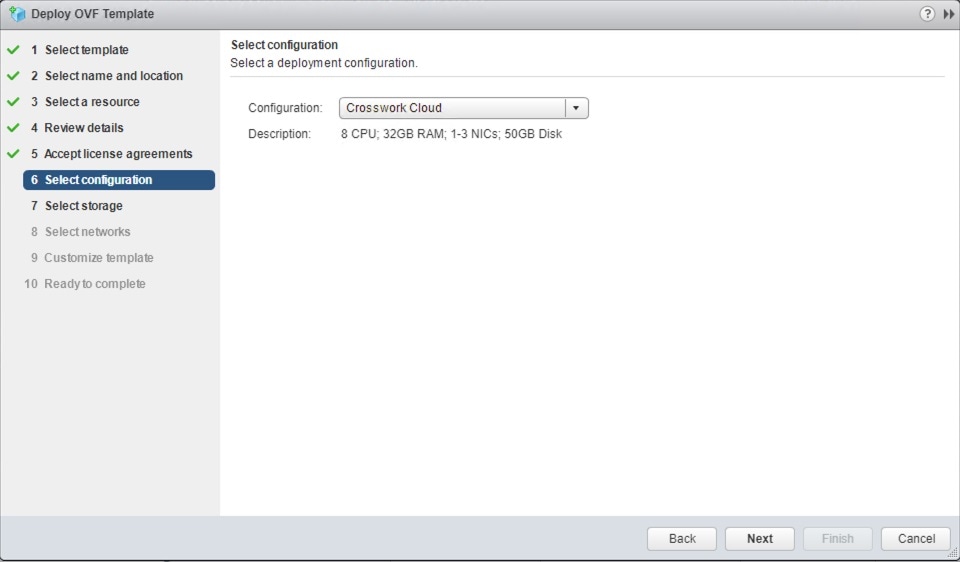
Step 8
Click Next to go to 6 Select configuration, as shown in the following figure. To install Cisco Crosswork Data Gateway for Crosswork Cloud, you must select Crosswork Cloud from the Configuration dropdown.
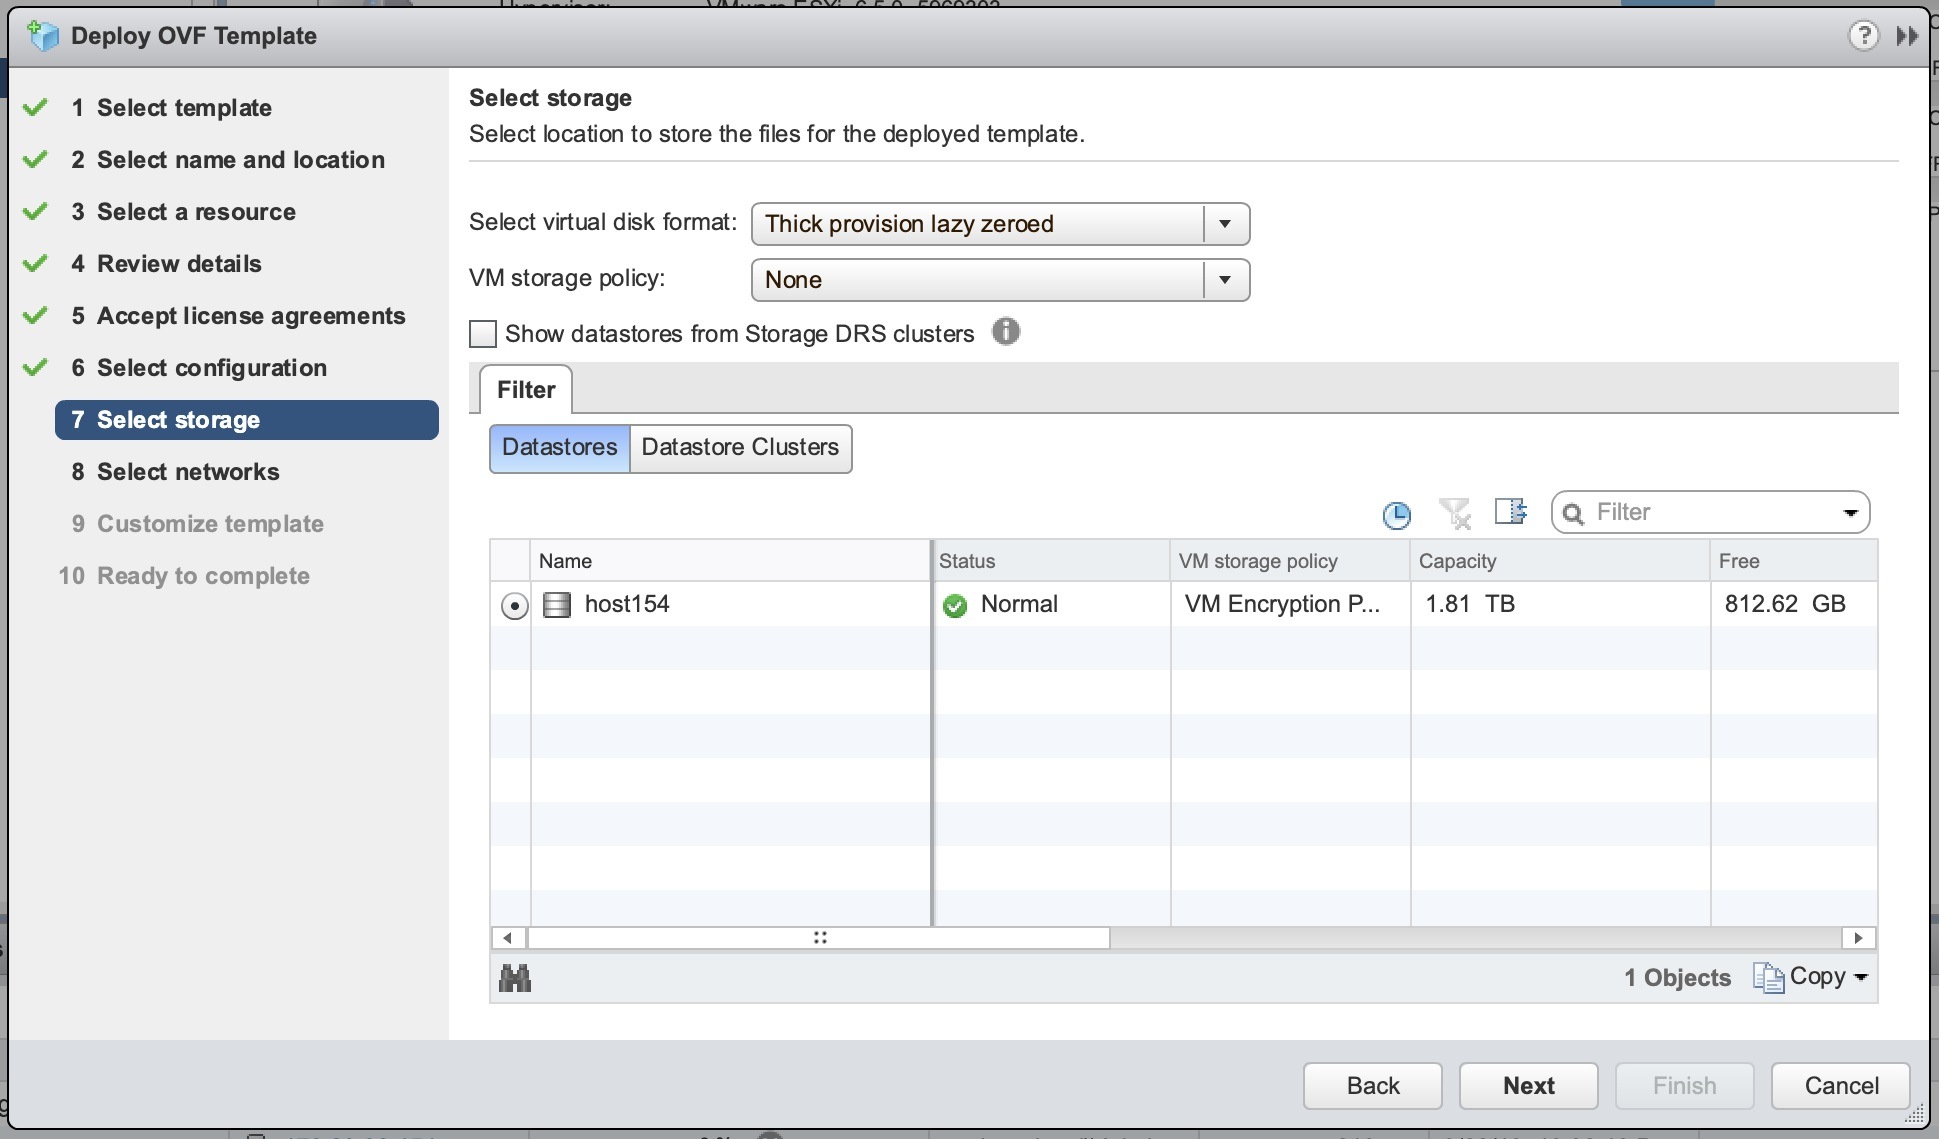
Step 9
Click Next to go to 7 Select storage, as shown in the following figure.
Cisco recommends that you select Thick provision lazy zeroed from the Select virtual disk format drop-down list.
From the Datastores table, choose the datastore you want to use and review its properties to ensure there is enough available storage.
Note
For production deployment, choose Thick provision eager zeroed as it will preallocate disk space and provide the best performance. For development purposes, Thin provision is recommended as it saves disk space.
Step 10
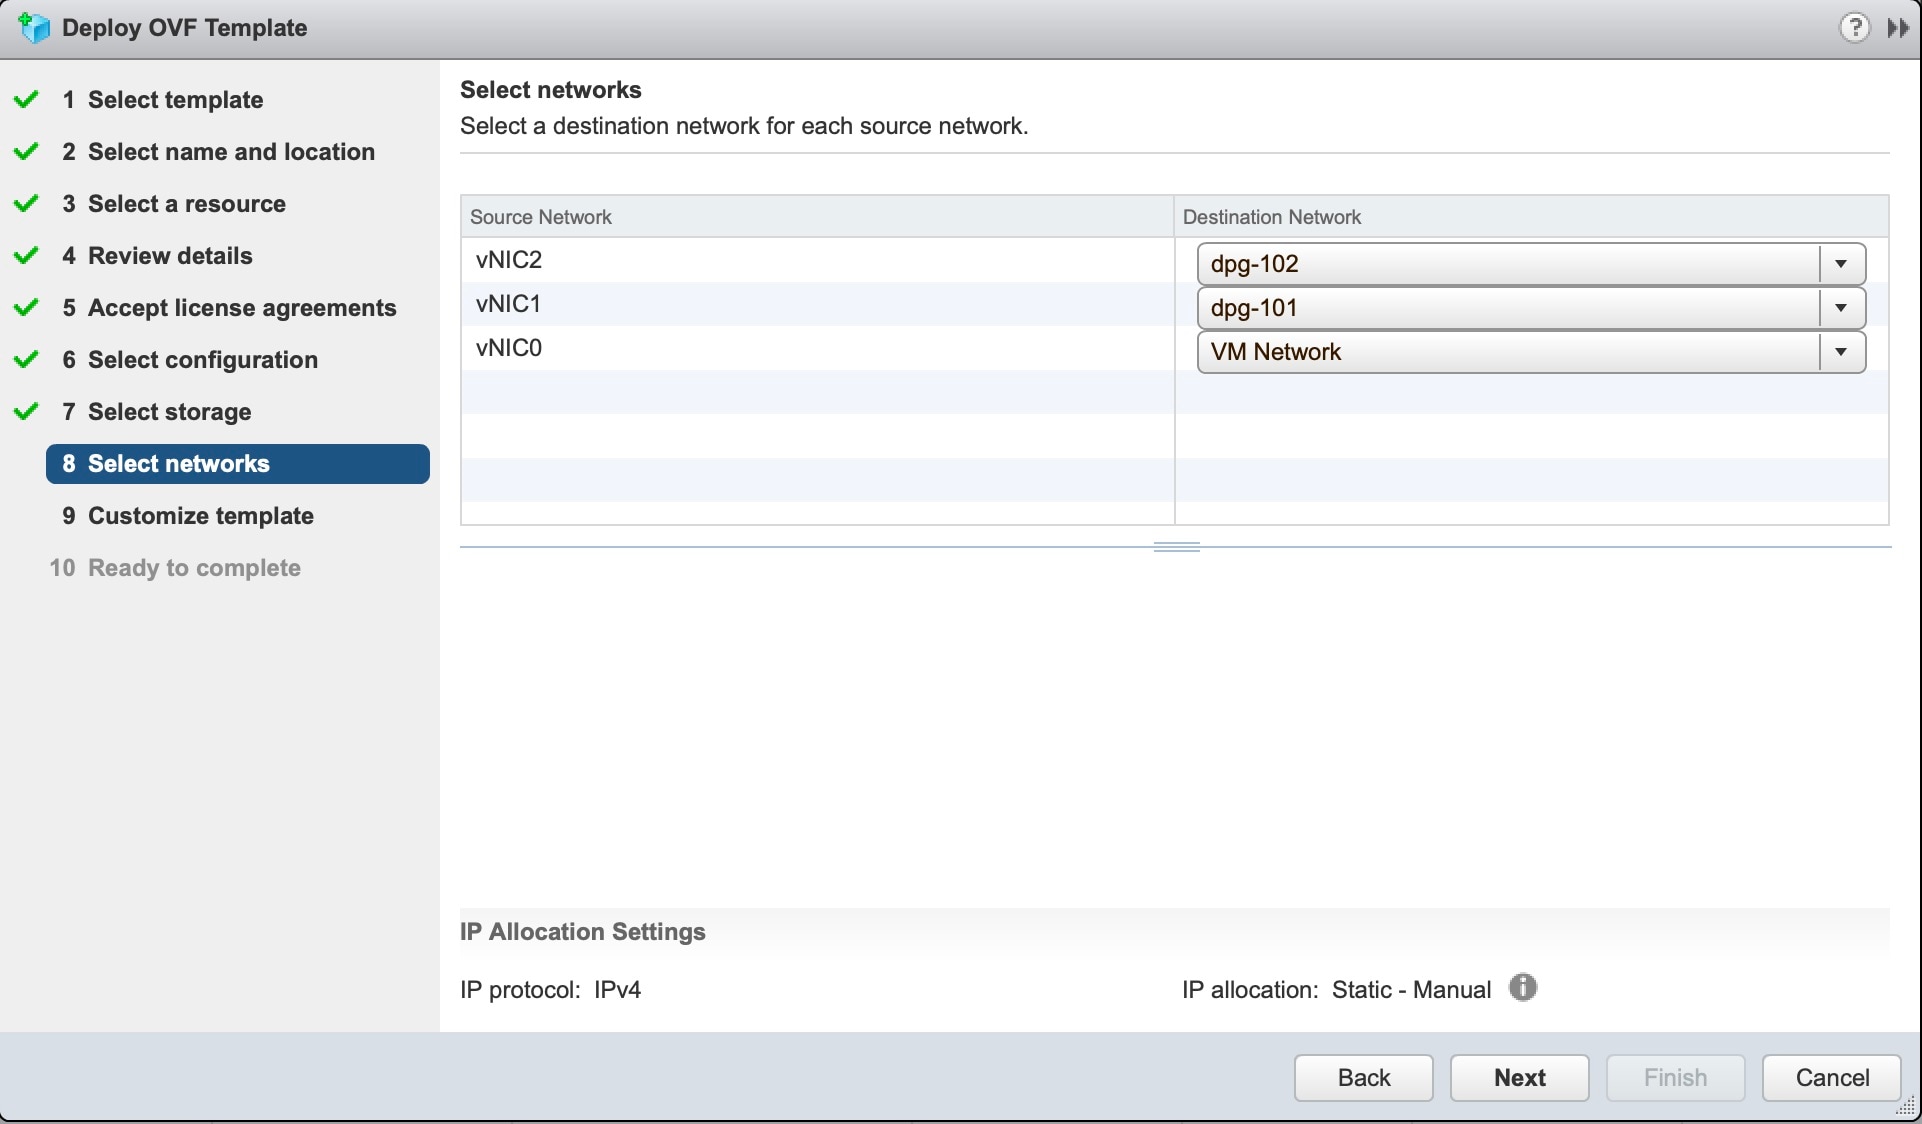
Click Next to go to 8 Select networks, as shown in the following figure. In the dropdown table at the top of the page, choose the appropriate destination network
for each source network, vNIC1 and vNIC0 respectively.
Certificate chains override any preset or generated certificates in the VM and are given as an SCP URI (user:host:/path/to/file).
01. Host Information
a. Hostname: Hostname of the server specified as a fully qualified domain name (FQDN).
Note
For larger systems it is likely that you will have more than one Cisco Crosswork Data Gateway instance. The Cisco Crosswork Data Gateway hostname should, therefore, be unique and created in a way that makes identifying a specific instance easy.
b. Description:A detailed description of the Cisco Crosswork Data Gateway instance.
c. Label: Label used by Crosswork to categorize and group multiple Cisco Crosswork Data Gateway instances.
d. Active vNICs: Number of vNICs to use for sending traffic. You can choose to use either 1 or 2 vNICs as per the following
combinations:
1 - sends all traffic through vNIC0.
2 - sends management traffic through vNIC0 and all data traffic through vNIC1.
e. Private Key URI: SCP URI to private key file for session key signing. You can retrieve this using SCP (user@host:path/to/file).
f. Certificate File URI: SCP URI to PEM formatted signing certificate chain for this VM. You can retrieve this using SCP (user@host:path/to/file).
g. Certificate File and Key Passphrase: SCP user passphrase to retrieve the Cisco Crosswork Data Gateway PEM formatted certificate file and private key.
02. Passphrases
a. dg-admin Password: The password you have chosen for the dg-admin user.
b. dg-oper Password: The password you have chosen for the dg-oper user.
Note
Cisco Crosswork Data Gateway supports either IPv4 or IPv6 for vNIC0, vNIC1, and vNIC2 interfaces. For the interface(s) and protocol you choose to use,
select Method as Static and enter information in Address, Netmask, and Gateway fields. The default value is None.
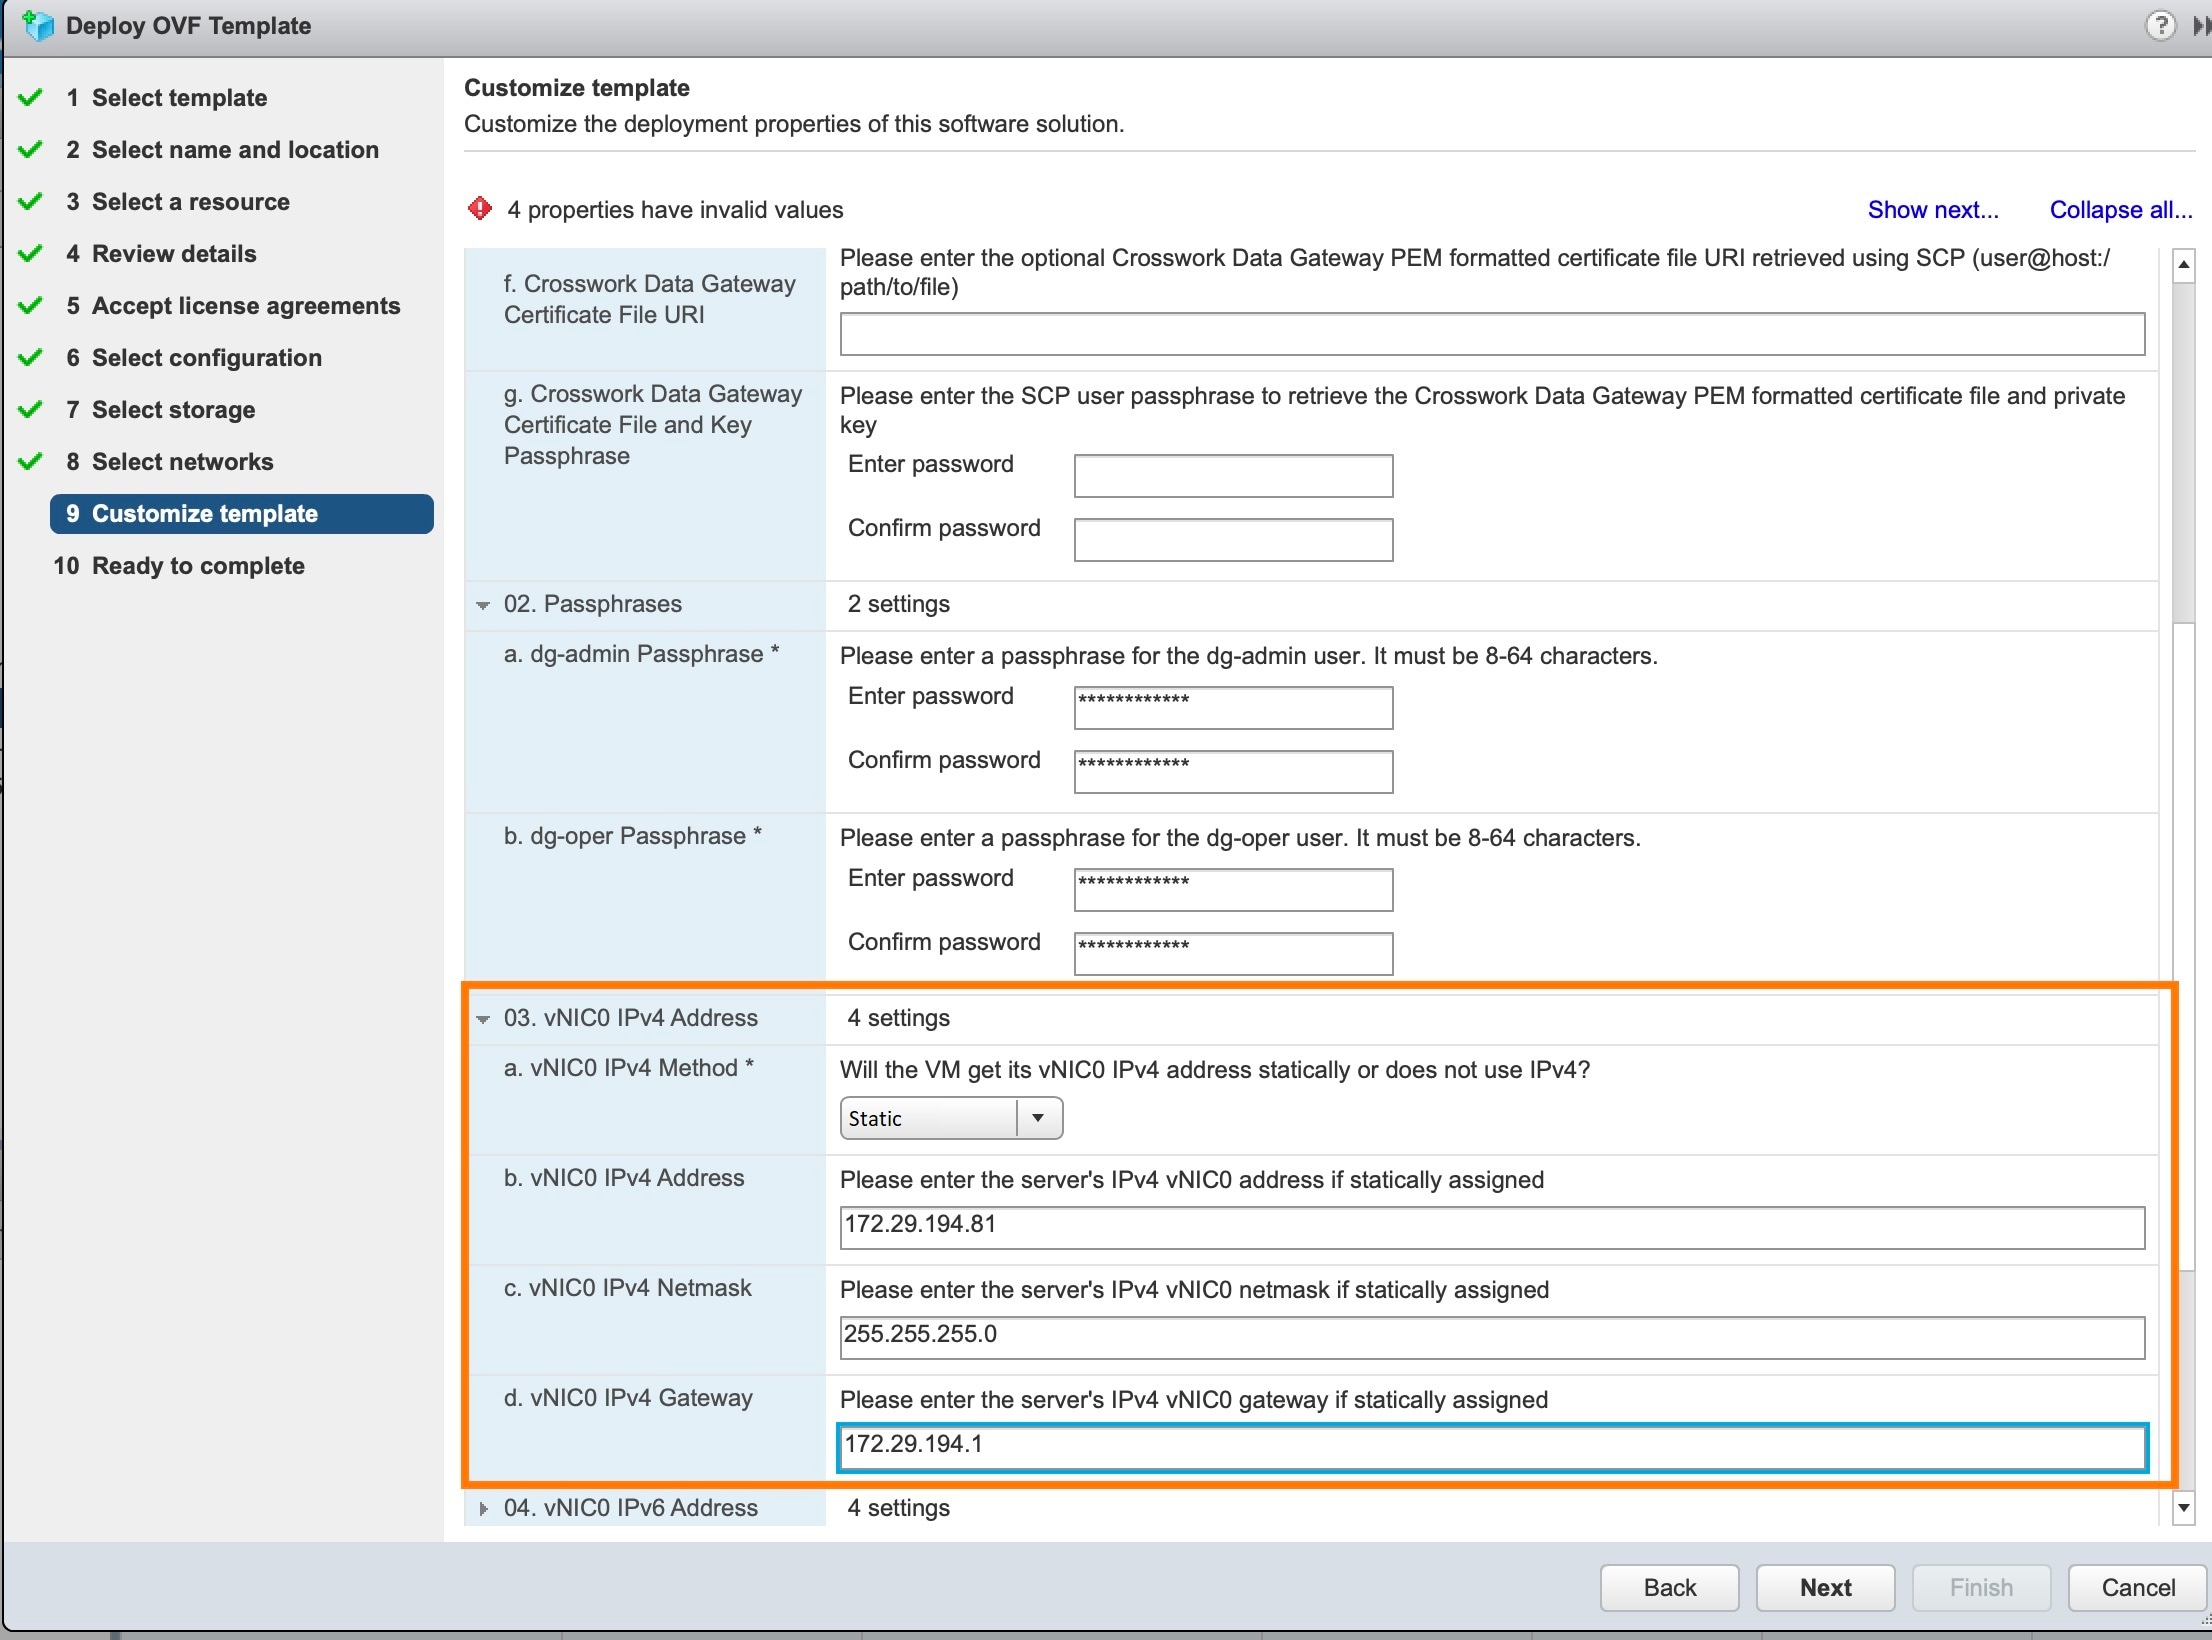
03. vNIC0 IPv4 Address
a. vNIC0 IPv4 Method: How the vNIC0 interface gets its IPv4 address.
b. vNIC0 IPv4 Address: IPv4 address of the vNIC0 interface.
c. vNIC0 IPv4 Netmask: IPv4 netmask of the vNIC0 interface in dotted quad format.
d. vNIC0 IPv4 Gateway: IPv4 address of the vNIC0 gateway.
An example is shown below:
04. vNIC0 IPv6 Address
a. vNIC0 IPv6 Method: How the vNIC0 interface gets its IPv6 address.
b. vNIC0 IPv6 Address: IPv6 address of the vNIC0 interface.
c. vNIC0 IPv6 Netmask: IPv6 netmask of the vNIC0 interface in dotted quad format.
d. vNIC0 IPv6 Gateway: IPv6 address of the vNIC0 gateway.
05. vNIC1 IPv4 Address
a. vNIC1 IPv4 Method: How the vNIC1 interface gets its IPv4 address.
b. vNIC1 IPv4 Address: IPv4 address of the vNIC1 interface.
c. vNIC1 IPv4 Netmask: IPv4 netmask of the vNIC1 interface in dotted quad format.
d. vNIC1 IPv4 Gateway: IPv4 address of the vNIC1 gateway.
06. vNIC1 IPv6 Address
a. vNIC1 IPv6 Method: How the vNIC1 interface gets its IPv6 address.
b. vNIC1 IPv6 Address: IPv6 address of the vNIC1 interface.
c. vNIC1 IPv6 Netmask: IPv6 netmask of the vNIC1 interface in dotted quad format.
d. vNIC1 IPv6 Gateway: IPv6 address of the vNIC1 gateway.
07. vNIC2 IPv4 Address
Not applicable to cloud deployment.
08. vNIC2 IPv6 Address
Not applicable to cloud deployment.
09. DNS and NTP
a. DNS Address: Space-delimited list of IPv4/IPv6 addresses of the DNS server accesible from the management interface.
b. DNS Search Domain: DNS search domain
c. NTP Servers: Space-delimited list of IPv4/IPv6 addresses or hostnames of the NTP servers accessible from the management interface.
Note
You must enter a value here, such as pool.ntp.org. NTP server is critical for time synchronization between Cisco Crosswork
Data Gateway VM, Cisco Crosswork Cloud, and devices. Using a non-functional or dummy address may cause issues when Crosswork
and Cisco Crosswork Data Gateway try to communicate with each other. If you are not using an NTP server, ensure that time
gap between Cisco Crosswork Data Gateway and Cisco Crosswork Cloud is not more than 24 hours. Else, Cisco Crosswork Data Gateway
will fail to connect.
10. Syslog Servers
a. Server Address: IPv4 or IPv6 address of a syslog server accessible from the management interface.
Note
If you are using an IPv6 address, it must be surrounded by square brackets ([1::1]).
b. Syslog Port: Port number of the syslog server.
c. Syslog Protocol: Use UDP, TCP, or RELP when sending syslog.
d. Use Syslog over TLS?: Use TLS to encrypt syslog traffic.
e. TLS Peer Name: Syslog server's hostname exactly as entered in the server certificate SubjectAltName or subject common name.
f. Syslog Root Certificate File URI: PEM formatted root cert of syslog server retrieved using SCP.
g. Syslog Certificate File Passphrase: Password of SCP user to retrieve Syslog certificate chain.
11. Controller Settings
f. Proxy Server URL: URL of management network proxy server.
g. Proxy Server Bypass List: Space-delimited list of subnets and domains that will not be sent to the proxy server.
h. Authenticated Proxy Username: Username for authenticated proxy servers.
i. Authenticated Proxy Passphrase: Passphrase for authenticated proxy servers.
j. HTTPS Proxy SSL/TLS Certificate File URI: HTTPS proxy PEM formatted SSL/TLS certificate file retrieved using SCP.
k. HTTPS Proxy SSL/TLS Certificate File passphrase: Password of SCP user to retrieve proxy certificate chain.
12. Auto Enrollment Package
Note
Enrollment package is required for enrolling Cisco Crosswork Data Gateway with Crosswork. The enrollment package is automatically transferred once Cisco Crosswork Data Gateway boots up for the first time if you specify these parameters during the installation.
If you do not specify these parameters during installation, then you must export enrollment package manually by following
the procedure Export Enrollment Package.
a. Enrollment Passphrase: SCP user passphrase to transfer enrollment package.
b. Enrollment Destination Host and Path: SCP host and path to transfer the enrollment package using SCP (user@host:/path/to/file ).
Step 12
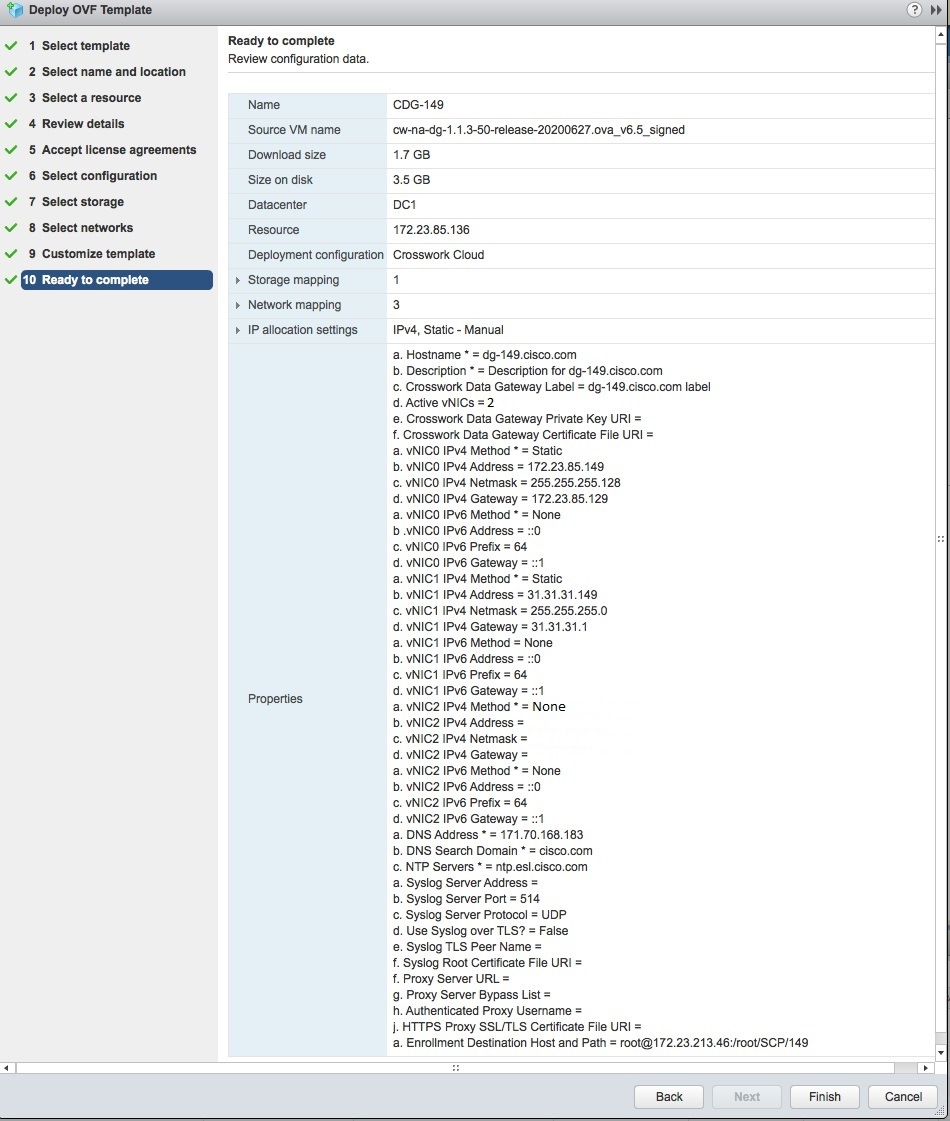
Click Next to go to 10 Ready to complete, as shown in the following figure. Review your settings and then click Finish if you are ready to begin deployment.
Step 13
Wait for the deployment to finish before continuing. To check the deployment status:
Open the vCenter vSphere client.
In the Recent Tasks tab for the host VM, view the status for the Deploy OVF template and Import OVF package jobs.
Wait for the deployment status to become 100%.
Note
If you are deploying Cisco Crosswork Data Gateway on VCenter 6.7U1 and above, you also need to set boot option to EFI before powering on the VM. Follow these steps:
On the host VM Summary tab, below the VM Hardware table, click Edit Settings.
On the Edit Settings page, click the VM Options tab.
Expand the Boot Options dropdown list and change the Firmware setting to EFI, if it not set by default. When you are finished, click OK. You may want to take a snapshot of the VM at this point.
You can now proceed to power on the VM.
Step 14
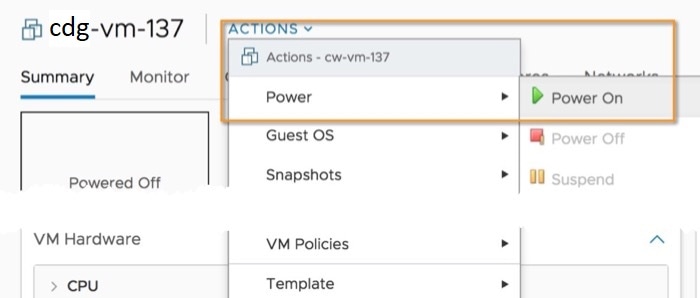
Once the deployment status is 100%, power on the VM to complete the deployment process. Expand the host’s entry so you can
click the VM and then choose Actions > Power > Power On, as shown in the following figure:
Wait for at least 5 minutes for the Cisco Crosswork Data Gateway VM to come up and then login via vCenter or SSH as explained in the Section Log In and Log Out.
Install Cisco Crosswork Data Gateway Via OVF Tool
This is an alternative way to install Cisco Crosswork Data Gateway. You can modify mandatory/optional parameters in the script
as per your requirement and run the OVF Tool.
Below is a sample script for installing using this method:
Enroll Cisco Crosswork Data Gateway with Crosswork Trust Insights
Note
For procedure to enroll Cisco Crosswork Data Gateway with Crosswork Trust Insights, refer Section: Add Crosswork Data Gateway Information in Cisco Crosswork Trust Insights User Guide.
Log In and Log Out
You can use either of the following two ways to access Cisco Crosswork Data Gateway:
Access Cisco Crosswork Data Gateway Through vCenter
Follow these steps to log in via vCenter:
Procedure
Step 1
Locate the VM in vCenter and then right click and select Open Console.
The Cisco Crosswork Data Gateway flash screen comes up.
Step 2
Enter username (dg-admin or dg-oper as per the role assigned to you) and the corresponding password (the one that you created during installation process) and
press Enter.
Access Cisco Crosswork Data Gateway Via SSH
Note
The SSH process is protected from brute force attacks by blocking the client IP
after a number of login failures. Failures such as incorrect username or
password, connection disconnect, or algorithm mismatch are counted against the
IP. Up to 4 failures within a 20 minute window will cause the client IP to be
blocked for at least 7 minutes. Continuing to accumulate failures will cause the
blocked time to be increased. Each client IP is tracked separately.
Follow these steps to login via SSH.
Procedure
Step 1
Run the following command:
ssh <username>@<ManagementNetworkIP>
where ManagementNetworkIP is the management network IP address.
For example,
To login as adminstrator user: ssh dg-admin@<ManagementNetworkIP>
To login as operator user: ssh dg-oper@<ManagementNetworkIP>
The Cisco Crosswork Data Gateway flash screen opens prompting for password.
Step 2
Input the corresponding password (the one that you created during installation process) and press Enter.
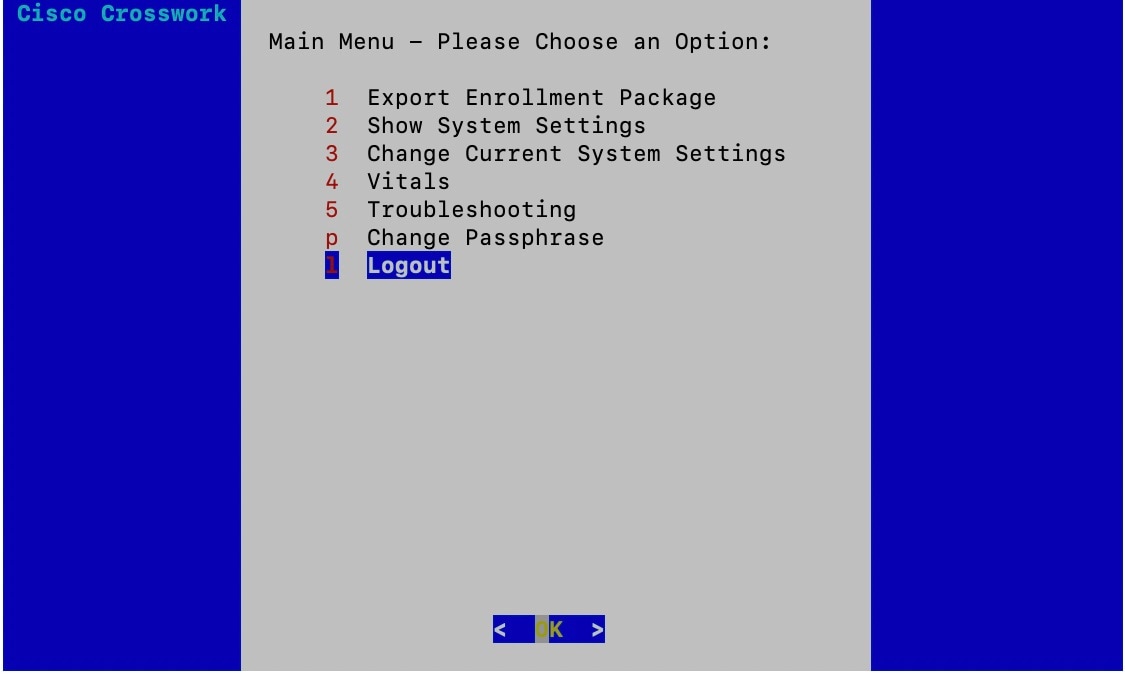
Log Out
To log out, select option l Logout from the Main Menu and press Enter or click OK.
Generate Enrollment Package
Every Cisco Crosswork Data Gateway instance must be identified by means of an immutable identifier. This requires generation
of a Cisco Crosswork Data Gateway enrollment package. The enrollment package can be generated using any of the following two
methods:
By supplying Auto Enrollment Package OVF parameters during installation process (see Auto Enrollment Package under OVF deployment scenarios and Step 11 Auto Enrollment Package of Install Crosswork Data Gateway via vCenter)
By using the Export Enrollment Package option from the interactive menu (see Export Enrollment Package)
The enrollment package is a JSON document created from the information obtained through the OVF template populated by the
user during installation. It includes the all necessary information about Cisco Crosswork Data Gateway required for registering, such as Certificate, UUID of the Cisco Crosswork Data Gateway instance, and metadata like Cisco Crosswork Data Gateway instance name, Creation Time, version info, etc.
If you opted not to export the enrollment package during install, then you must export it before you can enroll the Cisco
Crosswork Data Gateway instance with Crosswork Cloud. The steps to do so are described in Export Enrollment Package.
Note
The enrollment package is unique to each Cisco Crosswork Data Gateway instance.
The value shown for memory represents the usable amount for user processes, not the total VM amount. The Cisco Crosswork Data Gateway operating system
reserves about 700MB from the total VM memory for itself, which is excluded from memory reporting tools. It is expected for
the memory value reported here to be 1GB less than the full amount allocated to the VM due to operating system reservation and rounding.
Export Enrollment Package
To enroll the Cisco Crosswork Data Gateway with Crosswork Cloud, you must have a copy of the enrollment package on your local computer.
Note
This is needed only if you have not specified Auto Enrollment Package Transfer settings in the OVF template. Otherwise, the file will be copied to the SCP URI destination you selected after the VM boots.
Cisco Crosswork Data Gateway uses SCP (via SSH) protocol to preserve formatting and eliminate common errors when transferring
text-based files.
Follow these steps:
Procedure
Step 1
Log in to the Cisco Crosswork Data Gateway Base VM as explained in Section Log In and Log Out.
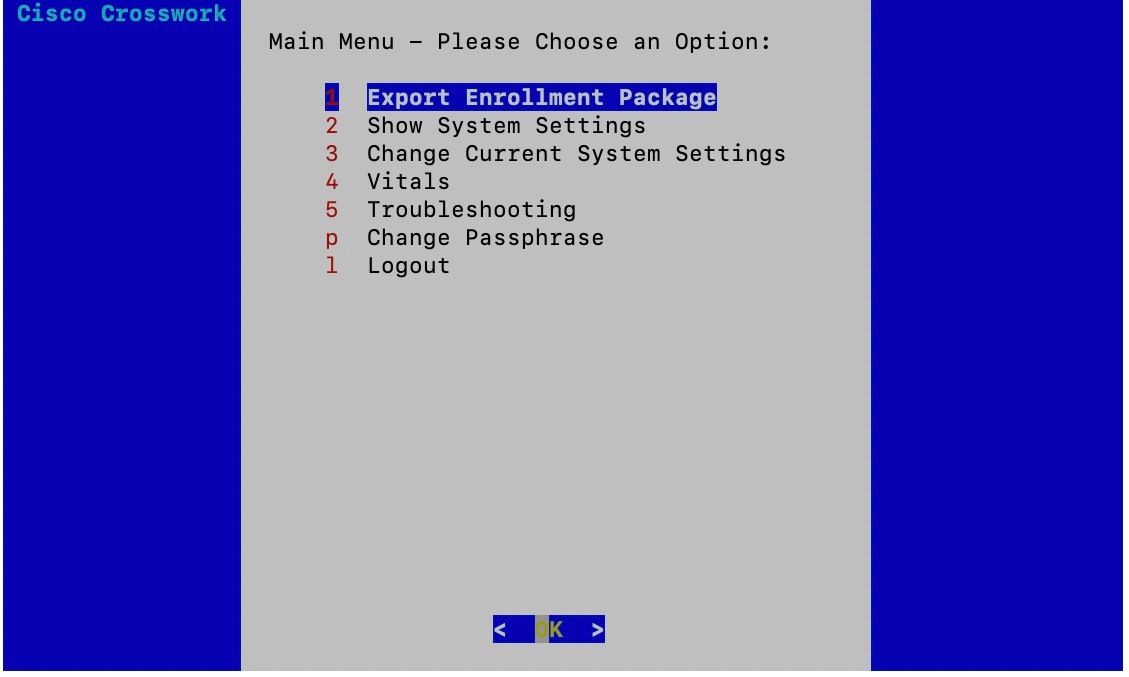
Step 2
From the Main Menu, select 1 Export Enrollment Package and click OK.
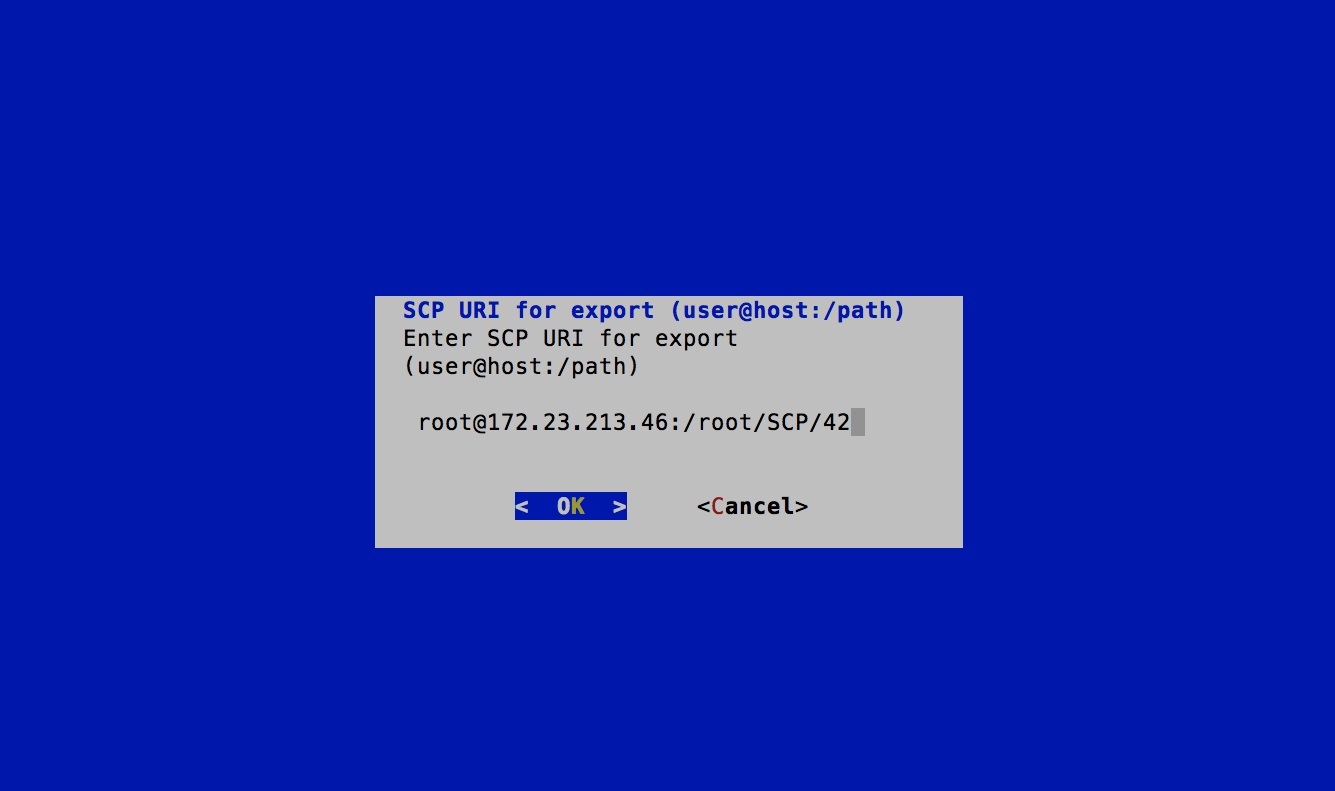
Step 3
Enter the SCP URI for exporting the enrollment package and click OK.
Note
The host must run an SCP server. Ideally, you should export the enrollment package to the local computer you will use to access
the Crosswork server.
If you are not using the default port 22, you can specify the port as a part of the SCP command. For example, to export the
enrollment package to another host that has SCP server listening on port 4000, you can give the following command:
-P4000 admin@<ip_address>:/home/admin
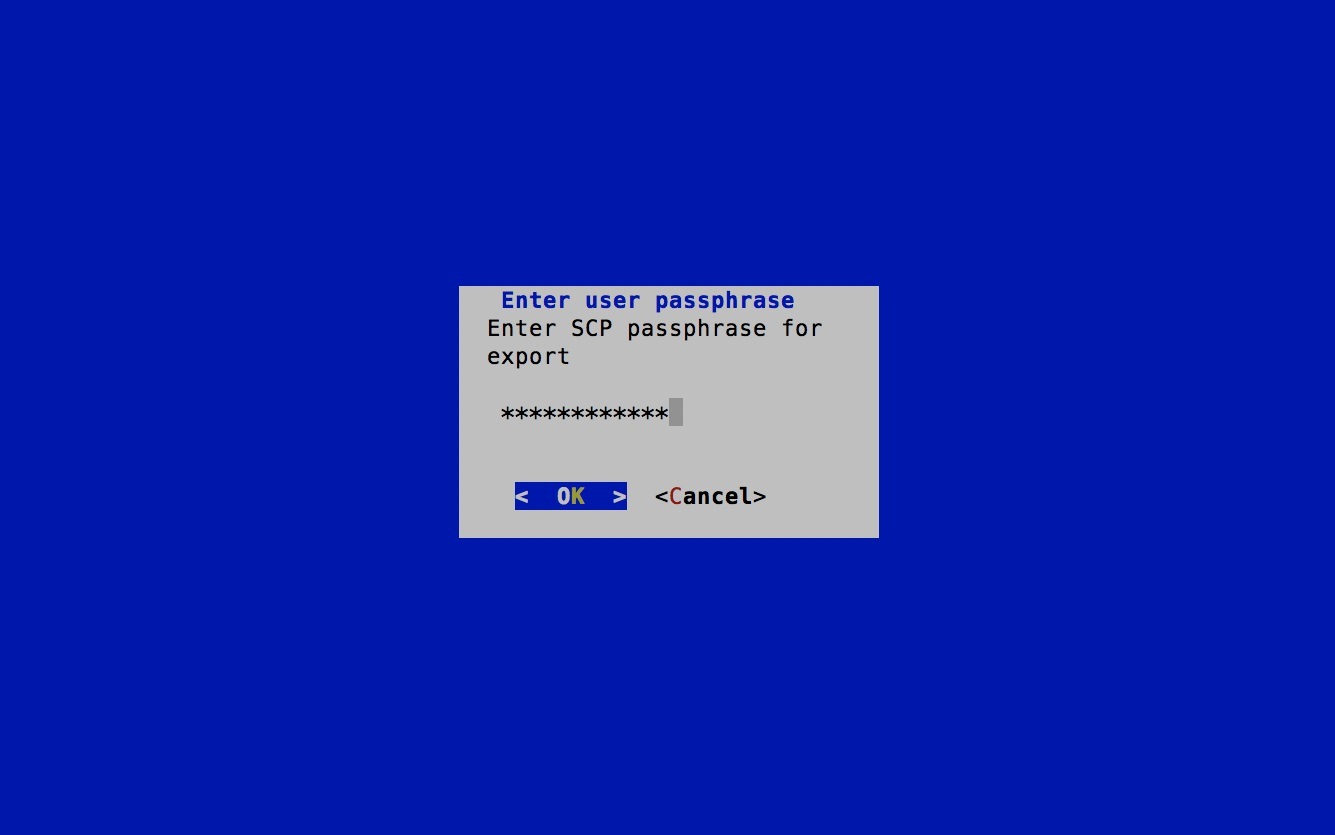
Step 4
Enter the SCP passphrase (the SCP user password) and click OK.
The enrollment package is exported.
Step 5
If you could not copy the enrollment package directly to your local computer, manually copy the enrollment package from the
SCP server to your local computer.
Step 6
Proceed with enrolling the Cisco Crosswork Data Gateway with Crosswork Cloud.
Note
Before enrolling Cisco Crosswork Data Gateway with Cisco Crosswork Trust Insights, the following two additional steps must
also be performed:

 Feedback