Cisco Application Policy Infrastructure Controller Enterprise Module Configuration Guide, Release 1.3.x
Bias-Free Language
The documentation set for this product strives to use bias-free language. For the purposes of this documentation set, bias-free is defined as language that does not imply discrimination based on age, disability, gender, racial identity, ethnic identity, sexual orientation, socioeconomic status, and intersectionality. Exceptions may be present in the documentation due to language that is hardcoded in the user interfaces of the product software, language used based on RFP documentation, or language that is used by a referenced third-party product. Learn more about how Cisco is using Inclusive Language.
- Updated:
- October 25, 2016
Chapter: Managing Users
Managing Users
- About Role Based Access Control
- About Authentication and Authorization
- Configuring Internal User Profiles
About Role Based Access Control
Cisco APIC-EM allows you to define a user profile by role and Role-Based Access Control (RBAC) scope. The role defines the actions that a user may perform, and the RBAC scope defines the resources that a user may access. Currently, devices are the only resources that can be assigned to an RBAC scope.
- User Profiles
- About User Roles
- Resource Groups
- RBAC Scopes
- Application Behavior Based on Role and RBAC Scope
User Profiles
A user profile defines a user's login, password, role (permissions) and RBAC scope (resource access).
User profiles can exist on the Cisco APIC-EM controller or on an external AAA server. Both of the following types of profiles can coexist for any user:
-
Internal user profile: resides on the Cisco APIC-EM controller.
-
External user profile: resides on an external AAA server.
The default user profile that is created when the Cisco APIC-EM is deployed has administrator role (ROLE_ADMIN) permissions and access to all resources (RBAC scope ALL). In turn, this user can create other user profiles with various roles and RBAC scopes, including user profiles with ROLE_ADMIN and RBAC scope ALL permissions (a user with global RBAC scope) or with ROLE_ADMIN and RBAC scope set to a specific group (user with partial RBAC scope).
You can view external user profiles which includes a username and their authorization on the controller. You view external user profiles and their roles in the External Users window. The authorization for the user consists of an RBAC scope and role in that RBAC scope.
About User Roles
Users are assigned user roles that specify the functions that they are permitted to perform:
-
Administrator (ROLE_ADMIN)
-
Policy Administrator (ROLE_POLICY_ADMIN)
-
Observer (ROLE_OBSERVER)
-
Installer (ROLE_INSTALLER)
When you deploy the Cisco APIC-EM for the first time, the configuration wizard prompts for a username and password. This first-time user is given full administrative (read and write) permissions for the controller and access to all resources. This user is able to create user profiles for other users.
 Note | Only users with the administrative role (ROLE_ADMIN) can create users profiles. These users can have RBAC scope set to ALL (user with global RBAC scope) or set to a specific group (user with partial RBAC scope). |
Note | We highly recommend that you configure at least two users with administrator (ROLE_ADMIN) privileges and SCOPE: ALL. In the unlikely event that one user is locked out or forgets his or her password, you have another user with administrative privileges who can help you to recover from this situation. |
Administrator Role
A user's access to Cisco APIC-EM functionality is determined both by its role and the RBAC scope that it is assigned. In general, the administrator role has full read/write access to all of the Cisco APIC-EM functions:
-
User and group settings
Note
For security reasons, passwords are not displayed to any user, not even those with administrator privileges.
Note
Although an administrator cannot directly change another user's password in the GUI, an administrator can delete and then re-create the user with a new password using the GUI.
-
Discovery credentials and Discovery
Note
Only users with access to all resources (RBAC scope set to ALL) can define discovery credentials and perform discovery.)
-
Inventory
-
Topology
-
Path Trace
-
EasyQoS (create, modify, and deploy QoS policies to devices)
-
System-wide controller-administration functions, such as Network Settings (Trustpool, Controller Certificate, Proxy Certificate) and Controller Settings (Update, Backup & Restore, Logging Level, Auth Timeout, Password Policy, Prime Credentials, Telemetry Collection and Controller Proxy)
-
App Management
-
System Administration
-
Audit Logs
-
APIs
Depending on the user's RBAC scope, the administrator's role is impacted as follows:
-
With access to all resources (RBAC scope set to ALL), the user can perform all of the administrator functions listed above to all resources.
-
With access to a subset of resources (RBAC scope set to Custom with resource groups assigned), the user can perform all of the administrator functions listed above, but only to the resources assigned in the RBAC scope, with the following exceptions:
-
Users cannot define discovery credentials or perform discovery.
-
Users can create new users and assign RBAC scopes to them, but they can only assign the RBAC scopes for which they have administrative roles. They can delete only the users that they have created.
-
Note | We highly recommend that you configure at least two users with administrator (ROLE_ADMIN) privileges and SCOPE: ALL. In the unlikely event that one user is locked out or forgets his or her password, you have another user with administrative privileges who can help you to recover from this situation. |
Policy Administrator Role
A user's access to Cisco APIC-EM functionality is determined both by its role and the RBAC scope that it is assigned. In general, the policy administrator role has full read/write access to the following functions:
-
Change Password
-
Discovery Credentials and Discovery
Note
Only users with access to all resources (RBAC scope set to ALL) can define discovery credentials and perform discovery.)
-
Inventory
-
Topology
-
Path Trace
-
EasyQoS (create, modify, and deploy QoS policies to devices)
-
Prime Credentials
-
Policy administration APIs
Depending on the user's RBAC scope, the policy administrator's role is impacted as follows:
-
With access to all resources (RBAC scope set to ALL), the user can perform all of the policy administrator functions listed above for all resources.
-
With access to a subset of resources (RBAC scope set to Custom with resource groups assigned), the user can perform all of the functions listed above (except define discovery credentials and perform discovery), but only for the resources assigned in the RBAC scope.
This role cannot access system-wide controller-administration functions, such as Users and Groups (except to change its own password), Network Settings (Trustpool, Controller Certificate, Proxy Certificate) and Controller Settings (Update, Backup & Restore, Logging Level, Auth Timeout, Password Policy, Telemetry Collection and Controller Proxy.)
Observer Role
A user's access to Cisco APIC-EM functionality is determined both by its role and the RBAC scope that it is assigned. With the exception of being able to change their own password, users with the observer role have read-only access (ability to view but not make any changes) to the following functions:
-
Discovery Results
-
Inventory
-
Topology
-
Path Trace
-
EasyQoS
-
System-wide controller-administration functions, such as Network Settings (Trustpool, Controller Certificate, Proxy Certificate) and Controller Settings (Update, Backup & Restore, Logging Level, Auth Timeout, Password Policy, Prime Credentials, Telemetry Collection and Controller Proxy)
-
App Management
-
System Administration
-
Audit Logs
-
APIs
Depending on the user's RBAC scope, the observer's role is impacted as follows:
-
With access to all resources (RBAC scope set to ALL), the user can view all of the functions listed above for all resources.
-
With access to a subset of resources (RBAC scope set to Custom with resource groups assigned), the user can view all of the functions listed above (except discovery credentials and discoveries), but only for the resources assigned in the RBAC scope.
Installer Role
Users who are assigned the installer role (ROLE_INSTALLER) can use the Cisco Plug and Play Mobile application to access the Cisco APIC-EM remotely to perform the following functions:
Installers cannot access the Cisco APIC-EM GUI. As such, they are not bound by an RBAC scope.
Note | For security reasons, passwords are not displayed to any user, not even those with administrator privileges. |
Resource Groups
In Cisco APIC-EM, you create groups to contain related resources. Then, you assign the groups to users to provide them access to the resources in the group. You may only create groups that contain the resources (or a subset of resources) to which you have access. Currently, devices are the only resources that can be assigned to a group.
Keep the following guidelines in mind when creating resource groups:
-
Only users with ROLE_ADMIN can define resource groups. A user with ROLE_ADMIN and access to all resources (RBAC scope set to ALL) can create resource groups that contain any or all of the available resources. A user with ROLE_ADMIN and access to only certain resources can create resource groups that only contain the same devices that the user has access to. Users cannot create resource groups that contain resources that they do not have access to.
-
A resource group cannot contain another resource group.
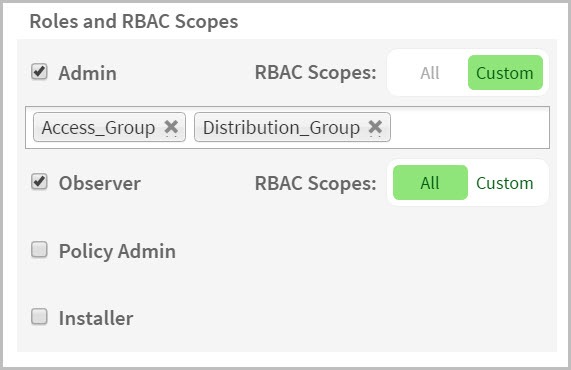
RBAC Scopes
The RBAC scope defines the resources that a user may access. Currently, devices are the only type of resource that can be assigned to an RBAC scope.
When you create a user profile, you can configure one or more user roles for the user. Each user role that you define is assigned a corresponding RBAC scope. The RBAC scope can be all of the resources (RBAC scope set to ALL) or it can be a limited set of resources (RBAC scope set to Custom). When you define a custom RBAC scope, you then need to assign resource groups to it.
For example, in the following figure, the Admin role has been assigned a custom RBAC scope, and the RBAC scope consists of two groups: Access_Group and Distribution_Group. This means that the user can perform all administrative functions to the devices in the Access_Group and Distribution_Group. The Observer role has been assigned the RBAC scope of ALL. This means that the user can view all of the devices in the Cisco APIC-EM.
Keep the following guidelines in mind when defining RBAC scopes for users:
-
A user can have only one role in a given RBAC scope.
-
If a user is assigned a role for one RBAC scope and a different role for another RBAC scope, and the RBAC scopes have some resource groups in common, the user is given the higher privileged access to the common devices. For example, a user is assigned ROLE_ADMIN for group G1 and ROLE_OBSERVER for group G2. Groups G1 and G2 have device D1 in common. (The device is in both groups.) This situation results in the user being given ROLE_ADMIN privileges for device D1.
-
Users who are working with the Cisco IWAN and Cisco Network PnP applications to monitor and manage devices and hosts must have their RBAC Scopes values set to All. The Cisco IWAN and Cisco Network PnP applications do not support Custom RBAC scopes.
Application Behavior Based on Role and RBAC Scope
A user who is assigned a role (for example, ROLE_ADMIN) and an RBAC scope set to ALL may perform the full range of the role's functions to all of the resources. However, if this same user is assigned a limited RBAC scope, the range of functions change, depending on the application. See the following table for a list of applications and the impact of a user's role and RBAC scope on the functions that they can perform.
About Authentication and Authorization
Users and their roles are subject to an authentication and authorization process.
Note | Currently, Cisco APIC-EM supports authentication and authorization. Accounting is not yet supported. |
With the Cisco APIC-EM, each resource for the controller is mapped to an action and each action is mapped to a required permission for a user. All REST APIs are therefore protected by the controller authentication process.
You can configure the following types of authentication for user access to the Cisco APIC-EM:
-
Internal—Local controller authentication based upon the usernames and passwords created using the controllers's own GUI. For information about configuring internal users, see Creating Internal Users.
-
External—External controller authentication based upon the usernames and passwords that exist on other AAA servers. For information about configuring external controller authentication, see Configuring External User Profiles.
When performing user authentication, the controller attempts to authenticate the user in the following order:
-
Authenticate with AAA server directory credentials using the RADIUS protocol (number of times attempted per user configuration using the GUI or APIs)
-
Authenticate with the user credentials that are configured locally on the controller (number of times attempted per user configuration using the controller GUI)
If the user credentials are authenticated in any of the above steps, then controller access is immediately granted.
Configuring Internal User Profiles
Configuring Groups for User Access
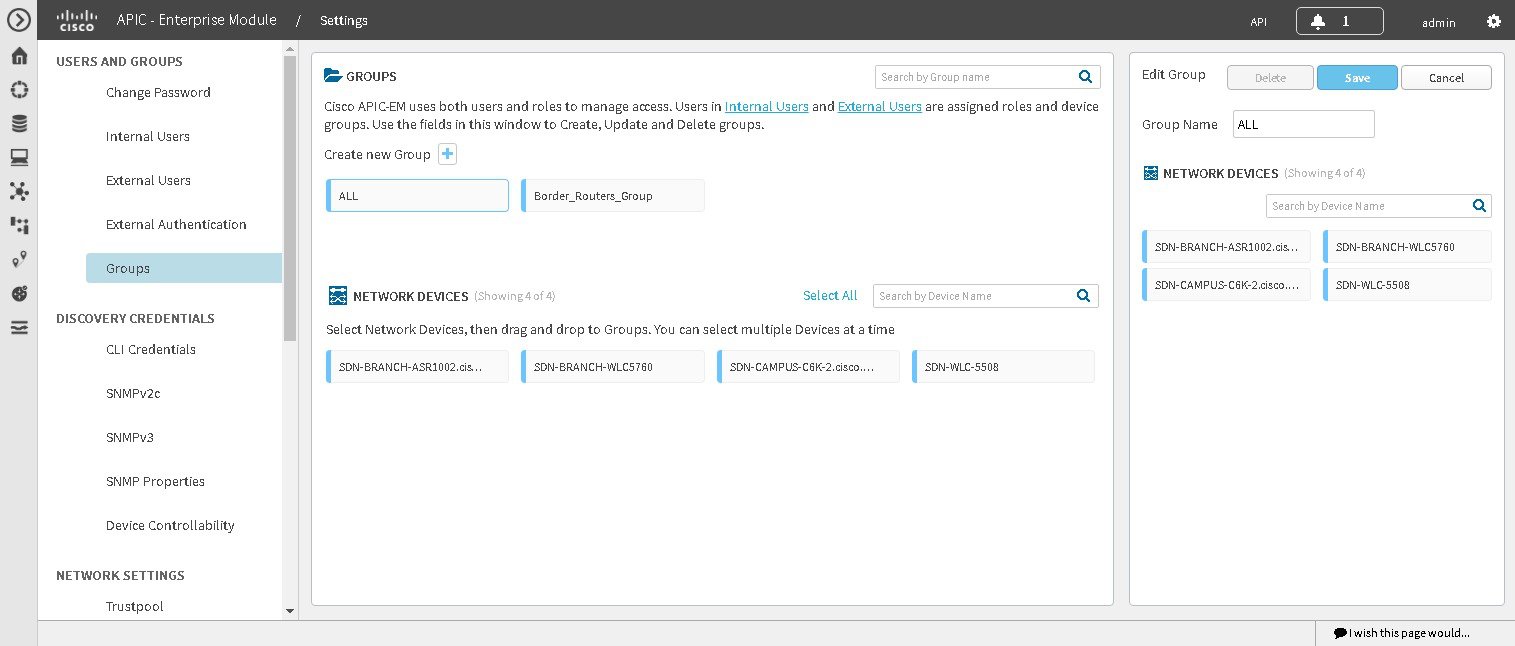
You can configure groups using the Groups window in the Cisco APIC-EM GUI.
Note | Hosts and wireless access points (Unified access points only) cannot be added to a group. Instead, they are automatically added to a group when the switch or wireless LAN controller to which the host or wireless access point is connected is added to the group. |
Both internal and external users can be configured for group access using RBAC scope. You configure RBAC scope for internal users with the controller's GUI using the Internal Users page. You configure RBAC scope for external users on the AAA server itself.
You must have successfully deployed the Cisco APIC-EM and it must be operational.
You must have administrator (ROLE_ADMIN) permissions and either access to all resources (RBAC scope set to ALL) or an RBAC scope that contains all of the resources that you want to group. For example, to create a group containing a specific set of resources, you must have access to those resources (custom RBAC scope set to all of the resources that you want to group).
You must have successfully performed a discovery, with the resulting discovered devices appearing in the controller's Inventory window.
| Step 1 | In the Home window, click either admin or the Settings icon (gear) at the top right corner of the screen. | ||||||||
| Step 2 | Click the Settings link from the drop-down menu. | ||||||||
| Step 3 | In the
Settings navigation pane, click
Groups to view the
Groups window.
The Groups window is divided into three fields.
| ||||||||
| Step 4 | Click the addition icon in the Groups field. | ||||||||
| Step 5 | Enter a name for the new group in the Group Name field that appears. | ||||||||
| Step 6 | Click the green checkmark to create and save the new group. | ||||||||
| Step 7 | Drag and drop
any network device icons from the
Network
Devices field to the new group icon in the
Groups field.
Dragging and dropping the network device icon to the new group icon will add that device to the new group. You can also click on several network device icons in the Network Devices field to first form a selection of devices, and then drag and drop the entire selection of devices to the group icon to form the new group.
| ||||||||
| Step 8 | Continue creating groups and adding devices for your network. |
What to Do Next
After configuring groups containing the appropriate devices for your network, access the Internal Users window. In this window, you assign group access permissions with the RBAC Scope field.
Creating Internal Users
You can create an internal user for the Cisco APIC-EM.
Note | User information (credentials) is stored in a local database on the controller. |
Note | We highly recommend that you configure at least two users with administrator (ROLE_ADMIN) privileges and SCOPE: ALL. In the unlikely event that one user is locked out or forgets his or her password, you have another user with administrative privileges who can help you to recover from this situation. |
You must have administrator (ROLE_ADMIN) permissions, as well as RBAC scope configured to all groups (global RBAC scope) or a specific subset of groups (non-global RBAC scope).
You must have configured the appropriate groups for the network devices using the Groups window in the controller's GUI.
| Step 1 | In the Home window, click either admin or the Settings icon (gear) at the top right corner of the screen. |
| Step 2 | Click the Settings link from the drop-down menu. |
| Step 3 | In the Settings navigation pane, click Internal Users to view the Internal Users window. |
| Step 4 | Click Create User. |
| Step 5 | In the Create User fields that now appear, you need to enter the username, password (twice), and role and group of the new user. |
| Step 6 | Enter the username. |
| Step 7 | Enter the password twice. |
| Step 8 | Click the appropriate role for the user. |
| Step 9 | Click the
appropriate
RBAC
Scope for the user (either
All or click and then select a
Custom RBAC Scope).
The ALL option in the RBAC Scopes field contains all devices discovered by the controller. Prior to configuring an internal user, set up RBAC scopes using Groups in the controller's GUI. |
| Step 10 | Click
Save to save the user configuration.
The Users window is displayed with the following information about the users: |
What to Do Next
Proceed to configure any other internal users for your network devices. If necessary, configure external authentication for any external users for your network devices using the External Authentication window in the controllers' GUI.
Deleting a User
A user with the administrator role (ROLE_ADMIN) can delete a user from the Cisco APIC-EM.
You must have administrator (ROLE_ADMIN) permissions and access to all devices (RBAC Scope set to ALL) to perform this procedure.
| Step 1 | From the Global toolbar, click the Administrative Functions (Gear) icon > Settings. | ||
| Step 2 | From the navigation pane in the
Settings window, click
Users.
The Users window is displayed with the following information about the users:
| ||
| Step 3 | Locate the user that you want to delete and,
in the Actions column, click the Delete icon.
The user is deleted from the Cisco APIC-EM database and is unable to access the controller.
|
Viewing and Editing User Information
You can view and change user information.
Note | User information (credentials) is stored in a local database on the controller. |
You must have administrator (ROLE_ADMIN) permissions and access to all devices (RBAC Scope set to ALL) to perform this procedure.
| Step 1 | From the Global toolbar, click the Administrative Functions (Gear) icon > Settings. |
| Step 2 | From the
navigation pane in the
Settings window, click
Users.
The Users window is displayed with the following information about the uses:
|
| Step 3 | If you want to
edit a user's information, from the
Actions column, click the
Edit icon.
The username and scope are configured by default so you cannot change their settings. However, you can change the role setting. Valid roles are ROLE_ADMIN, ROLE_POLICY_ADMIN, ROLE_OBSERVER, or ROLE_INSTALLER. |
| Step 4 | When you are finished editing the user information, click Update. |
Changing Your Password
You can change only your own Cisco APIC-EM password, unless you have administrator privileges (ROLE_ADMIN). With administrative privileges, you can change another user's password by deleting and then recreating the user profile with a new password.
You can use the password generator provided in the Change Password window or the following guidelines to create a secure password.
Create a password of at least 8 characters and one that contains characters from at least three of the following four classes:
-
Uppercase alphabet
-
Lowercase alphabet
-
Numerical digits
-
Special characters—include the space character or any of the following characters or character combinations:
! @ # $ % ^ & * ( ) - = + _ { } [ ] \\ | ; : " ' , < . > ? / :: #! ./ ;; >> << () **
In addition to a complex password, you should also ensure that user names do not create security vulnerabilities. To avoid user names that can create security vulnerabilities, the following rules should be followed:
-
All users should have unique user names and passwords.
-
Do not allow users to use the admin login and password
To avoid creating security vulnerabilities, we recommend that you follow the Cisco APIC-EM password policies when creating a password. For information, see the Cisco Application Policy Infrastructure Controller Enterprise Module Deployment Guide.
| Step 1 | From the Global toolbar, click the Administrative Functions (Gear) icon > Settings. | ||
| Step 2 | From the navigation pane in the Settings window, click Change Password. | ||
| Step 3 | In the
Change
Password window, enter the appropriate values in the following
fields:
| ||
| Step 4 | When you are
finished, click
Update to update and save the new password.
Click Cancel to cancel the password change. |
Viewing User Access Status
As an administrator, you can display the access status of a Cisco APIC-EM user.
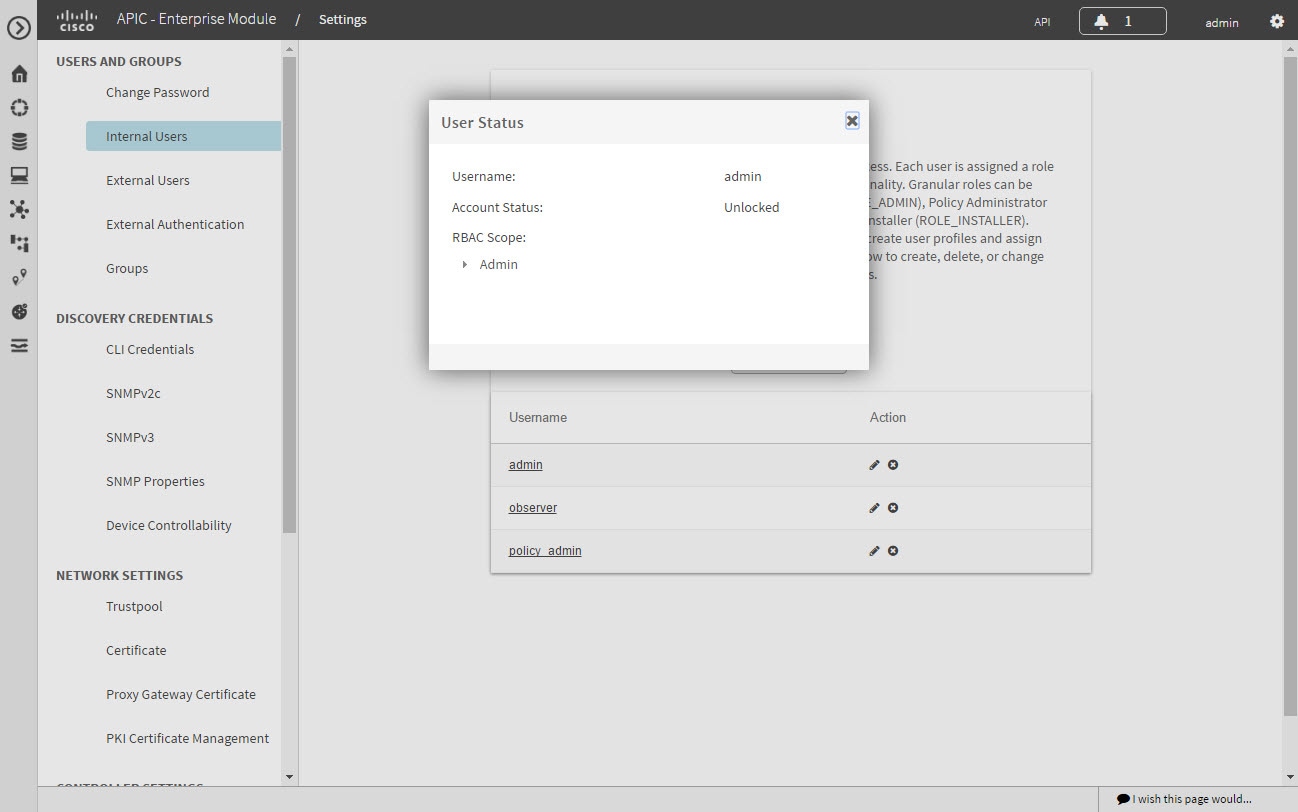
You must have administrator (ROLE_ADMIN) permissions and access to all devices (RBAC Scope set to ALL) to perform this procedure.
| Step 1 | From the Global toolbar, click theAdministrative Functions (Gear) icon > Settings. | ||
| Step 2 | From the
navigation pane in the
Settings window, click
Users.
The Users window is displayed with the following information about the users:
| ||
| Step 3 | Click the
individual username (link) to view the user's current access status.
The User Status dialog box opens, displaying the following information:
If you are an administrator, you can unlock the user account by clicking Unlock.
| ||
| Step 4 | When you are finished viewing or editing the user information, click Close. |
Configuring External Users
Configuring External User Profiles
The Cisco APIC-EM supports external authentication and authorization for users from an AAA server. The external authentication and authorization is based upon usernames, passwords, and attributes that already exist on a pre-configured AAA server. With external authentication and authorization, you can log into the controller with credentials that already exist on the AAA server. The RADIUS protocol is used to connect the controller to the AAA server.
The controller attempts to authenticate and authorize the user in the following order:
-
Authenticate/authorize with the user's credentials on a primary AAA server.
-
Authenticate/authorize with the user's credentials on a redundant or secondary AAA server.
-
Authenticate/authorize with the user's credentials managed by the Cisco APIC-EM.
A user is granted access to the controller only if both authentication and authorization is successful. When authentication/authorization is attempted using an AAA server, the response from that AAA server may be either a timeout or rejection:
-
A timeout occurs when there is no response received from the AAA server within a specific period of time. If the AAA server times out for the authentication/authorization request on the first configured AAA server, then there is a failover to the secondary AAA server. If the secondary AAA server also times out for the authentication/authorization request, then a fall back to local authentication/authorization occurs.
-
A rejection is an explicit denial of credentials. If the AAA server rejects an authentication/authorization attempt made from the controller, then there is a fall back to local authentication/authorization.
You configure parameters for the controller to connect to and communicate with an external AAA server, using the External Authentication window in the Cisco APIC-EM GUI.
You must have successfully deployed the Cisco APIC-EM and it must be operational.
You must have administrator (ROLE_ADMIN) permissions and either access to all resources (RBAC scope set to ALL) or an RBAC scope that contains all of the resources that you want to group. For example, to create a group containing a specific set of resources, you must have access to those resources (custom RBAC scope set to all of the resources that you want to group).
For information about user permissions and RBAC scopes required to perform tasks using the Cisco APIC-EM, see "User Settings" in the chapter, "Configuring the Cisco APIC-EM Settings".
You must have the AAA server already preconfigured, set up, and running. You must also configure the AAA server to interact with the Cisco APIC-EM. When configuring the AAA server to interact with the Cisco APIC- EM, perform the following additional steps:
-
Register the Cisco APIC-EM with the AAA server.
Note
This could also involve configuring a shared-secret on both the AAA server and Cisco APIC-EM controller.
-
Configure an attribute name with a value on the AAA server (the attribute name must match on both the AAA server and controller, see step 10 in the following procedure).
-
For a Cisco APIC-EM multi-host configuration, configure all individual host IP addresses and the Virtual IP address for the multi-host cluster on the AAA server.
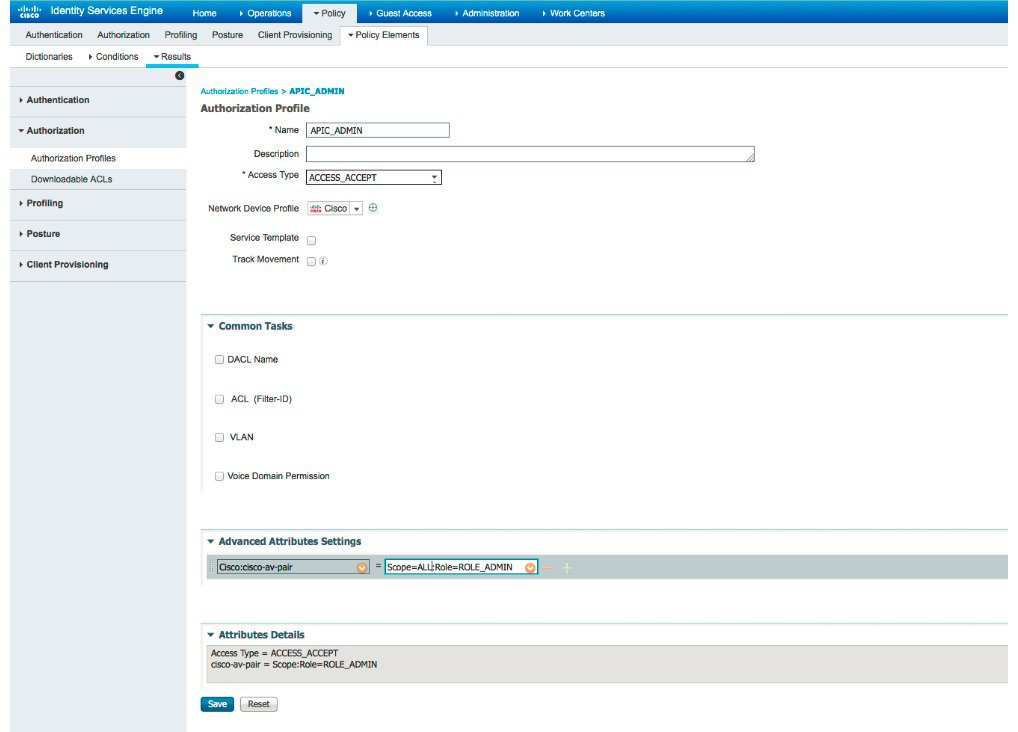
As an example of using the Cisco Identity Services Engine (ISE) GUI to configure values on an AAA server, you select Authorization Profiles in the Cisco ISE GUI navigation pane and proceed to configure an authorization profile. When configuring an authorization profile, you enter the following values:
-
Name: Enter a name for the authorization profile. We recommend that you enter a name similar to the role to be used for the profile. For example, for an admin (ROLE_ADMIN) use a name with "admin" within it, such as "APIC_ADMIN".
-
Description: Enter a description for the profile
-
Access Type: ACCESS_ACCEPT
-
Network Device Profile: Cisco
-
Advance Attribute Settings:
-
Attribute Name: cisco-av-pair (default value)
-
Scope: Scope=ALL:Role=ROLE_ADMIN
Note
The above Scope value is used when setting up external users with administrator permissions (ROLE_ADMIN) and RBAC scope set to ALL. If you have users with different roles and different RBAC scopes, then use the following format for the Scope value:
Scope=grp1,grp2,grp5:Role=ROLE_ADMIN&Scope=grp3,grp4:Role=ROLE_OBSERVER
With this Scope value format the colon (:) separates the scope(s) from the role. Commas separate the different groups within the scope. The ampersand (&) separates the different roles.
-
| Step 1 | In the Home window, click either admin or the Settings icon (gear) at the top right corner of the screen. | ||
| Step 2 | Click the Settings link from the drop-down menu. | ||
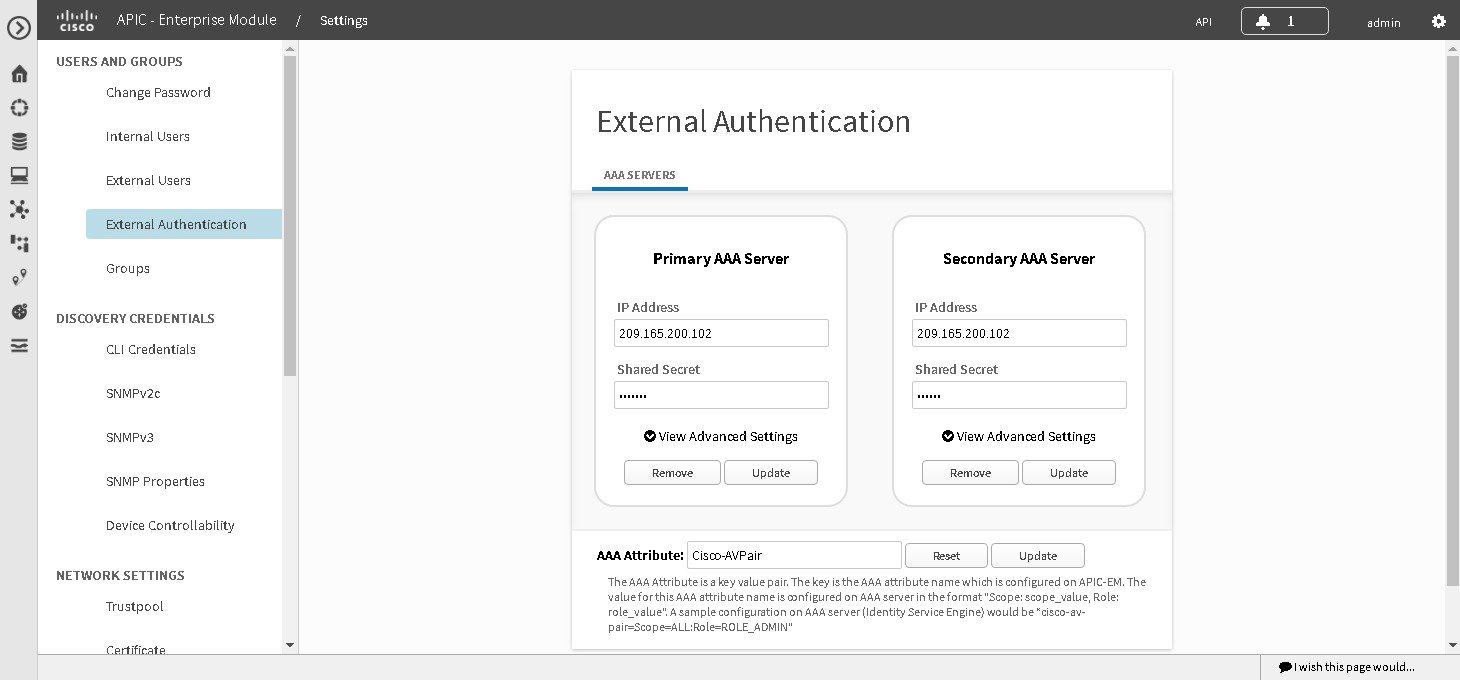
| Step 3 | In the Settings navigation pane, click External Authentication to view the External Authentication window. | ||
| Step 4 | Click the AAA Server tab to configure the controller with AAA server credential authentication values. | ||
| Step 5 | Configure
access to the AAA server for the controller by entering the following
required
information:
Click either View Advanced Settings to enter additional information for the configuration or Apply to save and apply your configuration. | ||
| Step 6 | (Optional)
Configure access to the AAA server for the controller by entering the following
information:
Click Apply to save and apply your configuration. | ||
| Step 7 | Click the
Add
AAA Server tab to configure a
secondary
AAA server for the controller.
The secondary AAA server is the backup AAA server that is used for high availability. | ||
| Step 8 | Configure
access to the
secondary
AAA server for the controller by entering the following
required
information:
We recommend that the secondary AAA server has the same configuration as the primary AAA server, otherwise results are unpredictable. Click either View Advanced Settings to enter additional information for the configuration or Apply to save and apply your configuration. | ||
| Step 9 | (Optional)
Configure access to the
secondary
AAA server for the controller by entering the following information:
Click Apply to save and apply your configuration. | ||
| Step 10 | Enter the
AAA
Attribute.
As part of the required, earlier AAA server configuration, you must have already configured an AAA attribute on the AAA server. The AAA attribute is a key value pair that consists of both a key and its value. The key is the AAA attribute name. On the Cisco APIC-EM, you register this AAA attribute name in the controller's GUI in this field. By doing so, you are instructing the controller to search for this key (AAA attribute name) in the AAA server response, after logging in with your AAA credentials. The default AAA attribute name on the controller is Cisco-AVPair. On the AAA server, you configure both the key (AAA attribute name) and its value. The key must be the same as that being configured on the Cisco APIC-EM. The value (which is only configured on the AAA server) supports the following format: Scope=scope_value:Role=role_value For example: Scope=ALL:Role=ROLE_ADMIN Note that if you have several users with different roles and scopes, then you use a different format: For example: Scope=grp1,grp2:Role=ROLE_ADMIN&Scope=grp3,grp4:Role=ROLE_OBSERVER This format used for multiple users, roles, and scopes is mandatory. The colon (:) separates the scope(s) from the roles in this format. Commas separate the groups within the scopes. The ampersand (&) separates the different role types. You can only list the role once using this format. So, in the above example if you need to add an admin for a group 5 (grp5), you would need to rewrite using the following format: Scope=grp1,grp2,grp5:Role=ROLE_ADMIN&Scope=grp3,grp4:Role=ROLE_OBSERVER Once finished, click Update to save the AAA Attribute name. |
What to Do Next
Log out of the Cisco APIC-EM.
Using your AAA server credentials, log back into the Cisco APIC-EM.
Access the External Users window on the controller's GUI to view the AAA server users, roles, and scope.
Note | If the authentication/authorization is successful and access is granted, then the user's external authentication/authorization is saved in the controller's database. All users successfully granted access can be viewed in the External Users window. |
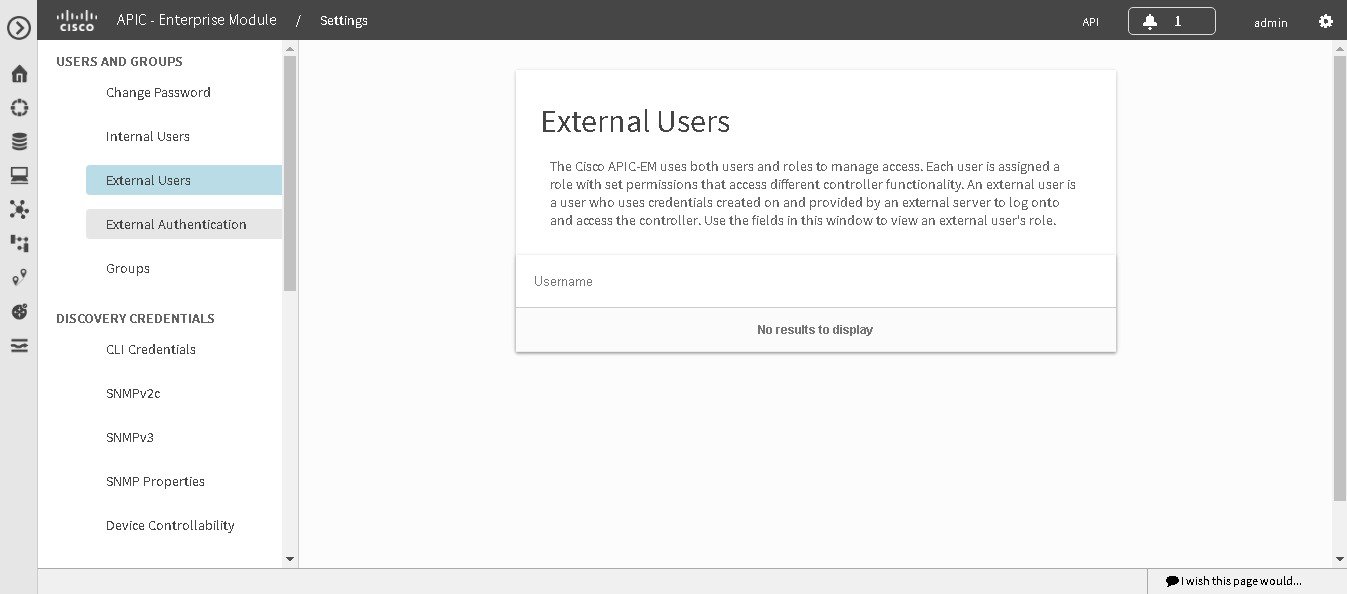
Viewing External Users
You can view external users that have access to the Cisco APIC-EM using the controller's GUI. An external user is a user with credentials created on and provided by an external server to log onto and access the controller.
Use the fields in the External Users window to view an external user's role and the groups they belong to. For information about configuring external controller authentication, see Configuring External User Profiles.
You must have administrator (ROLE_ADMIN) permissions, as well as RBAC scope configured to all groups (global RBAC scope) or a specific subset of groups (non-global RBAC scope).
You have already configured external authentication for the controller with an AAA server.
| Step 1 | In the Home window, click either admin or the Settings icon (gear) at the top right corner of the screen. | ||
| Step 2 | Click the Settings link from the drop-down menu. | ||
| Step 3 | In the Settings navigation pane, click External Users to view the External Users window. | ||
| Step 4 | Proceed to view
any external users displayed in this window.
|
 Feedback