Cisco Converged EdgeQAM Manager User Guide
Bias-Free Language
The documentation set for this product strives to use bias-free language. For the purposes of this documentation set, bias-free is defined as language that does not imply discrimination based on age, disability, gender, racial identity, ethnic identity, sexual orientation, socioeconomic status, and intersectionality. Exceptions may be present in the documentation due to language that is hardcoded in the user interfaces of the product software, language used based on RFP documentation, or language that is used by a referenced third-party product. Learn more about how Cisco is using Inclusive Language.
- Updated:
- April 20, 2016
Chapter: How to Use Cisco Converged EdgeQAM Manager
How to Use Cisco
Converged EdgeQAM Manager
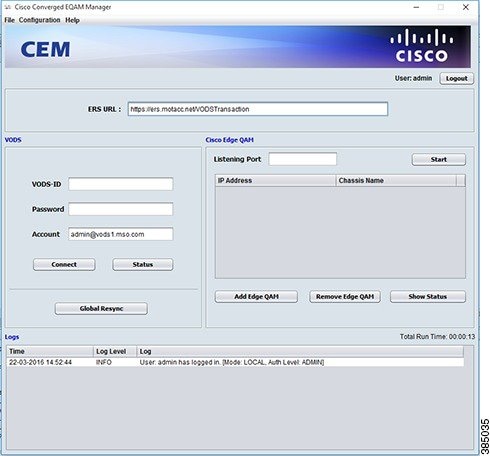
This is the main interface of the Cisco CEM application.
- User Authentication
- Communication with the ERS
- Communication with Cisco Edge QAM device
- General Operation
- Configuring SNMP Traps
- Feature Information for Converged EdgeQAM Manager
User Authentication
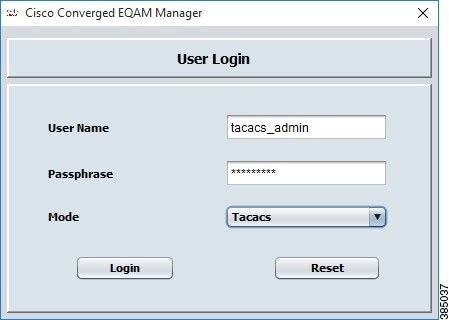
The CEM application supports user authentication in two modes: local and TACACS+.
The user authorization level that are supported by the CEM application are:
Local Authentication
When the CEM application is launched for the first time, a local administrator user has to be created. This admin user can then proceed and configure the CEM to connect with the ERS and Cisco Edge QAM device.
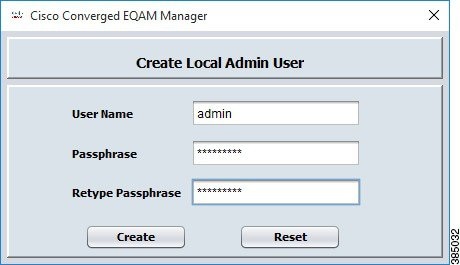
The validation rules for the passphrase are:
-
It must be 6-127 characters in length.
-
It must not contain any whitespace.
-
Character rules (any 3 of the following 4 rules):
-
It must not contain character sequences similar to qwerty.
An example of a passphrase that satisfies the aforementioned rules is: V#g0K$7q.
The admin user can create several other users with the Admin/Monitor privilege. The dialog to manage the users can be viewed using the Configuration > Login Settings menu item and then choosing the Local User Settings tab.
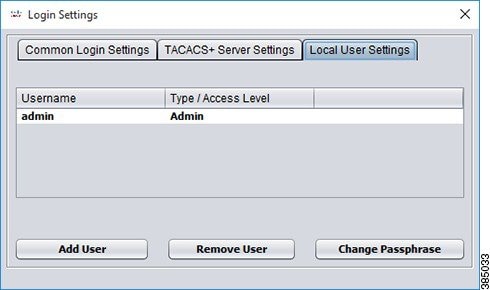
 Note | If the user forgets the passphrase, it cannot be retrieved by the user. Hence, it is important to know the passphrase of at least one local admin user. |
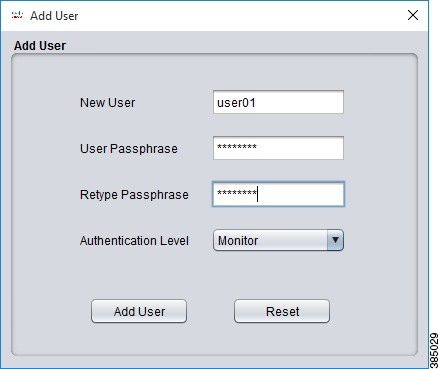
Only a user with the Admin privilege can add/remove users. A new user can be added by clicking the Add User button.
A user can be removed by selecting the user and then clicking the Remove User button.
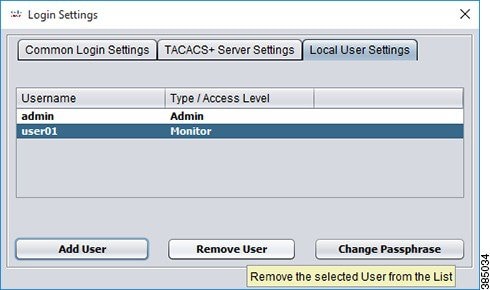
The passphrase can be updated by clicking the Change Passphrase button, and the passphrase rules that mentioned earlier are applicable in this dialog window too.

TACACS+ Authentication
The information regarding the TACACS+ server must be specified after logging in the CEM application as the local Admin user.
The dialog to specify the TACACS+ server information can be opened using the Configuration > Login Settings menu item then choosing the TACACS+ Server Settings tab.
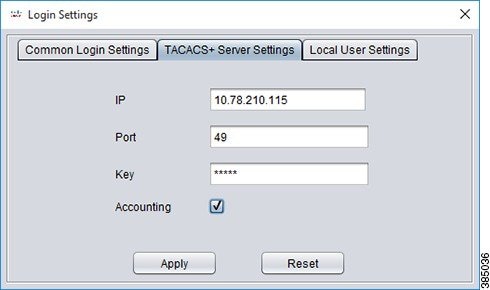
The Shared Secret that is configured on the TACACS+ server as a part of the TACACS+ Authentication Options must be set in the Key field of the Login Settings Dialog.
If the user intends to enable TACACS+ Accounting, then the checkbox must be selected as shown in the above screenshot.
Please close the Login Settings dialog box after clicking the Apply button.
Then the user can use the TACACS+ user credentials to login to the CEM application.
Common Login Settings
The settings that control the user session can be viewed/modified by clicking the Configuration > Login Settings menu item then choosing the Common Login Settings tab, including:
-
Idle Timeout (minutes)—Idle session timeout.
-
Maximum Invalid Login Attempt(s)—Maximum number of attempts a user can try to login with incorrect login credentials.
-
Login Screen Freeze Time (seconds)—Duration for which the login screen can be frozen after the user has entered invalid credentials for maximum admissible attempts.
-
Local User – Passphrase Expiry Time—Select the checkbox if you want to configure an expiry time for the passphrase (for the local user).
-
Local User – Passphrase Expiry Time (days)—Passphrase expiry time in days.

Passphrase Expiry
You can set the passphrase to expire after a period of a maximum of 180 days. By default, the passphrase expiry time is disabled.
Click the Local User – Passphrase Expiry Time checkbox to enable and configure the expiry time in the Common Login Settings tab. The Local User – Passphrase Expiry Time (days) field for specifying the time is enabled only when you select the Local User – Passphrase Expiry Time checkbox.
Communication with the ERS
Establishing a Connection with the ERS
Complete these steps to establish a connection with the ERS:
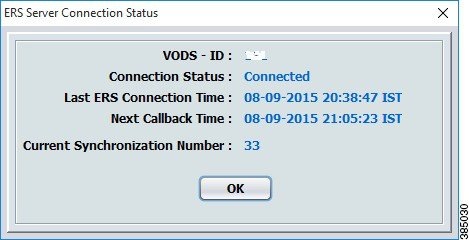
Status of the Connection with the ERS
The status of the connection with the ERS server can be ascertained by clicking the Status button.
Global Resynchronization
The Global Resynchronization Button is used to send the ECM request to the ERS and obtain the new set of ECM messages.
Note | Global Resynchronization can only be done when ARRIS/CCAD instructs the MSO to request and obtain the new set of ECM messages. |
Communication with Cisco Edge QAM device
Starting the Server Socket
Complete these steps to start the server socket:
Adding Cisco Edge QAM device
Complete these steps to add Cisco Edge QAM device:
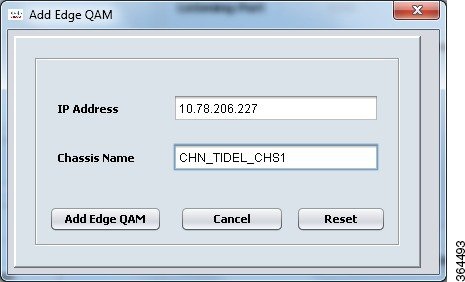
The connection will be established between the CEM application and Cisco Edge QAM device if PME is enabled on Cisco Edge QAM device.
Note | The hostname of Cisco Edge QAM device must match the one that is specified on the GUI of the CEM application. 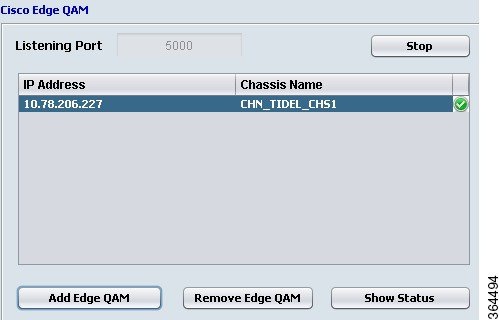 |
The tick symbol in the right-most column of the table indicates that the connection with Cisco Edge QAM device is established. If the cell is blank, it indicates that the connection has not established yet.
The CEM application will close the connection with Cisco Edge QAM device if:
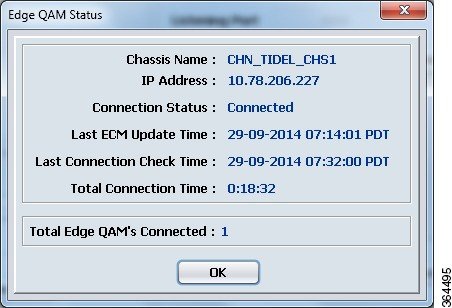
Status of the Connection with the Cisco Edge QAM device
The status of the connection between the CEM application and Cisco Edge QAM device can be ascertained by selecting Cisco Edge QAM device in the Edge QAM List and then clicking the Show Status Button.
Removing Cisco Edge QAM device
The connection with Cisco Edge QAM device can be closed and the corresponding entry in the Edge QAM List can be removed by selecting Cisco Edge QAM device in the Edge QAM list and then clicking the Remove Edge QAM button.
General Operation
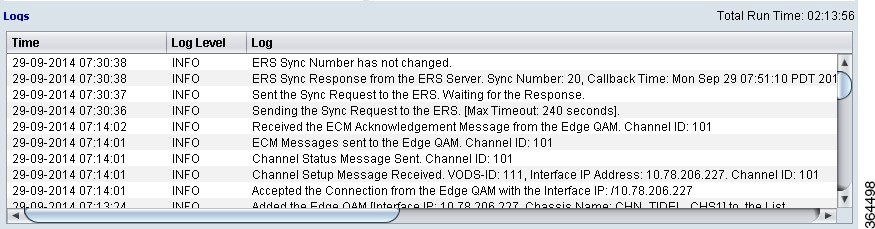
Viewing Logs
The logs that are written when the current instance of the CEM application is active will be displayed on the GUI.
Select the File > View Logs menu or the Ctrl+L shortcut key to view the complete set of logs. The log file will be opened in the default text editor of the operating system.
Application Settings
The settings that control the communication between the CEM application, the ERS and Cisco Edge QAM device can be viewed/modified using the File > Application Settings menu.
The following are the ERS connection settings that can be modified in the application settings dialog:
-
timeout for the initial handshake with the ERS server
-
timeout for receiving the data from the ERS server
-
the time after which the next message should be sent to the ERS server after the server returned an error
Cisco Edge QAM device connection settings including:
-
time for which the CEM will wait to receive the acknowledgment message for the ECM provision message from Cisco Edge QAM device before re-sending the ECM provision message
-
idle connection timeout
The application settings can be saved by clicking the File > Save Settings menu.
Configuring SNMP Traps
You can configure the CEM application to send SNMP trap messages to the remote SNMP Notification Host/Manager for any connection related errors.
The CEM application sends trap messages only if the connection is not restored before the timeout that is specified on the GUI. By default, trap messages are sent for both ERS connection related errors and Edge QAM connection errors.
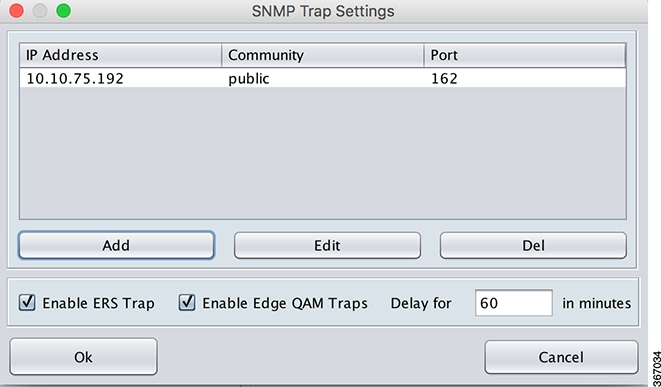
Adding SNMP Notification Host
You can add more than one remote SNMP notification host/manager. Complete these steps to add Cisco Edge QAM device:
| Step 1 | Choose Configuration > SNMP Trap Settings menu to open the SNMP Trap Settings window.
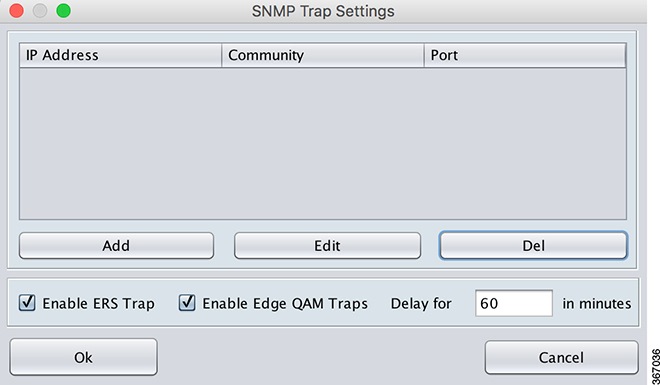 |
| Step 2 | Click the Add button to open the SNMP Trap Settings Add dialog box.
 |
| Step 3 | Enter the following details in the SNMP Trap Settings Add window:
|
| Step 4 | Click Ok to add the host to the list.
 |
| Step 5 | Choose the required checkboxes to enable the following:
|
| Step 6 | In the Delay for text box, specify the time after which the traps should be sent to the configured remote SNMP notification hosts.
The traps are sent to the hosts only if the connection is not restored before the timeout that is specified in the UI. By default, the delay is 60 minutes. |
Modify or Delete SNMP Configuration
You can modify the details of the remote SNMP notification hosts already added in the CEM application.
To edit the details, in the SNMP Trap Settings window, select the IP address and click the Edit button. You can edit the IP Address, Community (SNMP community string), and the Port fields.
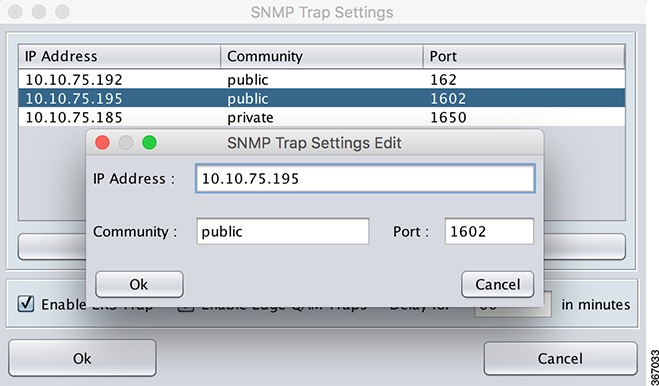
To delete a host configuration, in the SNMP Trap Settings window, select the IP address and click the Del button.
Feature Information for Converged EdgeQAM Manager
Use Cisco Feature Navigator to find information about platform support and software image support. Cisco Feature Navigator enables you to determine which software images support a specific software release, feature set, or platform. To access Cisco Feature Navigator, go to http://www.cisco.com/go/cfn. An account on Cisco.com is not required.
Note | The table below lists only the software release that introduced support for a given feature in a given software release train. Unless noted otherwise, subsequent releases of that software release train also support that feature. |
|
Feature Name |
Releases |
Feature Information |
|---|---|---|
|
SNMP Trap Configuration |
Converged EdgeQAM Manager 2.1 |
Cisco cBR-8 router is supported in this release. |
|
Converged EdgeQAM Manager |
Version 2.0 |
Cisco cBR-8 router is supported in this release. |
|
Converged EdgeQAM Manager |
Version 1.0 |
Cisco cBR-8 router is not supported in this release. |
 Feedback