-
null
Bias-Free Language
The documentation set for this product strives to use bias-free language. For the purposes of this documentation set, bias-free is defined as language that does not imply discrimination based on age, disability, gender, racial identity, ethnic identity, sexual orientation, socioeconomic status, and intersectionality. Exceptions may be present in the documentation due to language that is hardcoded in the user interfaces of the product software, language used based on RFP documentation, or language that is used by a referenced third-party product. Learn more about how Cisco is using Inclusive Language.
- Updated:
- January 13, 2014
Chapter: Creating and Managing IP Access Control Lists for WAAS Devices
Creating and Managing IP Access Control Lists for Cisco WAAS Devices
This chapter describes how to use the Cisco Wide Area Application Services (Cisco WAAS) Central Manager GUI to centrally create and manage IP access control lists (ACLs) for your Cisco WAAS devices.
This chapter contains the following sections:
- About IP ACLs for Cisco WAAS Devices
- Creating and Managing IP ACLs for Cisco WAAS Devices
- List of Extended IP ACL Conditions

Note![]() You must log in to the Cisco WAAS Central Manager GUI using an account with admin privileges to view, edit, or create IP ACL configurations.
You must log in to the Cisco WAAS Central Manager GUI using an account with admin privileges to view, edit, or create IP ACL configurations.
Note![]() Throughout this chapter, the term Cisco WAAS device is used to refer collectively to the Cisco WAAS Central Managers and Cisco Wide Area Application Engines (Cisco WAEs) in your network. The term Cisco WAE refers to Cisco WAE appliances Cisco WAE Network Modules (the Cisco NME-WAE family of devices).
Throughout this chapter, the term Cisco WAAS device is used to refer collectively to the Cisco WAAS Central Managers and Cisco Wide Area Application Engines (Cisco WAEs) in your network. The term Cisco WAE refers to Cisco WAE appliances Cisco WAE Network Modules (the Cisco NME-WAE family of devices).
About IP ACLs for Cisco WAAS Devices
In a centrally managed Cisco WAAS network environment, administrators should be able to prevent unauthorized access to various devices and services. IP ACLs can filter packets by allowing you to permit or deny IP packets destined for a Cisco WAAS device.
The Cisco WAAS software supports standard and extended ACLs that allow you to restrict access to a Cisco WAAS device. The Cisco WAAS software can use the following types of ACLs:
- Interface ACL: Applied on the built-in, port channel, standby. This type of ACL is intended to control management traffic (Telnet, SSH, and Cisco WAAS Central Manager GUI). The ACL rules apply only to traffic that is destined for the WAE or originates from the Cisco WAE, not Web Cache Communication Protocol (WCCP) transit traffic. Use the ip access-group interface configuration command to apply an interface ACL.
- WCCP ACL: Applied on inbound WCCP-redirected traffic to control access between an external server and external clients. The Cisco WAE acts like a firewall. Use the wccp access-list global configuration command to apply a WCCP ACL.
- SNMP ACL: Applied on an SNMP agent to control access to the SNMP agent by an external SNMP server that is polling for SNMP MIBs or SNMP statistics. Use the snmp-server access-list global configuration command to apply an SNMP ACL.
- Transaction-logs-flow ACL: Applied on the transaction logging facility to restrict the transactions to be logged. Use the transaction-logs flow access-list global configuration command to apply a transaction log ACL.
The following examples illustrate how interface ACLs can be used in environments that have Cisco WAAS devices:
- A Cisco WAAS device resides on the customer premises and is managed by a service provider, and the service provider wants to secure the device for its management only.
- A Cisco WAAS device is deployed anywhere within the enterprise. As with routers and switches, the administrator wants to limit access to Telnet, SSH, and the WAAS Central Manager GUI to the IT source subnets.
To use ACLs, you must first configure ACLs and then apply them to specific services or interfaces on the WAAS device. The following are some examples of how interface ACLs can be used in various enterprise deployments:
- An application layer proxy firewall with a hardened outside interface has no ports exposed. (Hardened means that the interface carefully restricts which ports are available for access, primarily for security reasons. Because the interface is outside, many types of attacks are possible.) The Cisco WAAS device’s outside address is globally accessible from the Internet, while its inside address is private. The inside interface has an ACL to limit Telnet, SSH, and GUI access.
- A Cisco WAE that is using WCCP is positioned on a subnet off the Internet router. Both the Cisco WAE and the router must have IP ACLs. IP access lists on routers have the highest priority, followed by IP ACLs that are defined on the Cisco WAEs.
Note![]() We strongly recommend that you use the Cisco WAAS Central Manager GUI instead of the Cisco WAAS CLI to centrally configure and apply ACLs to your WAAS devices. For more information, see the Creating and Managing IP ACLs for Cisco WAAS Devices.
We strongly recommend that you use the Cisco WAAS Central Manager GUI instead of the Cisco WAAS CLI to centrally configure and apply ACLs to your WAAS devices. For more information, see the Creating and Managing IP ACLs for Cisco WAAS Devices.
Creating and Managing IP ACLs for Cisco WAAS Devices
This section provides guidelines and an example of how to use the Cisco WAAS Central Manager GUI to create and manage IP ACLs for your Cisco WAAS devices.
Consider the following guidelines when you create an IP ACL:
–![]() Must be unique within the device.
Must be unique within the device.
–![]() IP ACL names must be limited to 30 characters and contain no white space or special characters.
IP ACL names must be limited to 30 characters and contain no white space or special characters.
–![]() When the IP ACL name is numeric, numbers 1 through 99 denote standard IP ACLs and numbers 100 through 199 denote extended IP ACLs. IP ACL names that begin with a number cannot contain nonnumeric characters.
When the IP ACL name is numeric, numbers 1 through 99 denote standard IP ACLs and numbers 100 through 199 denote extended IP ACLs. IP ACL names that begin with a number cannot contain nonnumeric characters.
- Each Cisco WAAS Central Manager device can manage up to 50 IP ACLs and a total of 500 conditions per device.
- The Cisco WAAS Central Manager GUI allows the association of standard IP ACLs with SNMP and WCCP. Any device that attempts to access one of these applications associated with an ACL must be on the list of trusted devices to be allowed access.
- You can associate any previously configured standard IP ACL with SNMP and WCCP. However, you can associate an extended IP ACL only with the WCCP application.
- You can delete an IP ACL, including all conditions and associations with network interfaces and applications, or you can delete only the IP ACL conditions. Deleting all conditions allows you to change the IP ACL type if you choose to do so. The IP ACL entry continues to appear in the IP ACL listing. However, it is, in effect, nonexistent.
- If you specify an empty ACL for any of the ACL types used by WAAS, it permits all traffic.
To use the WAAS Central Manager GUI to create and modify an IP ACL for a single WAE, associate an IP ACL with an application, and then apply it to an interface on the WAE, follow these steps:
Step 1![]() From the Cisco WAAS Central Manager menu, choose Devices > device-name.
From the Cisco WAAS Central Manager menu, choose Devices > device-name.
Step 2![]() Choose Configure > Network > TCP/IP Settings > IP ACL.
Choose Configure > Network > TCP/IP Settings > IP ACL.
The IP ACL window appears. By default, there are no IP ACLs defined for a WAE. The IP ACL window indicates if there are currently no IP ACLs configured for the Cisco WAE.
Step 3![]() Click Add IP ACL on the table heading row.
Click Add IP ACL on the table heading row.
The IP ACL window appears. Fill in the fields as follows:
By default, this new IP ACL is created as a standard ACL.
Step 4![]() Click OK to save the IP ACL named test1. IP ACLs without any conditions defined do not appear on the individual devices.
Click OK to save the IP ACL named test1. IP ACLs without any conditions defined do not appear on the individual devices.
Step 5![]() Add conditions to the standard IP ACL named test1 that you just created:
Add conditions to the standard IP ACL named test1 that you just created:
a.![]() Click the Add IP ACL Condition.
Click the Add IP ACL Condition.
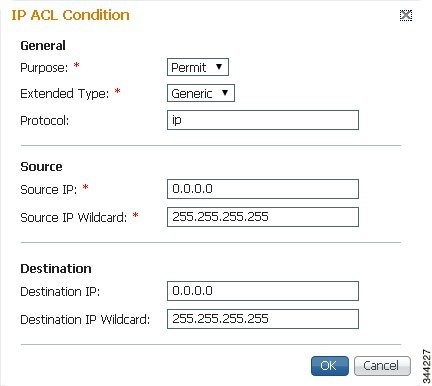
The IP ACL Condition window appears (Figure 9-1).
Note![]() The number of available fields for creating IP ACL conditions depends on the type of IP ACL that you have created, either standard or extended.
The number of available fields for creating IP ACL conditions depends on the type of IP ACL that you have created, either standard or extended.
Figure 9-1 Creating a New Condition for an Extended IP ACL Window
b.![]() Enter values for the properties that are enabled for the type of IP ACL that you are creating, as follows:
Enter values for the properties that are enabled for the type of IP ACL that you are creating, as follows:
–![]() To set up conditions for a standard IP ACL, go to Step 6.
To set up conditions for a standard IP ACL, go to Step 6.
–![]() To set up conditions for an extended IP ACL, go to Step 7.
To set up conditions for an extended IP ACL, go to Step 7.
Step 6![]() Set up conditions for a standard IP ACL:
Set up conditions for a standard IP ACL:
a.![]() From the Purpose drop-down list, choose a purpose (Permit or Deny).
From the Purpose drop-down list, choose a purpose (Permit or Deny).
b.![]() In the Source IP field, enter the source IP address.
In the Source IP field, enter the source IP address.
c.![]() In the Source IP Wildcard field, enter a source IP wildcard address.
In the Source IP Wildcard field, enter a source IP wildcard address.
d.![]() To save the condition, click OK.
To save the condition, click OK.
IP ACL conditions for the newly created IP ACL and its configured parameters are displayed in Table 9-1 .
e.![]() To add another condition to the IP ACL, select it and click Add IP ACL Condition.
To add another condition to the IP ACL, select it and click Add IP ACL Condition.
f.![]() Enter the details of the condition and click OK to save the additional condition.
Enter the details of the condition and click OK to save the additional condition.
g.![]() For a newly created IP ACL condition to appear in a particular position, select the position and click Insert. The IP ACL condition is placed in the selected position.
For a newly created IP ACL condition to appear in a particular position, select the position and click Insert. The IP ACL condition is placed in the selected position.
h.![]() To rearrange your list of conditions:
To rearrange your list of conditions:
- Select the condition (or multiple consecutive conditions) and use the Up or Down arrows, and click Save Moved Rows to commit the changes.
Alternatively, you can select one or multiple consecutive conditions and click Move to, to specify the row number in which the IP ACL condition should be positioned. This is especially helpful when there are numerous conditions listed in the table. After you verify your entries and the order in which the conditions are listed, click Save Moved Rows to commit the changes.
- The order of the conditions listed in the Cisco WAAS Central Manager GUI becomes the order in which IP ACLs are applied to the device.
- Click a column heading to sort by a configured parameter.
Table 9-1 describes the fields in a standard IP ACL.
Step 7![]() Set up conditions for an extended IP ACL:
Set up conditions for an extended IP ACL:
a.![]() From the Purpose drop-down list, choose a purpose (Permit or Deny).
From the Purpose drop-down list, choose a purpose (Permit or Deny).
b.![]() From the Extended Type drop-down list, choose a value (Generic, TCP, UDP, or ICMP). (See Table 9-2 .)
From the Extended Type drop-down list, choose a value (Generic, TCP, UDP, or ICMP). (See Table 9-2 .)
After you choose a type of extended IP ACL, various options become available in the GUI, depending on what type you choose.
c.![]() In the fields that are enabled for the chosen type, enter the data. (For more information, see Table 9-4 through Table 9-7 .)
In the fields that are enabled for the chosen type, enter the data. (For more information, see Table 9-4 through Table 9-7 .)
d.![]() To save the condition, click OK.
To save the condition, click OK.
IP ACL conditions for the newly created IP ACL and its configured parameters are displayed in Table 9-1 .
e.![]() To add another condition to the IP ACL, select it and click Add IP ACL Condition.
To add another condition to the IP ACL, select it and click Add IP ACL Condition.
f.![]() Enter the details of the condition in the window and click OK to save the additional condition.
Enter the details of the condition in the window and click OK to save the additional condition.
g.![]() For a newly created IP ACL condition to appear in a particular position, select the position and click Insert. The IP ACL condition is placed in the selected position.
For a newly created IP ACL condition to appear in a particular position, select the position and click Insert. The IP ACL condition is placed in the selected position.
h.![]() To rearrange your list of conditions:
To rearrange your list of conditions:
- Select the condition (or multiple consecutive conditions) and use the Up or Down arrows. Click Save Moved Rows to commit the changes.
Alternatively, you can select one or multiple consecutive conditions and click Move to, to specify the row number in which the IP ACL condition should be positioned. This is especially helpful when there are numerous conditions listed in the table. After you are satisfied with all your entries and the order in which the conditions are listed, click Save Moved Rows to commit the changes.
- The order of the conditions listed in the WAAS Central Manager GUI becomes the order in which IP ACLs are applied to the device.
- Click a column heading to sort by any configured parameter.
Step 8![]() Modify or delete an individual condition from an IP ACL:
Modify or delete an individual condition from an IP ACL:
a.![]() Select the name of the IP ACL whose condition you want to modify.
Select the name of the IP ACL whose condition you want to modify.
b.![]() A list of all the conditions that are currently applied to the IP ACL appears in the IP ACL Conditions, Table 9-1 . Select the condition and click Edit.
A list of all the conditions that are currently applied to the IP ACL appears in the IP ACL Conditions, Table 9-1 . Select the condition and click Edit.
c.![]() To modify the condition, change any corresponding field as necessary in the IP ACL Condition window and click OK to save the modifications.
To modify the condition, change any corresponding field as necessary in the IP ACL Condition window and click OK to save the modifications.
d.![]() To delete the condition, select it and click Delete on the table header.
To delete the condition, select it and click Delete on the table header.
e.![]() To rearrange your list of conditions, use the Up or Down arrows or the Move to column outlined in Step 6f and 7f.
To rearrange your list of conditions, use the Up or Down arrows or the Move to column outlined in Step 6f and 7f.
Step 9![]() Associate a standard IP ACL with SNMP or WCCP:
Associate a standard IP ACL with SNMP or WCCP:
a.![]() Click the Edit icon next to the name of the device for which you want to associate a standard IP ACL with SNMP or WCCP.
Click the Edit icon next to the name of the device for which you want to associate a standard IP ACL with SNMP or WCCP.
b.![]() Choose Configure > Network > TCP/IP Settings > IP ACL Feature Usage.
Choose Configure > Network > TCP/IP Settings > IP ACL Feature Usage.
The IP ACL Feature Settings window appears.
c.![]() From the SNMP or WCCP drop-down lists, choose the name of an IP ACL for SNMP or WCCP. (For more details, see Table 9-3 .) If you do not want to associate an IP ACL with one of the applications, choose Do Not Set.
From the SNMP or WCCP drop-down lists, choose the name of an IP ACL for SNMP or WCCP. (For more details, see Table 9-3 .) If you do not want to associate an IP ACL with one of the applications, choose Do Not Set.
d.![]() To save the settings, click Submit.
To save the settings, click Submit.
Step 10![]() Apply an IP ACL to an interface:
Apply an IP ACL to an interface:
a.![]() Click the Edit icon next to the name of the device for which you want to apply an IP ACL to an interface on the WAE.
Click the Edit icon next to the name of the device for which you want to apply an IP ACL to an interface on the WAE.
b.![]() Choose Configure > Network > Network Interfaces.
Choose Configure > Network > Network Interfaces.
The Network Interfaces window for the device appears. This window displays all the interfaces available on that device.
c.![]() Click the Edit icon next to the name of the interface to which you want to apply an IP ACL.
Click the Edit icon next to the name of the interface to which you want to apply an IP ACL.
The Network Interface settings window appears.
d.![]() From the Inbound ACL drop-down list at the bottom of the window, choose the name of an IP ACL.
From the Inbound ACL drop-down list at the bottom of the window, choose the name of an IP ACL.
e.![]() From the Outbound ACL drop-down list, choose the name of an ACL.
From the Outbound ACL drop-down list, choose the name of an ACL.
The only network interface properties that can be altered from the Cisco WAAS Central Manager GUI are the inbound and outbound IP ACLs. All other property values are populated from the device database and are read-only in the Cisco WAAS Central Manager GUI.
Step 11![]() To save the settings, click Submit.
To save the settings, click Submit.
Step 12![]() (Optional) Delete an IP ACL:
(Optional) Delete an IP ACL:
a.![]() Click the Edit icon next to the name of the device that has the IP ACL that you want to delete.
Click the Edit icon next to the name of the device that has the IP ACL that you want to delete.
b.![]() Choose Configure > Network > TCP/IP Settings > IP ACL.
Choose Configure > Network > TCP/IP Settings > IP ACL.
If you created conditions for the IP ACL, you have two options for deletion:
–![]() Delete ACL: Removes the IP ACL, including all the conditions and associations with network interfaces and applications.
Delete ACL: Removes the IP ACL, including all the conditions and associations with network interfaces and applications.
–![]() Delete All Conditions: Removes all the conditions, while preserving the IP ACL name.
Delete All Conditions: Removes all the conditions, while preserving the IP ACL name.
c.![]() To delete the entire IP ACL and its conditions, select the corresponding IP ACL and click Delete. You are prompted to confirm your action. Click OK. The record is deleted.
To delete the entire IP ACL and its conditions, select the corresponding IP ACL and click Delete. You are prompted to confirm your action. Click OK. The record is deleted.
d.![]() To delete only the conditions, select the condition or multiple conditions (consecutive or nonconsecutive conditions) and click Delete.
To delete only the conditions, select the condition or multiple conditions (consecutive or nonconsecutive conditions) and click Delete.
e.![]() When you are prompted to confirm your action, click OK. The conditions are deleted.
When you are prompted to confirm your action, click OK. The conditions are deleted.
To define an IP ACL from the Cisco WAAS CLI, you can use the ip access-list global configuration command, and to apply the IP ACL to an interface on the Cisco WAAS device, you can use the ip access-group interface configuration command. To configure the use of an IP ACL for SNMP, you can use the snmp-server access-list global configuration command. To specify an IP ACL that the WAE applies to the inbound WCCP redirected traffic that it receives, you can use the wccp access-list global configuration command.
List of Extended IP ACL Conditions
When you define a condition for an extended IP ACL, you can specify the Internet protocol to be applied to the condition (as described in Step 7 in the Creating and Managing IP ACLs for Cisco WAAS Devices).
The list of extended IP ACL conditions are as follows:
 Feedback