- Preface
- Introduction to Cisco WAAS
- Planning Your WAAS Network
- Using Device Groups and Device Locations
- Configuring Traffic Interception
- Configuring Network Settings
- Configuring Administrative Login Authentication, Authorization, and Accounting
- Creating and Managing Administrator User Accounts
- Creating and Managing IP Access Control Lists for WAAS Devices
- Configuring Other System Settings
- Using the WAE Device Manager GUI
- Configuring WAFS
- Configuring Application Acceleration
- Configuring and Managing WAAS Print Services
- Maintaining Your WAAS System
- Monitoring and Troubleshooting Your WAAS Network
- Configuring SNMP Monitoring
- Default Application Policies
- Index
Cisco Wide Area Application Services Configuration Guide (Software Version 4.0.7)
Bias-Free Language
The documentation set for this product strives to use bias-free language. For the purposes of this documentation set, bias-free is defined as language that does not imply discrimination based on age, disability, gender, racial identity, ethnic identity, sexual orientation, socioeconomic status, and intersectionality. Exceptions may be present in the documentation due to language that is hardcoded in the user interfaces of the product software, language used based on RFP documentation, or language that is used by a referenced third-party product. Learn more about how Cisco is using Inclusive Language.
- Updated:
- September 14, 2007
Chapter: Configuring SNMP Monitoring
- About SNMP
- Checklist for Configuring SNMP
- Preparing for SNMP Monitoring
- Enabling SNMP Traps
- Specifying the SNMP Host
- Specifying the SNMP Community String
- Creating SNMP Views
- Creating an SNMP Group
- Creating an SNMP User
- Configuring SNMP Asset Tag Settings
- Configuring SNMP Contact Settings
Configuring SNMP Monitoring
This chapter describes how to configure SNMP traps, recipients, community strings and group associations, user security model groups, and user access permissions.

Note ![]() Throughout this chapter, the term WAAS device is used to refer collectively to the WAAS Central Managers and WAEs in your network. The term WAE refers to WAE appliances and WAE Network Modules (the NME-WAE family of devices).
Throughout this chapter, the term WAAS device is used to refer collectively to the WAAS Central Managers and WAEs in your network. The term WAE refers to WAE appliances and WAE Network Modules (the NME-WAE family of devices).
This chapter contains the following sections:
•![]() Checklist for Configuring SNMP
Checklist for Configuring SNMP
•![]() Preparing for SNMP Monitoring
Preparing for SNMP Monitoring
•![]() Specifying the SNMP Community String
Specifying the SNMP Community String
•![]() Configuring SNMP Asset Tag Settings
Configuring SNMP Asset Tag Settings
•![]() Configuring SNMP Contact Settings
Configuring SNMP Contact Settings
About SNMP
Simple Network Management Protocol (SNMP) is an interoperable standards-based protocol that allows for external monitoring of WAAS devices through an SNMP agent.
An SNMP-managed network consists of the following primary components:
•![]() Managed device—A network node that contains an SNMP agent and resides on a managed network. Managed devices include routers, access servers, switches, bridges, hubs, computer hosts, and printers. Each WAAS device running the WAAS software has an SNMP agent.
Managed device—A network node that contains an SNMP agent and resides on a managed network. Managed devices include routers, access servers, switches, bridges, hubs, computer hosts, and printers. Each WAAS device running the WAAS software has an SNMP agent.
•![]() SNMP agent—A software module that resides on a managed device. An agent has local knowledge of management information and translates that information into a form compatible with SNMP. The SNMP agent gathers data from the Management Information Base (MIB), which is the repository for information about device parameters and network data. The agent can also send traps, or notification of certain events, to the management system.
SNMP agent—A software module that resides on a managed device. An agent has local knowledge of management information and translates that information into a form compatible with SNMP. The SNMP agent gathers data from the Management Information Base (MIB), which is the repository for information about device parameters and network data. The agent can also send traps, or notification of certain events, to the management system.
•![]() Management station—Also known as the SNMP host, the management station uses SNMP to send the agent an SNMP Get request to obtain information from the WAAS device. The managed devices then collect and store management information and use SNMP to make this information available to the management station.
Management station—Also known as the SNMP host, the management station uses SNMP to send the agent an SNMP Get request to obtain information from the WAAS device. The managed devices then collect and store management information and use SNMP to make this information available to the management station.
Before you can access this SNMP information, you must have deployed an SNMP management application on a management station. This SNMP management station is referred to as the SNMP host because it uses SNMP to send the device agent an SNMP Get request to obtain information from the WAAS device.
This section contains the following topics:
•![]() SNMP Security Models and Security Levels
SNMP Security Models and Security Levels
•![]() Downloading MIB Files to a WAAS Device
Downloading MIB Files to a WAAS Device
•![]() Enabling the SNMP Agent on a WAAS Device
Enabling the SNMP Agent on a WAAS Device
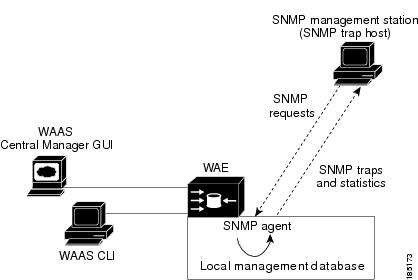
SNMP Communication Process
The SNMP management station and the SNMP agent that resides on a WAAS device use SNMP to communicate, as follows:
1. ![]() The SNMP management station (the SNMP host) uses SNMP to request information from the WAAS device.
The SNMP management station (the SNMP host) uses SNMP to request information from the WAAS device.
2. ![]() After receiving these SNMP requests, the SNMP agent on the WAAS device accesses a table that contains information about the individual device. This table, or database, is called a Management Information Base (MIB).
After receiving these SNMP requests, the SNMP agent on the WAAS device accesses a table that contains information about the individual device. This table, or database, is called a Management Information Base (MIB).
Note ![]() The SNMP agent on the WAAS device only initiates communication with the SNMP host under unusual conditions; it will initiate communication when it has a trap it needs to send to the host. For more information on this topic, see the "Enabling SNMP Traps" section.
The SNMP agent on the WAAS device only initiates communication with the SNMP host under unusual conditions; it will initiate communication when it has a trap it needs to send to the host. For more information on this topic, see the "Enabling SNMP Traps" section.
3. ![]() After locating the specified information in the MIB, the agent uses SNMP to send the information to the SNMP management station.
After locating the specified information in the MIB, the agent uses SNMP to send the information to the SNMP management station.
Figure 16-1 illustrates these SNMP operations for an individual WAAS device.
Figure 16-1 SNMP Components in a WAAS Network
Supported SNMP Versions
The WAAS software supports the following versions of SNMP:
•![]() Version 1 (SNMPv1)—This is the initial implementation of SNMP. See the RFC 1157 for a full description of its functionality.
Version 1 (SNMPv1)—This is the initial implementation of SNMP. See the RFC 1157 for a full description of its functionality.
•![]() Version 2 (SNMPv2c)—This is the second release of SNMP, described in RFC 1902. It provides additions to data types, counter size, and protocol operations.
Version 2 (SNMPv2c)—This is the second release of SNMP, described in RFC 1902. It provides additions to data types, counter size, and protocol operations.
•![]() Version 3 (SNMPv3)—This is the most recent version of SNMP, defined in RFC 2271 through RFC 2275.
Version 3 (SNMPv3)—This is the most recent version of SNMP, defined in RFC 2271 through RFC 2275.
Each Cisco device running WAAS software contains the software necessary to communicate information about device configuration and activity using the SNMP protocol.
SNMP Security Models and Security Levels
SNMPv1 and SNMPv2c do not have any security (that is, authentication or privacy) features to keep SNMP packet traffic confidential. As a result, packets on the wire can be detected and SNMP community strings compromised.
To solve the security shortcomings of SNMPv1 and SNMPv2c, SNMPv3 provides secure access to WAAS devices by authenticating and encrypting packets over the network. The SNMP agent in the WAAS software supports SNMPv3 as well as SNMPv1 and SNMPv2c.
The following security features are provided in SNMPv3:
•![]() Message integrity—Ensures that nothing has interfered with a packet during transmission.
Message integrity—Ensures that nothing has interfered with a packet during transmission.
•![]() Authentication—Determines that the message is from a valid source.
Authentication—Determines that the message is from a valid source.
•![]() Encryption—Scrambles the contents of a packet to prevent it from being seen by an unauthorized source.
Encryption—Scrambles the contents of a packet to prevent it from being seen by an unauthorized source.
SNMPv3 provides security models as well as security levels. A security model is an authentication process that is set up for a user and the group in which the user resides. A security level is the permitted level of security within a security model. A combination of a security model and a security level determines which security process is used when an SNMP packet is handled. Three security models are available: SNMPv1, SNMPv2c, and SNMPv3.
Table 16-1 describes the combinations of security models and security levels.
The SNMPv3 agent can be used in the following modes:
•![]() noAuthNoPriv mode (that is, no security mechanisms turned on for packets)
noAuthNoPriv mode (that is, no security mechanisms turned on for packets)
•![]() AuthNoPriv mode (for packets that do not need to be encrypted using the privacy algorithm [DES 56])
AuthNoPriv mode (for packets that do not need to be encrypted using the privacy algorithm [DES 56])
•![]() AuthPriv mode (for packets that must be encrypted; privacy requires that authentication be performed on the packet)
AuthPriv mode (for packets that must be encrypted; privacy requires that authentication be performed on the packet)
Using SNMPv3, users can securely collect management information from their SNMP agents without worrying that the data has been tampered with. Also, confidential information, such as SNMP set packets that change a Content Engine's configuration, can be encrypted to prevent their contents from being exposed on the wire. Also, the group-based administrative model allows different users to access the same SNMP agent with varying access privileges.
Supported MIBs
This section describes the Cisco-specific MIBs that are supported by WAAS. MIBs are listed in alphabetical order. The following Cisco-specific MIBs are supported:
ACTONA-ACTASTOR-MIB
This MIB provides WAAS statistics that include ActaStor version number, license information, install information, and general information.
CISCO-CDP-MIB
This MIB displays the ifIndex value of the local interface. For 802.3 repeaters on which the repeater ports do not have ifIndex values assigned, this value is a unique value for the port and is greater than any ifIndex value supported by the repeater. In this example, the specific port is indicated by the corresponding values of cdpInterfaceGroup and cdpInterfacePort, where these values correspond to the group number and the port number values of RFC 1516.
CISCO-CONFIG-MAN-MIB
This MIB represents a model of configuration data that exists in various locations:
•![]() running—In use by the running system
running—In use by the running system
•![]() terminal—Attached hardware
terminal—Attached hardware
•![]() local—Saved locally in NVRAM or in flash memory
local—Saved locally in NVRAM or in flash memory
•![]() remote—Saved to a server on the network
remote—Saved to a server on the network
This MIB includes only operations that are specifically related to configuration, although some of the system functions can be used for general file storage and transfer.
CISCO-CONTENT-ENGINE-MIB
This is the MIB module for the Cisco WAE device from Cisco Systems, Inc.
CISCO-ENTITY-ASSET-MIB
This MIB monitors the asset information of items in the ENTITY-MIB (RFC 2037) entPhysicalTable. This MIB lists the orderable part number, serial number, hardware revision, manufacturing assembly number and revision, firmware ID and revision (if any) and software ID and revision (if any) of relevant entities listed in ENTITY-MIB entPhysicalTable.
Entities that have none of this data available are not listed in this MIB. The table in this MIB is sparsely populated, so some variables may not exist for a particular entity at a particular time. For example, a row that represents a powered-off module may have no values for software ID (ceAssetSoftwareID) and revision (ceAssetSoftwareRevision). Similarly, a power supply would probably never have firmware or software information listed in the table.
Although the data may have other items encoded in it (for example, a manufacturing date in the serial number), consider all data items to be a single unit. Do not decompose the items or parse them. Use only string equal and unequal operations on them.
ENTITY-MIB
This is the MIB module for representing multiple logical entities supported by a single SNMP agent.
EVENT-MIB
This MIB defines event triggers and actions for network management purposes. The MIB is published as RFC 2981.
HOST-RESOURCES-MIB
This MIB manages host systems. The term "host" implies any computer that communicates with other similar computers connected to the Internet. The HOST-RESOURCES-MIB does not necessarily apply to devices whose primary function is communications services (terminal servers, routers, bridges, monitoring equipment). This MIB provides attributes that are common to all Internet hosts, for example, personal computers and systems that run variants of UNIX.
MIB-II
MIB-II is the Internet Standard MIB. The MIB-II is documented in RFC 1213 and is for use with network management protocols in TCP/IP-based internets.
Downloading MIB Files to a WAAS Device
You can download the MIB files for all of the MIBS that are supported by a WAAS device that is running the WAAS software from the following Cisco FTP site:
ftp://ftp.cisco.com/pub/mibs/v2
The MIB objects that are defined in each MIB are described in the MIB files at the above FTP site and are self-explanatory.
Enabling the SNMP Agent on a WAAS Device
By default, the SNMP agent on WAAS devices is disabled and an SNMP community string is not defined. The SNMP community string is used as a password for authentication when accessing the SNMP agent on a WAAS device. To be authenticated, the Community Name field of any SNMP message sent to the WAAS device must match the SNMP community string defined on the WAAS device.
The SNMP agent on a WAAS device is enabled when you define the SNMP community string on the device. The WAAS Central Manager GUI allows you to define the SNMP community string on a device or device group.
If the SNMPv3 protocol is going to be used for SNMP requests, the next step is to define an SNMP user account that can be used to access a WAAS device through SNMP. For more information on how to create an SNMPv3 user account on a WAAS device, see the "Creating an SNMP User" section.
Checklist for Configuring SNMP
Table 16-2 describes the process for enabling SNMP monitoring on a WAAS device or device group.
|
|
|
|---|---|
|
|
For more information, see the "Preparing for SNMP Monitoring" section |
|
|
The WAAS Central Manager provides a wide-range of traps that you can enable on a WAAS device or device group. For more information, see the "Enabling SNMP Traps" section. |
|
|
Specify the SNMP host to that the WAAS device or device group should send their traps to. You can specify multiple hosts so different WAAS devices send traps to different hosts. For more information, see the "Specifying the SNMP Host" section. |
|
|
Specify the SNMP community string so external users can read or write to the MIB. For more information, see the "Specifying the SNMP Community String" section. |
|
|
To restrict an SNMP group to a specific view, you must create a view that specifies the MIB subtree that you want the group to view. For more information, see the "Creating SNMP Views" section. |
|
|
You must set up an SNMP group if are going to create any SNMP users or want to restrict a group to view a specific MIB subtree. For more information, see the "Creating an SNMP Group" section. |
|
|
If the SNMPv3 protocol is going to be used for SNMP requests, you must create at least one SNMPv3 user account on the WAAS device in order for the WAAS device to be accessed through SNMP. For more information see the "Creating an SNMP User" section. |
|
|
For more information see the "Configuring SNMP Contact Settings" section. |
Preparing for SNMP Monitoring
Before you configure your WAAS network for SNMP monitoring, complete the following preparation tasks:
•![]() Set up the SNMP host (management station) that the WAAS devices will use to send SNMP traps.
Set up the SNMP host (management station) that the WAAS devices will use to send SNMP traps.
•![]() Determine if all your WAAS devices will be sending traps to the same host, or to different hosts. Write down the IP address or hostname of each SNMP host.
Determine if all your WAAS devices will be sending traps to the same host, or to different hosts. Write down the IP address or hostname of each SNMP host.
•![]() Obtain the community string used to access the SNMP agents.
Obtain the community string used to access the SNMP agents.
•![]() Determine if you want to create SNMP groups so you can restrict views by group.
Determine if you want to create SNMP groups so you can restrict views by group.
Enabling SNMP Traps
To enable a WAAS device to send SNMP traps, follow these steps:
Step 1 ![]() From the WAAS Central Manager GUI, choose Devices > Devices or Devices > Device Groups. The Devices or Device Groups window appears depending on your selection.
From the WAAS Central Manager GUI, choose Devices > Devices or Devices > Device Groups. The Devices or Device Groups window appears depending on your selection.
Step 2 ![]() Click the Edit icon next to the device or device group that you want to configure SNMP traps for. The Device Home window appears with the Contents pane on the left.
Click the Edit icon next to the device or device group that you want to configure SNMP traps for. The Device Home window appears with the Contents pane on the left.
Step 3 ![]() Click Show Advanced to display all menu items in the Contents pane.
Click Show Advanced to display all menu items in the Contents pane.
Step 4 ![]() In the Contents pane, choose General Settings > Notification and Tracking > SNMP > General Settings. The SNMP General Settings window appears. (See Figure 16-2.) Table 16-3 describes the fields in this window.
In the Contents pane, choose General Settings > Notification and Tracking > SNMP > General Settings. The SNMP General Settings window appears. (See Figure 16-2.) Table 16-3 describes the fields in this window.
Figure 16-2 SNMP General Settings Window
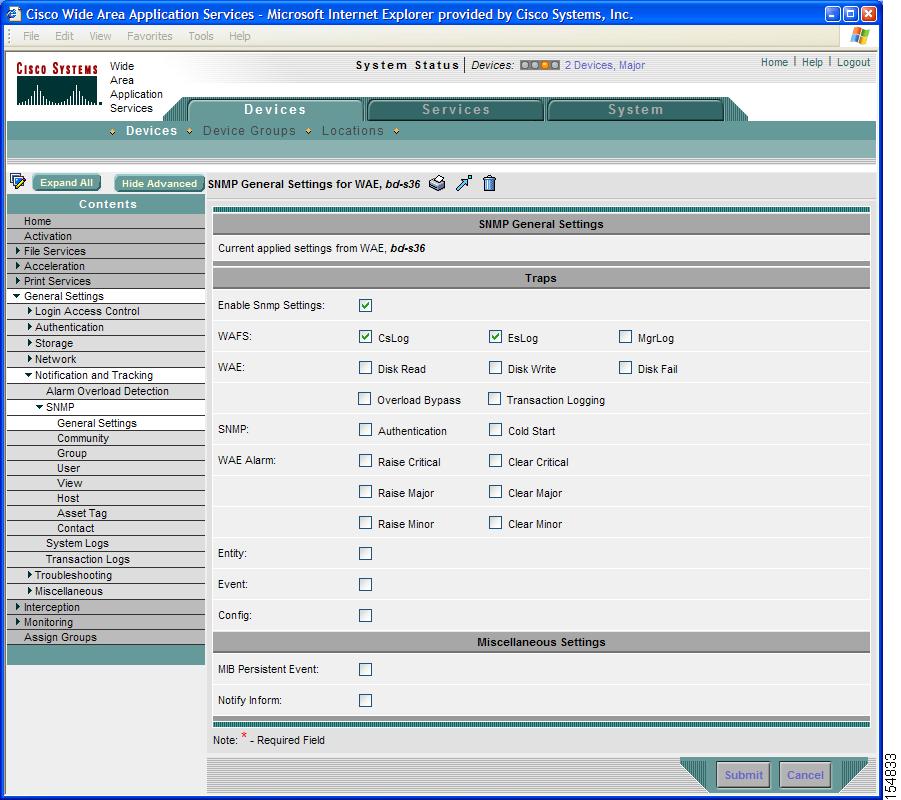
Step 5 ![]() To enable SNMP traps, check the appropriate check boxes.
To enable SNMP traps, check the appropriate check boxes.
Step 6 ![]() Click Submit.
Click Submit.
A "Click Submit to Save" message appears in red next to the current settings when there are pending changes to be saved after you have applied default or device group settings. You can also revert to the previously configured window settings by clicking Reset. The Reset button is visible only when you apply default or device group settings to change the current device settings but the settings have not yet been submitted.
To enable SNMP traps from the CLI, you can use the snmp-server enable traps global configuration command. You can use the snmp trigger EXEC command to define additional SNMP traps for other MIB objects of interest to your particular configuration.
Specifying the SNMP Host
Hosts are listed in the order in which they have been created. The maximum number of SNMP hosts that can be created is four.
To specify the SNMP host, follow these steps:
Step 1 ![]() From the WAAS Central Manager GUI, choose Devices > Devices or Devices > Device Groups. The Devices or Device Groups window appears.
From the WAAS Central Manager GUI, choose Devices > Devices or Devices > Device Groups. The Devices or Device Groups window appears.
Step 2 ![]() Click the Edit icon next to the device or device group for which you want to define an SNMP host. The Device Home window or the Modifying Device Groups window appears.
Click the Edit icon next to the device or device group for which you want to define an SNMP host. The Device Home window or the Modifying Device Groups window appears.
Step 3 ![]() Click Show Advanced to display all menu items in the Contents pane.
Click Show Advanced to display all menu items in the Contents pane.
Step 4 ![]() In the Contents pane, choose General Settings > Notification and Tracking > SNMP > Host. The SNMP Hosts window appears.
In the Contents pane, choose General Settings > Notification and Tracking > SNMP > Host. The SNMP Hosts window appears.
Step 5 ![]() In the taskbar, click the Create New SNMP Host icon. The Creating New SNMP Host window appears. Table 16-4 describes the fields in this table.
In the taskbar, click the Create New SNMP Host icon. The Creating New SNMP Host window appears. Table 16-4 describes the fields in this table.
Step 6 ![]() Enter the hostname or IP address of an SNMP trap host, SNMP community or user name, security model to send notification, and retry count and timeout for inform requests.
Enter the hostname or IP address of an SNMP trap host, SNMP community or user name, security model to send notification, and retry count and timeout for inform requests.
Step 7 ![]() Click Submit.
Click Submit.
To specify the SNMP host from the CLI, you can use the snmp-server host global configuration command.
Specifying the SNMP Community String
An SNMP community string is the password used to access an SNMP agent that resides on WAAS devices. There are two types of community strings: group and read-write. Community strings enhance the security of your SNMP messages.
Community strings are listed in the order in which they have been created. The maximum number of SNMP communities that can be created is ten. By default, an SNMP agent is disabled, and a community string is not configured. When a community string is configured, it permits read-only access to all agents by default.
To enable the SNMP agent and configure a community string to permit access to the SNMP agent, follow these steps:
Step 1 ![]() From the WAAS Central Manager GUI, choose Devices > Devices or Devices > Device Groups. The Devices or Device Groups window appears.
From the WAAS Central Manager GUI, choose Devices > Devices or Devices > Device Groups. The Devices or Device Groups window appears.
Step 2 ![]() Click the Edit icon next to the device or device group for which you want to configure an SNMP community setting. The Contents pane appears on the left.
Click the Edit icon next to the device or device group for which you want to configure an SNMP community setting. The Contents pane appears on the left.
Step 3 ![]() Click Show Advanced to display all menu items in the Contents pane.
Click Show Advanced to display all menu items in the Contents pane.
Step 4 ![]() In the Contents pane, choose General Settings > Notification and Tracking > SNMP > Community. The SNMP Community Strings window appears.
In the Contents pane, choose General Settings > Notification and Tracking > SNMP > Community. The SNMP Community Strings window appears.
Step 5 ![]() In the taskbar, click the Create New SNMP Community String icon. The Creating New SNMP Community String window appears. Table 16-5 describes the fields in this window.
In the taskbar, click the Create New SNMP Community String icon. The Creating New SNMP Community String window appears. Table 16-5 describes the fields in this window.
Step 6 ![]() In the appropriate fields, enter the community string, choose whether or not read-write access to the group is allowed, and enter the group name.
In the appropriate fields, enter the community string, choose whether or not read-write access to the group is allowed, and enter the group name.
Step 7 ![]() Click Submit.
Click Submit.
To configure a community string from the CLI, you can use the snmp-server community global configuration command.
Creating SNMP Views
To restrict a group of users to view a specific MIB tree, you must create an SNMP view using the WAAS Central Manager GUI. Once you create the view, you need to create an SNMP group and SNMP users that belong to this group as described in later sections.
Views are listed in the order in which they have been created. The maximum number of views that can be created is ten.
To create a Version 2 SNMP (SNMPv2) MIB view, follow these steps:
Step 1 ![]() From the WAAS Central Manager GUI, choose Devices > Devices or Devices > Device Groups. The Devices or Device Groups window appears.
From the WAAS Central Manager GUI, choose Devices > Devices or Devices > Device Groups. The Devices or Device Groups window appears.
Step 2 ![]() Click the Edit icon next to the device or device group for which you want to create an SNMPv2 view.
Click the Edit icon next to the device or device group for which you want to create an SNMPv2 view.
Step 3 ![]() Click Show Advanced to display all menu items in the Contents pane.
Click Show Advanced to display all menu items in the Contents pane.
Step 4 ![]() In the Contents pane, choose General Settings > Notification and Tracking > SNMP > View. The SNMP Views window appears.
In the Contents pane, choose General Settings > Notification and Tracking > SNMP > View. The SNMP Views window appears.
Step 5 ![]() In the taskbar, click the Create New View icon. The Creating New SNMP View window appears. Table 16-6 describes the fields in this window.
In the taskbar, click the Create New View icon. The Creating New SNMP View window appears. Table 16-6 describes the fields in this window.
Step 6 ![]() In the appropriate fields, enter the view name, the family name, and the view type.
In the appropriate fields, enter the view name, the family name, and the view type.
Step 7 ![]() Click Submit.
Click Submit.
Step 8 ![]() Create an SNMP group that will be assigned to this view as described in the section that follows.
Create an SNMP group that will be assigned to this view as described in the section that follows.
To create an SNMP view from the CLI, you can use the snmp-server view global configuration command.
Creating an SNMP Group
You must set up an SNMP group if are going to create any SNMP users or want to restrict a group of users to view a specific MIB subtree.
Groups are listed in the order in which they have been created. The maximum number of SNMP groups that can be created is ten.
To define a user security model group, follow these steps:
Step 1 ![]() From the WAAS Central Manager GUI, choose Devices > Devices or Devices > Device Groups. The Devices or Device Groups window appears.
From the WAAS Central Manager GUI, choose Devices > Devices or Devices > Device Groups. The Devices or Device Groups window appears.
Step 2 ![]() Click the Edit icon next to the device or device group for which you want to create an SNMP group. The Device Home or the Modifying Device Group window appears.
Click the Edit icon next to the device or device group for which you want to create an SNMP group. The Device Home or the Modifying Device Group window appears.
Step 3 ![]() Click Show Advanced to display all menu items in the Contents pane.
Click Show Advanced to display all menu items in the Contents pane.
Step 4 ![]() In the Contents pane, choose General Settings > Notification and Tracking > SNMP > Group. The SNMP Group Strings for WAE window appears.
In the Contents pane, choose General Settings > Notification and Tracking > SNMP > Group. The SNMP Group Strings for WAE window appears.
Step 5 ![]() In the taskbar, click the Create New SNMP Group String icon. The Creating New SNMP Group String for WAE window appears. Table 16-7 describes the fields in this window.
In the taskbar, click the Create New SNMP Group String icon. The Creating New SNMP Group String for WAE window appears. Table 16-7 describes the fields in this window.
|
|
|
|---|---|
Name |
Name of the SNMP group. You can enter a maximum of 256 characters. This is a required field. |
Sec Model |
Security model for the group. Choose one of the following options from the drop-down list: • • • • •
Note |
Read View |
Name of the view (a maximum of 64 characters) that enables you only to view the contents of the agent. By default, no view is defined. In order to provide read access to users of the group, a view must be specified. For information on creating SNMP views, see the "Creating SNMP Views" section. |
Write View |
Name of the view (a maximum of 64 characters) that enables you to enter data and configure the contents of the agent. By default, no view is defined. For information on creating SNMP views, see the "Creating SNMP Views" section. |
Notify View |
Name of the view (a maximum of 64 characters) that enables you to specify a notify, inform, or trap. By default, no view is defined. For information on creating SNMP views, see the "Creating SNMP Views" section. |
Step 6 ![]() In the appropriate fields, enter the SNMP group configuration name, the security model, and the names of the read, write, and notify views.
In the appropriate fields, enter the SNMP group configuration name, the security model, and the names of the read, write, and notify views.
Step 7 ![]() Click Submit.
Click Submit.
Step 8 ![]() Create SNMP users that belong to this new group as described in the section that follows.
Create SNMP users that belong to this new group as described in the section that follows.
To create an SNMP group from the CLI, you can use the snmp-server group global configuration command.
Creating an SNMP User
Users are listed in the order in which they have been created. The maximum number of users that can be created is ten.
To define a user who can access the SNMP engine, follow these steps:
Step 1 ![]() From the WAAS Central Manager GUI, choose Devices > Devices or Devices > Device Groups. The Devices or Device Groups window appears.
From the WAAS Central Manager GUI, choose Devices > Devices or Devices > Device Groups. The Devices or Device Groups window appears.
Step 2 ![]() Click the Edit icon next to the device or device group for which you want to create an SNMP user.
Click the Edit icon next to the device or device group for which you want to create an SNMP user.
Step 3 ![]() Click Show Advanced to display all menu items in the Contents pane.
Click Show Advanced to display all menu items in the Contents pane.
Step 4 ![]() In the Contents pane, choose General Settings > Notification and Tracking > SNMP > User. A list of SNMP users for the device or device group appears.
In the Contents pane, choose General Settings > Notification and Tracking > SNMP > User. A list of SNMP users for the device or device group appears.
Step 5 ![]() In the taskbar, click the Create New SNMP User icon. The Creating New SNMP User window appears. Table 16-8 describes the fields in this window.
In the taskbar, click the Create New SNMP User icon. The Creating New SNMP User window appears. Table 16-8 describes the fields in this window.
Step 6 ![]() In the appropriate fields, enter the user name, the group to which the user belongs, the engine identity of the remote entity to which the user belongs, the authentication algorithm used to protect SNMP traffic from tampering, the user authentication parameters, and the authentication parameters for the packet.
In the appropriate fields, enter the user name, the group to which the user belongs, the engine identity of the remote entity to which the user belongs, the authentication algorithm used to protect SNMP traffic from tampering, the user authentication parameters, and the authentication parameters for the packet.
Step 7 ![]() Click Submit.
Click Submit.
To create an SNMP user from the CLI, you can use the snmp-server user global configuration command.
Configuring SNMP Asset Tag Settings
To configure SNMP asset tag settings, which create values in the CISCO-ENTITY-ASSET-MIB, follow these steps:
Step 1 ![]() From the WAAS Central Manager GUI, choose Devices > Devices or Devices > Device Groups. The Devices or Device Groups window appears.
From the WAAS Central Manager GUI, choose Devices > Devices or Devices > Device Groups. The Devices or Device Groups window appears.
Step 2 ![]() Click the Edit icon next to the device or device group for which you want to define an SNMP asset tag. The Device Home or the Modifying Device Groups window appears.
Click the Edit icon next to the device or device group for which you want to define an SNMP asset tag. The Device Home or the Modifying Device Groups window appears.
Step 3 ![]() Click Show Advanced to display all menu items in the Contents pane.
Click Show Advanced to display all menu items in the Contents pane.
Step 4 ![]() In the Contents pane, choose General Settings > Notification and Tracking > SNMP > Asset Tag. The SNMP Asset Tag Settings window appears.
In the Contents pane, choose General Settings > Notification and Tracking > SNMP > Asset Tag. The SNMP Asset Tag Settings window appears.
Step 5 ![]() In the Asset Tag Name field, enter a name for the asset tag.
In the Asset Tag Name field, enter a name for the asset tag.
Step 6 ![]() Click Submit.
Click Submit.
To configure SNMP asset tag settings from the CLI, you can use the asset tag global configuration command.
Configuring SNMP Contact Settings
To configure SNMP contact settings, follow these steps:
Step 1 ![]() From the WAAS Central Manager GUI, choose Devices > Devices or Devices > Device Groups. The Devices or Device Groups window appears.
From the WAAS Central Manager GUI, choose Devices > Devices or Devices > Device Groups. The Devices or Device Groups window appears.
Step 2 ![]() Click the Edit icon next to the device or device group for which you want to configure an SNMP contact. The Device Home or the Modifying Device Groups window appears.
Click the Edit icon next to the device or device group for which you want to configure an SNMP contact. The Device Home or the Modifying Device Groups window appears.
Step 3 ![]() Click Show Advanced to display all menu items in the Contents pane.
Click Show Advanced to display all menu items in the Contents pane.
Step 4 ![]() In the Contents pane, choose General Settings > Notification and Tracking > SNMP > Contact. The SNMP Contact Settings window appears.
In the Contents pane, choose General Settings > Notification and Tracking > SNMP > Contact. The SNMP Contact Settings window appears.
Step 5 ![]() Enter a contact name and location in the provided fields.
Enter a contact name and location in the provided fields.
Step 6 ![]() Click Submit.
Click Submit.
To configure SNMP contact settings from the CLI, you can use the snmp-server contact global configuration command.
 Feedback