- About This Guide
- Before You Begin
- Getting Started with Cisco Vision Dynamic Signage Director Operation
- Working with TV Displays
- Working with Zones, Groups, and Locations
- Working with Content Deployment
- Working with Screen Templates in Cisco Vision Director
- Working with Content in Cisco Vision Director
- Working with Playlists in Cisco Vision Director
- Working with Video Walls
- Working with Event Scripts
- Monitoring Media Player Operation During an Event Using Device Management
- Troubleshooting Event Operations in Cisco Vision Director
- Managing System Services in Cisco Vision Director
- Managing Server Resources in Cisco Vision Director
- Managing Media Player Operation in Cisco Vision Director
- Managing Backups in Cisco Vision Director
- Glossary of Terms
Release 6.3: Cisco Vision Dynamic Signage Director Operations Guide
Bias-Free Language
The documentation set for this product strives to use bias-free language. For the purposes of this documentation set, bias-free is defined as language that does not imply discrimination based on age, disability, gender, racial identity, ethnic identity, sexual orientation, socioeconomic status, and intersectionality. Exceptions may be present in the documentation due to language that is hardcoded in the user interfaces of the product software, language used based on RFP documentation, or language that is used by a referenced third-party product. Learn more about how Cisco is using Inclusive Language.
- Updated:
- August 5, 2020
Chapter: Working with Playlists in Cisco Vision Director
- Information About Playlists
- How to Set Up Playlists
- Guidelines for Creating Playlists
- Prerequisites for Playlist Creation
- Creating a Playlist
- Adding Content Items to a Playlist
- Changing the Order of Content Items in a Playlist
- Content Playout in Random Mode
- Replacing Content in a Playlist During an Event
- Enhancements to Content Replacement
- Creating a Playlist with Looping Content
- Setting the Item Duration in a Playlist
- Copying Content From One Playlist to Another
- Deleting Content Items From a Playlist
- Deleting a Playlist
Working with Playlists in Cisco Vision Director
User Role: Administrator / Content Manager
This module provides information about how to create and modify groups of content items for sequential display using playlists in Cisco Vision Director.
Information About Playlists
A playlist is a series of content items (static images, video, widgets, channels, external URLs) that are grouped together to display in sequential order (one after the other) for a set duration and repeat. The playlist appears in a given area of the screen called a region.
Each playlist runs independently of other playlists. Multiple playlists can be run in any given event script in separate regions.
Note: There is no synchronization guarantee on playback of items across different playlists on the same script state.
Playlists are defined by the type of content that they contain—either static graphics only (Non Video), or video/other content types (Video or Mixed Media). A playlist set up as “Video or Mixed Media” can contain both video and static graphics, as well as other content types.
One of the most common uses of a playlist is in a screen template region where a series of advertisements cycle based upon a preset rotation. Playlists also can include tickers and full screen messages, among a number of other types of content.
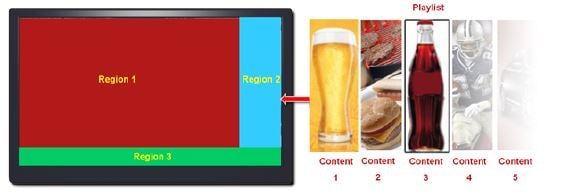
Figure 1 shows an example of a playlist that contains five static images that will each display for a set duration in Region 2 of the screen template.
Figure 1 Playlist Example of Static Images
The playlists to be run as part of an event script must be staged, or pre-loaded, to the Cisco DMPs prior to the event from the Library screen.
Playlist View
Figure 2 shows the Content screen playlist view and the options available there.
Figure 2 Playlist View Navigation
Use the sizing bars to customize your screen. Put your cursor near the top of the area you want to change. When the cursor changes to the crossbar, drag whichever area you want, to improve your visibility.
How to Set Up Playlists
This section includes the following topics:
■![]() Guidelines for Creating Playlists
Guidelines for Creating Playlists
■![]() Prerequisites for Playlist Creation
Prerequisites for Playlist Creation
■![]() Adding Content Items to a Playlist
Adding Content Items to a Playlist
■![]() Changing the Order of Content Items in a Playlist
Changing the Order of Content Items in a Playlist
■![]() Replacing Content in a Playlist During an Event
Replacing Content in a Playlist During an Event
■![]() Enhancements to Content Replacement
Enhancements to Content Replacement
■![]() Setting the Item Duration in a Playlist
Setting the Item Duration in a Playlist
■![]() Copying Content From One Playlist to Another
Copying Content From One Playlist to Another
■![]() Deleting Content Items From a Playlist
Deleting Content Items From a Playlist
Guidelines for Creating Playlists
When creating playlists, consider the following guidelines:
■![]() You cannot have playlists with the same name.
You cannot have playlists with the same name.
■![]() Each region can have only one playlist.
Each region can have only one playlist.
■![]() For Proof of Play, you can have more than one region with an ad playlist.
For Proof of Play, you can have more than one region with an ad playlist.
■![]() Cisco Vision Director can support static graphics and video in mixed media playlists.
Cisco Vision Director can support static graphics and video in mixed media playlists.
IMPORTANT: The digital media players do not support Flash content. For additional information, refer to allowable Static Graphic Formats.
■![]() Once a playlist displays the last content item in the list, it will loop back to the beginning of the playlist.
Once a playlist displays the last content item in the list, it will loop back to the beginning of the playlist.
■![]() The recommended ad rotation time is 30 seconds. 15 seconds is the minimum supported time for all content. As a best practice, we recommend that you never use less than 15 seconds per playlist content items.
The recommended ad rotation time is 30 seconds. 15 seconds is the minimum supported time for all content. As a best practice, we recommend that you never use less than 15 seconds per playlist content items.
Note : All playlists from all zones/groups for a given event must be loaded on every media player prior to the event.
Each playlist can have its own ad rotation time independent of other playlists.
Content in the playlist is displayed in the order in which it is added unless you re-order your content.
Note : As a series of content items transition in a playlist (such as advertisements in Region 2 of a standard 3-region L-wrap template), there will be some variance in the appearance of each content item as the media player displays where that content is presented. Each content item will generally appear on all corresponding media player displays within about one second of each playlist item transition. However, the amount of time that it takes for all displays in your venue to show the same content item within a playlist might exceed a one-second duration based on the following venue conditions: Network infrastructure, number of regions on the display, number of content items in the playlist, and the playlist duration.
Table 1 provides some guidelines for general playlist support in Cisco Vision Director.
Note : While these limits have been tested with basic Cisco Vision Director operation, the combination of maximum values and complexity of your system and content can potentially impact the actual limit. Therefore, be sure to test your playlist content for expected behavior before using in production.
Table 1 Playlist Guidelines and Limitations for Server Deployment Levels
|
|
Limit |
|
|
|---|---|---|---|
|
|
|
|
|
|
|
|
|
|
|
|
|
|
|
|
|
|
|
|
|
|
|
|
|
Consider the following restrictions and expected behavior when configuring playlists:
■![]() Single video loop—You can configure a playlist to loop continuously when you have a playlist with a single video content item set for a duration of zero, with the playlist duration also set to zero.
Single video loop—You can configure a playlist to loop continuously when you have a playlist with a single video content item set for a duration of zero, with the playlist duration also set to zero.
■![]() Single non-video loop—You can configure a playlist to loop continuously when you have a playlist with a single non-video content item by setting the item duration to -1, and setting the playlist duration to a number greater than or equal to zero.
Single non-video loop—You can configure a playlist to loop continuously when you have a playlist with a single non-video content item by setting the item duration to -1, and setting the playlist duration to a number greater than or equal to zero.
■![]() All playlists will loop their content (for example, once the last item plays, the playlist restarts with the first item) unless a duration of zero is configured on the first playlist item.
All playlists will loop their content (for example, once the last item plays, the playlist restarts with the first item) unless a duration of zero is configured on the first playlist item.
■![]() To run a playlist one time, you can specify a duration of zero for the last item in the playlist. There is different behavior if the last item is a non-video item versus a video. If the last item has zero duration, and once the rest of the playlist items run, then if the last item is a non-video item, it continuously plays for the duration of the state. If the last item is a video, the video plays one time followed by a black screen for the duration of the state.
To run a playlist one time, you can specify a duration of zero for the last item in the playlist. There is different behavior if the last item is a non-video item versus a video. If the last item has zero duration, and once the rest of the playlist items run, then if the last item is a non-video item, it continuously plays for the duration of the state. If the last item is a video, the video plays one time followed by a black screen for the duration of the state.
■![]() If a change is made to a playlist and the playlist is currently being displayed, it is possible that items in the playlist that are past an item in the playlist with a duration of zero, could get displayed and the playlist continues until the item with zero duration is reached again.
If a change is made to a playlist and the playlist is currently being displayed, it is possible that items in the playlist that are past an item in the playlist with a duration of zero, could get displayed and the playlist continues until the item with zero duration is reached again.
■![]() When collecting proof-of-play, we recommend duplicating the video so that the playlist will have two items. This way, every complete playback of the video can be recorded.
When collecting proof-of-play, we recommend duplicating the video so that the playlist will have two items. This way, every complete playback of the video can be recorded.
■![]() Video content—Some video frames may be dropped when transitioning between playlist items to ensure synchronized playback.
Video content—Some video frames may be dropped when transitioning between playlist items to ensure synchronized playback.
Prerequisites for Playlist Creation
Before you create playlists, be sure that the following conditions are met:
■![]() You are familiar with the playlist content types to specify the appropriate playlist types (Non Video, Video or Mixed Media).
You are familiar with the playlist content types to specify the appropriate playlist types (Non Video, Video or Mixed Media).
■![]() The content for the playlist is in the Library.
The content for the playlist is in the Library.
■![]() You have a naming convention to ease identification and management of your playlists.
You have a naming convention to ease identification and management of your playlists.
Creating a Playlist
User Role: Administrator / Content Manager
IMPORTANT: For video walls, the playlist must have the same number of items, and the same duration for each content item. Each list item must be of the same type. For more information, see Prerequisites for Video Walls.
1.![]() From the Library, click Playlist > New Playlist. The Create Playlist box appears on the right Figure 3.
From the Library, click Playlist > New Playlist. The Create Playlist box appears on the right Figure 3.

2.![]() Specify the Playlist options, see Table 2.
Specify the Playlist options, see Table 2.
a.![]() Type a Name for your playlist.
Type a Name for your playlist.
b.![]() Use the pull-down arrow for Type of media. Best to choose Mixed Media.
Use the pull-down arrow for Type of media. Best to choose Mixed Media.
|
|
|
|---|---|
|
|
|
|
|
|
|
|
|
|
|
|
|
|
|
c.![]() Define Default Runtime (if necessary). Cisco default runtime is 30 seconds.
Define Default Runtime (if necessary). Cisco default runtime is 30 seconds.
d.![]() Drag and drop content from the Asset Library or use the Upload Assets icon. Hover over the Action Icons (in red box).
Drag and drop content from the Asset Library or use the Upload Assets icon. Hover over the Action Icons (in red box).
e.![]() Enable Proof of Play (check the box) to record the entire event script at your venue.
Enable Proof of Play (check the box) to record the entire event script at your venue.
3.![]() Click Save. The name of the new playlist will display in the text below the Playlist Items dialog box.
Click Save. The name of the new playlist will display in the text below the Playlist Items dialog box.
The Playlist Detail in Listview shows: what order the content items were loaded, the title, the type of content, the duration of each piece of content, the size, and when the playlist was last modified.
Adding Content Items to a Playlist
User Role: Administrator / Content Manager
IMPORTANT: For video walls, the playlist must have the same number of items, and the same duration for each content item. Each list item must be of the same type. For more information, see Prerequisites for Video Walls.
Adding Content Items from the Asset Library to a Playlist
To add content items to a playlist:
1.![]() From Library, click Playlist > New Playlist. The Create Playlist box appears on the right (Figure 3).
From Library, click Playlist > New Playlist. The Create Playlist box appears on the right (Figure 3).
2.![]() In the Playlists pane, select the Name of the playlist where you want to add content items.
In the Playlists pane, select the Name of the playlist where you want to add content items.
3.![]() In the Asset Items list, select the content item(s) that you want to add to the playlist.
In the Asset Items list, select the content item(s) that you want to add to the playlist.
TIP: You can select multiple files using the standard multi-select keyboard strokes. Use the search or sort functions to find the content you want to add to the playlist.
IMPORTANT: Be sure to select content that is formatted for the proper TV display resolution where you will be running the playlist, and that it matches the region size where it will be displayed. For example, if the TV supports 1920x1080 resolution, the content you add to the playlist must be in 1920x1080 format to display properly on the TV screen.
4.![]() Drag and drop files onto the Playlist Items area.
Drag and drop files onto the Playlist Items area.
Content is displayed in the order in which it was added. A thumbnail of each piece of content is shown in the Playlist Items box. The header above the playlist box will indicate the number of items in the playlist.
5.![]() (Optional) To duplicate an item in the playlist, select a content item in the Playlist Items panel, and do one of the following:
(Optional) To duplicate an item in the playlist, select a content item in the Playlist Items panel, and do one of the following:
a.![]() To duplicate an item once —Click the Item duplicate icon.
To duplicate an item once —Click the Item duplicate icon.
b.![]() To duplicate an item multiple times —Click the drop-down arrow and select the “Duplicate multiple times” option.
To duplicate an item multiple times —Click the drop-down arrow and select the “Duplicate multiple times” option.
In the Duplicate Contents dialog, specify the number of times that you want to duplicate the item and click Duplicate.
Metadata-Validity and Playability
Tag an asset with metadata comprised of validity and playability information. Add granularity to your asset by configuring exactly when it is effective (validity) and exactly when it can be shown (playability). These values are typically provided by a sponsor or asset provider. Previously, an asset was unrestricted.
To set validity and playability data:
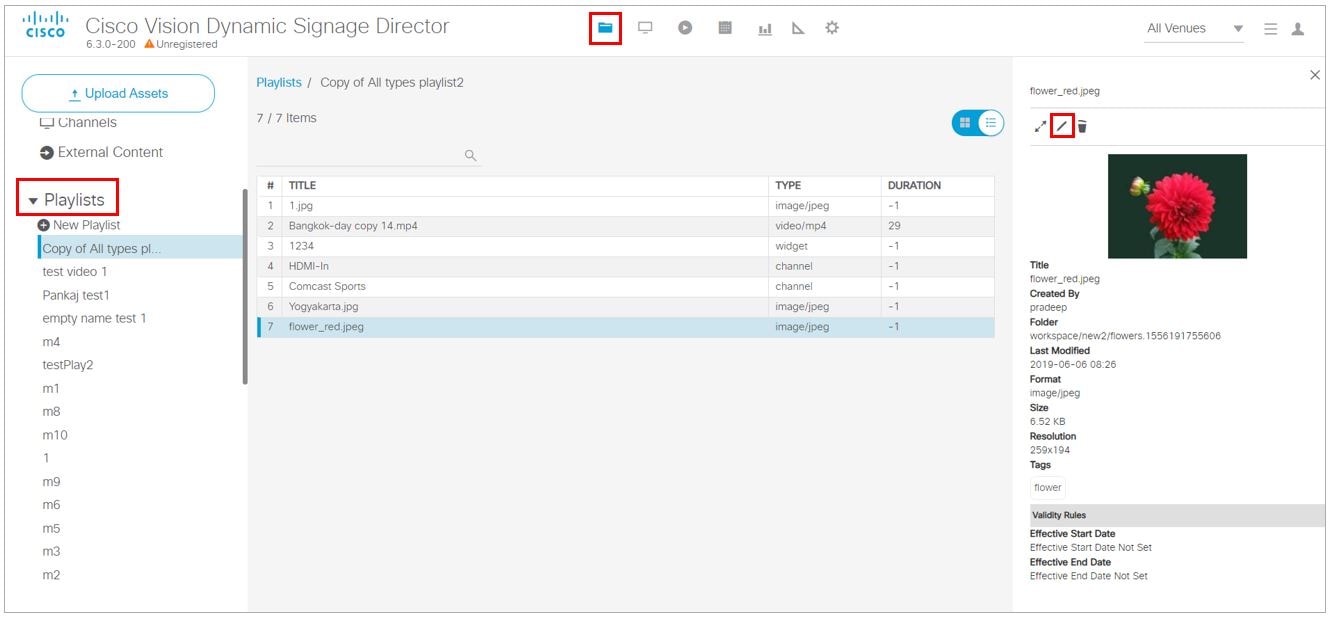
2.![]() Click an asset. The Metadata window appears.
Click an asset. The Metadata window appears.
3.![]() Set values (see Figure 4). Click the Edit icon (pen) at top of panel.
Set values (see Figure 4). Click the Edit icon (pen) at top of panel.
a.![]() For validity, set the Effective Start Date and Effective End Date.
For validity, set the Effective Start Date and Effective End Date.
Note : If you do not set this metadata, the default for all content is forever .
Figure 4 Setting Metadata Values
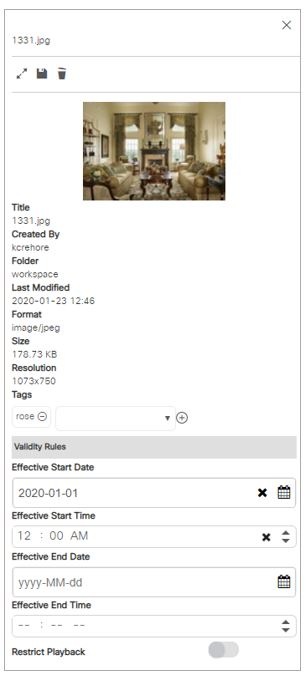
b.![]() If you do not set the end date, it will default to forever.
If you do not set the end date, it will default to forever.
c.![]() If you do not pick a time, it will default to midnight (12:00 am).
If you do not pick a time, it will default to midnight (12:00 am).
d.![]() Slide Restrict Playback button (Figure 5) to enable greater flexibility. The Playable options appear.
Slide Restrict Playback button (Figure 5) to enable greater flexibility. The Playable options appear.
Figure 5 Restricting Playback of Content
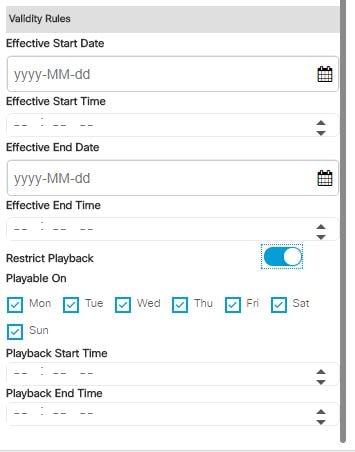
e.![]() Choose days of the week you want the content to validly play. Uncheck days you do not want the content to play.
Choose days of the week you want the content to validly play. Uncheck days you do not want the content to play.
f.![]() Choose Start and End times.
Choose Start and End times.
g.![]() Click the Save icon at the top of the panel.
Click the Save icon at the top of the panel.
IMPORTANT : No matter where the physical location of the DMP is, once you set the start/stop data, the time you choose is “local” to that DMP. That is, content will play on that DMP at exactly the time you choose in the time zone of the DMP.
Note : When your content become valid in the script, that content is not instantly valid. Meaning the next time the playlist loops back, the content becomes available (valid and playable).
IMPORTANT : Cisco Vision Director does NOT support a playlist with NO valid content. A playlist has to have at least ONE piece of content that is valid. Therefore the default for all content, unless you set its metadata, is always valid.
Adding Static Graphics to a Non-Video Playlist by Direct Upload
You can drag and drop images from the Asset Library to a playlist, or, if you have not already uploaded the content to Cisco Vision Director, you can upload images directly to the playlist.
To directly upload static graphics to a non-video playlist:
1.![]() Click Library, click Playlist > New Playlist.
Click Library, click Playlist > New Playlist.
2.![]() In the Playlists listing, select the name of the playlist where you want to add images.
In the Playlists listing, select the name of the playlist where you want to add images.
TIP: Once you select images to upload, you can change the target playlist name or even create a new playlist for the selected content in the Upload dialog box. You can also create and apply tags to the content.
4.![]() In the Open dialog box, select the images that you want to upload.
In the Open dialog box, select the images that you want to upload.
TIP: You can also select a compressed.zip file to upload multiple images.
6.![]() In the Upload Content dialog box ( Figure 6), do the following:
In the Upload Content dialog box ( Figure 6), do the following:
Figure 6 Import Content Dialog Box
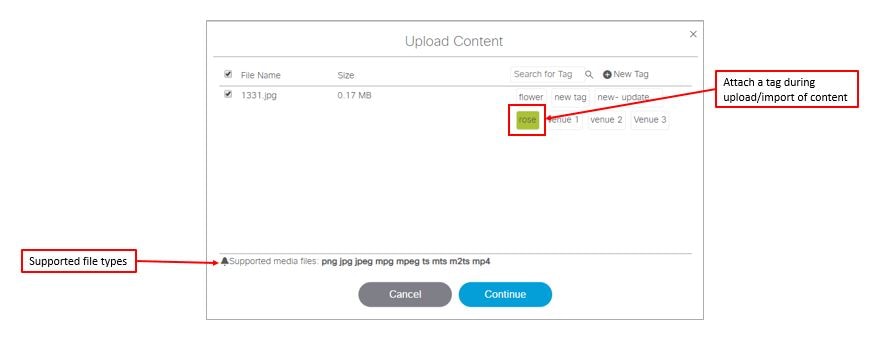
a.![]() (Optional) Change the target playlist to another existing playlist, or type the name of a new playlist to be created.
(Optional) Change the target playlist to another existing playlist, or type the name of a new playlist to be created.
b.![]() (Optional) Apply an existing tag, or create a new tag name to apply to the content.
(Optional) Apply an existing tag, or create a new tag name to apply to the content.
Changing the Order of Content Items in a Playlist
User Role: Administrator / Content Manager
Content is displayed in the order in which it is added.
TIP: If you do not need a specific order of items, click Randomize (Figure 3) to put the content items into an arbitrary order.
To change the order of content items in a playlist:
1.![]() Click Library, click Playlist.
Click Library, click Playlist.
3.![]() In the Playlist Items list, select the content item that you want to move and drag and drop it into the desired position in the list. If you place the thumbnail of the content on top of another thumbnail, they swap positions.
In the Playlist Items list, select the content item that you want to move and drag and drop it into the desired position in the list. If you place the thumbnail of the content on top of another thumbnail, they swap positions.
Content Playout in Random Mode
New in Release 6.3 is the ability to create a random playout of your content.
To create a “shuffled” playlist:
1.![]() Click Library, click Playlist.
Click Library, click Playlist.
3.![]() In the Playlist Items list, select Randomize icon (Figure 7). Your content order changes.
In the Playlist Items list, select Randomize icon (Figure 7). Your content order changes.
Figure 7 Random Playout of Content in a Playlist

After clicking the Random icon, the content changes position on the right panel. Now the content plays in the order you see in the list.
Replacing Content in a Playlist During an Event
User Role: Administrator / Content Manager
You can perform content updates in a playlist during content presentation as long as you follow important guidelines.
Restrictions for Event-Time Content Replacement
CAUTION: Event-Time Content Replacement should be used with care if you are using Proof of Play due to impact of Proof of Play reporting if changes are made while a script is running. Weigh the cost-benefit of replacing content versus PoP impact. Once an updated event script has stopped running, the PoP will operate normally upon re-running of the script.
Before replacing content in a playlist during an event, consider the following restrictions:
■![]() Avoid making the following types of playlist updates when using replacing content that is using Proof of Play:
Avoid making the following types of playlist updates when using replacing content that is using Proof of Play:
–![]() Adding items to the end of a playlist—The new item will show up in the PoP raw data, but not the detailed report.
Adding items to the end of a playlist—The new item will show up in the PoP raw data, but not the detailed report.
–![]() Removing an item from a playlist—Synchronization of the PoP reporting will be mismatched.
Removing an item from a playlist—Synchronization of the PoP reporting will be mismatched.
■![]() The replacement content file name must be unique or the Proof of Play record will be impacted.
The replacement content file name must be unique or the Proof of Play record will be impacted.
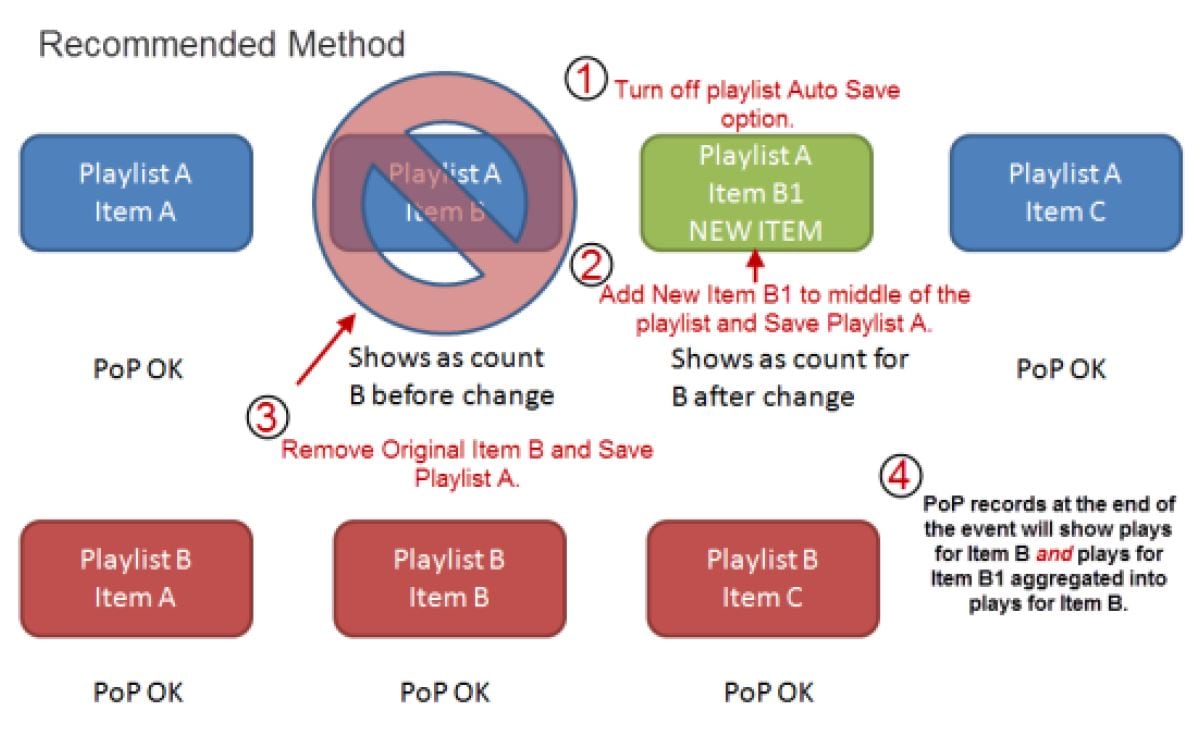
The best practice is to Import the content item with a new file name and add it to the playlist before removing the content item to be replaced. See Figure 8 for an illustration of the recommended workflow to preserve PoP reporting.
■![]() Widgets are not supported for event-time content replacement.
Widgets are not supported for event-time content replacement.
■![]() Content replacement can negatively impact video content synchronization and is not recommended. If you must consider this, plan to have non-video content available as the replacement.
Content replacement can negatively impact video content synchronization and is not recommended. If you must consider this, plan to have non-video content available as the replacement.
Figure 8 Replacement of Existing Content Item
Enhancements to Content Replacement
New enhancements to content replacement allow you to update a playlist and save it, then update another playlist, without waiting for the first content replacement command to finish. In Release 6.0, you could make changes to a playlist, but only one change (total) to a playlist in any running script is allowed at a time, until that change is fully complete on the system. Content Replacement is defined as making changes to running scripts without restarting the script.
You can do multiple content replacements (playlist change or file upload) without waiting for the prior content replacements to finish. There are a couple limitations:
■![]() You can only have one replacement per content item or one replacement per playlist queued. In other words, you can’t replace the same content a second time until the first replacement process finishes.
You can only have one replacement per content item or one replacement per playlist queued. In other words, you can’t replace the same content a second time until the first replacement process finishes.
■![]() You cannot make another change to the same playlist until the first change to that playlist finishes.
You cannot make another change to the same playlist until the first change to that playlist finishes.
■![]() All file uploads, even if you did not select content replacement, will temporarily block another upload of an item of the same name.
All file uploads, even if you did not select content replacement, will temporarily block another upload of an item of the same name.
TIP : Check your work thoroughly before you start the content replacement process. That way, you won’t need to go back and try to make more changes to your scripts before they get staged.
Note : Content replacement can invalidate the Proof of Play report.
This feature concerns uploading content to the Library (Director Server). Once completed successfully, this triggers uploading to the staging to the DMP specified.
To access content replacement:
1.![]() From Library > Upload Assets. A dialog box appears. Choose the files.
From Library > Upload Assets. A dialog box appears. Choose the files.
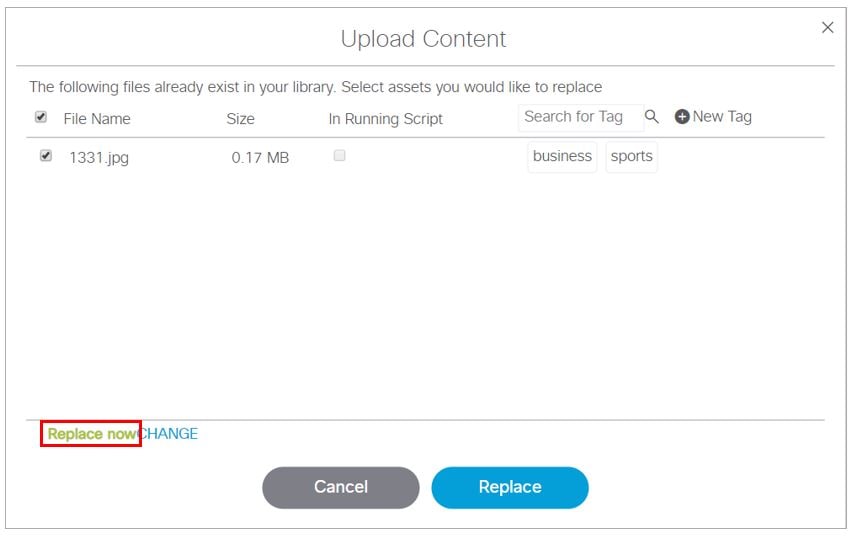
2.![]() Click Replace Now > Continue if you want the content replacement to happen immediately, overwriting the content that may be staged to the DMP (Figure 9).
Click Replace Now > Continue if you want the content replacement to happen immediately, overwriting the content that may be staged to the DMP (Figure 9).
3.![]() This dialog shows you which content files are in conflict. Select the files to replace and click Replace.
This dialog shows you which content files are in conflict. Select the files to replace and click Replace.
Figure 9 Content Replacement Conflict
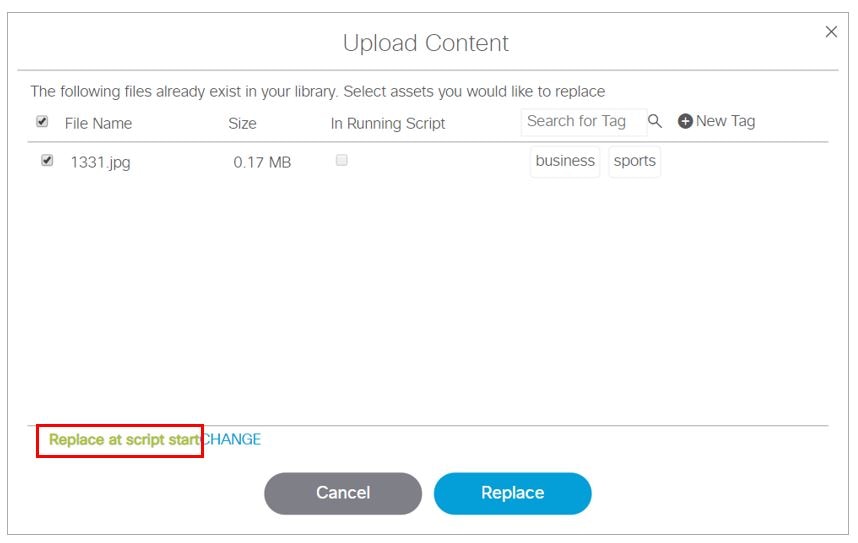
4.![]() Choose CHANGE > Replace at script start to stage the content to the DMP at script start (Figure 10).
Choose CHANGE > Replace at script start to stage the content to the DMP at script start (Figure 10).
Figure 10 Replace at Script Start Option
If there is a previous upload that hasn’t fully processed or you try to upload the same assets again, an error appears (Figure 11). For these files, you must retry to upload them because no changes occurred.
Figure 11 Error Uploading File Message

Now you can perform content replacement on a second playlist (it cannot be the same playlist) even if the first playlist isn’t done processing. With the newest content replacement enhancements you can make changes to running scripts, even if they have started.
Limitations to Content Replacement Enhancement
1.![]() The Proof of Play may become invalid if you do content replacements.
The Proof of Play may become invalid if you do content replacements.
2.![]() Content replacement only applies to local video and image files only (not channels, external URLs, or widgets).
Content replacement only applies to local video and image files only (not channels, external URLs, or widgets).
3.![]() Playlists containing 1 item will not content replace (change). To make this work:
Playlists containing 1 item will not content replace (change). To make this work:
a.![]() Create a playlist of the same item twice
Create a playlist of the same item twice
b.![]() Change states to a different state with a different playlist, then return to the prior state
Change states to a different state with a different playlist, then return to the prior state
IMPORTANT : If the DMP performs a reboot during this uploading and staging process, check your script and be sure the process completed and the replaced content commands will get pushed to the DMP. There is no auto-retry command to the DMP of the staging to make certain the content gets replaced.
Workaround : Go the DMP staging screen and manually stage the content to the DMP.
Creating a Playlist with Looping Content
User Role: Administrator / Content Manager
Once a playlist displays the last content item in its list, it will automatically loop, or replay content from the beginning of the playlist, as long as an item duration of 0 is not specified for the first content item.
For playlists with only a single video or non-video item, you need to be sure that the item duration and playlist duration to specific values to achieve a continuous replay (loop) of the playlist.
To create a playlist with looping content:
1.![]() Click Library, click Playlist.
Click Library, click Playlist.
2.![]() Select an existing playlist or create a new one.
Select an existing playlist or create a new one.
3.![]() Change the screen to List view for the thumbnails.
Change the screen to List view for the thumbnails.
4.![]() Add content items to the playlist. For more information, see Adding Content Items to a Playlist.
Add content items to the playlist. For more information, see Adding Content Items to a Playlist.
5.![]() Select the playlist that you want to modify and do the following:
Select the playlist that you want to modify and do the following:
a.![]() To loop a playlist with multiple content items —Automatic. Be sure that the item duration for the first content item in the playlist is not 0.
To loop a playlist with multiple content items —Automatic. Be sure that the item duration for the first content item in the playlist is not 0.
b.![]() To loop a playlist with a single, non-video item —Set the Default Item Duration for the playlist to a value greater than or equal to 0 and set the item duration to -1. Use the Pen icon to edit. See Figure 12.
To loop a playlist with a single, non-video item —Set the Default Item Duration for the playlist to a value greater than or equal to 0 and set the item duration to -1. Use the Pen icon to edit. See Figure 12.
Figure 12 Duration Values to Loop Single-Item Non-Video Playlist

c.![]() To loop a playlist with a single, video item —Set both the Default Runtime Duration and item Duration to a value of 0 ( Figure 13).
To loop a playlist with a single, video item —Set both the Default Runtime Duration and item Duration to a value of 0 ( Figure 13).
IMPORTANT: When looping a single video item of 0 duration, be aware that content synchronization is lost on the SV-4K media player.
Figure 13 Duration Values to Loop Single-Item Video Playlist
6.![]() Click Update for an existing playlist, or Save for a new one.
Click Update for an existing playlist, or Save for a new one.
Setting the Item Duration in a Playlist
User Role: Administrator / Content Manager
IMPORTANT: For video walls, the playlist must have the same number of items and the same duration for each content item.
The Default Item Duration is set in the Playlist Details panel. The default value is 30 seconds.
When you add non-video content items to the playlist, the value set in the Default Item Duration is used by default. In list view, you will see an item duration value of -1 (ignore) for the content item, which means that the default item duration set for the playlist is used.
Video content items use the length of the video as their default duration when added to a playlist.
To set the item duration in a playlist:
1.![]() Click Library > Playlists. Click on the playlist you want to check or change. The playlist content displays in Listview with all the durations shown for each asset.
Click Library > Playlists. Click on the playlist you want to check or change. The playlist content displays in Listview with all the durations shown for each asset.
2.![]() Change the screen to List view for the thumbnails (Figure 14).
Change the screen to List view for the thumbnails (Figure 14).
3.![]() Select the existing playlist or create a new one.
Select the existing playlist or create a new one.
4.![]() Add content items to the playlist. For more information, see Adding Content Items to a Playlist.
Add content items to the playlist. For more information, see Adding Content Items to a Playlist.
5.![]() In the Playlist Items panel, select the list icon so that you can see the content items detail, including the item Duration ( Figure 13).
In the Playlist Items panel, select the list icon so that you can see the content items detail, including the item Duration ( Figure 13).
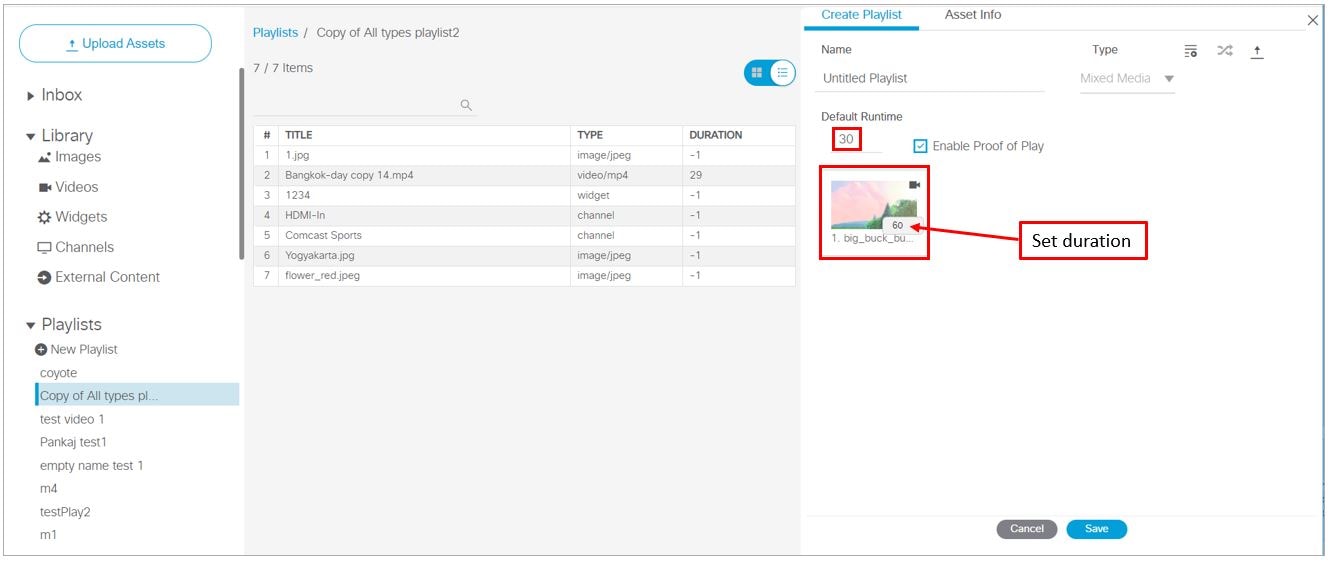
Figure 14 Playlist Item Duration

6.![]() Click the item Duration cell for the content item that you want to modify.
Click the item Duration cell for the content item that you want to modify.
7.![]() Type a value or use the spinner controls to set the item duration (in seconds), using the following guidelines:
Type a value or use the spinner controls to set the item duration (in seconds), using the following guidelines:
a.![]() For advertisements —Set a value of 15-30 (recommended).
For advertisements —Set a value of 15-30 (recommended).
b.![]() To use the Default Item Duration set in the playlist properties —Use a value of -1 (This is the default).
To use the Default Item Duration set in the playlist properties —Use a value of -1 (This is the default).
c.![]() To run a playlist one time (where last content-item is non-video) —Set a value of 0 for the last non-video content item.
To run a playlist one time (where last content-item is non-video) —Set a value of 0 for the last non-video content item.
The content will play one time, and the last non-video item will run until the end of the Event state.
IMPORTANT: If the last content item is a video, then the video will play one time and a black screen is displayed for the remainder of the Event state.
d.![]() To loop a playlist with multiple content items —Automatic. Be sure that the item duration for the first content item in the playlist is not 0.
To loop a playlist with multiple content items —Automatic. Be sure that the item duration for the first content item in the playlist is not 0.
e.![]() To loop a playlist with a single, non-video item —Set the Default Item Duration for the playlist to a value greater than or equal to 0 and set the item duration to -1.
To loop a playlist with a single, non-video item —Set the Default Item Duration for the playlist to a value greater than or equal to 0 and set the item duration to -1.
f.![]() To loop a playlist with a single, video item —Set both the Default Item Duration and item Duration to a value of 0.
To loop a playlist with a single, video item —Set both the Default Item Duration and item Duration to a value of 0.
8.![]() Click Update for an existing playlist, or Save for a new one. For more information about creating playlists with looping content, see Enhancements to Content Replacement.
Click Update for an existing playlist, or Save for a new one. For more information about creating playlists with looping content, see Enhancements to Content Replacement.
Copying Content From One Playlist to Another
User Role: Administrator / Content Manager
You can easily copy content from one playlist to another. This task is useful for video walls or other groups of TV displays where you want to show identical content.
To copy content from one playlist to another:
1.![]() Click Library, click Playlist.
Click Library, click Playlist.
2.![]() Create the new playlist if it does not already exist.
Create the new playlist if it does not already exist.
3.![]() Select the name of the playlist that you want to copy content items from.
Select the name of the playlist that you want to copy content items from.
TIP: Use the Search box to find a playlist.
4.![]() In the Playlist Items panel, select all of the items.
In the Playlist Items panel, select all of the items.
5.![]() Drag and drop the content items to the target playlist in the Playlists panel where you want to copy the content.
Drag and drop the content items to the target playlist in the Playlists panel where you want to copy the content.
6.![]() Specify the Playlist options (see Table 3).
Specify the Playlist options (see Table 3).
Table 3 Specify Playlist Options
|
|
|
|---|---|
|
|
|
|
|
|
|
|
|
|
|
|
|
|
|
7.![]() Click Save. The name of the new playlist will display in the text below the Playlist Items dialog box. Since you have not yet added items to the playlist, (0 Items) are indicated.
Click Save. The name of the new playlist will display in the text below the Playlist Items dialog box. Since you have not yet added items to the playlist, (0 Items) are indicated.
Deleting Content Items From a Playlist
User Role: Administrator / Content Manager
When you delete an item from a playlist, the item remains in the content library and is only removed from the playlist.
To delete an item from a playlist:
1.![]() Click Library, click the Playlist arrow to see the listing, select the playlist where you want to delete a content item.
Click Library, click the Playlist arrow to see the listing, select the playlist where you want to delete a content item.
2.![]() In the Playlist Items panel, select the content item that you want to delete.
In the Playlist Items panel, select the content item that you want to delete.
3.![]() Click the Trashcan icon (Delete).
Click the Trashcan icon (Delete).
IMPORTANT: There are two delete functions that pertain to playlists—one to delete the actual playlist itself and one to delete items in a playlist. Be sure what you are deleting.
4.![]() In the confirmation dialog box, click Delete to remove the item.
In the confirmation dialog box, click Delete to remove the item.
Deleting a Playlist
User Role: Administrator / Content Manager
When you delete a playlist, the playlist is permanently removed from the content library. However, the content items in the playlist are still available to you in the content library.
1.![]() Click Library, click the Playlist arrow to see the listing.
Click Library, click the Playlist arrow to see the listing.
2.![]() In the Playlist thumbnails, double-click Playlists (in blue) to show a list of all the playlists you’ve created in the middle panel. Select the playlist from the panel.
In the Playlist thumbnails, double-click Playlists (in blue) to show a list of all the playlists you’ve created in the middle panel. Select the playlist from the panel.
3.![]() In the Playlist Detail Panel, select the trashcan icon (Delete).
In the Playlist Detail Panel, select the trashcan icon (Delete).
4.![]() In the confirmation dialog box, click Delete to remove the playlist.
In the confirmation dialog box, click Delete to remove the playlist.
 Feedback