- About This Guide
- Before You Begin
- Getting Started with Cisco Vision Dynamic Signage Director Operation
- Working with TV Displays
- Working with Zones, Groups, and Locations
- Working with Content Deployment
- Working with Screen Templates in Cisco Vision Director
- Working with Content in Cisco Vision Director
- Working with Playlists in Cisco Vision Director
- Working with Video Walls
- Working with Event Scripts
- Monitoring Media Player Operation During an Event Using Device Management
- Troubleshooting Event Operations in Cisco Vision Director
- Managing Switch Data in Cisco Vision Director
- Managing System Services in Cisco Vision Director
- Managing Server Resources in Cisco Vision Director
- Managing Media Player Operation in Cisco Vision Director
- Managing Backups in Cisco Vision Director
- Glossary of Terms
Release 6.2: Cisco Vision Dynamic Signage Director Operations Guide
Bias-Free Language
The documentation set for this product strives to use bias-free language. For the purposes of this documentation set, bias-free is defined as language that does not imply discrimination based on age, disability, gender, racial identity, ethnic identity, sexual orientation, socioeconomic status, and intersectionality. Exceptions may be present in the documentation due to language that is hardcoded in the user interfaces of the product software, language used based on RFP documentation, or language that is used by a referenced third-party product. Learn more about how Cisco is using Inclusive Language.
- Updated:
- September 19, 2019
Chapter: Working with Screen Templates in Cisco Vision Director
Working with Screen Templates in Cisco Vision Director
User Role: Administrator / Content Manager
This module provides information about how to set up the layout of content on a TV display by defining regions for the screen using predefined or custom templates.
Information About Screen Templates
Screen templates define the video and non-video regions and layout of a display. Screen templates are used to create various layouts for the presentation of different types of content. Screen templates are assigned to zones or groups and apply to all locations within them.
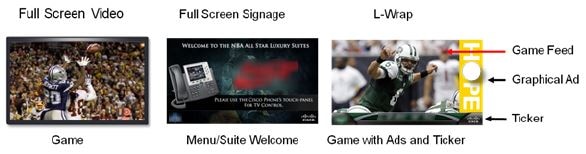
Figure 1 shows three basic templates. The “L-wrap” template divides the screen into three sections where you have video in the top left of the screen, advertising along the right side, and a ticker across the bottom that might be showing scores and a news feed.
Figure 1 Three Basic Templates
Cisco Vision Director allows you to create the following types of screen templates:
■![]() Custom template—Specifies the size and arrangement of regions on the screen.
Custom template—Specifies the size and arrangement of regions on the screen.
■![]() Overlay template—Specifies a video region that overlaps a secondary video region or non-video region that overlaps a video region in the template.
Overlay template—Specifies a video region that overlaps a secondary video region or non-video region that overlaps a video region in the template.
Default Screen Template Dimensions
The dimensions for the default screen templates are fixed and cannot be changed.
Alternatively, you can create custom screen templates (where you specify different sizes for the screen template regions) and overlay screen templates (where you have a non-video or video region overlapping a video or mixed media region).
Table 1 defines the default screen templates that are included with Cisco Vision Director 4.0 and later. Installing a full ISO image removes previously available templates.
Table 1 Default Screen Templates


Note : Obsolete templates (such as 3-Region, Welcome, Exit, Emergency, Outside Emergency, 3-Region, 3-Region double) might still appear in your system if you have upgraded from earlier releases.
Full Screen Default Templates
The full screen templates that come with the Cisco Vision Director software are used to display full-screen video (or mixed media) or full-screen graphics. Figure 2 shows an example of a video (or mixed media) in the full screen template. Figure 3 shows an example of a graphic in the full screen template. Both are fixed screen templates and cannot be customized. Table 2 and Table 3 show the template dimensions.
Figure 2 Full Screen Video (or Mixed Media) Template Example

Table 2 Full Screen Video or Mixed Media Template Dimensions
|
|
|
|---|---|
|
|
|
Figure 3 Full Screen Graphic Template Example

Table 3 Full Screen Graphic Template Dimensions
|
|
|
|---|---|
|
|
|
3-Region Lwrapper Default Template
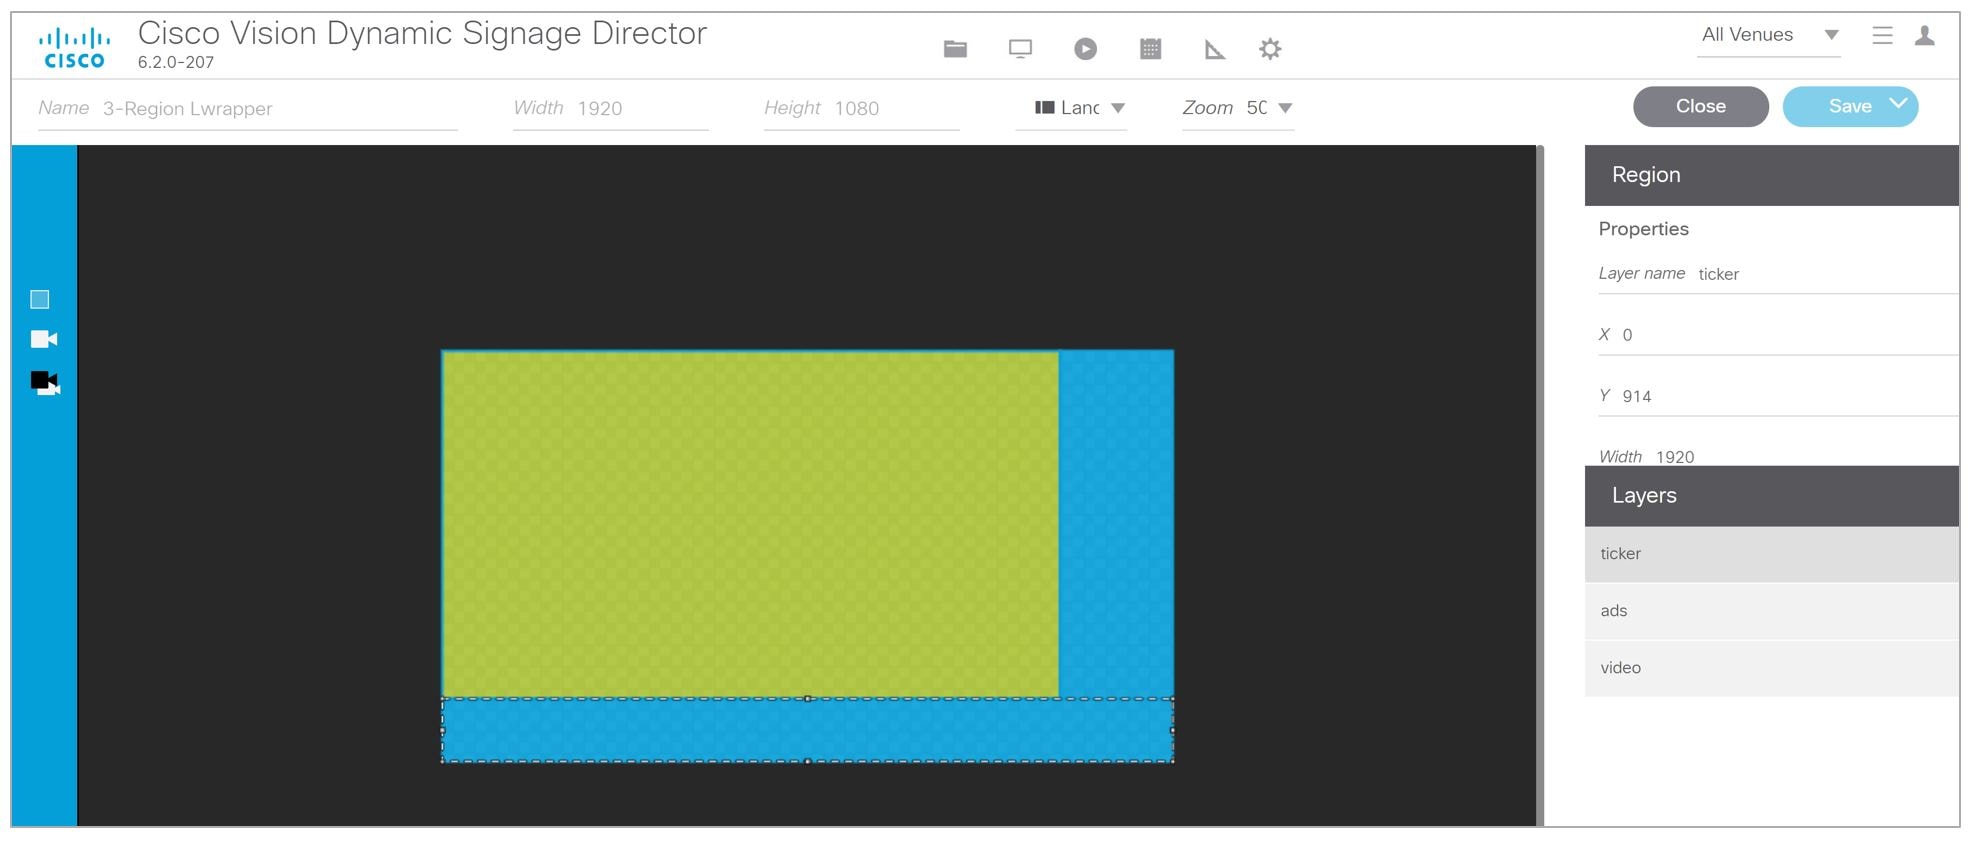
Figure 4 shows an example of the content for the 3-Region Lwrapper template that comes standard with Cisco Vision Director. This is a fixed screen template and cannot be customized. Table 4 shows the template dimensions. Click on the regions and see the Properties in the right panel update with dimensions and layer names.
Figure 4 3-Region Lwrapper Template
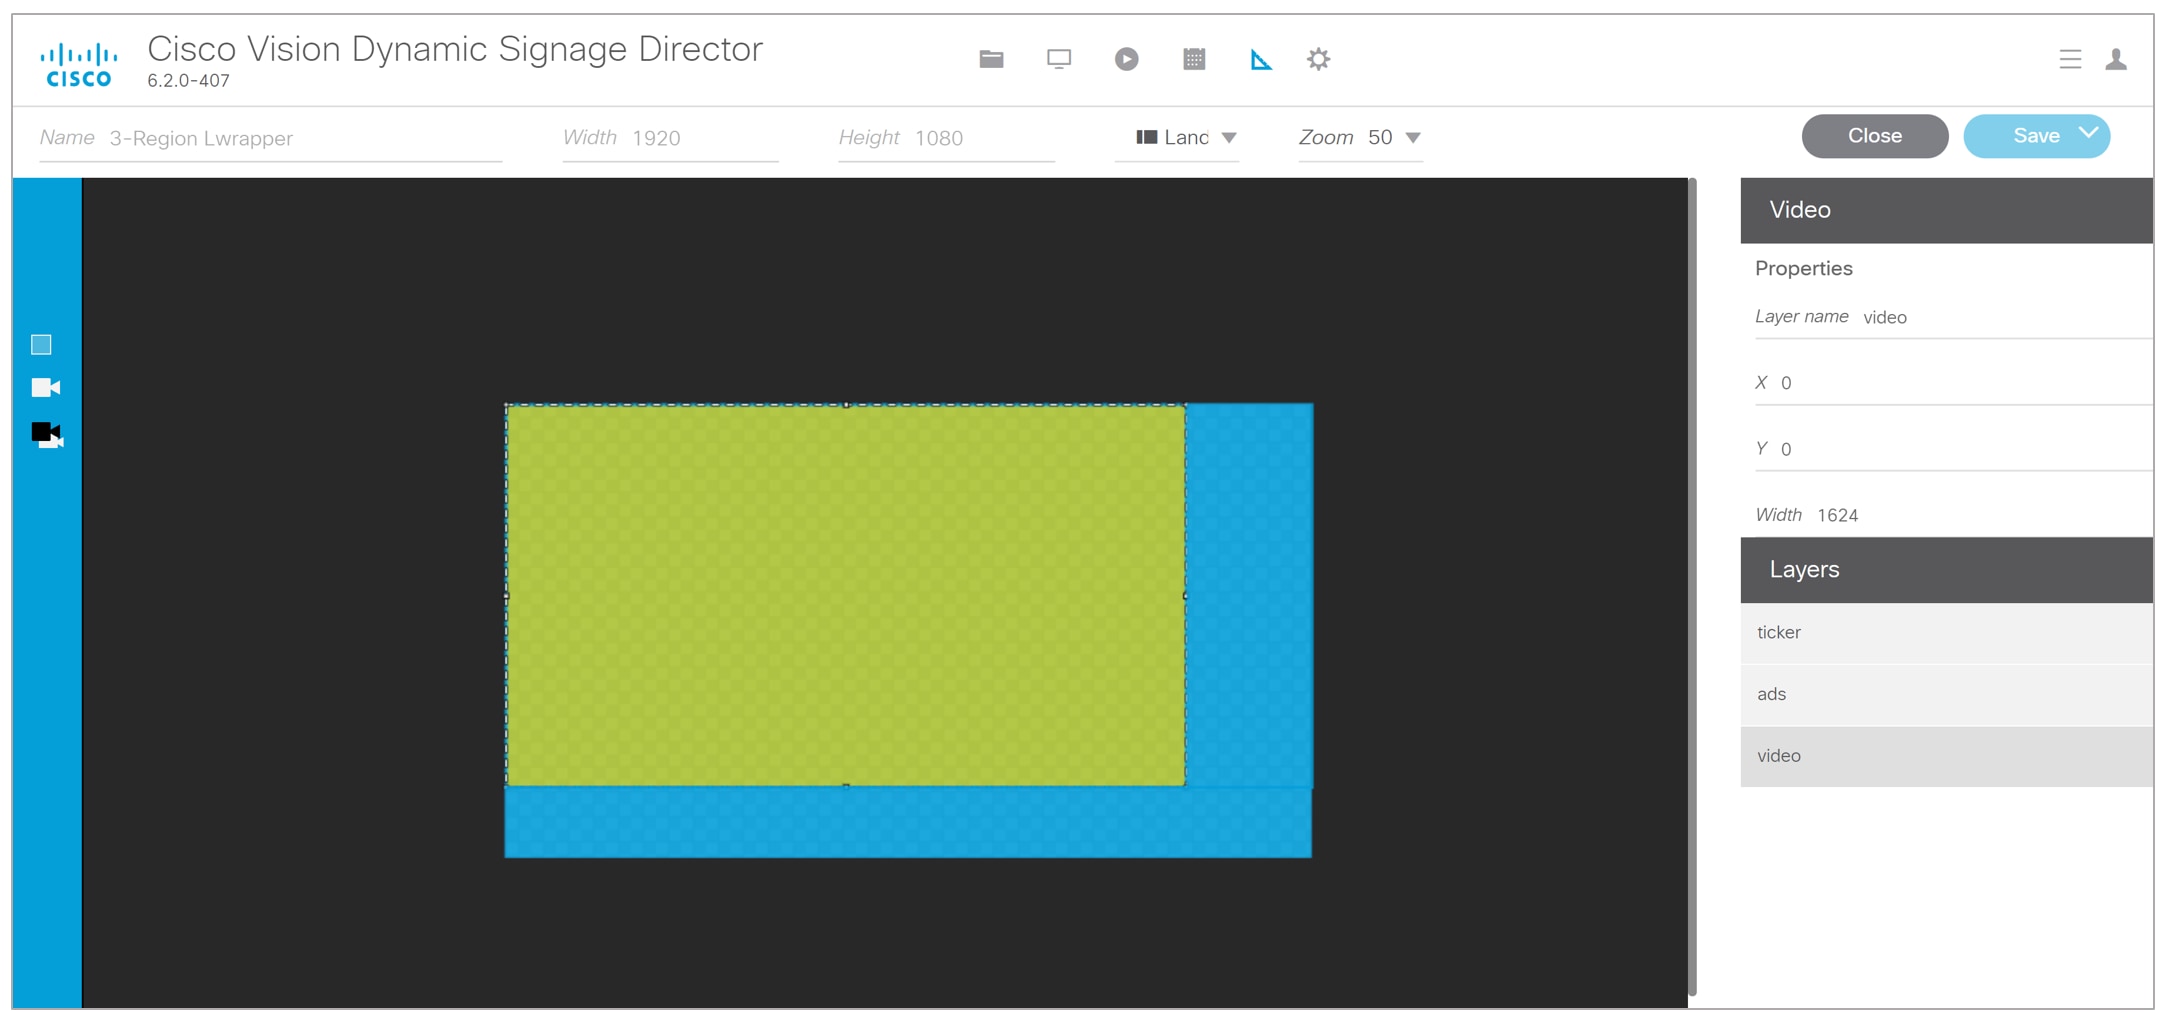
Figure 5 shows an example of the content for the 3-Region Lwrapper template that comes standard with Cisco Vision Director. This is a fixed screen template and cannot be customized. Table 5 shows the template dimensions.
Figure 5 3-Region Lwrapper Template
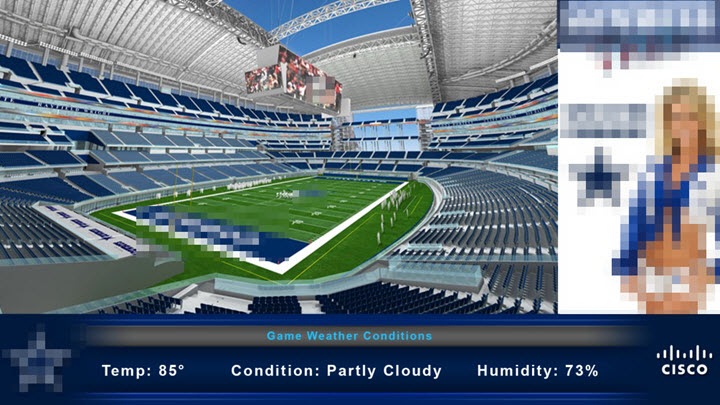
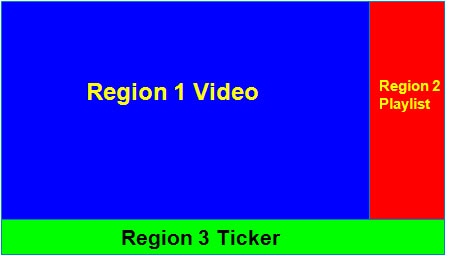
Table 5 3-Region Lwrapper Region Template Dimensions
|
|
|
|---|---|
|
|
|
|
|
|
|
|
|
Table 6 lists the characteristics of the 3-Region Lwrapper screen template.
Table 6 3-Region Lwrapper Screen Template Characteristics
Full Screen Dual Video Default Template
A full screen dual video default template is available for the DMPs. Dual video regions allow you to overlay two video regions; a secondary local or multicast video region and a primary video region.
The dual video template provides the following capabilities:
■![]() Show two video feeds at the same time.
Show two video feeds at the same time.
■![]() Place video-based advertisements.
Place video-based advertisements.
■![]() Promote a moment of exclusivity during an event.
Promote a moment of exclusivity during an event.
■![]() Apply luminance (luma) keying to the secondary video region.
Apply luminance (luma) keying to the secondary video region.
For video content with UHD resolution on the SV-4K, CV-UHD, and CV-UHD2 digital media players, you cannot apply a luma key. Luma keying is only supported for dual video when an HD video in the secondary region uses a luma key over a UHD video in the primary region.
Table 7 lists the specifications of the dual video regions.
Table 7 Full Screen Dual Video Template Specifications
Note : The luma key default is set to #ff2000. To enable luma keying, scroll down the Properties panel and click the checkbox (Figure 6).
Figure 6 Enable Luma Keying in the Properties Panel
To change the global luma key value:
1.![]() Go to More > Management Dashboard > Dynamic Signage Director Configuration > System Configuration > Global DMP Settings > Default - Audio/Video/Closed Caption .
Go to More > Management Dashboard > Dynamic Signage Director Configuration > System Configuration > Global DMP Settings > Default - Audio/Video/Closed Caption .
Custom Screen Templates
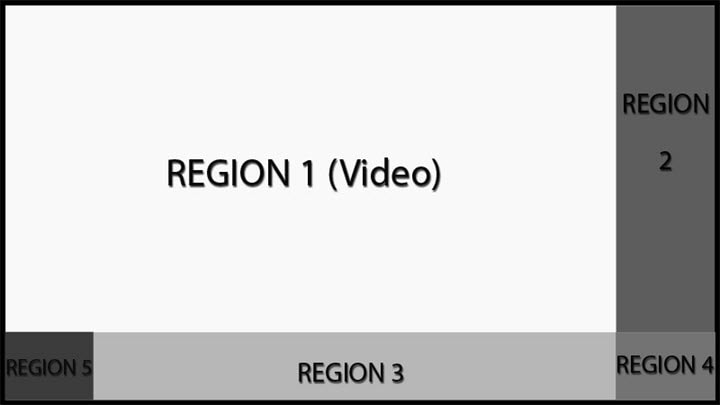
Custom screen templates allow you to change the size and arrangement of content regions on the screen to fit your sponsor and venue needs. Figure 7 shows an example of some custom screen templates.
Figure 7 Custom Screen Template Example
Custom Overlay Screen Templates
Overlay screen templates are custom templates that allow a non-video region (graphics) to overlap a video (or mixed media) region on the DMPs.
TIP: On the DMP, you can also create a custom template that allows for dual video regions or you can use the default full screen dual video template. See Full Screen Dual Video Default Template.
This overlay feature can be assigned to any region. Using the overlay feature you can display:
■![]() A full-screen video (or mixed media) region with a full-screen non-video (graphics) content region overlaid on top.
A full-screen video (or mixed media) region with a full-screen non-video (graphics) content region overlaid on top.
■![]() A brand/graphic overlaid in a small region of the screen.
A brand/graphic overlaid in a small region of the screen.
■![]() A ghosted brand/graphic such as a transparent logo where some of the colors in the logo are transparent and others are not.
A ghosted brand/graphic such as a transparent logo where some of the colors in the logo are transparent and others are not.
Note : When creating an overlay screen template on the digital media player that has a primary video and a non-video region on top, be sure the image is designed to fit on the canvas. If the image is placed off the canvas, only part of the image will appear.
The recommended file format for graphics when using an overlay template is 8-bit or 24-bit PNG (transparent pixels supported). When you create the PNG file, you must make the pixels transparent for the full-size video region. JPG files are not recommended because they do not preserve transparency.
How to Configure Screen Templates
This section includes the following topics:
■![]() General Guidelines for All Screen Templates
General Guidelines for All Screen Templates
■![]() Guidelines for Custom Screen Templates
Guidelines for Custom Screen Templates
■![]() Understanding the Templates Screen
Understanding the Templates Screen
■![]() Creating Custom Screen Templates
Creating Custom Screen Templates
■![]() Setting the Size and Position of a Region on the Template Canvas
Setting the Size and Position of a Region on the Template Canvas
General Guidelines for All Screen Templates
When creating screen templates and populating content, consider the following:
■![]() Templates are ordered by name.
Templates are ordered by name.
■![]() For Proof of Play, you can have more than one region with an ad playlist.
For Proof of Play, you can have more than one region with an ad playlist.
■![]() Regions are listed from top-to-bottom layer order, where the top layer appears at the top of the list.
Regions are listed from top-to-bottom layer order, where the top layer appears at the top of the list.
■![]() Layers are numbered, if a screen template contains a non-video region and a video or mixed media region, the video or mixed media region always appears at the bottom of the list.
Layers are numbered, if a screen template contains a non-video region and a video or mixed media region, the video or mixed media region always appears at the bottom of the list.
Note : You can manually drag a video region to be on top of other regions; however, the rendering of the regions below the video region will not be predictable and can be completely invisible.
■![]() A box icon adds a non-video region.
A box icon adds a non-video region.
■![]() A video icon adds a video or mixed media region.
A video icon adds a video or mixed media region.
■![]() Switching a non-video region to a video region might produce a warning if there is already an existing video region.
Switching a non-video region to a video region might produce a warning if there is already an existing video region.
■![]() Saving an existing template with regions removed will produce a force dialog for confirmation. In addition, when a template that is used in an event script is edited (including when one is adding a region) a force dialog appears for confirmation. You should also edit the scripts that use the changed template to verify that the added or removed regions contain the appropriate content and changes occur as expected.
Saving an existing template with regions removed will produce a force dialog for confirmation. In addition, when a template that is used in an event script is edited (including when one is adding a region) a force dialog appears for confirmation. You should also edit the scripts that use the changed template to verify that the added or removed regions contain the appropriate content and changes occur as expected.
Note : Cisco Vision Director supports HD/SD and video content with UHD resolution (local and streaming video) on the SV-4K, CV-UHD, and CV-UHD2 digital media players. Graphics with UHD resolution are not supported. The DMP-2K media players only support HD/SD content.
Guidelines for Custom Screen Templates
Consider the following guidelines when creating custom screen templates:
■![]() Regions can contain non-video content (static graphics), video, or a combination of both (in a mixed media region).
Regions can contain non-video content (static graphics), video, or a combination of both (in a mixed media region).
■![]() The number of allowable regions will vary based on the media player.
The number of allowable regions will vary based on the media player.
■![]() Up to 5 regions are supported for each screen template, more than 5 may cause degradation. Results may vary depending on what type of non-video content is used. For example, a very simple widget may not cause degradation but a very complex widget could.
Up to 5 regions are supported for each screen template, more than 5 may cause degradation. Results may vary depending on what type of non-video content is used. For example, a very simple widget may not cause degradation but a very complex widget could.
Table 8 provides the number of content regions that you can have when creating custom templates.
Table 8 Number of Allowed Content Regions When Creating Custom Templates
|
|
|
|---|---|
|
|
|
|
|
|
|
|
|
■![]() A custom template designed for DMPs can contain up to two video regions.
A custom template designed for DMPs can contain up to two video regions.
Note : The digital media players do not support dual UHD video regions.
–![]() Using luma keying on video region 2, you can enable select areas of video region 1 content to be visible through video region 2.
Using luma keying on video region 2, you can enable select areas of video region 1 content to be visible through video region 2.
–![]() You can change the order of the video regions by changing their relative layer order in the template.
You can change the order of the video regions by changing their relative layer order in the template.
■![]() When layering regions, the non-video content (graphics, widgets, etc.) will always appear above the video content.
When layering regions, the non-video content (graphics, widgets, etc.) will always appear above the video content.
IMPORTANT: When layering two video/mixed media regions on the DMPs, if the playlist for the first video/mixed media region includes both video and non-video content, then the non-video content in the first region will always appear on top of the video in the second video region. Name the layers with “top” or “bottom” so that “Layer1Bottom” will be covered by “Layer2Top.”
If you must include non-video content in region 1, then a workaround is to create a local video of the static content and use that in the playlist so that it remains in the primary region.
■![]() To optimize performance, the video and graphic aspect ratio sizes should match the aspect ratio of the region. Multi-screen template stretching is not currently supported on DMPs.
To optimize performance, the video and graphic aspect ratio sizes should match the aspect ratio of the region. Multi-screen template stretching is not currently supported on DMPs.
■![]() All regions must fit within the 1920x1080 dimensions. If you are using an overlay, then you can have two regions that are both 1920x1080.
All regions must fit within the 1920x1080 dimensions. If you are using an overlay, then you can have two regions that are both 1920x1080.
Note : DMPs support negotiation to many resolutions. When the negotiated resolution is less than 1920x1080, the template will be cropped to that lower resolution.
Understanding the Templates Screen
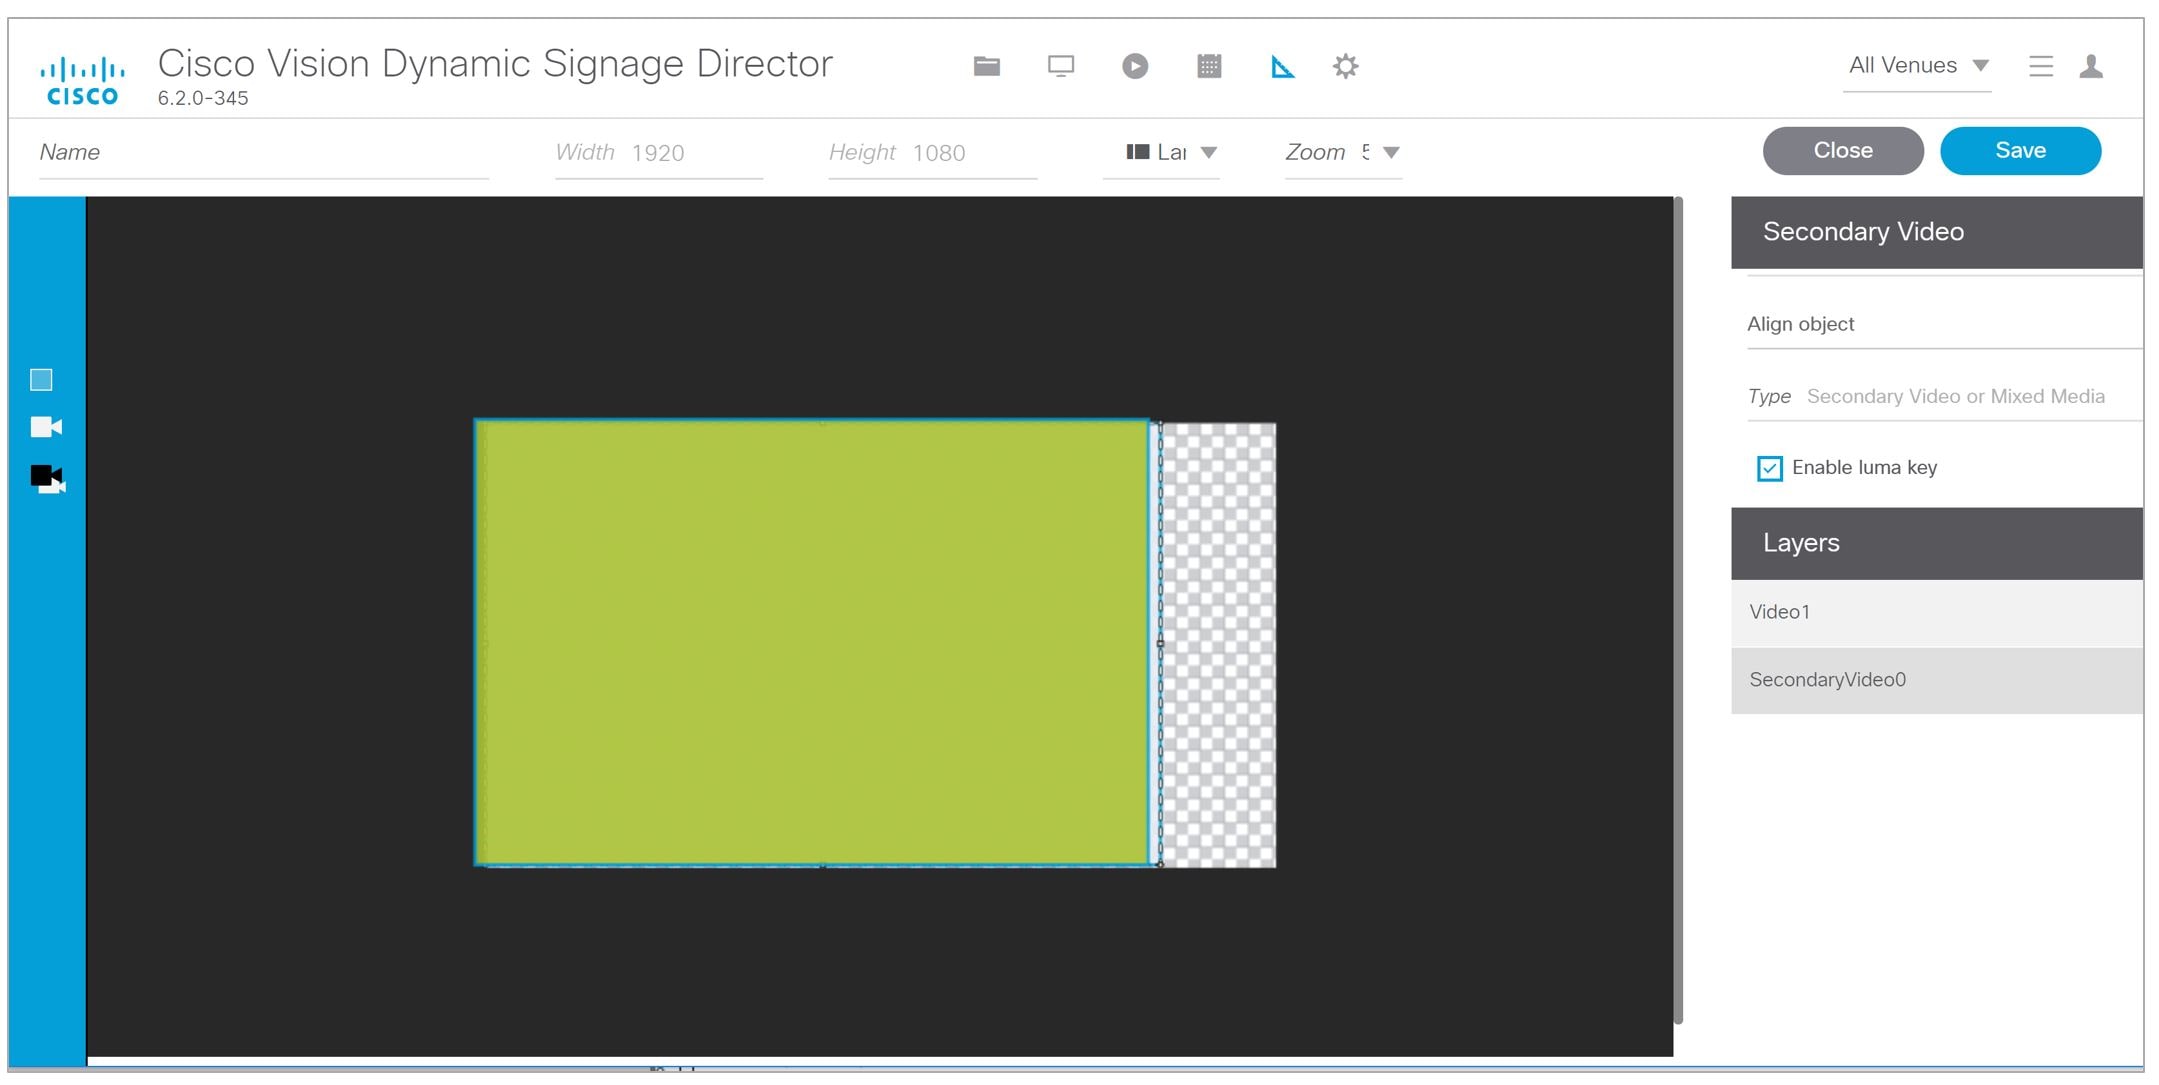
Figure 8 shows the Full Screen Dual Video Template, one of the four default templates.
Figure 8 Templates Screen Navigation
The left panel has Non-Video Region, Primary Video Region, and Secondary Video Region icons.
Choose Landscape or Portrait orientation for your content.
Choose a zoom percent from the drop down.
Click Layer name, type in a name and set the X, Y, Width, Height, Align object, Type, and click the Enable luma key box metadata (if needed).
Creating Custom Screen Templates
User Role: Administrator / Content Manager
There are two ways that you can create new custom screen templates in Cisco Vision Director:
■![]() Adding a new template for which you define all properties and regions.
Adding a new template for which you define all properties and regions.
■![]() Copying from the default standard templates or another existing template to leverage the same properties and regions.
Copying from the default standard templates or another existing template to leverage the same properties and regions.
Default templates (indicated by a lock icon to the left of the template name) can be copied but not modified.
Adding a New Template
The default view is List View for templates. Select a template and use the icons above the list.
1.![]() Go to Designer > Templates.
Go to Designer > Templates.
2.![]() Click New Template “ + ” icon. A new template appears.
Click New Template “ + ” icon. A new template appears.
3.![]() Type a new name. For suggestions on naming conventions, see the Naming Screen Templates.
Type a new name. For suggestions on naming conventions, see the Naming Screen Templates.
4.![]() Add one or more regions (up to 5).
Add one or more regions (up to 5).
Copying From an Existing Template
An alternative way to create a new template is to copy an existing template that you have already customized, or copy from one of the default system templates. This method saves you time and includes all of the properties from the copied template.
1.![]() Go to Designer > Templates.
Go to Designer > Templates.
2.![]() Select the template, click Copy. “Copy of...” the template you chose appears.
Select the template, click Copy. “Copy of...” the template you chose appears.
3.![]() Select the template name and click Rename icon. The Rename dialog box appears.
Select the template name and click Rename icon. The Rename dialog box appears.
4.![]() Type a new name. Click OK. For suggestions on naming conventions, see the Naming Screen Templates.
Type a new name. Click OK. For suggestions on naming conventions, see the Naming Screen Templates.
6.![]() (As required) Modify the region properties and layers.
(As required) Modify the region properties and layers.
Note: Another way to copy/create a new template is to open an existing template, click Edit to make changes, then click Save As. Type in a new name in the dialog box.
Naming Screen Templates
When naming screen templates, use meaningful abbreviations within the name to help you identify it. For example:
■![]() Use “FV” in the name to indicate the screen template is for full-screen video
Use “FV” in the name to indicate the screen template is for full-screen video
■![]() Use “LW” to indicate the screen template is for an Lwrapper.
Use “LW” to indicate the screen template is for an Lwrapper.
Additionally, you can include other pertinent information such as “beer” for a playlist that only has beer advertisements in it or “BrandY” for a playlist that only has BrandY products in it.
Setting the Size and Position of a Region on the Template Canvas
User Role: Administrator / Content Manager
There are several ways that you can modify the size and position of a region on the template canvas.
Resizing a Region
IMPORTANT: For the DMPs, the Width and Height of the template canvas must match the content resolution and/or aspect ratio. For more information, see Canvas and Template Resolution.
■![]() Select a handle of the region box and drag it to enlarge or shrink that dimension of the region.
Select a handle of the region box and drag it to enlarge or shrink that dimension of the region.
■![]() For a more precise result, type the actual pixel value in the Width and Height properties.
For a more precise result, type the actual pixel value in the Width and Height properties.
Repositioning a Region
TIP: X and Y values should be 0, 0 when creating fullscreen template regions. The upper left corner (0,0) position is the starting point for all templates.
To reposition a region, you can:
■![]() Select a region (layer) and drag it on the canvas to change its position (offset).
Select a region (layer) and drag it on the canvas to change its position (offset).
■![]() For a specific position, type the actual pixel offset values:
For a specific position, type the actual pixel offset values:
–![]() X—(Horizontal offset) Number of pixels to indent the content from the left side of the canvas.
X—(Horizontal offset) Number of pixels to indent the content from the left side of the canvas.
–![]() Y—(Vertical offset) Number of pixels to indent the content from the top of the canvas.
Y—(Vertical offset) Number of pixels to indent the content from the top of the canvas.
■![]() To change the layer order of a region on the canvas, go to the Regions list box and drag and drop the region up or down to change its order.
To change the layer order of a region on the canvas, go to the Regions list box and drag and drop the region up or down to change its order.
IMPORTANT: A multicast video layer should always be the bottom layer (Layer 1). Make sure all video regions are nearest the bottom.
How to Use Luma Keying for Dual Video Templates
Note : Dual video luminance keying is not supported by the CV-HD or CV-HD2 media players.
This section includes the following topics:
■![]() Understanding How the Luma Key Works
Understanding How the Luma Key Works
■![]() Modifying the Default Luma Key Value
Modifying the Default Luma Key Value
Understanding How the Luma Key Works
Luminance keying is used to filter the brightness level of content. Based on the key value, a range of brighter and darker pixels are filtered out and made transparent.
Luma Key Examples
Luma keys are useful when you want to overlay video content over the multicast stream of a live event using dual video regions.
Figure 9 shows an example of overlaying “GOAL” to highlight a moment of exclusivity during a game.
Figure 9 Goal Overlaying Game Stream

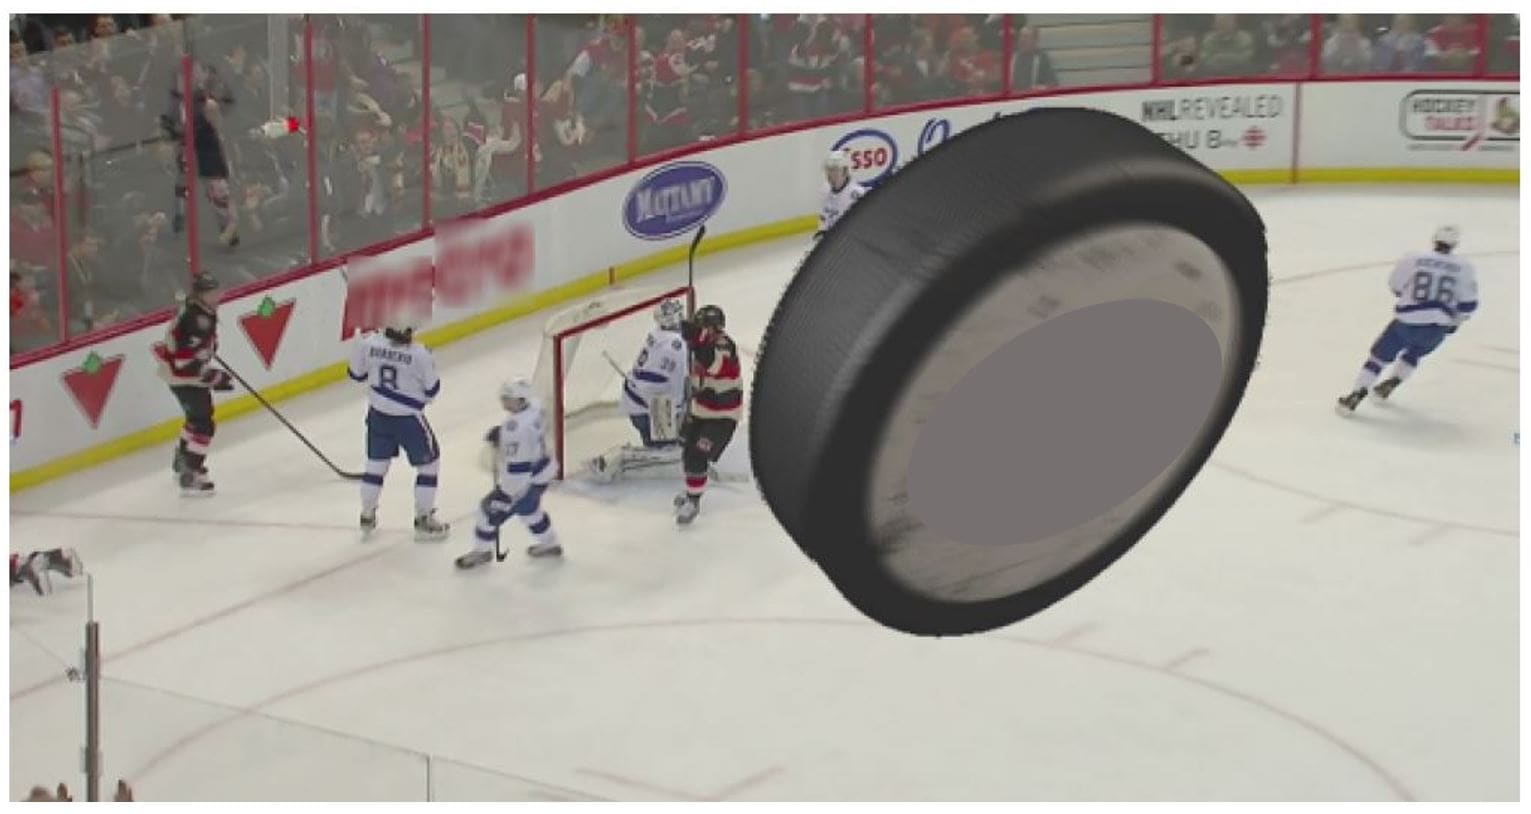
Figure 10 shows an example of a hockey puck moving over the game stream to highlight a goal during the game.
Figure 10 Flying Hockey Puck Overlaying Game Stream After Goal
Modifying the Default Luma Key Value
The Luma key property is set globally for all digital media players in the system. It can be enabled or disabled per dual video template from the Designer > Templates screen while editing the template.
TIP: Contact the Cisco Vision Customer Experience (CX) Digital Media Services team for guidance on how to effectively use and set the luma key value for your content needs.
The Luma key property is a 6-digit hexadecimal value that is set to #ff2000 by default. Table 9 shows the format of the hexadecimal key and how the bits are interpreted.
|
|
|
|
|---|---|---|
|
|
|
|
With the default value, content with the luma of 0xff is masked (left unchanged), and content with luma values in the range of 0x00 to 0x20 (the darker pixels) are filtered from the content and made transparent.
To disable the luma key property globally for all DMPs, do not set a value (Figure 11). If the Luma key property is blank, then no masking will be applied even if the option is set on the template.
To modify the default luma key value:
1.![]() Go to More > Management Dashboard > Dynamic Signage Director Configuration > System Configuration > Global DMP Settings > Audio/Video/Closed Caption .
Go to More > Management Dashboard > Dynamic Signage Director Configuration > System Configuration > Global DMP Settings > Audio/Video/Closed Caption .
2.![]() In the Configuration Property box, find the Luma key property (Figure 11).
In the Configuration Property box, find the Luma key property (Figure 11).
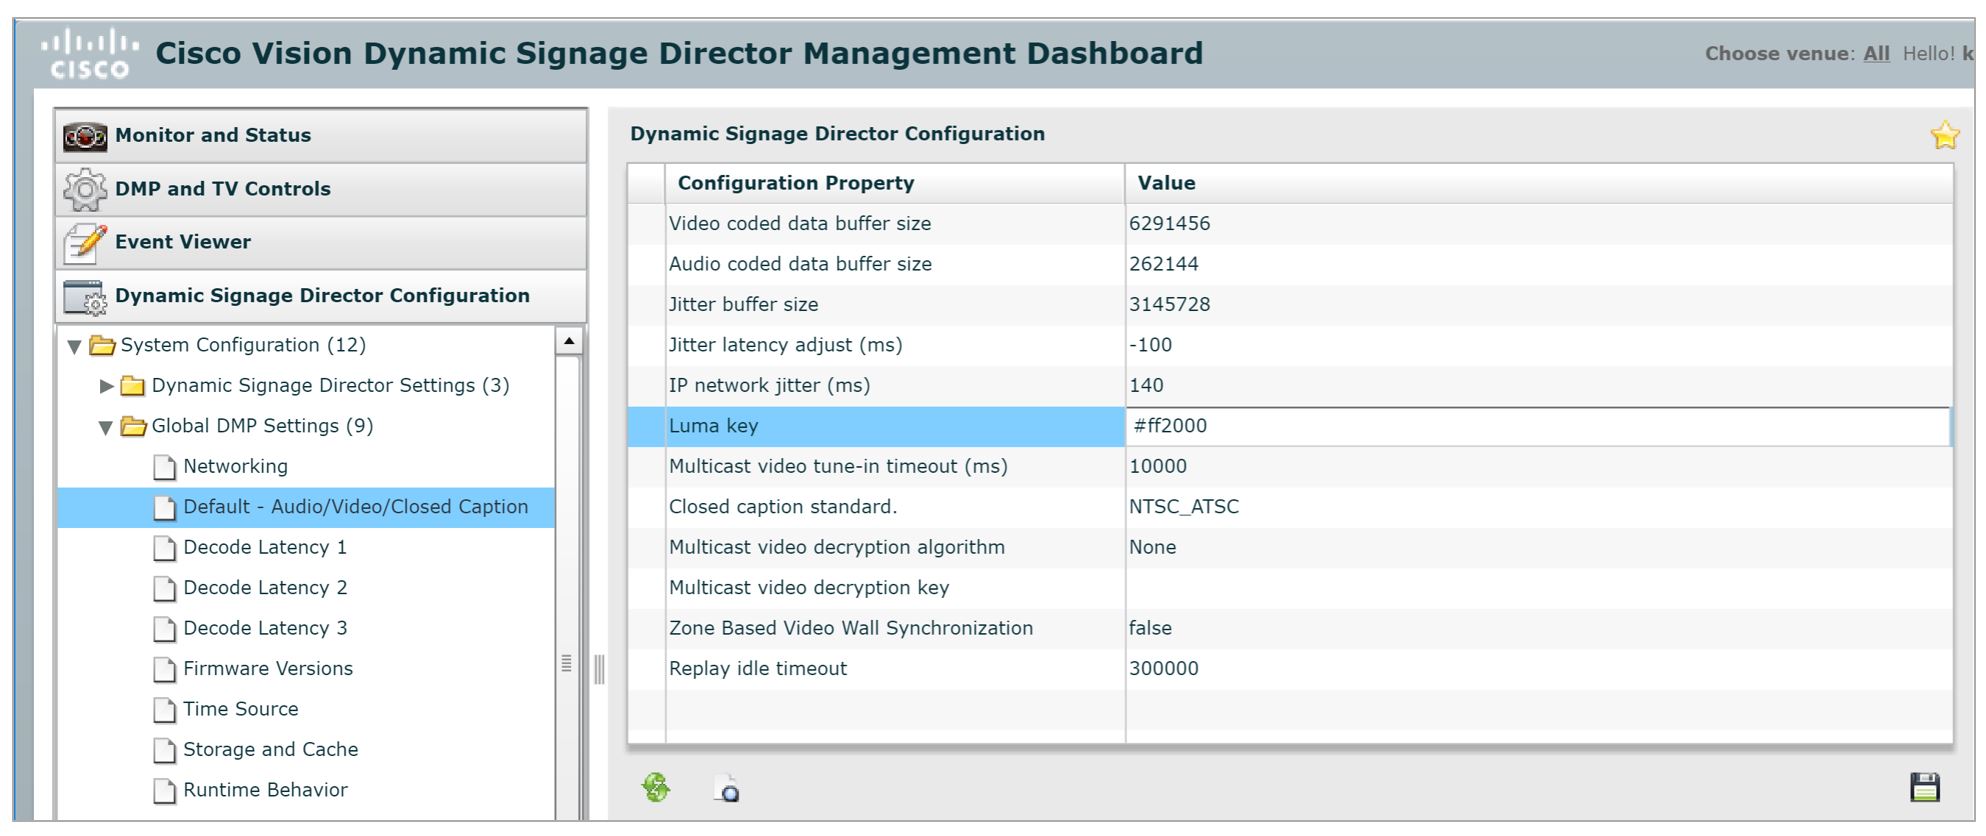
3.![]() In the value box, type the 6-digit hexadecimal value beginning with the # sign.
In the value box, type the 6-digit hexadecimal value beginning with the # sign.
4.![]() Click the disk icon to save your changes.
Click the disk icon to save your changes.
TIP: You do not need to reset the media player to apply the new value. Whenever a script starts, the digital media player retrieves the global settings.
 Feedback