Release 2.0: Cisco StadiumVision Mobile Reporter Administration Guide
Bias-Free Language
The documentation set for this product strives to use bias-free language. For the purposes of this documentation set, bias-free is defined as language that does not imply discrimination based on age, disability, gender, racial identity, ethnic identity, sexual orientation, socioeconomic status, and intersectionality. Exceptions may be present in the documentation due to language that is hardcoded in the user interfaces of the product software, language used based on RFP documentation, or language that is used by a referenced third-party product. Learn more about how Cisco is using Inclusive Language.
- Updated:
- October 17, 2014
Chapter: Configuring the Cisco StadiumVision Mobile Reporter Server
- Configuring Cisco StadiumVision Mobile Reporter for Service Quality Reporting
Configuring the Cisco StadiumVision Mobile Reporter Server
First Published: October 17, 2014
This module is intended for the system installer and administrator (admin user) to set up the Cisco StadiumVision Mobile Reporter system. It includes the following sections:
- Configuring Cisco StadiumVision Mobile Reporter for Service Quality Reporting (required)
- Uploading Event Schedule Information to Cisco StadiumVision Mobile Reporter (required)
- Uploading Test Points to StadiumVision Mobile Reporter (optional)
- Configuring Performance Mode for StadiumVision Mobile Reporter (as required)
For other server configuration information not documented in this module, see also the “Cisco StadiumVision Mobile Reporter Text Utility Interface” module.
Configuring Cisco StadiumVision Mobile Reporter for Service Quality Reporting

Note![]() Beginning in Release 2.0, the Reporter application supports a new mechanism to upload AP names using a CSV file.
Beginning in Release 2.0, the Reporter application supports a new mechanism to upload AP names using a CSV file.
Although AP names and areas can still be discovered through integration with Cisco Prime Infrastructure in Release 2.0, the CSV upload method is preferred and recommended to provision this AP information.
Integration with Cisco PI is configured to allow the Reporter application to track the total number of WiFi clients in the venue to provide data for the WiFi clients marketing report and for calculation of the Event Scorecard Uptake Score.
- Uploading AP Information to StadiumVision Mobile Reporter (preferred)
- Configuring Cisco Prime Infrastructure Integration for Cisco StadiumVision Mobile Reporter (optional)
Uploading AP Information to StadiumVision Mobile Reporter
Complete this task to map each access point (AP) to an AP area so that you can obtain client reports in Cisco StadiumVision Mobile Reporter.
Prerequisites for Uploading AP Information
The admin user can download a template spreadsheet file to use as an example for specifying the AP information. See the “Information About Uploading Data” section.

Be sure that you have the following information before uploading access point (AP) information to Cisco StadiumVision Mobile Reporter:
Procedure
To create and upload AP information, complete the following steps:
Step 1![]() Log into the Cisco StadiumVision Mobile Reporter as admin.
Log into the Cisco StadiumVision Mobile Reporter as admin.
The “Upload Access Point (AP) names” screen is displayed.
Step 4![]() To access a sample template from which to specify your AP data, click Download a template.
To access a sample template from which to specify your AP data, click Download a template.
a.![]() Open or save the sample apnames.xlsx file.
Open or save the sample apnames.xlsx file.
b.![]() Populate the spreadsheet with the appropriate AP data.
Populate the spreadsheet with the appropriate AP data.
c.![]() Save the spreadsheet as Unicode Text format, with a .txt file extension.
Save the spreadsheet as Unicode Text format, with a .txt file extension.
Step 5![]() From the “Upload Access Point (AP) names” screen, click Browse and navigate to the.txt file that you created in the previous step.
From the “Upload Access Point (AP) names” screen, click Browse and navigate to the.txt file that you created in the previous step.![]()
Step 6![]() Click Upload to load the AP names.
Click Upload to load the AP names.
Configuring Cisco Prime Infrastructure Integration for Cisco StadiumVision Mobile Reporter
In this method of obtaining AP information for service quality reporting, Cisco StadiumVision Mobile Reporter uses the Cisco Prime Infrastructure (PI) interface, and retrieves AP area information using rules from the data in PI.
Prerequisites for Cisco PI Server Configuration
Before you configure Cisco PI integration, be sure that you have met the following requirements:
- An SVM user account (name and password) is configured with access to the API on the PI server. See the “Cisco PI User Account Configuration Example” section.
- You have the following information:
–![]() IP address of the PI server.
IP address of the PI server.
–![]() The SVM user account (username and password) on the PI server.
The SVM user account (username and password) on the PI server.
Cisco PI User Account Configuration Example
In Cisco PI, an SVM user account needs to be configured with permissions to access the API on Prime Infrastructure.
Figure 1 shows how to add an SVM user and define a custom User Defined Group.

Figure 2 shows the User Defined Group permissions to configure for access to the Cisco StadiumVision Mobile Reporter API calls.
Figure 2 Prime Infrastructure Settings for Cisco StadiumVision Mobile Reporter API Calls

Configuring Cisco PI Integration on Cisco StadiumVision Mobile Reporter
To configure Cisco PI integration on Cisco StadiumVision Mobile Reporter, complete the following steps:
For more information, see the “Logging Into the TUI” section.
Step 2![]() From the Main Menu, go to System
From the Main Menu, go to System![]() Settings > External System
Settings > External System![]() s > Configure Prime Infrastructure (PI) system
s > Configure Prime Infrastructure (PI) system![]() .
.
A series of configuration prompts appear to step you through entering the PI server integration information.
Step 3![]() At the prompts, type the following information:
At the prompts, type the following information:
- IP address of the PI server.
- Username and password of the account configured on the PI server for SVM access.
- The network SSIDs to be used, separated by commas. If the SSID contains a space, surround it with double quotes as shown in the following example:
After you complete entering the PI server information, return to the External Systems menu.
Step 4![]() To verify the configuration, select View Prime Infrastructure (PI) Configuration.
To verify the configuration, select View Prime Infrastructure (PI) Configuration.
Step 5![]() Confirm the PI configuration information that appears has been correctly specified.
Confirm the PI configuration information that appears has been correctly specified.
Modifying the AP Name Field Prefix
Note![]() This task is only used when obtaining AP information for Cisco StadiumVision Mobile Reporter from Cisco PI. It is no longer needed when using the recommended CSV file upload method to provision AP information.
This task is only used when obtaining AP information for Cisco StadiumVision Mobile Reporter from Cisco PI. It is no longer needed when using the recommended CSV file upload method to provision AP information.
This task allows you to group common characters found in AP names and group them for AP area reporting. AP names frequently are defined in parts that describe the locations of those APs in a venue. For example, “SJC1-LOWER-A100-3” might be an AP name for the third AP located in the “SJC1-LOWER-A100” section of the venue. In this task, you can define an Area for all AP names using these first three parts of the AP name: “SJC1-LOWER-A100.”
To modify the AP name prefix, complete the following steps:
Step 1![]() Log on with an snetac account to access the command line prompt.
Log on with an snetac account to access the command line prompt.
Step 2![]() Change directory to /var/svm/config.
Change directory to /var/svm/config.
Step 3![]() Edit the variables.xml file.
Edit the variables.xml file.
At the bottom, you will find two lines.
The first contains “AP_AREA_REGEX”. This line contains a regular expression to match the AP name. It contains regex 'grouping' operators which are parentheses. These parentheses mean 'take any characters inside the parentheses and assign it to a variable. The variable resulting starts with a $ and has a number, sequential based on reading the regex left to right.
The next line contains AP-AREA_REPLACEMENT. This uses those groupings found above.
Enabling or Disabling Cisco PI Integration
By default, the Cisco PI configuration is disabled on the Cisco StadiumVision Mobile Reporter server.
When Cisco PI integration is enabled, the Reporter application makes a call periodically (every 60 seconds) to the PI server to collect statistics.
To enable or disable Cisco PI integration, complete the following steps:
For more information, see the “Logging Into the TUI” section.
Step 2![]() From the Main Menu, go to System
From the Main Menu, go to System![]() Settings > External System
Settings > External System![]() s and do one of the following:
s and do one of the following:
The Cisco StadiumVision Mobile Reporter services are restarted and PI integration is either enabled or disabled.
Troubleshooting the Cisco PI Server Connection
To troubleshoot communication between Cisco StadiumVision Mobile Reporter and the Cisco PI server, complete the following steps:
For more information, see the “Logging Into the TUI” section.
Step 2![]() From the Main Menu, go to System
From the Main Menu, go to System![]() Settings > External System
Settings > External System![]() s > Test Prime Infrastructure (PI) Connection.
s > Test Prime Infrastructure (PI) Connection.
If you receive a JSON report after running the script, there the Cisco StadiumVision Mobile Reporter server has access to the Cisco PI server. If you receive an http or an error message, there is an issue.
Uploading Event Schedule Information to Cisco StadiumVision Mobile Reporter
The event schedule is used by the Cisco StadiumVision Mobile Reporter to know when event data is to be collected and processed into predefined reports and charts. The Event and Season reports depend on the event schedule to define a time period for each event and for the sports season.
This schedule is used to present the charts. When an event transpires, the Live Event reports will begin to show data from the start of the event. At some point in time after an event is over (the next night), the charts in categories for Event Report and Season Report will be updated with the latest summary data from the most recent event.
To create an event schedule, use the included template that you can get using the System Tools > Upload Event Schedule menu option when logged in as admin.
Information About Uploading Data
Note the following conditions about the event schedule and AP names:
- A spreadsheet application such as Microsoft Excel should be used to populate the spreadsheet.
- The spreadsheet should be saved as Unicode Text and a tab separated text file (a sample is shown in Figure 3).
The Upload Event Schedule dialog box contains a Download Template button and an Upload button to upload the populated spreadsheet.
Figure 3 Event Schedule Spreadsheet Sample
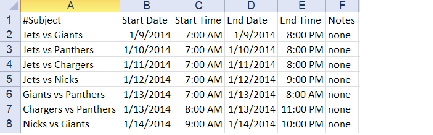
Note![]() Events can only be scheduled for single days (the Start Date and End Date must be the same day). Events cannot exceed 24-hours or be scheduled past midnight.
Events can only be scheduled for single days (the Start Date and End Date must be the same day). Events cannot exceed 24-hours or be scheduled past midnight.
To create and upload an event schedule, complete the following steps:
Step 1![]() Log into the Cisco StadiumVision Mobile Reporter as admin.
Log into the Cisco StadiumVision Mobile Reporter as admin.
Step 3![]() Click Upload Event Schedule.
Click Upload Event Schedule.
The “Upload an event schedule screen” is displayed showing the currently uploaded schedule.
Step 4![]() To access a sample template from which to specify your event data, click Download a template.
To access a sample template from which to specify your event data, click Download a template.
a.![]() Open or save the sample EventSchedule.xlsx file.
Open or save the sample EventSchedule.xlsx file.
b.![]() Populate the spreadsheet with the appropriate event data.
Populate the spreadsheet with the appropriate event data.
Note![]() You cannot change past events. For example, the current date is January 2 and in December you had uploaded an event for Jan 1 that went from 6-10pm, you cannot now re-upload that event and rename it nor change the times. You can only change names and times in the future. If you attempt to do this, the schedule will upload but no prior events will be changed.
You cannot change past events. For example, the current date is January 2 and in December you had uploaded an event for Jan 1 that went from 6-10pm, you cannot now re-upload that event and rename it nor change the times. You can only change names and times in the future. If you attempt to do this, the schedule will upload but no prior events will be changed.
c.![]() Save the spreadsheet as Unicode Text format, with a .txt file extension.
Save the spreadsheet as Unicode Text format, with a .txt file extension.
Step 5![]() From the “Upload an event schedule” screen, click Browse and navigate to the.txt file that you created in the previous step.
From the “Upload an event schedule” screen, click Browse and navigate to the.txt file that you created in the previous step.![]()
Step 6![]() Click Upload to load the event schedule.
Click Upload to load the event schedule.
Step 7![]() When the upload is complete, verify the information shown on the screen to confirm success.
When the upload is complete, verify the information shown on the screen to confirm success.
Troubleshooting Uploaded Data
If there are errors in the upload, an error form is displayed. The form indicates the line in the uploaded file that has the error, and a description of the problem. Examples of some errors are:
Uploading Test Points to StadiumVision Mobile Reporter
During deployment of Cisco StadiumVision Mobile at a venue, the deployment team can verify the WiFi performance throughout the venue using test points that are uploaded to Cisco StadiumVision Mobile Reporter and by running a special mobile application that reports on the manually-entered test point locations.
It is not expected that performance is uniform throughout the venue, so multiple locations should be selected by the deployment team to test performance quality. This allows the report "D: Location Performance" to be generated by the admin user in Cisco StadiumVision Mobile Reporter. If adjustments are needed, they can be made and the location can be re-tested.
Configuring Performance Mode for StadiumVision Mobile Reporter
Use Performance Mode when the expected number of clients is very large and not all functionality is required.
Note![]() If the expected number of mobile clients is 5000 or greater, it is recommended that Performance mode be enabled.
If the expected number of mobile clients is 5000 or greater, it is recommended that Performance mode be enabled.
Two things are affected when using Performance mode:
- The amount of logging is less verbose.
- The size of the memory heap is larger (20 GB) versus 15 GB in normal mode.
Enabling or Disabling Performance Mode
To enable or disable performance mode, complete the following steps:
For more information, see the “Logging Into the TUI” section.
Step 2![]() From the Main Menu, go to Services Control > Performance Mode and do one of the following:
From the Main Menu, go to Services Control > Performance Mode and do one of the following:
The Cisco StadiumVision Mobile Reporter services are restarted and Performance Mode is either enabled or disabled.
Verifying Performance Mode Configuration
If you need to verify whether Performance Mode is enabled or disabled you can display the status using the TUI.
To verify performance mode configuration, complete the following steps:
For more information, see the “Logging Into the TUI” section.
Step 2![]() From the Main Menu, go to Services Control > Performance Mode > Display Performance Mode Status.
From the Main Menu, go to Services Control > Performance Mode > Display Performance Mode Status.
The display shows whether Performance Mode is enabled or disabled.
Step 3![]() Press any key to return to the Performance Mode menu.
Press any key to return to the Performance Mode menu.
 Feedback