- Cisco StadiumVision Director Software Installation and Upgrade Guide
- Preface
- Getting Started Installing or Upgrading Cisco StadiumVision Director
- Upgrading a Cisco StadiumVision Director Server From Release 2.4 SP1 to Release 3.0
- Installing Cisco StadiumVision Director Software From a DVD
- Using the TUI Upgrade Utility
- Upgrading the CIMC and BIOS Firmware on a Cisco StadiumVision Director Platform 2 Server
- Migrating the Cisco StadiumVision Director Server Environment to Platform 2 from the Cisco ADE 2140 Series Appliance
- Installing Additional Hard Drives in the Cisco StadiumVision Director Platform 2 Server
- Appendix A: Post-Upgrade Checklist
- Appendix B: Port Reference
Cisco StadiumVision Director Software Installation and Upgrade Guide, Release 3.0
Bias-Free Language
The documentation set for this product strives to use bias-free language. For the purposes of this documentation set, bias-free is defined as language that does not imply discrimination based on age, disability, gender, racial identity, ethnic identity, sexual orientation, socioeconomic status, and intersectionality. Exceptions may be present in the documentation due to language that is hardcoded in the user interfaces of the product software, language used based on RFP documentation, or language that is used by a referenced third-party product. Learn more about how Cisco is using Inclusive Language.
- Updated:
- August 20, 2012
Chapter: Using the TUI Upgrade Utility
- Best Practices
- Prerequisites
- Information About Using the TUI Upgrade Utility to Update an Existing Release 3.0 Server
- Upgrade Tasks
- Verifying the Upgrade
- Clearing the Browser Cache
- Importing the Security Certificate
- Logging Into Cisco StadiumVision Director
- Verifying the Control Panel and Other Menus
- Checking for Duplicate MAC Address Entries
- Verifying that Services are Running
- Configuring the DMP 4310 Assigned VLAN Property for VLAN Compliance Check
- Verifying DMPs, Groups, and Zones in the Management Dashboard
- Verifying the Multicast Configuration
- Setting Up the Quest Venue Manager to Send Updates to Cisco StadiumVision Director Server
- What to Do Next
Using the TUI Upgrade Utility

Note ![]() If you are upgrading an existing Cisco StadiumVision Director server from Release 2.4 to Release 3.0, see the "Upgrading a Cisco StadiumVision Director Server from Release 2.4 SP1 to Release 3.0" module first.
If you are upgrading an existing Cisco StadiumVision Director server from Release 2.4 to Release 3.0, see the "Upgrading a Cisco StadiumVision Director Server from Release 2.4 SP1 to Release 3.0" module first.
This module describes how to upgrade an existing server already running Cisco StadiumVision Director, including installation of service packs. This procedure is also referred to generally as an ISO upgrade to refer to both the service pack and upgrade ISO process.
This module includes the following topics:
•![]() Information About Using the TUI Upgrade Utility to Update an Existing Release 3.0 Server
Information About Using the TUI Upgrade Utility to Update an Existing Release 3.0 Server
Best Practices
Before you begin upgrading an existing Cisco StadiumVision Director server, consider the following best practices:
•![]() Choose an appropriate down time to perform the upgrade on the Cisco StadiumVision Director server when there is adequate time to complete and verify the upgrade before any scheduled events and to allow time to resolve any unexpected issues that might occur.
Choose an appropriate down time to perform the upgrade on the Cisco StadiumVision Director server when there is adequate time to complete and verify the upgrade before any scheduled events and to allow time to resolve any unexpected issues that might occur.
•![]() Refer to the Release Notes for Cisco StadiumVision Director Release 3.0 for the latest information about hardware and software requirements, changes, important notes, and caveats for your software release.
Refer to the Release Notes for Cisco StadiumVision Director Release 3.0 for the latest information about hardware and software requirements, changes, important notes, and caveats for your software release.
•![]() Pay particular attention to the required hardware and software versions for other devices supporting your Cisco StadiumVision solution and be sure that you upgrade those devices as needed. For example, generally only certain firmware versions are supported for the DMP hardware, or a new firmware version is needed to provide additional functionality supported by the Cisco StadiumVision Director software.
Pay particular attention to the required hardware and software versions for other devices supporting your Cisco StadiumVision solution and be sure that you upgrade those devices as needed. For example, generally only certain firmware versions are supported for the DMP hardware, or a new firmware version is needed to provide additional functionality supported by the Cisco StadiumVision Director software.
•![]() Perform a backup and restore of the primary and secondary servers:
Perform a backup and restore of the primary and secondary servers:
–![]() Perform a backup of the currently active primary server.
Perform a backup of the currently active primary server.
–![]() Restore the backup data onto the standby secondary server.
Restore the backup data onto the standby secondary server.
–![]() Promote the secondary server to primary.
Promote the secondary server to primary.
–![]() Access the promoted secondary server to perform the upgrade.
Access the promoted secondary server to perform the upgrade.
For more information about performing a backup and restore on a Cisco StadiumVision Server, see the Backing Up and Restoring Cisco StadiumVision Director Servers guide.
Prerequisites
Be sure that the following requirements are met before you upgrade your server:
•![]() Your server is running a minimum of Cisco StadiumVision Director Release 2.4.0-168 or higher.
Your server is running a minimum of Cisco StadiumVision Director Release 2.4.0-168 or higher.
•![]() If you are upgrading your server from Release 2.4, you are following the requirements and tasks described in the "Upgrading a Cisco StadiumVision Director Server from Release 2.4 SP1 to Release 3.0" module in this guide.
If you are upgrading your server from Release 2.4, you are following the requirements and tasks described in the "Upgrading a Cisco StadiumVision Director Server from Release 2.4 SP1 to Release 3.0" module in this guide.
•![]() You have the IP address for the Cisco StadiumVision Director server where you want to upload the ISO upgrade image. You will need to use this information as part of the URL to access the ISO upload utility.
You have the IP address for the Cisco StadiumVision Director server where you want to upload the ISO upgrade image. You will need to use this information as part of the URL to access the ISO upload utility.
•![]() You have a supported browser version for Cisco StadiumVision Director. For more information about the latest supported browsers, see the Cisco StadiumVision Release Notes for Release 3.0.
You have a supported browser version for Cisco StadiumVision Director. For more information about the latest supported browsers, see the Cisco StadiumVision Release Notes for Release 3.0.
•![]() You have an installer account on the Cisco StadiumVision Director server.
You have an installer account on the Cisco StadiumVision Director server.
Information About Using the TUI Upgrade Utility to Update an Existing Release 3.0 Server
The ISO upgrade procedure for Cisco StadiumVision Director includes the following tasks:
1. ![]() Downloading an ISO service pack or upgrade file from the software download site on Cisco.com.
Downloading an ISO service pack or upgrade file from the software download site on Cisco.com.
2. ![]() Uploading the ISO file from your laptop to the Cisco StadiumVision Director server using the upload utility through your browser.
Uploading the ISO file from your laptop to the Cisco StadiumVision Director server using the upload utility through your browser.
3. ![]() Installing the ISO image using the upgrade utility in the Text Utility Interface (TUI).
Installing the ISO image using the upgrade utility in the Text Utility Interface (TUI).
ISO Upgrade Files
The ISO upgrade files are stored in the following location:
/var/www/cgi-bin/ISOupload
You can store multiple ISO upgrade files on a Cisco StadiumVision Director server. The files will be displayed with a sequence number and the ISO filename in the TUI upgrade utility for you to select which file to install.
Disk Maintenance
There is no automatic aging of ISO upgrade files or any utility to remove files from the Cisco StadiumVision Director server.
You should periodically maintain your disk storage by manually removing any ISO upgrade files that you no longer need.
Upgrade Tasks
To upgrade your Cisco StadiumVision Director server, complete the following tasks:
•![]() Downloading ISO Upgrade Files from Cisco.com (required)
Downloading ISO Upgrade Files from Cisco.com (required)
•![]() Uploading an ISO Upgrade File to the Cisco StadiumVision Director Server (required)
Uploading an ISO Upgrade File to the Cisco StadiumVision Director Server (required)
•![]() Installing the ISO Upgrade Image on the Cisco StadiumVision Director Server (required)
Installing the ISO Upgrade Image on the Cisco StadiumVision Director Server (required)
•![]() Verifying the Upgrade (required)
Verifying the Upgrade (required)
Downloading ISO Upgrade Files from Cisco.com
Be sure to download the upgrade files to a location, such as a laptop computer, where you can access them for installation onto the Cisco StadiumVision Director server.
To download an ISO upgrade file, complete the following steps:
Step 1 ![]() Go to the Cisco StadiumVision Director software download site at:
Go to the Cisco StadiumVision Director software download site at:
Note ![]() This site page is also available from the Cisco StadiumVision Director product support page by clicking Download Software > Cisco StadiumVision Director.
This site page is also available from the Cisco StadiumVision Director product support page by clicking Download Software > Cisco StadiumVision Director.
Step 2 ![]() Select the ISO upgrade or service pack file (as available), and optionally the companion MD5 checksum file, and download them.
Select the ISO upgrade or service pack file (as available), and optionally the companion MD5 checksum file, and download them.
Table 1 shows the filename conventions used for ISO upgrades.
|
|
|
|---|---|
64-bit Model SV-DIRECTOR-K9 or SV-PLATFORM2= |
• • |
1 "nnn" represents the build number of the image in the file. |
Table 2 shows the filename conventions used for service pack (SP) ISO upgrades.
|
|
|
|---|---|
64-bit Model SV-DIRECTOR-K9 or SV-PLATFORM2= |
• • |
1 "x' represents the ordered number of the service pack file. The first service pack is SP1. |
You can download the files using one of the following methods:
•![]() Download both files at one time—Select each file and click Add to Cart. Then at the top of the download page, click the "Download Cart (2 items)" link.
Download both files at one time—Select each file and click Add to Cart. Then at the top of the download page, click the "Download Cart (2 items)" link.
•![]() Download each file independently—Click the Download Now button in the file selection box for each file.
Download each file independently—Click the Download Now button in the file selection box for each file.
Step 3 ![]() (Optional) To verify the integrity of your upgrade file from the download, you can use a command-line or GUI utility on your laptop to calculate the checksum on the .iso file. Open the .md5sum file to compare the value that you calculated with the expected value provided in the .md5sum file.
(Optional) To verify the integrity of your upgrade file from the download, you can use a command-line or GUI utility on your laptop to calculate the checksum on the .iso file. Open the .md5sum file to compare the value that you calculated with the expected value provided in the .md5sum file.
The values should match. If they do not, retry the download.
Uploading an ISO Upgrade File to the Cisco StadiumVision Director Server
After you have downloaded the ISO upgrade file from Cisco.com, you need to upload the file to the Cisco StadiumVision Director server using a URL from a browser to access the ISO uploader utility. Once you have uploaded the software to the server, then you will use the TUI to install the upgrade image.
Prerequisites
Be sure that you know the IP address of the Cisco StadiumVision Director server where you want to upload the file, and you have a supported browser version for Cisco StadiumVision Director.
To upload an ISO upgrade file to the Cisco StadiumVision Director server, complete the following steps:
Step 1 ![]() Log into Cisco StadiumVision Director as an administrator.
Log into Cisco StadiumVision Director as an administrator.
Step 2 ![]() Open your browser, and to go the following URL, where x.x.x.x is replaced by the IP address of the server where you want to upload the upgrade software (Figure 1):
Open your browser, and to go the following URL, where x.x.x.x is replaced by the IP address of the server where you want to upload the upgrade software (Figure 1):
http://x.x.x.x/cgi-bin/isoupload.cgi
Figure 1 ISO Updater Utility
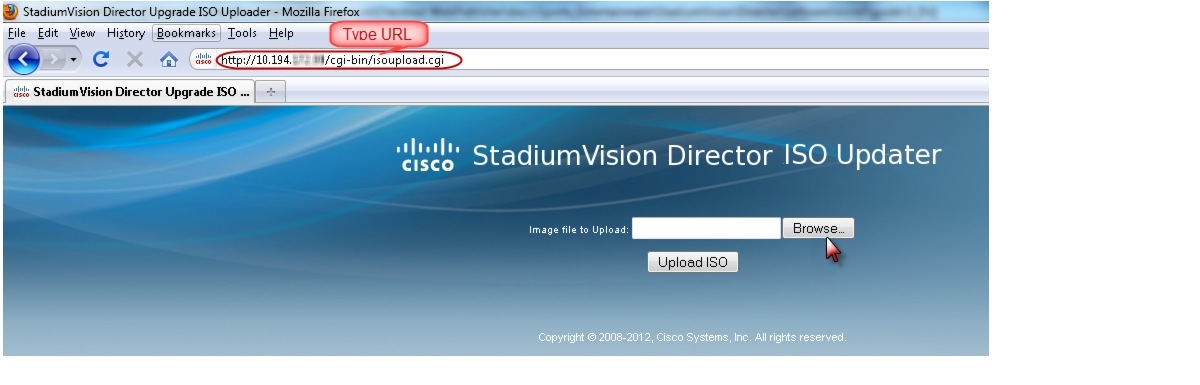
Step 3 ![]() Click Browse (Figure 1).
Click Browse (Figure 1).
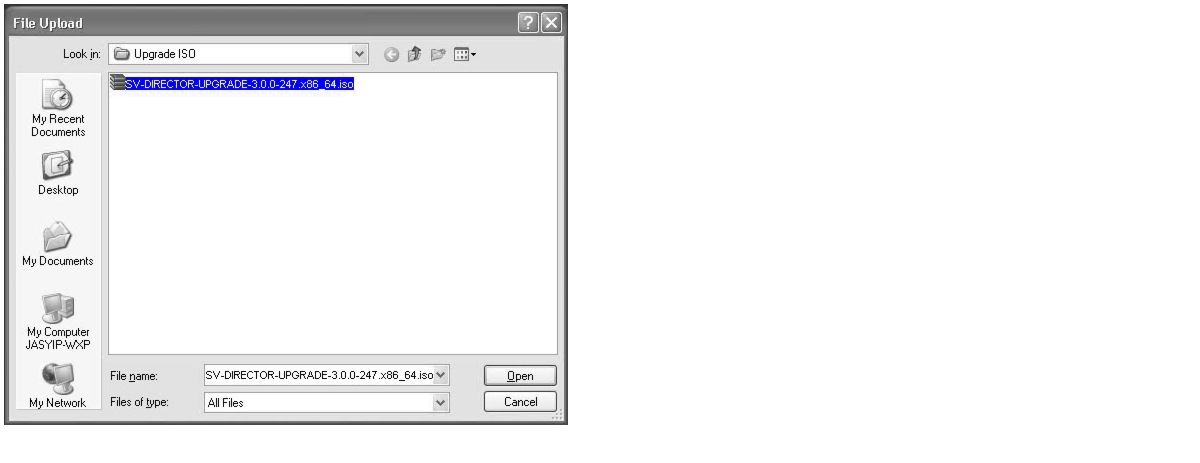
Step 4 ![]() From the File Upload dialog box, navigate to the location of the ISO upgrade file that you downloaded from Cisco.com. Select the file that you want to upload and click Open. Figure 2 shows an example of selection of a 64-bit ISO upgrade file.
From the File Upload dialog box, navigate to the location of the ISO upgrade file that you downloaded from Cisco.com. Select the file that you want to upload and click Open. Figure 2 shows an example of selection of a 64-bit ISO upgrade file.
Figure 2 File Upload Dialog Box
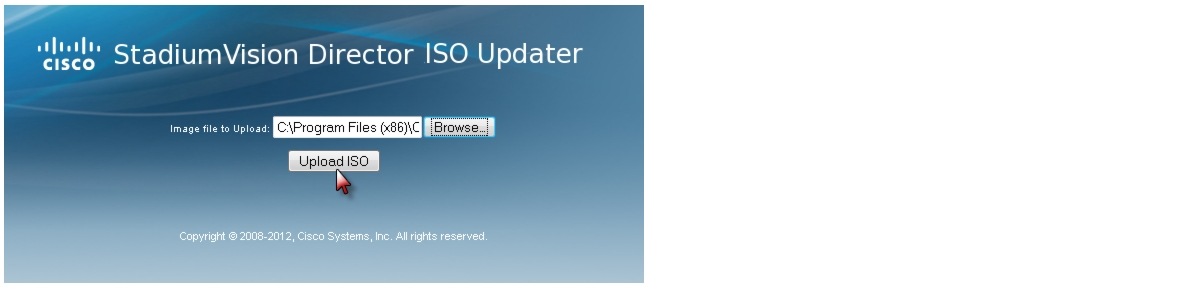
Step 5 ![]() Click the Upload ISO button (Figure 3). The file is sent to the server.
Click the Upload ISO button (Figure 3). The file is sent to the server.

Figure 3 ISO File Selection and Upload
When the ISO upload is complete, one of the following occurs:
•![]() Image integrity is verified before an image is stored on the server. When the image is validated and uploaded successfully, a message is displayed stating that the ISO image has been uploaded.
Image integrity is verified before an image is stored on the server. When the image is validated and uploaded successfully, a message is displayed stating that the ISO image has been uploaded.
•![]() The image upload failed for some reason and you will need to retry the upload again.
The image upload failed for some reason and you will need to retry the upload again.
Installing the ISO Upgrade Image on the Cisco StadiumVision Director Server
To install the ISO upgrade image on the Cisco StadiumVision Director server, complete the following steps:
Step 1 ![]() Use a directly connected console, or use an SSH client from a laptop computer that is connected to the Cisco StadiumVision Server network to run a secure login to the Cisco StadiumVision Director server using the IP address for your server.
Use a directly connected console, or use an SSH client from a laptop computer that is connected to the Cisco StadiumVision Server network to run a secure login to the Cisco StadiumVision Director server using the IP address for your server.
Step 2 ![]() When the login prompt appears, enter the installer userid followed by the installer password at the password prompt.
When the login prompt appears, enter the installer userid followed by the installer password at the password prompt.
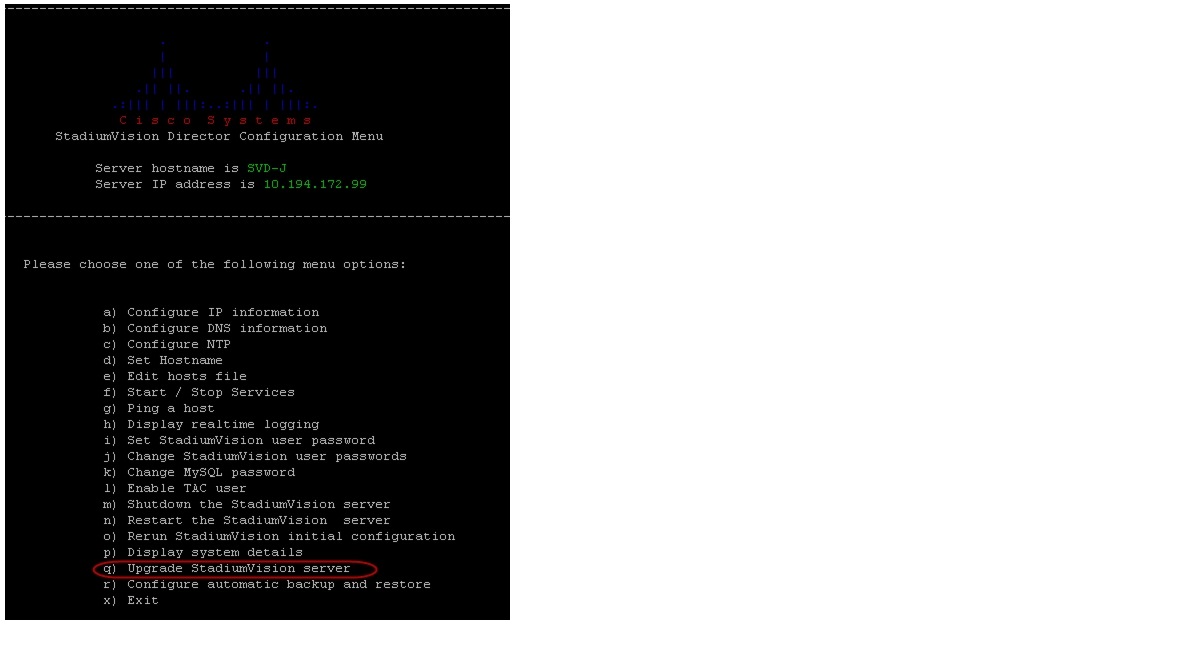
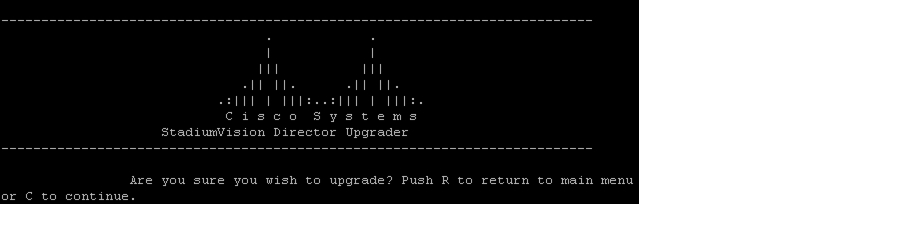
Step 3 ![]() When the StadiumVision Director Configuration menu appears, type q and press Enter (Figure 4):
When the StadiumVision Director Configuration menu appears, type q and press Enter (Figure 4):
Figure 4 TUI Main Menu Option for Upgrade of Cisco StadiumVision Server
Step 4 ![]() When the upgrade configuration confirmation prompt appears, type c to continue (Figure 5):
When the upgrade configuration confirmation prompt appears, type c to continue (Figure 5):
Figure 5 TUI Upgrade Configuration Confirmation
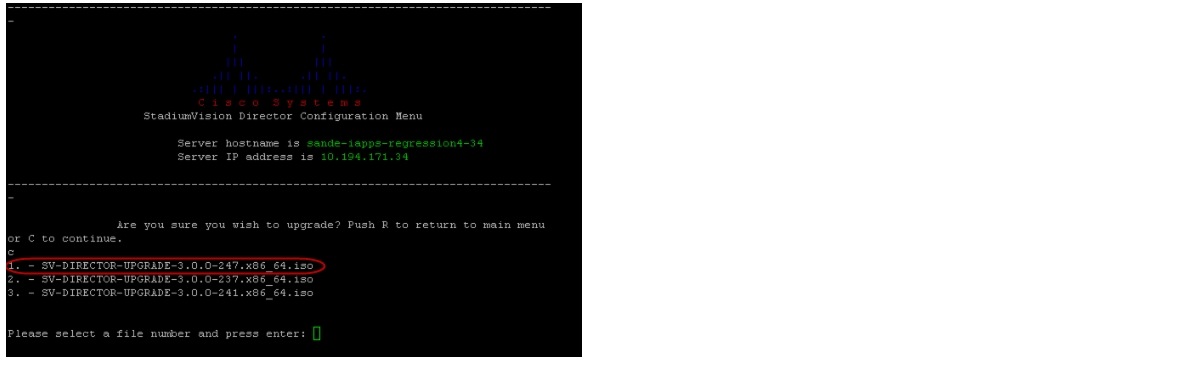
Step 5 ![]() All of the ISO upgrade files that you have uploaded are displayed with a sequence number and the image name. Type the sequence number that corresponds to the image that you want to install, and press Enter. Figure 6 shows an example of selection of a 64-bit ISO upgrade file for installation.
All of the ISO upgrade files that you have uploaded are displayed with a sequence number and the image name. Type the sequence number that corresponds to the image that you want to install, and press Enter. Figure 6 shows an example of selection of a 64-bit ISO upgrade file for installation.
Figure 6 ISO Upgrade Image File List
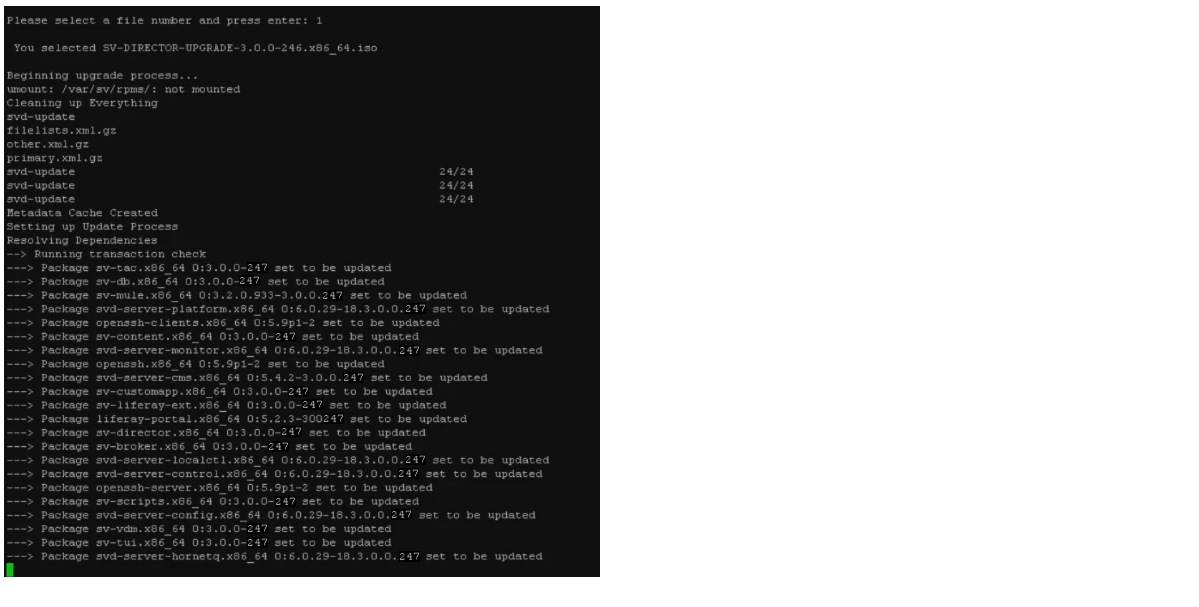
The upgrade process begins (Figure 7).
Figure 7 Start of ISO Upgrade Process
Step 6 ![]() When the "Upgrade complete" message appears, press any key. (Figure 8):
When the "Upgrade complete" message appears, press any key. (Figure 8):
Figure 8 End of ISO Upgrade Process
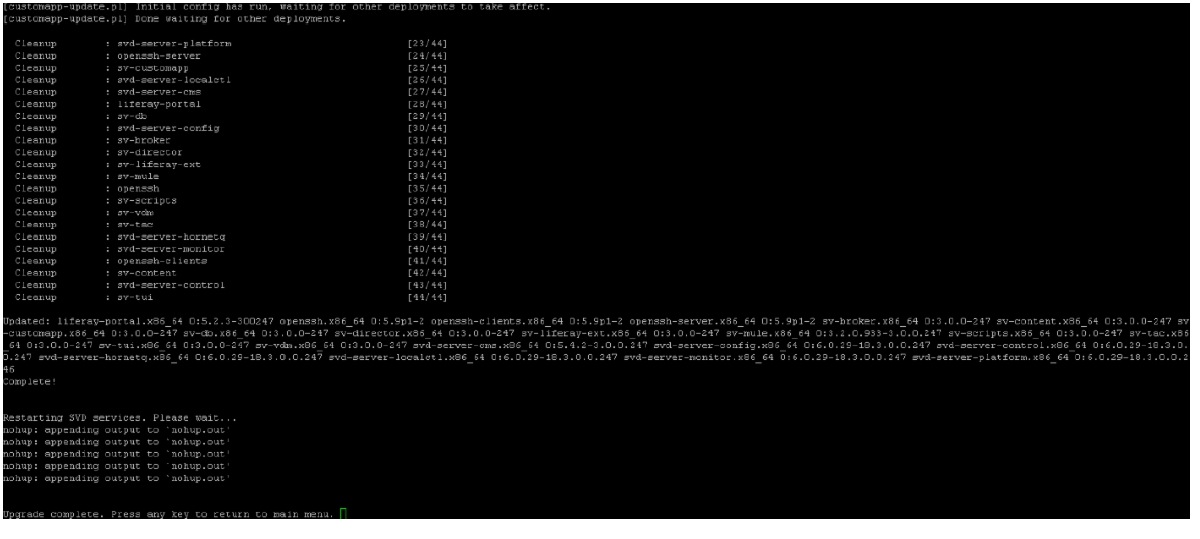
Note ![]() There is no need to reboot the Cisco StadiumVision Director server. The server is restarted automatically after the upgrade is complete.
There is no need to reboot the Cisco StadiumVision Director server. The server is restarted automatically after the upgrade is complete.
Step 7 ![]() Exit the TUI and go on to the "Verifying the Upgrade" section.
Exit the TUI and go on to the "Verifying the Upgrade" section.
Verifying the Upgrade
To verify the upgrade, complete the following tasks:
•![]() Clearing the Browser Cache (required)
Clearing the Browser Cache (required)
•![]() Importing the Security Certificate (required)
Importing the Security Certificate (required)
•![]() Logging Into Cisco StadiumVision Director (required)
Logging Into Cisco StadiumVision Director (required)
•![]() Verifying the Control Panel and Other Menus (required)
Verifying the Control Panel and Other Menus (required)
•![]() Checking for Duplicate MAC Address Entries (required)
Checking for Duplicate MAC Address Entries (required)
•![]() Verifying that Services are Running (required)
Verifying that Services are Running (required)
•![]() Configuring the DMP 4310 Assigned VLAN Property for VLAN Compliance Check (required)
Configuring the DMP 4310 Assigned VLAN Property for VLAN Compliance Check (required)
•![]() Verifying DMPs, Groups, and Zones in the Management Dashboard (required)
Verifying DMPs, Groups, and Zones in the Management Dashboard (required)
•![]() Verifying the Multicast Configuration (required)
Verifying the Multicast Configuration (required)
•![]() Setting Up the Quest Venue Manager to Send Updates to Cisco StadiumVision Director Server (required if using Quest for commerce integration)
Setting Up the Quest Venue Manager to Send Updates to Cisco StadiumVision Director Server (required if using Quest for commerce integration)
Clearing the Browser Cache
After you perform a Cisco StadiumVision Director software upgrade, you must clear the browser cache to be sure that you are viewing the latest version of Cisco StadiumVision Director.
To clear the browser cache in Mozilla FireFox, complete the following steps:
Step 1 ![]() From the menu bar, go to Tools > Clear Recent History.
From the menu bar, go to Tools > Clear Recent History.
The Clear Recent History dialog box appears.

Tip ![]() You can also press Ctrl + Shift + Delete to open the Clear Recent History dialog box.
You can also press Ctrl + Shift + Delete to open the Clear Recent History dialog box.
Step 2 ![]() In the "Time range to clear:" box, select Everything.
In the "Time range to clear:" box, select Everything.
Step 3 ![]() Open the Details drop-down list and select the Cache checkbox if it does not have a checkmark.
Open the Details drop-down list and select the Cache checkbox if it does not have a checkmark.
Step 4 ![]() Click Clear Now.
Click Clear Now.
To clear the browser cache in Microsoft Internet Explorer, complete the following steps:
Step 1 ![]() From the menu bar, go to Tools > Delete Browsing History.
From the menu bar, go to Tools > Delete Browsing History.
Tip ![]() You can also press Ctrl + Shift + Delete to open the Delete Browsing History dialog box.
You can also press Ctrl + Shift + Delete to open the Delete Browsing History dialog box.
Step 2 ![]() Select the Temporary Internet Files checkbox if it does not have a checkmark.
Select the Temporary Internet Files checkbox if it does not have a checkmark.
Step 3 ![]() Click Delete.
Click Delete.
Importing the Security Certificate
When you access a Cisco StadiumVision Director server for the first time using Microsoft Internet Explorer or Mozilla Firefox, a security certificate warning will appear. Some Cisco StadiumVision Director functionality requires that the certificate is imported.
Importing the Security Certificate for Microsoft IE
To import the security certificate in Microsoft Internet Explorer, complete the following steps:
Step 1 ![]() When you see the warning page with the title "There is a problem with this website's security certificate," click the "Continue to this website..." option.
When you see the warning page with the title "There is a problem with this website's security certificate," click the "Continue to this website..." option.
Step 2 ![]() Next to the URL bar on the top of the browser window, click Certificate Error and then click the "View certificates" link.
Next to the URL bar on the top of the browser window, click Certificate Error and then click the "View certificates" link.
Step 3 ![]() In the Certificate dialog box, click Install Certificate... .
In the Certificate dialog box, click Install Certificate... .
Step 4 ![]() In the Certificate Import Wizard dialog box, click Next>.
In the Certificate Import Wizard dialog box, click Next>.
Step 5 ![]() In the next step of the wizard, select "Place all certificates in the following store" radio button and then click Browse... .
In the next step of the wizard, select "Place all certificates in the following store" radio button and then click Browse... .
Step 6 ![]() In the Select Certificate Store dialog box, select the "Trusted Root Certification Authorities" store and click Ok.
In the Select Certificate Store dialog box, select the "Trusted Root Certification Authorities" store and click Ok.
Step 7 ![]() Click Next> in the Certificate Import Wizard dialog.
Click Next> in the Certificate Import Wizard dialog.
Step 8 ![]() Click Finish.
Click Finish.
Step 9 ![]() In the Security Warning dialog box, click Yes.
In the Security Warning dialog box, click Yes.
Confirm that a dialog stating "The import was successful." appears.
Step 10 ![]() Close all Microsoft IE windows.
Close all Microsoft IE windows.
You should now be able to access the Cisco StadiumVision Director server using Microsoft IE without any security certificate warnings.
Adding a Security Exception for Mozilla Firefox
To add the security exception for Mozilla Firefox, complete the following steps:
Step 1 ![]() When you see the warning page with the title "This Connection is Untrusted," click the "I Understand the Risks" option.
When you see the warning page with the title "This Connection is Untrusted," click the "I Understand the Risks" option.
Step 2 ![]() Click Add Exception....
Click Add Exception....
Step 3 ![]() In the Add Security Exception dialog box, click Confirm Security Exception.
In the Add Security Exception dialog box, click Confirm Security Exception.
Step 4 ![]() Close all Mozilla Firefox windows.
Close all Mozilla Firefox windows.
You should now be able to access the Cisco StadiumVision Director server using Mozilla Firefox without any security certificate warnings.
Logging Into Cisco StadiumVision Director
To verify that the upgrade to Cisco StadiumVision Director Release 2.4 was successful, and that Cisco StadiumVision Director is up and operating, complete the following steps:
Step 1 ![]() Open a browser window and type the URL for the Cisco StadiumVision Director server, in the following sample format, where x.x.x.x is the IPv4 address of the Cisco StadiumVision Director server:
Open a browser window and type the URL for the Cisco StadiumVision Director server, in the following sample format, where x.x.x.x is the IPv4 address of the Cisco StadiumVision Director server:
https://x.x.x.x/StadiumVision/login.jsp
or alternatively,
http://x.x.x.x
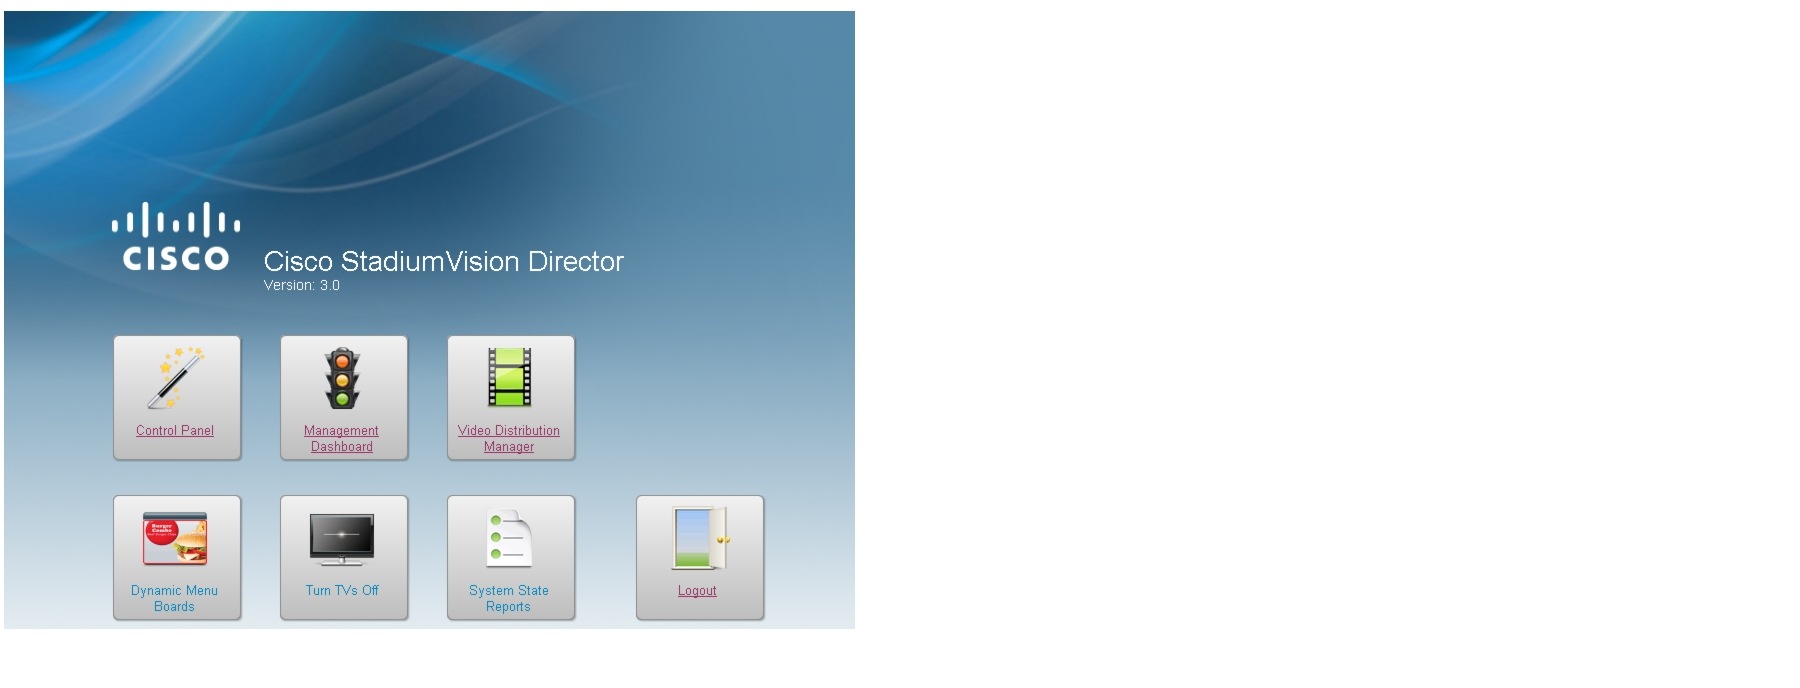
The Cisco StadiumVision Director login screen appears (Figure 9).
Figure 9 Cisco StadiumVision Director Login Screen

Step 2 ![]() Verify that the Version 3.0 is displayed.
Verify that the Version 3.0 is displayed.
Tip ![]() If your window is not displaying Version 3.0, be sure that you have cleared the browser cache as describe in the "Clearing the Browser Cache" section.
If your window is not displaying Version 3.0, be sure that you have cleared the browser cache as describe in the "Clearing the Browser Cache" section.
Step 3 ![]() Type your Cisco StadiumVision Director administrator login credentials and click Log In.
Type your Cisco StadiumVision Director administrator login credentials and click Log In.
Note ![]() When you first log into Cisco StadiumVision Director, the default administrator username and password is admin.
When you first log into Cisco StadiumVision Director, the default administrator username and password is admin.
The Cisco StadiumVision Director Main Menu screen appears (Figure 10).
Figure 10 Cisco StadiumVision Director Main Menu
Verifying the Control Panel and Other Menus
To verify the control panel, complete the following steps:
Step 1 ![]() From the Cisco StadiumVision Director Main Menu, click Control Panel.
From the Cisco StadiumVision Director Main Menu, click Control Panel.
After a few moments of loading resources, the Cisco StadiumVision Control Panel Setup screen will open in a new window (Figure 11).
Figure 11 Cisco StadiumVision Control Panel
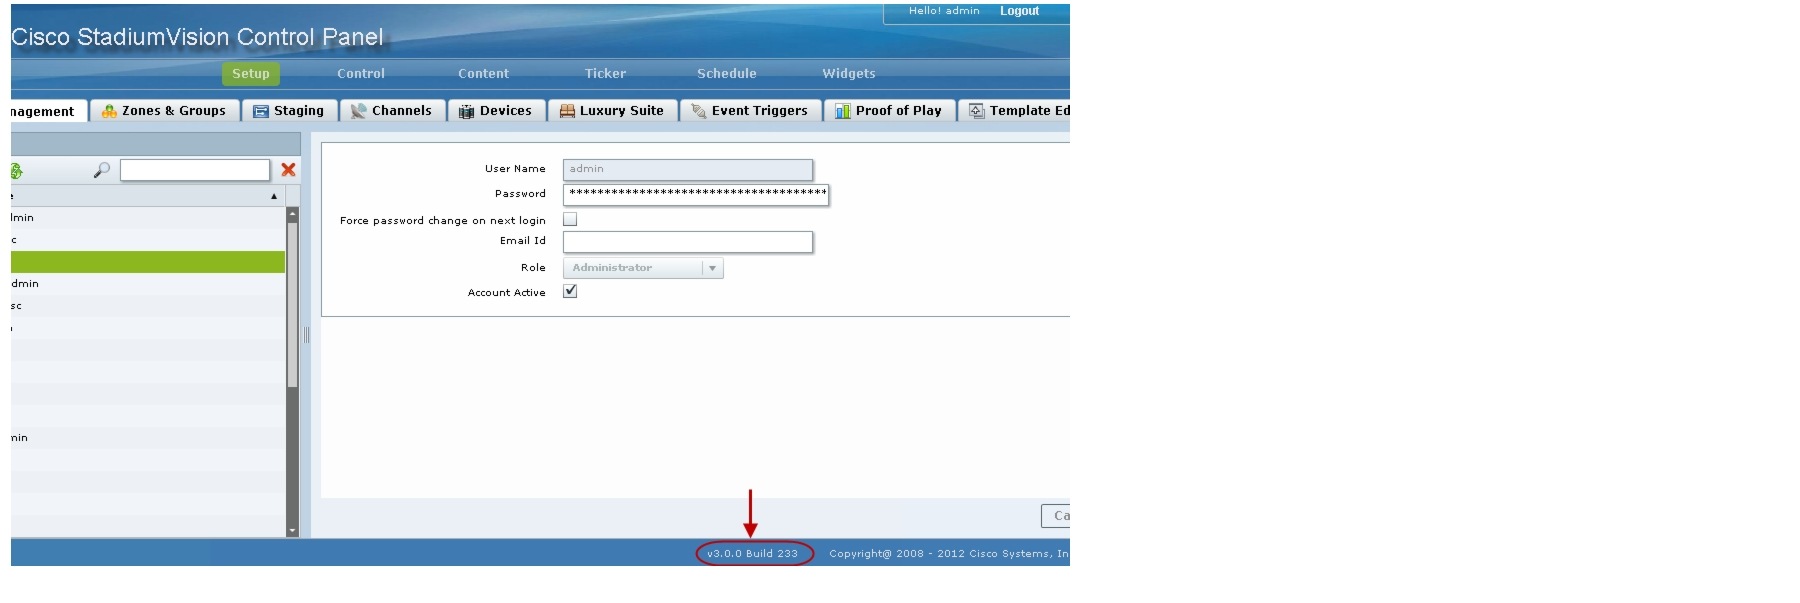
Step 2 ![]() Confirm the version and build number of your Cisco StadiumVision Director software in the lower right corner of the Control Panel window.
Confirm the version and build number of your Cisco StadiumVision Director software in the lower right corner of the Control Panel window.
Tip ![]() If your window is not displaying the appropriate version and build that you loaded, be sure that you have cleared the browser cache as describe in the "Clearing the Browser Cache" section.
If your window is not displaying the appropriate version and build that you loaded, be sure that you have cleared the browser cache as describe in the "Clearing the Browser Cache" section.
Step 3 ![]() Verify that you can open the other Cisco StadiumVision Director screens and menus.
Verify that you can open the other Cisco StadiumVision Director screens and menus.
Checking for Duplicate MAC Address Entries
Cisco StadiumVision Director does not support duplicate MAC addresses for the DMPs. After you have upgraded your software, check the following file for any duplicates:
/var/sv/db/mysql/upgrade-invalidmac.csv
Tip ![]() You can also run the GetStatus operation on selected DMPs in the Management Dashboard to update the MAC address for the selected DMPs in the Cisco StadiumVision Director database.
You can also run the GetStatus operation on selected DMPs in the Management Dashboard to update the MAC address for the selected DMPs in the Cisco StadiumVision Director database.
Verifying that Services are Running
After you upgrade, go to the Management Dashboard to verify that all of the primary Cisco StadiumVision Director services are running.
To verify that services are running, complete the following steps:
Step 1 ![]() From the Management Dashboard, expand the Service Alerts pane.
From the Management Dashboard, expand the Service Alerts pane.
Step 2 ![]() Verify that all of the primary services—in particular the Content Management CMS Server—are in "Normal" (green) state without any service alerts.
Verify that all of the primary services—in particular the Content Management CMS Server—are in "Normal" (green) state without any service alerts.
Figure 12 Verifying Normal Service States
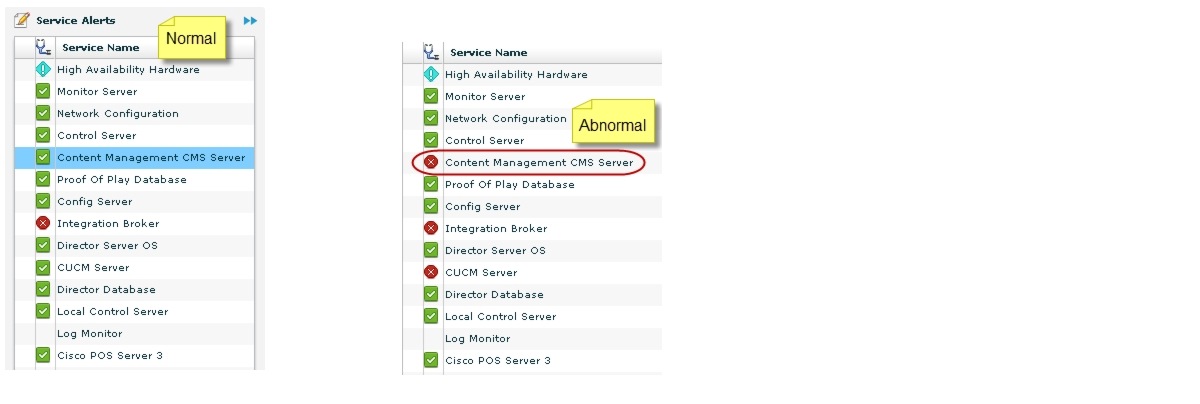
Step 3 ![]() If the CMS server or another service in the above list is not in Normal state but should be, use the TUI services menu to restart it.
If the CMS server or another service in the above list is not in Normal state but should be, use the TUI services menu to restart it.
Configuring the DMP 4310 Assigned VLAN Property for VLAN Compliance Check
After you upgrade, you need to go to the Management Dashboard and change the Assigned VLAN property under Global DMP Settings for both the 4310 and 4310 v5.x.x settings according to your DMP VLAN configuration.
Configuring this property in the Management Dashboard settings for the DMP 4310s will ensure that the Dashboard value can be checked for compliance with the value being sent by the DMP:
•![]() If all of your DMPs are located on the same VLAN (recommended)—Type the number of the VLAN and save the configuration.
If all of your DMPs are located on the same VLAN (recommended)—Type the number of the VLAN and save the configuration.
•![]() If all of your DMPs are not located on the same VLAN, or you want to bypass any VLAN compliance checking—Type "$svd_ignore" and save the configuration.
If all of your DMPs are not located on the same VLAN, or you want to bypass any VLAN compliance checking—Type "$svd_ignore" and save the configuration.
The value in the Assigned VLAN property in the Management Dashboard settings for the DMP 4310s is checked against what is being sent by the DMP, unless you have configured $svd_ignore.
Figure 13 shows how to configure the Assigned VLAN property under the 4310 Settings for DMPs that are not located on the same VLAN using the "$svd_ignore" string.
Note ![]() You need to set a value for the Assigned VLAN property for both the 4310 Settings and the 4310 v5.2.3 Settings under Global DMP Settings in the Management Dashboard..
You need to set a value for the Assigned VLAN property for both the 4310 Settings and the 4310 v5.2.3 Settings under Global DMP Settings in the Management Dashboard..
To configure the Assigned VLAN Property, complete the following steps:
Step 1 ![]() Go to the Management Dashboard, and click SV Director Configuration > System Configuration > Global DMP Settings.
Go to the Management Dashboard, and click SV Director Configuration > System Configuration > Global DMP Settings.
Step 2 ![]() Complete both of the following steps, as shown in Figure 13:
Complete both of the following steps, as shown in Figure 13:
a. ![]() Click 4310 Settings. Find the Assigned VLAN property. In the box, type either the VLAN number where the DMP resides, or $svd_ignore.
Click 4310 Settings. Find the Assigned VLAN property. In the box, type either the VLAN number where the DMP resides, or $svd_ignore.
b. ![]() Click 4310 v5.x.x Settings. Find the Assigned VLAN property. In the box, type either the VLAN number where the DMP resides, or $svd_ignore
Click 4310 v5.x.x Settings. Find the Assigned VLAN property. In the box, type either the VLAN number where the DMP resides, or $svd_ignore
Figure 13 Assigned VLAN Property Configuration for DMPs
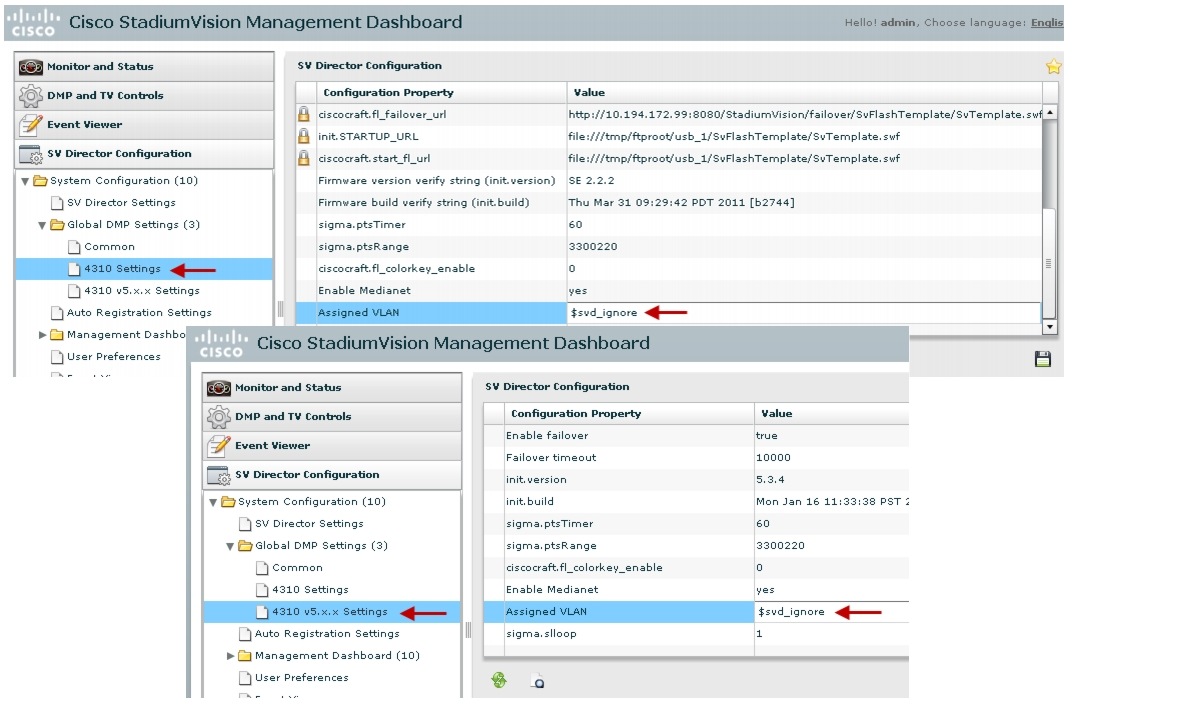
Step 3 ![]() Click the Save icon.
Click the Save icon.
Verifying DMPs, Groups, and Zones in the Management Dashboard
Note ![]() Before you verify DMP status, be sure that you have set the Assigned VLAN property for your DMP 4310s so that the VLAN compliance check can be performed. For more information, see the "Configuring the DMP 4310 Assigned VLAN Property for VLAN Compliance Check" section.
Before you verify DMP status, be sure that you have set the Assigned VLAN property for your DMP 4310s so that the VLAN compliance check can be performed. For more information, see the "Configuring the DMP 4310 Assigned VLAN Property for VLAN Compliance Check" section.
To check DMPs, groups, and zones after you upgrade your software, complete the following steps:
Step 1 ![]() Go to the Management Dashboard and verify that all of your groups, zones and DMPs are present and in the green state.
Go to the Management Dashboard and verify that all of your groups, zones and DMPs are present and in the green state.
Step 2 ![]() From the DMP and TV Controls dashboard drawer, run a Get Status on all DMPs to update Cisco StadiumVision Director's record of DMP MAC addresses using the following dashboard command path:
From the DMP and TV Controls dashboard drawer, run a Get Status on all DMPs to update Cisco StadiumVision Director's record of DMP MAC addresses using the following dashboard command path:
DMP and TV Controls > Monitoring > Get Status.
Step 3 ![]() Run an Initial Config to enable the Video Distribution Manager (VDM) configuration using the following dashboard command path:
Run an Initial Config to enable the Video Distribution Manager (VDM) configuration using the following dashboard command path:
DMP and TV Controls > DMP Install > Initial Config.
Step 4 ![]() Run Get Status to confirm that all DMPs have successfully rebooted.
Run Get Status to confirm that all DMPs have successfully rebooted.
Step 5 ![]() Stage the Flash template using the following dashboard command path:
Stage the Flash template using the following dashboard command path:
DMP and TV Controls > DMP Install > Stage Template.
Step 6 ![]() Send Global DMP Settings to the DMPs using the following dashboard command path:
Send Global DMP Settings to the DMPs using the following dashboard command path:
DMP and TV Controls > Global > Global DMP Settings.
Note ![]() You must send the Global DMP Settings command twice to reboot the DMPs due to an issue with enabling Medianet services for the first time.
You must send the Global DMP Settings command twice to reboot the DMPs due to an issue with enabling Medianet services for the first time.
Step 7 ![]() Run Get Status to confirm that the DMPs are in good health.
Run Get Status to confirm that the DMPs are in good health.
Note ![]() This will also update the MAC address for the DMPs.
This will also update the MAC address for the DMPs.
Step 8 ![]() (Optional) Change the DMP State of healthy DMPs to "Production" using the following dashboard command path:
(Optional) Change the DMP State of healthy DMPs to "Production" using the following dashboard command path:
DMP and TV Controls > Auto Registration > Change DMP State.
Step 9 ![]() Run Get Status to check the DMP state after the change.
Run Get Status to check the DMP state after the change.
Step 10 ![]() Investigate any DMPs that are not in "Normal" state.
Investigate any DMPs that are not in "Normal" state.
Verifying the Multicast Configuration
Cisco StadiumVision Director uses both unicast and multicast communications for DMP control-plane operation. The Cisco Connected Stadium design requires that Cisco StadiumVision Director uses the 239.193.0.0 multicast group address range.
The multicast group address for Cisco StadiumVision Director is configured in the "MulticastHostPort" registry.
To verify or configure the multicast addressing for Cisco StadiumVision Director, complete the following steps:
Step 1 ![]() From the Management Dashboard, select Tools > Advanced > Registry.
From the Management Dashboard, select Tools > Advanced > Registry.
Step 2 ![]() Scroll to the "MulticastHostPort" registry key in the Parameters list and confirm the entry for the registry.
Scroll to the "MulticastHostPort" registry key in the Parameters list and confirm the entry for the registry.
Step 3 ![]() To change the value, click on the value field and specify a multicast address in the range 239.193.0.0/24.
To change the value, click on the value field and specify a multicast address in the range 239.193.0.0/24.
Step 4 ![]() Click Apply.
Click Apply.
Setting Up the Quest Venue Manager to Send Updates to Cisco StadiumVision Director Server
After you upgrade, you need to set up the Quest Venue Manager to support sending updates to the Cisco StadiumVision server when menu items change.
To set up the Quest Venue Manager to send updates to the Cisco StadiumVision Director server, complete the following steps:
Step 1 ![]() Access the Quest server.
Access the Quest server.
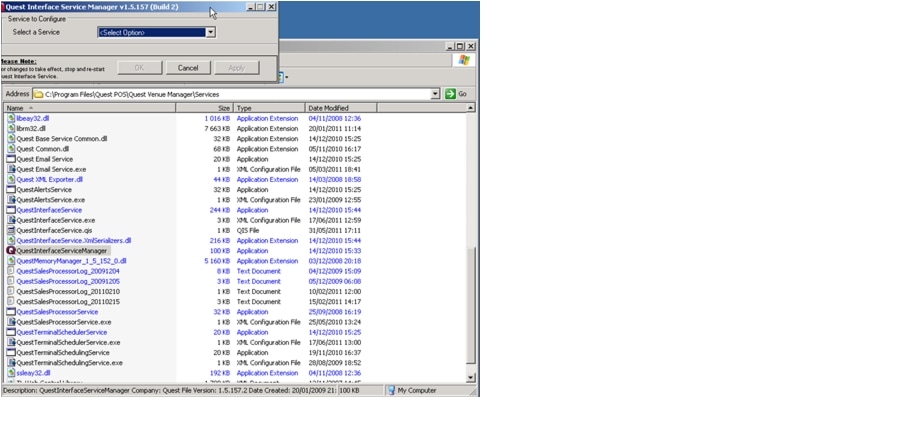
Step 2 ![]() Go to the C:\Program Files\Quest POS\Quest Venue Manager\Services directory.
Go to the C:\Program Files\Quest POS\Quest Venue Manager\Services directory.
Step 3 ![]() Start the executable application program named "QuestInterfaceServiceManager" (Figure 14).
Start the executable application program named "QuestInterfaceServiceManager" (Figure 14).
Figure 14 QuestInterfaceServiceManager Application
Step 4 ![]() When the Quest Interface Service Manager application window opens, specify the following options (Figure 15):
When the Quest Interface Service Manager application window opens, specify the following options (Figure 15):
a. ![]() In the Select a Service box, choose the Quest Menu Web Service Notification.
In the Select a Service box, choose the Quest Menu Web Service Notification.
b. ![]() Select the Enabled checkbox so a checkmark appears.
Select the Enabled checkbox so a checkmark appears.
c. ![]() In the URL box, enter "http://svd:8080/StadiumVision/services/TerminalUpdate."
In the URL box, enter "http://svd:8080/StadiumVision/services/TerminalUpdate."
d. ![]() In the Poll Interval box, select 1 minute.
In the Poll Interval box, select 1 minute.
e. ![]() Select the Keypad and PLU update checkboxes so a checkmark appears.
Select the Keypad and PLU update checkboxes so a checkmark appears.
f. ![]() In the Terminal Type box, select Web Service.
In the Terminal Type box, select Web Service.
Figure 15 Select a Service to Configure
Step 5 ![]() Click OK.
Click OK.
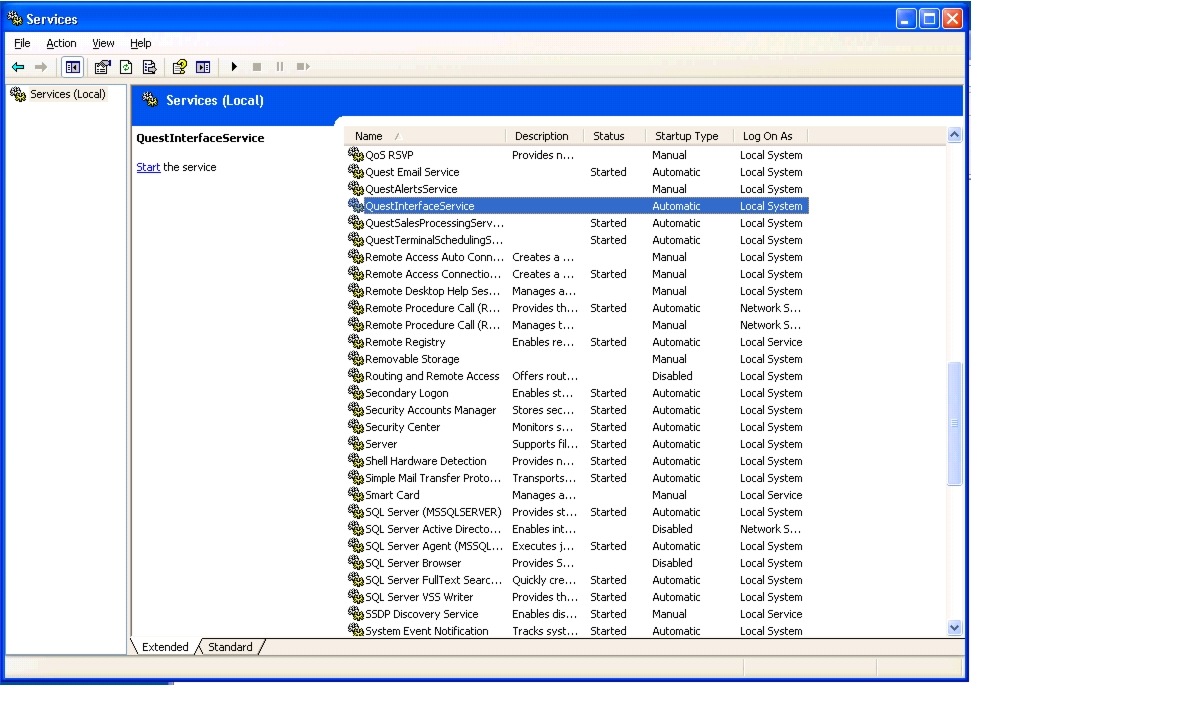
Step 6 ![]() Restart the windows service to implement the configuration by completing the following steps:
Restart the windows service to implement the configuration by completing the following steps:
a. ![]() From your laptop, click Start > Run. . .
From your laptop, click Start > Run. . .
b. ![]() When the Run dialog box opens, type "services.msc".
When the Run dialog box opens, type "services.msc".
c. ![]() Find the Quest Interface Service and restart it (Figure 16).
Find the Quest Interface Service and restart it (Figure 16).
Figure 16 Restart the Quest Interface Service
What to Do Next
Use the "Appendix A: Post-Upgrade Checklist" to be sure that you have completed the required verification steps.
 Feedback