- Cisco StadiumVision Director Dynamic Menu Board and Store Configuration Guide, Release 2.4
- Preface
- Getting Started
- Overview of the Dynamic Menu Board Application
- Working with Stores in the DMB Application
- Working with Images in the DMB Application
- Working with the DMB Application User Interface
- Creating and Updating Menu Boards
- Appendix A: DMB Default Menu Theme Reference
- Appendix B: Advanced Architecture and DMB Customizations
Release 2.4: Cisco StadiumVision Director Dynamic Menu Board and Store Configuration Guide
Bias-Free Language
The documentation set for this product strives to use bias-free language. For the purposes of this documentation set, bias-free is defined as language that does not imply discrimination based on age, disability, gender, racial identity, ethnic identity, sexual orientation, socioeconomic status, and intersectionality. Exceptions may be present in the documentation due to language that is hardcoded in the user interfaces of the product software, language used based on RFP documentation, or language that is used by a referenced third-party product. Learn more about how Cisco is using Inclusive Language.
- Updated:
- August 19, 2012
Chapter: Working with Stores in the DMB Application
Working with Stores in the DMB Application
This module provides an overview of stores and describes the tasks for configuring and updating store content in Cisco StadiumVision Director for use in menus. Users who are defined with administrator or concessionaire roles in Cisco StadiumVision Director can perform store-related tasks within the DMB application. However, only administrators can configure Point of Sale (PoS)-based stores from the Control Panel.
This module includes the following topics:
•![]() Information About Stores in Cisco StadiumVision Director
Information About Stores in Cisco StadiumVision Director
•![]() How to Configure Stores in Cisco StadiumVision Director
How to Configure Stores in Cisco StadiumVision Director
•![]() How to Update PoS Server Information and Menu Content
How to Update PoS Server Information and Menu Content
Information About Stores in Cisco StadiumVision Director
Cisco StadiumVision Director makes content available for dynamic menus through the configuration of stores, which are collections of items available for sale that can be linked to appear on one or more menu boards.
Menu content for the Dynamic Menu Board (DMB) application in Cisco StadiumVision Director can come from integration with external PoS systems, or it can be built manually within the Cisco StadiumVision Director software by defining what's referred to as a Cisco store.
Cisco stores are used when you do not have a PoS system to integrate with, or when you want to populate menus with different items from a single data source. Only Cisco stores are defined within the DMB application. However, use of Cisco stores do not support live in-suite ordering using an IP phone.
Stores are based on certain supported vendor installation types. Table 1 describes the different vendor installation types that are supported by the DMB application to populate menu content and some of their characteristics.
|
|
|
|
|
|
|
|
|---|---|---|---|---|---|---|
Cisco |
DMB Application |
Administrator or Concessionaire |
|
|||
Demo |
Control Panel / Point of Sale |
Administrator |
|
|
|
|
MicrosStands |
Control Panel / Point of Sale |
Administrator |
|
|
||
MicrosSuites |
Control Panel / Point of Sale |
Administrator |
|
|
|
|
Quest |
Control Panel / Point of Sale |
Administrator |
|
|
|
1 All PoS-based installations are configured by a Cisco StadiumVision Director Administrator in coordination with the PoS vendor installer to obtain PoS system-specific information for that venue. |
Cisco Store Configuration
Cisco Stores have hierarchical groupings of items:
•![]() Family Groups—Family Groups in the Cisco Store correspond to the top-level options on the menu such as Food, Beverages, Merchandise.
Family Groups—Family Groups in the Cisco Store correspond to the top-level options on the menu such as Food, Beverages, Merchandise.
•![]() Major Groups—Major Groups correspond to the sub-menus for family groups, such as Snacks, Meals, Non-Alcoholic Beverages.
Major Groups—Major Groups correspond to the sub-menus for family groups, such as Snacks, Meals, Non-Alcoholic Beverages.
•![]() Items—Items correspond to the individual items and prices for the items under each sub-menu such as Shrimp Salad, Hotdog, Cisco Cola.
Items—Items correspond to the individual items and prices for the items under each sub-menu such as Shrimp Salad, Hotdog, Cisco Cola.
Images can be added to menus, sub-menus, and items, and must be available in the Image Gallery to be used. For more information, see the "Working with Images in the DMB Application".
The groups, items, and images for Cisco stores are configured through the Dynamic Menu Board application interface.
PoS Store Synchronization
When a PoS vendor is first installed, and when certain PoS server information or menu content is changed in the PoS system, the information needs to be updated in Cisco StadiumVision Director. This can be done by Cisco StadiumVision Director using a periodically-scheduled update, or it can be done manually (on demand) for an immediate synchronization.
There are some differences in how menu content can be updated based on your PoS vendor installation:
•![]() Micros systems—Support one-way content synchronization. PoS server updates must be initiated by Cisco StadiumVision Director for retrieval of owner/customer information and menu item changes from the PoS server.
Micros systems—Support one-way content synchronization. PoS server updates must be initiated by Cisco StadiumVision Director for retrieval of owner/customer information and menu item changes from the PoS server.
•![]() Quest systems—Support two-way content synchronization. Updates of Quest stock items can trigger a notification to the Cisco StadiumVision Director server, which results in an update to the Theme and transmission to the DMP. Menu content updates can also be initiated by Cisco StadiumVision Director.
Quest systems—Support two-way content synchronization. Updates of Quest stock items can trigger a notification to the Cisco StadiumVision Director server, which results in an update to the Theme and transmission to the DMP. Menu content updates can also be initiated by Cisco StadiumVision Director.
By default, PoS store synchronization is scheduled to run by Cisco StadiumVision Director once every 24 hours for all stores.
A task in the Management Dashboard called "PosGetMenuTask" runs a process that checks when the last store updates were made in Cisco StadiumVision Director, and compares that timestamp with the scheduled synchronization interval for the store and the elapsed time. The PosGetMenu task runs by default once every 5 minutes using a value of "periodic-300-seconds," where "300" is a value in seconds.
There are two areas where related configuration for PoS server synchronization can be performed in Cisco StadiumVision Director:
•![]() Control Panel—By an administrator in the Point of Sale > Stores panel using the Synchronize icon to do an immediate update.
Control Panel—By an administrator in the Point of Sale > Stores panel using the Synchronize icon to do an immediate update.
•![]() Management Dashboard—By an administrator in the Tools > Advanced > Run a Task panel to run the PosGetMenuTask immediately to verify if a PoS server update should be performed. An advantage of this method is that all stores for Quest are automatically updated in the Control Panel.
Management Dashboard—By an administrator in the Tools > Advanced > Run a Task panel to run the PosGetMenuTask immediately to verify if a PoS server update should be performed. An advantage of this method is that all stores for Quest are automatically updated in the Control Panel.

Note ![]() It is important to understand that the PosGetMenuTask initiates a process to verify when the last synchronization was performed by Cisco StadiumVision Director according to the synchronization interval. It does not necessarily mean that an immediate store update will occur with the PoS server unless the interval conditions have been reached.
It is important to understand that the PosGetMenuTask initiates a process to verify when the last synchronization was performed by Cisco StadiumVision Director according to the synchronization interval. It does not necessarily mean that an immediate store update will occur with the PoS server unless the interval conditions have been reached.
•![]()
How to Configure Stores in Cisco StadiumVision Director
This section includes the following tasks:
•![]() Configuring PoS Stores From the Control Panel
Configuring PoS Stores From the Control Panel
•![]() Configuring Cisco Stores From the DMB Application
Configuring Cisco Stores From the DMB Application
Before You Begin
Note ![]() The configuration of PoS stores in Cisco StadiumVision Director must be carefully planned and coordinated with the PoS system installer to ensure that the dependent information between the PoS system and the Cisco StadiumVision Director store is properly correlated.
The configuration of PoS stores in Cisco StadiumVision Director must be carefully planned and coordinated with the PoS system installer to ensure that the dependent information between the PoS system and the Cisco StadiumVision Director store is properly correlated.
Before you configure stores in Cisco StadiumVision Director, be sure that the following requirements are met:
•![]() Prerequisites for Configuring Micros Stores in Cisco StadiumVision Director
Prerequisites for Configuring Micros Stores in Cisco StadiumVision Director
•![]() Prerequisites for Configuring Quest Stores in Cisco StadiumVision Director
Prerequisites for Configuring Quest Stores in Cisco StadiumVision Director
Prerequisites for Configuring Micros Stores in Cisco StadiumVision Director
Before you configure a Micros store in Cisco StadiumVision Director, be sure that the following requirements are met:
•![]() The required Cisco StadiumVision Director server hardware is installed and running Cisco StadiumVision Release 2.4 or later.
The required Cisco StadiumVision Director server hardware is installed and running Cisco StadiumVision Release 2.4 or later.
•![]() The required Micros 9700 hardware and software versions are installed. For the latest information on supported hardware and software versions, see the "Commerce Integration Systems Support" section of the Release Notes for Cisco StadiumVision Director Release 2.4.
The required Micros 9700 hardware and software versions are installed. For the latest information on supported hardware and software versions, see the "Commerce Integration Systems Support" section of the Release Notes for Cisco StadiumVision Director Release 2.4.
Note ![]() For more detailed information about integrating Micros or Quest PoS systems in Cisco StadiumVision Director, contact your Cisco Systems representative to obtain an integration planning guide with site planning worksheets.
For more detailed information about integrating Micros or Quest PoS systems in Cisco StadiumVision Director, contact your Cisco Systems representative to obtain an integration planning guide with site planning worksheets.
•![]() The following information has been configured in the Micros PoS system by the vendor:
The following information has been configured in the Micros PoS system by the vendor:
–![]() Menus, sub-menus, and items with descriptions and images.
Menus, sub-menus, and items with descriptions and images.
–![]() Store Identifiers—Identifies the location where the order of items for sale from a suite will be received, which corresponds to a PoS terminal or printer. The PoS system can have one store to service all suites at a venue, or multiple stores to service different areas of suites.
Store Identifiers—Identifies the location where the order of items for sale from a suite will be received, which corresponds to a PoS terminal or printer. The PoS system can have one store to service all suites at a venue, or multiple stores to service different areas of suites.
–![]() Suite Identifiers—Identifies the supported suites in the venue for PoS orders, and is also used to correlate customers that are permitted to make charges in those suites.
Suite Identifiers—Identifies the supported suites in the venue for PoS orders, and is also used to correlate customers that are permitted to make charges in those suites.
Note ![]() The Suite Identifiers in the PoS system should include the suites that are configured in Cisco StadiumVision Director at the venue for proper delivery information. The suite identifiers are automatically inherited from integration with the Micros system in the Cisco StadiumVision Director Control Panel > Setup > Luxury Suite > Commerce panel for configuration.
The Suite Identifiers in the PoS system should include the suites that are configured in Cisco StadiumVision Director at the venue for proper delivery information. The suite identifiers are automatically inherited from integration with the Micros system in the Cisco StadiumVision Director Control Panel > Setup > Luxury Suite > Commerce panel for configuration.
–![]() Customer Credentials—Used to validate permission for a customer to charge orders from a suite. This information is set in the Micros system's Owners pages.
Customer Credentials—Used to validate permission for a customer to charge orders from a suite. This information is set in the Micros system's Owners pages.
Note ![]() The customer credentials are automatically inherited in Cisco StadiumVision Director from integration with the Micros system.
The customer credentials are automatically inherited in Cisco StadiumVision Director from integration with the Micros system.
•![]() The Micros installer has provided the following information to the Cisco StadiumVision Director administrator for the Micros store configuration:
The Micros installer has provided the following information to the Cisco StadiumVision Director administrator for the Micros store configuration:
–![]() IP address of the Micros server.
IP address of the Micros server.
–![]() Port used to connect to the Micros server, typically 8080.
Port used to connect to the Micros server, typically 8080.
–![]() Order type number (Identifies whether orders are for suites or concessions stands).
Order type number (Identifies whether orders are for suites or concessions stands).
–![]() Price level number (Identifies whether orders are event day or advance orders).
Price level number (Identifies whether orders are event day or advance orders).
–![]() Menu family group number (Identifies starting number of graphics for sub-menu categories).
Menu family group number (Identifies starting number of graphics for sub-menu categories).
–![]() Menu major group number (Identifies starting number of graphics for menu categories).
Menu major group number (Identifies starting number of graphics for menu categories).
–![]() Client Names.
Client Names.
Prerequisites for Configuring Quest Stores in Cisco StadiumVision Director
Before you configure a Quest store in Cisco StadiumVision Director, be sure that the following requirements are met:
•![]() The required Cisco StadiumVision Director server hardware is installed and running Cisco StadiumVision Release 2.4 or later.
The required Cisco StadiumVision Director server hardware is installed and running Cisco StadiumVision Release 2.4 or later.
•![]() The required Quest hardware and software versions are installed. For the latest information on supported hardware and software versions, see the "Commerce Integration Systems Support" section of the Release Notes for Cisco StadiumVision Director Release 2.4.
The required Quest hardware and software versions are installed. For the latest information on supported hardware and software versions, see the "Commerce Integration Systems Support" section of the Release Notes for Cisco StadiumVision Director Release 2.4.
•![]() The following information has been configured in the Quest PoS system by the vendor:
The following information has been configured in the Quest PoS system by the vendor:
–![]() Menus, sub-menus, and items with descriptions and images.
Menus, sub-menus, and items with descriptions and images.
–![]() Store Identifiers—Identifies the location where the order of items for sale from a suite will be received, which corresponds to a PoS terminal or printer. The PoS system can have one store to service all suites at a venue, or multiple stores to service different areas of suites.
Store Identifiers—Identifies the location where the order of items for sale from a suite will be received, which corresponds to a PoS terminal or printer. The PoS system can have one store to service all suites at a venue, or multiple stores to service different areas of suites.
–![]() Suite Identifiers—Identifies the supported suites in the venue for PoS orders, and is also used to correlate customers that are permitted to make charges in those suites.
Suite Identifiers—Identifies the supported suites in the venue for PoS orders, and is also used to correlate customers that are permitted to make charges in those suites.
Note ![]() The Suite Identifiers in the Quest system are defined using the logical ID parameter. This logical ID must match the "External suite id" that is manually configured for suites in the Cisco StadiumVision Director Control Panel > Setup > Luxury Suite > Commerce panel.
The Suite Identifiers in the Quest system are defined using the logical ID parameter. This logical ID must match the "External suite id" that is manually configured for suites in the Cisco StadiumVision Director Control Panel > Setup > Luxury Suite > Commerce panel.
–![]() Customer Credentials—Used to validate permission for a customer to charge orders from a suite.
Customer Credentials—Used to validate permission for a customer to charge orders from a suite.
Note ![]() The customer credentials must match between the Quest system and Cisco StadiumVision Director. However, the information is not automatically retrieved and must be manually configured and correlated.
The customer credentials must match between the Quest system and Cisco StadiumVision Director. However, the information is not automatically retrieved and must be manually configured and correlated.
•![]() The Quest installer has provided the following information to the Cisco StadiumVision Director administrator for the Quest store configuration:
The Quest installer has provided the following information to the Cisco StadiumVision Director administrator for the Quest store configuration:
–![]() IP address of the Quest server.
IP address of the Quest server.
–![]() Port used to connect to the Quest server, typically 8080.
Port used to connect to the Quest server, typically 8080.
–![]() Order type string (Identifies the type of order, and must be EDO for Event Day Order. Advance Day Order [ADO] is not supported).
Order type string (Identifies the type of order, and must be EDO for Event Day Order. Advance Day Order [ADO] is not supported).
–![]() User Name for login to the Quest server.
User Name for login to the Quest server.
–![]() Password for the Quest server user.
Password for the Quest server user.
–![]() Terminal ID, typically 999.
Terminal ID, typically 999.
–![]() Customer ID/password credentials configured in the Quest system.
Customer ID/password credentials configured in the Quest system.
–![]() Suite-to-store mapping to correlate which suites are served by which Quest stores.
Suite-to-store mapping to correlate which suites are served by which Quest stores.
–![]() Customer-to-suite mapping to correlate which customers are allowed to place orders in suites.
Customer-to-suite mapping to correlate which customers are allowed to place orders in suites.
Configuring PoS Stores From the Control Panel
If your site plans to use menu items that are defined in a Micros or Quest PoS system, an administrator must configure the PoS store in Cisco StadiumVision Director from the Point of Sale interface in the Control Panel before the DMB application can be used to add those items to a menu.
When you integrate Cisco StadiumVision Director with a PoS system, content from the PoS system is automatically made available to the DMB application for menu creation, and orders can be placed from an IP phone in suites when the Cisco StadiumVision Director services are configured in Cisco Unified Communications Manager (CUCM) for the phone.
A venue might support multiple PoS systems. Repeat this and the other related tasks for as many PoS vendors as your site plans to support.
This section includes the following tasks:
•![]() Accessing the Point of Sale Interface (required)
Accessing the Point of Sale Interface (required)
•![]() Creating a New Vendor Installation and Type (required)
Creating a New Vendor Installation and Type (required)
•![]() Configuring the Vendor Installation Information (required)
Configuring the Vendor Installation Information (required)
•![]() Configuring Stores (required)
Configuring Stores (required)
•![]() Configuring Customer Access (required)
Configuring Customer Access (required)
•![]() Assigning Stores to Luxury Suites (required)
Assigning Stores to Luxury Suites (required)
•![]() Verifying the PoS Store Configuration (required)
Verifying the PoS Store Configuration (required)
Accessing the Point of Sale Interface
To access the point of sale interface, complete the following steps:
Step 1 ![]() Log into Cisco StadiumVision Director as an administrator.
Log into Cisco StadiumVision Director as an administrator.
Step 2 ![]() From the main menu, click Control Panel.
From the main menu, click Control Panel.
Step 3 ![]() To access the external content integration interface, do one of the following:
To access the external content integration interface, do one of the following:
•![]() From the Setup screen, point your cursor to the blank tab on the far right end of the tab list.
From the Setup screen, point your cursor to the blank tab on the far right end of the tab list.

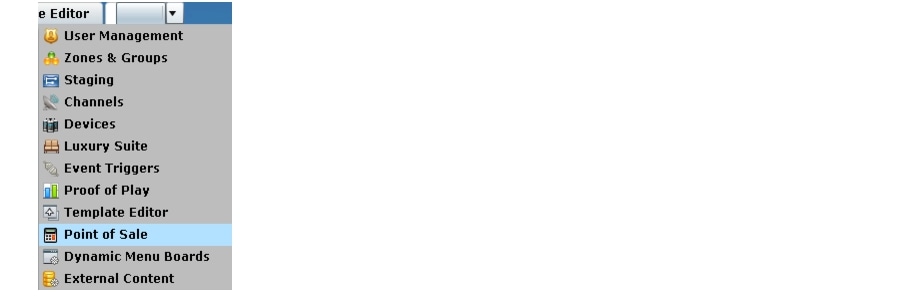
The tab bar automatically scrolls horizontally to reveal the remaining tabs. Click Point of Sale.

•![]() From the Setup screen, click the arrow to open the drop-down list of all tabs and click Point of Sale.
From the Setup screen, click the arrow to open the drop-down list of all tabs and click Point of Sale.
Creating a New Vendor Installation and Type
Note ![]() Cisco StadiumVision Director comes pre-configured with knowledge about the Cisco vendor installation. Therefore, no configuration of the Cisco vendor is required in the Control Panel.
Cisco StadiumVision Director comes pre-configured with knowledge about the Cisco vendor installation. Therefore, no configuration of the Cisco vendor is required in the Control Panel.
To create a new vendor installation, complete the following steps:
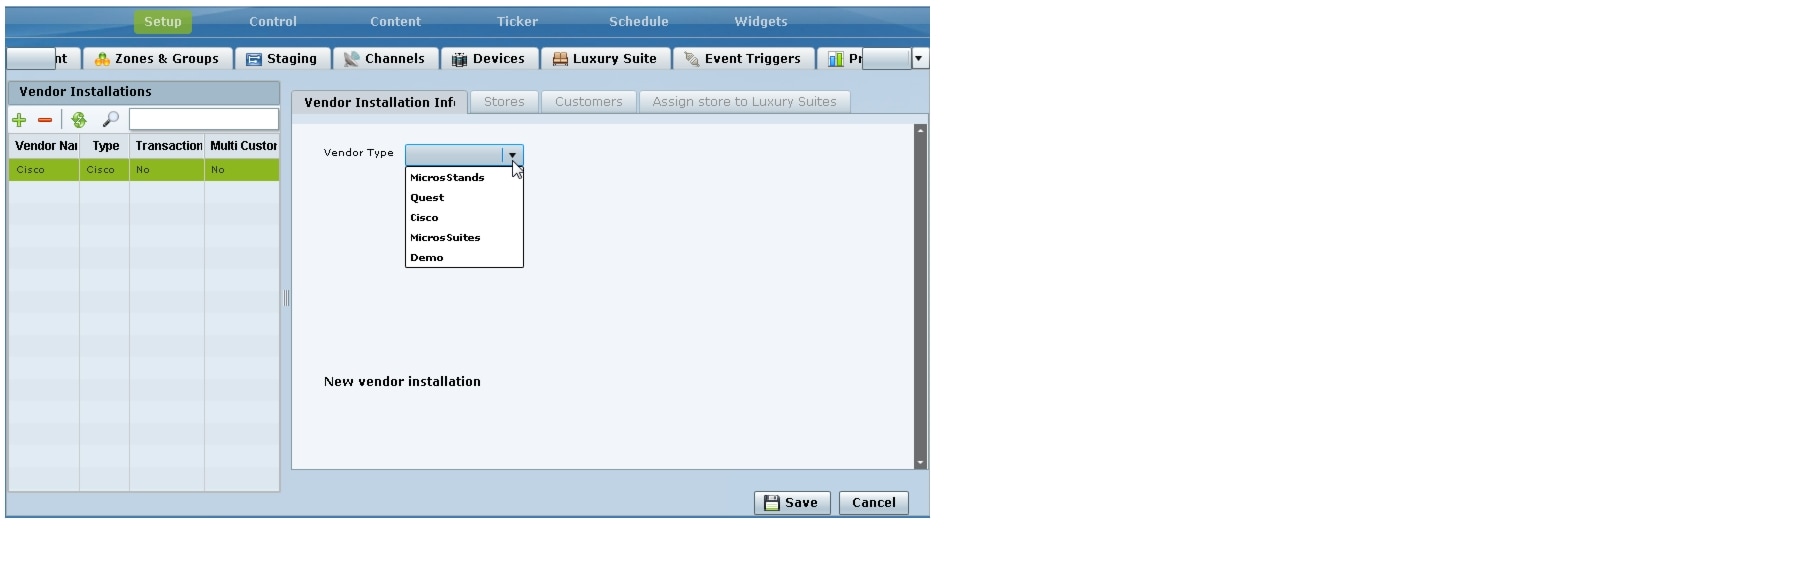
Step 1 ![]() In the Vendor Installations box on the left side of the screen, click the Plus (+) icon.
In the Vendor Installations box on the left side of the screen, click the Plus (+) icon.
The Vendor Type box appears in the Vendor Installation Info panel.
Step 2 ![]() In the Vendor Type box, open the drop-down list and select the PoS vendor (Figure 1).
In the Vendor Type box, open the drop-down list and select the PoS vendor (Figure 1).
Figure 1 Point of Sale Vendor Type Drop-Down List Box
Step 3 ![]() Click Save.
Click Save.
Configuring the Vendor Installation Information
The vendor installation information that you need to configure is dependent on the PoS system with which you are integrating.
This task describes the information to be configured for the MicrosSuites or Quest vendor types as examples.
Note ![]() The Micros system does not have built-in support for images to be assigned to Major and Family Groups. To work around this, the Micros installer can create "dummy" placeholders for major groups and family groups that are assigned to a range of numbers that are not orderable in the Micros system. In this way, an image can be assigned to these groups in Micros. The starting number of these placeholders must be configured in the Cisco StadiumVision Director Vendor Installation Info panel under the "Menu family group number" and "Menu major group member" options in Step g and Step h.
The Micros system does not have built-in support for images to be assigned to Major and Family Groups. To work around this, the Micros installer can create "dummy" placeholders for major groups and family groups that are assigned to a range of numbers that are not orderable in the Micros system. In this way, an image can be assigned to these groups in Micros. The starting number of these placeholders must be configured in the Cisco StadiumVision Director Vendor Installation Info panel under the "Menu family group number" and "Menu major group member" options in Step g and Step h.
For more information about how to add these images in the Micros system, see the Micros integration guide available from your Cisco Systems representative.
To configure the vendor installation information, complete the following steps according to your vendor type:
Step 1 ![]() In the Vendor Installation Info panel, complete the following information:
In the Vendor Installation Info panel, complete the following information:
For MicrosSuites Vendor Type (Figure 2):
Figure 2 MicrosSuites Vendor Installation Info Panel
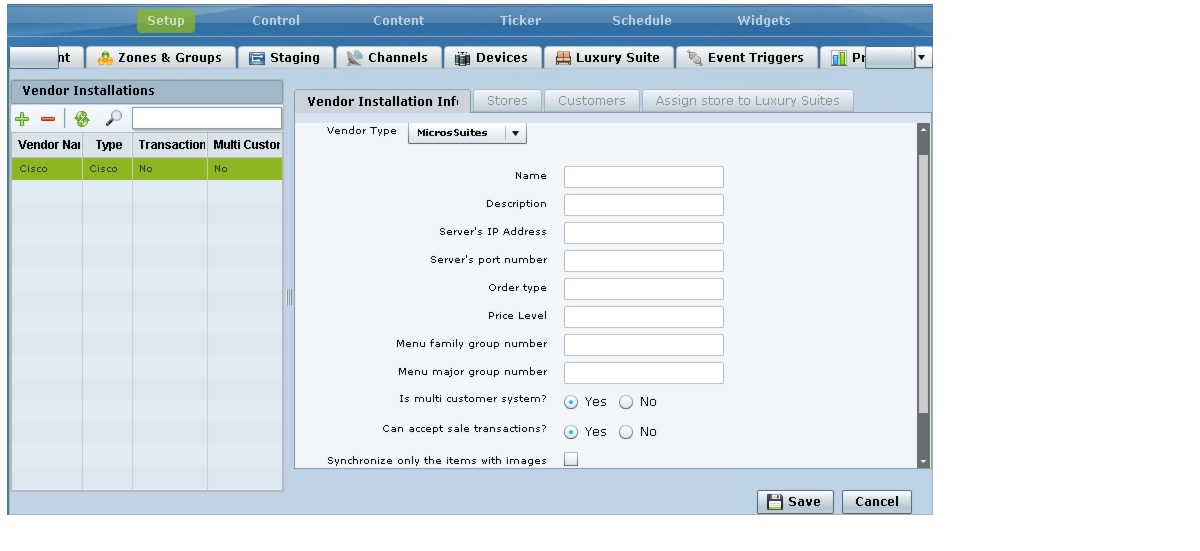
a. ![]() Name—Any name that you want to use for the vendor installation.
Name—Any name that you want to use for the vendor installation.
b. ![]() Description—Any additional information to describe the installation.
Description—Any additional information to describe the installation.
c. ![]() Server's IP Address—IP address of the Micros server from the installer.
Server's IP Address—IP address of the Micros server from the installer.
d. ![]() Server's port number—Port used to connect to the Micros server, typically 8080.
Server's port number—Port used to connect to the Micros server, typically 8080.
e. ![]() Order type—Number from the installer that identifies whether orders are for suites or concessions stands.
Order type—Number from the installer that identifies whether orders are for suites or concessions stands.
f. ![]() Price Level—Number from the installer that identifies whether orders are event day or advance orders.
Price Level—Number from the installer that identifies whether orders are event day or advance orders.
g. ![]() Menu family group number—Number from the installer that identifies the starting number of images for sub-menu categories in the Micros system.
Menu family group number—Number from the installer that identifies the starting number of images for sub-menu categories in the Micros system.
h. ![]() Menu major group number—Number from the installer that identifies starting number of images for menu categories in the Micros system.
Menu major group number—Number from the installer that identifies starting number of images for menu categories in the Micros system.
i. ![]() Is multi customer system?
Is multi customer system?
–![]() Yes—An owner/customer can place orders from multiple suites with a username and password. Many venues also use multi-customer support to allow different customers to order from the same suite.
Yes—An owner/customer can place orders from multiple suites with a username and password. Many venues also use multi-customer support to allow different customers to order from the same suite.
–![]() No—Orders are placed using the customer PIN that is configured in Cisco StadiumVision Director for a particular suite.
No—Orders are placed using the customer PIN that is configured in Cisco StadiumVision Director for a particular suite.
j. ![]() Can accept sales transactions?
Can accept sales transactions?
–![]() Yes—For concessions stands.
Yes—For concessions stands.
–![]() No—For suites.
No—For suites.
k. ![]() Synchronize only the items with images—When selected, retrieves only the data from the Micros server that corresponds to saleable menu items that have images associated with them.
Synchronize only the items with images—When selected, retrieves only the data from the Micros server that corresponds to saleable menu items that have images associated with them.
For Quest Vendor Type (Figure 3):
Figure 3 Quest Vendor Installation Info Panel
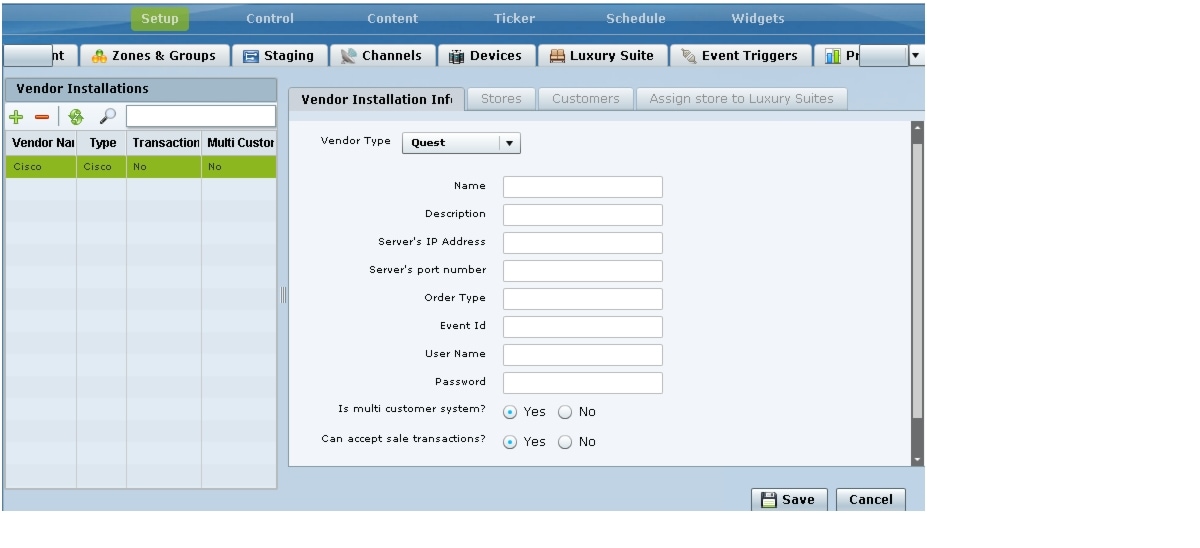
a. ![]() Name—Any name that you want to use for the vendor installation.
Name—Any name that you want to use for the vendor installation.
b. ![]() Description—Any additional information to describe the installation.
Description—Any additional information to describe the installation.
c. ![]() Server's IP Address—IP address of the Quest server from the installer.
Server's IP Address—IP address of the Quest server from the installer.
d. ![]() Server's port number—Port used to connect to the Quest server, typically 8080.
Server's port number—Port used to connect to the Quest server, typically 8080.
e. ![]() Order Type—Character string from the installer that identifies whether orders are for EDO (Event Day Order) or ADO (Advance Day Order).
Order Type—Character string from the installer that identifies whether orders are for EDO (Event Day Order) or ADO (Advance Day Order).
f. ![]() Event Id—Number from the installer, typically 999.
Event Id—Number from the installer, typically 999.
g. ![]() User Name—User account to login to the Quest server
User Name—User account to login to the Quest server
h. ![]() Password—Password for the Quest server user account.
Password—Password for the Quest server user account.
i. ![]() Is multi customer system?
Is multi customer system?
–![]() Yes—An owner/customer can place orders from multiple suites with a username and password. Many venues also use multi-customer support to allow different customers to order from the same suite.
Yes—An owner/customer can place orders from multiple suites with a username and password. Many venues also use multi-customer support to allow different customers to order from the same suite.
–![]() No—Orders are placed using the customer PIN that is configured in Cisco StadiumVision Director for a particular suite.
No—Orders are placed using the customer PIN that is configured in Cisco StadiumVision Director for a particular suite.
j. ![]() Can accept sales transactions?
Can accept sales transactions?
–![]() Yes—For concessions stands.
Yes—For concessions stands.
–![]() No—For suites.
No—For suites.
Step 2 ![]() Click Save.
Click Save.
Configuring Stores
The store information that you need to configure is dependent on the PoS system with which you are integrating.
You might use different store identifiers for different areas or levels in a venue to identify the location of the store that services a given set of suites. For example, in a large stadium the PoS system might be configured with multiple pantries, each servicing a distinct area of the stadium. Each of these needs to be configured as a separate store in Cisco StadiumVision Director to enable assignment of the appropriate suites to the corresponding store/pantry/printer.
Note ![]() The store identifiers that are in the PoS system must match what is configured in Cisco StadiumVision Director in the Control Panel > Setup > Point of Sale > Stores panel for that vendor.
The store identifiers that are in the PoS system must match what is configured in Cisco StadiumVision Director in the Control Panel > Setup > Point of Sale > Stores panel for that vendor.
•![]() Micros systems—Store identifiers are called "ClientName." The value is typically "POSAPI" for a single Micros store (Figure 4).
Micros systems—Store identifiers are called "ClientName." The value is typically "POSAPI" for a single Micros store (Figure 4).
Figure 4 Micros Stores Panel

•![]() Quest systems—Store identifiers are called "Terminal ID." The value is typically "999" for a single Quest store (Figure 5).
Quest systems—Store identifiers are called "Terminal ID." The value is typically "999" for a single Quest store (Figure 5).
Figure 5 Quest Stores Panel

To configure a store, complete the following steps according to your vendor type:
Step 1 ![]() In the Stores panel, click the Plus (+) icon to add a new store for the selected vendor installation.
In the Stores panel, click the Plus (+) icon to add a new store for the selected vendor installation.
Step 2 ![]() Type the store identifier information according to the information from your PoS installer:
Type the store identifier information according to the information from your PoS installer:
•![]() Client Name (Micros)—POSAPI
Client Name (Micros)—POSAPI
•![]() Terminal ID (Quest)—999
Terminal ID (Quest)—999
Note ![]() If you have multiple stores at your venue, other Client Names or Terminal IDs might need to be configured.
If you have multiple stores at your venue, other Client Names or Terminal IDs might need to be configured.
Step 3 ![]() (Optional) In the Description box, type a description to add more detail about this store identifier.
(Optional) In the Description box, type a description to add more detail about this store identifier.
Configuring Customer Access
How you configure PoS customer access depends on whether or not multi-customer support is enabled in the Vendor Installation Info panel in the Cisco StadiumVision Director Point of Sale interface.
•![]() Is multi customer system? option is No—PoS username and password is configured in Control Panel > Setup > Luxury Suites > Commerce panel and must match the credential that is configured in the PoS system. For more information, see the "Configuring Single Customer Access in Luxury Suites" section.
Is multi customer system? option is No—PoS username and password is configured in Control Panel > Setup > Luxury Suites > Commerce panel and must match the credential that is configured in the PoS system. For more information, see the "Configuring Single Customer Access in Luxury Suites" section.
•![]() Is multi customer system? option is Yes—Customer information is configured in the Control Panel > Setup > Point of Sale > Customers panel for Quest systems only, and must match the credentials that are configured in the PoS system. For more information, see the "Configuring Multiple Customers for Quest Systems" section.
Is multi customer system? option is Yes—Customer information is configured in the Control Panel > Setup > Point of Sale > Customers panel for Quest systems only, and must match the credentials that are configured in the PoS system. For more information, see the "Configuring Multiple Customers for Quest Systems" section.

Tip ![]() In Micros systems, the information for multiple owners is automatically populated in Cisco StadiumVision Director after store synchronization is performed.
In Micros systems, the information for multiple owners is automatically populated in Cisco StadiumVision Director after store synchronization is performed.
Configuring Single Customer Access in Luxury Suites
Complete this task if your PoS vendor installation is not configured for multiple customers. Figure 6 shows an example of the Commerce panel options for integration of PoS stores and customer information.
Figure 6 Commerce Panel for Luxury Suite
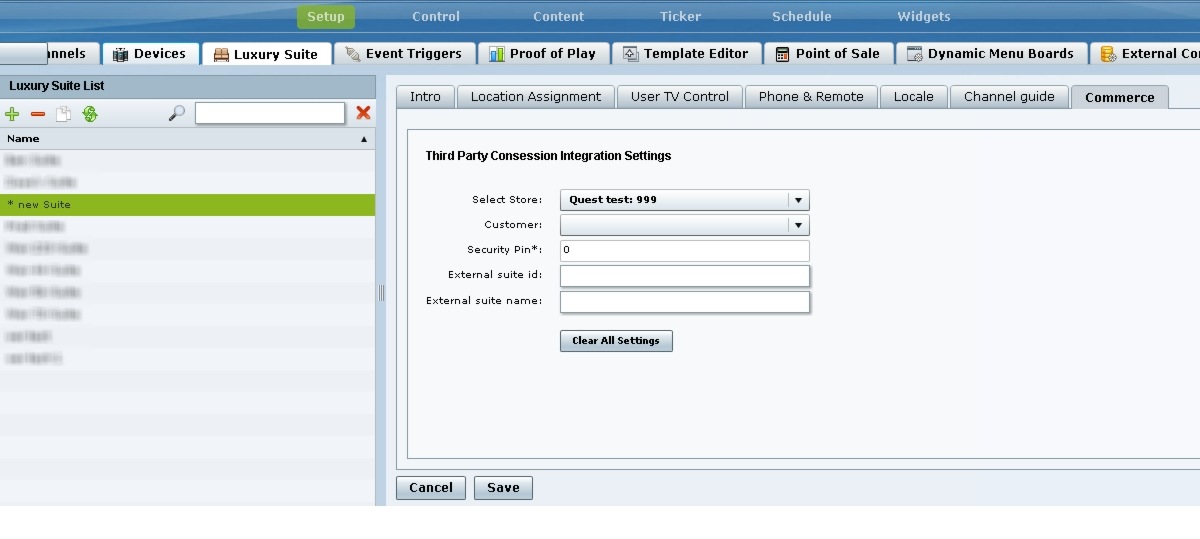
Prerequisites
You have the PoS customer name and PIN from the PoS system installer.
To configure single customer access in luxury suites, complete the following tasks:
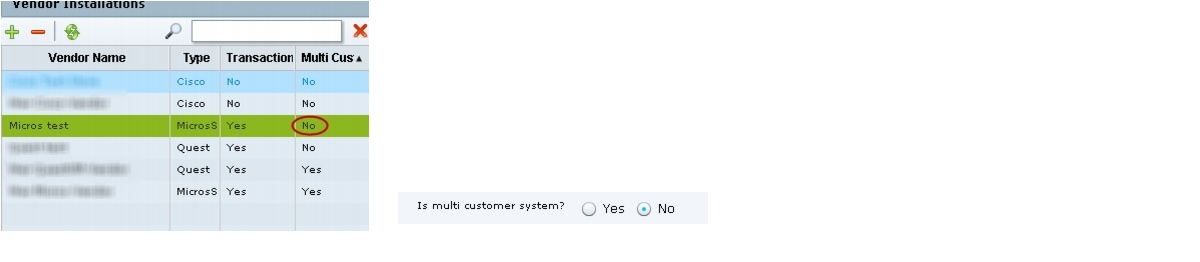
Step 1 ![]() In the Control Panel > Setup > Point of Sale panel, confirm that your vendor installation is disabled for multi-customer support (Figure 7).
In the Control Panel > Setup > Point of Sale panel, confirm that your vendor installation is disabled for multi-customer support (Figure 7).
Figure 7 Multi-Customer Support is Disabled
Step 2 ![]() Go to Control Panel > Setup > Luxury Suite.
Go to Control Panel > Setup > Luxury Suite.
Step 3 ![]() Select an existing suite (or add a new suite as required).
Select an existing suite (or add a new suite as required).
Step 4 ![]() Click Commerce.
Click Commerce.
Step 5 ![]() In the Customer drop-down box, select the PoS customer (Figure 6).
In the Customer drop-down box, select the PoS customer (Figure 6).
Step 6 ![]() In the Security Pin box, type the customer PIN.
In the Security Pin box, type the customer PIN.
Step 7 ![]() Click Save.
Click Save.
Configuring Multiple Customers for Quest Systems
Note ![]() Skip this task if you are configuring a Micros system with multiple customers. Micros owners are automatically populated in the Customers panel in Cisco StadiumVision Director once you synchronize the store.
Skip this task if you are configuring a Micros system with multiple customers. Micros owners are automatically populated in the Customers panel in Cisco StadiumVision Director once you synchronize the store.
Prerequisites
Before you configure multiple customers for Quest, be sure that the installer has provided the customer IDs and password credentials that are configured in the Quest system. The information that you configure in Cisco StadiumVision Director must match that information.
To configure multiple customers for Quest systems, complete the following steps:
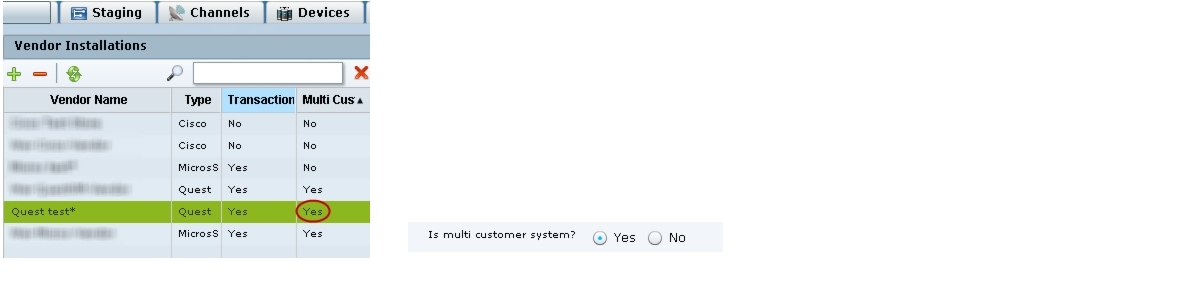
Step 1 ![]() In the Control Panel > Setup > Point of Sale screen, go to the Vendor Installation Info panel and confirm that your vendor installation is enabled for multi-customer support (Figure 8).
In the Control Panel > Setup > Point of Sale screen, go to the Vendor Installation Info panel and confirm that your vendor installation is enabled for multi-customer support (Figure 8).
Figure 8 Multi-Customer Support is Enabled
Step 2 ![]() Click Customers.
Click Customers.
Step 3 ![]() Click the Plus (+) icon to add a new customer for the selected Quest vendor installation (Figure 9).
Click the Plus (+) icon to add a new customer for the selected Quest vendor installation (Figure 9).
Figure 9 Add New Customer for Quest
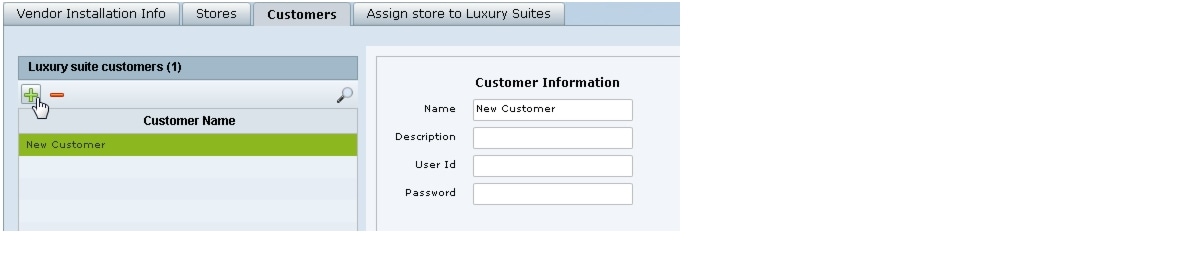
Step 4 ![]() Using the information provided by the Quest installer, complete the Name, Description (optional), User Id, and Password fields.
Using the information provided by the Quest installer, complete the Name, Description (optional), User Id, and Password fields.
Step 5 ![]() Click Update.
Click Update.
Step 6 ![]() Repeat from Step 3 for each customer.
Repeat from Step 3 for each customer.
Assigning Stores to Luxury Suites
There are two ways that you can assign stores to luxury suites in Cisco StadiumVision Director Control Panel Setup. In either interface, you can accomplish the same assignments, but each interface allows you to more easily assign either multiple stores or multiple suites.
•![]() Point of Sale > Stores panel—Allows you to assign multiple suites to a particular store.
Point of Sale > Stores panel—Allows you to assign multiple suites to a particular store.
•![]() Luxury Suites > Commerce panel—Allows you to assign mulitple stores to a particular suite.
Luxury Suites > Commerce panel—Allows you to assign mulitple stores to a particular suite.
This section includes the following topics:
•![]() Assigning a Store to Multiple Suites
Assigning a Store to Multiple Suites
•![]() Assigning a Suite to Multiple Stores
Assigning a Suite to Multiple Stores
•![]() Removing an Assigned Suite From a Store
Removing an Assigned Suite From a Store
Prerequisites
Before you can assign stores to luxury suites, the luxury suites must be configured in Cisco StadiumVision Director.
Assigning a Store to Multiple Suites
To assign a store to multiple suites, complete the following tasks:
Step 1 ![]() Go to the Control Panel > Setup > Luxury Suite screen.
Go to the Control Panel > Setup > Luxury Suite screen.
Step 2 ![]() Click Commerce.
Click Commerce.
Step 3 ![]() In the Luxury Suite List box, do one of the following:
In the Luxury Suite List box, do one of the following:
•![]() To select a sequential range of suites, use the standard Click/Shift+Click key sequence.
To select a sequential range of suites, use the standard Click/Shift+Click key sequence.
•![]() To select a non-sequential list of suites, use the standard Click/Ctrl+Click key sequence.
To select a non-sequential list of suites, use the standard Click/Ctrl+Click key sequence.
Step 4 ![]() In the Select Store drop-down list on the Commerce panel, select the store identifier that you want to assign to the selected suites.
In the Select Store drop-down list on the Commerce panel, select the store identifier that you want to assign to the selected suites.
Step 5 ![]() Click Save.
Click Save.
Assigning a Suite to Multiple Stores
When you assign a suite to multiple stores you must individually select and add each store. Multi-selection of stores for suite assignment is not supported in the Stores panel.
To assign a suite to multiple stores, complete the following tasks:
Step 1 ![]() Go to the Control Panel > Setup > Point of Sale screen.
Go to the Control Panel > Setup > Point of Sale screen.
Step 2 ![]() Click Assign store to Luxury Suites.
Click Assign store to Luxury Suites.
Step 3 ![]() In the Vendor Installations box, select the vendor whose stores you want to configure.
In the Vendor Installations box, select the vendor whose stores you want to configure.
Step 4 ![]() In the Store List box, select the store that you want to assign to suites.
In the Store List box, select the store that you want to assign to suites.
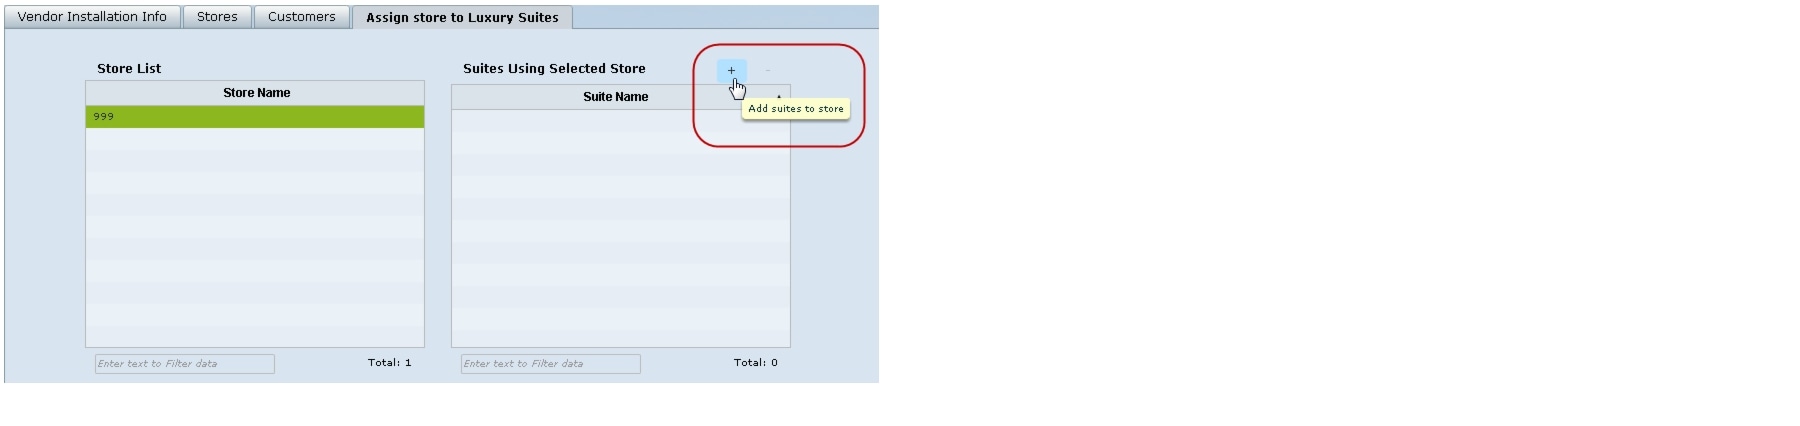
Step 5 ![]() In the right corner above the Suites Using Selected Store box, click the Plus (+) icon to open a list of available suites.
In the right corner above the Suites Using Selected Store box, click the Plus (+) icon to open a list of available suites.
Tip ![]() The Plus (+) and Minus (-) icons to add and remove suites can be difficult to see until you hover your mouse over the icon area and the balloon help appears as shown in Figure 10.
The Plus (+) and Minus (-) icons to add and remove suites can be difficult to see until you hover your mouse over the icon area and the balloon help appears as shown in Figure 10.
Figure 10 Add Suites to Store Icon
A list of the configured Luxury Suites in Cisco StadiumVision Director is displayed.
Figure 11 Suite Selection List with Add Buttons
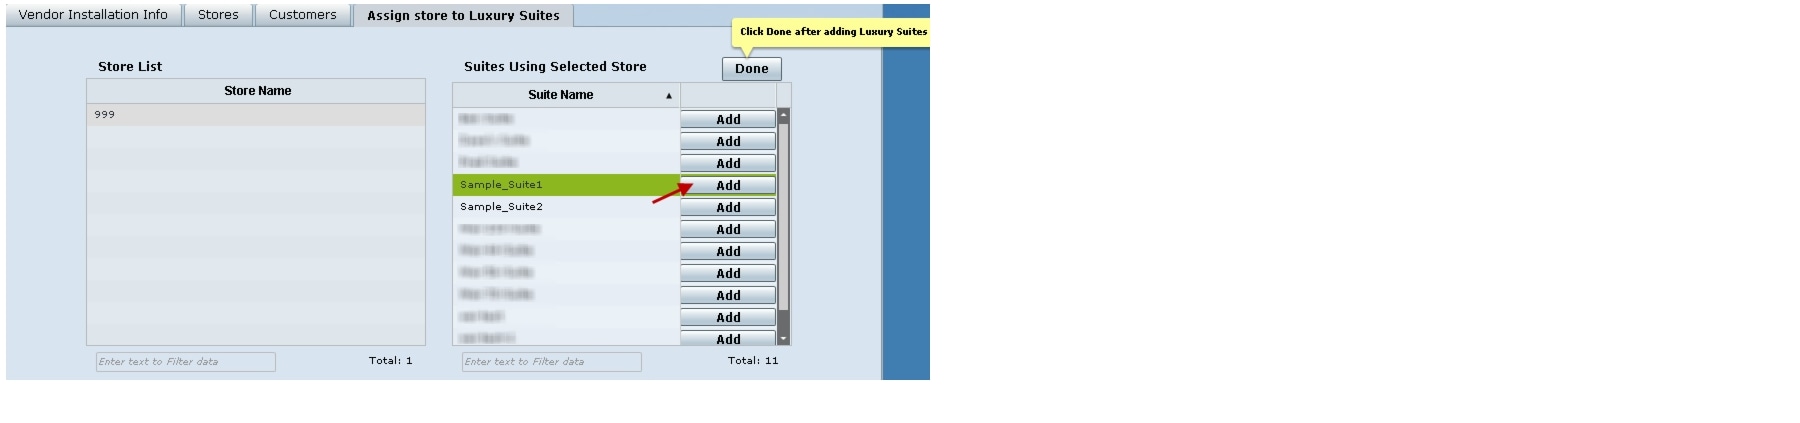
Step 6 ![]() In the Suite Name box, select the suite that you want to assign to the selected store and click the Add button beside that suite (Figure 11).
In the Suite Name box, select the suite that you want to assign to the selected store and click the Add button beside that suite (Figure 11).
Step 7 ![]() Repeat Step 6 for as many suites as you want to assign to the store.
Repeat Step 6 for as many suites as you want to assign to the store.
Step 8 ![]() Click Done.
Click Done.
Removing an Assigned Suite From a Store
To remove an assigned suite from a store, complete the following tasks:
Step 1 ![]() Go to the Control Panel > Setup > Point of Sale screen.
Go to the Control Panel > Setup > Point of Sale screen.
Step 2 ![]() Click Assign store to Luxury Suites.
Click Assign store to Luxury Suites.
Step 3 ![]() In the Vendor Installations box, select the vendor whose stores you want to configure.
In the Vendor Installations box, select the vendor whose stores you want to configure.
Step 4 ![]() In the Store List box, select the store from which you want to remove a suite assignment.
In the Store List box, select the store from which you want to remove a suite assignment.
Step 5 ![]() In the Suites Using Selected Store box, select the suite that you want to remove.
In the Suites Using Selected Store box, select the suite that you want to remove.
Step 6 ![]() In the right corner above the Suites Using Selected Store box, click the Minus (-) icon (Figure 12).
In the right corner above the Suites Using Selected Store box, click the Minus (-) icon (Figure 12).
Figure 12 Remove Suites From Store Icon

The selected store is removed immediately.
Verifying the PoS Store Configuration
To verify the PoS store configuration, complete the following steps:
Step 1 ![]() Go to the Control Panel > Setup > Point of Sale screen.
Go to the Control Panel > Setup > Point of Sale screen.
Step 2 ![]() Click Stores.
Click Stores.
Step 3 ![]() In the Vendor Installations box, select the vendor whose store configuration you want to verify.
In the Vendor Installations box, select the vendor whose store configuration you want to verify.
Step 4 ![]() Select the store that you want to verify.
Select the store that you want to verify.
Step 5 ![]() In the icon bar on the Stores box, click the Synchronize icon to manually start an update of data from the selected PoS system. The icon changes state while the update is in progress (Figure 13).
In the icon bar on the Stores box, click the Synchronize icon to manually start an update of data from the selected PoS system. The icon changes state while the update is in progress (Figure 13).
Figure 13 Synchronize Icon

The update might take up to 15 seconds.
Step 6 ![]() Confirm that the successful store reload message appears in the Control Panel (Figure 14).
Confirm that the successful store reload message appears in the Control Panel (Figure 14).
Figure 14 Successful Store Reload Message

Step 7 ![]() To verify receipt of menu data from the PoS system, click the Show Menu Items icon (Figure 15).
To verify receipt of menu data from the PoS system, click the Show Menu Items icon (Figure 15).
Figure 15 Show Menu Items Icon

Step 8 ![]() In the Menu Items dialog box, click the arrows beside the menu groups to display successful retrieval of the PoS system menu items into Cisco StadiumVision Director (Figure 16).
In the Menu Items dialog box, click the arrows beside the menu groups to display successful retrieval of the PoS system menu items into Cisco StadiumVision Director (Figure 16).
Figure 16 Menu Item Dialog Box

Configuring Cisco Stores From the DMB Application
Note ![]() Although the Cisco store vendor installation type is available from the Control Panel > Setup > Point of Sale interface, Cisco stores must be created in the DMB application by either an administrator or concessionaire and should not be created from the Control Panel.
Although the Cisco store vendor installation type is available from the Control Panel > Setup > Point of Sale interface, Cisco stores must be created in the DMB application by either an administrator or concessionaire and should not be created from the Control Panel.
This section includes the following tasks:
•![]() Adding Family Groups, Major Groups, and Items to a Cisco Store
Adding Family Groups, Major Groups, and Items to a Cisco Store
Prerequisites
If you plan to use any images other than those already provided in the Dynamic Menu Board Image Gallery, then be sure that those images are created in the appropriate format and uploaded. For more information, see the "Working with Images in the DMB Application".
Creating New Cisco Stores
To create a new Cisco store from the DMB application, complete the following steps:
Step 1 ![]() Log into Cisco StadiumVision Director as an administrator or concessionaire.
Log into Cisco StadiumVision Director as an administrator or concessionaire.
Step 2 ![]() From the main menu, click Dynamic Menu Boards.
From the main menu, click Dynamic Menu Boards.
Step 3 ![]() Click Stores.
Click Stores.
Step 4 ![]() Click New (Plus (+) icon) to create a new Cisco store.
Click New (Plus (+) icon) to create a new Cisco store.
Step 5 ![]() In the Store information box, type a Name and Description for the store.
In the Store information box, type a Name and Description for the store.
Step 6 ![]() Click Save.
Click Save.
Adding Family Groups, Major Groups, and Items to a Cisco Store
Cisco Stores have hierarchical groupings of items:
•![]() Family Groups—Correspond to the top-level options on the menu such as Food, Beverages, Merchandise.
Family Groups—Correspond to the top-level options on the menu such as Food, Beverages, Merchandise.
•![]() Major Groups—Correspond to the sub-menus for the top-level family groups, such as Snacks, Meals, Non-Alcoholic Beverages.
Major Groups—Correspond to the sub-menus for the top-level family groups, such as Snacks, Meals, Non-Alcoholic Beverages.
•![]() Items—Correspond to the individual items and prices for the items under each sub-menu such as Shrimp Salad, Hotdog, Cisco Cola.
Items—Correspond to the individual items and prices for the items under each sub-menu such as Shrimp Salad, Hotdog, Cisco Cola.
This section includes the following tasks:
•![]() Adding Family Groups (required)
Adding Family Groups (required)
•![]() Adding Major Groups Under a Family Group (required)
Adding Major Groups Under a Family Group (required)
•![]() Adding Items Under Major Groups (required)
Adding Items Under Major Groups (required)
Adding Family Groups
To add family groups, complete the following steps:
Step 1 ![]() In the Stores panel, select the Cisco store where you want to add a family group.
In the Stores panel, select the Cisco store where you want to add a family group.
Step 2 ![]() Click Family Group.
Click Family Group.
Step 3 ![]() Specify the Name, Description, and Display name fields (Figure 17).
Specify the Name, Description, and Display name fields (Figure 17).
Note ![]() The Name field is an internal identifier for use on the Theme, and must be unique within the Theme. The Display name is what is shown on the menu board and does not need to be unique on this theme.
The Name field is an internal identifier for use on the Theme, and must be unique within the Theme. The Display name is what is shown on the menu board and does not need to be unique on this theme.
Figure 17 Family Group Configuration

Step 4 ![]() (Optional) To assign an image to the group, do one of the following:
(Optional) To assign an image to the group, do one of the following:
•![]() In the drop-down list box, select an image name to assign.
In the drop-down list box, select an image name to assign.
•![]() Click Browse to see thumbnails of available images.
Click Browse to see thumbnails of available images.
Tip ![]() The images shown are from the default mu_img folder in the Image Gallery.
The images shown are from the default mu_img folder in the Image Gallery.
Step 5 ![]() Click Save.
Click Save.
Note ![]() You cannot save the group until you change at least one area of information from the defaults that were created.
You cannot save the group until you change at least one area of information from the defaults that were created.
Adding Major Groups Under a Family Group
Major groups are added as sub-groups to family groups in a Cisco store to further organize items.
To add a major group under a family group, complete the following steps:
Step 1 ![]() In the Cisco store, select the Family group level where you want to add a major group as a sub-group.
In the Cisco store, select the Family group level where you want to add a major group as a sub-group.
The Major Group button is enabled.
Step 2 ![]() Click Major Group.
Click Major Group.
Step 3 ![]() Specify the Name, Description, and Display name fields.
Specify the Name, Description, and Display name fields.
Step 4 ![]() (Optional) To assign an image to the group, do one of the following:
(Optional) To assign an image to the group, do one of the following:
•![]() In the drop-down list box, select an image name to assign.
In the drop-down list box, select an image name to assign.
•![]() Click Browse to see thumbnails of available images.
Click Browse to see thumbnails of available images.
Tip ![]() The images shown are from the default mu_img folder in the Image Gallery.
The images shown are from the default mu_img folder in the Image Gallery.
Step 5 ![]() Click Save.
Click Save.
Note ![]() You cannot save the group until you change at least one area of information from the defaults that were created.
You cannot save the group until you change at least one area of information from the defaults that were created.
Adding Items Under Major Groups
Individual items are added under major groups in a Cisco store.
To add items under major groups, complete the following steps:
Step 1 ![]() In the Cisco store, select the Major group level where you want to add individual items.
In the Cisco store, select the Major group level where you want to add individual items.
The Item button is enabled.
Step 2 ![]() Click Item.
Click Item.
Step 3 ![]() Specify the following fields:
Specify the following fields:
•![]() Name
Name
•![]() Description and Description2—optional.
Description and Description2—optional.
•![]() Display name—optional.
Display name—optional.
•![]() Calories—optional.
Calories—optional.
•![]() Price—optional.
Price—optional.
Step 4 ![]() (Optional) To hide a configured item from dislay on a menu board, select the Hidden? option.
(Optional) To hide a configured item from dislay on a menu board, select the Hidden? option.
Tip ![]() This option allows you to remove a group or item from displaying on the menu board temporarily, perhaps for just the current event, but still retain it on the menu board for subsequent events by simply changing the hidden attribute again.
This option allows you to remove a group or item from displaying on the menu board temporarily, perhaps for just the current event, but still retain it on the menu board for subsequent events by simply changing the hidden attribute again.
Step 5 ![]() (Optional) To assign an image to the group, do one of the following:
(Optional) To assign an image to the group, do one of the following:
•![]() In the drop-down list box, select an image name to assign.
In the drop-down list box, select an image name to assign.
•![]() Click Browse to see thumbnails of available images.
Click Browse to see thumbnails of available images.
Tip ![]() The images shown are from the default mu_img folder in the Image Gallery.
The images shown are from the default mu_img folder in the Image Gallery.
Step 6 ![]() Click Save.
Click Save.
Note ![]() You cannot save the item until you change at least one area of information from the defaults that were created.
You cannot save the item until you change at least one area of information from the defaults that were created.
How to Update PoS Server Information and Menu Content
This section includes the following tasks:
•![]() Modifying the Schedule of the PosGetMenuTask in the Management Dashboard (optional)
Modifying the Schedule of the PosGetMenuTask in the Management Dashboard (optional)
•![]() Configuring the Synchronization Interval for Periodic Automatic Updates of PoS Stores in the DMB Application (optional)
Configuring the Synchronization Interval for Periodic Automatic Updates of PoS Stores in the DMB Application (optional)
•![]() Synchronizing PoS Stores Manually in the DMB Application (optional)
Synchronizing PoS Stores Manually in the DMB Application (optional)
•![]() Synchronizing Stores Manually in the Control Panel (optional)
Synchronizing Stores Manually in the Control Panel (optional)
Modifying the Schedule of the PosGetMenuTask in the Management Dashboard
By default, the PosGetMenuTask is configured for a value of "periodic-300-seconds," which means that a process in Cisco StadiumVision Director runs every 5 minutes to check if any PoS stores require an update based on the last update time and the synchronization interval for that store.
Be sure that the schedule for this task is sufficiently frequent to ensure that any configured synchronization intervals for stores in the system can be met.
To modify the schedule of the PosGetMenuTask in the Management Dashboard, complete the following tasks:
Step 1 ![]() Log into Cisco StadiumVision Director as an administrator.
Log into Cisco StadiumVision Director as an administrator.
Step 2 ![]() From the main menu, click Management Dashboard.
From the main menu, click Management Dashboard.
Step 3 ![]() Click Tools > Advanced > Scheduled Tasks.
Click Tools > Advanced > Scheduled Tasks.
Step 4 ![]() In the Scheduled Task box, scroll to find the PosGetMenuTask.
In the Scheduled Task box, scroll to find the PosGetMenuTask.
Step 5 ![]() In the Task Time field for the PosGetMenuTask, type periodic-xxxx-seconds, where xxxx is the number of seconds that specify the frequency with which you want to check if PoS server updates are due. The minimum frequency value is 5 seconds, and the maximum is the number of seconds in one day (24 hours).
In the Task Time field for the PosGetMenuTask, type periodic-xxxx-seconds, where xxxx is the number of seconds that specify the frequency with which you want to check if PoS server updates are due. The minimum frequency value is 5 seconds, and the maximum is the number of seconds in one day (24 hours).
Note ![]() Be sure that this value is less than the synchronization interval for stores, which is 24 hours by default. Otherwise, the PosGetMenuTask will not run regularly enough to ensure that the synchronization interval is met.
Be sure that this value is less than the synchronization interval for stores, which is 24 hours by default. Otherwise, the PosGetMenuTask will not run regularly enough to ensure that the synchronization interval is met.
Step 6 ![]() Click Apply.
Click Apply.
Configuring the Synchronization Interval for Periodic Automatic Updates of PoS Stores in the DMB Application
By default, Cisco StadiumVision Director synchronizes its stores with the PoS server once every 24 hours. You can configure the frequency of the scheduled update from 1 to 24 hours.
Note ![]() This interval works in conjunction with the PosGetMenuTask process that runs periodically in Cisco StadiumVision Director to verify the time of last update and check it against the configured synchronization interval for all stores. The PosGetMenuTask frequency should be set to ensure that the synchronization interval can be met.
This interval works in conjunction with the PosGetMenuTask process that runs periodically in Cisco StadiumVision Director to verify the time of last update and check it against the configured synchronization interval for all stores. The PosGetMenuTask frequency should be set to ensure that the synchronization interval can be met.
To configure the synchronization interval for periodic automatic updates of stores in the DMB application, complete the following steps:
Step 1 ![]() Log into Cisco StadiumVision Director as an administrator or concessionaire.
Log into Cisco StadiumVision Director as an administrator or concessionaire.
Step 2 ![]() From the main menu, click Dynamic Menu Boards.
From the main menu, click Dynamic Menu Boards.
Step 3 ![]() Click Stores.
Click Stores.
Step 4 ![]() Click Browse All.
Click Browse All.
Step 5 ![]() On the left side of the screen, select the name of the PoS store whose update interval you want to modify.
On the left side of the screen, select the name of the PoS store whose update interval you want to modify.
Step 6 ![]() In the Sync Interval (hours): field, do one of the following:
In the Sync Interval (hours): field, do one of the following:
•![]() Type a number from 1-24 in the box.
Type a number from 1-24 in the box.
•![]() Use the up/down arrows to set the hour.
Use the up/down arrows to set the hour.
Step 7 ![]() Click Save Sync Interval (Figure 18).
Click Save Sync Interval (Figure 18).
Figure 18 Sync Interval Update

Synchronizing PoS Stores Manually in the DMB Application
Step 1 ![]() Log into Cisco StadiumVision Director as an administrator or concessionaire.
Log into Cisco StadiumVision Director as an administrator or concessionaire.
Step 2 ![]() From the main menu, click Dynamic Menu Boards.
From the main menu, click Dynamic Menu Boards.
Step 3 ![]() Click Stores.
Click Stores.
Step 4 ![]() Click Browse All.
Click Browse All.
Step 5 ![]() On the left side of the screen, select the name of the PoS store that you want to update.
On the left side of the screen, select the name of the PoS store that you want to update.
Step 6 ![]() Click Sync Store (Figure 19).
Click Sync Store (Figure 19).
Figure 19 Manually Synchronizing a Store

Step 7 ![]() When a message box is displayed stating that the synchronize store was successful, click Ok (Figure 20). This may take several seconds as Cisco StadiumVision Director gets the data from the PoS system.
When a message box is displayed stating that the synchronize store was successful, click Ok (Figure 20). This may take several seconds as Cisco StadiumVision Director gets the data from the PoS system.
Figure 20 Successful Store Synchronization Message Box

An update of content from the PoS server is immediately started and the Last updated field is modified.
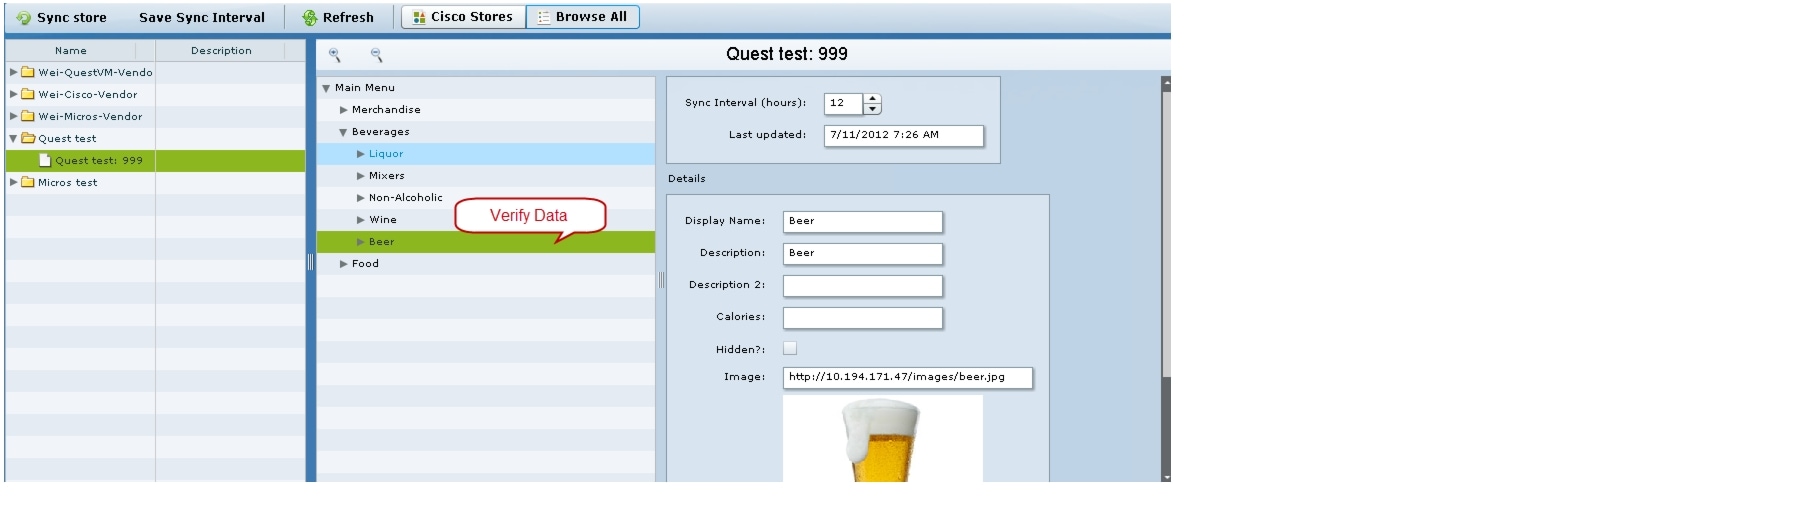
Step 8 ![]() In the middle of the screen, select the menu items to verify (as possible) that updated store data is received (Figure 21).
In the middle of the screen, select the menu items to verify (as possible) that updated store data is received (Figure 21).
Figure 21 Verify Store Data
Synchronizing Stores Manually in the Control Panel
Step 1 ![]() Log into Cisco StadiumVision Director as an administrator.
Log into Cisco StadiumVision Director as an administrator.
Step 2 ![]() From the main menu, click Control Panel.
From the main menu, click Control Panel.
Step 3 ![]() Click Setup > Point of Sale.
Click Setup > Point of Sale.
Step 4 ![]() Click Stores.
Click Stores.
Step 5 ![]() In the Vendor Installations box, select the vendor whose store configuration you want to verify.
In the Vendor Installations box, select the vendor whose store configuration you want to verify.
Step 6 ![]() Select the store that you want to verify.
Select the store that you want to verify.
Step 7 ![]() In the icon bar on the Stores box, click the Synchronize icon to manually start an update of data from the selected PoS system. The icon changes state while the update is in progress (Figure 13).
In the icon bar on the Stores box, click the Synchronize icon to manually start an update of data from the selected PoS system. The icon changes state while the update is in progress (Figure 13).
Figure 22 Synchronize Icon

The update might take up to 15 seconds.
Step 8 ![]() Confirm that the successful store reload message appears in the Control Panel (Figure 14).
Confirm that the successful store reload message appears in the Control Panel (Figure 14).
Figure 23 Successful Store Reload Message

Step 9 ![]() To verify receipt of menu data from the PoS system, click the Show Menu Items icon.
To verify receipt of menu data from the PoS system, click the Show Menu Items icon.
 Feedback