Cisco Intersight OnPremises: Deployment, Verification and Troubleshooting
Available Languages
Download Options
Bias-Free Language
The documentation set for this product strives to use bias-free language. For the purposes of this documentation set, bias-free is defined as language that does not imply discrimination based on age, disability, gender, racial identity, ethnic identity, sexual orientation, socioeconomic status, and intersectionality. Exceptions may be present in the documentation due to language that is hardcoded in the user interfaces of the product software, language used based on RFP documentation, or language that is used by a referenced third-party product. Learn more about how Cisco is using Inclusive Language.
Contents
Introduction
Cisco Intersight provides infrastructure management for Cisco Unified Compute System (Cisco UCS) and Cisco HyperFlex platforms. This platform offers an intelligent level of management that enables IT organizations to analyze, simplify, and automate their environments in more advanced ways than previous generations of tools.
Cisco Intersight Virtual Appliancedelivers the management features of Intersight for Cisco UCS and HyperFlex in an easy to deploy VMware OVA that allows you to control what system details leave your premises. The Virtual Appliance form factor enables additional data locality, security, or compliance needs that are not completely met by intersight.com.Cisco Intersight Virtual Appliancerequires a connection back to Cisco and Intersight services for updates and access required services for full functionality of intersight.com.Cisco Intersight Virtual Applianceis not intended for an environment where you operate data centers with no external connectivity.
This guide provides an overview of how to install and set up Cisco Intersight Virtual Appliance in your environment.
Contributed by Brian Morrissey and Mohammed Majid Hussain, Cisco CX Engineers.
Prerequisites
Understanding of UCS, DNS records
Requirements
TheCisco Intersight Virtual ApplianceOVA can be deployed on VMware ESXi 6.0 and higher. The following sections describe the various system requirements to install and deployCisco Intersight Virtual Appliance:
|
Item |
System Requirements |
|---|---|
|
Supported Hypervisors |
VMware ESXi 6.0 and higher VMware vSphere Web Client 6.5 and higher |
|
Storage |
500 GB. Cisco recommends that you use thin provisioning to optimize disk storage usage. |
|
RAM |
32 GB |
|
vCPU Cores |
16 |
 Note Note |
Cisco Intersight Virtual Appliancesupports managing up to 2000 servers per deployment and deploying 50 service profiles. |
IP Address and Hostname Requirements
Setting up Intersight Appliance requires an IP address and 2 hostnames for that IP address. The hostnames must be in the following formats:
-
myhost.mydomain.com—A hostname in this format is used to access the GUI. This must be defined as anA record and PTR recordin DNS. The PTR record is required for reverse lookup of the IP address. If an IP address resolves to multiple hostnames, the first resolved hostname is used.
-
dc-myhost.mydomain.com—Thedc-must be prepended to your hostname. This hostname must be defined as theCNAME of myhost.mydomain.com. Hostnames in this format are used internally by the appliance to manage device connections.
| Attention |
Ensure that the appropriate entries of typeA, CNAME, and PTR recordsexist in the DNS, as described above. |
Port Requirements
The following table lists the ports required to be open for Intersight Appliance communication.
|
Port |
Protocol |
Description |
|---|---|---|
|
443 |
TCP/UDP |
This port is required for communication between:
For more information about connectivity, seeConnectivity Requirements. |
|
80 |
TCP |
This port is required for communication between:
|
Connectivity Requirements
-
Intersight Virtual Appliance must properly resolve svc.ucs-connect.com(intersight.com). If a proxy is required for an HTTPS connection to svc.ucs-connect.com, it can be configured in the device connector user interface.
-
Ensure that there is no firewall between the appliance and the endpoint.
-
Ensure thatCisco Intersight Virtual Appliancehas access to the following sites directly or through a proxy. For more information about setting up a proxy, seeCloud Connection. All the following URLs are accessed through HTTPS:
-
svc.intersight.com—for the device connector to access Intersight services
-
cisco.com—For access to all Cisco URLs
-
api.cisco.com:443— for access to Cisco Software download site
-
tools.cisco.com:443—for access to Cisco Smart Licensing Manager
-
-
Supported Browsers
Cisco Intersight runs on the following minimum supported browser versions:
-
Google Chrome 62.0.3202.94
-
Firefox 57.0.1
-
Safari 10.1.1
Software Compatibility
This section contains details about the minimum versions of the following software supported by the appliance:
|
Component |
Minimum Supported Version |
|---|---|
|
Cisco UCS Manager |
3.2(1) |
|
Cisco HyperFlex Connect and Data Platform |
2.6 |
|
Cisco IMC |
3.1(3) for M5 Servers 3.0(4) for M4 Servers For more information about the Cisco IMC Software requirements for the M4 and M5 Servers, see the Supported Systems section in the Help Center. SeeTable 1for a complete list of the supported software and the required device connector versions. |
| Important |
|
Components Used
The information in this document was created from the devices in a specific lab environment. All of the devices used in this document started with a cleared (default) configuration. If your network is live, make sure that you understand the potential impact of any command.
UCSM 4.0(1c)
Cisco Intersight Appliance 1.0.9-7
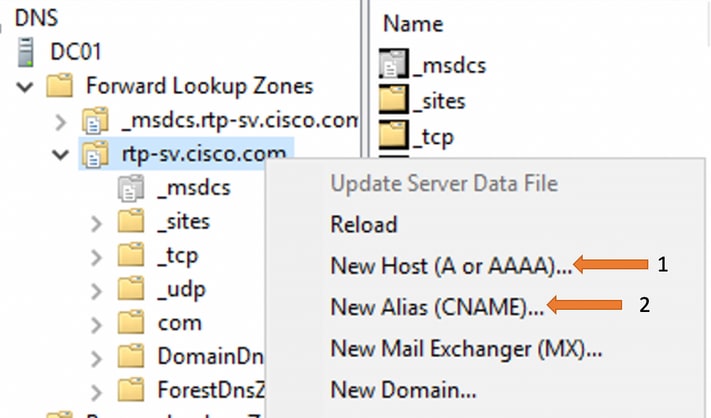
Configure
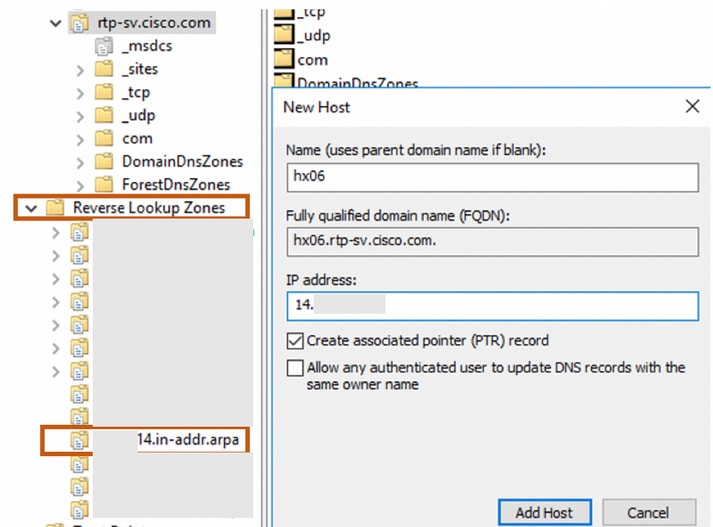
Configure DNS A record and CNAME
Make sure you have defined reverse lookup zone for the subnet in question.
Define DNS A record as shown then click Add Host
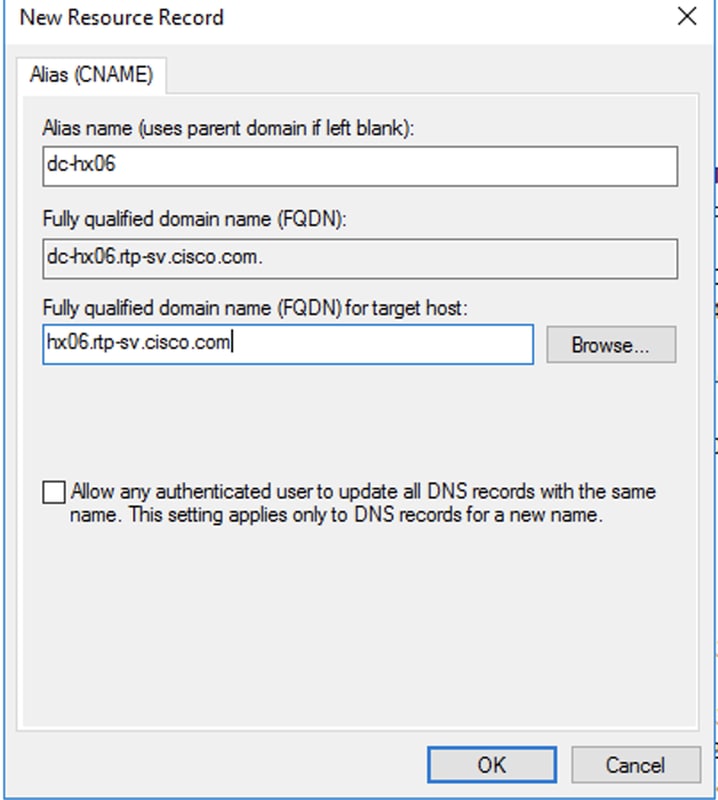
Define CNAME as shown
Verify that the PTR record is configured.

Configure forwarders as necessary

Once the DNS setting have been configured, proceed towards deploying the Intersight Appliance.
Log in to VMware vSphere Web Client with administrator credentials.
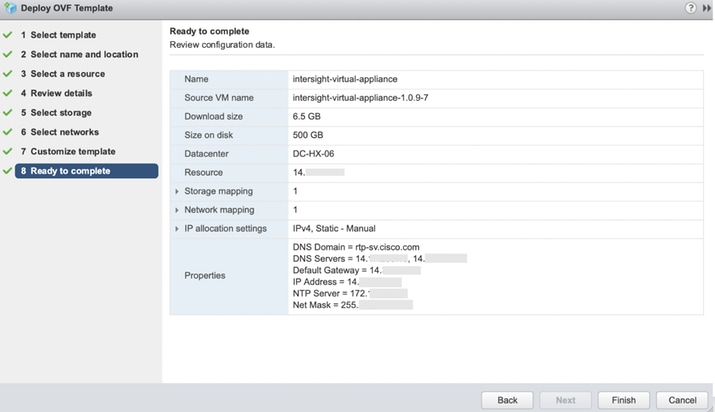
Right-click on the host and select Deploy OVF Template.
Go through the wizard and review the details in the Ready to complete section
Specify the DNS name you configured earlier in the web browser and you should be able to monitor the progress of the deployment
You can click on the progress bar to view more details in the form of rolling log messages
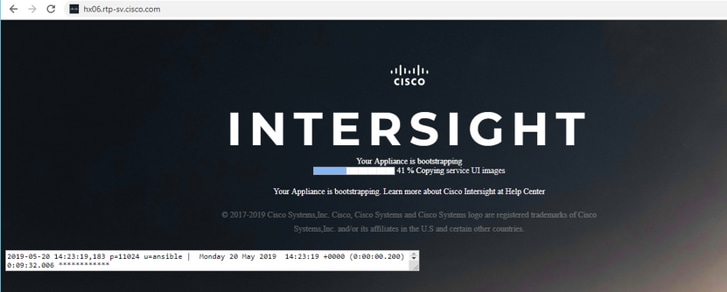
After you install the Cisco Intersight Virtual Appliance OVA, go <<http://your fqdn.com>> to access the Initial Setup Wizard. The wizard enables you to complete the setup of the Intersight appliance. Use the following instructions to complete the setup
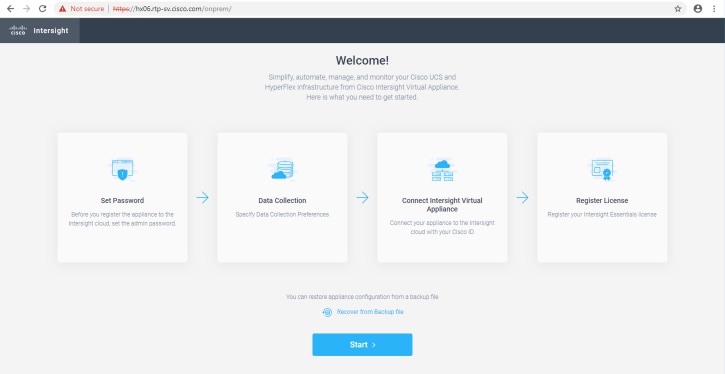
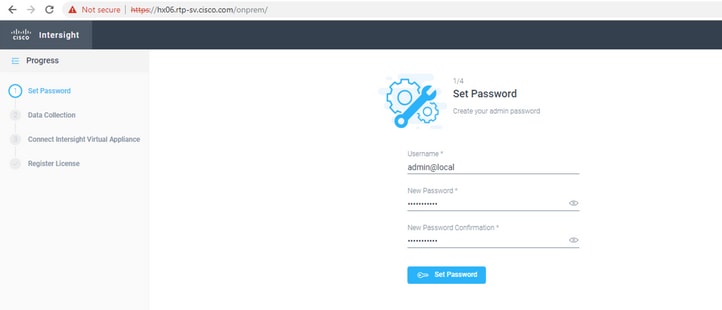
Set Password—Before you register the appliance with Intersight, you must create an admin password. The password can contain 0-9, A-Z, a-z, and all special characters except a colon (:) and space. You must use the same password to log in to Intersight.
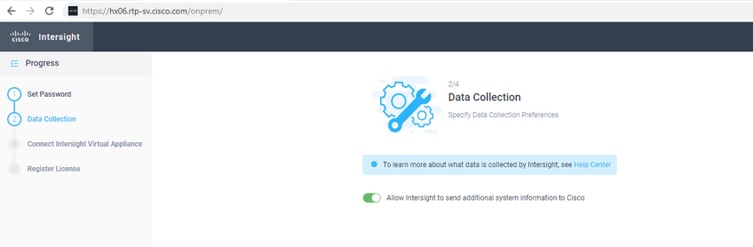
Data Collection—Specify your preference to allow Intersight to send additional system information to Cisco. This option is enabled by default.
For more information about what data is collected by Intersight, see Data Collected from Intersight Virtual Appliance
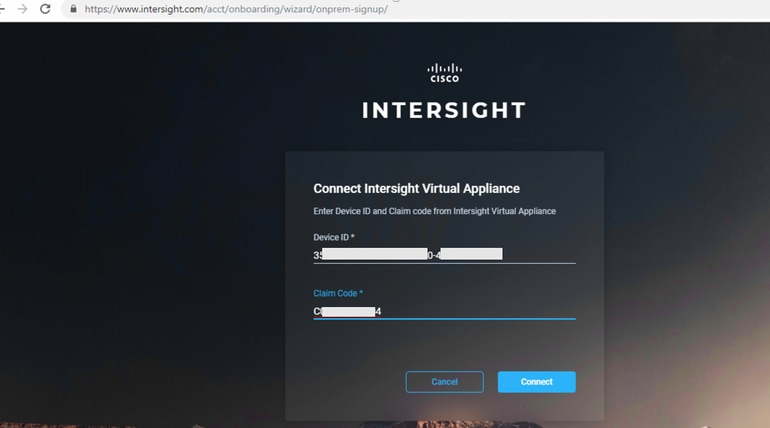
Connect Intersight Virtual Appliance—Click to connect Cisco Intersight Virtual Appliance to Intersight services using your Cisco ID. If you do not have a Cisco ID, you can create onehere
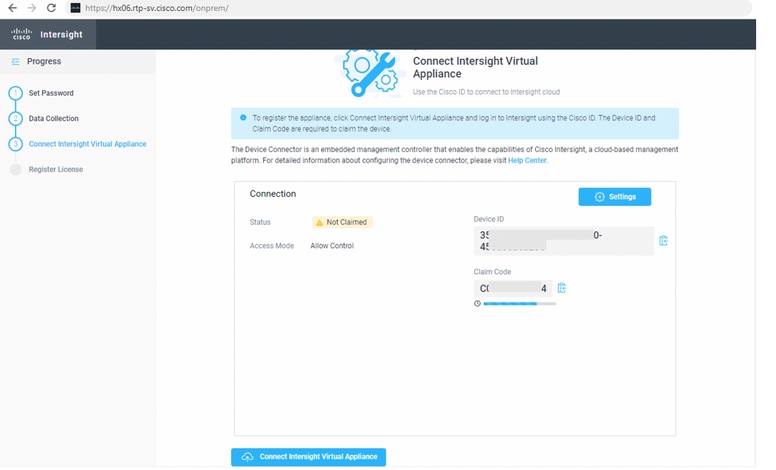
Specify the Device ID and the Claim Code from the Intersight Virtual Appliance
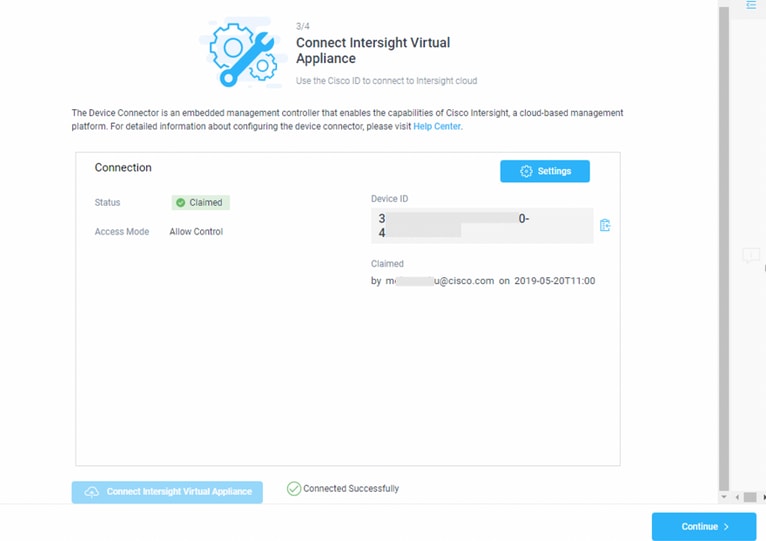
A successful claim should look like so
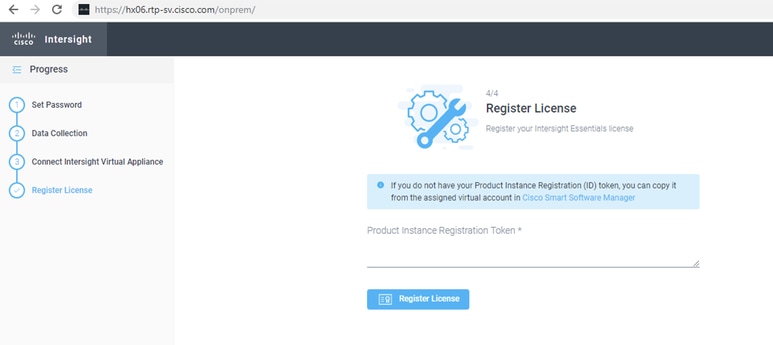
Register License—Click Register License. Obtain a license registration token from Cisco Smart License Manager, and apply add the token to activate your license. The license registration process could take a few minutes to complete. For more information about registering your Intersight license, watch Activating Intersight License
Claiming a Device
From Intersight Dashboard>Devices, click Claim a New Device
Select theDevice Typefrom the drop-down list.
You can select a Cisco UCS Fabric Interconnect, Integrated Management Controller or a HyperFlex Server.
Enter the IP/Hostname of the device you want to claim.
Enter the Username for the device. This user must have administrative privileges.
Enter the Password for the user and click Claim to initiate device claim.
You can monitor the progress of the claim by clicking on the revolving circular icon
The device claim process could take a few minutes. If required, the Device Connector will be automatically upgraded as part of the process.
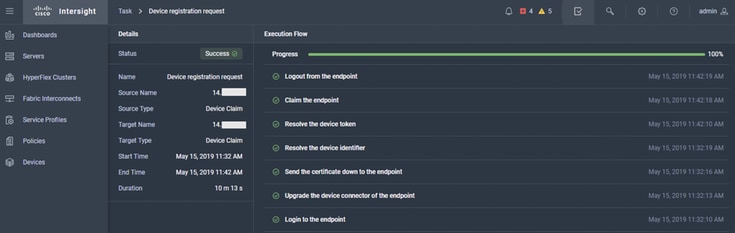
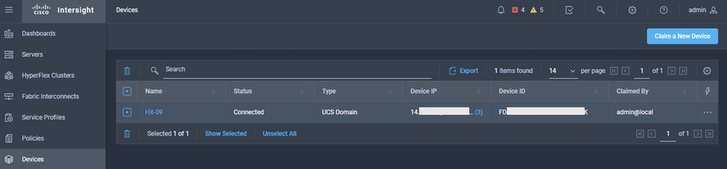
Once a device is successfully claimed, it would should up in the Devices section
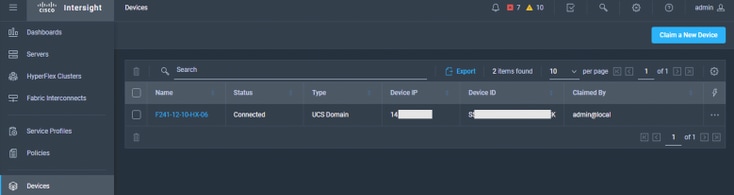
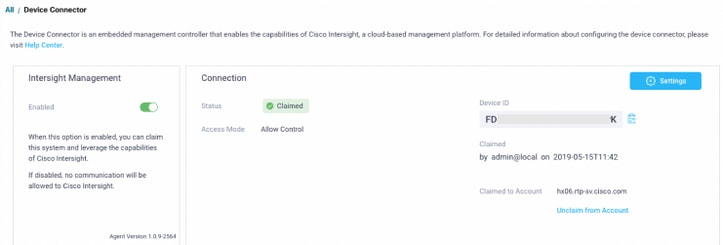
We could also login to the UCSM (in this case) and verify the claim status
Unclaim a device
You can unclaim a device by selecting a device from Devices>Device Table view, and clicking Delete
Click Delete to unclaim

Network Diagram
N/A
Configurations
N/A
Verify
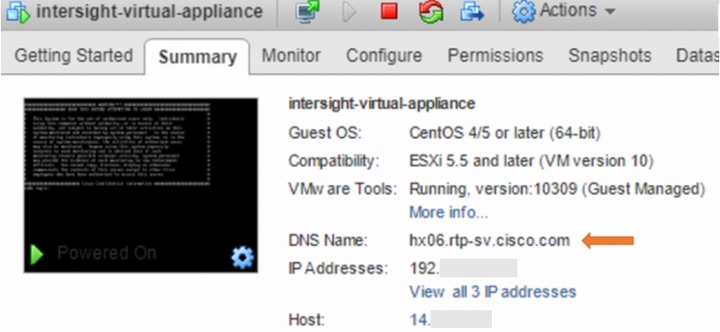
Confirm if your FQDN resolves to the IP address you specified

Click on the Intersight Appliance. Under the Summary tab you should be able to see the DNS name being resolved
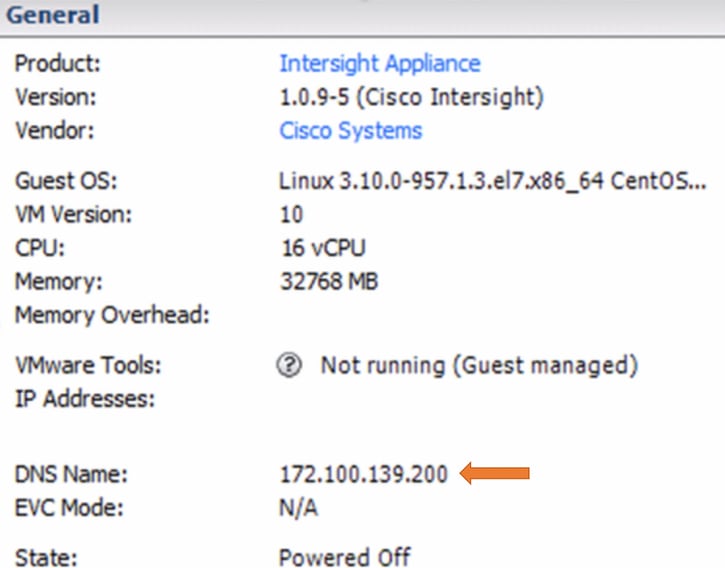
If DNS resolution wasn't successdul, it would look something like this:
Troubleshoot
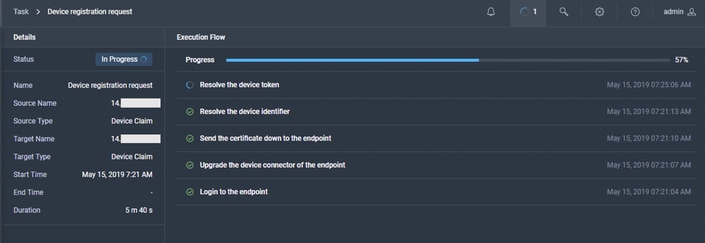
Scenario 1
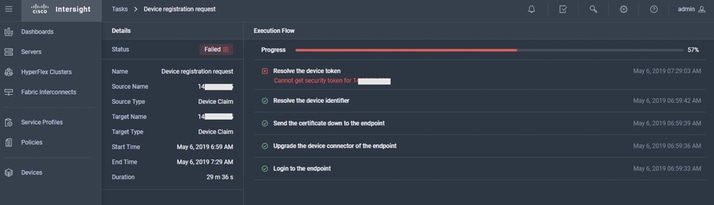
If the progress bar (under device registration) on the appliance looks hung or fails, give UCSM a look and see what it reports
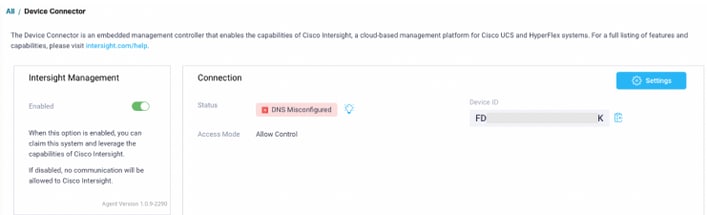
The UCSM reports that the Connection hasn't completed yet as there is a DNS Misconfiguration
Let us look at the device_connector.log
/var/sysmgr/sam_logs/device_connector.log
2019-05-15T15:34:40.643Z error base/connector.go:1477 Error in round trip {"traceId": "DC791e24a496bf9aec1c79f4c1b41cfb39", "error": "dial tcp: lookup dc-hx06.rtp-sv.cisco.com on 14.xx.xx.xx:53: no such host"}
2019-05-15T15:34:40.643Z error base/connector.go:413 Connection error {"traceId": "DC791e24a496bf9aec1c79f4c1b41cfb39", "error": "DNS Misconfigured: Error during dns lookup: lookup dc-hx06.rtp-sv.cisco.com on 14.xx.xx.xx:53: no such host"}
2019-05-15T15:36:10.171Z error base/rest_interface.go:268 security token is nil {"traceId": "DC7c3714b0a2d1f910e838086cd339c7f8"}
The logs indicate that there is some misconfiguration with the DNS settings.
So we could verify a few more things to figure out where the misconfiguration could be
Ping the hostname you defined, as the A record on your DNS.
In this case, it does respond, so that was set correctly

Use Ping -a <IP_Address> to verfiy if the resolution occurs, this is to confirm that a PTR record exists

Let us get the nslookup output for both the A record and the CNAME for clues on where we would need to look in the DNS settings
The A record does resolve, so that was set correctly

The CNAME doesn't resolve, which would indicate that the CNAME was either not set or was misconfigured

Solution
In this scenario, CNAME wasn't configured on the DNS server. Once done, the error went away and registration was successful
The nslookup for the CNAME now resolves.

Scenario 2
The device claim has failed
The UCSM reports that the Connection hasn't completed yet as there is a DNS Misconfiguration

Lets us look at the device_connector.log
var/sysmgr/sam_logs/device_connector.log
2019-05-06T09:13:28.312Z info base/types.go:282 Failed to resolve proxy hostname
2019-05-06T09:13:28.312Z error base/connector.go:1477 Error in round trip {"error": "dial tcp: lookup dc-hx06.rtp-sv.cisco.com on 172.xx.xx.xx:53: no such host"}
2019-05-06T09:13:28.312Z error base/connector.go:413 Connection error {"error": "DNS Misconfigured: Error during dns lookup: lookup dc-hx06.rtp-sv.cisco.com on 172.xx.xx.xx:53: no such host"}
Solution
Incorrect DNS IP Address was specified on UCSM. Once that was corrected, the device was claimed successfully.
APPENDIX A - BIND DNS Sample
/etc/named.conf
options {
        directory       "/var/named";
        dump-file       "/var/named/data/cache_dump.db";
        statistics-file "/var/named/data/named_stats.txt";
        memstatistics-file "/var/named/data/named_mem_stats.txt";

        /*
         - If you are building an AUTHORITATIVE DNS server, do NOT enable recursion.
         - If you are building a RECURSIVE (caching) DNS server, you need to enable
           recursion.
         - If your recursive DNS server has a public IP address, you MUST enable access
           control to limit queries to your legitimate users. Failing to do so will
           cause your server to become part of large scale DNS amplification
           attacks. Implementing BCP38 within your network would greatly
           reduce such attack surface
        */
        recursion yes;

        dnssec-enable yes;
        dnssec-validation yes;

        /* Path to ISC DLV key */
        bindkeys-file "/etc/named.iscdlv.key";

        managed-keys-directory "/var/named/dynamic";

        pid-file "/run/named/named.pid";
        session-keyfile "/run/named/session.key";
};

logging {
        channel default_debug {
                file "data/named.run";
                severity dynamic;
        };
};

zone "." IN {
        type hint;
        file "named.ca";
};

zone "rtp-sv.local" {
        type master;
        file "/etc/named/zone/rtp-sv.local";
};

zone "177.6.206.in-addr.arpa" {
        type master;
        file "/etc/named/zone/206.6.177";
};


include "/etc/named.rfc1912.zones";
include "/etc/named.root.key";
/etc/named/zone/rtp-sv.local
$TTL 3D
@       IN      SOA     rtp-sv.local. root.rtp-sv.local. (
                        199609206       ; serial, todays date + todays serial #
                        8H              ; refresh, seconds
                        2H              ; retry, seconds
                        4W              ; expire, seconds
                        1D )            ; minimum, seconds
                NS      rtp-sv.local.
                NS      ns2.rtp-sv.local.
                MX      10 rtp-sv.local.  ; Primary Mail Exchanger
                TXT     "RTP-sv local"

localhost       A       127.0.0.1

intersight      A       206.xx.xx.xx

ns              A       206.xx.xx.xx
www             A       207.xx.xx.xx

dc-intersight   CNAME   intersight.rtp-sv.local.
mail            CNAME   land-5.com.
/etc/named/zone/206.xx.xx.
$TTL 3D
@               IN      SOA     rtp-sv.local. root.rtp-sv.local. (
                                199609206       ; Serial
                                28800   ; Refresh
                                7200    ; Retry
                                604800  ; Expire
                                86400)  ; Minimum TTL
                        NS      rtp-sv.local.
                        NS      ns2.rtp-sv.local.
;
;       Servers
;
1       PTR     intersight.rtp-sv.local.
2       PTR     www.rtp-sv.local.
2       PTR     ns.rtp-sv.local.
Contributed by Cisco Engineers
- Brian MorrisseyCisco CX Engineer
- Mohammed Majid HussainCisco CX Engineer
 Feedback
Contact Cisco
- Open a Support Case

- (Requires a Cisco Service Contract)