Introduction
This document provides a configuration example that is used in order to perform a console capture on a Cisco TelePresence server or a Cisco Multipoint Control Unit (MCU).
Prerequisites
Requirements
Cisco recommends that you have the required materials before you attempt the configuration that is described in this document:
- PC or laptop
- Terminal emulation software, such as PuTTY, Secure CRT, or TeraTerm
- Serial console cable that uses the RJ45-to-DB9 cable that is supplied with the MCU or TPS
- Cisco TelePresence MCU
Components Used
The information in this document is based on these software and hardware versions:
- Cisco TelePresence Server 7010
- Cisco TelePresence 5300 Series MCU
- Cisco TelePresence 4500 Series MCU
- Cisco TelePresence 4200 Series MCU
- Cisco TelePresence Gateway Series ISDN
- Cisco TelePresence 8000 Series Mobility Services Engine (MSE)
The information in this document was created from the devices in a specific lab environment. All of the devices used in this document started with a cleared (default) configuration. If your network is live, make sure that you understand the potential impact of any command.
Background Information
Frequently, the Cisco Technical Assistance Center (TAC) requests that you obtain a console capture from your Cisco TelePresence server or MCU. The need for this data typically arises when you attempt to troubleshoot issues, to include unexpected reboots.
The console capture provides granular system information when the problem event occurs. The capture is accomplished through the terminal emulation software that is used. The output must be logged to a text file that is saved on the PC or other retrievable location. When you set up the connection, ensure that you configure the console connection so that it never times-out.
Note: The terminal emulation software that is used in this configuration example is PuTTY. Secure CRT, TeraTerm, and other terminal emulation software can also be used, but you must adjust the configuration settings accordingly.
Configure
Note: This article assumes that you have made the physical console connection to the MCU or TPS. For more details about these settings, refer to the Connecting to the console port on a Cisco acquired Codian unit Cisco article.
Complete these steps in order to configure your console:
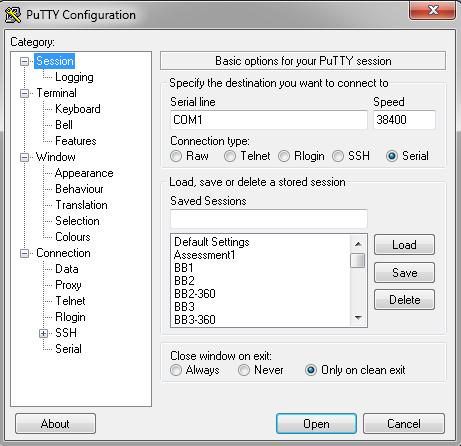
- Open PuTTY and specify a serial console connection with the appropriate COM port for your device:
Note: For more details about these settings, refer to the Connecting to the console port on a Cisco acquired Codian unit Cisco article.

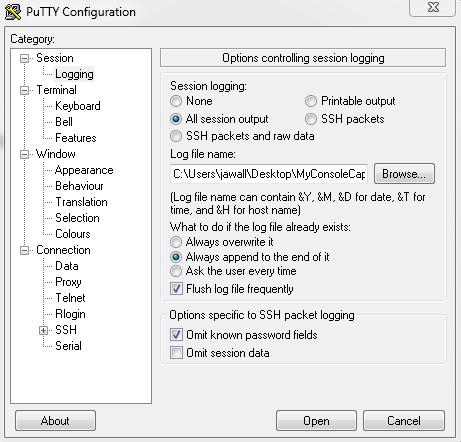
- Configure the session so that it saves all of the output to a text file. Cisco recommends that you complete these steps in order to ensure that no data is lost:
- Navigate to Session > Logging and check the All session output and Always append to the end of it check boxes.
- In the Log file name section, locate your desktop and add a file name that you will remember, such as MyConsoleCapture.log:
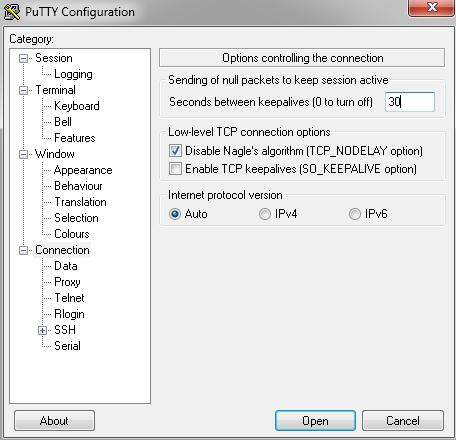
- Configure the console session so that it does not time-out. The session might need to run for an extended period of time, depending upon the nature of the issue and the logging. Complete these steps in order to configure a keepalive in your terminal software:
- Navigate to the Connection category from the PuTTY Configuration window.
- In the Options controlling the connection section, enter the appropriate value in the Seconds between keepalives (0 to turn off) field.
Note: In this example, the keepalive interval is set to 30 seconds. This value might seem high, but no other traffic flows through this connection and this guarantees that the session is maintained. Ultimately, you can choose an interval value that best suits your needs. However, Cisco recommends that you configure this value under the 60-Minute time-out on the MCU or TPS in order to avoid timing issues where the keepalive occurs a half-second after the session is timed-out on the MCU or TPS.
- Click Open in order to open the connection.
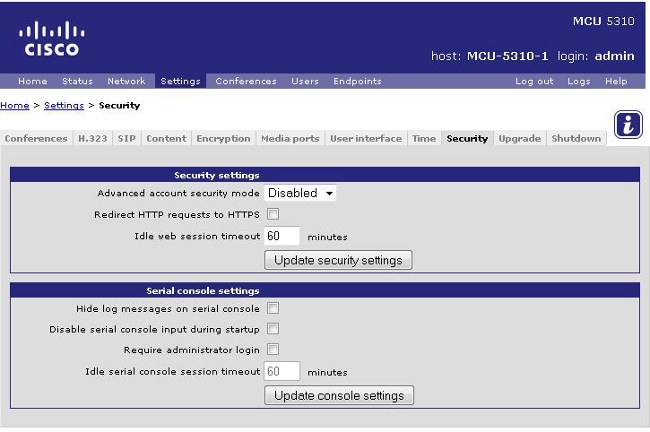
- Complete these steps in order to verify that the connection will not be closed by the MCU:
- Navigate to Settings > Security > Serial Console Settings on the MCU.
- Uncheck the Hide log messages on serial console, Disable serial console input during startup, and Require administrator login check boxes.
- Click Update console settings.
Note: The serial console settings are only configurable on the MCU; they are not configurable on the TelePresence server.
Optional Security Measures
This configuration process creates a console security risk. If necessary, take extra measures in order to secure the location of your MCU:
Verify
If your configuration works correctly, you receive output on the console screen in PuTTY. This depends on whether your device is busy. At a minimum, when you make a configuration change from the device web interface, a log output to the console should appear (similar to the Event Log).
Troubleshoot
These are the three most common problems that you might encounter:
- An incorrect or defective cable is used. Ensure that you use the cable that came with your device. If your cable is defective, it is possible to repair it. Refer to the Pinout of a Cisco acquired Codian serial cable Cisco article for pinout details.
- Unrecognizable characters display on the console screen. This indicates that the baud rate is set incorrectly. The baud rates are based on multiples of two, so you can double or halve the value as needed until you find the correct setting. However, the correct setting should be 38,400 in this instance.
- You are unable to connect to the terminal emulation software. Besides cabling issues, this problem is usually caused by one of these issues:
- You attempt to connect via Telnet or Secure Shell (SSH) and must change your connection type to serial.
- You are on the wrong COM port. In order to discover the COM port that your PC uses with USB-based serial connections, navigate to Control Panel > Device Manager and click Ports. From this window, you can verify the COM port that is assigned to your USB serial device.
- You do not have the drivers for your serial device installed. If this is the case, you must locate and install them.
 Feedback