Campus Software Image Management (SWIM) Using Cisco DNA Center Deployment Guide
Available Languages
Bias-Free Language
The documentation set for this product strives to use bias-free language. For the purposes of this documentation set, bias-free is defined as language that does not imply discrimination based on age, disability, gender, racial identity, ethnic identity, sexual orientation, socioeconomic status, and intersectionality. Exceptions may be present in the documentation due to language that is hardcoded in the user interfaces of the product software, language used based on RFP documentation, or language that is used by a referenced third-party product. Learn more about how Cisco is using Inclusive Language.
- US/Canada 800-553-2447
- Worldwide Support Phone Numbers
- All Tools
 Feedback
 Feedback
Audience
The audience for this document is network administrators who wish to automate the upgrade of a Catalyst 9000 series switch at a branch or campus using Cisco DNA Center software image management (SWIM) solution.
About This Guide
This guide demonstrates the value of the Cisco DNA Center software image management (SWIM) solution using a specific combination of equipment, OS version, and configuration. You may apply this procedure to any Catalyst 9000 series switch but in this guide, we will only focus on Catalyst 9300 switch.
| Reader tip |
| For more information on Cisco DNA Center supported devices please refer to the compatibility matrix information https://www.cisco.com/c/en/us/support/cloud-systems-management/dna-center/products-device-support-tables-list.html |
Use Cases
Standardize software images for your network devices with software image management (SWIM).
Implementation Flow

This document contains four major sections:
● The Define section presents a high-level overview of how software image management (SWIM) within Cisco DNA Center can help reduce device installation and upgrade times from hours to minutes.
● The Design section discusses the pre-requisites for setting up software image management (SWIM) in a network with Cisco DNA Center.
● The Deploy section of the guide shows how to standardize an image by marking as a golden image and go through the update image workflow to distribute and activate the golden image on a network device.
● The Operate section briefly discusses the known caveats of software image management (SWIM) in Cisco DNA Center.
Solution overview
Cisco DNA Center can help with the non-fabric wired deployments in various different ways such as – network discovery, network inventory, return merchandise authorization, software image management (SWIM) etc.
| Reader tip |
| This guide only covers software image management (SWIM). For day-zero onboarding of a switch with Plug and Play (PnP) and return merchandise authorization (RMA) refer to the following guide, Network Device Onboarding for Cisco DNA Center Deployment Guide. |
Campus Topology highlighting Standardize software images for your network devices with SWIM.
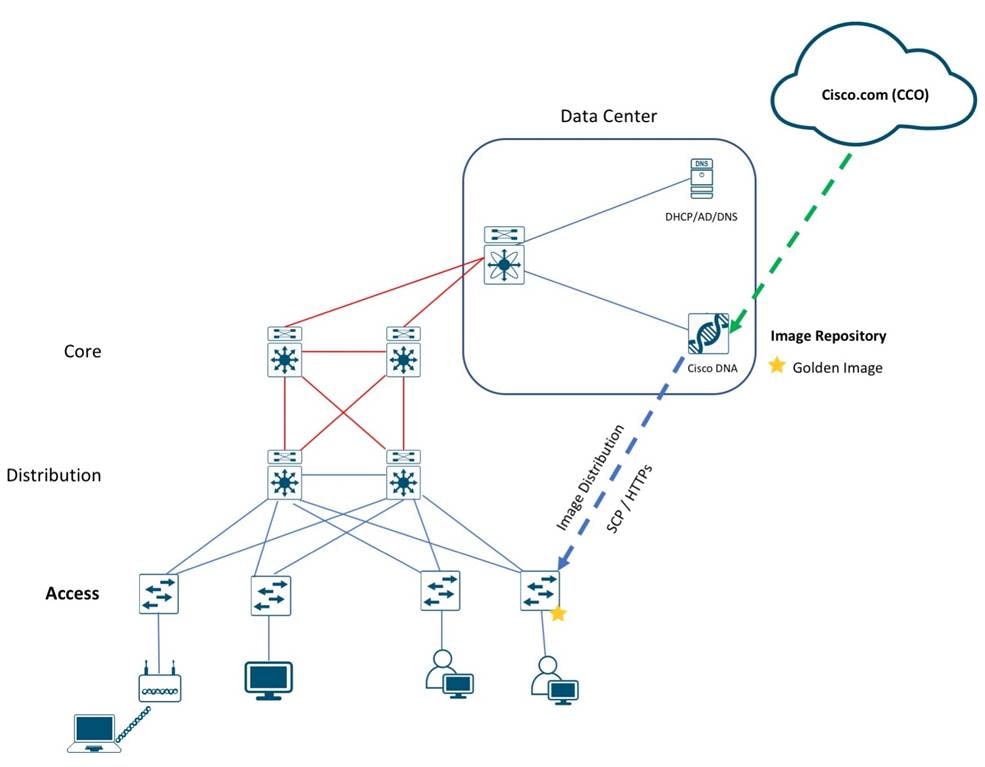
Cisco DNA Center is designed for intent-based networking (IBN). The solution breaks the process in to Day 0 and Day N. The solution provides a unified approach to provision enterprise networks comprised of Cisco routers, switches, and wireless devices with a near zero touch deployment experience.
Zero-touch device connectivity and Software Image Management (SWIM) features reduce device installation and upgrade times from hours to minutes and bring new remote offices online with plug-and-play ease from an off-the-shelf Cisco device. Software Image Management (SWIM) manages software upgrades and controls the consistency of image versions across your network.
Before you proceed you must make sure you already have Cisco DNA Center installed on your network.
| Reader tip |
| For more information on how to install Cisco DNA Center, refer to Cisco DNA Center Installation resources page. |
Before performing an image upgrade, the following pre-requisites should be reviewed.
1. Check the Minimum Software Releases Requirements on Devices
Cisco DNA Center requires the software releases on devices to meet the ones listed in Minimum Supported Software Version column of supported devices spreadsheet below: https://www.cisco.com/c/en/us/support/cloud-systems-management/dna-center/products-device-support-tables-list.html
2. Devices have CLI /SNMP or HTTPS/SCP credentials.
Network devices should be in managed state or the administrators have CLI/SNMP or HTTPS/SCP credentials for Cisco DNA Center to discover them and bring them in managed state before performing a Software Image upgrade. This requirement is only for Day N scenario.
3. CCO Credentials
Though this is not a mandatory requirement for SWIM but its strongly recommended to add CCO credentials. Otherwise, certain features like ROMMON upgrade or suggested and latest image display list of images will not function. CCO Credentials is also required to download the KGV file for Integrity Verification of Software Images.
4. Integrity Verification of Software Images
The Integrity Verification application monitors software images that are stored in Cisco DNA Center for unexpected changes or invalid values that could indicate your devices are compromised. During the import process, the system determines image integrity by comparing the software and hardware platform checksum value of the image that you are importing to the checksum value identified for the platform in the Known Good Values (KVG) file to ensure that the two values match.
Process 1: Connect to Cisco and access software images
Cisco DNA Center must be connected to Cisco (CCO) to display and allow you to select Cisco-recommended software images for the devices that it manages.
| Tech tip |
| As part of the Cisco DNA Center installation, you will be asked to complete a first-time setup wizard in which you will be required to provide Cisco Credentials before the Terms and Conditions must be accepted. For any reason the Cisco Credentials need to be reentered or changed please follow the instructions below. |
Procedure 1. Verify Cisco Credentials
Step 1. Login to the Cisco DNA Center.
Step 2. Click the hamburger icon, then select System > Settings.
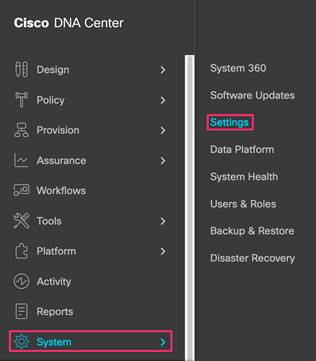
Step 3. In System . Settings select Cisco.com Credentials from left.
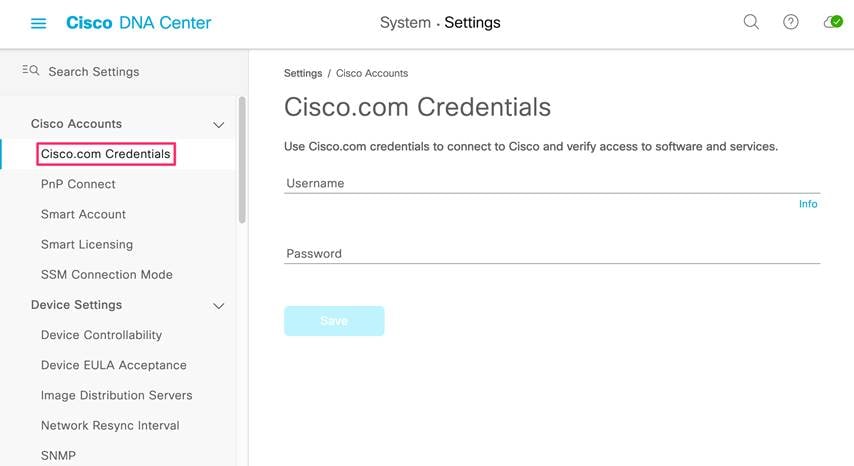
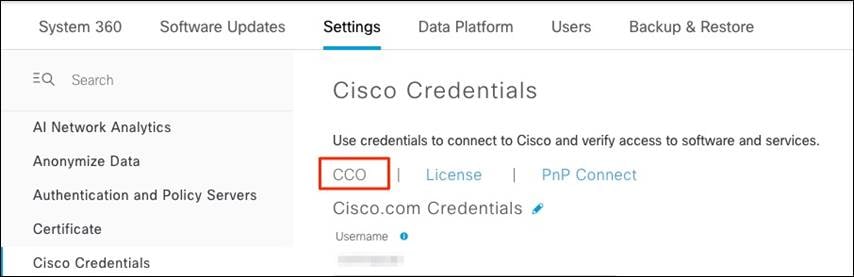
Step 4. Under Cisco Credentials, select CCO
Step 5. Enter the Cisco Connection Online (CCO) username and password.
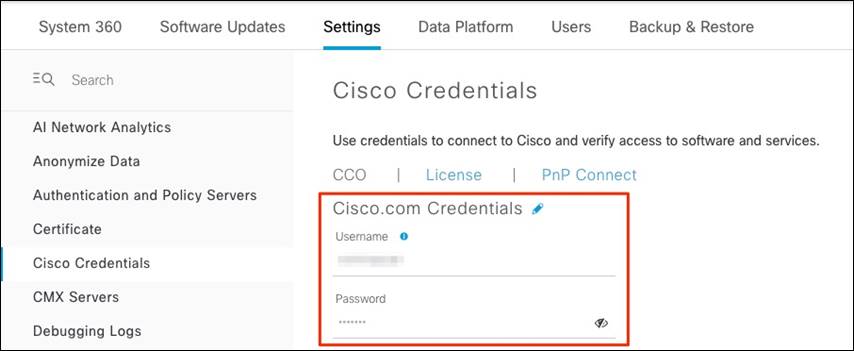
| Tech tip |
| The credentials (user and password) entered must have SUPER-ADMIN-ROLE OR NETWORK-ADMIN-ROLE privileges. |
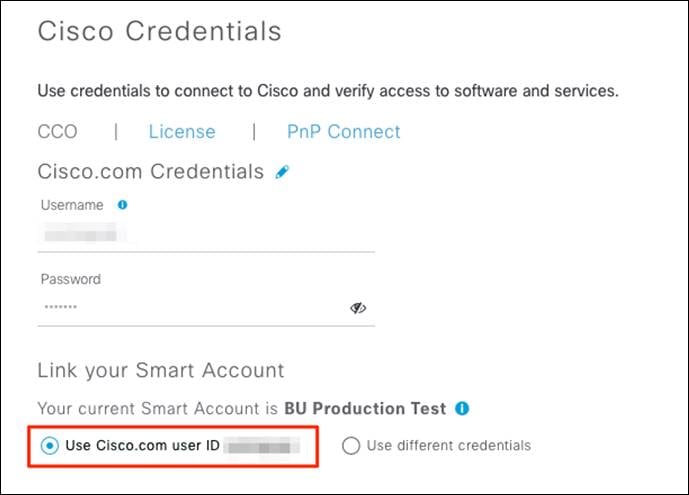
Step 6. Select Use Cisco.com user ID and click Apply.
This section of the guide shows how to standardize an image by marking as a golden image and go through the update image workflow to distribute and activate the golden image on a network device (example: Catalyst 9300 Series Switch).
Process 2: Upgrade Workflow
This process is used to import and upload the latest software images for a network device (example: Catalyst 9300 Series Switch) to the Cisco DNA Center software image repository.
| Tech tip |
| When doing a major code update (example: 16.9.1 to 16.11.1) there is additional delay due to ROMMON code upgrade |
Table 1. Software Images for the Catalyst 9300 Series Switches
| Platform |
Software Version |
Software Image Name |
| Cisco Catalyst 9300 Switch |
IOS XE Release 16.9.1 (Current) |
Install Mode (16.9.1) |
| Cisco Catalyst 9300 Switch |
IOS XE Release 16.9.3 (Upgrade image) |
Install Mode (16.9.3) |
The following procedures are required for this process:
● Standardize the image by marking a Golden Image.
● Distribute and activate the software image for the switch.
Procedure 1. Standardize the image by marking a Golden Image
Images can be imported automatically through Cisco Connection Online (CCO) or manually uploaded. Cisco DNA Center perform the following.
· Image Compliance Check (Pre/Post)
· Automatically download of Software Maintenance Updates (SMU)
· Prompt to provision Image updates
For the purpose of this guide, we will use the latter.
Cisco DNA Center displays the suggested and latest image list for each of the discovered device families.
| Tech tip |
| CCO credentials are required for Cisco DNA Center to fetch and display the suggested list of images automatically. To learn how, refer above to Process 1 (Option 1). |
Use the following steps to apply software updates of images and software maintenance updates (SMUs) to the devices, by importing the required images, marking images as golden, and applying images to devices.
Option 1 – (AUTO) Recommended Software Image
It’s highly recommended to mark a software image as golden from the list provided by Cisco-recommended images.
Step 1. Login to Cisco DNA Center.
Step 2. Go to Design > Image Repository
Step 3. Click to expand to view the full list available Cisco-recommended images.

| Tech tip |
| For Cisco DNA Center to suggest Cisco recommended and latest images under image repository it requires CCO login as show above in Process 1. |
Step 4. Mark the Cisco-recommended image as golden.

| Tech tip |
| After you mark the Cisco-recommended image as golden, Cisco DNA Center automatically downloads the image from cisco.com |
| Tech tip |
| Also select non-LDPE software image and avoid selecting the Licensed Data Payload Encryption (LDPE) software version as it is a limited deployment export control version which limits IPSEC capabilities. An example of LDPE is cat9k_iosxeldpe.X.X.X.SPA.bin, compared to non-LDPE cat9k_iosxe.X.X.X.SPA.bin |
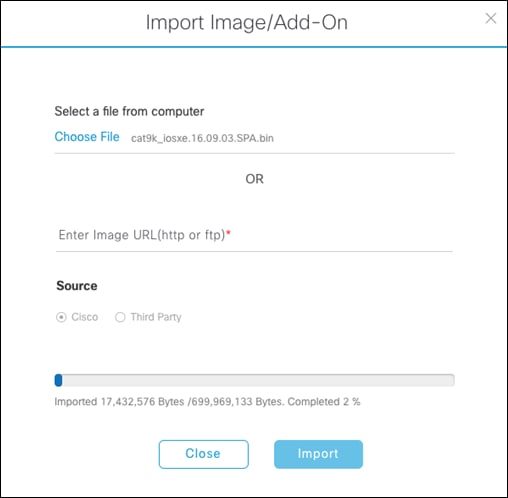
Option 2 – (Manually) Upload Software Image
If the software image you would like to mark as golden is not available, you can upload the image manually.
Step 1. Login to Cisco DNA Center.
Step 2. Go to Design > Image Repository
Step 3. Click +Import
Step 4. From the Import Image/Add-On dialog, choose a file location, and then click Import.
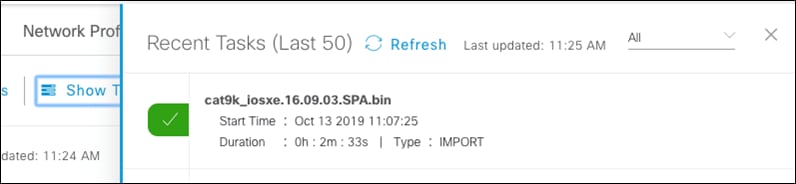
Step 5. Under Image Repository, click Show Tasks to verify if the import was successful.
Step 6. Under Image Repository, click Imported Images to expand the list of all the imported images that are pending to be assigned to a device family.
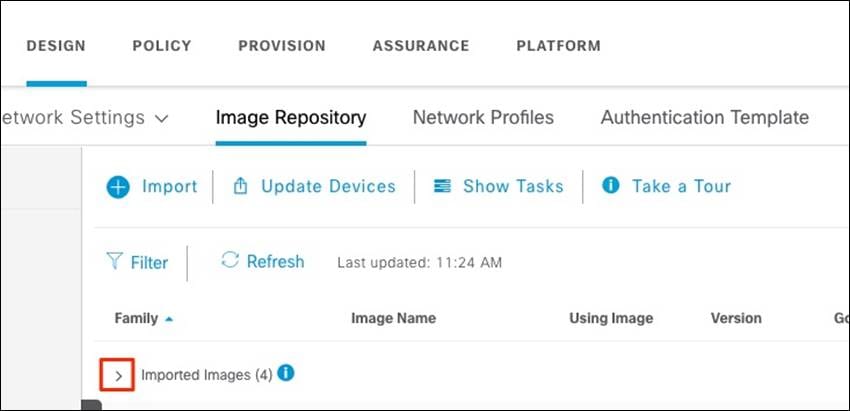
Step 7. Click on Assign next to the image name need to be assigned.
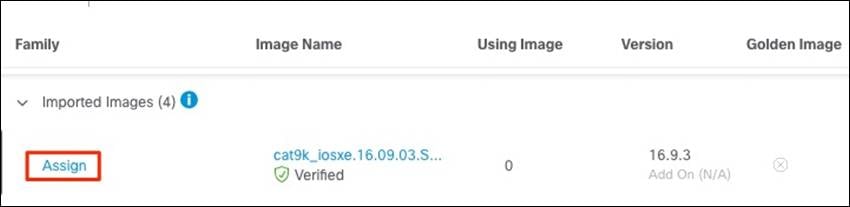
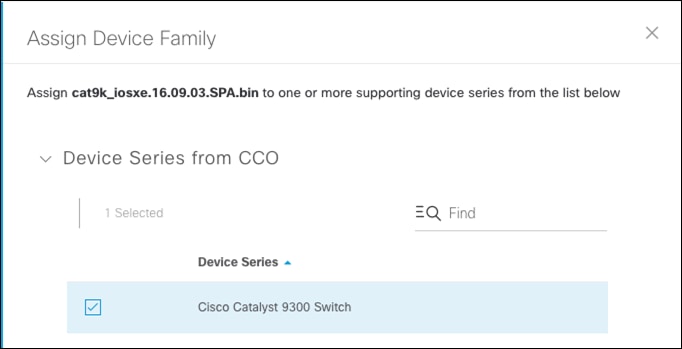
Step 8. The slide out panel will show the list of device series from CCO based on the selected image. Check the box next to the Device Series and click Assign.
Step 9. Go to the assigned Device Family and click the expand icon and verify the image imported is available to mark as golden.
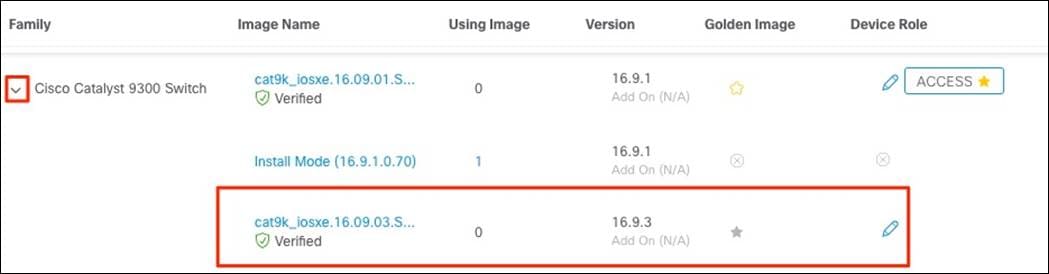
Step 10. Mark the manually uploaded image as golden.

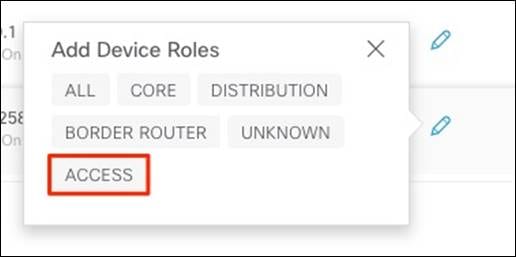
Step 11. (Optional) Click the pencil icon and select the appropriate role, to mark a Golden Image for specific device role.
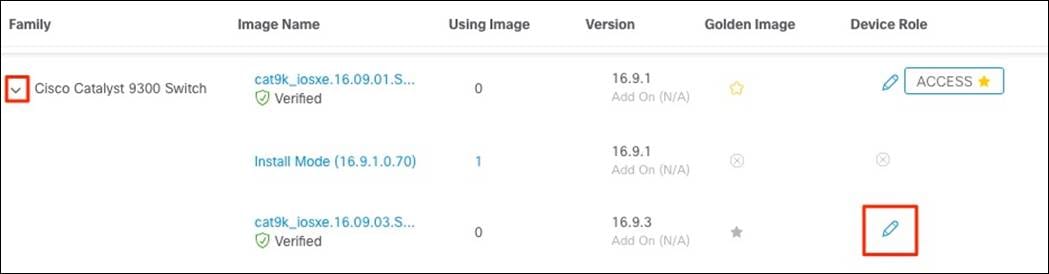
Step 12. (Optional) Select ACCESS tag.
Step 13. Verify image is marked as golden and ACCESS tag is selected.

Procedure 2. Provision and activate the software image
Now that the image is in repository, it can be distributed and activated on the network devices. It’s recommended to run the activation at a specified date and time to comply with existing network change windows.
Before pushing a software image to a device, Cisco DNA Center runs a compliance check of devices in inventory compared to the images marked golden. Devices out of compliance with the golden image are marked as Need Update in inventory. If you have not designated a golden image for the device type, then the device's image cannot be updated.
Cisco DNA Center also performs pre-checks on the device, such as checking the health of the CPU, disk space, and the route summary etc. After it pushes a software image to a device, Cisco DNA Center repeats these checks to ensure that the state of the network remains unchanged.
The following are the steps for distributing software images to the Catalyst 9300 switch or any network device in the inventory.
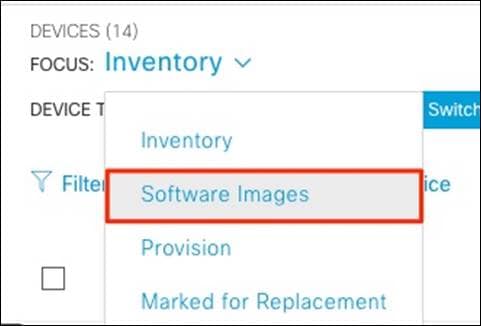
Step 1. From the main Cisco DNA Center dashboard navigate to Provision > Devices
Step 2. Click the devices focus which is set to Inventory by default and select Software Images.
Step 3. From the list of devices, locate the switch (example: AD1-9300.cisco.local)
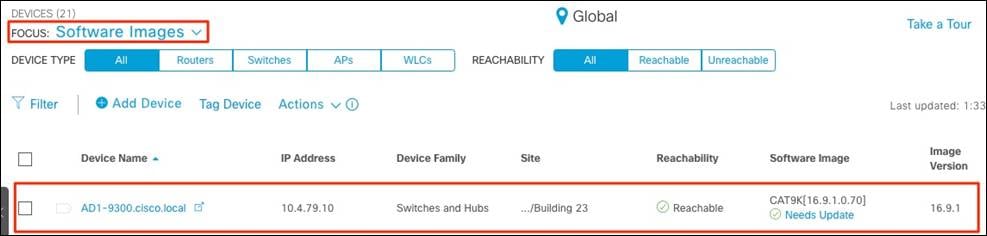
Step 4. Click Needs Update

| Tech tip |
| If incorrect Golden Image is shown even after refreshing the page or running recheck the devices table, the image that is not set as Golden Image anymore will need to be deleted from the image repository and then only the Need Update option will be available. |
Step 5. Under Image Update Readiness Check, verify the correct Golden Image is shown.
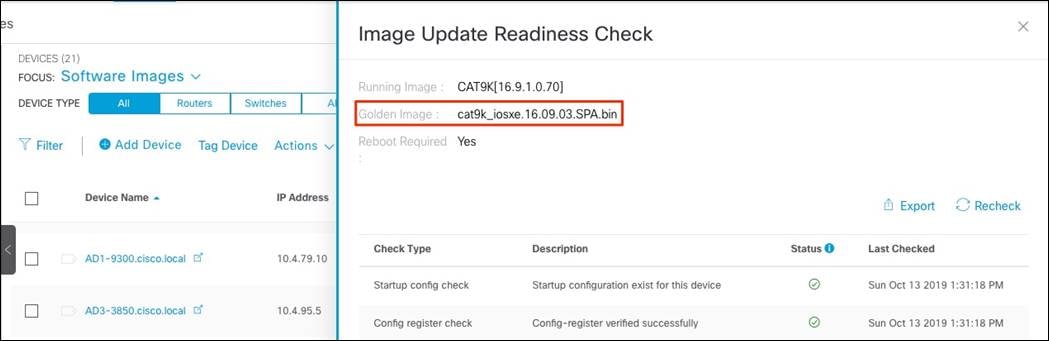
| Tech tip |
| Ensure that the Status column of all the checks shows either a green icon indicating success, or a yellow icon indicating a warning. If any of the checks shows a red icon indicating failure, the image on the platform cannot be upgraded. If necessary, correct any issues on the switch which resulted in a red icon indicating failure. Click the Recheck button in the upper right corner to re-run the readiness assessment. |
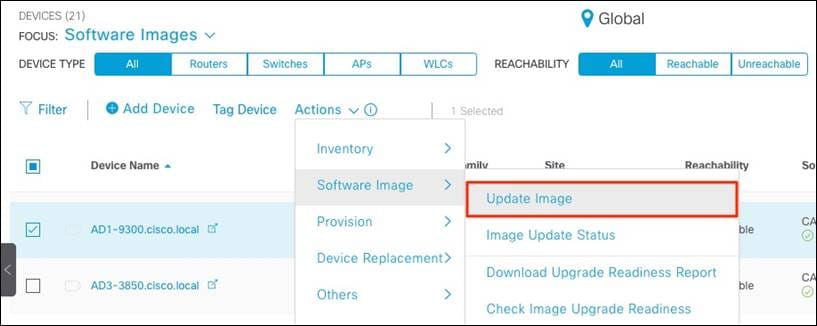
Step 6. Under the Actions drop-down menu, select Software Image > Update Image.
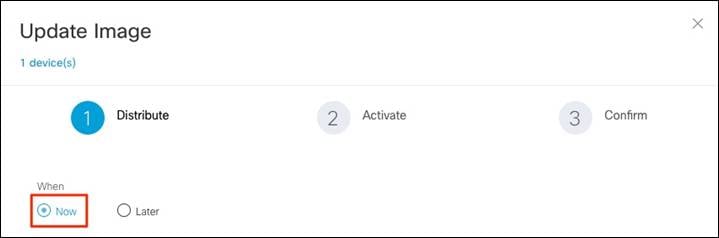
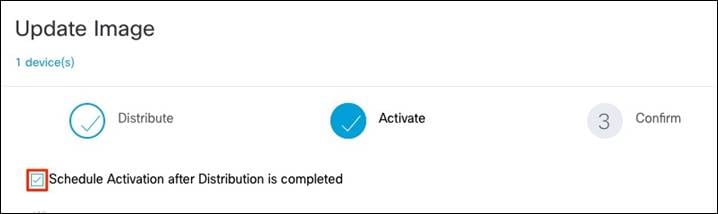
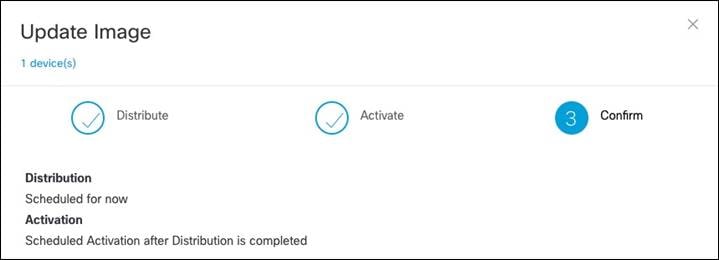
Step 7. Go through the 3-steps Update Image workflow.
1. Distribute: Select Now or Later (recommended for production devices) and click Next.
2. Activate: Check Schedule Activation after Distribution is completed and click Next.
3. Confirm: Review the summary and click Confirm.
A notification is displayed stating the image update initiated.

| Tech tip |
| If you have scheduled the distribution and activation for a future date and/or time you can view the upcoming scheduled task. |
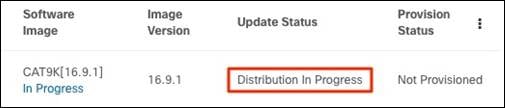
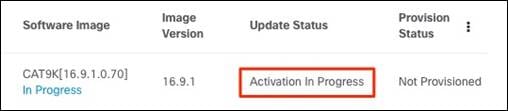
Step 8. Verify the under the Software Image column, Need Update changed to In Progress.

Step 9. Monitor the Update Status of the device.
| Tech tip |
| During this process the device will reboot and become Unreachable for a while (15-30mins). |
a. Update Status changes to Distribution in Progress
b. Update Status changes to Activation in Progress
c. Update Status changes to Activation Success
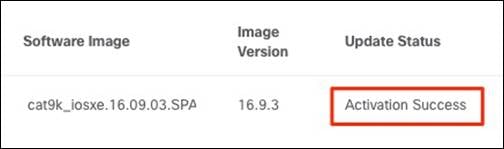
Verify the software image of the switch (example: AD1-9300.cisco.local) is now updated to the golden image (example: 16.9.3).
Known Caveats
● In Cisco DNA Center, it is mandatory to mark image as Golden for device family for upgrade at global or site levels. Golden image is essentially equivalent to the certified software image by Enterprise IT, which will be used to standardize the image for all relevant devices of this device family in customer network environment.
● Golden image can be defined not only on a per device family, but also on device role. In general, you may only have one golden image per device family and for that, use ALL tag to apply in the device role.
● Configuring a time zone within IOS XE devices via the clock time zone IOS CLI command may cause a warning to appear within the Image Upgrade Readiness Check panel, indicating the time is significantly different between your device and Cisco DNA Center. You may be able to clear this warning by removing the clock time zone command from the device, resyncing the device within inventory, and clicking on the Recheck button to run the readiness assessment again. This will cause the time format of the device be displayed in UTC time, rather than the local time zone.
● During the SWIM upgrade of the network switch, DNAC does not modify the boot variable like the packages.conf filename or its location in bootflash. It takes the original file and modify the contents only to complete the upgrade after the device reboot.
Appendix A— Hardware and software used for validation
Table 2. Hardware and software
| Functional area |
Product |
Software version |
| Controller (PnP Server) |
Cisco DNA Center |
2.1.2.3 |
| Device to Onboard (PnP Agent) |
Catalyst 9300 Switch Series |
16.9.03 |
Cisco DNA Cisco Digital Network Architecture
Cisco PnP Cisco Plug and Play
SWIM Software Image Management
SSL Secure Sockets Layer
VLAN Virtual Local Area Network
For comments and suggestions about this guide and related guides, join the discussion on Cisco Community.