
Use the Networking > DMZ page to configure a Demarcation Zone or Demilitarized Zone (DMZ). A DMZ is a sub-network that is behind the firewall but that is open to the public. By placing your public services on a DMZ, you can add an additional layer of security to the LAN. The public can connect to the services on the DMZ but cannot penetrate the LAN. You should configure your DMZ to include any hosts that must be exposed to the WAN (such as web or email servers).
This section describes how to configure the DMZ networks. The DMZ configuration is identical to the VLAN configuration. There are no restrictions on the IP address or subnet assigned to the DMZ port, except it cannot be identical to the IP address given to the predefined VLANs.
Note Up to 4 DMZs can be configured on the security appliance.
Figure 4-1 Example DMZ with One Public IP Address for WAN and DMZ
In this scenario, the business has one public IP address, 209.165.200.225, which is used for both the security appliance’s public IP address and the web server’s public IP address. The administrator configures the configurable port to be used as a DMZ port. A firewall rule allows inbound HTTP traffic to the web server at 172.16.2.30. Internet users enter the domain name that is associated with the IP address 209.165.200.225 and can then connect to the web server. The same IP address is used for the WAN interface.
Figure 4-2 Example DMZ with Two Public IP Addresses
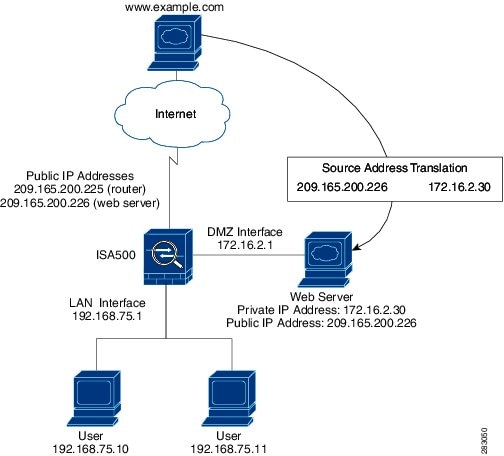
In this scenario, the ISP has supplied two static IP addresses: 209.165.200.225 and 209.165.200.226. The address 209.165.200.225 is used for the security appliance’s public IP address. The administrator configures the configurable port to be used as a DMZ port and created a firewall rule to allow inbound HTTP traffic to the web server at 172.16.2.30. The firewall rule specifies an external IP address of 209.165.200.226. Internet users enter the domain name that is associated with the IP address 209.165.200.226 and can then connect to the web server.
1. To add a new DMZ, click Add. To modify the settings for a DMZ, click the Edit (pencil) icon.
Other options: To delete a DMZ, click the Delete (x) icon.
2. In the Basic Settings tab, enter the following information:
• Name: Enter the name for the DMZ.
• IP Address: Enter the subnet IP address for the DMZ.
• Netmask: Enter the subnet mask for the DMZ.
• Spanning Tree: Check this box to enable the Spanning Tree feature to determine if there are loops in the network topology.
• Port: Specify a configurable port as a DMZ port. Traffic through the DMZ port is directed to the DMZ. All available configurable ports appear in the Port list. Choose a port from the Port list and add it to the Member list. The selected configurable port will be set as a DMZ port.
NOTE: This setting will change the port type and access mode of the selected configurable port. Changing the port type will wipe out all configuration relative to the physical port.
• Zone: Choose the default DMZ zone or a custom DMZ zone to which the DMZ is mapped. You can click the Create Zone link to view, edit, or add the zones on the security appliance.
3. In the DHCP Pool Settings tab, choose the DHCP mode from the DHCP Mode drop-down list.
• Disable: Choose this option if the computers on the DMZ are configured with static IP addresses or are configured to use another DHCP server.
• DHCP Server: Allows the security appliance to act as a DHCP server and assigns IP addresses to all devices that are connected to the DMZ. Any new DHCP client joining the DMZ is assigned an IP address of the DHCP pool.
• DHCP Relay: Allows the security appliance to use a DHCP Relay. If you choose DHCP Relay, enter the IP address of the remote DHCP server in the Relay IP field.
4. If you choose DHCP Server as the DHCP mode, enter the following information:
• Start IP: Enter the starting IP address in the DHCP range.
• End IP: Enter the ending IP address in the DHCP range.
NOTE: The Start and End IP addresses must be in the same subnet with the DMZ IP address.
• Lease Time: Enter the maximum connection time that a dynamic IP address is “leased” to a network user. When the time elapses, the user will be automatically renewed the dynamic IP address.
• DNS 1: Enter the IP address of the primary DNS server.
• DNS 2: Optionally, enter the IP address of the secondary DNS server.
• WINS 1: Optionally, enter the IP address of the primary WINS server.
• WINS 2: Optionally, enter the IP address of the secondary WINS server.
• Domain Name: Optionally, enter the domain name for the DMZ.
• Default Gateway: Enter the IP address of default gateway.
• Option 66: Provides provisioning server address information to hosts requesting this option. Only supports the IP address or host name of a single TFTP server. Enter the IP address of the single TFTP server for the DMZ.
• Option 67: Provides a configuration/bootstrap file name to the hosts requesting this option. This is used in conjunction with the option 66 to allow the client to form an appropriate TFTP request for the file. Enter the configuration/bootstrap file name on the specified TFTP server.
• Option 150: Supports a list of TFTP servers (2 TFTP servers). Enter the IP addresses of TFTP servers. Separate multiple entries with commas (,).
5. In the IPv6 Setting tab, specify IPv6 addressing for the DMZ if you enable the IPv4/IPv6 mode.
• IPv6 Address: Enter the IPv6 address based on your network requirements.
• IPv6 Prefix Length: Enter the number of characters in the IPv6 prefix.
The IPv6 network (subnet) is identified by the prefix, which consists of the initial bits of the address. The default prefix length is 64 bits. All hosts in the network have the identical initial bits for the IPv6 address. The number of common initial bits in the addresses is set by the prefix length field.
6. Click OK to save your settings.
7. Click Save to apply your settings.
8. If you want to reserve certain IP addresses for specified devices, go to the Networking > DHCP Reservations page. See Configuring DHCP Reserved IPs. You must enable DHCP Server or DHCP Relay mode for this purpose.