These steps describe how to configure quality
of service (QoS) on your access point. With this feature, you can
provide preferential treatment to certain traffic at the expense
of others. Without QoS, the access point offers best-effort service
to each packet, regardless of the packet contents or size.
Typically, networks operate on a best-effort delivery
basis, which means that all traffic has equal priority and an equal
chance of being delivered in a timely manner. When congestion occurs,
all traffic has an equal chance of being dropped.
When you configure QoS on the access point, you
can select specific network traffic, prioritize it according to
its relative importance, and use congestion-management and congestion-avoidance
techniques to provide preferential treatment. Implementing QoS in
your wireless LAN makes network performance more predictable and
bandwidth utilization more effective.
When you configure QoS, you create QoS policies
and apply the policies to the VLANs configured on your access point.
If you do not use VLANs on your network, you can apply your QoS
policies to the access point's Ethernet and radio ports.
QoS is disabled by default. Before configuring
QoS on your access point, you should be aware of this information:
- The most important guideline in QoS deployment
is to be familiar with the traffic on your wireless LAN. If you
know the applications used by wireless client devices, the applications'
sensitivity to delay, and the amount of traffic associated with
the applications, you can configure QoS to improve performance.
- QoS does not create additional bandwidth for
your wireless LAN; it helps control the allocation of bandwidth.
If you have plenty of bandwidth on your wireless LAN, you might
not need to configure QoS.
Follow these steps to configure QoS on your access
point.
- If you use VLANs on your wireless LAN, make
sure the necessary VLANs are configured on your access point before
configuring QoS.
- On the navigation menu, click Services
to go to the Services Summary window.
- From the expanded Services menu, click QoS
to go to the QoS Policies window.
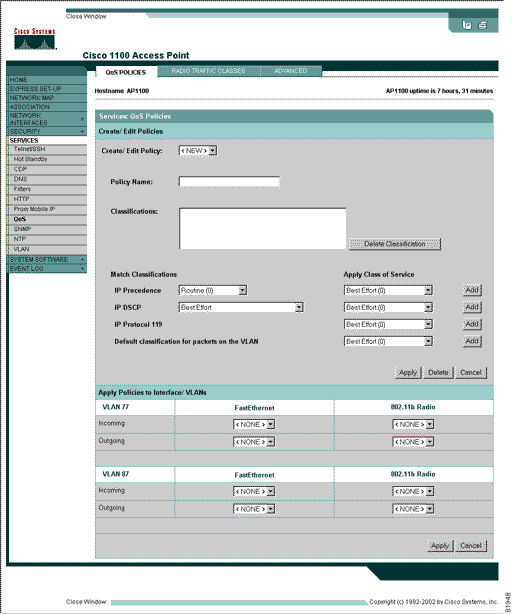
- With <NEW> selected in the Create/Edit
Policy field, type a name for the QoS policy in the Policy Name
entry field. The name can contain up to 25 alphanumeric characters.
Do not include spaces in the policy name.
- If the packets you need to prioritize contain
IP precedence information in the IP header TOS field, select an
IP precedence classification from the IP Precedence drop-down
menu. Menu selections include:
- Routine (0)
- Priority (1)
- Immediate (2)
- Flash (3)
- Flash Override (4)
- Critic/CCP (5)
- Internet Control (6)
- Network Control (7)
- From the Apply Class of Service drop-down menu,
select the class of service that the access point will apply to
packets of the type that you selected from the IP Precedence menu.
The access point matches your IP Precedence selection with your
class of service selection. Settings in the Apply Class of Service
menu include:
- Best Effort (0)
- Background (1)
- Spare (2)
- Excellent (3)
- Control Lead (4)
- Video <100ms Latency (5)
- Voice <100ms Latency (6)
- Network Control (7)
- Click Add beside
the Class of Service menu for IP Precedence. The classification
appears in the Classifications field. To delete a classification,
select it and click Delete beside the
Classifications field.
- If the packets that you need to prioritize contain
IP DSCP precedence information in the IP header TOS field, select
an IP DSCP classification from the IP DSCP drop-down menu. Menu
selections include:
- Best Effort
- Assured Forwarding - Class 1 Low
- Assured Forwarding - Class 1 Medium
- Assured Forwarding - Class 1 High
- Assured Forwarding - Class 2 Low
- Assured Forwarding - Class 2 Medium
- Assured Forwarding - Class 2 High
- Assured Forwarding - Class 3 Low
- Assured Forwarding - Class 3 Medium
- Assured Forwarding - Class 3 High
- Assured Forwarding - Class 4 Low
- Assured Forwarding - Class 4 Medium
- Assured Forwarding - Class 4 High
- Class Selector 1
- Class Selector 2
- Class Selector 3
- Class Selector 4
- Class Selector 5
- Class Selector 6
- Class Selector 7
- Expedited Forwarding
- Use the Apply Class of Service drop-down menu
to select the class of service that the access point will apply
to packets of the type that you selected from the IP DSCP menu.
The access point matches your IP DSCP selection with your class
of service selection.
- Click Add beside
the Class of Service menu for IP DSCP. The classification appears
in the Classifications field.
- If you need to prioritize the packets from Spectralink phones
(IP Protocol 119) on your wireless LAN, use the Apply Class of
Service drop-down menu to select the class of service that the
access point will apply to Spectralink phone packets. The access
point matches Spectralink phone packets with your class of service
selection.
- Click Add beside
the Class of Service menu for IP Protocol 119. The classification
appears in the Classifications field.
- If you want to set a default classification
for all packets on a VLAN, use the Apply Class of Service drop-down
menu to select the class of service that the access point will
apply to all packets on a VLAN. The access point matches all packets
with your class of service selection.
- Click Add beside
the Class of Service menu for Default classification for packets
on the VLAN. The classification appears in the Classifications
field.
- When you finish adding classifications to the
policy, click Apply under the Apply
Class of Service drop-down menus. To cancel the policy and reset
all fields to defaults, click Cancel
below the Apply Class of Service drop-down menus. To delete the
entire policy, click Delete below the
Apply Class of Service drop-down menus.
- Use the Apply Policies to Interface/VLANs drop-down
menus to apply policies to the access point Ethernet and radio
ports. If VLANs are configured on the access point, drop-down
menus for each VLAN’s virtual ports appear in this section.
If VLANs are not configured on the access point, drop-down menus
for each interface appear.
- Click Apply at the
bottom of the page to apply the policies to the access point ports.
- If you want the access point to give priority
to all voice packets regardless of VLAN, click the Advanced
tab.
|