Nexus 7000 Series Switch QoS Configuration Example
Available Languages
Contents
Introduction
This document provides a sample configuration for quality of service (QoS) features on the Cisco Nexus 7000 Series Switch to simplify how classification and queueing is achieved.
Prerequisites
Requirements
Ensure that you meet these requirements before you attempt this configuration:
Have a basic knowledge of Nexus 7000 Series Switches configuration
Have a basic knowledge of QoS
Components Used
The information in this document is based on the Nexus 7000 Series Switch.
The information in this document was created from the devices in a specific lab environment. All of the devices used in this document started with a cleared (default) configuration. If your network is live, make sure that you understand the potential impact of any command.
Conventions
Refer to the Cisco Technical Tips Conventions for more information on document conventions.
Overview
The default QoS parameters on the Nexus 7000 switch are sufficient for most deployments. However, you need to understand the restrictions and configuration details required to create custom policies.
There are two aspects that you need to consider for QoS on Nexus 7000 M-Series linecards:
queuing policies
QoS policies
Queuing is performed in the hardware and is configured with the use of Modular QoS CLI (MQC) queuing policies. The QoS policies, used to mark or police traffic, are used via a MQC policy in the exact format as a standard QoS policy on other Cisco platforms. For example, an access list used to classify traffic in a class-map with a corresponding policy-map to set/police traffic.
Currently, M-series modules perform queuing based strictly on the Class of Service (CoS) value. Therefore, you need to first understand how the CoS value is derived. After you know what CoS value enters/leaves the switch, you can focus on the queuing configuration to obtain the desired QoS for different traffic types.
Class of Service Behavior
For routed unicast traffic, the CoS value is derived from the 3 most-significant bits of the Differentiated Services Code Point (DSCP) value. For bridged unicast traffic, the CoS value is copied from the CoS value received in the 802.1q header. Note that on L2 access links there is no trunk header. Therefore, if traffic is received on an access port and bridged it will egress the switch with CoS 0. The DSCP value is not changed, but the packet may not get the desired priority. You can manually set the CoS value in a policy-map via any QoS policy that manually sets the CoS or DSCP value.
It is important to understand the behavior for multicast as well. Routed multicast traffic derives its CoS value in the same manner as routed unicast traffic. For bridged multicast traffic, the behavior depends on the L3 state. If there is no L3 state for the multicast group, the CoS is derived in the same manner as bridged unicast traffic. If there is an L3 state for the multicast group, the CoS is derived in the same manner as routed unicast traffic. Note that when you enable Protocol Independent Multicast (PIM) in sparse mode on the switch virtual interface (SVI) for the VLAN in which traffic is received, an S,G entry is created when the multicast is seen.
In summary, the CoS behavior for a traffic type is shown here:
| Traffic Type | CoS Behavior |
| routed unicast | copied from 3-MSB of ToS |
| bridged unicast | unchanged |
| routed multicast | copied from 3-MSB of ToS |
| bridge multicast with L3 state for group | copied from 3-MSB of ToS |
| bridge multicast with no L3 state for group | unchanged |
Modify COS Behavior on Access Links
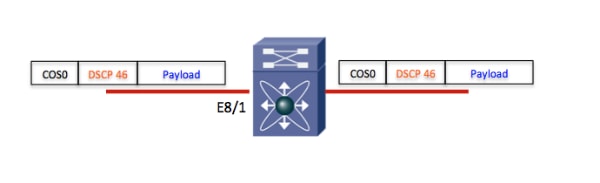
Consider an example where traffic is received on access port (Eth8/1) and bridged on the VLAN. By default, the CoS value of bridged unicast traffic is unchanged. If traffic arrives on an access port the default CoS value of 0 is assigned. In this example, priority traffic (DSCP 46) is received on an access port and egress the switch with the DSCP value unchanged and a CoS value of 0. Thus, the packet does not get the proper priority.
A potential workaround is to create a QoS policy to manually set the CoS value on the ingress port.
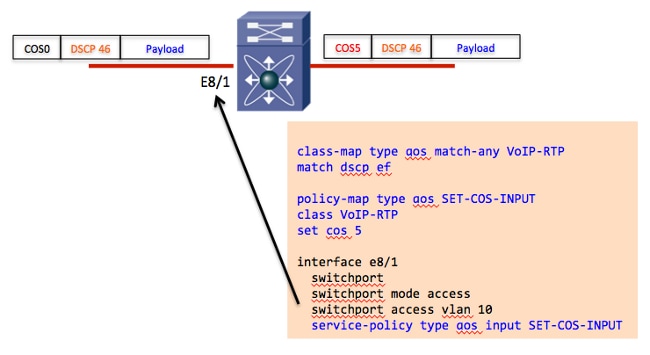
In the example, only packets with DSCP 46 have their CoS values updated. If there were multiple DSCP values required to ensure a proper CoS value, additional class-maps and actions in the policy-map would need to be defined.
An alternative option is to use a table-map with the action 'default copy'. The table-map allows you to reset the DSCP based on the current DSCP value. For example, if traffic was received with a DSCP value of 40 and you need to ensure it was remarked to a DSCP value of 46, you could use a table map with the action 'from 40 to 46'.
A table-map also contains a 'default copy' action which sets the DSCP value to its original value. This is similar to creating a policy-map with the classification of 'match dscp ef' and action of 'set dscp ef'. Logically, the DSCP value is unchanged, but the 'set dscp' action implictly sets the CoS value to the 3-MSB of the new DSCP value.
Therefore, if you need to ensure that the CoS value is always updated to the 3-MSB of the DSCP value, use a table-map with a single action of 'default copy'.

Egress Queue Selection and Schedule
Once the CoS value is derived, you can manipulate the global queuing class-maps to affect the cos-to-queue mappings. These class-maps are global and affect all modules in all virtual device contexts (VDCs) for that particular queuing type. For example, consider these default queuing class-maps for the M108 and M132 modules (1p7q4t):
class-map type queuing match-any 1p7q4t-out-pq1
  Description: Classifier for egress priority queue of type 1p7q4t
  match cos 5-7

class-map type queuing match-any 1p7q4t-out-q2
  Description: Classifier for egress queue 2 of type 1p7q4t

class-map type queuing match-any 1p7q4t-out-q3
  Description: Classifier for egress queue 3 of type 1p7q4t

class-map type queuing match-any 1p7q4t-out-q4
  Description: Classifier for egress queue 4 of type 1p7q4t

class-map type queuing match-any 1p7q4t-out-q5
  Description: Classifier for egress queue 5 of type 1p7q4t

class-map type queuing match-any 1p7q4t-out-q6
  Description: Classifier for egress queue 6 of type 1p7q4t

class-map type queuing match-any 1p7q4t-out-q7
  Description: Classifier for egress queue 7 of type 1p7q4t

class-map type queuing match-any 1p7q4t-out-q-default
  Description: Classifier for egress default queue of type 1p7q4t
  match cos 0-4
By default, cos 0-4 is mapped to the default queue and cos 5-7 is mapped to the priority queue. These go hand-in-hand with the default queuing policy for the same queuing type:
policy-map type queuing default-out-policy
  class type queuing out-pq1
    priority level 1
    queue-limit percent 16
  class type queuing out-q2
    queue-limit percent 1
  class type queuing out-q3
    queue-limit percent 1
  class type queuing out-q-default
    queue-limit percent 82
    bandwidth remaining percent 25
The priority queue is 'priority' with a queue-limit of 16%. The default queue has a queue-limit of 82% with a default bandwidth remaining weight. The other queues, which are not in use, are assigned a queue-limit of 1%. Note that q4, q5, and q6 are not represented in the default queuing policy and will, therefore, have an even smaller queue-limit and bandwidth weight programmed in hardware.
Create a Custom Queuing Policy
In order to create a custom queuing policy, complete these steps:
- Create a custom queuing policy with the desired queue limit and bandwidth allocation.
- Modify the global queuing class-maps to create the needed CoS to queue mapping.
- Apply the new queuing policy to the appropriate interfaces.
Consider an example for M132 modules that have a 1p7q4t queuing architecture where all 8 CoS values are mapped to a separate queue. The output shows the custom queuing policy along with the changes to the global queuing class-maps:
policy-map type queuing 10G_POLICY
  class type queuing 1p7q4t-out-pq1
    priority level 1
    queue-limit percent 10
  class type queuing 1p7q4t-out-q2
    queue-limit percent 10
    bandwidth remaining percent 10
  class type queuing 1p7q4t-out-q3
    queue-limit percent 5
    bandwidth remaining percent 5
  class type queuing 1p7q4t-out-q4
    queue-limit percent 5
    bandwidth remaining percent 5
  class type queuing 1p7q4t-out-q5
    queue-limit percent 10
    bandwidth remaining percent 20
  class type queuing 1p7q4t-out-q6
    queue-limit percent 5
    bandwidth remaining percent 10
  class type queuing 1p7q4t-out-q7
    queue-limit percent 5
    bandwidth remaining percent 10
  class type queuing 1p7q4t-out-q-default
    queue-limit percent 50
    bandwidth remaining percent 40
! voice
class-map type queuing match-any 1p7q4t-out-pq1
  match cos 5
! scavenger
class-map type queuing match-any 1p7q4t-out-q2
  match cos 1
! transactional
class-map type queuing match-any 1p7q4t-out-q3
  match cos 2
! call signaling
class-map type queuing match-any 1p7q4t-out-q4
  match cos 3
! video
class-map type queuing match-any 1p7q4t-out-q5
  match cos 4
! routing
class-map type queuing match-any 1p7q4t-out-q6
  match cos 6
! management
class-map type queuing match-any 1p7q4t-out-q7
  match cos 7
! best effort
class-map type queuing match-any 1p7q4t-out-q-default
  match cos 0
The final step is to apply the custom queuing policy to each 1p7q4t interface:
interface Ethernet8/1
 service-policy type queuing output 10G_POLICY
Caveats
The default queuing policy assumes that CoS 0-4 are mapped to the default queue and CoS 5-7 are mapped to the priority queue. Therefore, the queue-limits for queues q3, q4, q5, q6, and q7 are extremely small. You can enter the show queuing interface command to validate the current queue-size and bandwidth configured and applied in the hardware.
Consider the example policy in the previous section where each CoS value was mapped to a specific queue. At the end of the example, the custom queuing policy was applied to Eth8/1. Also, assume that there is another 1p7q4t interface (Eth6/1) which was left with the default queuing policy:
N7k# show queuing interface e6/1
<some output omitted>

   Configured queue-limit ratios
      queue-limit ratios:     78[1p7q4t-out-q-default] 1[1p7q4t-out-q2] 1[1p7q4t-out-q3]
      *1[1p7q4t-out-q4] *1[1p7q4t-out-q5] *1[1p7q4t-out-q6] *1[1p7q4t-out-q7] 16[1p7q4t-out-pq1]
   * means unused queue with mandatory minimum queue-limit

   Thresholds:
     COS   Queue                      Threshold Type     Min    Max
     ______________________________________________________________
      0    1p7q4t-out-q-default           DT             100    100
      1    1p7q4t-out-q2                  DT             100    100
      2    1p7q4t-out-q3                  DT             100    100
      3    1p7q4t-out-q4                  DT             100    100
      4    1p7q4t-out-q5                  DT             100    100
      5    1p7q4t-out-pq1                 DT             100    100
      6    1p7q4t-out-q6                  DT             100    100
      7    1p7q4t-out-q7                  DT             100    100
From the above output you can see that queues q2 and q3 have a queue-limit of 1% while q4, q5, q6, and q7 have *1% which is the minimum mandatory queue-limit (in other words., significantly less than 1%). Additionally, you can see that CoS values 1-4 and 6-7 utilize these very small queues. The small queue-sizes quickly result in output discards and can degrade network performance. This is further exacerbated if default traffic CoS 0 is mapped to one of these small queues.
In summary, if you create a custom queueing policy and change the global queuing class-maps, it is critical to apply the custom queuing policy to all interfaces across the chassis that share the same queueing type.
Also, some helpful drop commands are listed here:
- show policy-map interface ex/y
- show system internal queueing stat interface ex/y
Related Information
Revision History
| Revision | Publish Date | Comments |
|---|---|---|
1.0 |
29-May-2013
|
Initial Release |
 Feedback
Contact Cisco
- Open a Support Case

- (Requires a Cisco Service Contract)