Feedback
Table Of Contents
Troubleshooting End User Wireless Networks
Using the Cisco SSC Simplified User Interface
Example 1 - Unable to Connect to the Home Access Point
Example 2 - Unable to Connect to the Enterprise Network
Integrated VPN Connection Failure
Co-Existence with Other Wireless Client Managers
Gathering Logs and Packet Traces
Creating the Cisco Support Report for SSC
Troubleshooting End User Wireless Networks
This chapter provides troubleshooting suggestions for typical user problems and contains these sections:
•
Using the Cisco SSC Simplified User Interface
•
•
Using the Cisco SSC Simplified User Interface
SSC is designed to eliminate the chances of an end user corrupting the 802.1X configurations that have been deployed by an administrator. Users cannot edit the deployed configuration profiles. Also, the 802.1X wireless configurations are validated and tested prior to deployment mis-configured 802.1X settings are unlikely.
The SSC GUI also helps to minimize the possibility of end user errors with manual entries. Home networks can be created by simply double-clicking the detected home SSID (network name) or by selecting it from the SSC tray icon. Where the user is required to provide a WEP key for home networks, the key entry can be unmasked to allow easy visual verification.
By minimizing the user interface and hiding unneeded 802.1X information from the end user, SSC helps the user to easily diagnose wireless connection settings:
•
•
•
•
•
•
•
•
When the user is unable to resolve the network problem after following the self-help options listed above, it might be necessary to contact the support help desk to resolve the problem.
When a help desk call is generated the user might report one of the following problems:
•
•
•
Association Failure
This section describes two association problems that might be experienced by a typical user.
Example 1 - Unable to Connect to the Home Access Point
The user cannot configure SSC to use his home access point. In a home environment, the user might be using one of these association modes:
•
•
•
•
•
•
•
The support help desk should be able to assist in correcting the problem and might ask the user to perform these operations:
1.
a.
b.
c.
d.
Note
2.
3.
a.
b.
4.
a.
b.
c.
5.
–
The user might have mis-configured the client using Open WEP instead of Shared WEP or vice versa. The user can toggle the settings using SSC to try the other mode.
–
Some access points use a passphrase to generate a WEP key. The user should highlight the connection and click Edit > Generate Router WEP key and provide the passphrase to generate the correct WEP key.
If a passphrase is not used, the user should highlight the connection in the SSC GUI, click Edit, and check Show password to visually verify the password entered.
–
The user might have forgotten the password because the previously used client application was caching the credentials. The user might need to reconfigure the access point's settings with a new password (see Steps 3 and 4 above).
–
Some access points provide multiple key indices in which the WEP key can be configured. Cisco recommends that the first key index be configured with the static WEP key. The user might need to reconfigure the access point's WEP key setting (see Steps 3 and 4 above).
–
If the user's PC has multiple wireless network adapters installed and enabled, SSC might be using a wireless network adapter that is being blocked by the MAC filter settings on the access point. The user might need to reconfigure the access point's settings (see Steps 3 and 4 above).
If the user is still unable to successfully connect to the access point, the user should reset the access point to factory defaults and then re-configure the access point's settings.
Example 2 - Unable to Connect to the Enterprise Network
The user cannot connect to the enterprise network using a wireless connection in a cube, conference room, or office building.
The network administrator deploys pre-configured configuration profiles within an enterprise. There are two main reasons for an 802.11 association failure in an enterprise environment:
1.
This may happen when the wireless deployment is not well designed or because of noisy spectrum due to other devices in the environment that may even include microwave ovens.
2.
Wireless networks have been around for a long time and it is very likely that the user's PC has an old version of the wireless NIC driver. It is recommended that the network administrator redistribute known good NIC drivers for the NIC driver chipsets within his enterprise environment to all users.
Authentication Failure
In an enterprise environment in which the 802.1X configuration is correctly deployed with SSC and the network infrastructure components (including the access points, controllers, and the RADIUS server) are correctly configured, these problems might cause an authentication failure:
•
•
•
•
•
•
If the problem continues, the support help desk should request that the user provide a Cisco Support Report with packet capturing enabled. For instructions on creating the support report, see the "Gathering Logs and Packet Traces" section.
IP Connectivity Failure
When the 802.1X authentication is successful, SSC tries to get a valid IP address. In some networks, it might take up to 40 seconds to renew the IP address. If the wireless LAN adapter fails to receive a valid IP address, these actions might help to resolve the problem or identify the cause:
•
•
•
•
The root cause of the problem might be as simple as a DHCP server running out of available IP addresses.
Integrated VPN Connection Failure
SSC allows the user to automatically establish a VPN connection after connecting to a wireless profile, if the profile is configured to do so.
The end user might be unable to establish a VPN tunnel to his enterprise network using SSC. VPN problems might be indicated as follows:
•
This might happen if the administrator did not deploy a profile with the Allow VPN option checked to the user.
•
This might happen if the Cisco VPN client version is older than 4.8. The user must upgrade the VPN client on his PC.
•
This may happen if the user is using the stand-alone Cisco VPN client interface to establish VPN connections. If the Cisco VPN client interface is being used to connect and disconnect VPN connections, SSC gives up control over VPN functionality.
To resolve this problem, the user should not use the standalone Cisco VPN client interface to establish a connection. He should allow SSC to establish the VPN connection. However, if desired, he can use the Cisco VPN client interface to see the connection status.
•
This might happen when the user credentials provided to SSC are incorrect. When using SSC with the Soft Token option, the user credentials to be provided to SSC must be the username and the user PIN that were previously provided to the SofToken-II application.
Note
If the VPN problem continues, a Cisco support report should be provided to the support help desk to analyze the problem and determine the root cause of the problem (see the "Gathering Logs and Packet Traces" section).
Co-Existence with Other Wireless Client Managers
To enable the Cisco Aironet Client Utility (ACU) to coexist with SSC, the user must configure the wireless network adapter to allow Windows to configure the adapter. The user must perform these steps to configure the wireless network adapter:
Step 1
Step 2
Step 3
Step 4
To enable the Cisco Aironet Desktop Utility (ADU) to coexist with SSC, the user must configure the ADU to allow SSC to control the adapter.
Note
The user must click Client Adapters and Client Software and follow the prompts. The user must register or be a registered user of Cisco.com to download software.
The user must perform these steps to configure the ADU:
Step 1
Step 2
Step 3
Step 4
Step 5
When SSC is active, it takes control from the Microsoft Windows native wireless client. In other words, the Windows native client can display SSID's but cannot configure or set wireless connection settings. To stop SSC from controlling the wireless adapter, the user must disable SSC by clicking Settings and choosing Enable Client (a check indicates SSC is enabled). Disabling SSC gives control of the wireless adapter to any other wireless client management application that can manage the wireless connections.
Note
The iPassConnect client software and SSC can co-exist if the following instructions are carried out when the user is using a public Wi-Fi hotspot (such as an airport).
Step 1
Step 2
Step 3
Step 4
Step 5
Note
Gathering Logs and Packet Traces
SSC provides a diagnostic utility called the Log Packager, which is part of the Cisco Client Utilities. Installed separately, this utility is available from the Windows Start > Programs menu. The utility provides SSC's current status, interface and driver details, FIPS status, and wireless LAN information (SSIDs detected, association status, etc.). This information can be useful in diagnosing connectivity problems when using SSC and the NIC adapter.
Creating the Cisco Support Report for SSC
To create the Cisco support report, follow these steps:
Step 1
Figure 5-1 Accessing the Client Utility Using Windows Program Menu
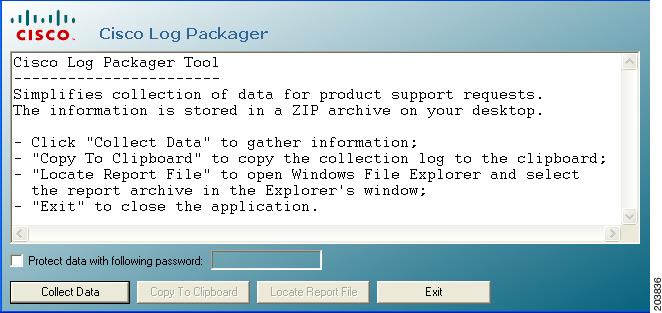
When the Log Packager program opens, Figure 5-2 appears.
Figure 5-2 Log Packager Window
Step 2
Step 3
If you click Copy to Clipboard, the contents of the CiscoSupportReportLog.txt file is copied to the Windows clipboard.
Step 4